manuals.online logo
Brands
  1. Home
  2. •
  3. Brands
  4. •
  5. Renkforce
  6. •
  7. Cables And Connectors
  8. •
  9. Renkforce DVD Maker II User manual

Renkforce DVD Maker II User manual

Version 06/13
°
DVD Maker II
Item-No. 95 45 54
Intended Use
The product is intended for the connection to a USB port of a computer and it is used for
digitalising AV signals.
This product complies with the applicable National and European requirements. All names of
companies and products are the trademarks of the respective owner. All rights reserved.
Included in the delivery
• USB-AV adapter
• Connection cable
• Data carrier with driver/software
• Operating manual
Features
• Connection to the computer via USB2.0
• AV input jack (RCA), S Video input
Safety Instructions
The warranty will be void in the event of damage caused by failure to observe
these safety instructions! Liability for any and all consequential damage is
excluded!
Nor do we assume any liability for material and personal damage caused by
improper use or non-compliance with the safety instructions! The warranty
will be void in such cases.
The unauthorised conversion and/or modification of the product is inadmissible
because of safety and approval reasons (CE).
The product must not get damp or wet.
The product is not a toy. Keep away from children.
Handle the product carefully, it can be damaged by impacts, blows or by falling from
a low height.
Connection and Driver Installation
• Boot your operating system (at least Windows XP SP2) and wait until the boot has finished.
• Connect the USB-AV adapter to a free USB2.0 port of your computer.
• Insert the data carrier enclosed in the corresponding drive of your computer.
Should the installation not start automatically, start the program "Autorun.exe" in the main
directory on the data carrier. Follow all of the instructions of the software.
• After completion of the driver/software installation, a restart might be required before the USB
AV adapter can function properly.
• Connect an AV source to the 3 RCA jacks (yellow for the video signal, the two others for the
audio signal). Alternatively, the S-video connection can be used for the video signal and the
red/white RCA jack connectors for the audio signal.
• When you start the software "VivaStation", it is essential that you set the correct video stan-
dard after selecting the recording device.
If you right-click in the preview window afterwards, you can select e.g. the input (cinch or
SVideo) and perform other settings or record the video signal.
Tips and Instructions
• It is necessary to use an USB 2.0 port to prevent interruptions and juddering during the video
recording.
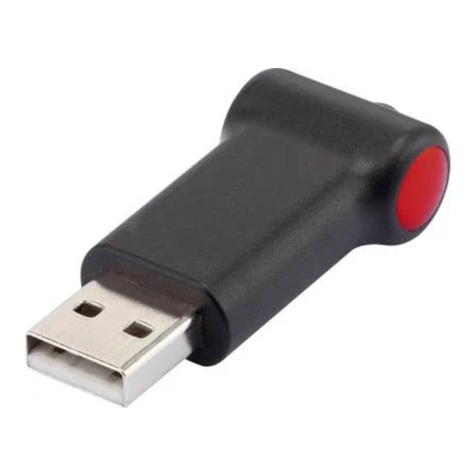
• The button on the AV adaptor is used for the creating a still image.
Disposal
Please dispose of the device when it is no longer of use, according to the current
statutory requirements.
OPERATING INSTRUCTIONS
Diese Bedienungsanleitung ist eine Publikation der Conrad Electronic SE, Klaus-Conrad-Str. 1, D-92240 Hirschau (www.conrad.com).
Alle Rechte einschließlich Übersetzung vorbehalten. Reproduktionen jeder Art, z. B. Fotokopie, Mikroverfilmung, oder die Erfassung in
elektronischen Datenverarbeitungsanlagen, bedürfen der schriftlichen Genehmigung des Herausgebers. Nachdruck, auch auszugs-
weise, verboten.
Diese Bedienungsanleitung entspricht dem technischen Stand bei Drucklegung. Änderung in Technik und Ausstattung vorbehalten.
© Copyright 2013 by Conrad Electronic SE.
These operating instructions are a publication by Conrad Electronic SE, Klaus-Conrad-Str. 1, D-92240 Hirschau (www.conrad.com).
All rights including translation reserved. Reproduction by any method, e.g. photocopy, microfilming, or the capture in electronic data pro-
cessing systems require the prior written approval by the editor. Reprinting, also in part, is prohibited.
These operating instructions represent the technical status at the time of printing. Changes in technology and equipment reserved.
© Copyright 2013 by Conrad Electronic SE.
Version 06/13
°
DVD-Maker II
Best.-Nr. 95 45 54
Bestimmungsgemäße Verwendung
Das Produkt ist zum Anschluss an einen USB-Port eines Computers vorgesehen und dient dort
zum Digitalisieren eines analogen AV-Signals.
Dieses Produkt erfüllt die gesetzlichen, nationalen und europäischen Anforderungen. Alle ent-
haltenen Firmennamen und Produktbezeichnungen sind Warenzeichen der jeweiligen Inhaber.
Alle Rechte vorbehalten.
Lieferumfang
• USB-AV-Adapter
• Anschlusskabel
• Datenträger mit Treiber/Software
• Bedienungsanleitung
Merkmale
• Anschluss an den Computer via USB2.0
• Cinch-AV-Eingang, SVideo-Eingang
Sicherheitshinweise
Bei Schäden, die durch Nichtbeachten dieser Bedienungsanleitung verur-
sacht werden, erlischt die Gewährleistung/Garantie! Für Folgeschäden über-
nehmen wir keine Haftung!
Bei Sach- oder Personenschäden, die durch unsachgemäße Handhabung
oder Nichtbeachten der Sicherheitshinweise verursacht werden, über-
nehmen wir keine Haftung! In solchen Fällen erlischt die Gewährleistung/
Garantie.
Aus Sicherheits- und Zulassungsgründen (CE) ist das eigenmächtige Umbauen
und/oder Verändern des Produkts nicht gestattet.
Das Produkt darf nicht feucht oder nass werden.
Das Produkt ist kein Spielzeug, es ist nicht für Kinderhände geeignet.
Gehen Sie vorsichtig mit dem Produkt um, durch Stöße, Schläge oder dem Fall aus
bereits geringer Höhe wird es beschädigt.
Anschluss und Treiber-Installation
• Starten Sie das Betriebssystem (mindestens Windows XP SP2) und warten Sie, bis es voll-
ständig geladen ist.
• Verbinden Sie den USB-AV-Adapter mit einem freien USB2.0-Port Ihres Computers.
• Legen Sie den mitgelieferten Datenträger in das entsprechende Laufwerk Ihres Computers ein.
Wenn die Installation nicht automatisch starten sollte, so starten Sie das Programm
"Autorun.exe" im Hauptverzeichnis des Datenträgers. Folgen Sie allen Anweisungen der
Software.
• Nach Beendigung der Treiber-/Softwareinstallation ist ggf. ein Neustart erforderlich, bevor
der USB-AV-Adapter einwandfrei funktioniert.
• Schließen Sie eine AV-Quelle z.B. an den 3 Cinch-Buchsen an (die gelbe ist für das
Videosignal, die anderen beiden für das Audiosignal). Alternativ kann der SVideo-Anschluss
für das Videosignal und die rote/weiße Cinchbuchse für das Audiosignal verwendet werden.
• Nach dem Start der Software "VivaStation" ist nach der Auswahl des Aufzeichnungsgeräts
unbedingt noch der richtige Videostandard einzustellen.
Wenn Sie anschließend mit der rechten Maustaste in das Vorschaufenster klicken, können
Sie z.B. den Eingang (Cinch- oder SVideo) auswählen und weitere Einstellungen vornehmen
bzw. das Videosignal aufzeichnen.
Tipps und Hinweise
• Verwenden Sie unbedingt einen USB2.0-Port, andernfalls gibt es Aussetzer und Ruckler bei
der Videoaufzeichnung.
• Die Taste auf dem AV-Adapter dient für das Anfertigen eines Standbildes.
Entsorgung
Entsorgen Sie das Produkt am Ende seiner Lebensdauer gemäß den geltenden
gesetzlichen Bestimmungen.
쮕BEDIENUNGSANLEITUNG
Version 06/13
°
DVD-Maker II
N° de commande 95 45 54
Utilisation conforme
Le produit est conçu pour être raccordé à un port USB d’un ordinateur et il y sert alors à
numériser un signal A/V analogique.
Cet appareil satisfait aux dispositions légales nationales et européennes. Tous les noms d’en-
treprises et les appellations d’appareils figurant dans ce mode d’emploi sont des marques dépo-
sées des propriétaires correspondants. Tous droits réservés.
Étendue de la fourniture
• Adaptateur A/V USB
• Câble de raccordement
• Support de données avec logiciel pilote
• Manuel d’utilisation
Caractéristiques
• Raccordement à l’ordinateur via USB2.0
• Entrée Cinch-AV, entrée SVideo
Consignes de sécurité
Tout dommage résultant du non-respect de ce mode d’emploi entraîne l’an-
nulation de la garantie ! Nous déclinons toute responsabilitépour des dom-
mages consécutifs !
Par ailleurs, nous n’assumons aucune responsabilité en cas de dommages
matériels et corporels résultant d’une utilisation de l’appareil non-conforme
aux spécifications ou du non-respect de ces instructions ! Dans ces cas-là, la
garantie est annulée.
Pour des raisons de sécurité et d’homologation (CE), les transformations et/ou
modifications arbitraires de l’appareil sont interdites.
Il convient de préserver l’appareil de l’eau et de l’humidité.
Le produit n´est pas un jouet. Ne le laissez pas à la portée des enfants.
Cet appareil doit être manipulé avec précaution, les coups, les chocs ou une chu-
te, même d’une faible hauteur, peuvent l’endommager.
Raccordement et installation des pilotes
• Lancez le système d’exploitation (nécessite au moins Windows XP SP2) et attendez qu’il soit
complètement chargé.
• Branchez l’adaptateur A/V USB à un port USB 2.0 libre de votre ordinateur.
• Insérez le support de données fourni dans le lecteur correspondant de votre ordinateur.
Si l’installation ne démarre pas automatiquement, exécutez le programme « autorun.exe »
situé dans le répertoire principal du support de données. Suivez toutes les instructions du
logiciel.
• Après l’installation du pilote/logiciel, un nouveau démarrage peut s’avérer nécessaire pour que
l’adaptateur A/V USB fonctionne correctement.
• Raccorder une source AV p. ex. aux trois douilles Cinch (jaune pour le signal vidéo, les deux
autres pour le signal audio). Alternativement la connexion SVideo pour le signal vidéo et la pri-
se RCA rouge/blanche peuvent être utilisées pour le signal audio.
• Après le lancement du logiciel « VivaStation », vous devez impérativement régler la norme
vidéo qui convient après la sélection de l'appareil d'enregistrement.
Ensuite, un clic droit de la souris sur la fenêtre d’aperçu permet par ex. de sélectionner l’en-
trée (RCA ou S-Vidéo) et d’effectuer d’autres réglages ou d’enregistrer le signal vidéo.
Conseils et consignes
• Utiliser impérativement un port USB2.0, sinon il y aura des interruptions et à-coups dans l’en-
registrement vidéo.
• La touche sur l’adaptateur A/V sert à obtenir une image fixe.
Élimination
Il convient de procéder à l’élimination de l’appareil au terme de sa durée de vie
conformément aux prescriptions légales en vigueur.
MODE D’EMPLOI
Versie 06/13
°
DVD-maker II
Bestnr. 95 45 54
Beoogd gebruik
Het product is bedoeld voor aansluiting op een USB-poort van een computer en dient voor het
digitaliseren van een analoog AV-signaal.
Dit product voldoet aan de voorwaarden van de nationale en Europese wetgeving. Alle voorko-
mende bedrijfsnamen en productaanduidingen zijn handelsmerken van de betreffende eigena-
ren. Alle rechten voorbehouden.
Omvang van de levering
• USB-AV-adapter
• Aansluitkabel
• CD met stuurprogramma´s/software
• Gebruiksaanwijzing
Kenmerken
• Aansluiting op de computer via USB2.0
• Cinch-AV-ingang, S-video-ingang
Veiligheidsinstructies
Bij schade die wordt veroorzaakt door het niet in acht nemen van deze
gebruiksaanwijzing, vervalt het recht op garantie! Wij stellen ons niet aan-
sprakelijk voor gevolgschade!
Voor materiële schade of persoonlijk letsel, veroorzaakt door ondeskundig
gebruik of het niet opvolgen van de veiligheidsaanwijzingen, aanvaarden wij
geen aansprakelijkheid! In dergelijke gevallen vervalt de garantie.
Om veiligheids- en goedkeuringsredenen (CE) is het eigenmachtig ombouwen
en/of veranderen van het product niet toegestaan.
Het product mag niet vochtig of nat worden.
Het product is geen speelgoed en is niet geschikt voor kinderen.
Behandel het product voorzichtig. Door stoten, schokken of een val - zelfs van
geringe hoogte - kan het beschadigd raken.
Aansluiten en installeren van het stuurprogramma
• Start het besturingsysteem (minimaal Windows XP SP2) en wacht tot het volledig is geladen.
• Verbind de USB-AV-adapter met een vrije USB2.0-poort van uw computer.
• Plaats de meegeleverde gegevensdrager in het betreffende station van uw computer.
Kies - als de installatie niet automatisch start - het programma "autorun.exe" uit de hoofdmap
op de gegevensdrager. Volg alle aanwijzingen van de software.
• Na beëindiging van de installatie van de stuur-/softwareprogramma’s moet eventueel de
computer opnieuw worden gestart, voordat de USB-AV-adapter feilloos functioneert.
• Sluit een audiovisuele bron aan op bijvoorbeeld de drie cinch-bussen (de gele is bedoeld voor
het videosignaal, de rode en witte voor het audiosignaal). Als alternatief kan de S-video-aan-
sluiting voor het videosignaal en de rood/witte cinch-bus voor het audiosignaal worden
gebruikt.
• Na het starten van de software "VivaStation" moet na de keuze van het opnametoestel
onherroepelijk nog de juiste videostandaard worden ingesteld.
Als u aansluitend met de rechter muistoets in het voorbeeldvenster klikt, kunt u bijv. de ingang
(cinch- of Svideo) kiezen en overige instellingen uitvoeren resp. het videosignaal registreren.
Tips en adviezen
• Gebruik beslist een USB 2.0-poort; anders ontstaan artefacten bij het opslaan van een video.
• De toets op de AV-adapter dient voor het maken van een stilstaand beeld.
Verwijdering
Verwijder het product aan het einde van zijn levensduur volgens de geldende
wettelijke bepalingen.
GEBRUIKSAANWIJZING
Ce mode d'emploi est une publication de la société Conrad Electronic SE, Klaus-Conrad-Str. 1, D-92240 Hirschau (www.conrad.com).
Tous droits réservés, y compris de traduction. Toute reproduction, quelle qu'elle soit (p. ex. photocopie, microfilm, saisie dans des
installations de traitement de données) nécessite une autorisation écrite de l'éditeur. Il est interdit de le réimprimer, même par extraits.
Ce mode d'emploi correspond au niveau technique du moment de la mise sous presse. Sous réserve de modifications techniques et de
l'équipement.
© Copyright 2013 by Conrad Electronic SE.
Deze gebruiksaanwijzing is een publicatie van de firma Conrad Electronic SE, Klaus-Conrad-Str. 1, D-92240 Hirschau (www.conrad.com).
Alle rechten, vertaling inbegrepen, voorbehouden. Reproducties van welke aard dan ook, bijvoorbeeld fotokopie, microverfilming of de
registratie in elektronische gegevensverwerkingsapparatuur, vereisen de schriftelijke toestemming van de uitgever. Nadruk, ook van
uittreksels, verboden.
Deze gebruiksaanwijzing voldoet aan de technische stand bij het in druk bezorgen. Wijziging van techniek en uitrusting voorbehouden.
© Copyright 2013 by Conrad Electronic SE. V2_0613_01/IV
This manual suits for next models

1

Other Renkforce Cables And Connectors manuals

Renkforce RF-3312686 User manual

Renkforce

Renkforce RF-3312686 User manual

Renkforce 1383254 User manual

Renkforce

Renkforce 1383254 User manual

Renkforce 1407351 User manual

Renkforce

Renkforce 1407351 User manual

Renkforce 1360256 User manual

Renkforce

Renkforce 1360256 User manual

Renkforce 1300042 User manual

Renkforce

Renkforce 1300042 User manual

Renkforce RF-4555488 User manual

Renkforce

Renkforce RF-4555488 User manual

Renkforce RF-4079655 User manual

Renkforce

Renkforce RF-4079655 User manual

Renkforce 1485272 User manual

Renkforce

Renkforce 1485272 User manual

Renkforce 1277993 User manual

Renkforce

Renkforce 1277993 User manual

Renkforce 1783459 User manual

Renkforce

Renkforce 1783459 User manual

Renkforce 1360250 User manual

Renkforce

Renkforce 1360250 User manual

Renkforce 1360258 User manual

Renkforce

Renkforce 1360258 User manual

Renkforce 2350336 User manual

Renkforce

Renkforce 2350336 User manual

Renkforce 1362483 User manual

Renkforce

Renkforce 1362483 User manual

Renkforce 1404059 User manual

Renkforce

Renkforce 1404059 User manual

Renkforce 1404051 User manual

Renkforce

Renkforce 1404051 User manual

Renkforce RF-4032108 User manual

Renkforce

Renkforce RF-4032108 User manual

Renkforce T568A User manual

Renkforce

Renkforce T568A User manual

Renkforce 1462244 User manual

Renkforce

Renkforce 1462244 User manual

Renkforce 1611411 User manual

Renkforce

Renkforce 1611411 User manual

Renkforce 2339782 User manual

Renkforce

Renkforce 2339782 User manual

Popular Cables And Connectors manuals by other brands

TRENDnet TU3-SA - Quick installation guide

TRENDnet

TRENDnet TU3-SA - Quick installation guide

Reinhausen c.a.p.t. 099 Series Installation manual & maintenance

Reinhausen

Reinhausen c.a.p.t. 099 Series Installation manual & maintenance

Hama PC-Link-Cable Operating	 instruction

Hama

Hama PC-Link-Cable Operating instruction

Philips SWV3472W Specifications

Philips

Philips SWV3472W Specifications

ITW SIMCO ION SLCC HV instructions

ITW

ITW SIMCO ION SLCC HV instructions

Hubbell MINI-QUICK H MS FA1 Series installation instructions

Hubbell

Hubbell MINI-QUICK H MS FA1 Series installation instructions

Olympus A00010A Instructions for use

Olympus

Olympus A00010A Instructions for use

Wentronic clicktronic 70742 user manual

Wentronic

Wentronic clicktronic 70742 user manual

BK Radio KAA 0700 manual

BK Radio

BK Radio KAA 0700 manual

Manhattan 150712 install guide

Manhattan

Manhattan 150712 install guide

Philips SWV6432 Specifications

Philips

Philips SWV6432 Specifications

Fluke i5s instruction sheet

Fluke

Fluke i5s instruction sheet

BK TECHNOLOGIES BKR0608 User instructions

BK TECHNOLOGIES

BK TECHNOLOGIES BKR0608 User instructions

Omron XN2 manual

Omron

Omron XN2 manual

XTBA SMART MERGE4:2 manual

XTBA

XTBA SMART MERGE4:2 manual

Crestron TPMC-CBL-T installation guide

Crestron

Crestron TPMC-CBL-T installation guide

Tecnosystemi Smart Clima 11125135 user manual

Tecnosystemi

Tecnosystemi Smart Clima 11125135 user manual

Marmitek 25008323 user manual

Marmitek

Marmitek 25008323 user manual

manuals.online logo
manuals.online logoBrands
  • About & Mission
  • Contact us
  • Privacy Policy
  • Terms and Conditions

Copyright 2025 Manuals.Online. All Rights Reserved.