Renogy RSHSRZ02P User manual

Smart Relay (Zigbee)
User Manual
VERSION A0

1
CAUTION
Thanks to its built-in Zigbee 3.0 communication
module, Smart Relay works with Renogy ONE to
create a Zigbee LAN where you can control other
connected devices intelligently and enable scene
synchronization.
This User Manual contains instructions for Smart
Relay. Please read the User Manual carefully before
using the device.
Please avoid exposing the components to direct
sunlight. Do NOT allow water to enter Smart
Relay. To ensure quality wireless communication,
please keep it away from metal objects at a
distance of at least 20 cm or 7.88 inches.
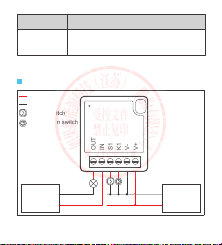
After wiring, use PE double-sided adhesive to
secure Smart Relay to the selected mounting
location.

2
WARNING
Do NOT disassemble Smart Relay because no
parts inside it require maintenance or repair.
Smart Relay can only be powered by a DC power
supply (8V-30V); otherwise Smart Relay will be
damaged. Risk of electric shock! Make sure the
power supply is powered off before connection.
When wiring, make sure the wire retainer in the
hole is fully opened.

3
Product Overview
Smart Relay power supply hole,
connecting to the positive/negative
terminal of a DC power supply
(8V-30V).
Wiring holes
V+/V-
Function
Connecting to a push button
switch to turn devices on or off.
K1
Connecting to a rocker switch to
turn devices on or off.
S1
Connecting to the fire wire of an
AC power supply or the positive
terminal of a DC power supply.
IN
Connecting to the positive side of
the load.
OUT

4
Function
It displays the current operating
status of Smart Relay.
Flashing: Restoring to factory
settings and waiting for network
distribution, flashing for 3
minutes.
On: Relay status-ON.
Off: Relay status-OFF.
LED light
Part
OUT
IN
S1
K1
V-
V+
Button
LED light

5
Wiring Diagram
AC
Power
Supply
N
L
AC load
+
-
DC
Power
Supply
Negative
Positive
Rocker switch
Push button switch
AC Load
Function
Press: Power on/off Smart Relay.
Long press for 5s: Factory reset.
Button
Part
OUT
IN
S1
K1
V-
V+

6
The input voltage of AC Power Supply shall not
exceed 250 V.
For an AC load, operating voltage: ≤ 250 V;
operating current: ≤ 16 A.
You can choose to connect your switch(es) to
either, neither, or both of S1 and K1 to your circuit
on demand.
WARNING
Connect the AC Power Supply to OUT/IN only;
otherwise Smart Relay may be damaged.

7
WARNING
The input voltage of DC Power Supply shall not
exceed 30 V.
For a DC load, operating voltage: ≤ 30 V;
operating current: ≤ 16 A.
DC load
+
-
DC
Power
Supply
Negative
Positive
Rocker switch
Push button switch
DC Load
OUT
IN
S1
K1
V-
V+

8
Method 1: Long press the Button for 5s until the
LED indicator flashes.
Method 2: Long press the push button switch
connecting to K1 until the LED indicator flashes.
Method 3: Turn on/off the rocker switch
connecting to S1 10 times continuously.
Factory Reset
Smart Relay should be used in association with
Renogy ONE. For more detailed instructions,
please refer to the User Manual of Renogy ONE.
Add Smart Relay (Zigbee) to Renogy
ONE.
You can choose to connect your switch(es) to
either, neither, or both of S1 and K1 to your circuit
on demand.

10
For optimum performance, it is recommended to
perform these tasks regularly.
Maintenance
Ensure Smart Relay is mounted in a clean,
dry, and ventilated area.
Ensure there is no damage or wear on the
cables.
Make sure that Smart Relay is in normal state.
Ensure there is no any corrosion, insulation
damage, or discoloration marks of overheating
or burning.
For additional support, contact the Renogy
technical support team through renogy.com
/contact-us. Have the following information available
when contacting Renogy.
Technical Support
Owner name Purchase channel
Contact information Serial number
Order number Brief description of the issue

11
Disclaimer
Renogy makes no warranty as to the accuracy,
sufficiency, or suitability of information in the User
Manual because continuous product improvements
are going to be made.
Renogy assumes no responsibility or liability for
losses or damages, whether direct, indirect,
consequential, or incidental, which might arise out
of the use of information in the User Manual.
Renogy is not responsible or liable for the failures,
damages, or injuries resulting from repair
attempted by unqualified personnel or improper
installation and operation.
The illustrations in the User Manual are for
demonstration purposes only. Details may appear
slightly different depending on product revision and
market region.
Renogy reserves the right to change the
information in the User Manual without notice.

Renogy Empowered
Renogy aims to empower people around the world through education and distribu-
tion of DIY-friendly renewable energy solutions.
We intend to be a driving force for sustainable living and energy independence.
In support of this effort, our range of solar products makes it possible for you to
minimize your carbon footprint by reducing the need for grid power.
Live Sustainably with Renogy
Did you know? In a given month, a 1KW solar energy system will...
Save 170 pounds of coal from being burned
Save 300 pounds of CO2from being released into the atmosphere
Save 105 gallons of water from being consumed
PLUS
Renogy Power
Renogy Power Plus allows you to stay in the loop with upcoming solar energy
innovations, share your experiences with your solar energy journey, and connect
with like-minded people who are changing the world in the Renogy Power Plus
community.
Also, follow us on Social Media @RenogySolar.
Table of contents
Popular Relay manuals by other brands

Seg
Seg XRI1-IE manual

Crucible Technologies
Crucible Technologies GBR1 Installation and user guide

American Time
American Time H004896R quick start guide

GE
GE b30 instruction manual

pizzato
pizzato CS AR-01 Series operating instructions

Honeywell
Honeywell Farenhyt Series Installation and maintenance instructions

Stahl
Stahl 9174/10-14-00 operating instructions

Pilz
Pilz PSEN ma1.3p-20 operating manual

Midcontinent
Midcontinent MD41-244 Installation manual and operating instructions

P&B
P&B MR-METI31 Technical manual

ASO Safety Solutions
ASO Safety Solutions ELMON 42-622 Brief instructions

SMC Networks
SMC Networks IL100 Operation manual