ReSound Unite User manual

17427100-GB-10.08 Rev.C
GETIING STARTED
(Quick Guide)
USING AN AUDIO CABLE
3a. Insert the red and
white plugs of the audio cable
into the red and
white sockets on the
ReSound Unite TV.
4a. Insert the plugs
at the other end of
the red and white
audio cable into the
“AUDIO OUT” sockets
on the TV, sound sys-
tem or computer. 4a
3a
Should there only be a digital
port in your TV, you will need
a “digital to analog audio con-
verter” and a Toslink optical
or coaxial cable to connect
the ReSound Unite TV
to your TV. Consult your
TV technician for these
items.
3d. Insert the red and
white plugs of the audio
cable into the red and
white sockets on the
ReSound Unite TV.
4d. Insert the plugs at
the other end of the red
and white audio cable
into the sockets on the
digital to analog audio
converter.
5d. Connect the converter’s
power supply to the converter
and plug it into an electric wall
outlet.
USING A DIGITAL TO ANALOG AUDIO CONVERTER
3d
4d
5d
6d
7d
For the Toslink optical cable:
6d. Plug one end of the
Toslink optical cable into the
converter.
7d. Plug the other end of the
Toslink optical cable into the
digital audio output port on
the TV.
For the coaxial cable:
6e. Plug one end of the co-
axial cable into the converter.
7e. Plug the other end of the
coaxial cable into the digital
audio output port on the TV.
7e
6e
3b. Insert the red and white
plugs of the audio cable into
the red and white sockets on
the ReSound Unite TV.
4b. Insert the plugs at
the other end of the red
and white audio cable
into the sockets on the
headphone jack adap-
tor.
5b. Plug the head-
phone jack adaptor into
the headphone socket
on the TV, sound sys-
tem or computer.
3b
4b
5b
USING A HEADPHONE JACK ADAPTOR USING A SCART ADAPTOR
3c. Insert the red and white
plugs of the audio cable into
the red and white sockets on
the ReSound Unite TV.
4c. Insert the plugs at
the other end of the red
and white audio cable
into the sockets on the
Scart adaptor.
5c. Plug the Scart adap-
tor into the TV’s Scart
terminal.
3c
4c
5c
1. Plug the power cord into
the Mini-USB socket on the
ReSound Unite TV.
2. Plug the other end of the
power cord into an electric
wall outlet.
Depending upon the features
of your particular audio device,
such as a TV, sound system or
computer, choose one of the
following procedures:
SETTING UP YOUR RESOUND UNITE™ TV
A
1
2
• Using an audio cable
• Using a headphone jack apadtor
• Using a SCART adaptor
• Using a digital to analog audio converter
Worldwide headquarters
GN ReSound A/S
Lautrupbjerg 7
DK-2750 Ballerup, Denmark
Tel.: +45 45 75 11 11
Fax: +45 45 75 11 19
www.resound.com
United Kingdom
GN ReSound Ltd.
Kirtlington Business Centre
Portway
Kirtlington
Oxon OX5 3JA
Tel.: +44 1869 352 800
Fax: +44 1869 343 466
www.gnresound.co.uk
Australia
GN ReSound Pty. Ltd.
Unit R1 Regents Park Estate
391 Park Road
Regents Park NSW 2143
Tel.: (free) 1800 658 955
Fax: +61 2 9743 7472
www.gnresound.com.au
New Zealand
GN ReSound (NZ) Ltd.
12 Parkway Drive
Mairangi Bay
Auckland
Tel.: (free) 0800 900 126
Fax: (free) 0800 007 695
www.gnresound.co.nz
Canada
GN ReSound Canada
303 Supertest Road
Toronto, Ontario
CANADA M3J 2M4
Tel.: +1 888 737 6863
Fax: +1 800 666 4089
canada@gnresound.com
www.gnresound.ca

It is possible to pair up to
three ReSound Unite TV units
with a given pair of hearing
instruments. To pair a second
ReSound Unite TV:
• Follow steps 1 and 2 under
• Then press the pairing but-
ton of the second ReSound
Unite TV TWO times.
• Channel indicator light #2
will begin flashing.
• Finish the second pairing by
closing the battery doors on
the hearing instruments.
NOTE! Check with your hear-
ing healthcare professional
to determine if your instru-
ments have been pre-paired.
Instruments that have been
prepaired do not need to be
paired again.
1. Make sure the ReSound
Unite TV is plugged into a
wall socket and that the green
power light is on.
2. Open the battery doors on
both hearing instruments.
3. Press the pairing button on
the ReSound Unite TV once to
activate the pairing mode
4. You can tell that the pairing
mode has been activate when
channel indicator light #1 is
flashing. Pairing mode will be
activated for 20 seconds.
5. While the channel indicator
light is flashing, close the bat-
tery doors on both hearing
instruments.
6. Successful pairing will
be indicated by an audible
melody played in both hearing
instruments. You are now
ready to use the ReSound
Unite TV!
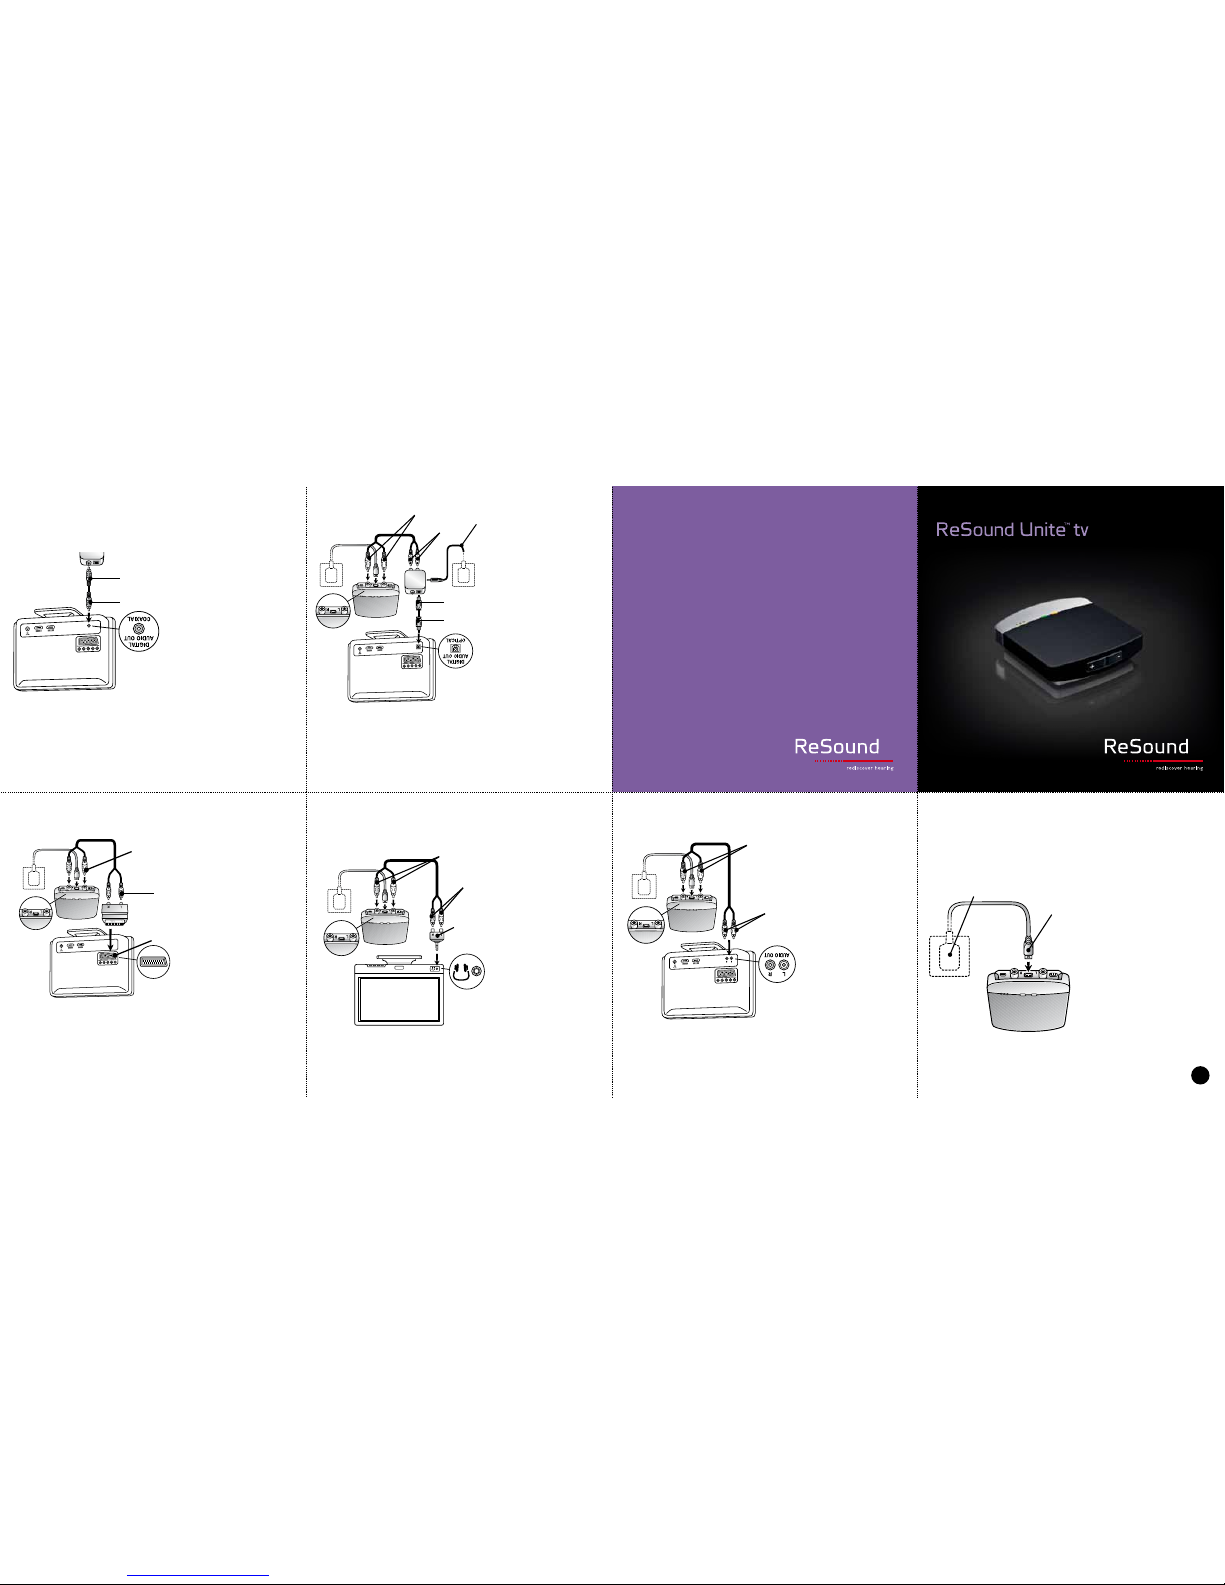
PAIRING TO A SECOND OR THIRD RESOUND UNITE TV
Options for vertical
positioning:
• Place the ReSound Unite TV
in the table stand provided.
• Mount it to the wall with
hardware provided.
• Velcro it to the TV.
ORIENTING THE RESOUND UNITE™ TV IN
A VERTICAL POSITION
C
• A third ReSound Unite TV
unit can be similarly paired
by:
• Pressing the pairing
button THREE times and
completing the procedure
as described above.
When using the optional
remote control, the display will
show that it is searching, and
then indicate that it is conec-
ted to the ReSound Unite TV.
Once you have selected a
ReSound Unite TV listening
program, a melody of beeps
will be heard in your hearing
instrument.
TO STOP LISTENING TO
A STREAMER PROGRAM
EITHER: Quickly press and
release the push button on
your hearing instrument;
OR: Press the “P” button on
the remote control.
After setting up and pairing,
you can listen to sound from
the ReSound Unite TV as
follows.
TO START LISTENING TO
A STREAMER PROGRAM
With your TV, sound system or
computer turned on …
EITHER: Press and hold the
push button on your hearing
instrument for 3 seconds;
OR: Press the streamer button
on the remote control.
LISTENING TO SOUND FROM YOUR
RESOUND UNITE™ TV
D
Streamer
button
PAIRING TO YOUR HEARING INSTRUMENTS
B
2.
5.
1.
3.
4.
Channel
indicator
light #3
Channel
indicator
light #2
TV
TV
B
Tips and Support
For more details on the ReSound Unite tv, refer
to the user guide. For further support, tips and
videos, go to the ReSound Unite website on
www.resound.com/products/unite
Other manuals for Unite
8
Other ReSound TV Receiver manuals