2. Press the BAND Selection Button (4) repeatedly to select AM or FM band as desire
3. Turn the Station Selection Knob (6) to select the desired station.
4. Turn the VOLUME Control Knob (13)to adjust volume level as desired.
NOTE: If the unit produces noise due to the influence of nearby appliances, (such as a TV, computer,
or fluorescent light), you should move the unit to another place to listen to the radio.
Antennas:
AM:
This unit has a built-in internal magnetic antenna, which provides adequate reception in most areas.
If reception is weak, turn the unit to improve reception.
FM:
The FM Telescopic Antenna is for FM reception only. If reception is weak, adjust the length and the
angle of the antenna.
CASSETTE TAPE PLAYER OPERATION
1. Slide the Function Selector (15) to Cassette Tape position
2. Press the Stop/Cassette Tape Door Open Button (11) to open the Cassette Tape Door (27) and
place a cassette tape in it correctly, then close the Cassette Tape Door (27).
3. Press Play Button (8) to play the track of the cassette tape.
4. Turn the VOLUME Control Knob (13) to adjust volume level as desire.
5. Press the Skip/Fast Forward (9) and Skip/Fast Forward (10) Buttons to fast searching the specific
section.
6. Press Play/Pause Button (12) to pause, press again to resume normal playback.
7. Press Stop/Cassette Tape Door Open Button (11) to stop the tape playback.
RECORD OPERATION
1. Put the tape to be recorded into the tape compartment correctly, and close the door. Rewind the
tape to the position where you want to start recording.
2. Record the sound of CD disc or USB / TF card, slide the Function Selector (15) to the position of
CD or USB / TF card to play.
3. To record radio, slide the Function Selector (15) to the position of Radio and tune to the desired
radio station.
4. Press the Record Button (7) to start recording, at this time the Play Button (8) will be pressed.
5. If you need the stop the recording, press Stop Button (11) will be OK.
6. To record an external audio source, slide the Function Selector (15) to the position of "tape" and
press the Record Button (7) to record.
OTHER ORPERATIONS
Power Off: slide the Function Selector (15) to the position of "tape".
Listen with Headset: Using stereo headphone, insert it into the Headphone Jack (16).
CARE AND MAINTENANCE
1. Do not expose compact discs to direct sunlight, high humidity, high temperatures or dust, etc.
To prevent fire or shock hazard, disconnect your unit from the AC power source when cleaning. The
finish on your unit may be cleaned with a dust cloth and cared for as other furniture. Use caution
when cleaning and wiping the plastic parts.
2. Head Cleaning: After every 10 hours of tape playback, you should clean the magnetic head and
pinch roller spindle. You should use cotton with a little cleaning fluid or alcohol for cleaning or use a
dry or wet cleaning tapes.
3. After the recording is complete, use a screwdriver or other sharp tool to break the scratch-proof
film on the tape to expose the scratch-proof hole.
4. Cover the tape scratch-proof hole with adhesive tape, you can use the tape to record again
OPERATION
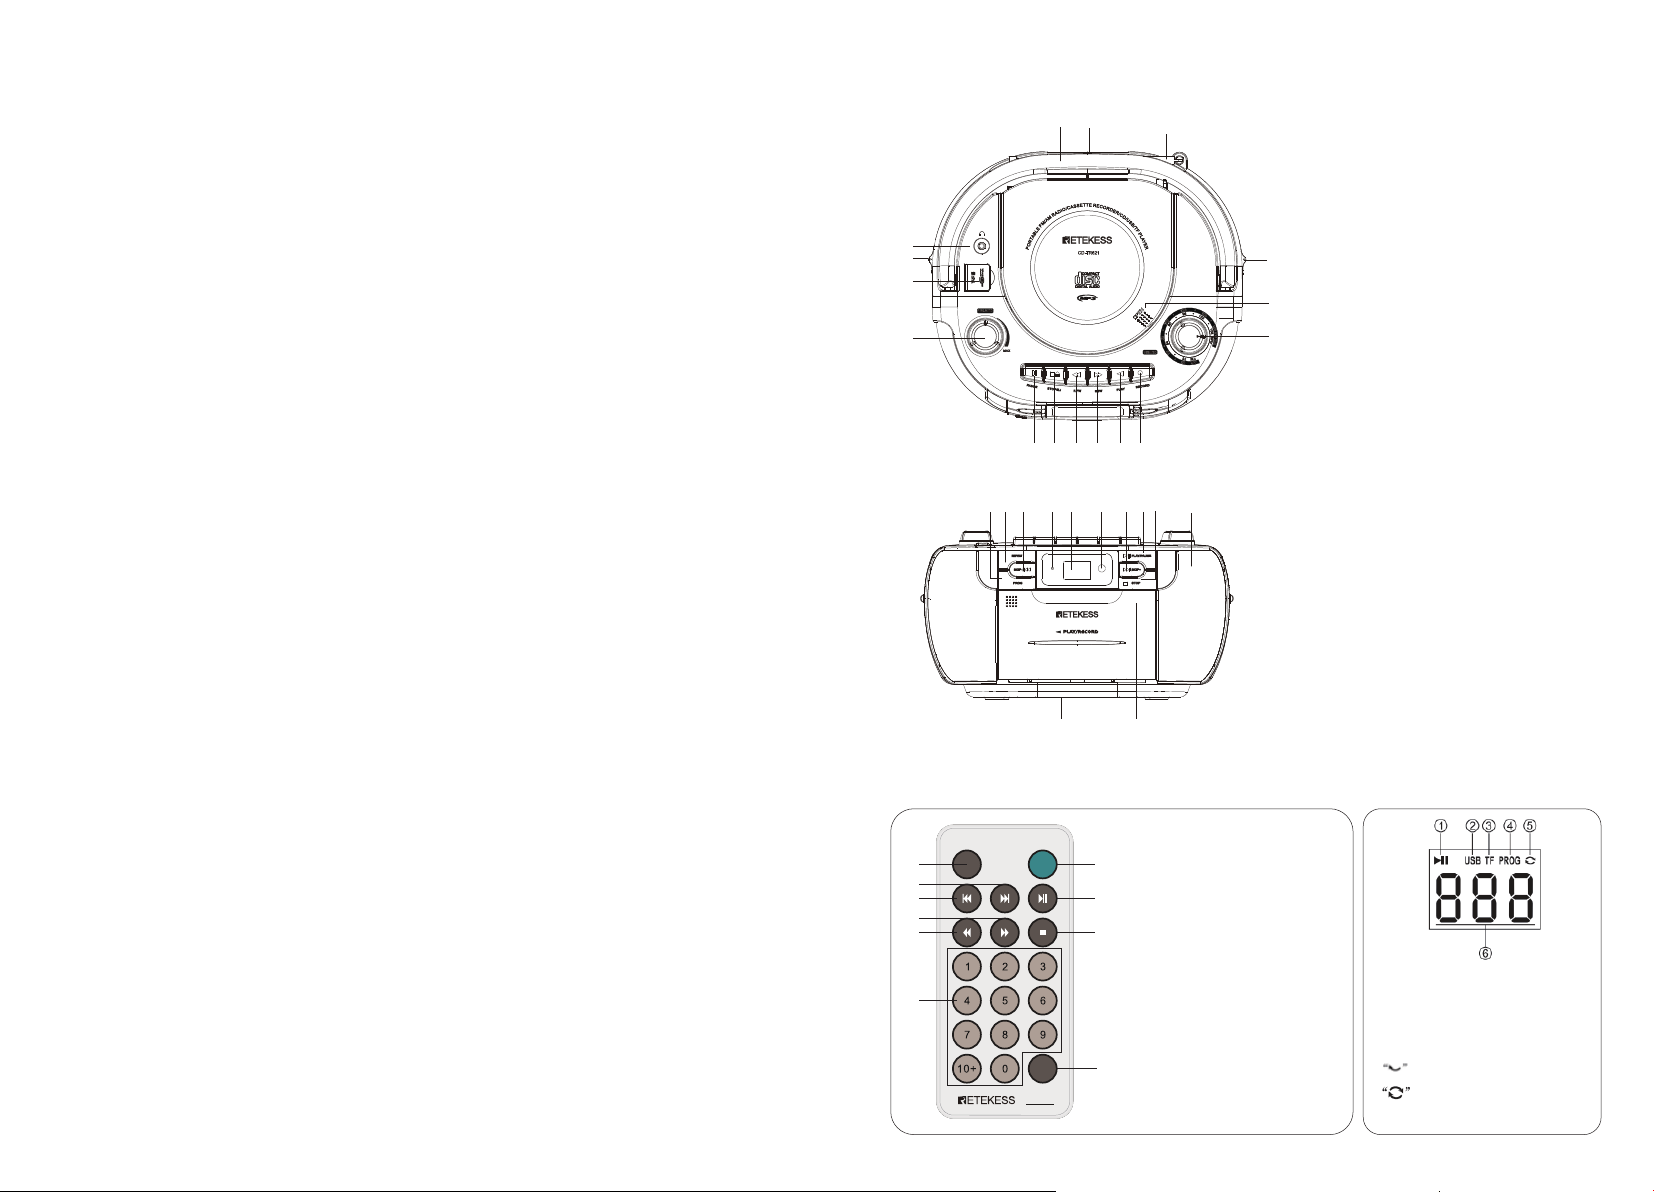
REMOTE CONTROL
1. Program Button: When the CD / USB / TF card stops playing, press this key to enter the
programming operation.
2. Next Song Button: In the state of playing CD / USB / TF card, press this key to select the next song
to play.
3. Previous Song Button: In the state of playing CD / USB / TF card, press this key to select the
previous song to play.
4. Skip/Fast Forward Button: In the state of playing CD / USB / TF card, press and hold this key to
fast forward searching the specific section.
5. Skip/Fast Backward Button: In the state of playing CD / USB / TF card, press and hold this key to
fast backward searching the specific section.
6. Number Keypad: When playing a CD / USB / TF card, you can use the numeric keys to select a
specific song.
7. Mute Button: During playback, press this key to mute mode and press it again back to normal
playback.
8. Play/Pause Button: During CD / USB / TF card playback, press this button to pause playback, and
press this button again to resume playback.
9. Stop Button: In the state of playing CD / USB / TF card, press this button to stop playing.
10. Repeat Button: During CD / USB / TF card playback, press this key to repeat a single track or all
tracks.
CD PLAYER OPERATION
1. Slide the Function Selector (15) to CD position
2. Press the OPEN/CLOSE Area on the CD Door (5) to open it then place a CD disc on the center
spindle, with the printed side face up
3. Close the CD door by pressing the OPEN/CLOSE area (5). Wait a few seconds; “CD” letters will
appear on the LCD Display
4. Player will start playing the first track on the disc after closed the CD door.
5. During playback:
●Turn the VOLUME Control Knob (13) to adjust volume level as desire.
●Press the Play/Pause Button (24) to pause; press it again to resume normal playback
●Press the Skip/Fast Forward (9) and Skip/Fast Forward (10)Buttons repeatedly to skip the tracks.
●Press and hold the Skip/Fast Forward (9) and Skip/Fast Forward (10) Buttons to fast searching the
specific section.
●Press the Repeat Button(18) once to single song repeat mode, shows on display; Press the
Repeat Button(18) twice to all song repeat mode, shows on display; Press the Repeat
Button(18) three time to cancel the repeat mode.
●Press Stop Button (25) to stop playing.
6.When the CD is stopped, press the Program Button (17) to set the CD programming. Press the
button (17) once the song name on LCD display flashes, press the Previous Song Button (19) and
Next Song Button (23) select the track you want to program. Press the Program Button(17) again to
complete the operation, repeat the above steps to program multiple tracks, press the Play/Pause
Button (24) to play the corresponding tracks in sequence, if you need to cancel the programming
playback, just press the Stop Button (25).
(Note: The above operations can also be done with the remote control)
USB/TF CARD OPERATION
Insert the USB / TF card into the USB / TF Card Socket (14), slide the Function Selector (15) to
position, then wait a few seconds, the tracks will appear on the LCD Display.
NOTE: The files in USB/TF card must be in MP3 or WMA format. If USB and TF card are inserted at
the same time, USB playback priority.
RADIO OPERATION
1. Slide the Function Selector (15) to RADIO position to turn on the radio
3 4