REVCAMUK MON293GL User manual

1
Instructions for our MON293GL
Clip-over mirror monitors
This booklet contains informaon about our mirror monitor and its menu
system, explaining what the various opons inside actually do (as the menu
system is quite a bit more versale than most of the basic mirror monitors
menus).
Please be aware that some of the menu systems are subject to change (if
you noce anything that diers then please let us know so we can keep
these instrucons up to date).
Please keep this guide handy in case you ever nd someone has been play-
ing with your monitor and changed all the sengs.

2
Technical Specicaons
7” Colour LCD screen
Power supply: 12V/24V
Power Consumpon: 8.64W or lower
Digital Screen Resoluon: 800 x3(RGB)x480
Operang Temperature: -10C to +65C
2 Inputs
PAL/NTSC/AUTO
Rotaon/Mirror on both channels
Full funcon Remote Control
Wiring Harness Layout
We oen get calls from people who have connected the green trigger wire to an
ignion source because they want it to come on all the me, this then locks out the
buons and keeps it on channel 2. If you wish to have it on all the me then please
do not aach the green wire to anything, the monitor will remember the last power
state when the monitor gets power so no trigger is needed in this case.

3
Choosing a power supply and earthing
We recommend that you use a switched with ignion power supply (either
12V or 24V it will automacally work on either). We advise against going
directly to the vehicle baery, or on a permanent supply as you will dis-
charge your baery even when the monitor is powered down as well as the
equipment being at risk due to the voltage uctuaons experienced when
the alternator kicks on/o. We recommend earthing direct to chassis at a
point with a bare metal surface.
Connecng the monitor to wiring harness
Please be careful when inserng the
connecon from the monitor to the
wiring harness. There is a groove and a
ridge on the 8mm connector to help
line the pins up in to the correct posi-
on (see photo).
Buon Layout
The mirror monitor has touch sensive buons as opposed to physical push
in buons. We nd these really responsive and easy to use. We have in-
cluded a quick guide below to what each of
the buons do.
Up Arrow = Up
Down Arrow = Down
M = Menu/Enter
V1/V2 = Change Channel
= Power On/O

4
How to use the Menu System
The menu system is easy to nav-
igate through using the top
three buons on the monitor.
To enter the menu system press
the M buon. You will now see
the opons as shown in the im-
age to the right.
Press the - or down buon to
move down unl your selecon
is over the required funcon
you wish to modify. To enter the
sub menu/funcon press M
buon (this works as an enter
buon as well as the menu buon). Pressing + or up arrow will move the
selecon up at any me.
Picture Sub Menu
Scroll to the required opon and press M buon to enter/modify required
opon.
Brightness : Adjust the brightness of the picture
Contrast : Adjust the contrast of the picture
Colour : Adjust the colour of the picture
Reset : Resets values to default
Return : Returns to main menu
Exit : Exits menu completely
Volume Funcon
This secon can be ignored as the monitor doesn’t have a built in speaker.

5
Language Sub Menu
Select from the following opons, these are in order should someone have
changed for you already.
English, French, German, Spanish, Portuguese, Italian, Dutch, Return, Ex-
it.
Mirroring Sub Menu
This funcon will only be used by a few people with a specic need, 99% of
our customers can ignore it.
If for example you have a camera you wish to cancel mirror image on to
use as a normal view camera looking to the side then you can use this
menu to do so.
1. Exit the menu system and select the camera you wish to modify us-
ing CAM buon.
2. Enter the main menu, arrow down to mirroring and press menu to
enter.
3. Select the channel number of the camera you wish to modify.
4. As default the opon is set to o, change this to the opon you re-
quire. The opons are : OFF, V = Vercal ip will turn the picture
upside down, HV = Horizontal and Vercal ip will turn the picture
upside down and mirror that image with the horizontal rotaon, H =
Horizontal ip this will mirror the image.
5. In our example we would have changed our camera to H, as this will
mirror the picture (almost all of our cameras are mirror imaged as
standard so mirroring this mirror image will turn it back in to a nor-
mal view image).
Video Sub Menu
As standard we recommend that you use Auto, which will auto detect the
video type of the camera. The opons are PAL/NTSC/AUTO. Selecng the
wrong type would mean you get a black and white picture or no picture.

6
Park Setup (Guidelines)
The monitor can add guidelines to the picture when the trigger wire has
power (ie when reverse is selected). If you wish to have guidelines shown
then before connuing ensure your camera is plugged in to Channel 2 / V2
and the green trigger wire is connected to the reverse light feed. The moni-
tor should now trigger on and o every me you go in to and out of re-
verse.
Enter this menu and set LINE 2 to ON.
Now enter Line 2 Setup.
The rst adjustment will allow you to move the batch of guidelines along
the vercal axis, the image below shows the max adjustment up and down
of the guidelines.
Tip: We nd holding the up or down buon will move it quicker than
pressing individually lots of mes.
When you are happy with the adjustment press M buon to take you to the
next screen to adjust the width of the guideline box ie the Horizontal ad-
justment. See the picture below for min/max horizontal adjustment.

7
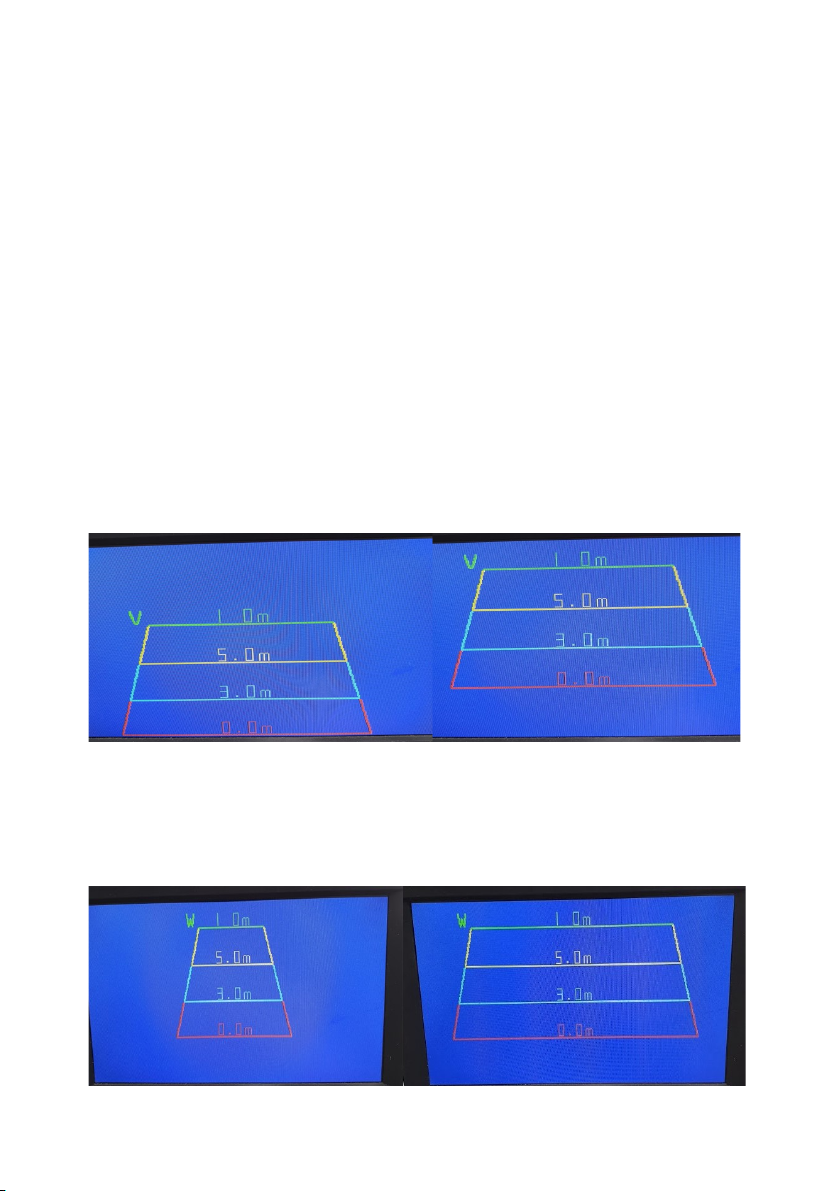
To adjust the values of the numbers assigned to the lines, go back to the
main park setup menu and enter the line number menu. To modify values
use the up and down keys to change the number to the required value and
the Menu buon to go to the next number to adjust.
Opon Sub Menu
Allows you to select picture mode and aspect rao (16:9/4:3), this is usually
le alone and picture mode can be changed when not in menu by pressing
the mode buon.
Imperial Funcon
Pressing this will allow you to use either M for metres or F for feet. This on-
ly really applies if you are using guidelines on the monitor.
Interval Cong Sub Menu
This monitor can be setup to switch between two cameras automacally on
a pre-assigned number of seconds per camera. This menu system will allow
you to do so. Enter the menu and you will have CAM1 and CAM2 listed.
You can change either channel from 1 to 30 seconds. So if you wanted
CAM1 on for 30 seconds then just a quick view of CAM2 for 3 seconds you
would set CAM1 to 30 and CAM2 to 3.
To see the interval change in acon, exit the menu system.
Now press the Menu buon for a few seconds unl you see the word
“Interval” pop up in green on the top of the screen, this should now change
channels to the mings set in the interval cong sub menu.
Cam Delay Sub Menu
Changing the me for channel 2 will mean the monitor stays on this channel
for however many seconds you set (1-20) aer the trigger wire no longer
has power. This is useful for people who don’t want the monitor to switch
on/o when making small back and forth parking manoeuvres or where
channel 2 is a side camera and the trigger wire is aached to the indicator
light and would require a me delay to ensure the picture doesn’t ash on
and o with the indicator light.

8
Fing the monitor over the
mirror
The monitor is designed to clip over
your exisng interior mirror, on the
rear it has two spring loaded clips and
two xed upper clips.
First you must pull down the two lower
clips, you will feel the springs trying to
pull the clips up and as you do this.
Place the monitor over the exisng
mirror by resng the upper clips on the top of your interior mirror and plac-
ing the lower clips underneath.
Next release the lower clips so the springs clamps these on to the underside
of the interior mirror.
Check the monitor is rmly located against the mirror and make any small
adjustments as necessary.
Table of contents
Other REVCAMUK Dashcam manuals