RFXCOM RFXLAN User manual

Copyright
2
2011, RFXCO
M
E
M
E
th
RFX
R
F
er
n
Us
e
ww
w
X
LAN Versi
o
F
X
L
n
et I
e
r
g
w
.rfxc
o
o
n 0.5
L
A
N
nt
e
g
ui
d
o
m.co
m
N
rfa
c
d
e
m
pa
g
c
e
g
e 1 / 23

Copyright 2011, RFXCOM RFXLAN Version 0.5 page 2 / 23
1. Table of Contents
1.Table of Contents......................................................................................................................2
2.RFXLAN Ethernet interface.......................................................................................................3
3.Front panel................................................................................................................................4
3.1.RFXLAN 5V DC power ......................................................................................................4
3.2.USB connection.................................................................................................................4
3.3.Reset button.......................................................................................................................4
3.4.LAN connection..................................................................................................................4
4.Receiver and transmitter installation.........................................................................................4
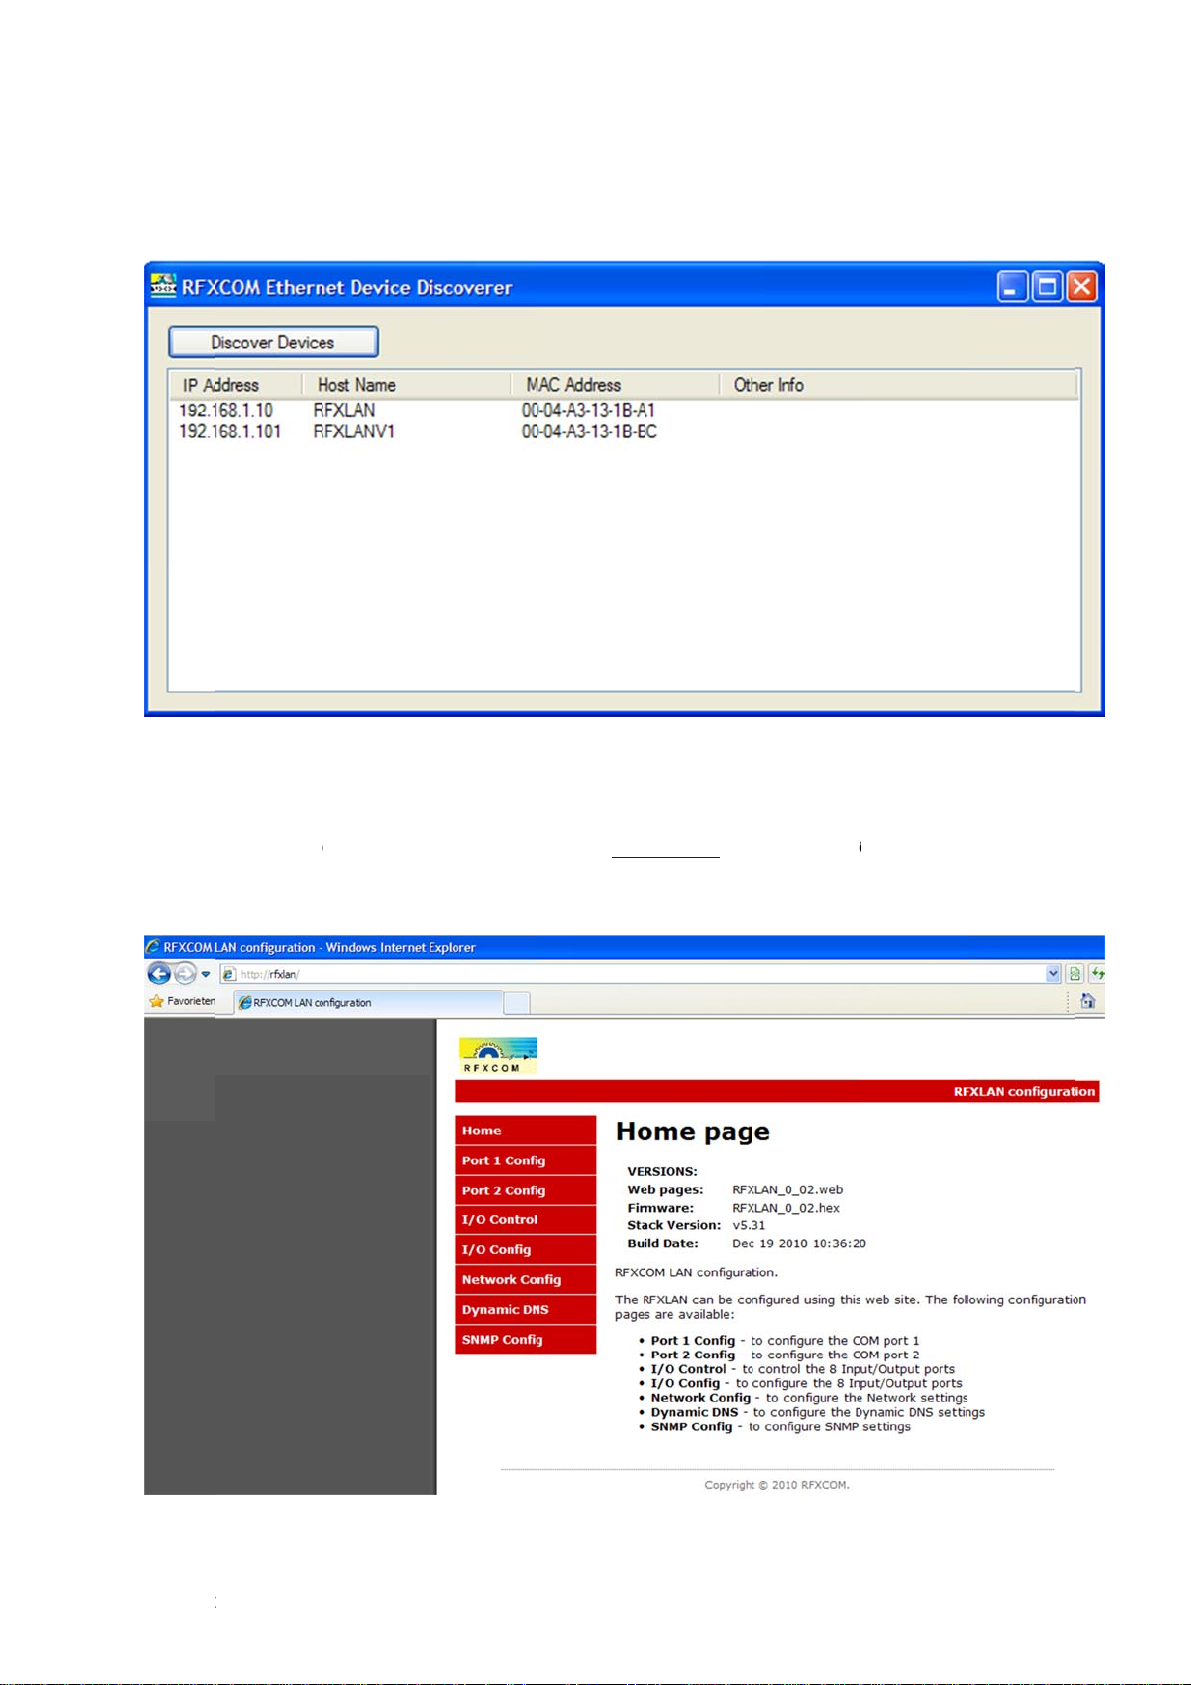
5.How to find the IP and MAC address of the RFXLAN...............................................................5
6.Configure the RFXLAN .............................................................................................................5
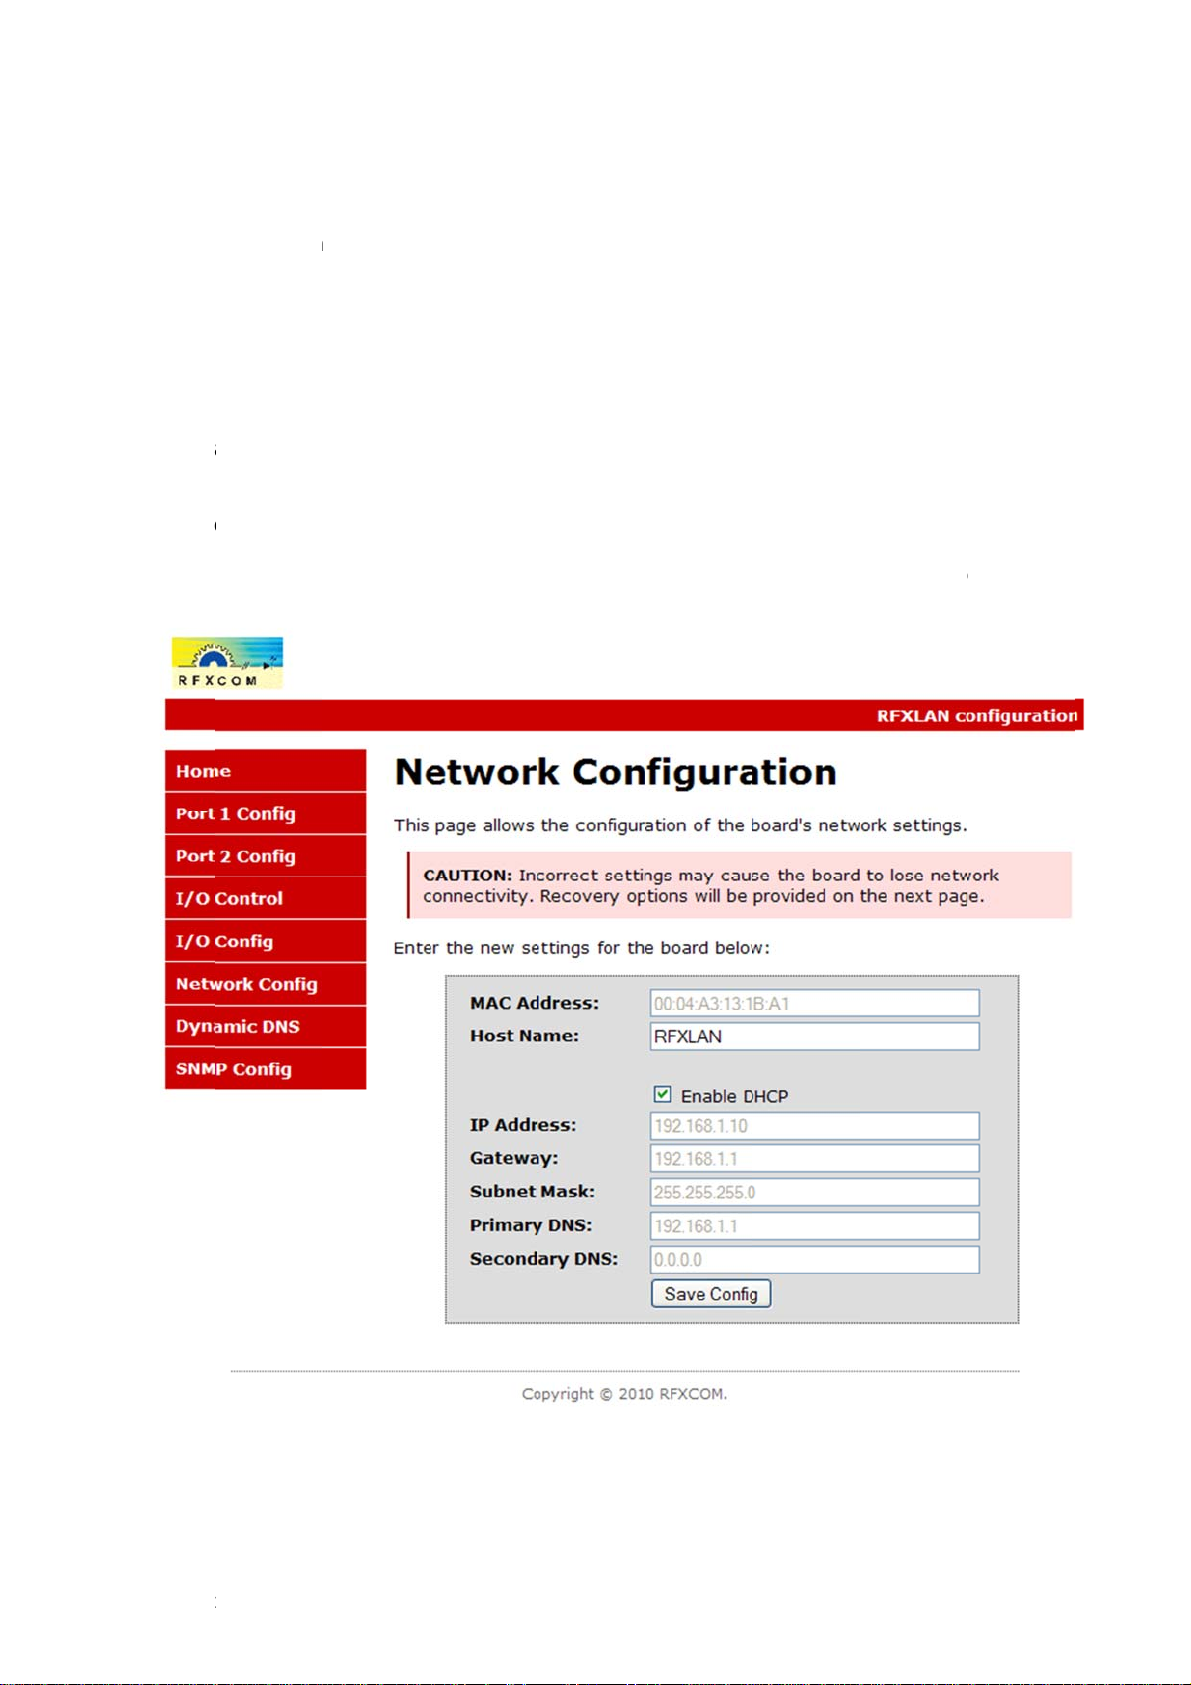
6.1.Configure the network interface.........................................................................................6
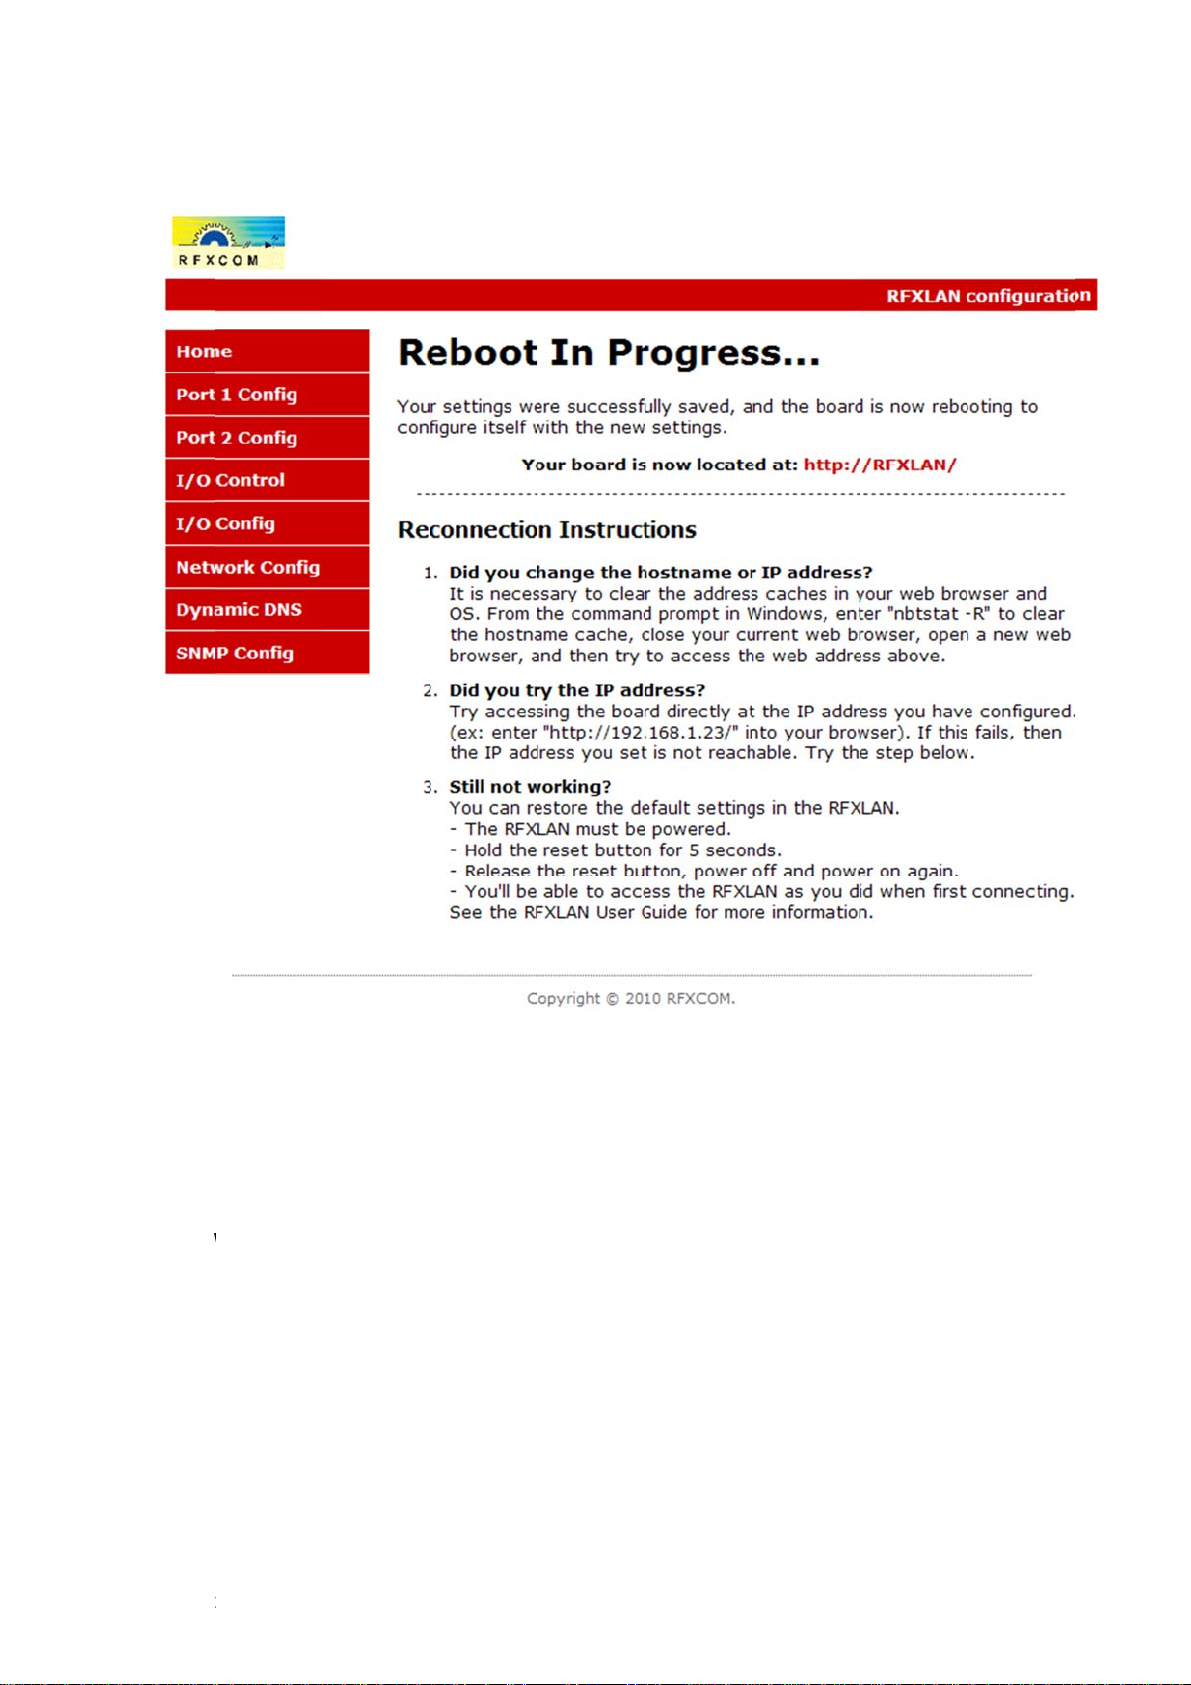
6.2.Restore to default network settings....................................................................................7
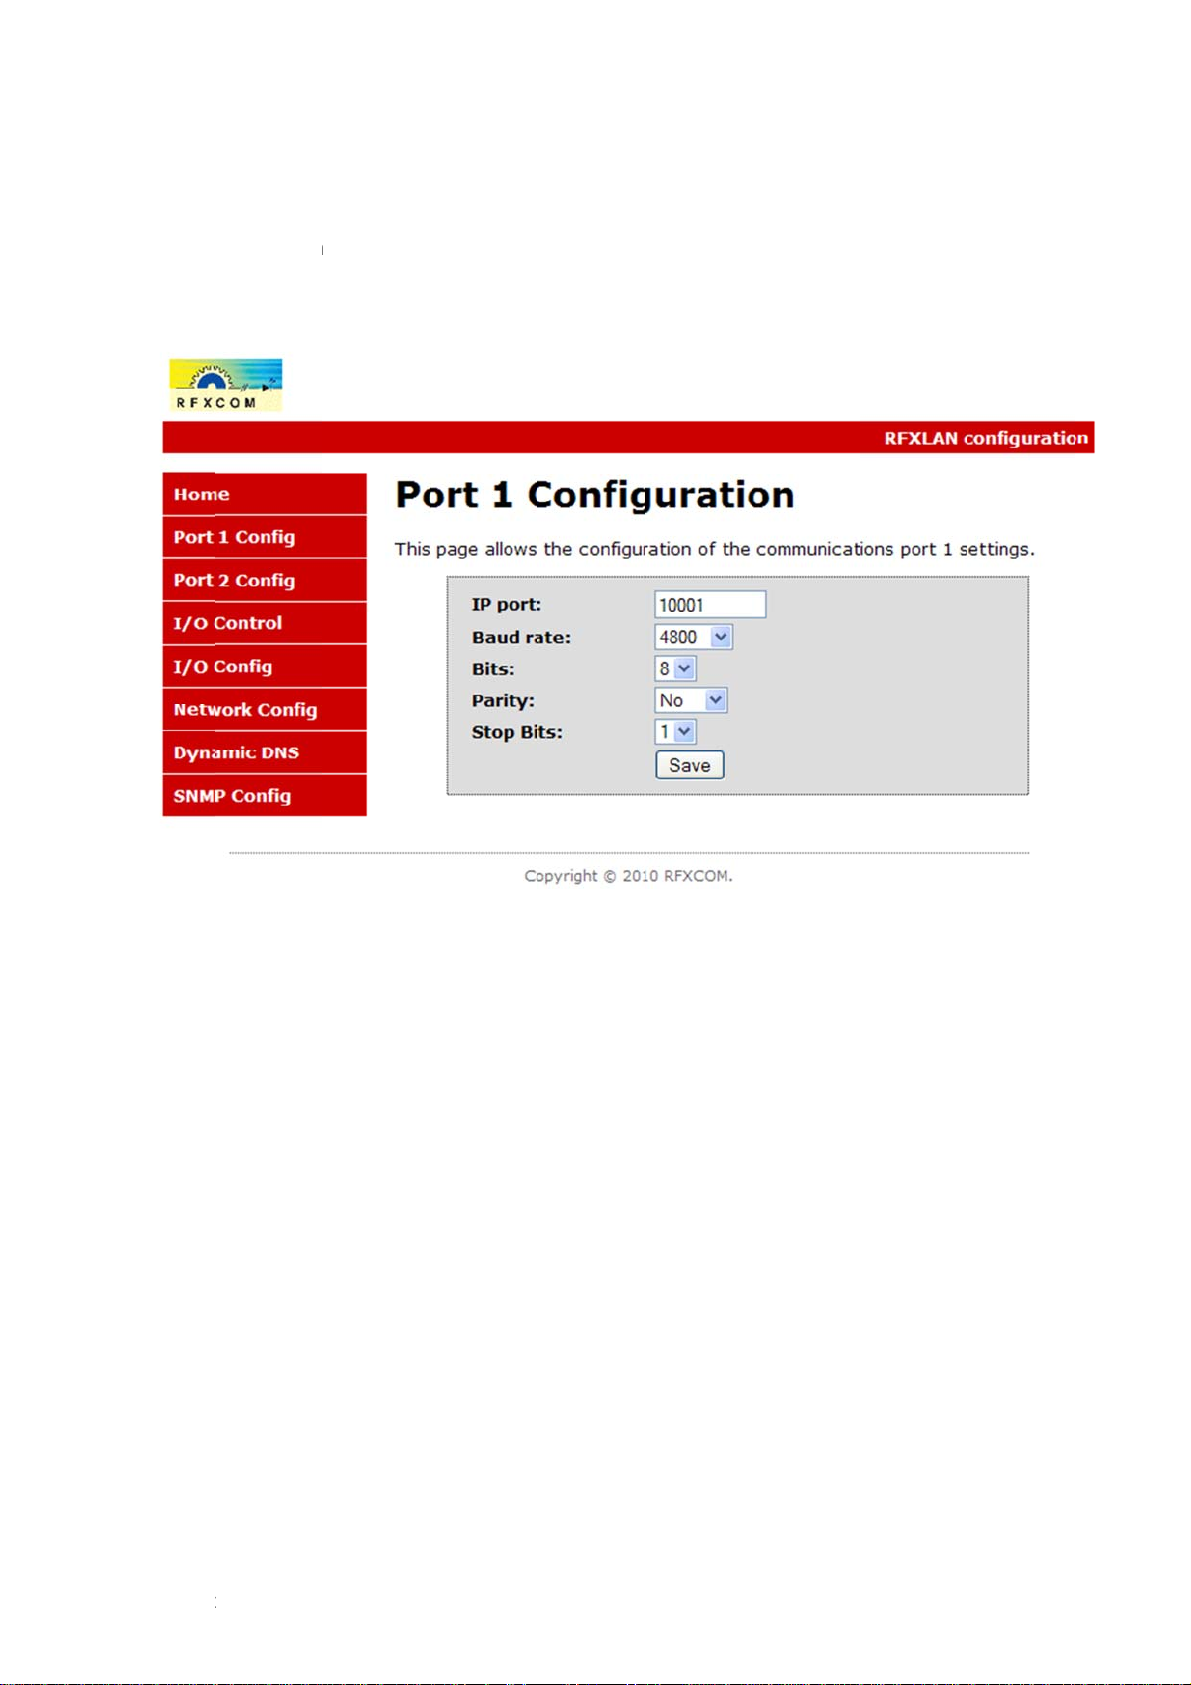
7.Configure Port 1........................................................................................................................8
8.Configure Port 2........................................................................................................................9
9.Configure I/O ports..................................................................................................................10
10.Configure Dynamic DNS .....................................................................................................11
11.Configure SNMP..................................................................................................................12
12.Flash update of the RFXLAN...............................................................................................13
12.1.Update firmware in the RFXLAN (soon available)........................................................13
12.2.Update web pages in the RFXLAN ..............................................................................16
13.Install a Windows COM Port redirector. ..............................................................................17
13.1.Create the Connector...................................................................................................17
13.2.Create the TcpClient ....................................................................................................19
13.3.Save the configured virtual COM ports. .......................................................................20
13.4.Start VSPE automatically at Windows startup..............................................................21
14.Ports to open in a Firewall...................................................................................................21
15.I/O lines ...............................................................................................................................22
15.1.I/O Control Protocol......................................................................................................22
15.2.Command types...........................................................................................................22
16.Warranty..............................................................................................................................23
17.Warning:..............................................................................................................................23
18.Copyright notice...................................................................................................................23
19.Revision history...................................................................................................................23

Copyright 2011, RFXCOM RFXLAN Version 0.5 page 3 / 23
2. RFXLAN Ethernet interface.
The function of the Ethernet interface is to facilitate I/O connections to the RF receivers and RF
transmitters. The Ethernet Interface communicates with the system using a TCP/IP connection.
The device controller in the RFXCOM Ethernet interface communicates to the RFXCOM receivers
and transmitter via the internal COM ports.
For the Windows platform a COM port redirector is necessary. All existing Home Automation
software based on Windows that is using COM port communication to the RFXCOM receivers can
also use the RFXCOM Ethernet interface without any change.
The RFXCOM receivers have a W800 compatible receiving mode and all existing W800 Home
Automation software based on Windows can also use the RFXCOM Ethernet interface without any
modifications.
All software supporting TCP/IP connections can also use the RFXCOM Ethernet Interface.
RFXLAN Ethernet Interface:
Internal COM port for 2 receivers (Master+Slave)
Internal COM port for 1 transmitter
IP port with 8 I/O lines
TCP/IP communication,
Configuration using a web browser,
USB interface for firmware upgrades,
LAN interface 10/100Mb.
The RFXCOM Ethernet Interface uses the Internet Protocol (IP) for network communications. It
uses the Transmission Control Protocol (TCP) to assure that no data is lost or duplicated, and that
everything sent to the connection arrives correctly at the target.
TCP is used for the serial ports and the I/O lines.
IP is used for addressing, routing, and data block handling over the network.
HTTP is used for the build-in web server to configure the Ethernet device controller.
SNMP V2 is used for network monitoring.

Copyright
2
3. Fr
o
3.1.
Import
a
center
p
receive
r
3.2.
This co
n
3.3.
The re
s
reset b
u
T
T
s
3.4.
Conne
c
The left
4. R
e
Discon
n
The M
a
A
n opti
o
A
trans
m
2011, RFXCO
M
o
nt pa
n
RFXLA
N
a
nt: use th
e
p
in. A non-
c
r
s/transmitt
e
USB c
o
n
nection is
Reset
b
s
et button i
s
u
tton gentl
y
T
he firmwa
up and hel
d
T
he RFXL
A
s
econds w
h
LAN c
o
c
t the RFXL
t
LED indic
a
e
ceiver
a
n
ect the po
w
a
ster receiv
e
o
nal Slave
r
m
itter must
M
n
el
N
5V D
C
e
delivered
c
ompatible
p
e
r!
o
nnectio
n
used for fir
m
b
utton
s
behind th
e
y
.
re flash up
d
d
for at lea
s
A
N default
s
h
en the RF
X
o
nnectio
n
AN using a
a
tes data tr
a
a
nd tra
n
w
er from th
e
e
r should b
e
r
eceiver m
u
always be
RFX
C
power
5 Volts 1.2
A
p
ower ada
p
n
m
ware flas
h
e
front pane
d
ate proce
d
s
t 4 second
s
s
ettings are
X
LAN is ru
n
n
straight R
J
a
ffic and th
e
n
smitt
e
e
RFXLAN.
e
plugged i
n
u
st always
b
plugged int
X
LAN Versi
o
A
DC switc
h
p
tor will de
s
h
updates
a
e
l and has
m
d
ure will sta
s
,
restored if
n
ning.
J
45 cable a
s
e
right LED
e
r instal
.
n
into the J
P
b
e plugged
t
o the JP6
c
o
n 0.5
h
ed power
s
s
troy the Et
h
a
nd RFXC
O
m
ultiple fun
c
rt if the res
e
the reset b
u
s
supplied.
indicates
c
lation
P
4 connect
into the JP
5
c
onnector.
s
upply with
h
ernet inter
f
O
M diagnos
t
c
tions. Use
e
t button is
u
tton is pre
s
onnected.
o
r of the Et
5
connecto
r
pa
g
the positiv
e
f
ace and th
t
ics.
a 2 mm pi
n
pressed d
u
ssed for at
t
hernet mo
d
r
.
g
e 4 / 23
e
voltage a
s
e installed
n
to push th
e
u
ring power
least 4
d
ule.
s
e

Copyright
2
5. H
o
Start th
e
A
ll con
n
6. C
o
Start a
b
supplie
d
A
fter th
e
2011, RFXCO
M
o
w to fi
n
e
RFXCO
M
n
ected RF
X
o
nfigur
e
b
rowser an
d
d
by the D
H
e
connect
y
M
n
d the I
P
M
Ethernet
D
X
COM devi
c
e
the R
F
d
connect t
H
CP server.
y
ou will see
RFX
P
and
M
D
iscoverer.
e
c
es will be
d
F
XLAN
he RFXLA
N
this scree
n
X
LAN Versi
o
M
AC ad
d
e
xe and cli
c
d
isplayed w
N
using htt
p
n
:
o
n 0.5
d
ress
o
c
k Discover
ith their IP,
p
://rfxlan or
o
f the R
F
Devices.
NetBIOS n
t
he IP addr
e
pa
g
F
XLAN
ame and
M
r
ess of the
R
g
e 5 / 23
M
AC addres
R
FXLAN
s.

Copyright
2
6.1.
The co
n
User n
a
Passw
o
The de
f
Import
a
If you h
a
connec
t
name t
o
names
o
To use
desele
c
2011, RFXCO
M
Config
u
n
figuration
p
a
me: admi
n
o
rd: rfxco
m
f
ault netwo
r
NetBIOS n
a
DHCP ena
b
a
nt:
a
ve multipl
e
t
the next
R
o
the next
R
o
n your ne
t
the RFXL
A
c
t DHCP an
M
u
re the
n
p
ages are
p
n
m
r
k settings i
n
a
me: RFXL
b
led
e
RFXLAN
R
FXLAN to
a
R
FXLAN so
t
work.
A
N in applic
a
d assign a
f
RFX
n
etwork
i
p
rotected b
y
n
the RFX
L
A
N
interfaces
y
a
void dupli
c
that a rest
o
a
tions you
c
f
ixed IP ad
d
X
LAN Versi
o
i
nterfac
e
y
a User na
L
AN are:
y
ou have t
o
c
ate NetBI
O
o
re to defa
u
c
an use th
e
d
ress.
o
n 0.5
e
.
me and Pa
s
assign a d
O
S names.
A
u
lt settings
w
NetBIOS
n
s
sword.
ifferent Net
A
ssign als
o
w
ill not
r
es
u
n
ame with
D
pa
g
BIOS nam
e
o
a differen
t
u
lt in duplic
a
D
HCP ena
b
g
e 6 / 23
e
before yo
u
NetBIOS
a
te NetBIO
S
b
led or
u
S

Copyright
2
Press t
h
be disp
l
6.2.
Follow
t
W
The RF
Note:
The fir
m
RFXLA
N
2011, RFXCO
M
h
e “Save C
l
ayed:
Restor
e
t
he next pr
o
Power the
R
Press and
h
middle of t
h
W
arning:
T
10 second
s
XLAN net
w
m
ware flash
N
is conne
c
M
onfig” butt
o
e
to def
a
o
cedure to
r
R
FXLAN in
t
h
old the re
s
h
e front pa
n
T
he RFXL
A
s
.
w
ork setting
s
procedure
c
ted to the
p
RFX
o
n after yo
u
ult net
w
r
estore the
t
erface, (re
s
s
et button f
o
n
el.
N will start
s
are now
s
will also st
a
p
ower. See
X
LAN Versi
o
u
have mad
w
ork sett
i
RFXLAN t
o
s
et button
N
o
r 5 secon
d
a firmware
s
et to: Host
a
rt if the re
s
the chapt
e
o
n 0.5
e the requi
r
i
ngs.
o
default ne
t
N
OT press
e
d
s. The res
e
flash upda
t
Name: RF
X
s
et button i
s
r “Install n
e
r
ed change
s
t
work settin
e
d)
e
t button is
b
t
e if the res
e
X
LAN and
D
s
pressed f
o
e
w firmware
pa
g
s
. The nex
t
n
gs:
behind the
e
t button is
D
HCP ena
b
o
r 5 secon
d
e
in the RF
X
g
e 7 / 23
screen will
hole in the
pressed fo
r
b
led.
d
s when th
e
X
LAN”.
r
e

Copyright
2
7. C
o
The co
n
User n
a
Passw
o
COM p
o
The de
f
Press t
h
activat
e
2011, RFXCO
M
o
nfigur
e
n
figuration
p
a
me: admi
n
o
rd: rfxco
m
o
rt 1 is nor
m
f
ault setting
h
e “Save”
b
e
the select
e
M
e
Port 1
p
ages are
p
n
m
m
ally used
f
s used are:
b
utton after
e
d settings.
RFX
p
rotected b
y
f
or the rece
IP port 10
0
you have
m
X
LAN Versi
o
y
a User na
ivers in the
0
01, 4800b
d
m
ade the re
q
o
n 0.5
me and Pa
s
JP4 / JP5
c
d
, 8 bits da
t
q
uired cha
n
s
sword.
c
onnectors
.
t
a, no parit
y
n
ges. The
R
pa
g
.
y
, 1 stop bi
t
R
FXLAN wil
g
e 8 / 23
l reboot to

Copyright
2
8. C
o
The co
n
User n
a
Passw
o
COM p
o
The de
f
Press t
h
activat
e
2011, RFXCO
M
o
nfigur
e
n
figuration
p
a
me: admi
n
o
rd: rfxco
m
o
rt 2 is nor
m
f
ault setting
h
e “Save”
b
e
the select
e
M
e
Port 2
p
ages are
p
n
m
m
ally used
f
s used are:
b
utton after
e
d settings.
RFX
p
rotected b
y
f
or the tran
s
port 1000
2
you have
m
X
LAN Versi
o
y
a User na
s
mitter in t
h
2
, 4800bd,
8
m
ade the re
q
o
n 0.5
me and Pa
s
h
e JP6 con
n
8
bits data,
q
uired cha
n
s
sword.
n
ector.
no parity,
2
n
ges. The
R
pa
g
2
stop bits
R
FXLAN wil
g
e 9 / 23
l reboot to

Copyright
2
9. C
o
The co
n
User n
a
Passw
o
The 8 I
/
Only In
p
Press t
h
activat
e
2011, RFXCO
M
o
nfigur
e
n
figuration
p
a
me: admi
n
o
rd: rfxco
m
/
O ports ca
n
p
ut ports c
a
h
e “Save”
b
e
the select
e
M
e
I/O po
p
ages are
p
n
m
n
be config
u
a
n be confi
g
b
utton after
e
d settings.
RFX
rts
p
rotected b
y
u
red individ
g
ured for u
s
you have
m
X
LAN Versi
o
y
a User na
ually for In
p
s
e with or w
m
ade the re
q
o
n 0.5
me and Pa
s
p
ut or Outp
u
ithout the u
q
uired cha
n
s
sword.
u
t.
se of an int
n
ges. The
R
pag
e
t
ernal pull-
u
R
FXLAN wil
e
10 / 23
u
p.
l reboot to

Copyright
2
10.
C
The co
n
User n
a
Passw
o
Import
a
2011, RFXCO
M
C
onfigu
r
n
figuration
p
a
me: admi
n
o
rd: rfxco
m
a
nt: This fu
n
M
r
e Dyn
a
p
ages are
p
n
m
n
ction has
n
RFX
a
mic D
N
p
rotected b
y
ot been te
s
X
LAN Versi
o
N
S
y
a User na
s
ted yet.
o
n 0.5
me and Pa
s
s
sword.
pag
e
e
11 / 23

Copyright
2
11.
C
The co
n
User n
a
Passw
o
SNMP
h
2011, RFXCO
M
C
onfigu
r
n
figuration
p
a
me: admi
n
o
rd: rfxco
m
h
as not be
e
M
r
e SNM
p
ages are
p
n
m
e
n tested a
n
RFX
P
p
rotected b
y
n
d is not ye
t
X
LAN Versi
o
y
a User na
t
fully impl
e
o
n 0.5
me and Pa
s
mented.
s
sword.
pag
e
e
12 / 23

Copyright
2
12.
F
12.1.
Firmwa
C
t
S
S
C
2011, RFXCO
M
F
lash u
p
Update
re is flashe
d
Use the fil
e
Remove th
e
Connect th
e
Push and
h
Power the
R
t
he RFXLA
If this is th
e
Hardware
w
oDo
n
oDo
n
oIns
e
o
A
cc
S
tart the R
F
S
elect in R
F
Click the C
o
M
p
date o
f
firmwa
r
d
in the RF
X
e
on the RF
X
e
power fro
e
RFXLAN
h
old the res
e
R
FXLAN a
n
N USB.
e
first time
y
w
ill open.
n
ot allow t
o
n
ot install
a
e
rt and sele
ept the dri
v
F
Xflash pr
o
F
Xflash th
e
o
nnect to
D
RFX
f
the R
F
r
e in the
R
X
LAN usin
g
X
COM CD
o
m the RFX
L
USB to a
W
e
t button o
n
n
d hold the
y
ou have c
o
o
let Windo
w
utomaticall
y
ct the RFX
C
v
e
r
o
gram.
e
USB RFX
L
D
evice butt
o
X
LAN Versi
o
F
XLAN
RFXLA
N
g
this proc
e
or downloa
L
AN
W
indows sy
s
n
the RFXL
A
reset butto
o
nnected th
e
w
s search
y
C
OM CD
L
AN COM
p
o
n
o
n 0.5
N
(soon
a
dure on a
W
d the RFX
L
s
tem
A
N
n
for at lea
s
e
RFXLAN
p
ort
a
vailable
)
W
indows s
y
L
AN_x_yy.h
s
t 5 second
s
USB to the
pag
e
e)
y
stem:
h
ex firmwar
e
s until the
P
PC the Wi
z
e
13 / 23
e
file.
P
C detects
z
ard New

Copyright
2
C
C
C
C
2011, RFXCO
M
Click the E
r
Click the C
o
Click again
Click the O
M
r
ase Devic
e
o
nnect to
D
the Conne
pen HEX fil
RFX
e
button
D
evice butt
o
c
t to Devic
e
e button a
n
X
LAN Versi
o
o
n to discon
e
button to
c
n
d load the
o
n 0.5
nect the R
F
c
onnect th
e
RFXCOM_
x
F
XLAN
e
RFXLAN
x
_xx.hex fil
pag
e
e
e
14 / 23

Copyright
2
C
C
2011, RFXCO
M
Click the
W
Click on th
e
Update the
M
W
rite device
e
Normal E
x
web page
s
RFX
button and
x
ecution M
o
s
now. This
X
LAN Versi
o
the RFXL
A
o
de button
t
is only nec
o
n 0.5
A
N is repro
g
t
o set the
R
essary if a
n
g
rammed.
R
FXLAN to
r
n
ew versio
n
pag
e
r
unning mo
n
is availab
e
15 / 23
de.
l
e.

Copyright
2
12.2.
The we
f
S
o
S
2011, RFXCO
M
Update
b pages ar
e
Use the fil
e
Important:
T
f
irmware lo
a
S
tart a we
b
o
r http://<
R
S
elect the
R
M
web pa
g
e
uploaded
e
on the RF
X
T
he web fil
e
a
ded in the
b
browser a
n
R
FXLAN I
P
R
FXLAN w
e
RFX
g
es in t
h
using this
p
X
COM CD
o
e
must hav
e
RFXLAN i
n
n
d enter: h
t
P
number>/
r
e
b file and
c
X
LAN Versi
o
h
e RFXL
A
p
rocedure:
or downloa
e
the same
n
terface.
t
tp://rfxlan/r
f
r
fxupload (
e
c
lick Uploa
d
o
n 0.5
A
N
d the RFX
L
main relea
s
f
xupload (i
f
e
.g. http://1
d
L
AN_x_yy.
w
s
e (x) as th
e
f
the NetBI
O
92.168.1.1
0
pag
e
w
eb file.
e RFXLAN
_
O
S name i
s
0
0/rfxuploa
d
e
16 / 23
_
x_yy.hex
s
RFXLAN)
d
)

Copyright
2
13. I
n
Some
H
plug-in
f
Progra
m
for exa
m
A
free
C
http://w
w
Eterlogi
A
few s
t
1.
C
2.
C
t
3.
S
4.
C
13.1.
Select
D
2011, RFXCO
M
n
stall a
H
ome Auto
m
f
or Homes
e
m
s that onl
y
m
ple applic
a
C
OM port r
e
w
w.eterlogi
i
c delivers
a
t
eps are n
e
Create a d
e
Create a d
e
t
he Conne
c
S
ave the c
o
Create a s
h
Create
D
evice and
M
Windo
w
m
ation pro
g
e
er and xP
L
y
can com
m
a
ble for Ho
u
e
director fo
r
c.com/Pro
d
a
lso a COM
e
cessary to
e
vice with t
y
e
vice with t
y
c
tor COM p
o
o
nfigured
C
h
ortcut to s
t
the Con
n
click Creat
e
RFX
w
s CO
M
rams have
L
RFX. The
s
m
unicate usi
u
seBot.
r
32 bits Wi
n
d
ucts.VSP
E
port redire
create and
y
pe: Conne
y
pe: TcpCli
e
o
rt.
C
OM ports
art VSPE
a
n
ector
e
X
LAN Versi
o
M
Port
r
direct TCP
/
s
e program
s
i
ng a COM
n
dows can
E
.html
ctor for 64
b
use a VSP
ctor and a
s
e
nt and co
n
a
utomaticall
o
n 0.5
r
edirect
o
/
IP commu
n
s
do not ne
e
port will ne
e
be downlo
a
b
its Windo
w
E virtual C
O
s
sign a CO
M
n
nect the I
P
y
at Windo
w
o
r.
n
ications b
u
e
d a COM
p
e
d a COM
p
a
ded at:
w
s systems
O
M port:
M
port to thi
P
address o
r
w
s startup.
pag
e
u
ilt in like t
h
p
ort redirec
t
p
ort redire
c
.
s device.
r NetBIOS
n
e
17 / 23
h
e RFXCO
M
t
or.
c
tor. This is
n
ame with
M

Copyright
2
Select
C
Click Fi
2011, RFXCO
M
C
onnector
a
nish.
M
a
nd click N
e
RFX
e
xt
X
LAN Versi
o
o
n 0.5 pag
e
e
18 / 23

Copyright
2
13.2.
Select
D
Select
T
2011, RFXCO
M
Create
D
evice and
T
cpClient a
n
M
the Tcp
C
click Creat
e
n
d click Ne
x
RFX
C
lient
e
x
t
X
LAN Versi
o
o
n 0.5 pag
e
e
19 / 23

Copyright
2
Enter t
h
A
t Rem
1
o
Select t
Click S
e
Speed:
DTR/R
T
Parity:
Bits:
Stop bi
t
Click Fi
13.3.
If you h
a
and is
n
Click
F
2011, RFXCO
M
h
e IP addre
s
ote TCP p
o
10001 for t
h
o
r 10002 f
o
t
he source
s
e
ttings and
480
0
T
S: NO,
no,
8
t
s: 1 fo
r
nish
Save t
h
a
ve config
u
n
ow ready t
o
F
ile – Save
M
s
s or NetBI
o
rt ente
r
:
h
e receiver
o
r the trans
m
s
erial port t
h
set the Se
r
0
,
r
the receiv
e
h
e confi
g
u
red the C
O
o
use.
as and s
a
RFX
O
S name
a
port
m
itter port
h
at was cr
e
r
ial port sett
e
rs and 2 f
o
g
ured vi
r
O
M port (C
O
a
ve the file
X
LAN Versi
o
a
t Remote
T
e
ated in the
t
ings to:
o
r the trans
r
tual CO
M
O
M8 in this
e
on your sel
o
n 0.5
T
CP host,
previous s
t
mitter.
M
ports.
e
xample) c
o
ected locat
t
ep, COM8
o
rrectly it
w
ion.
pag
e
in this cas
e
w
ill show th
e
e
20 / 23
e
,
e
status OK
Table of contents
Popular Recording Equipment manuals by other brands

NCast
NCast Presentation Recorder Reference manual

AMX
AMX AXC-ADI Dimensional drawing

Inline
Inline CIA101 Operation manual

Fostex
Fostex CR200 Brochure & specs

Wheatstone Corporation
Wheatstone Corporation A-7000 Technical manual

Lenze AC Tech
Lenze AC Tech SMVector RS-485 LECOM Communication Module reference guide