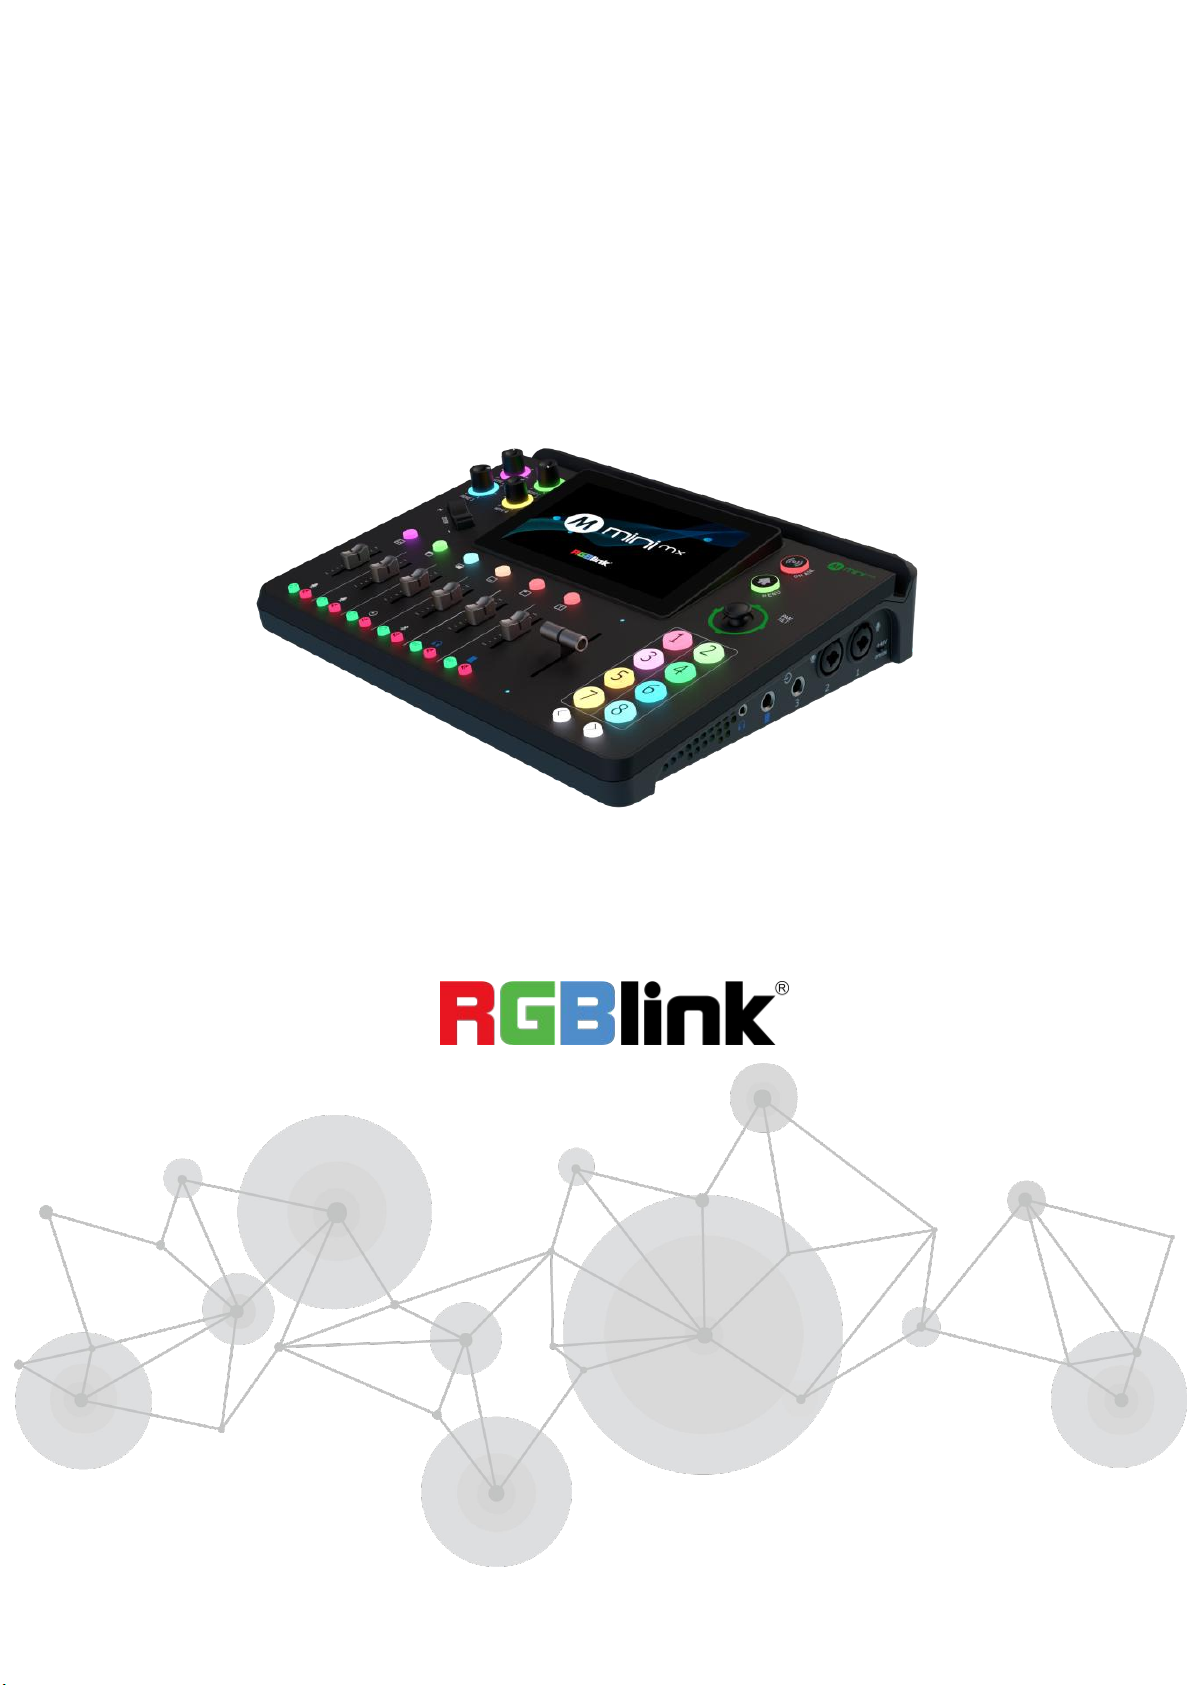
RGBlink mini-mx User manual

Quick Start
mini-mx

mini-mx Quick Start
1
Content
About Your Product ............................................................................................... 2
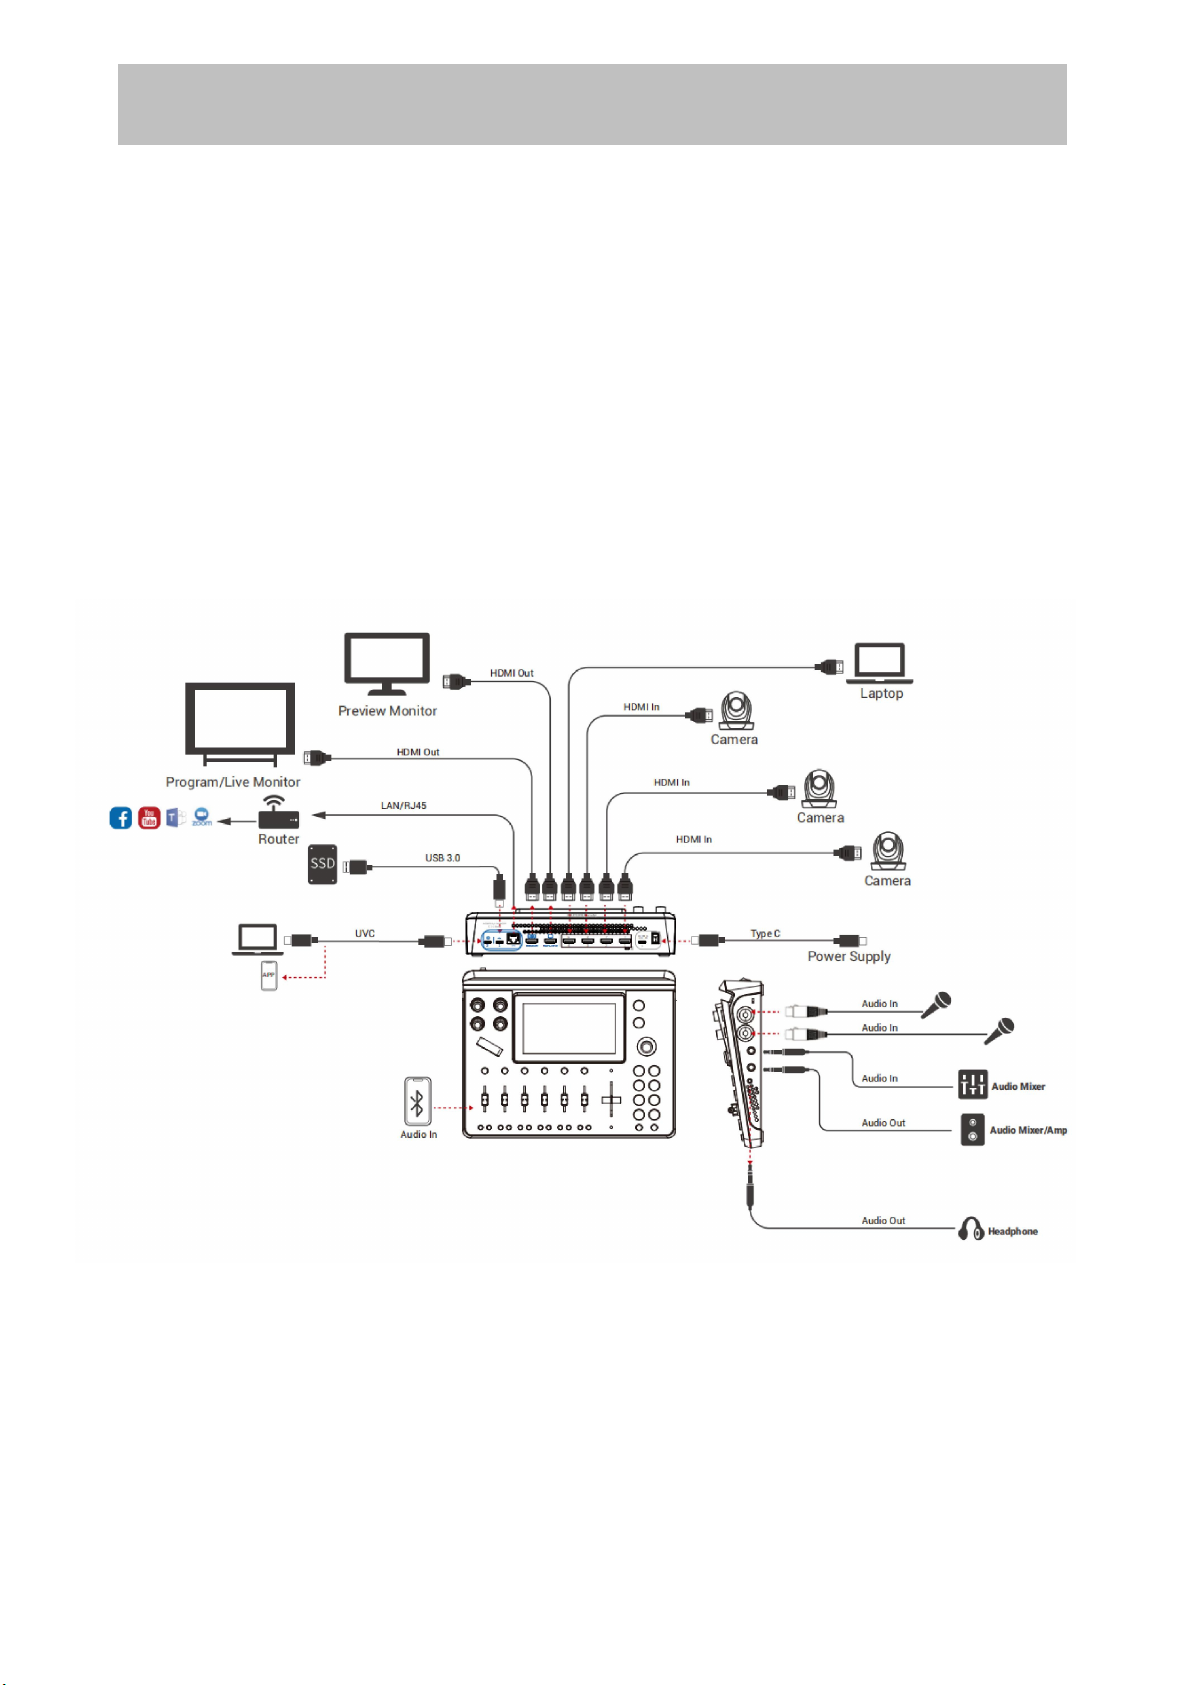
Product Overview...................................................................................................2
Key Features ...........................................................................................................3
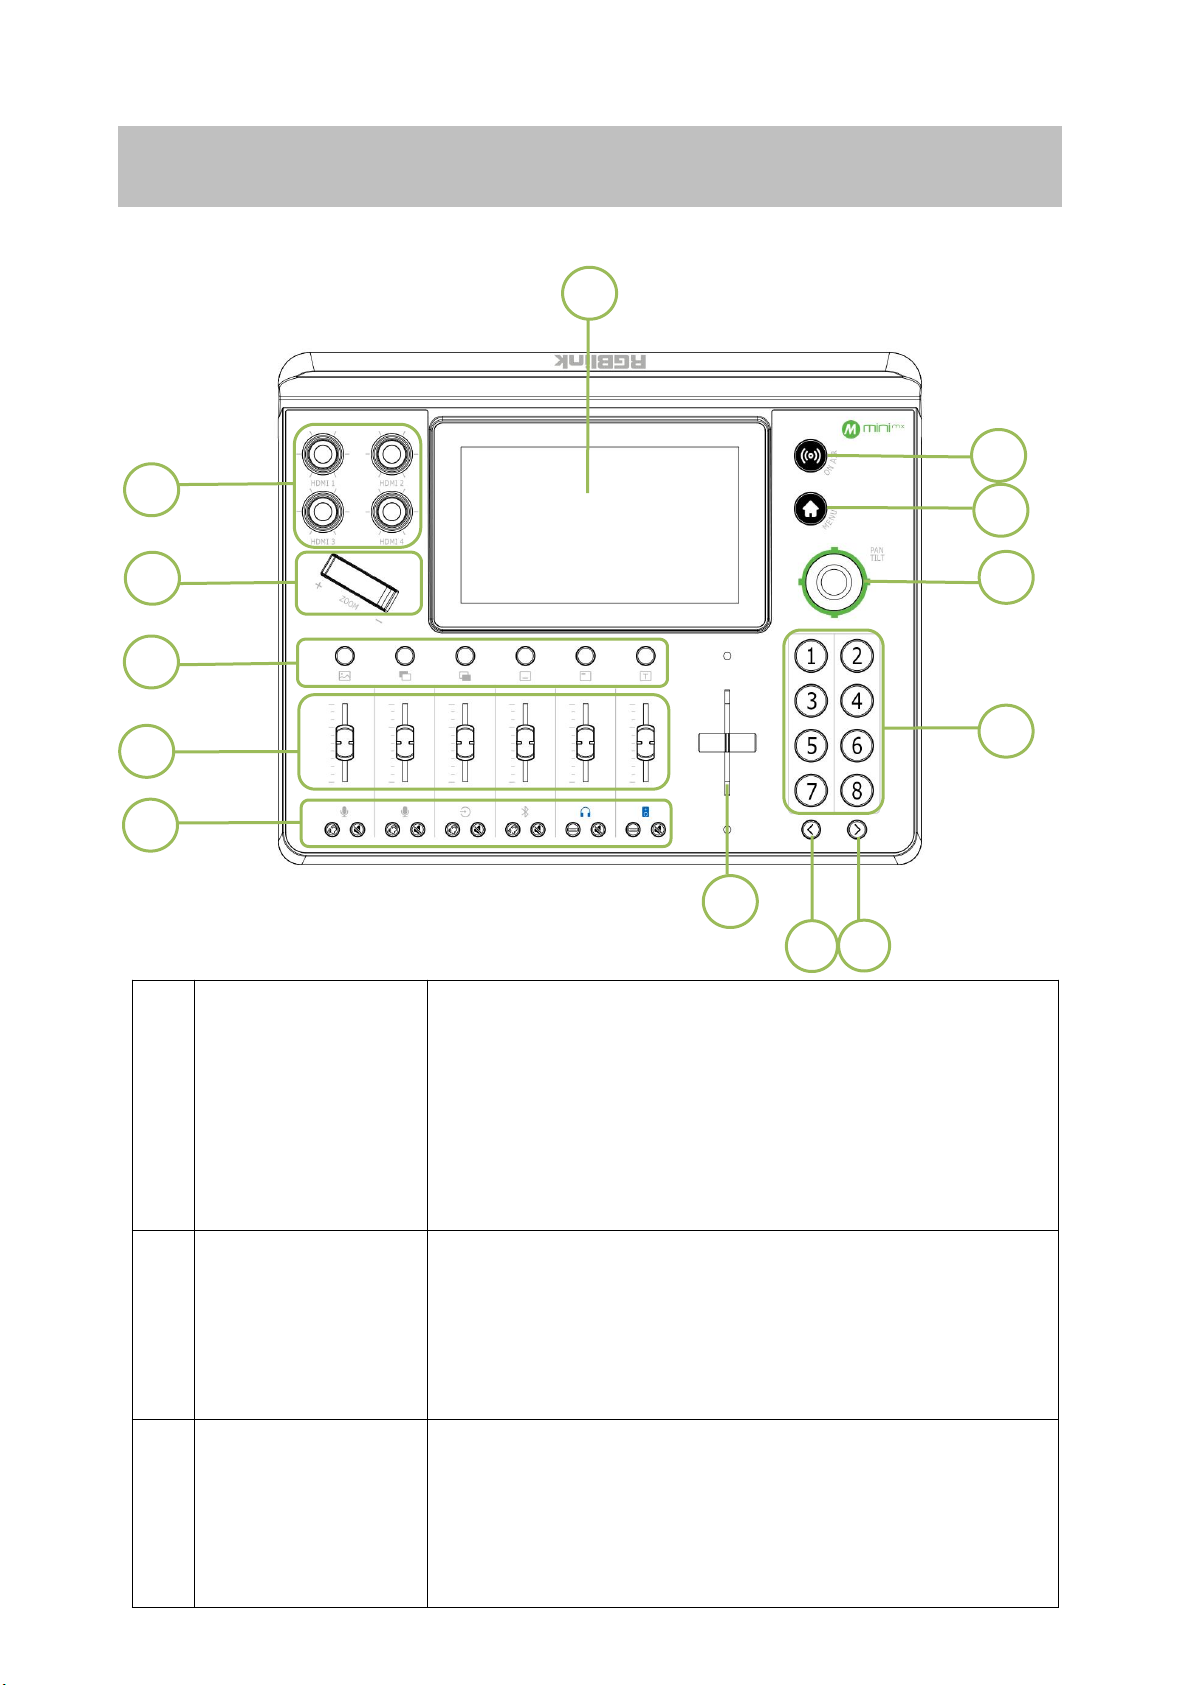
Hardware Orientation ............................................................................................4
Front Panel .............................................................................................................4
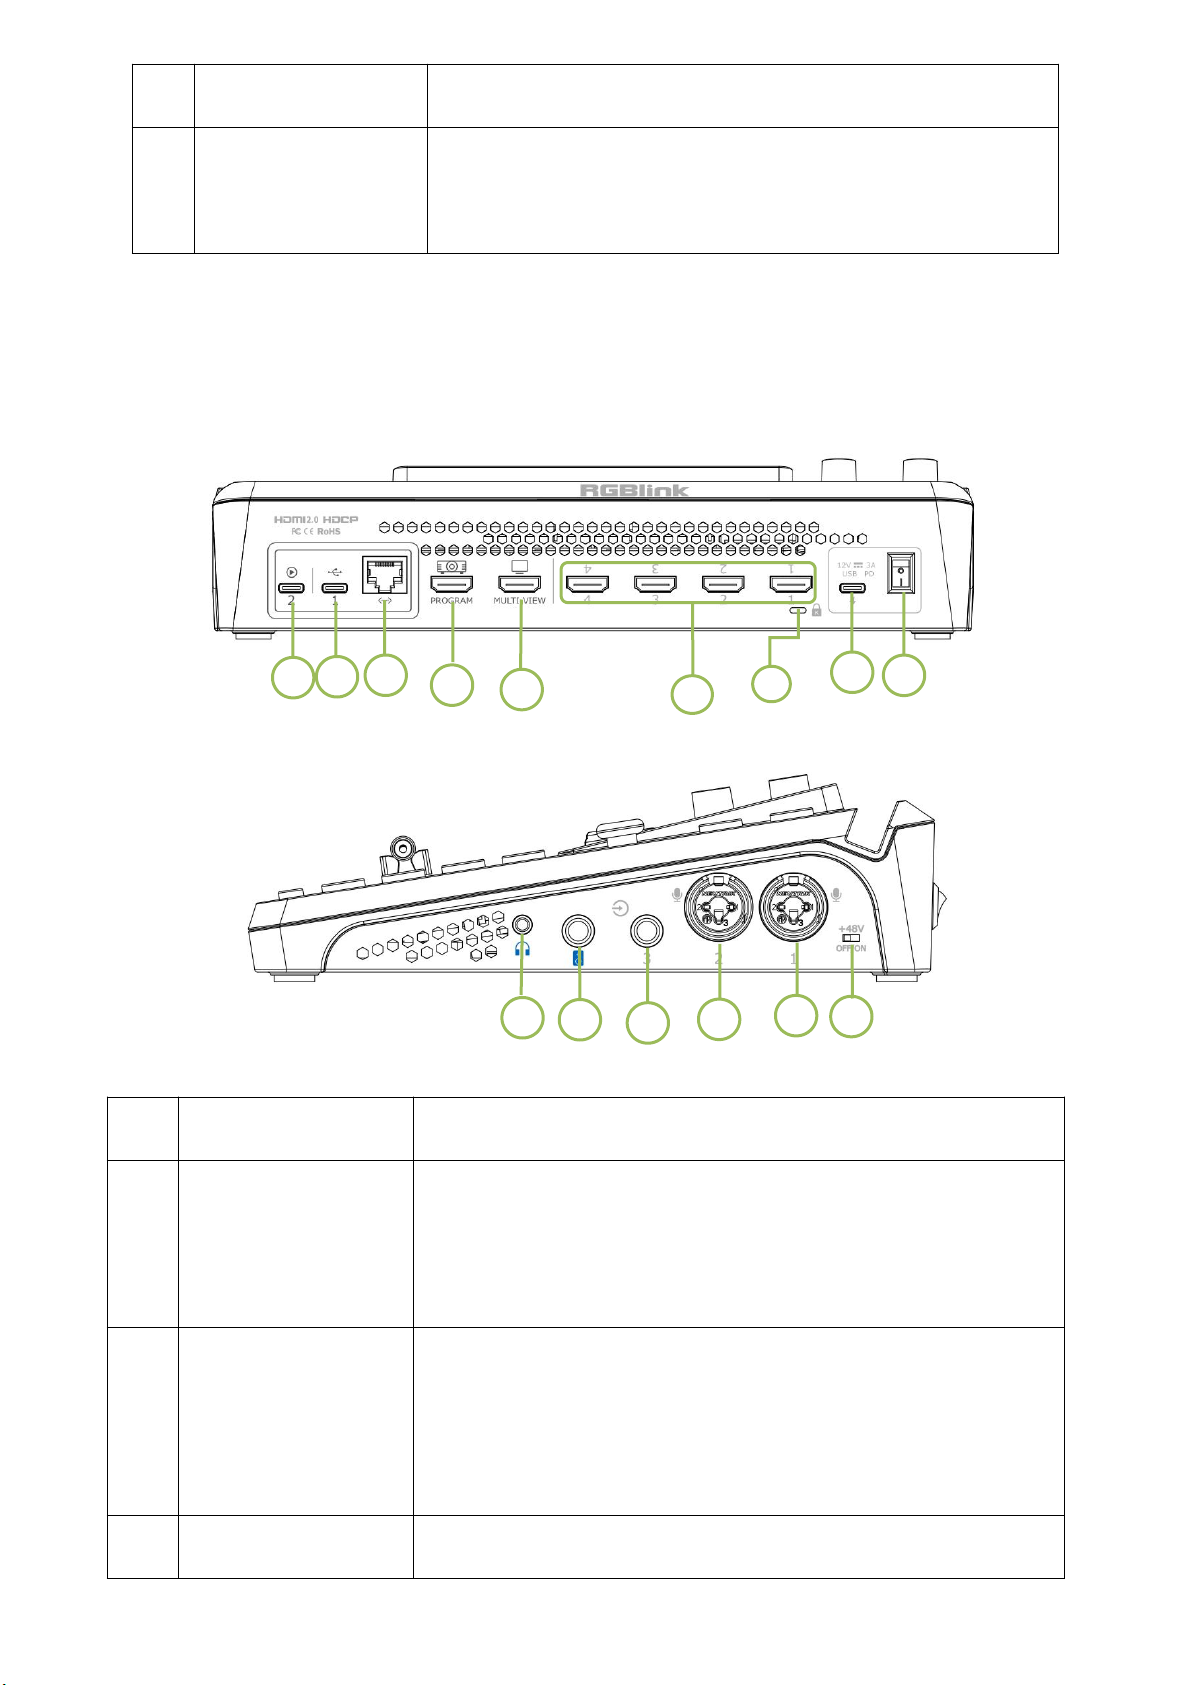
Interface Panel ....................................................................................................... 6
Dimension ..............................................................................................................8
Use Your Product ................................................................................................... 9
Standby Interface ................................................................................................... 9
Touch Screen Operation....................................................................................... 11
Switch Effect Setting .............................................................................................11
PIP ........................................................................................................................12
PTZ Control ...........................................................................................................12
Load and Save ...................................................................................................... 13
Chroma Key..........................................................................................................14
Audio Setting ........................................................................................................14
Video Output ....................................................................................................... 15
Settings ................................................................................................................ 15
Contact Information .............................................................................................17

mini-mx Quick Start
2
About Your Product
Product Overview
Mix to the max. The all-in-one mini-mx video enables accessible
professional multi-source video productions with cameras, laptops and
multiple audio sources. For live presentation and streaming, do it all with
ease from the unique and fully featured mini-mx.
mini-mx System Connection Diagram

mini-mx Quick Start
3
Key Features
● 4K multi-channel streaming video mixer
● Built-in 5.5 inch touch screen for menu operation
● Quad HDMI 2.0 inputs, resolutions up to 4K@60
● Dual HDMI 1.3 outputs for monitoring of multi-window PVW and
PGM
● Dual MIC In, Dual Audio Out for audio monitoring
● Mix for HDMI embedded and external audio
● One-key recording. Recording capacity of hard drive is up to 2T
● Stream to up to 4 platforms simultaneously over IP and 32 platforms
via TAO APP
● Support multi-layer overlay, layer scaling and cropping
● 15 switch effect modes
● 5-direction joystick for controlling up to 4 PTZ cameras
● Save and store up to 16 scene presets. One-click for preset recall
● Control via computer and software
● Support Chroma Key
● One-key quick switch between portrait and landscape screen

mini-mx Quick Start
4
Hardware Orientation
Front Panel
1
Audio Volume
Control Knob
● Embedded audio volume adjustment of HDMI 1-4
input signals. User can check audio status via touch
screen.
● Knob color adjustable.
2
Adjuster
● Zoom in/out when PTZ control is enabled.
● Adjust size of sub-picture when it is under position
and scale adjustment.
3
Layer Selection
Button
● Indicate BG, Layer A, Layer B, STILL, LOGO and
TEXT from left to right.
● Light turns blue in PVW. Light flashes in green
1
2
3
4
5
8
7
6
11
9
10
12
13

mini-mx Quick Start
5
when this layer is selected.
● Button color adjustable.
4
Channel Fader
● To control audio volume level for each channel.
● Indicate MIC1/MIC2/LINE IN/Bluetooth/PREVIEW
/PROGRAM from left to right.
5
Monitoring &
Mute Button
● Click monitoring button to switch audio to the
monitoring port.
● Click mute button to stop adding audio to PGM if it
turns red; click mute button again to add audio to
PGM if it turns green then.
6
T-Bar
● PVW and PGM views can be transitioned manually
by pushing the T-bar bidirectionally from the top to
the bottom or from the bottom to the top.
7
Page UP
● Press to return to the previous page.
8
Page Down
● Press to enter the next page.
9
Buttons 1-8
● For option selection of the right edge on the touch
screen.
● Button color adjustable.
10
5-Direction
Joystick
● Set pan, tilt, zoom for PTZ camera.
● For adjustment of layer position.
11
MENU
● Press to return to the previous menu; press and
hold to return to the main menu.
● Button color adjustable.
12
ON AIR
● Click to start or end streaming.
● Streaming status can be checked on LCD screen
through indicator light: steady red shows ON AIR;
flashing red shows unstable network ON AIR; unlit

mini-mx Quick Start
6
2
3
4
5
6
7
8
9
Interface Panel
No.
Name
Description
1
UVC (WEBCAM)
● Audio and video stream output port.
● Connect mini-mx to a laptop for instant recognition
as webcam for streaming or video conference.
2
USB-C
● Insert SSD or U disk to USB 3.0 recording output
interface for recording.
● Insert a U disk to import audio, video and pictures.
3
LAN
● Gigabit network port for web streaming, PTZ control
shows streaming is finished.
13
5.5-inch Touch
Screen
● For menu operation.
● For multi-view window monitoring.
10
11
13
12
15
14
1

mini-mx Quick Start
7
and firmware upgrade.
4
HDMI-A
(PROGRAM)
● PROGRAM output port.
5
HDMI-A
(MULTI-VIEW)
● PREVIEW output port. Multi-view output port.
MULTI-VIEW / HDMI 1/2/3/4 / PROGRAM optional.
6
1-4 HDMI IN
● 1-4 HDMI inputs to connect HDMI video sources, up
to 4K resolution and downward compatible with all
resolution.
7
Locking Hole
● Can be used with T-lock to fix the device.
8
Power Socket
● PD 12V, 3A USB-C power input.
9
Power Switch
● Rocker switch to power on or off your device.
10
3.5mm mini-Jack
● Audio Jack for PREVIEW or PROGRAM monitoring.
11
6.35mm TRS Jack
(AUDIO OUT)
● Balanced 6.35mm XLR Jack.
12
LINE IN
● Balanced 6.35mm XLR Jack to connect to mobile
phone, computer or audio console.
13
MIC IN 2
● XLR/TRS NEUTRIK MIC IN Port.
14
MIC IN 1
● XLR/TRS NEUTRIK MIC IN Port with 48V Phantom
Power supported.
15
+48V Dip Switch
● 48V Phantom Power supported.
● Defaults to OFF.

mini-mx Quick Start
8
Dimension
Following is the dimension of mini-mx for your reference:
280mm × 222.6mm × 63.5mm.

mini-mx Quick Start
9
Use Your Product
Standby Interface
No.
Area
Description
1
PREVIEW
●Show PVW (Preview) monitoring screen.
2
Layer Selection
●Indicate BG, LAYER A, LAYER B, STILL, LOGO and TEXT from
bottom to top;
●For no layer in PVW before, user can add layer by one click; layer
in green shows selected;
●For layer added in PVW before but not been selected, layer
shows in blue;
●For layer in green, tap it to close; for layer in blue, press and hold
it for 3s to close. Tap layer needed again for re-adding.
1
4
2
5
3
6

mini-mx Quick Start
10
3
PROGRAM
●Check PGM screen and output audio status;
●Streaming and recording status can be viewed with a touch.
4
Source or Preset
Selection
●Use【1】-【8】buttons on the front panel for selection;
●Use 4 windows in the upper to monitor HDMI 1-4 sources; use
【1】-【4】buttons to switch sources; use 4 windows at the bottom
for material selection. Videos, pictures can be added and saved by
using a USB flash drive.
5
Audio Status
Monitoring
●Monitor 3 analog audio inputs, 1 Bluetooth audio input and 4
HDMI inputs.
6
Icons
●To Enter MENU, Return to Standby Interface, Page up and Page
down.

mini-mx Quick Start
11
Touch Screen Operation
Switch Effect Setting
Push the MENU button and the 5.5-inch LCD
screen will quickly enter the main menu
interface. The right part of the screen
displays the main menu interface, as shown
in the right figure.
1. Click【EFFECT】or Button【1】to
enter the menu.
2. Select the effect, the root directory
icon will be replaced with the last
selected icon. 15 transition effects are
available.
8 functions are available in main menu. Push
corresponding menu icon and the LCD
screen will enter corresponding interface.

mini-mx Quick Start
12
2. There are 7 layout options can be
selected. Click Advanced Setting icon to
adjust Size, Position and ZOOM. Click
Reset to restore the value to the default
settings.
1. Click【PIP】or Button【2】to enter
the menu.
PIP
PTZ Control
2. Turn on the Enable function, select the
number of camera and then set the IP
address ( mini-mx and camera should be
in the same LAN ).
1. Click 【PTZ】or Button【3】to
enter the menu.

mini-mx Quick Start
13
3. You can adjust the zoom and focus
in the menu. The rotation angle of the
PTZ can be adjusted by the joystick,
and the focal length adjusted by the
adjuster.
1. After setting the effect, click【VIEWS】,
icon or Button 【4】to enter the
menu.
2. User can save 16 presets in total. Click
icon to save the screenshot of the
current PREVIEW scene in VIEW and click
for deletion.
Load and Save

mini-mx Quick Start
14
3. Select View to load the saved presets
directly.
Chroma Key
Audio Setting
2. User can choose to enable/disable the
function and select the background color
to be removed and make adjustments. The
size of layers can also be set via sliding the
bar.
1. Click【CHROMA KEY】or Button【5】
to enter the setting menu.
1. Click【AUDIO】or Button【6】to enter
the setting interface.
2. mini-mx supports audio output mix of
multiple channels. You can turn on/off analog
audio output and the volume can be adjusted
by Channel Fader. 10 audio columns indicate
MIC1\MIC2\LINEIN\Bluetooth\HDMI1\HDMI
2\HDMI3\HDMI4\PGM\Monitor respectively.
If the sound and the video are not
synchronous, increase or reduce the Delay
value.

mini-mx Quick Start
15
Video Output
Settings
1.Click【VIDEO OUT】or Button【7】to
enter the setting menu.
2.Choose different layout in Multi-view and
Program. Click Format to set output resolution.
3. Click【Stream】in the main interface
to import stream address and set delay
value.
4. Press 【Record】to enter the menu so
as to enable recording function and set
the quality and format. Tap Output Status
interface in the left to check Disk Info,
including capacity and remaining time.

mini-mx Quick Start
16
1. Click【SETTINGS】or Button【8】
to enter the menu.
2. There are 7 functions available for
users to select.
3. Click【Fan】for fan speed adjustment.
Four gears for you to choose from, and
you can also turn on【Auto】to achieve
automatic adjustment of the fan speed.
4. Click 【About 】to check device
information and upgrade device. Users can
also set Auto PVW time and perform
Factory Reset.
5. Click【Key Color】to set color and whole
brightness for buttons of different areas.
6. Click【Bluetooth to turn on or off Bluetooth.
Turn on Bluetooth and the interface will display
the devices that can be connected. Choose the
phone needed to be paired then play music via
Bluetooth.

mini-mx Quick Start
17
Contact Information
Warranty:
All products are designed and tested to the highest quality standard and
backed by 1 year parts and labor warranty. Warranties are effective upon
delivery date to customer and are non-transferable. RGBlink warranties
are only valid to the original purchase/owner. Warranty related repairs
include parts and labor, but do not include faults resulting from user
negligence, special modification, lighting strikes, abuse(drop/crush),
and/or other unusual damages.
The customer shall pay shipping charges when unit is returned for repair.
Headquarter: Room 601A, No. 37-3 Banshang community, Building 3,
Xinke Plaza, Torch Hi-Tech Industrial Development Zone, Xiamen, China
● Tel: +86-592-5771197
● Fax: +86-592-5788216
● Customer Hotline: 4008-592-315
● Web:
~ http://www.rgblink.com
~ http://www.rgblink.cn
Other manuals for mini-mx
7
Table of contents
Other RGBlink Music Mixer manuals