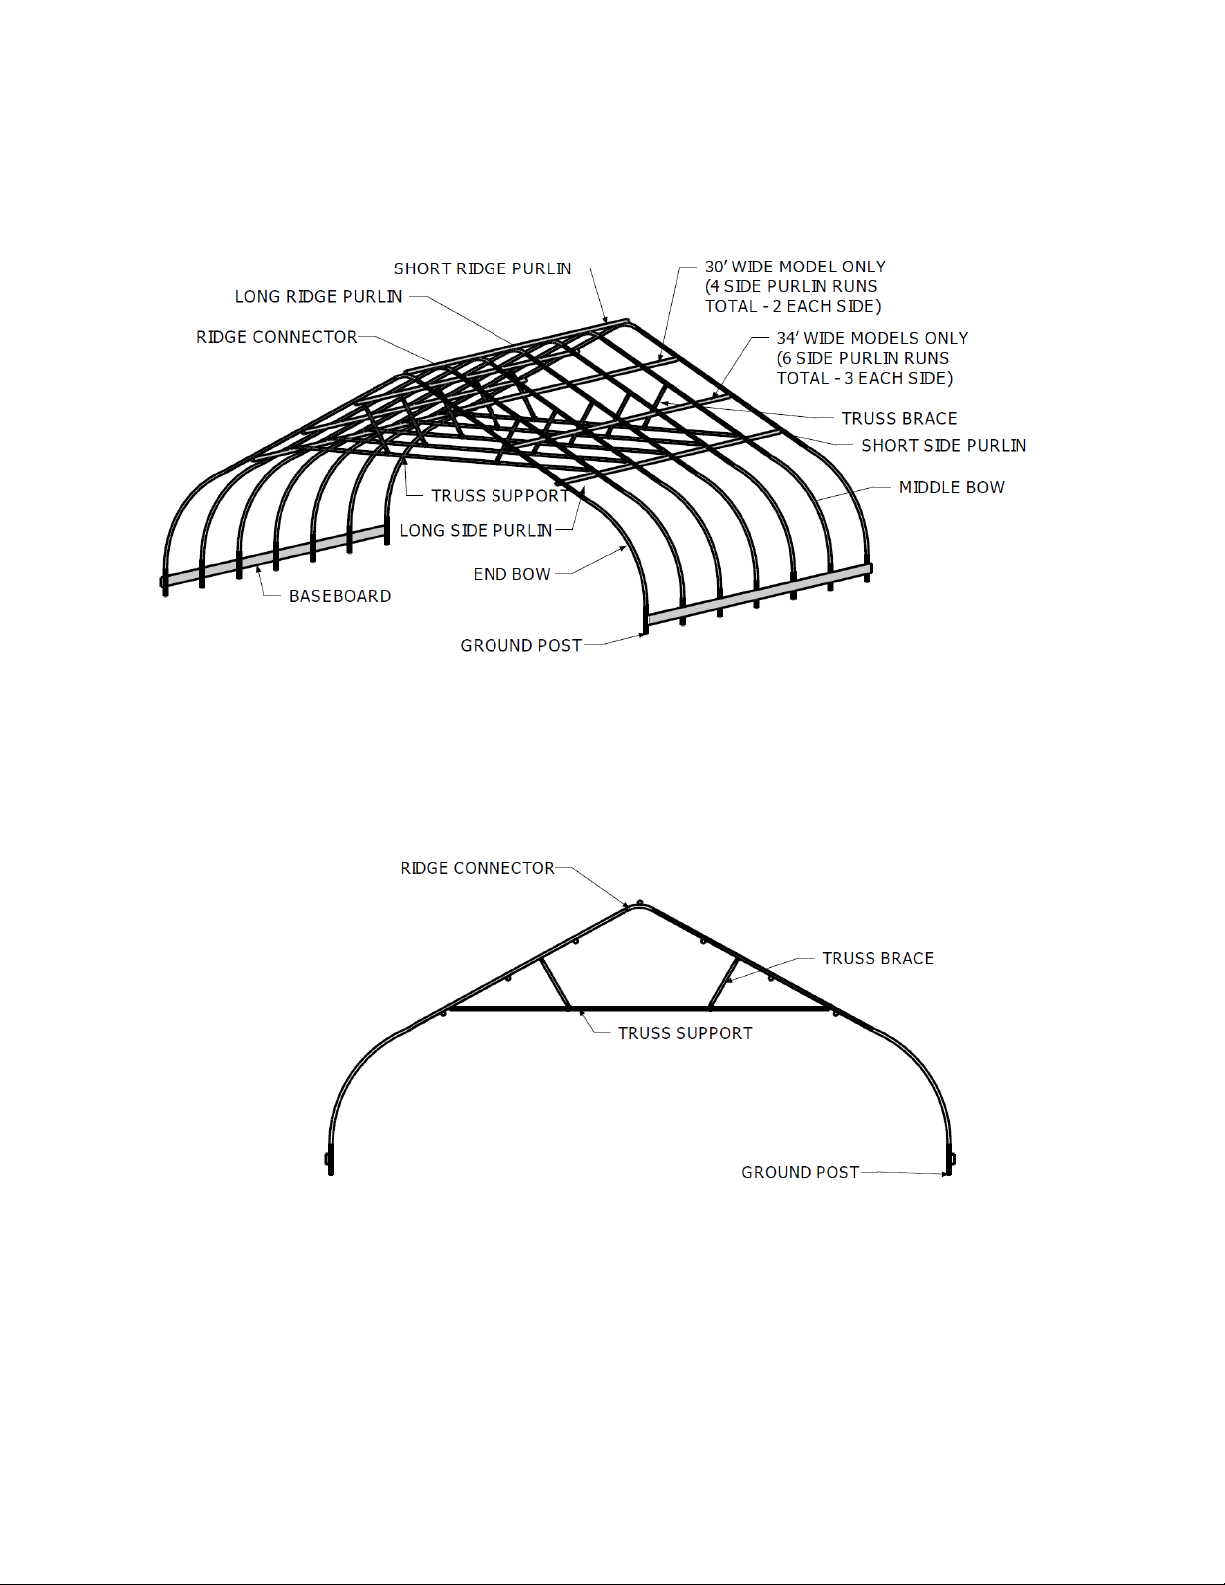
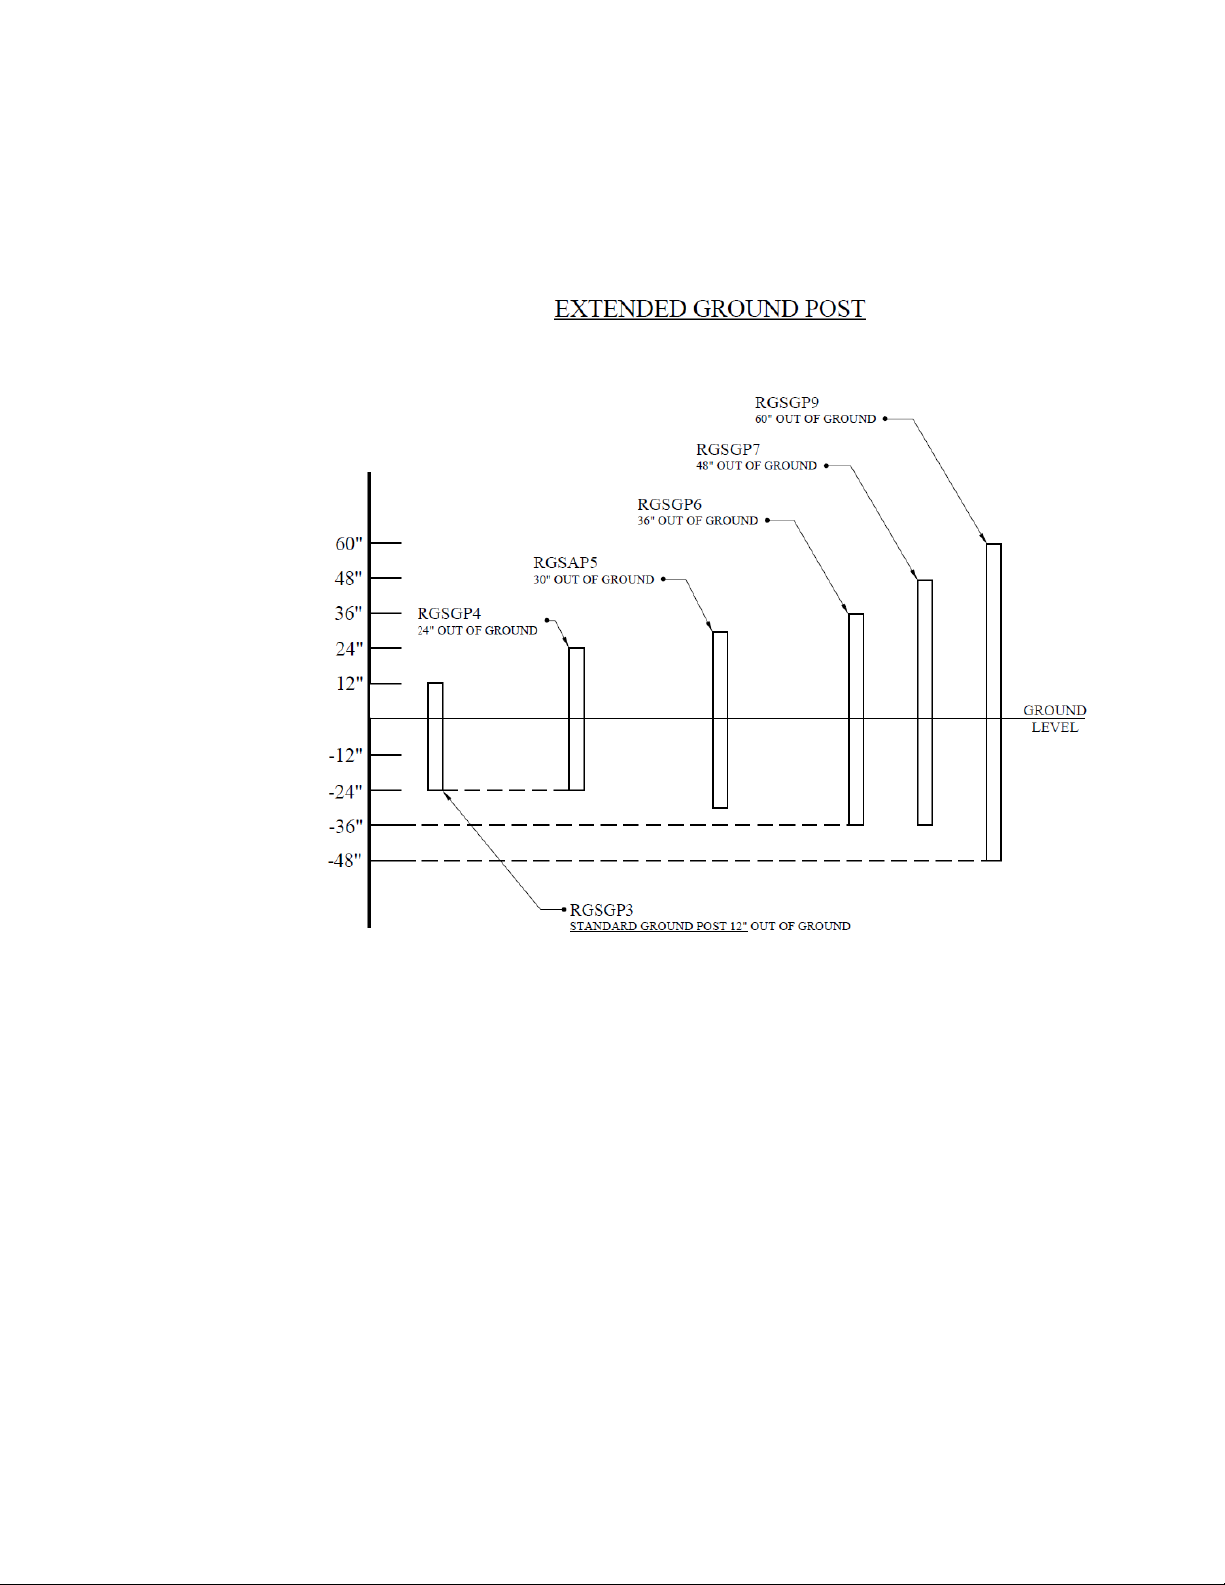
rgs Nor' Easter 20-11 Manual

Nor’ Easter Greenhouse
Installation Directions
(603)629-9004 for Customer Support
Version 20-11

Suggested Tool List
8’ step ladder
Utility knife
Clamps
4’ level
Tape measures
100’ or longer tape measure
Deep drive socket set with an adaptor for your drill
Sledge hammer
Sharpie markers
Cordless drills
Impact driver
Circular saw with wood blade if wood framed ends
Jigsaw or reciprocating saw with metal blade for polycarbonate or steel framing
Extension cords
RGS provides a care kit with a ground post driver, a 5/16” magnetic driver for tek
screws and wood-mate screws, a line level, a 3/8” drill bit and mason line
Always refer to your pick lists for parts to be used in each step of the construction
process.
READ THROUGH EACH SECTION OF THE MANUAL FIRST BEFORE YOU ENGAGE IN
THE ASSEMBLY PROCESS. THIS WILL HELP YOU FULLY UNDERSTAND THE
CONSTRUCTION PROCESS.

Illustrated Parts List


Laying Out Your Greenhouse and Installing Ground Posts
Make sure your site location is clean and level as possible. A level greenhouse is
especially important from end to end and the site must not have more than a few
inches of height difference.

If you have rocky or very hard soil, you should consider either renting a power
auger or digging a continuous trench and backfilling it with clean soil.

The tools necessary will be mason twine, a line level and the ground post driver.
To layout your ground posts, you can either use the method below, or you can set
up stringlines using batter boards. We provide a line level for you to make sure
your string lines are level, however for greenhouses 96’ or longer, we recommend
using a laser level or a transit.
This is a laser level that can easily be rented.

The depth of your ground post will be dependent upon which length that you have.
Refer to the diagram below to determine how far into the ground you will drive
your ground post.

If you have plated ground posts, refer to the diagram below for attaching the
ground posts to concrete.

Find the left rear corner of the greenhouse, and using the ground post driver and a
sledge hammer, bang the ground post into the ground. Refer to your pick list and
the diagram to determine how much of your ground post will be in the ground and
out of the ground. The bolt holes are at the top of the ground post. Make sure
your ground post is plumb, and the holes at the top of the ground post are facing
inside and outside of the greenhouse.
This is the ground post driver inserted into the ground post

Next, install the left front ground post the length of your greenhouse. The most
common lengths are typically 48’, 72’, 96’ or 144’, but your greenhouse may be a
different length. The dimensions of the greenhouse are “on center” dimensions, so
you are measuring from the center of each post to get your lengthwise
measurement.
Next, using the twine and a line level, run a string line from one ground post to the
other ground post to level. Run the string line around the holes at the top of the
ground post. Pull the twine tight to get an accurate reading. A laser line level or
transit also works very well to get an accurate reading.
Next, locate the right rear ground post widthwise from the left rear ground post to
get the widthwise measurement. Set up another string line and level the ground
post.
To get the right front ground post correct, you will need to check the
measurements of each opposite corner. The diagonal measurements of each of the
opposite corners should be within 1” of each other. By checking the diagonals, it is
squaring the greenhouse. The diagonal measurements are as follows for each
length greenhouse:

30’ wide structure 48’ = 56.6 ft. or 57’ 7” 34’ width 48’ = 58’ 10”
30’ wide structure 72’ = 78 ft. 34’ width 72’ = 79’ 7”
30’ wide structure 96’ = 100.6 ft. or 100’ 7” 34’ width 96’ = 101’ 10”
30’ wide structure 144’ = 147 ft. 34’ width 144’ = 148’
Tip: The way to determine the diagonal measurement is (A x A) + (B x B) = (C x
C). A squared plus B squared equals C squared. A is the width of the greenhouse,
B is the length of the greenhouse and C is the diagonal of the greenhouse. For
example, (30 x 30 = 900) + (48 x 48 = 2,304) = (3,204, then take the square root of
this which is 56.6 ft.)

After the 4 corners are set and the ground posts are level and plumb, you are now
ready to install the remaining ground posts. The ground posts are most commonly
located 4’ on center, but post spacing may be different if you purchased a
greenhouse with either 2’, 3’ or 6’ bow spacing. Using your long 100’ tape, measure
and mark the locations of each ground post on the string lines.
Tip: Alternatives to using the ground post driver include the following. You can
purchase a metal fence post driver from a hardware store or fence company.
These are useful when driving in taller ground posts that are 6 ft. or higher and
cost around $40. You can also rent or buy a gas-powered post driver which is the
most efficient way to install ground posts.

This is a fence post driver
This is a gas-powered post driver

If you have a ridge vent, do the following.
If not, skip this step.
On the next step, which is bow assembly, you will be attaching the bows to the
ridge connector using 5/16” carriage bolts and nuts. However, with a ridge vent, on
one side of the ridge connector, you will instead use 3/8” x 2 ¾” hex head bolt and
nut provided in the ridge vent kit. Only hand tighten. Later, you will be removing
the nut to attach a special bracket for the vent braces.
Bow assembly with truss supports & truss braces

In this step, you will assemble the half end bows (with painted ends) and half
middle bows to the ridge connector. You will then attach the truss support and
truss braces to the bow assembly. Do not completely tighten any nuts and bolts.
You will need to have some flex when installing the bow assemblies into the ground
posts.
Lay out your bows and ridge connector on a flat and clean surface. The bows will
connect to the ridge connector with an internal splice that is 8” long. See photos.
Bow Internal Splice Ridge Connector


Ridge Connector Bow

The next step will be attaching the truss support and truss braces to the bow
assembly using 5/16” x 1” carriage bolts and nuts and brace bands as shown in the
photo.
Slide (2) 2” brace bands onto each side of the bow assembly.
Next, you will assemble the two pieces of the truss support together. Truss
supports come in two separate pieces. One piece has a swedged end and one piece
has a non-swedged end.

This is what a swedge looks like.
This is the other end of the truss support
Refer to your pick list for specific lengths of each part
Table of contents
Popular Greenhouse Kit manuals by other brands

Grandio
Grandio Summit Series installation manual

Palram
Palram Mythos 6'x10' manual

Riverstone Networks
Riverstone Networks Monticello Mont-8-BK-PREMIUM Assembly instructions

Mercia Garden Products
Mercia Garden Products 04GREEN0606SD-V2 Assembly instructions

FJK home products
FJK home products HD207-R user guide

Alton
Alton EVOLUTION FOUR LT Series instruction manual