REMPLACEMENT MEMOIRE DE CAPACITÉ SUPERIEURE
Le récepteur de la version standard est équipé d’une mémoire pouvant
contenir 15 codes. Pour obtenir une mémoire de capacité supérieure,
l’installateur devra remplacer le composant standard “M” qui se trouve
dans le récepteur par un composant fourni sur demande, contenant 250
codes (code CET91070) ou 1000 codes (code CET91080).
Dans ce but, procédez de la façon suivante:
1) Mettez hors tension et sortez le récepteur du connecteur sur le
dispositif central et sélectionnez le type de mémoire que vous désirez
utiliser (pontet P1).
2) Sortez la mémoire de son socle en faisant attention a l’encoche de
référence.
3) Introduisez la nouvelle mémoire, en faisant attention a l’encoche de
référence.
4) Introduisez le récepteur dans le connecteur, puis remettez sous
tension.
5) Effectuez un effacement de tous les codes en vidant la memoire de
codes eventuellement inserrés.
6) Suivez la procédure normale de mémorisation des codes.
N.B.: Si, lorsque vous remettez en marche le récepteur, la LED reste
allumée, assurez-vous que la mémoire a été correctement
installée.
Le récepteur nécessite une antenne, sinon la portée est réduite à
quelques mètres. L’antenne doit être installée en position verticale.
On peut utiliser un contact normalement fermé (n.f.) ou normalement
ouvert (n.o.) en agissant sur le pontet, comme indiqué dans le schéma
Fig.1. Le récepteur est fourni de serie avec un contact normalement
ouvert (n.o.)
REPLACING MEMORY FOR GREATER CAPACITY
The standard version receiver is provided with a memory having a 15-
code capacity.
To increase this capacity, You should replace the standard component
“M” on the receiver with the optional 250-code (code CET91070) or 1000-
code (code CET91080) component.
To do so, follow this procedure :
1) Switch off power, extract the receiver from the connector on the control
box and select desired memory capacity (jumper P1).
2) Remove the memory module from its base, checking the reference
slot.
3) Insert the new memory module correctly with reference to the slot.
4) Insert the receiver into the connector, then switch power back on.
5) Delete all the codes from the memory.
6) Follow the normal code-memorisation process.
N.B. If the indicator LED stays “ON” when the receiver is operating,
check that the memory module has been fitted correctly.
The receiver requires an antenna; otherwise its range is reduced to a few
meters. The antenna must be installed in a vertical position as high as
possible.
Either a normally closed (n.c.) or normally open (n.o.) contact may be
used, soldering contacts, as shown in the diagram Fig.1.
The receiver is generally supplied with a normally open contact.
SPEICHERERWEITERUNG
Der Standardspeicher des Empfängers unterstützt maximal 15 Codes.
Zur Erweiterung dieser Kapazität muß der Installationstechniker das
Standard-Bauteil “M” am Empfänger durch ein Zubehörteil mit Kapazität
für 250 (Art.Nr. CET91070) oder 1000 Codes (Art.Nr. CET91080)
ersetzen.
Hierzu folgendermaßen verfahren:
1.) Spannung abtrennen, Empfängerverbinder von Steuerung abstecken
und gewünschten Speichertyp anwählen (Jumper P1).
2.) Speicher aus dem Anschlußsockel herausziehen, hierbei auf die
Bezugsmarke achten.
3.) Neuen Speicher einstecken und hierbei auf die Bezugsmarke achten.
4.) Empfänger an Verbinder anschließen und daraufhin Spannung
geben.
5.) Alle in Speicherung abgelegten Codes löschen.
6.) An dieser Stelle die normale Speicherprozedur durchführen.
Merke: Sollte die Led nach Inbetriebnahme des Empfängers weiterhin
aufleuchten, den korrekten Speichereinbau überprüfen.
Für den Empfängerbetrieb ist eine Antenne erforderlich, da die
Reichweite sonst auf wenige Meter schrumpft.
Größtmögliche Einbauhöhe der Antenne auswählen.
Empfänger sind mit Öffner ausgestattet.
Gemäß Übersicht läßt sich durch Lötung des Jumpers ein Öffner bzw.
Schließer verwenden Fig1.
FRANÇAISE DEUTSCH
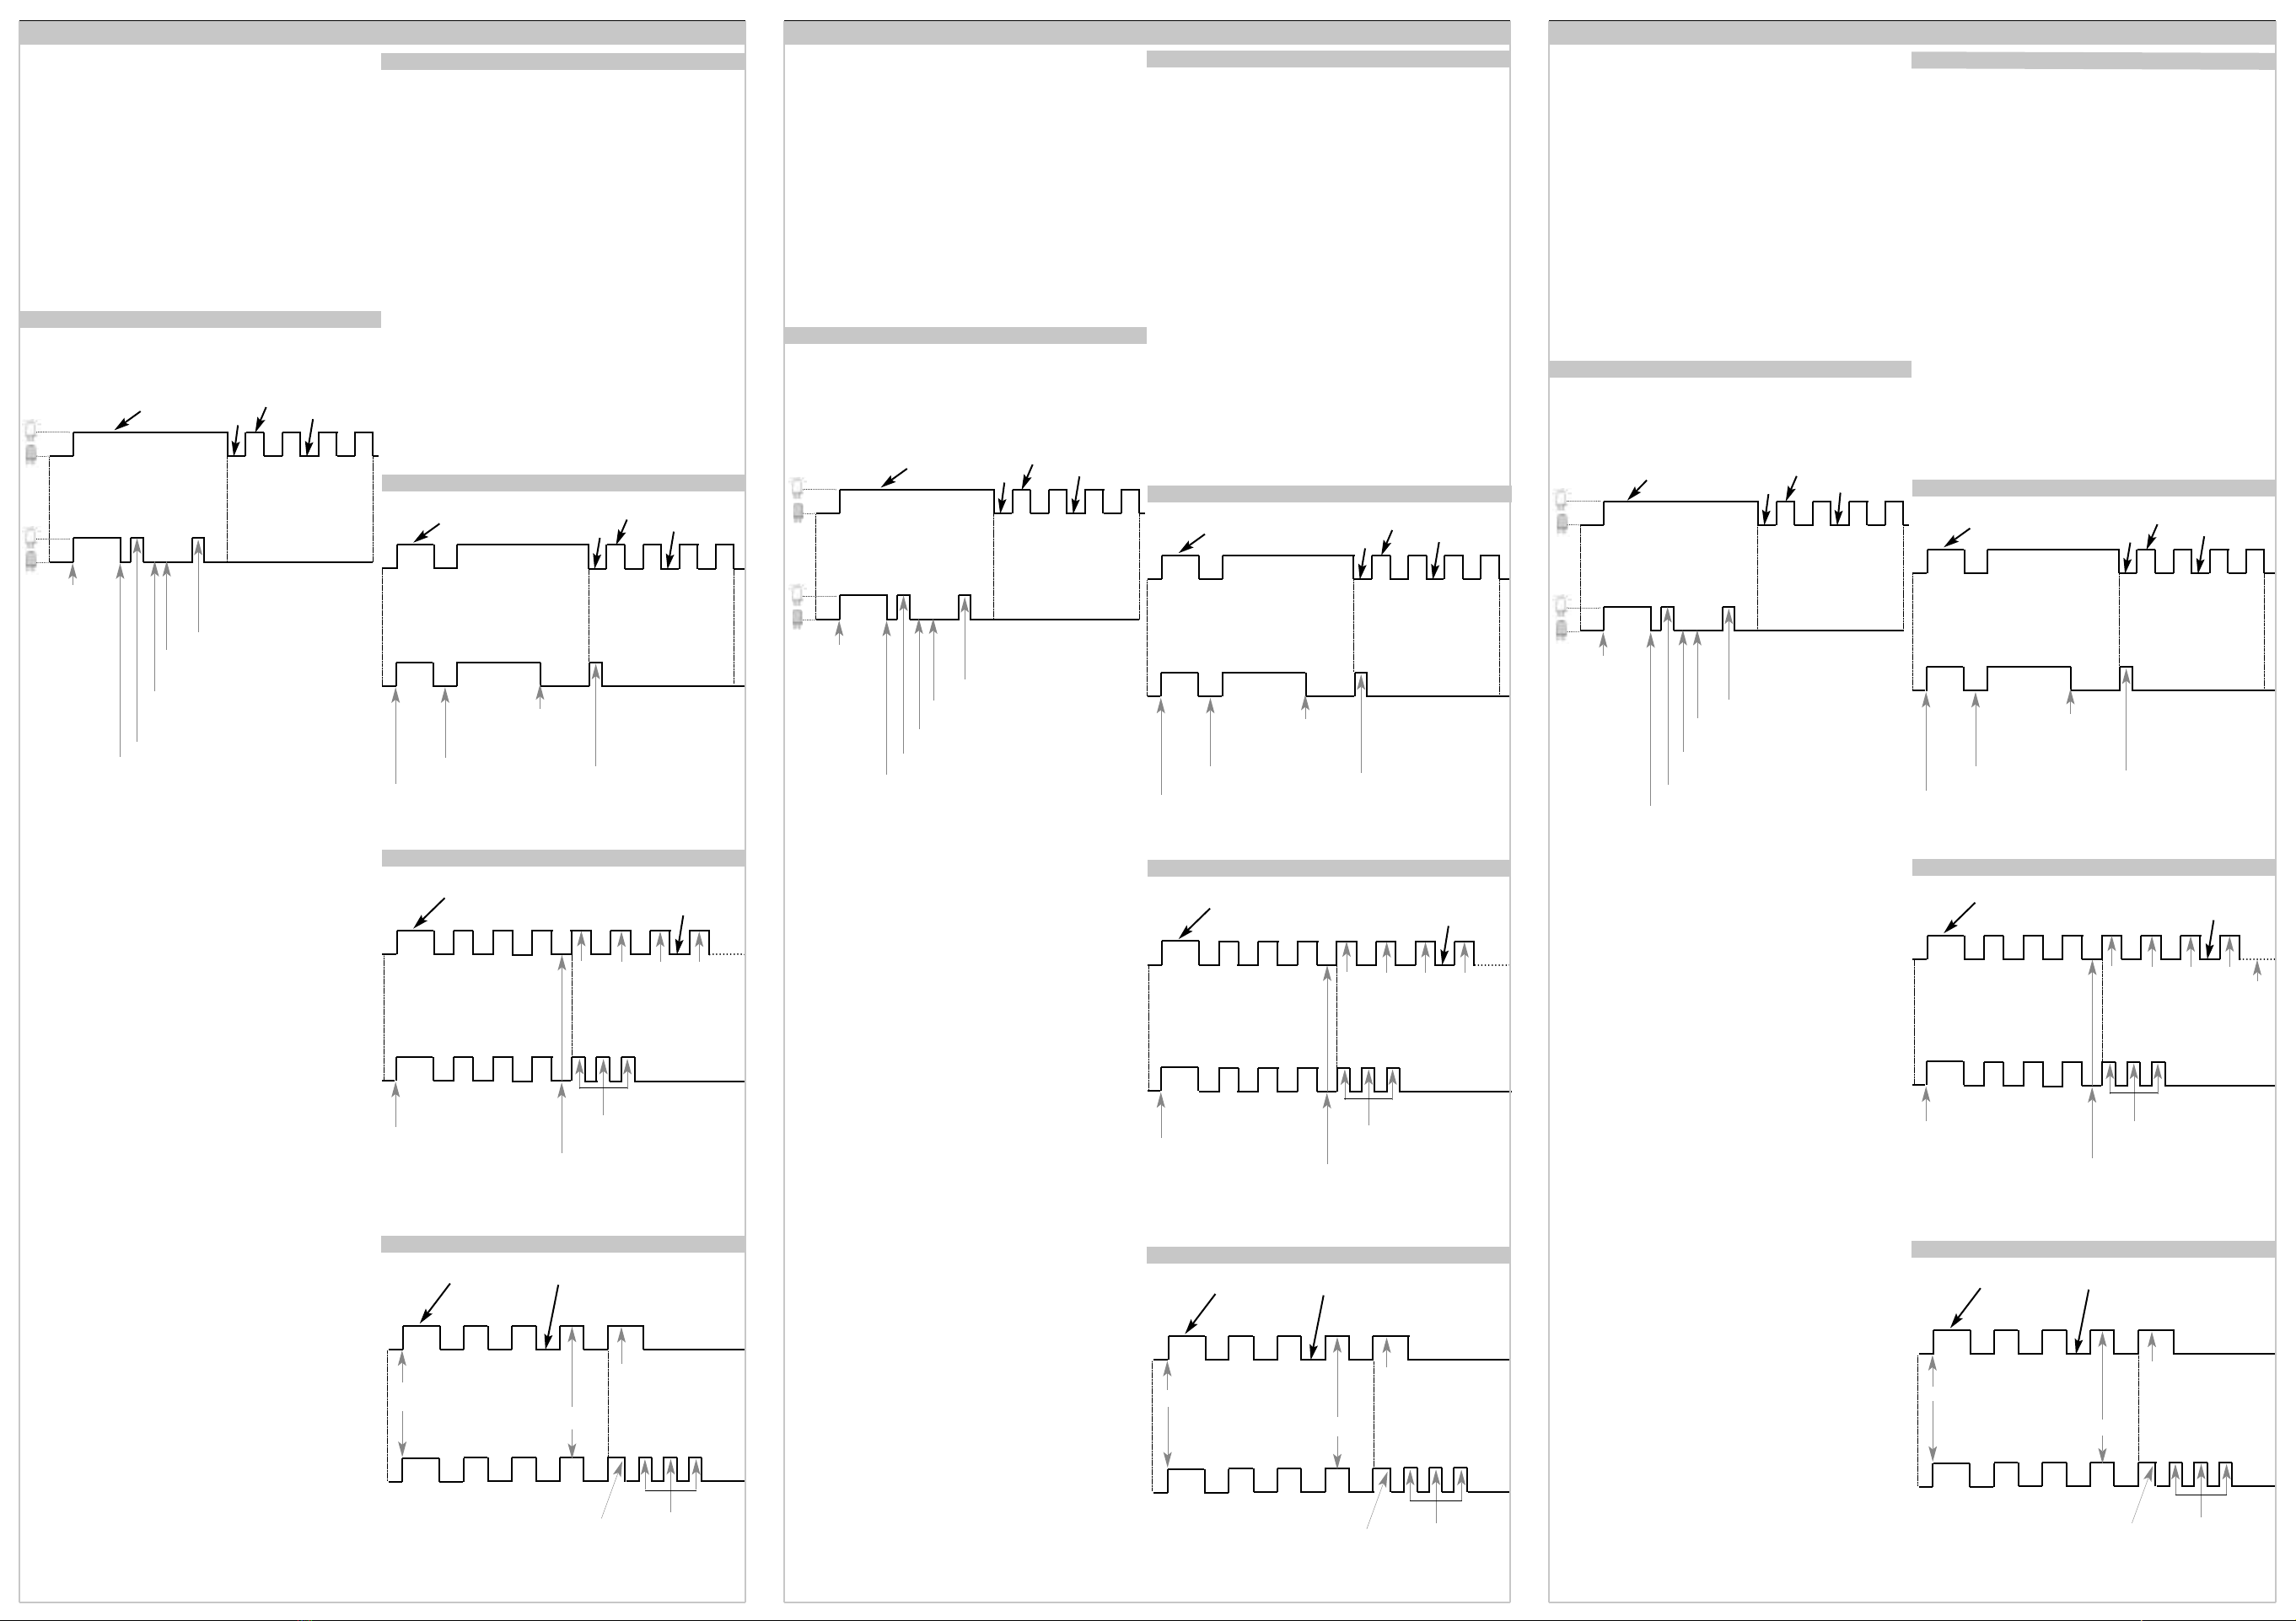
EFFACEMENT D’UN CODE RADIO
VERIFICATION DU NOMBRE DE CODES RADIO SAISIS
0,5s 0,5s Led éteinte
EFFACEMENT TOTAL DES CODES RADIO SAISIS
10s de temps utile pour
transmettre le code à
effacer avec la
télécommande Ces 4 clignotements indiquent
que le temps admis pour
l’effacement des codes est
écoulé.
Code non effacé.
Le code effacé sera
signalé par un
clignotement, si transmis.
2s
0,5s
2s
0,5s
Confirmation code effacé
Transmission du code à
effacer
Appuyer sur le poussoir P et le
mantenir enfoncé
Relâcher le poussoir
Led allumée
2s
2s
0,5s
1° 2°
etc.
Autres
codes
entrés
3°
0,5s
1° 2° 3°
Appuyer sur le poussoir P et le
mantenir enfoncé
Led allumée Led éteinte
3 flashes = Aucun code saisis
ou Mémoire vide
3 flashes = Mémoire vide
Poussoir P enfoncé un
instant
1er code
Relâcher le poussoir P apres le
3ème clignotement
2e code
3e code
4e code
2s
2s
0,5s
0,5s
1° 2°
3°
2s
0,5s
0,5s
1° 2° 3°
1° 2° 3°
Temps utile pour la pression du
poussoir P et pour effacer tous
les codes
Confirmation
d’effacement non
réussie
Relâcher le poussoir P
Appuyer sur le poussoir P
et le mantenir enfoncé
Led allumée Led éteinte
SINGLE RADIO CODE CANCELLATION
CHECK OF RADIO CODES ENTERED
0,5s 0,5s Led off
CANCELLATION OF ALL RADIO CODES ENTERED
10 second time interval to
transmit code to be
cancelled by means of
remote control 4 long flashes indicate end of
time allowed for cancellation of
single code.
Code no cancelled.
The cancelled code will
be indicated by one long
flash
2s
0,5s
2s
0,5s
Code cancellation confirmation
Code to cancel
transmitted
Keep P pressed
Release P
Led on
2s
2s
0,5s
1° 2°
etc.
Other
codes
entered
3°
0,5s
1° 2° 3°
Keep P pressed
Led on Led off
3 short flashes = No code
entered or memory empty
3 short flashes =
Memory empty
confirmation
Press P briefly
code 1
Release P after the third long flash
code 2
code 3
code 4
2s
2s
0,5s
0,5s
1° 2°
3°
2s
0,5s
0,5s
1° 2° 3°
1° 2° 3°
Time interval to press
pushbutton P and cancel
all codes
No cancel
confirmation
Release P
Keep P pressed
Led on Led off
LÖSCHEN EINES EINZELNEN FUNKCODES
ÜBERPRÜFUNG DER NUMMER DER EINGEGEBENEN CODES
0,5s 0,5sLed ausgeschaltet
VOLLSTÄNDIGES LÖSCHEN DER EINGEGEBENEN FUNKCODES
10s nutzbare Zeit für die
Übertragung des mit der
Fernbedienung zu
löschenden Codes Diese 4 Aufblinkvorgänge
signalisieren das Ende der für
die Speicherung der Codes
zugelassenen Zeit.
Code nicht gelöscht.
Der gelöschte Code wird
nach erfolgter
Übertragung durch ein
Aufblinken angezeigt.
2s
0,5s
2s
0,5s
Bestätigung des zu
löschenden Coden
Übertragung des zu
löschenden Codes
ausgeführt.
Taste P drücken und
gedrückt halten
Taste loslassen
Led eingeschaltet
2s
2s
0,5s
1° 2°
u.s.w.
Andere eingegebene
Codes
3°
0,5s
1° 2° 3°
Taste P drücken und
gedrückt halten
Led eingeschaltet Led ausgeschaltet
3 Blitzvorgänge = Kein Code
eingegeben oder Speicher leer.
3 Blitzvorgänge =
Bestätigung für leeren
Speicher
Taste P für einen
Augenblick betätigt
1. Code
Taste P nach dem 3. Aufblinkvorgang
loslassen
2. Code
3. Code
4. Code
2s
2s
0,5s
0,5s
1° 2°
3°
2s
0,5s
0,5s
1° 2° 3°
1° 2° 3°
Nutzbare Zeit zur
Betätigung von Taste P
und Löschung sämtlicher
Codes
Fehlende
Bestätigung für
Löschvorgang
Taste P loslassen
Taste P drücken und
gedrückt halten
Led eingeschaltet Led ausgeschaltet
APPRENTISSAGE DU CODE
N.B.: En cas d’erreurs dans la procédure d’utilisation du poussoir,
répéter l’opération après avoir effectué une RAZ en insérant et
désinsérant pendant 1s le cavalier.
10s de temps utile pour
transmettre le code à
mémoriser avec la
télécommande
Apprentissage du code non
effectué. Ces 4 clignotements
indiquent que le temps admis
pour la mémorisation des
codes est écoulé.
Apprentissage du code effectué.
Une impulsion successive de la
télécomande commandera le relais
temps?
250ms
250ms code appris
0,5s 0,5s
Transmission du code
250ms confirmation du code
Appuyer sur le
poussoir P et le
relâcher aussitôt.
4 s à disposition pour transmettre la
confirmation du code radio.
Led allumée Led éteinte
SIGNALISATIONS DE LA LED
1 clignotement* : Le code reçu n’existe pas parmi ceux qui ont été
mémorisés
1 Éclair** : Le code reçu a été mémorisé
2 clignotements : Le nouveau code existe déjà dans la mémoire.
2 Éclairs : Différents signaux ont été reçus, pendant la
procédure d’apprentissage. Effacer le code et le
retaper.
3 clignotements : La mémoire est saturée (15 codes maximum si
transmission standard)
3 Éclairs : Aucun code n’est enregistré dans la mémoire.
4 clignotements : Fin du délai accordé pour effectuer la procédure
d’apprentissage ou d’effacement pour un code.
4 Éclairs : La procédure d’effacement indique que vous essayez
d’effacer un code qui n’existe pas dans la mémoire.
10 Éclairs : Mémorisations bloquées
*Clignotement : Led allumée pour 0,5s
**Éclair: Led allumée pour 0,25s
RADIO CODE ACQUISITION
N.B.: In the event of errors during the pushbutton operation
procedure, repeat the operation after resetting by wiring in Jumper
for 1 second and then removing.
10 second interval to transmit
code settings by means of
remote control. 4 long flashes indicate the end
of the time available to set
codes.
Code not acquired.
Code acquisition complete, the next
pulse from the remote control
activates relay
time?
250ms
250ms code acquired
0,5s 0,5s
Code transmission
250ms code confirmed
Press P and
release immediately
4 second time interval available to transmit
Led on Led off
LED SIGNALS
1 long flash*: Code received is not present in memory.
1 SHORT FLASH**: Code received has been memorised.
2 long flashes: New code already exists in memory.
2 SHORT FLASHES: Different signals received during self-learning
procedure (repeat recording procedure) Cancel
code and re-enter.
3 long flashes: Memory saturated (max. 15 codes if standard
transmission).
3 SHORT FLASHES: No code is recorded in memory (after cancel total
memory or new receiver/circuit board).
4 long flashes: End of max. time for new-code self-learning
procedure (max. 10 secs).
4 SHORT FLASHES: During the delete procedure, indicates that code
requested for deletion does not exist in memory.
10 SHORT FLASHES:setting locked
*Long flash: Led ON for 0,5s
**Short flash: Led ON for 0,25s LERNEN DER FUNKCODES
HINWEIS: Bei Fehlern bezüglich der Verwendung der Taste ist der
Vorgang nach Ausführung eines RESETS durch Ein- und Ausrücken
der Drahtbrücke für die Dauer von einer Sekunde zu wiederholen.
10s nutzbare Zeit für die
Übertragung des mit der
Fernbedienung zu den
Speicherncodes
Diese 4 Aufblinkvorgänge
signalisieren das Ende der für
die Speicherung der Codes
zugelassenen Zeit.
Lernen des Codes nicht
ausgefürt.
Lernen des Codes ausgerführt.
Durch einen anschließenden Impuls
der Ferbedienung wird die Öffnung
geschltet.
Zeit?
250ms
250ms für Lernen des Codes
0,5s
0,5s
Übertragung des Codes
250ms für Bestätigung des Codes
Taste P drücken
und unverzüglich
loslassen
4 Sekunden verfügbare Zeit zur Übertragung der
Bestätigung des Funk-Codes
Led eingeschaltet Led ausgeschaltet
LED-MELDUNGEN
1 Aufblinken* = Ungültiges Signal.
1 Blitzvorgang** = Code gespeichert oder gelöscht je nach
angewählter Prozedur.
2 Aufblinkvorgänge = Code bereits vorhanden.
2 Blitzvorgänge = Überlagerte Funksignale bei Registrierung.
Code löschen und nochmals eingeben.
3 Aufblinkvorgänge = Speicher gesättigt (max. 15 Codes bei
Standard-Übertragung).
3 Blitzvorgänge = Speicher leer, kein Code eingegeben.
4 Aufblinkvorgänge = Ende der nutzbaren Zeit zur Speicherung oder
Löschung eines einzelnen Codes.
4 Blitzvorgänge = Versuch der Löschung eines nicht im Speicher
vorhandenen Codes.
10 Blitzvorgänge = Speicherungen gesperrt.
*Aufblinken: Led eingeschaltet für 0,5s
**Blitzvorgänge: Led eingeschaltet für 0,25s
RESET - Each time the configuration is changed, RESET the device
making ajumper between the two pins shown in the scheme.
Before feeding the receiver with power supply make sure that the
jumper used to change the power supply is set on the wished
voltage. If this is not the case carry out the instructions shown in
the scheme to select the wished voltage.
CODE LEARNING
As indicated above, each receiver recognises a given number of codes
recorded by You in its memory. The code recording procedure is called
“self-learning”.
This procedure must be activated by You using push-button “P” on the
receiver circuit board.
RESET - Chaque fois que l’on fait un changement de la
configuration effectuer un reset en faisant un pont entre les deux
pins signalés dans le schéma.
Avant d’alimenter le récepteur, controler que le cavalier de
changement de tension soit positionné sur le voltage souhaité. Se
référer au schema pour selectioner une nouvelle valeur de tension.
APPRENTISSAGE DES CODES
Le récepteur reconnaît un nombre déterminé de codes enregistrés par
vos soins dans sa mémoire utilisant la procédure appelée “auto-
apprentissage”.
Cette procédure s’effectue en agissant sur le bouton “P” qui se trouve sur
la carte du récepteur.
RESET - Bevor jeder Änderung der Konfiguration muß ein RESET
durch einen Jumper zwischen den zwei in der Zeichnung
angegeben pins durchgeführt werden.
Bevor der Empfänger beschickt wird, muss der Jumper für die
Spannungsänderung fuer die gewuenschte Spannung vorbereitet
sein. Sollte das nicht der Fall sein, wählen Sie die neue
gewuenschte Spannung wie bei Zeichnung.
CODE-ERLERNUNG
Wie bereits erwähnt, erkennt der Empfänger eine gewisse Anzahl von
Codes, die der Installationstechniker eingespeichert hat.
Die Ablegung der zulässigen Steuercodes wird als “Erlernphase”
bezeichnet.
Für diese Prozedur muß der Installationstechniker die Taste “P” auf der
Empfängerplatine drücken.
ENGLISH
Arrêter la transmission
Stop transmission die Übertragung stoppen