Ricatech RMC400 User manual

RMC400
USER MANUAL GEBRUIKERSHANDLEIDING MODE D’EMPLOI
BEDIENUNGSANLEITUNG MANUAL DE USUARIO

IMPORTANT SAFEGUARDS FOR AUDIO PRODUCTS
PLEASE READ CAREFULLY THE FOLLOWING IMPORTANT SAFEGUARDS THAT ARE APPLICABLE
TO YOUR EQUIPMENT.
1. Read Instructions - All the safety and operating instructions should be read before the appliance is
operated.
2. Retain Instructions - The safety and operating instructions should be retained for future
reference.
3. Heed Warnings - All warnings on the appliance and in the operating instructions should be adhered
to.
4. Follow Instructions - All operating and use instructions should be
followed.
5. Water and Moisture - The appliance should not be used
near water-for example, near a bathtub,washbowl, kitchen
sink,laundry tub, in a wet basement, or near a swimming
pooland the like.
6. Carts and Stands - The appliance should be used only with a
cart or stan that is recommendedby the manufacturer.
6A.An appliance and cart combination should be moved with care. Quick stops, excessive force, and
uneven surfaces may cause the appliance and cart combination to overturn.
7. Wall or Ceiling Mounting - The appliance should be mounted to a wall or ceiling only as
recommended by the manufacturer.
8. Ventilation - The appliance should be situated so that its location or position does not interfere
with-its proper ventilation.For example, the appliance should not be situated on a bed, sofa,
rug,or similar surface that may block the ventilation penings; or, placed in a built-in installation, such
as a bookcase or cabinet that may impede the flow of air through the ventilation openings.
9. Heat - The appliance should be situated away from heat sources such as radiators, heat
registers, stoves,or other appliances (including amplifiers) that produce heat.
10.Power Sources - The appliance should be connected to a power supply only of the type described in
the operating instructions or as marked on the appliance.
11.Grounding or Polarization - Precautions should be taken so that the grounding or
polarization means of an appliance is not impeded.
12.Power - Cord Protection - Power-supply cords should be routed so that they are not likely to be walked
on or pinched by items placed upon or against them, paying particular attention to cords at plugs, and the
point where they exit from the appliance.
13.Cleaning - The appliance should be cleaned only as recommended by the manufacturer.
14.This product is designed for use with the antenna attached and should not be connected to any other
external antennas.
15.Non-use Periods - The power cord of the appliance should be unplugged from the outlet when left
unused for a long period of time.
16.Object and Liquid Entry - Care should be taken so objects do not fall and liquids are not spilled into
the enclosure through openings
17.Damage Requiring Service - The appliance should be serviced by qualified service personnel when:
A. The power-supply cord of the plug has been damaged;or
B. Objects have fallen, or liquid has been spilled into the appliance;or
C. The appliance has been exposed to rain;or
D. The appliance does not appear to operate normally or exhibits a marked change inperformance; or
E.The appliance has been dropped, or the enclosure damaged.
18.Servicing - The user should not attempt to service the appliance beyond that described in
the operating instructions. All other servicing should be referred to qualified service personnel.

WARNING:
To reduce the risk of fire or electric shock, do not expose this appliance to rain or moisture.
CAUTION:
Use of controls or adjustments or performance of procedures other than those specified may result in hazardous
radiation exposure..
The lighting flash with arrowhead
symbol, within an equilateral
triangle, is intended to alert user to
the presence of uninsulated
"dangerous voltage" within the
product's enclosure that may be of
sufficient magnitude to constitute
risk of electric shock to persons.
CAUTION: TO REDUCE THE RISK OF
ELECTRIC SHOCK, DO NOT REMOVE
COVER (OR BACK). NO USER –
SERVICEABLE PARTS INSIDE. REFER
SERVICING TO QUALIFIED SERVICE
PERSONNEL.
CAUTION
RISK OF ELECTRIC SHOCK DO
NOT OPEN
The exclamation point within an
equilateral triangle is intended to
alert user to the presence of
important operating and
maintenance (servicing) instruction
in the literature accompanying the
appliance.
CAUTION
For Compact Disc Units Only:
INVISBLE LASER RADIATION WHEN OPEN AND INTERLOCK FAILED
OR DEFEATED. AVOID DIRECT EXPORSURE TO LASER BEAM.
Specification
Frequency Range : AM 530 - 1600 KHz
: FM 88 - 108 MHz
Power Supply : SWITCHING ADAPTOR AC 100-240V / DC 12V 3A
Speed : 33 1/3, 45, 78 RPM
Speaker : 3‖ 1/2‖ 4ohm 5W x 2
Replacement Needle : NP4
•DESIGN AND SPECIFICATION SUBJECT TO CHANGE WITHOUT NOTICE.
Unpacking
1 Remove packing materials from unit.
NOTE: Save all packing materials.
2 Remove plastic bag covering radio.
3 Remove AC ADAPTOR from packing.
4 Remove tie from AC ADAPTER.
5 Open lid and remove styrofoam shipping material from turntable.
6 Remove black tie-wrap from under the tone arm.
7 Remove tape and white protective needle cover by gently pulling
them towards the front of the unit.
8 Turn the TURNTABLE SUSPENSION SCREW clockwise until it is
all the way down. Do not force or over tighten it. This allows the
turntable to float on its shock absorbers.
9 Release tone arm hold down clip by gently pushing to the right.
This will unlock tone arm from its arm rest. Re-lock the hold down
clip when moving the unit to another location.

Power Source
1 Plug the AC Adaptor (output 12V 3A) of the unit into appropriate wall outlet
2 Plug the small end of the adapter into the Adaptor Jack on the back of the unit.
General
1 Make sure the unit is plugged in correctly to an AC outlet.
2 Press the POWER button to turn on the unit .
3 Once the power is turned on, press the FUNCTION button to switch between Tuner/CD/Phono/Aux.
When switching between functions, wait one second after pressing the function button before pressing it
again. This gives the unit time to load the correct information for the selected function.
Radio Operation
1 Press the FUNCTION button to set the unit to Tuner mode
2 Press the BAND button to select the desired tuning band (AM/FM).
3 Select the desired radio station by rotating Tuning knob .
4 Adjust the volume to the desired listening level.
Antenna
Antenna: for FM reception, the unit is provided with a FM WIRE ANTENNA , move the wire until the reception is
clear and with no interferences. For AM reception, the unit is provided with a directional build-in ferrite antenna.
Rotate the set to find the position in which the best reception is obtained. Do not connect the EXTERNAL FM
ANTENNA to any outside antenna.
USB Operation
Using the included software and cable, the USB connection allows you record your records onto your computer.
Follow these instructions to use the USB.
1 Insert the enclosed software CD into your computer.
2 Follow the instructions on the computer screen to install the software. If the software does not load
automatically, browse the software CD and open the "Readme.html" file. Follow the instructions on the main
menu.
3 Connect the square end of the cable to the JACK on the back of the unit.
4 Connect the other end to a USB port on your computer.
5 On your computer, open the Record Recording Software.
6 For instructions on operating the Record Recording Software, browse the software CD and open the
README.html .
Turntable Operation
1 Press the FUNCTION button to set the unit to Phono mode.
2 Set the SPEED CONTROL SWITCH to the correct speed (331/3, 45 or 78 rpm) for the selected record.
3 Use the CUE LEVER to raise the tone arm off its rest. Move the tone arm over the record and use the
cue lever to lower it to the point you want the record to start.
4 At the end of the record, the tone arm will return to its rest.
NOTE:The turntable and cassette players both operate in the same mode. Make sure the cassette player is in
STOP mode when listening to a record.
Accessory:ADAPTER FOR 45 RPM
To play the 45rpm record, place the ADAPTER on the spindle.
Playing a Cassette
1 While in Phono mode, press the STOP/EJECT button on the cassette player to open the cassette door.
2 Insert a prerecorded cassette tape into the cassette door.
3 Press the PLAY button to begin play.
4 To stop playback, press the STOP/EJECT button.
5 Press the STOP/EJECT button again to eject the cassette.

To Fast Forward or Rewind
1 While playback is stopped, press the FAST FORWARD or REWIND button to fast forward or rewind
the cassette.
2 Once the desired position is reached on the cassette, press the STOP/EJECT button.
3 Press the PLAY button to begin play.
NOTE: The cassette player plays the side of the cassette facing away from the unit. To play the other
side of the cassette, you must eject the cassette and turn it over.
Playing a CD
1 Press the FUNCTION button to set the unit to CD mode.
2 Press the EJECT button to open the CD tray. Insert a CD into the tray with the label side facing up.
3 Press the EJECT button again to close the CD tray. The display will show ―CD Load‖ for a few seconds
and playback will automatically begin.
4 To skip forwards or backwards through the tracks on a CD, press the Forward Skip or Backward Skip
buttons.
5 To fast forward or rewind through a track, press and hold the Forward Skip or Backward Skip buttons
on the control panel. Release the buttons once you reach the desired position on the track. To use the
remote to fast forward or rewind, press Forward search or Backward search one time. Once the desired
position is reached, press the button again to resume play.
Repeat Playback
1 To repeat a single track, select the desired track number and press the REPEAT button once. " Repeat
" will show on the display. Press the PLAY button and the selected track will repeat once it is finished.
2 To repeat a whole CD, press the REPEAT button twice. The display will show "Repeat All". Once the
disc is finished, it will start over again from the beginning.
3 To turn off the repeat feature, press the REPEAT button again. The repeat display will disappear from
the LCD.
Random Play
1 While playing a CD, press the RANDOM button on the remote control. ―Random‖ will show on the LCD
display. The unit will randomly select songs from the CD.
2 To cancel Random playback, press the Stop button.
Programmed Playback
1 Make sure the CD is stopped.
2 Press the PROGRAM button. ―MEMORY‖, "PGM 1" will show on the display, and ―MEMORY‖ will
flash.
3 Press the or buttons to select a desired track.
4 Press the PROGRAM button twice to store the selected track number, ―MEMORY‖ will stop flashing
now.
5 Repeat steps 3 and 4 above to program additional tracks into memory.
6 When all the selected tracks have been programmed into memory, press the CD Play/Pause button to play
the disc in the designated order.
NOTE: Maximum of 35 tracks can be programmed into memory.
Playing MP3 CD’s
This unit will play CD’s recorded in MP3 format. All the controls and functions work the same as a regular CD.
Listed below are features and instructions that are unique to playing a MP3 CD.
Folder/Album Playback
If your MP3 CD is separated into folders, follow the steps below to access the folders.
1 While the CD is stopped, press the FOLDER+ or the FOLDER- buttons to advance forward or backwards
through the folders on your disc.
2 Once the desired folder is reached, use the Forward Skip or Backward Skip buttons to select the desired
track.
3 Press the PLAY to begin playback of the selected track.
CD Information
If the MP3 CD has track information stored on it, such as artist and title, the LCD will display that information

during playback of the CD.
1 While the MP3 disc is playing, press the BAND button .
2 The CD information will start to scroll across the LCD.
3 Press the BAND button again to hide the information.
NOTE:
If the CD was recorded without any track information, UNKNOWN will be displayed when the
BAND button is pressed.
Search Play
MP3 CD’s normally contain many files. By using the search features described below, you can easily and quickly
locate albums or songs. Follow the steps below to use the search feature.
Search by File Name
1 In stop or play mode, press the FIND
to start the alphabetic and numerical search.
2 Press the FOLDER+ or the FOLDER- buttons to select the corresponding letter or number of the track you
are searching for.
3 When the desired track is found, press the PLAY to start playing the selected track.
4 To exit search mode press the FIND button until the "* " disappears from the LCD display.
Search by Folder / Album Title
1 While the CD is stopped, press the FIND twice to start to browse the album. The search icon, ALBUM
001 and its name will be shown on the display.
2 Press theFOLDER+ or the FOLDER buttons repeatedly to select the desired album.
3 Press the Forward Skip or Backward Skip buttons to select the desired folder/album.
NOTE:
The search feature will only work if the MP3 CD has information such as Folder, Artist and Song
titles already stored on the CD. This information is added at the time the CD is created and cannot be
added afterwards.
NOTE:
You cannot record MP3 CD’s with this unit. They must be created with a computer or other
device.
RANDOM PLAY
1 While playing a MP3 CD, press the RANDOM button on the remote control. ―RANDOM‖ will be on the LCD
display. The unit will randomly select songs from the MP3 CD and play them in any order.
2 To cancel Random Playback, press the STOP button.
Repeat playback
PROGRAMMED PLAYBACK
1 Press the PROGRAM BUTTON. ―MEMORY‖, ―P-01" will show on the display and ―MEMORY‖ will flash.
2 Press the FOLDER+ or FOLDER –to select an Album.
3 Press the FORWARD SKIP+ BUTTON or the BACKWARD SKIP- BUTTON to select a track.
4 Press the PROGRAM BUTTON again to store the selected track number,
5 Repeat steps 2 and 4 above to program further tracks.
6 Press the STOP BUTTON once to confirm the Program setting, ―MEMORY‖ will stop flashing.
7 Press the PLAY/PAUSE BUTTON to start programmed playback.
8 To erase the programmed sequence, press the STOP BUTTON twice. Programmed tracks will also be
erased when the CD DOOR is opened.
NOTE: A maximum of 70 tracks can be programmed to play in any order.
CD Recording Operation
Preparation
This unit is designed to record CD-R and CD-RW discs bearing the identification logo ―Compact Disc
Recordable‖ or ―CD-Rewritable‖. If CD’s do not conform to this standard, they may not record properly.
Recording Records to CD
1 Load a compatible blank CD-R or CD-RW into the unit.
2 Press the FUNCTION button to set the unit to Phono mode.
3 Set the SPEED CONTROL SWITCH to the correct speed (33 1/3, 45 or 78 rpm) for the selected record.
4 Use the CUE LEVER to raise the tone arm off its rest. Move the tone arm over the record and use the cue
lever to lower it to the point you want the recording to start.
5. Adjust the sound to the required Volume level. This cannot be done once recording has started!
6 Press the CD RECORD button . ―Record‖ will show on the LCD. The CD will begin recording.

7 Once the first side of the record is finished, press the STOP button . The display will read ―CLOSE TK‖ for
one second and then change to ―PHONO‖.
8 Turn the record over and repeat steps 4-7 to record the other side.
9 After recording is completed, press the STOP button .The display will read "CLOSE TK" for two second and
then change to "PHONO".
10 Once you have finished the recording, press the FINALIZE button button. The display will read "Finalize".
11 Once the CD has been finalized, the unit will return to Phono mode and the display will show "PHONO".
The CD is now ready for use.
NOTE: If the CD is not finalized, it will not play in any other CD player. Not all CD players are compatible
with CD-R and CD-RW’s. Check the owner’s manual for other CD players for compatibility.
Recording Cassettes to CD
1 Load a compatible blank CD-R or CD-RW into the unit.
2 Press the FUNCTION button to set the unit to Phono mode.
3 Load a pre-recorded cassette tape into the cassette player. Press to PLAY to get the cassette to the point in
which you want to start the recording.
4. Adjust the sound to the required Volume level. This cannot be done once recording has started!
5 Once the cassette is ready and playing, press the CD RECORD button ―Record‖ will flash on the LCD. The
CD will begin recording.
6 Once the first side of the cassette is finished, press the STOP button. The display will read ―CLOSE TK‖for
one second and then change to ―PHONO‖.
7 Eject the cassette tape and flip it over to the other side.
8 Repeat steps 4 and 6 to record the other side of the cassette.
9 After recording is completed, press the STOP button. The display will read ―CLOSE TK‖ for one second
and then change to "PHONO".
10 Once you have finished the recording, press the FINALIZE button. The display will read "Finalize".
11 Once the CD has been finalized, the unit will return to Phono mode and the display will show "PHONO".
The CD is now ready for use.
NOTE:If the CD is not finalized, it will not play in any other CD player. Not all CD players are compatible
with CD-R and CD-RW.s. Check the owner’s manual for other CD players for compatibility.
Manual Track Division
You can divide your recording into separate tracks if you wish. By doing this, each song will have its own
sequential track number. To do this, you must use the Split Track button.
While Recording your record or cassette, listen for the end of each song. There will usually be a brief silence
between songs. Once you are at the end of the song, press the Split Track button. The recording will then go to
the next track number by increments of one. Once the recording is finished, you can press the Forward Skip or
Backward Skip buttons to go to the beginning of each song.
Erasing a CD-RW
If using a CD-RW, you can erase the whole CD and rerecord it. Erase procedures are only possible with CD-RW
discs. It is not possible to erase or rerecord a CD-R CD. To erase a CD-RW, follow the steps below.
1 Press the FUNCTION button to set the unit to CD mode.
2 Load a recorded CD-RW into the unit.
3 Press the STOP button to stop playback.
4 Press the ERASE button . ERASE will appear on the display ,Press PLAY button to confirm and the erasing
process will begin. When finished, the display will first read ―F Done‖ and then ―BLANK‖.
5 The CD is now ready to record.
NOTE: Once a CD is erased, the contents that were on the CD cannot be retrieved.
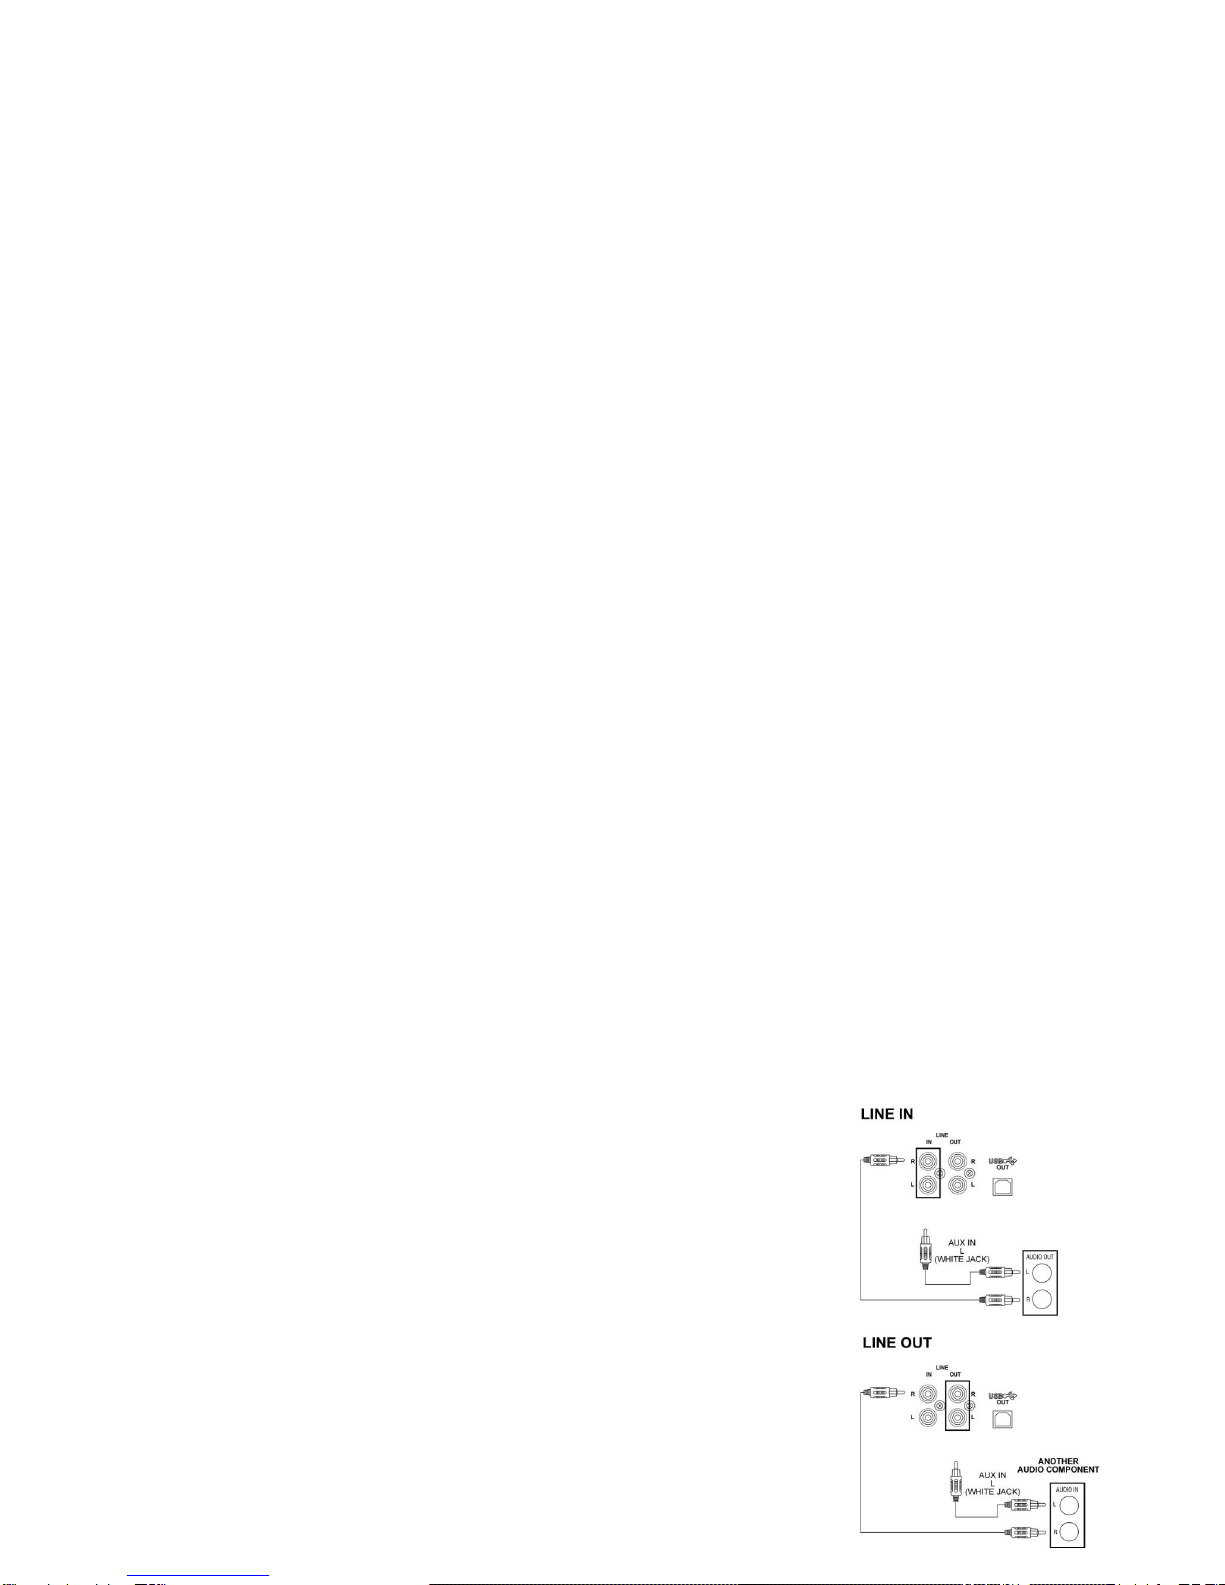
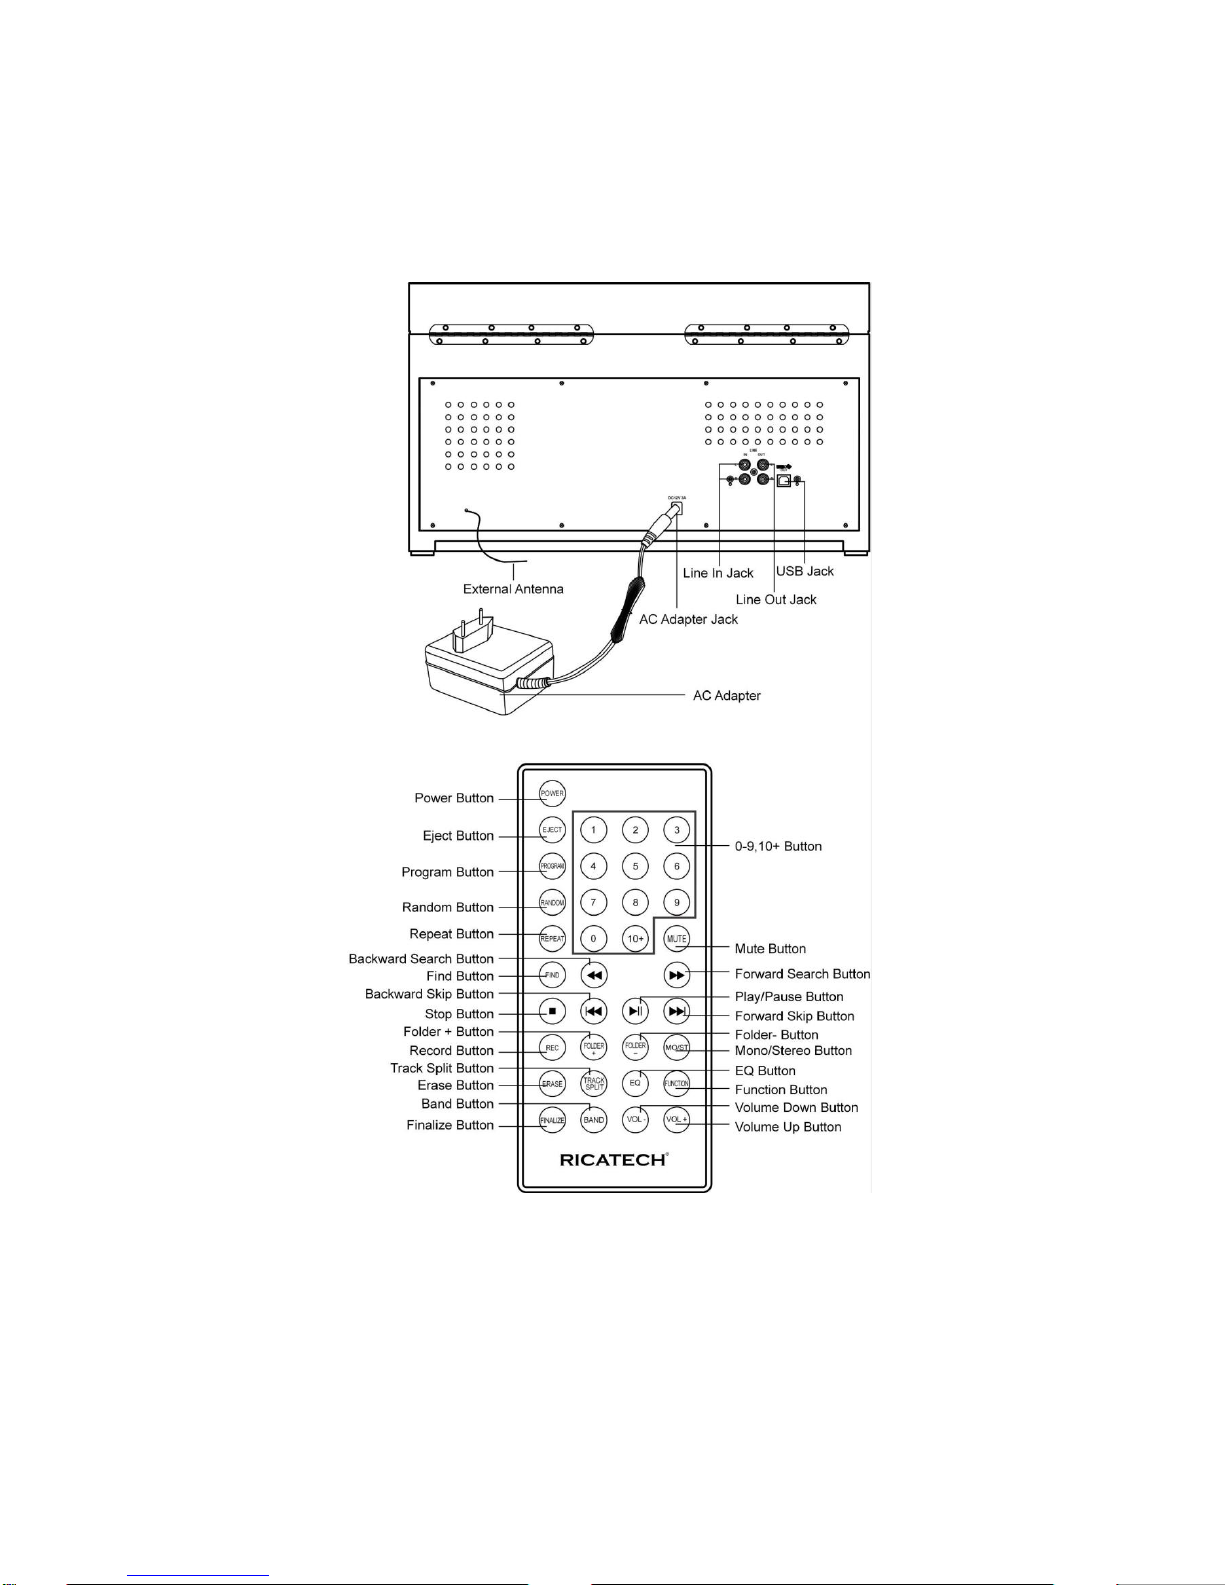
Audio Connections
LINE IN
Using the LINE IN front input jack or rear input jack will allows you to hook
up additional external audio components and listen to them through your
unit. Any component with an audio output such as a Tuner, can be
connected by using the correct cables. This unit uses 3.5mm mini pin
cable (front), standard RCA cables (back). Simply plug the connector on
3.5mm mini pin cable (front) or standard RCA cables (back). red and white
one end of the cable to the red and white Aux In jacks on the back of your
unit. The other end of the cable will plug into the Audio Output jack on the
external component. For more information on hooking up the external
component, see the owner’s manual for that component.

NOTE: If you input the signal at same time,the sound will be mix.
LINE OUT
Using the LINE OUT will allow you to run the audio from your unit into a
home stereo, television or other stereo source. To make this connection, you
will need standard RCA cables. Plug the red and white connectors on one
end of the cable into the red and white Audio Output jacks on the back of the
unit. The other end of the cable will plug into the Aux Input jacks of your
selected component. For more information on hooking up to the external
component, see the owner’s manual for that component.
NOTE: You can still listen to your unit when using the Audio Output feature
General
Troubleshooting
There is no Power
1 Make sure the power adaptor is plugged in correctly.
2 Check to see that the power button is pushed in.
There is no Sound
1 Check the volume level by turning the volume knob.
Turntable will not work
1 Make sure the unit is set to Phono mode by pressing the Function button.
2 Make sure the protective needle cover is removed.
3 Make sure the chrome Turntable Suspension Screw is screwed all the way down.
4 Check the cassette player to make sure a cassette is not playing.
CD does not play
1 Check to make sure CD is inserted correctly (label side facing up).
2 Check that the surface of the CD is clean
3 Make sure function switch is set to CD position.
4 Make sure the CD is not blank.
5 Some of the CD-R or CD/RW Discs are not compatible with other CD Players.
Use a different brand of Disc.
Will not record
1 Make sure you are using a CD-R or CD-RW CD.
2 Check that the CD is blank.
3 Try again with another disc.
Turntable has low volume
1 Remove and reinstall the stylus.

Control Locators

Control Locators

Software Notes
The USB Turntable will work with any software that supports a USB Audio Device.
Audacity is free software, distributed under the General Public License (GPL). More information, as well as open
source code and can be found on the web at http://audacity.sourceforge.net.
Audacity works on both Windows as well as Mac OS. See below for system requirements.
For Windows:
Windows version Recommended RAM/processor speed Minimum RAM/processor speed
Windows 2000, XP 512 MB/1 GHz 128 MB/300 MHz
Windows Vista Home Basic 2 GB / 1 GHz 512 MB / 1 GHz
Windows Vista Home 4 GB / 2 GHz 1 GB / 1 GHz
Premium/Business/Ultimate
For Mac:
Audacity 1.2 requires MAC OS X 10.1 or later
Audacity runs best with at least 64 MB RAM and a 300 MHz processor.
For more information, visit http://audacity.sourceforge.net
For help and tutorials, visit http://audacity.sourceforge.net/help/tutorials

Customer support
You can contact the Ricatech customer service when you have a question or a problem with your Ricatech
product. You can contact us by telephone and email.
Email
For customer support by email, please sent a email to
[email protected] Please make sure that you mention the model number and serial number of the product,
mention your name & address and describe your question or problem clearly.
Telephone
For customer support by telephone, please dial +32 3 3265694. One of our service staff will be ready to serve
you. For full procedure please visit the website of Ricatech at: www.ricatech.com
Ricatech B.V.
Cornusbaan 1
2908 KB Capelle a/d IJssel
The Netherlands

Nederlands
BELANGRIJKE VOORZORGSMAATREGELEN VOOR
AUDIOPRODUCTEN
LEES AANDACHTIG DE VOLGENDE BELANGRIJKE VOORZORGSMAATREGELEN DIE VAN TOEPASSING
ZIJN OP UW APPARATUUR.
1. Instructies lezen - Alle veiligheids - en bedieningsinstructies moeten worden gelezen voordat het
apparaat wordt gebruikt.
2. Instructies bewaren - De veiligheids- en bedieningsinstructies moeten worden
bewaard voor raadpleging in de toekomst.
3. Aandacht besteden aan waarschuwingen - Alle waarschuwingen op het apparaat
en in de bedieningsinstructies moeten in acht worden genomen.
4. Instructies opvolgen - Alle bedienings- en gebruiksinstructies moeten worden
opgevolgd.
5. Water en vocht - Het apparaat mag niet worden gebruikt in de buurt van water,
bijvoorbeeld nabij een badkuip, wasbak, gootsteen, wastobbe, in een vochtige kelder
of nabij een zwembad en dergelijke.
6A. Karretjes en staanders - Het apparaat mag alleen worden gebruikt met een karretje of staander
aanbevolen door de fabrikant.
6A.Een apparaat op een karretje moet voorzichtig worden verplaatst. Bruusk stoppen, overmatige
kracht en oneffen oppervlakken kunnen het karretje met apparaat doen omkantelen.
7. Wand- of plafondbevestiging - Het apparaat mag aan een wand of plafond alleen worden
bevestigd volgens de aanbevelingen van de fabrikant.
8. Ventilatie - De plaats en de stand van het apparaat mogen correcte ventilatie niet belemmeren.
Het apparaat mag bijvoorbeeld niet op een bed, sofa, vloerkleed of dergelijk oppervlak worden
geplaatst aangezien de ventilatieopeningen kunnen worden geblokkeerd; en evenmin in een
ingebouwde installatie zoals een boekenrek of kast aangezien de luchtstroom door de
ventilatieopeningen kan worden belemmerd.
9. Warmte - Het apparaat moet verwijderd zijn van warmtebronnen zoals radiators, warmteregisters,
kachels of andere toestellen (inclusief versterkers) die warmte produceren.
10. Voedingsbronnen - Het apparaat mag alleen worden aangesloten op een voeding van het type
beschreven in de bedieningsinstructies of aangegeven op het apparaat.
11. Aarding of polarisatie - Er moeten voorzorgsmaatregelen worden genomen zodat de middelen
voor aarding of polarisatie van een apparaat niet worden belemmerd.
12. Voeding - Netsnoerbescherming –Netsnoeren moeten zodanig worden geleid dat de kans om
erop te trappen of ze te knellen met voorwerpen die erop of ertegen staan minimaal is, met
bijzondere aandacht voor netsnoeren aan stekkers en op de plaats waar ze het apparaat verlaten.
13. Reiniging - Het apparaat mag alleen worden gereinigd volgens de aanbevelingen van de
fabrikant.
14. Dit product is ontworpen voor gebruik met de bevestigde antenne en mag niet worden
aangesloten op andere externe antennes.
15. Perioden van niet gebruik - Het netsnoer van het apparaat moet uit het stopcontact worden
getrokken wanneer het apparaat lange tijd niet wordt gebruikt.
16. Voorwerpen en vloeistoffen in het apparaat - U dient voorzichtig te zijn dan er geen
voorwerpen vallen of vloeistoffen worden gemorst in de behuizing via openingen
17. Schade die onderhoud vereist - Het apparaat moet door gekwalificeerd onderhoudspersoneel
worden onderhouden wanneer:
A. Het netsnoer van de stekker beschadigd is; of
B. Voorwerpen zijn gevallen of vloeistoffen zijn gemorst in het apparaat; of
C. Het apparaat werd blootgesteld aan regen; of
D. Het apparaat niet normaal lijkt te werken of de prestaties opvallend zijn gewijzigd; of
E. Het apparaat is gevallen, of de behuizing beschadigd is.
18.Onderhoud - De gebruiker mag niet proberen onderhoud van het apparaat uit te voeren behalve
het onderhoud beschreven in de bedieningsinstructies. Alle andere onderhoudswerkzaamheden
moeten worden uitgevoerd door gekwalificeerd onderhoudspersoneel.

OPGELET:
Het gebruik van de bediening of aanpassingen of prestaties van procedures andere dan deze hier opgegeven
kunnen leiden tot gevaarlijke blootstelling aan straling.
Specificaties
Frequentiebereik : AM 530 - 1600 KHz
: FM 88 - 108 MHz
Voedingsbron : OMSCHAKELINGSADAPTER AC 100-240 V / DC 12 V 3 A
Snelheid : 33 1/3, 45, 78 TPM
Luidspreker : 3‖ 1/2‖ 4 ohm 5 W x 2
Vervangingsnaald : NP4
•ONTWERP EN SPECIFICATIES ONDERHEVIG AAN WIJZIGINGEN ZONDER VOORAFGAANDE
KENNISGEVING.
Uitpakken
1 Verwijder de verpakkingsmaterialen van het apparaat. OPMERKING: Bewaar al het verpakkingsmateriaal.
2 Verwijder de plastic zak die de radio bedekt.
3 Neem de AC-ADAPTER uit de verpakking.
4 Verwijder de kabelbinder van de AC-ADAPTER.
5 Open het deksel en verwijder het piepschuimen verpakkingsmateriaal van de platenspeler.
6 Verwijder de zwarte kabelbinder onder de pick-uparm.
7 Verwijder de tape en witte naaldbescherming door ze voorzichtig naar de voorzijde van het apparaat te
trekken.
8 Draai de DRAAITAFELSUSPENSIESCHROEF met de klok mee totdat deze helemaal beneden is.
Forceer het niet of maak het niet te stevig vast. Dit stelt de platenspeler in staat om op zijn schokdempers te
zweven.
9 Laat de toonarm-neerdrukker los door voorzichtig naar rechts te drukken. Hierdoor wordt de toonarm
losgemaakt van zijn armsteun. Vergrendel de neerdrukker opnieuw wanneer u het apparaat naar een andere
locatie brengt.
OPGELET
Alleen voor Compact Disc-
apparaten:
ONZICHTBARE LASERSTRALING WANNEER OPEN EN WANNEER
VERGRENDELING MISLUKT OF WORDT VERIJDELD. VERMIJD
DIRECTE BLOOTSTELLING AAN LASERSTRAAL.
Het symbool van de bliksemflits
met pijlkop, in een gelijkzijdige
driehoek, is bedoeld om de
gebruiker attent te maken op de
aanwezigheid van niet-geï-
soleerde ―gevaarlijke spanning‖ in
de behuizing van het product die
zo hoog kan zijn dat ze gevaar
voor een elektrische schok
betekent voor personen.
OPGELET: OM HET GEVAAR VOOR EEN
ELEKTRISCHE SCHOK TE
VERMINDEREN, BEHUIZING (OF
ACHTERKANT) NIET VERWIJDEREN. GEEN
DOOR DE GEBRUIKER TE
ONDERHOUDEN ONDERDELEN AAN DE
BINNENKANT. LAAT ONDERHOUD OVER
AAN GEKWALIFICEERD
ONDERHOUDS- PERSONEEL.
Het uitroepteken in een
gelijkzijdige driehoek is be-
doeld om de gebruiker attent
te maken op de
aanwezigheid van een
belangrijke instructie voor
bediening en onderhoud
(service) in de documentatie
bij het apparaat.

Voedingsbron
1 Sluit de AC-adapter (12 V 3 A-uitgang) van het apparaat aan op een geschikt stopcontact
2 Steek het smalle uiteinde van de adapter in de adapteraansluiting aan de achterzijde van het apparaat.
Algemeen
1 Zorg ervoor dat het apparaat correct is aangesloten op het stopcontact.
2 Druk op de STROOM-knop om het apparaat in te schakelen.
3 Eens de stroom is ingeschakeld, druk op de FUNCTIE-knop om te wisselen tussen Tuner/CD/Phono/Aux.
Wanneer u overschakelt tussen functies, wacht een seconde nadat u op de FUNCTIE-knop heeft gedrukt
voordat u deze opnieuw indrukt. Dit geeft het apparaat de tijd om de correcte informatie voor de geselecteerde
functie te laden.
Bediening van de radio
1 Druk op de FUNCTIE-knop om het apparaat in Tuner-stand te zetten
2 Druk op de BAND-knop om de gewenste golfband (AM/FM) te selecteren.
3 Selecteer de gewenste radiozender door aan de afstemknop te draaien.
4 Stel het volume in op het gewenste luisterniveau.
Antenne
Antenne: voor FM-ontvangst is het apparaat uitgerust met een FM-DRAADANTENNE, verplaats de draad tot de
ontvangst zuiver en zonder storingen is. Voor AM-ontvangst is het apparaat uitgerust met een ingebouwde
ferrietstaaf-richtingsantenne. Draai het toestel om de positie met optimale ontvangst te vinden. Sluit de
EXTERNE FM-ANTENNE niet aan op een buitenantenne.
USB gebruiken
Met gebruik van de meegeleverde software en kabel laat de USB-verbinding u toe uw platen op uw computer op
te nemen. Volg deze instructies om USB te gebruiken.
1 Plaats de meegeleverde software CD in uw computer.
2 Volg de instructies op het scherm om de software te installeren.Als de software niet automatisch laadt, blader
dan door de software CD en open het "Readme.html"-bestand. Volg de instructies in het hoofdmenu.
3 Steek het vierkante uiteinde van de kabel in de AANSLUITING aan de achterzijde van het apparaat.
4 Sluit het andere uiteinde aan op een USB-poort van uw computer.
5 Open de software voor plaatopname op uw computer.
6 Voor instructies over de bediening van de software voor plaatopname, blader in de software CD en open
README.html.
Bediening van de draaitafel
1 Druk op de FUNCTIE-knop om het apparaat in Phono-stand te zetten.
2 Zet de TOERENTALSCHAKELAAR op het correcte toerental (331/3, 45 of 78 tpm) voor de geselecteerde
plaat.
3 Gebruik de OPTILHENDEL om de pick-uparm van de armsteun te tillen. Breng de toonarm boven de plaat en
laat hem met de toonarmhendel neer op het punt waar u het afspelen van de plaat wilt starten.
4 Aan het einde van de plaat keert de toonarm automatisch terug naar de armsteun.
OPMERKING:De draaitafel- en cassettespelers werken beiden in dezelfde stand. Zorg ervoor dat de cassette
speler in STOP-stand is tijdens het beluisteren van een plaat.
Accessoire:ADAPTER VOOR 45 TPM
Om een 45tpm-plaat af te spelen, plaats de ADAPTER op de spil.
Een cassette afspelen
1 Terwijl het apparaat in Phono-stand staat, druk op de STOP/UITWERPEN-knop op de cassettespeler om de
cassettedeur te openen.
2 Steek een vooraf opgenomen cassette in de cassettedeur.
3 Druk op de AFSPELEN-knop om de weergave te starten.
4 Druk op de STOP-knop om de weergave te stoppen.
5 Druk nogmaals op de STOP/UITWERPEN-knop om de cassette uit te werpen.

Om snel vooruit of achteruit te spoelen
1 Druk, terwijl het afspelen is gestopt, op de SNEL VOORUIT of TERUGSPOELEN-knop om de cassette snel
vooruit of achteruit te spoelen.
2 Eens de gewenste positie op de cassette is bereikt, drukt u op de STOP/UITWERPEN-knop.
3 Druk op de AFSPELEN-knop om de weergave te starten.
OPMERKING: De cassettespeler speelt de zijde van de cassette gericht naar de buitenkant van het apparaat af.
Om de andere zijde van de cassette af te spelen moet u de cassette uitwerpen en ze omdraaien.
Een CD afspelen
1 Druk op de FUNCTIE-knop om het apparaat in CD-stand te zetten.
2 Druk op de UITWERPEN-knop om de CD-lade te openen. Plaats een CD in de lade met de bedrukte zijde
naar boven.
3 Druk nogmaals op de UITWERPEN-knop om de CD-lade te sluiten. De display toont ―CD laden‖ gedurende
enkele seconden en de weergave zal automatisch starten.
4 Om vooruit of achteruit door de tracks op een CD te gaan, druk op de Vooruit Skip- ofAchteruit Skip-knoppen.
5 Om snel vooruit of achteruit door een track te gaan, houd de Vooruit Skip- of Achteruit Skip-knoppen op het
bedieningspaneel ingedrukt. Laat de knoppen los eens u de gewenste positie in het nummer hebt bereikt.
Om de afstandsbediening voor snel vooruit of achteruit te gebruiken, druk één maal op Voorwaarts of
Achterwaarts zoeken. Eens de gewenste positie bereikt is, druk opnieuw op de knop om de weergave te
hervatten.
Herhaalde weergave
1 Om één nummer te herhalen, selecteer het gewenste nummer en druk één maal op de HERHAAL-knop. "
Herhaal " zal op de display getoond worden. Druk op de PLAY-toets en het geselecteerde nummer wordt
herhaald zodra het voltooid is.
2 Om een volledige CD te herhalen, druk tweemaal op de HERHAAL-knop. De display toont ―Alles Herhalen‖.
Zodra de CD is beëindigd, wordt de CD vanaf het begin opnieuw afgespeeld.
3 Om de herhaalfunctie uit te schakelen, druk nogmaals op de HERHAAL-knop. De herhaaldisplay zal
verdwijnen van het LCD-scherm.
Willekeurig afspelen
1 Druk tijdens het afspelen van een CD op de WILLEKEURIG-knop op de afstandsbediening. " Willekeurig " zal
op de LCD-display getoond worden. Het apparaat zal willekeurig nummers van de CD kiezen.
2 Om het willekeurig afspelen te annuleren, druk op de Stop-knop.
Geprogrammeerde weergave
1 Zorg ervoor dat de CD is gestopt.
2 Druk op de PROGRAMMA-knop. ―GEHEUGEN‖, "PGM 1" zal getoond worden op de display, en
―GEHEUGEN‖ zal knipperen.
3 Druk op de of -knoppen om het gewenste nummer te selecteren.
4 Druk tweemaal op de PROGRAMMA-knop om het geselecteerde nummer op te slaan, ―MEMORY‖ zal nu
stoppen met knipperen.
5 Herhaal bovenstaande stappen 3 en 4 om andere nummers in het geheugen te programmeren.
6 Wanneer alle geselecteerde nummers geprogrammeerd zijn in het geheugen, druk op de CD
Afspelen/Pauze-knop om de CD in de opgegeven volgorde af te spelen.
OPMERKING: Maximaal 35 nummers kunnen in het geheugen worden geprogrammeerd.
MP3-CD’s afspelen
Dit apparaat speelt CD’s opgenomen in MP3-formaat af. Alle functies werken op dezelfde manier als een gewone
CD. Hieronder vindt u een lijst met kenmerken en instructies die uniek zijn voor het afspelen van een MP3-CD.
Weergave Map/Album
Als uw MP3-CD is onderverdeeld in mappen, volgt u de onderstaande stappen om toegang te krijgen tot de
mappen.
1 Wanneer de CD is gestopt, drukt u op de MAP+ of de MAP- knop om vooruit of achteruit door de mappen op
de disc te gaan.
2 Eens de gewenste map is bereikt, gebruik de Vooruit- of Achteruit Skip-knoppen om het gewenste nummer te
selecteren.
3 Druk op de AFSPELEN-knop om het afspelen van het geselecteerde nummer te starten.

CD-informatie
Indien de MP3-CD informatie bevat, zoals artiest en titel, dan zal de LCD-display die informatie weergeven
tijdens het afspelen van de CD.
1 Terwijl de MP3-CD wordt afgespeeld, drukt u op de BAND-toets.
2 De CD-informatie begint over de LCD-display te rollen.
3 Druk nogmaals op de BAND-knop om de informatie te verbergen.
OPMERKING:
Als de CD opgenomen werd zonder nummerinformatie, zal ONBEKEND worden getoond
wanneer de BAND-knop wordt ingedrukt.
Afspelen zoeken
MP3-CD's bevatten meestal vele bestanden. Door de zoekfuncties hieronder beschreven te gebruiken, kan u
makkelijk en snel albums of nummers terugvinden. Volg de onderstaande stappen om de zoekfunctie te
gebruiken.
Zoeken op bestandsnaam
1 Druk in de stop- of weergavestand op de ZOEKEN-knop om te beginnen met het alfabetisch en numeriek
zoeken.
2 Druk op de MAP+ of de MAP- knoppen om de corresponderende letter of het corresponderende nummer van
het muzieknummer dat u zoekt te selecteren.
3 Wanneer het gewenste nummer is gevonden, druk op de AFSPELEN-knop om afspelen van het
geselecteerde nummer te starten.
4 Om de zoekstand uit te schakelen, druk op de ZOEKEN-knop totdat de "* " verdwijnt van de LCD-display.
Zoeken op Map / Albumtitel
1 Terwijl de CD is gestopt, druk tweemaal op ZOEKEN om te beginnen door het album te bladeren. Het
zoekpictogram, ALBUM 001 en de naam van het album worden getoond op de display.
2 Druk herhaaldelijk op de MAP+ of de MAP- knoppen om het gewenste album te selecteren.
3 Druk op de Vooruit Skip of Achteruit Skip-knoppen om de gewenste map/album te selecteren.
OPMERKING:
De zoekfunctie zal enkel werken als de MP3-CD informatie zoals Map, Artiest en Titel bevat.
Deze informatie wordt toegevoegd op het moment waarop de CD wordt geschreven en kan achteraf niet
toegevoegd worden.
OPMERKING:
U kan geen MP3-CD’s opnemen met dit apparaat. Ze moeten worden aangemaakt met een
computer of een ander apparaat.
WILLEKEURIG AFSPELEN
1 Druk tijdens het afspelen van een MP3-CD op de WILLEKEURIG-knop op de afstandsbediening.
"WILLEKEURIG" zal op de LCD-display getoond worden. Het apparaat zal willekeurig nummers selecteren
van de MP3-CD en ze in willekeurige volgorde afspelen.
2 Om het willekeurig afspelen te annuleren, druk op de STOP-knop.
Herhaalde weergave
GEPROGRAMMEERDE WEERGAVE
1 Druk op de PROGRAMMAKNOP. ―GEHEUGEN‖, ―P-01" zal getoond worden op de display, en ―GEHEUGEN‖
zal knipperen.
2 Druk op de MAP+ of MAP- knoppen om een Album te selecteren.
3 Druk op de VOORUIT SKIP+ KNOP of de ACHTERUIT SKIP- KNOP om een nummer te selecteren.
4 Druk opnieuw op de PROGRAMMAKNOP om het geselecteerde nummer op te slaan.
5 Herhaal bovenstaande stappen 2 en 4 om andere nummers te programmeren.
6 Druk één maal op de STOP-KNOP om de programma-instelling te bevestigen, ―GEHEUGEN ‖ zal stoppen
met knipperen.
7 Druk op de AFSPELEN/PAUZE-KNOP om geprogrammeerde weergave te starten.
8 Om de geprogrammeerde sequentie te wissen, druk tweemaal op de STOP-KNOP. Geprogrammeerde
nummers worden tevens gewist wanneer de CD-DEUR wordt geopend.
OPMERKING: Maximaal 70 nummers kunnen worden geprogrammeerd voor het afspelen in elke willekeurige
volgorde.
Bediening CD-opname

Voorbereiding
Dit apparaat is ontworpen voor het opnemen van CD-R en CD-RW-discs met het identificatielogo ―Compact Disc
Recordable‖ of ―CD-Rewritable‖. Als de CD’s niet voldoen aan deze norm, zullen ze misschien niet goed
opnemen.
Platen opnemen naar CD
1 Plaats een lege CD-R of CD-RW in het apparaat.
2 Druk op de FUNCTIE-knop om het apparaat in Phono-stand te zetten.
3 Zet de TOERENTALSCHAKELAAR op het correcte toerental (33 1/3, 45 of 78 tpm) voor de geselecteerde
plaat.
4 Gebruik de OPTILHENDEL om de pick-uparm van de armsteun te tillen. Breng de toonarm boven de plaat en
laat hem met de toonarmhendel neer op het punt waar u de opname wilt starten.
5. Stel het volume in op het gewenste volumeniveau. Dit kan niet worden uitgevoerd nadat de opname is
begonnen!
6 Druk op de CD OPNEMEN-knop. ―Opnemen" zal op de LCD-display getoond worden. De CD zal beginnen
opnemen.
7 Nadat de eerste zijde van de plaat voltooid is, drukt u op de STOP-knop. De display zal ―SLUIT TK‖
gedurende één seconde weergeven en daarna veranderen naar ―PHONO‖.
8 Draai de plaat om en herhaal stappen 4-7 om de andere zijde op te nemen.
9 Nadat de opname is voltooid, drukt u op de STOP-knop. De display zal ―SLUIT TK‖ gedurende twee
seconden weergeven en daarna veranderen naar ―PHONO‖.
10 Wanneer u klaar bent met de opname, drukt u op deAFWERKEN-knop. De display zal ―Afwerken‖
weergeven.
11 Zodra de CD afgewerkt is, zal het apparaat terugkeren naar Phono-stand en zal de display ―PHONO‖
weergeven. De CD is nu klaar voor gebruik.
OPMERKING: Als de CD niet is afgewerkt, dan zal hij niet afspelen in een andere CD-speler. Niet alle CD-
spelers zijn compatibel met CD-R en CD-RW’s. Controleer de gebruiksaanwijzing van andere CD-spelers voor
compatibiliteit.
Cassettes opnemen naar CD
1 Plaats een lege CD-R of CD-RW in het apparaat.
2 Druk op de FUNCTIE-knop om het apparaat in Phono-stand te zetten.
3 Plaats een vooraf opgenomen cassette in de cassettespeler. Druk opAFSPELEN om de cassette op het punt
te brengen waarop u de opname wilt starten.
4. Stel het volume in op het gewenste volumeniveau. Dit kan niet worden uitgevoerd nadat de opname is
begonnen!
5 Eens de cassette klaar is en afgespeeld wordt, druk op de CD OPNEMEN-knop en ―Opnemen‖ zal knipperen
op de LCD-display. De CD zal beginnen opnemen.
6 Nadat de eerste zijde van de cassette voltooid is, drukt u op de STOP-knop. De display zal ―SLUIT TK‖
gedurende één seconde weergeven en daarna veranderen naar ―PHONO‖.
7 Werp de cassette uit en draai ze om naar de andere kant.
8 Herhaal de stappen 4 en 6 om de andere zijde van de cassette op te nemen.
9 Nadat de opname is voltooid, drukt u op de STOP-knop. De display zal ―SLUIT TK‖ gedurende één seconde
weergeven en daarna veranderen naar ―PHONO‖.
10 Wanneer u klaar bent met de opname, drukt u op deAFWERKEN-knop. De display zal ―Afwerken‖
weergeven.
11 Zodra de CD afgewerkt is, zal het apparaat terugkeren naar Phono-stand en zal de display ―PHONO‖
weergeven. De CD is nu klaar voor gebruik.
OPMERKING: Als de CD niet is afgewerkt, dan zal hij niet afspelen in een andere CD-speler. Niet alle CD-
spelers zijn compatibel met CD-R en CD-RW’s. Controleer de gebruiksaanwijzing van andere CD-spelers voor
compatibiliteit.
Handmatige Nummerverdeling
U kan uw opname opdelen in afzonderlijke nummers als u dit wenst. Door dit te doen zal elk nummer een eigen
opeenvolgend nummer hebben. Op dit te doen moet u de Splits Nummer-knop gebruiken.
Tijdens het opnemen van uw plaat of cassette, let u erop wanneer elk nummer ten einde loopt. Normaliter is er
een korte stilte tussen nummers. Wanneer u aan het einde van een nummer komt, drukt u op de Splits Nummer-
knop. De opname zal dan naar het volgende nummer gaan in stappen van één nummer. Zodra de opname is
voltooid kan u de Vooruit Skip- of Achteruit Skip-knoppen indrukken om naar het begin van elk nummer te gaan.

Een CD-RW wissen
Als u een CD-RW gebruikt, kunt u de hele CD wissen en hem opnieuw opnemen. Wishandelingen zijn enkel
mogelijk met CD-RW’s. Het is niet mogelijk een CD-R te wissen of opnieuw op te nemen. Om een CD-RW te
wissen volgt u de onderstaande stappen.
1 Druk op de FUNCTIE-knop om het apparaat in CD-stand te zetten.
2 Plaats een opgenomen CD-RW in het apparaat.
3 Druk op de STOP-knop om de weergave te stoppen.
4 Druk op de WISSEN-knop. WISSEN verschijnt op de display, druk op de AFSPELEN-knop om te bevestigen
en het wisproces zal beginnen. Wanneer dit voltooid is, zal de display eerst ―F Klaar‖ en dan ―BLANCO‖
weergeven.
5 De CD is nu klaar om op te nemen.
OPMERKING: Eens een CD gewist is, kan de inhoud ervan niet worden gerecupereerd.
Audio-aansluitingen
LINE IN
Met behulp van de LINE IN-voor- of achteraansluiting kunt u extra externe
audiocomponenten aansluiten en beluisteren via uw apparaat. Elke
component met een audio-uitgang zoals een tuner kan worden
aangesloten met behulp van de correcte kabels. Dit apparaat maakt
gebruik van een 3,5 mm kabel met ministekker (voorzijde), RCA-
standaardkabels (achterzijde). Sluit de connector aan op de 3,5 mm kabel
met ministekker (voorzijde) of de RCA-standaardkabels (achterzijde). Het
uiteinde met de rode en witte stekkers past in de rode en witte
hulpingangaansluiting op de achterzijde van uw apparaat. Het andere
uiteinde van de kabel wordt aangesloten op de audio-uitgangsaansluiting
van de externe component. Raadpleeg voor meer informatie over het
aansluiten van de externe component de gebruikershandleiding van de
betreffende component.
OPMERKING: Als u meerdere signalen tegelijkertijd invoert,
wordt het geluid gemengd.
LINE OUT
Met behulp van LINE OUT kunt u de audio van uw apparaat naar een
stereo-installatie, televisie of andere apparaat sturen. Om dit aan te sluiten
heeft u RCA-standaardkabels nodig. Sluit de rode en witte stekkers aan een
uiteinde van de kabel aan op de rode en witte audio-uitgangsaansluitingen
op de achterzijde van uw apparaat. Het andere uiteinde van de kabel wordt
aangesloten op de hulpingangsaansluiting van de externe component.
Raadpleeg voor meer informatie over het aansluiten van de externe
component de gebruikershandleiding van de betreffende component.
OPMERKING: U kan nog steeds naar uw apparaat luisteren terwijl u de audio-uitgangsfunctie
gebruikt
Algemeen
Probleemoplossing
Er is geen stroomtoevoer
1 Controleer of de stekker van het apparaat correct is aangesloten.
2 Controleer of de stroomknop ingedrukt is.
Er is geen geluid
1 Controleer het volumeniveau door aan de volumeknop te draaien.
Draaitafel werkt niet
1 Zorg dat het apparaat in Phono-stand staat door op de Functie-knop te drukken.
2 Controleer of de naaldbescherming is verwijderd.
3 Controleer of de verchroomde draaitafelsuspensieschroef volledig naar beneden is geschroefd.
4 Controleer de cassettespeler om er zeker van te zijn dat er geen cassette wordt afgespeeld.

CD wordt niet afgespeeld
1 Controleer of de CD juist is geplaatst (etiket naar boven gericht).
2 Controleer of het oppervlak van de CD schoon is
3 Zorg dat de functieschakelaar in de CD-positie staat.
4 Controleer of de CD niet leeg is.
5 Sommige CD-R of CD-RW’s zijn niet compatibel met andere CD-spelers. Gebruik een ander merk CD.
Kan niet opnemen
1 Controleer of u een CD-R of CD-RW gebruikt.
2 Controleer of de CD leeg is.
3 Probeer opnieuw met een andere CD.
Draaitafel heeft laag volume
1 Verwijder de naald en installeer ze opnieuw.
Table of contents
Languages:
Other Ricatech Media Player manuals