AllSee PPHD5 Instructions for use

Standalone Android Media Player
Hardware User Manual
Manual Version PPHD5 1.0

Standalone Android Media Player Hardware User Manual
Page 1
Safety Instructions
•Please keep the display away from any heat sources. Place the display in a
stable and well-ventilated place.
•Please handle with care as product contains glass.
•The holes or openings on the display are designed for ventilation. Do not
cover or block the ventilation holes or openings with any objects.
•Remove protective covering from the screen before you use the display.
•Shut off the power supply before cleaning. Use a soft lint-free cloth
instead of a tissue to wipe the screen.
•You may use a glass cleaner to clean the product as required. However,
never spray the cleaner directly onto the display surface.
•Do not attempt to repair this product yourself! Improper disassembly of
the product may invalidate the warranty and lead to possible danger
•If you have a problem that cannot be solved using the "Troubleshooting"
guidelines, please contact your supplier.

Standalone Android Media Player Hardware User Manual
Page 2
Contents:
1. Introduction................................................................................................................................4
1.1 Box Contents ...................................................................................................................4
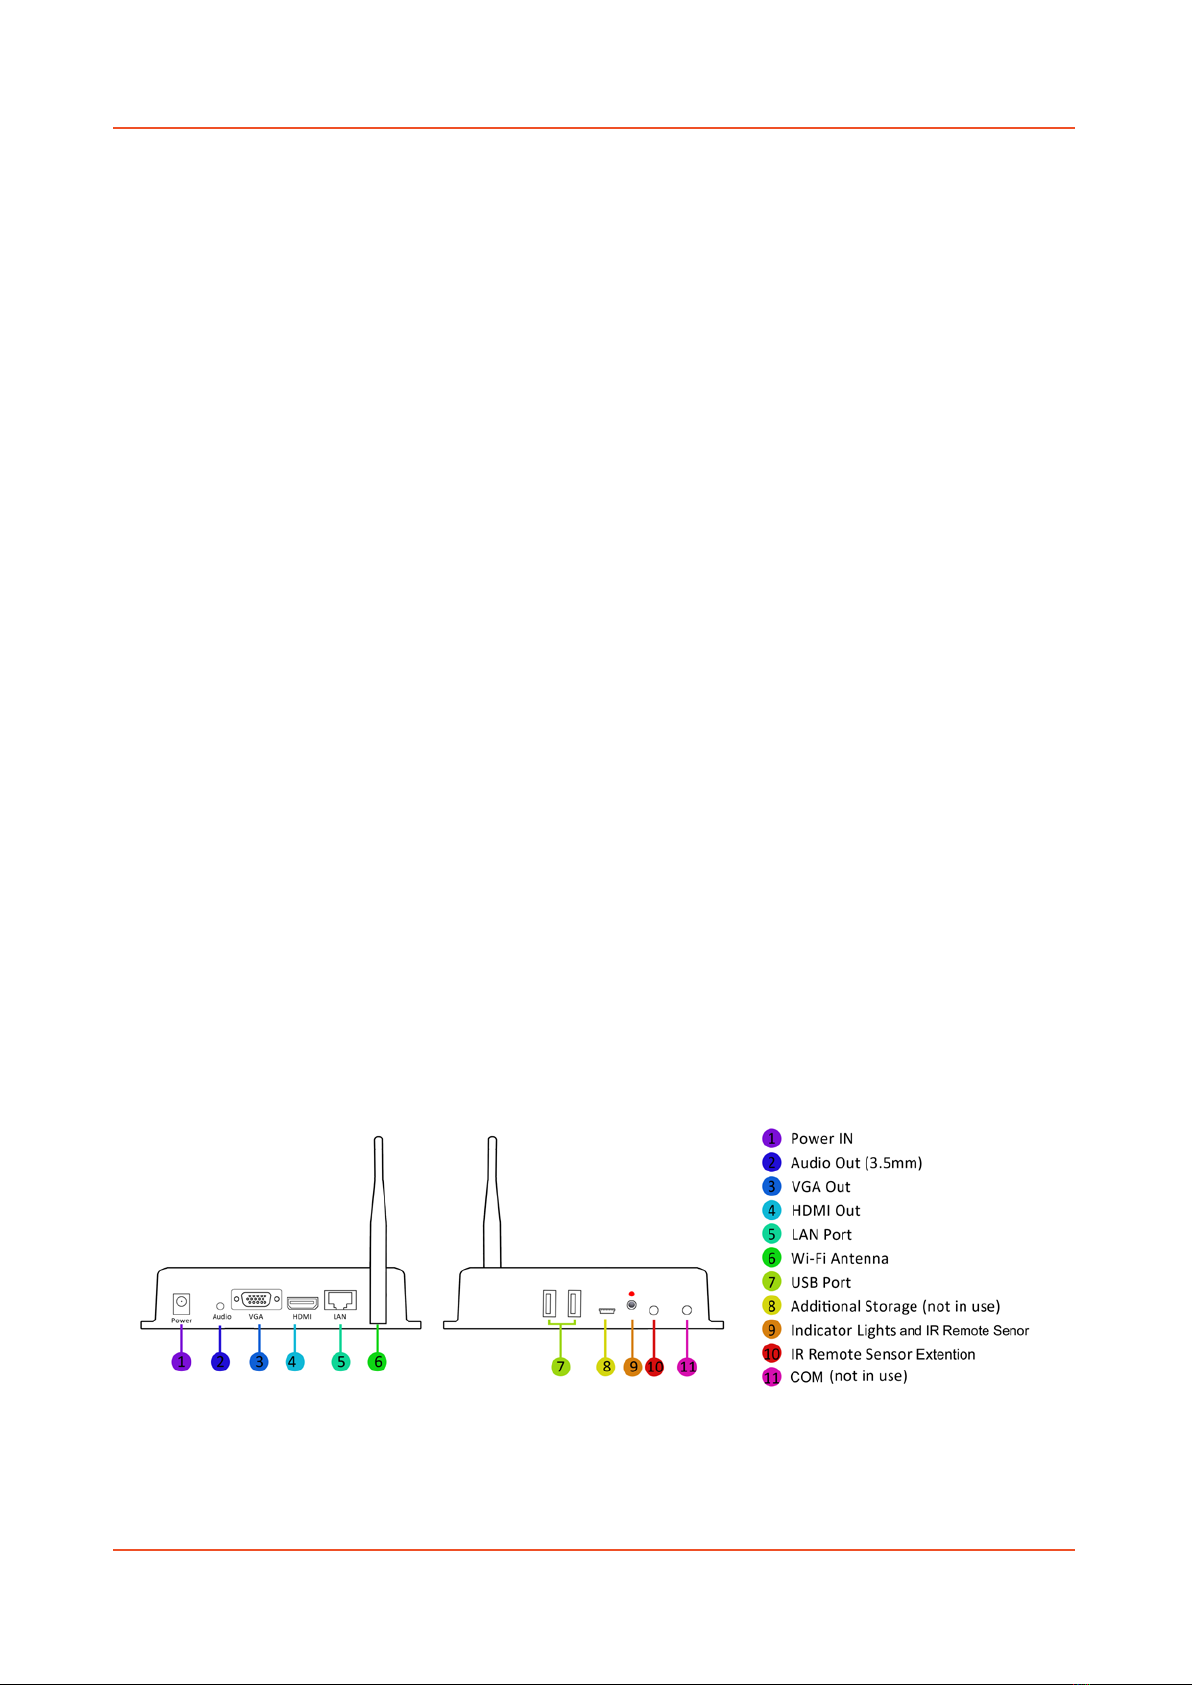
1.2 Product Overview............................................................................................................4
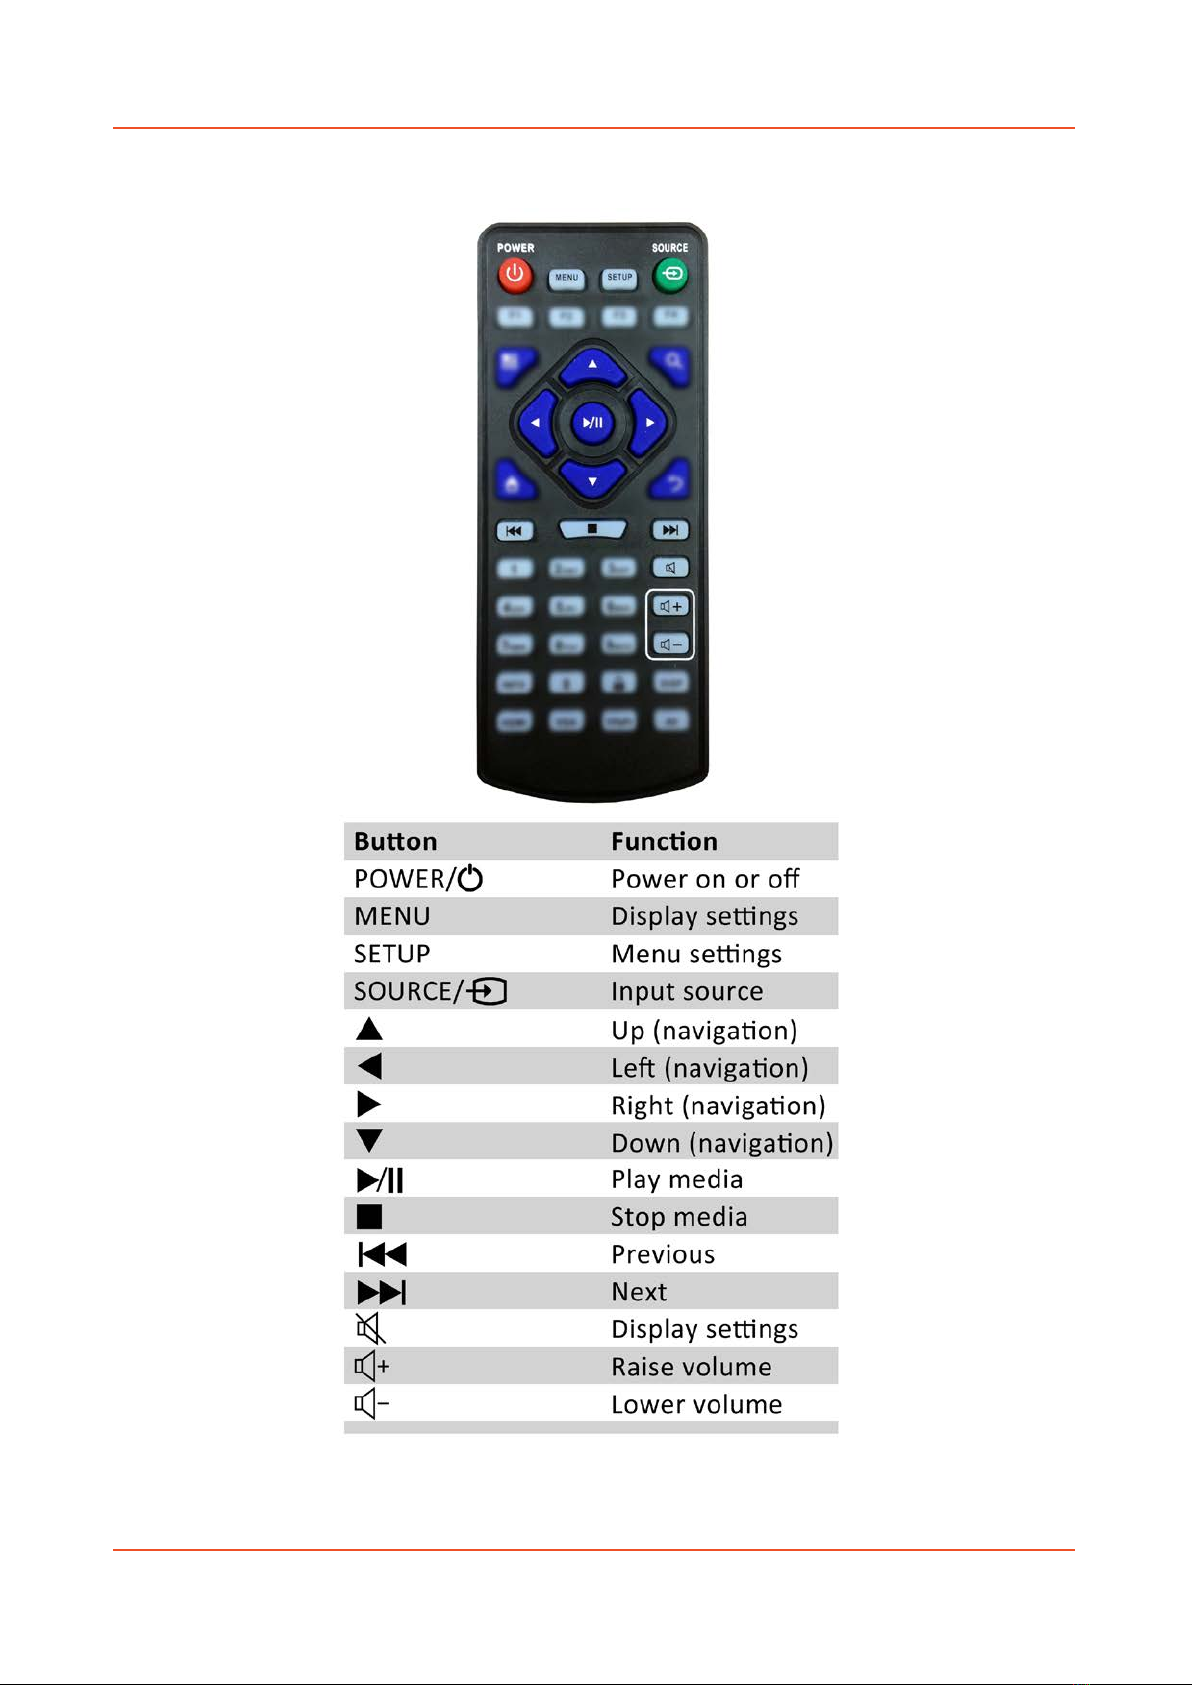
1.3 Remote Control ...............................................................................................................5
1.4 Replacing the Remote Control Battery ...........................................................................6
1.5 Home Screen ...................................................................................................................7
1.6 System Menu Operation .................................................................................................8
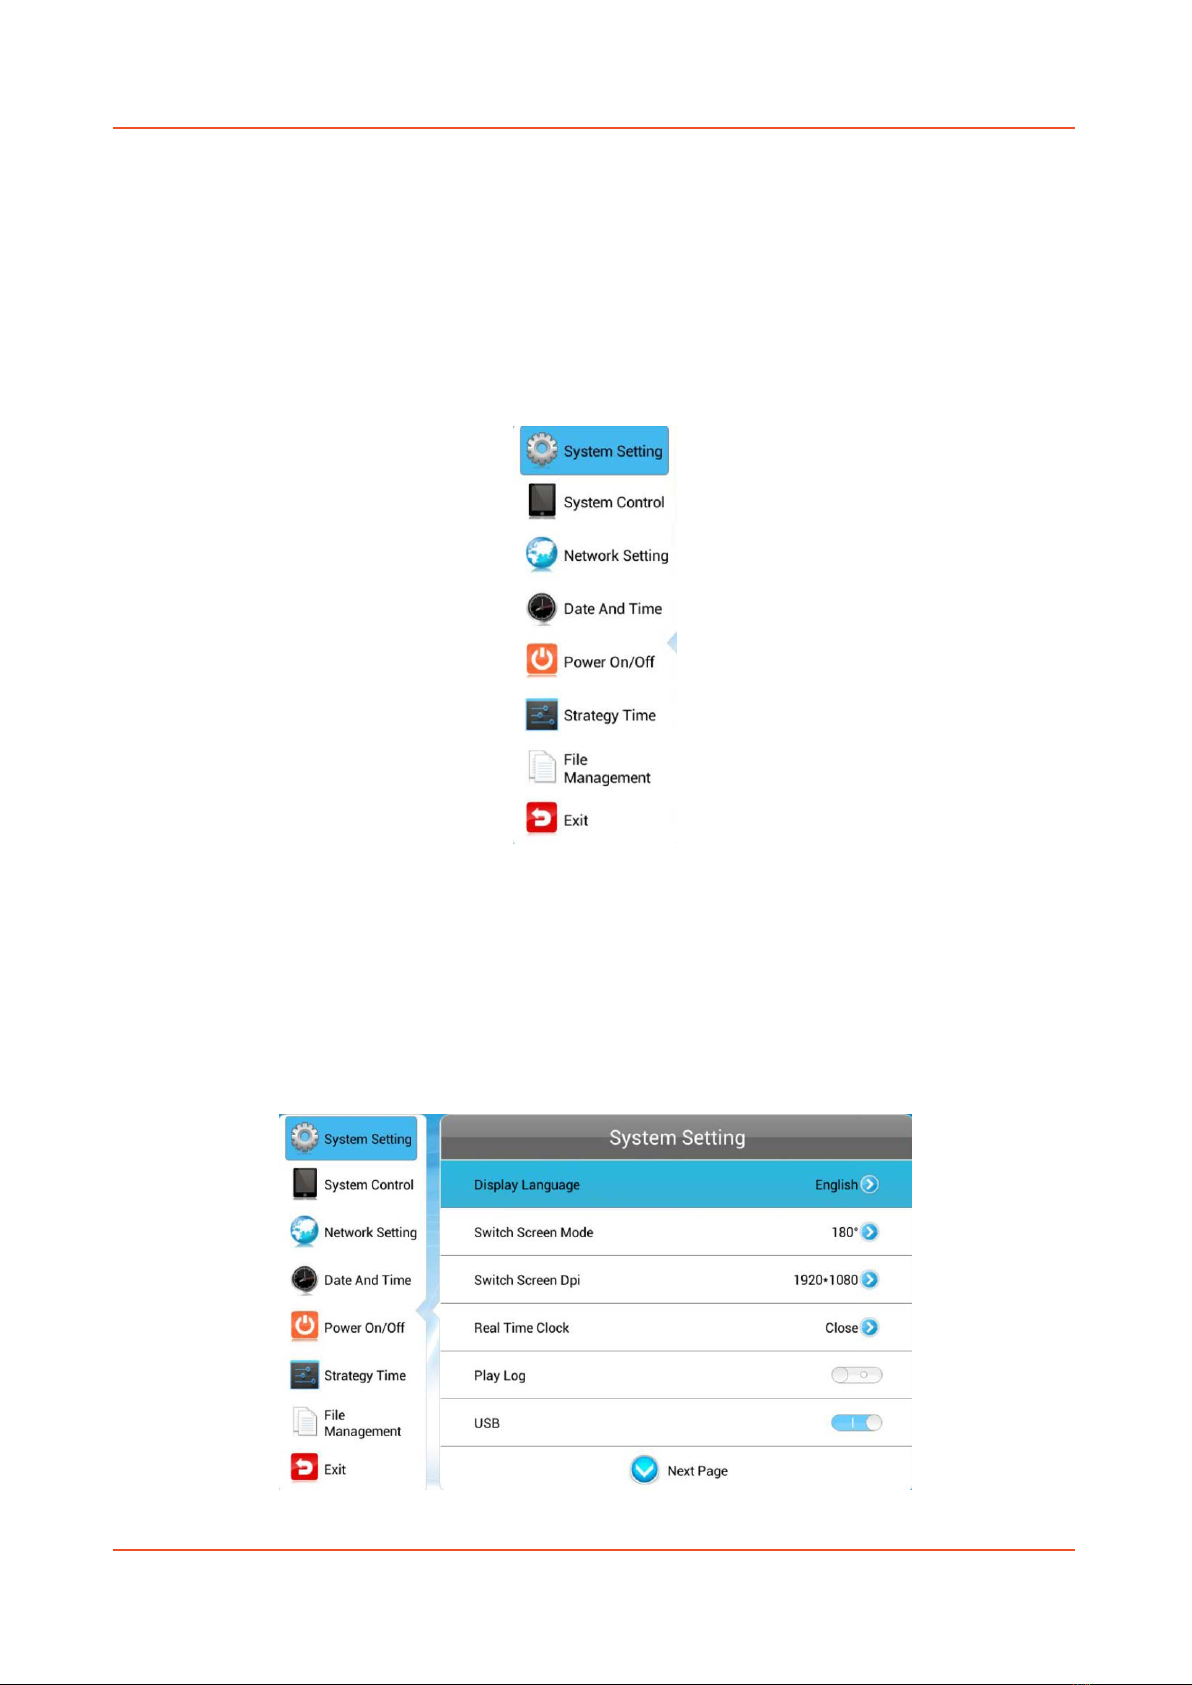
1.6.1 System Settings ........................................................................................................8
1.6.2 System Control .......................................................................................................15
1.6.3Network Setting .....................................................................................................17
1.6.4 Date & Time ...........................................................................................................20
1.6.5 Power On/Off .........................................................................................................22
1.6.6 Timer Strategy........................................................................................................23
1.6.7 File Management ...................................................................................................26
1.6.8 Exit..........................................................................................................................26
1.7 Display Settings .............................................................................................................27
2. System Operation .....................................................................................................................30
2.1 Supported Media Files ..................................................................................................30
2.2 Inputs ............................................................................................................................31
3. F.A.Qs and Troubleshooting Guide ...........................................................................................32
3.1 Why is my screen displaying "Error (Screen Mode Mismatch)"? .................................32
3.2 How do I update my screen if it is not connected to the internet? (Plug and play
method) .......................................................................................................................................33
3.3 How do I play PowerPoint presentations on my display?............................................. 37
3.4 Video Format Conversion .............................................................................................37
3.4.1 Format Factory (Standard Definition) ....................................................................37
3.4.2 HD Video Converter Deluxe (High Definition) .......................................................44
3.5 My media file does not fit properly on the screen .......................................................44
3.6 My moving GIF files will not move................................................................................45

Standalone Android Media Player Hardware User Manual
Page 3
Table of Figures
Figure 1 Product Overview...................................................................................................................4
Figure 2 Home Screen..........................................................................................................................7
Figure 3 Device inputs........................................................................................................................31

Standalone Android Media Player Hardware User Manual
Page 4
1. Introduction
Congratulations on your purchase of our product. Please read carefully and follow all instructions
in the manual before first use.
The product should not be exposed to liquids dripping or splashing and no objects filled with
liquids, such as vases, should be placed on the product.
For user convenience, a number of operations can be performed through the remote control.
Attention:
1. Do not change any default setting when it is unnecessary.
2. Keep the product far away from water during installation and use.
1.1Box Contents
1 x Cloud Network Media Player.
1 x Power Adaptor
1 x CD (User Manuals).
1 x Remote Control (with 2xAAA batteries).
1 x Wi-Fi Antenna
1.2Product Overview
Figure 1 Product Overview

Standalone Android Media Player Hardware User Manual
Page 5
1.3Remote Control

Standalone Android Media Player Hardware User Manual
Page 6
1.4Replacing the Remote Control Battery
1. Slide the battery cover off, as shown below.
2. Remove the used batteries.
4. Insert the two new AAA batteries with their terminals corresponding to the indicators.
5. Put the cover back on.

Standalone Android Media Player Hardware User Manual
Page 7
1.5Home Screen
Once your screen has powered up and begins to play content press the “STOP” button on the
remote control to go back to the Home Screen (pictured below). Notice: You may need to change
the screen input source to HDMI/VGA – Press the “HDMI”/ “VGA” button on the remote control
Figure 2 Home Screen

Standalone Android Media Player Hardware User Manual
Page 8
1.6System Menu Operation
From the Home Screen you can bring up the Main Menu by pressing the “SETUP” button the
remote control. The Main Menu includes following sub-menus: System Settings, System Control,
Network Settings, Date & Time, Power On/Off, Timer Strategy, File Management and Exit.
Press ↑ & ↓to select the right item, press “PLAY” to confirm selection. To get back to the side
menu press the “LEFT” navigation button on the remote control.
1.6.1 System Settings
The sub-menus within this section are: Display Language, Screen Mode, Screen Resolution, On
Screen Clock, USB, Scrolling Text, Sync Settings, Restore to Factory Settings and Auto Start. To exit a
sub-menu please press the “LEFT” navigation button the remote control, you can now navigate
though the Main Menus sub-menus.

Standalone Android Media Player Hardware User Manual
Page 9
Display Language
The On Screen Display supports multiple languages, the default being English. As with all menu
operation press “DOWN” to access the sub-menu then use the navigation buttons to select the
right item, then “PLAY” to confirm selection.
Switch Screen Mode
Here you can set the screens orientation so as the OSD and content display correctly. There are 4
options as pictured below:
•0° (default landscape) - Displays in landscape with the locker door on the left hand side.
•90° - Displays in portrait with the locker door on the top.
•180° - Displays in landscape with the locker door on the right hand side.
•270° (default portrait) - Displays in portrait with the locker door on the bottom.

Standalone Android Media Player Hardware User Manual
Page 10
Screen Resolution
This menu allows you to set the screen resolution; this should be set to 1920x1080.
Real Time Clock
This option allows you to display a clock while content is playing. There are 5 options as pictured
below:
•Close: The screen doesn’t display time.
•Top Left: The time will be displayed on top left of the screen.
•Top Right: The time will be displayed on top right of the screen.
•Bottom Left: The time will be displayed on bottom left of the screen.
•Bottom Right: The time will be displayed on bottom right of the screen.

Standalone Android Media Player Hardware User Manual
Page 11
Play Log
This is a network function only. When the slider is turned on (blue) the screen will record all media
files that are displayed.
USB
This allows you to enable or disable the USB port. If you want to be able to update the screen
please ensure this is turned on (blue).

Standalone Android Media Player Hardware User Manual
Page 12
Scrolling Text
This allows you to enable or disable the scrolling text function. If you have included scrolling text in
your playlist (using the CMS) and want it to display please ensure this is turned on (blue).

Standalone Android Media Player Hardware User Manual
Page 13
Sync Settings (Network mode only)
This is a network function only. This feature of synchronisation allows multiple screens to display
the same content at the same time.
Sync Settings- enable or disable the feature of synchronisation.
Sync Settings- set the role that the screen has during synchronisation.
Host - set the screen as the unique host in a network and the slave screens will synchronise
from this host.
Slave - as a slave, the screen will play synchronised content with of host.
Sync Methods - allows you to choose the player communication means for synchronisation.
2.4G - The host and slave screens will communicate via 2.4G by using a 2.4G module, which
can achieve a short distance wireless communication of around 100 meters.
Network - the host and slave screens in a LAN will communicate via the network.

Standalone Android Media Player Hardware User Manual
Page 14
Restore To Factory Settings
Highlight “Yes” and press “PLAY” to restore factory settings; this will restore all system settings
back to default.
Auto Start
This feature allows your screen to start playing the pre-loaded content as soon as it has finished
booting up. If you want to enable this feature (recommended) please ensure this is turned on
(blue).

Standalone Android Media Player Hardware User Manual
Page 15
1.6.2 System Control
To exit a sub-menu please press the “LEFT” navigation button the remote control, you can now
navigate though the Main Menus sub-menus. The sub-menus within this section are: Work Mode,
Content Management, Content Storage and Machine Name.
Work Mode
This feature allows you set the update method for your screen. It should be set to “LAN” or “WIFI”
if you are using the media player in network mode or “STANDALONE” if you are using it in plug and
play mode (updating via USB).

Standalone Android Media Player Hardware User Manual
Page 16
Content Storage
This should be set to “Internal Memory”. If your player is set to STANDALONE mode and you want
to run your content directly from the USB stick rather than have it copy over to the internal
memory change this setting to “USB”.
Machine Name
This feature will tell you what your screen’s name is on the CMS (Network mode only).
Play Mode (STANDALONE only)
This should be set to “Open”.
Image Duration (STANDALONE only)
Here you can set the default image duration time for your content. Please note that if you assign
an image duration time using the scheduling software it will override this setting.

Standalone Android Media Player Hardware User Manual
Page 17
1.6.3 Network Setting (network modes only)
To exit a sub-menu please press the “LEFT” navigation button the remote control, you can now
navigate though the Main Menus sub-menus. To set accurate values first select the top “date” field
by pressing “PLAY”.
Server Configuration
This section contains the information that allows the screen to communicate with the server. All
settings within this section will be pre-set before you receive your goods. Please do not change any
of these settings unless you have adequate technical support. The settings should be set as follows:

Standalone Android Media Player Hardware User Manual
Page 18
IP Mode
This feature is only available when the screen is set to “LAN” mode. It allows you to set a static IP
should this be necessary. In most cases the “Addressing Method” should be set to DHCP.
To set a static IP address, press the “RIGHT” navigation button to move the slider to “Manual”. This
will open up four new fields; Local ID, Subnet Mask, Default Gateway and DNS. Once you have
inputted your information into these fields navigate to and select “Back”. The system will ask to if
you want to reboot the screen so that the changes can take effect, select “YES”.
WIFI Setting
This feature is only available when the screen is set to “WIFI” mode. It allows you to select your
Wi-Fi network and input your password. This information will then be saved so that when the
screen reboots it automatically looks for your Wi-Fi network and has the credentials to connect.
Navigate to your Wi-Fi network from the list of available networks then press “PLAY”. This will then
prompt you to input your password (if required). Press “PLAY” while the password filed is

Standalone Android Media Player Hardware User Manual
Page 19
highlighted; this will bring up an on screen keyboard. Once you have entered your password
highlight and select “back” from the on screen keyboard. Then highlight and select “Connect”.
Local ID
This is your screen’s serial number. This is pre-set and cannot be changed.
MAC Address
This is your screen’s MAC Address. This is pre-set and cannot be changed.
Table of contents
Other AllSee Media Player manuals