Rich Context RWS6298 User manual

ASSEMBLY INSTRUCTIONS
RWS6298
ATTENTION: THIS PRODUCT IS NOT FOR COMMERCIAL USE
INTENDED FOR RESIDENTIAL USE ONLY.
PARTS LIST
PART
NO. MATERIAL CODE PART Q’TY
1
2
3
4
5
61
1
1
1
7
8
9
4
4
2
1
1
BACK ASSEMBLY
LEFT ARM
RIGHT ARM
BOLT M6*15
BOLT M6*30
SEAT ASSEMBLY BOLT M6*45
HEX. KEY WRENCH 4MM
HEX. KEY WRENCH 10MM
RWS6298-CS03-1
RWS6298-CS02-1
RWS6298-CS01-2
RWS6298-CS01-3
PAGE 1 OF 3V-3 COURTYARD CREATIONS INC.
17C40A0705001YX
17C40A0710001YX
17C40A0716001YX
17KAA0101----Y4
17KAC3101----Y3
FIGURE 1
Use the correct bolts as indicated. Do not tighten any of the bolts until the chair is completely
assembled.
Do not discard of any of the packaging until you have checked that you have all of the parts and
fittings required.
Keep children away during assembly. This item contains small parts that can be swallowed by
children. Children should always be under direct adult supervision while using this product.
Retain these assembly instructions for future reference.
Quote the following FQC No. when contacting the service center.
!
!
!
!
!
Attention:
Make sure that each bolt needed for all steps
matches the corresponding figure to ensure proper
assembly.
Step 1:
Fasten the seat assembly (#2) to the back
assembly (#1) by using bolts (#6). Keep the bolts
loose. See Figure 1.
1
2
6
#6 BOLT M6*30
30
STOP DO NOT RETURN TO THE STORE!
SERVICE CENTER TOLL FREE NO.
TEL: 1-877-539-7436
FAX: 1-877-539-7439

V-3
STOP DO NOT RETURN TO THE STORE!
Note:
The labels marked “L” and “R” on arms (#3 and
#4) should coincide with Figure 2 to ensure proper
assembly.
PAGE 2 OF 3
FIGURE 2
FULL ASSEMBLY
FIGURE 3
Step 2:
Place the left arm (#3) onto a non-abrasive
surface, such as a carpet. Fasten the seat
assembly (#2) to arms (#3 and #4) by using bolts
(#5 and #6). Keep the bolts loose. See Figure 2.
Step 3:
Fasten both the left arm (#3) and the right arm (#4)
to the back assembly (#1) by using bolts (#7).
Make sure that all of the bolts have been
tightened completely. See Figure 3.
Step 4:
See Full Assembly.
Cleaning and Maintenance
• Wash frame parts with mild soap and water, rinse thoroughly, and dry completely. Do not use bleach,
acid, or other solvents on the frame parts.
•We recommend the use of furniture covers when not in use.
• Inspect and tighten all of the bolts and fasteners on a regular basis to ensure the proper performance
and safety of your chair.
•In order to prolong the life and beauty of your chair, we recommend that it be stored in a dry and
protected area during off season periods.
3
7
1
L
4
3
5
5
6
2
4
R
#5 BOLT M6*15
15
#7 BOLT M6*45
45
#6 BOLT M6*30
30

V-3
STOP DO NOT RETURN TO THE STORE!
PAGE 3 OF 3
The store where you made your purchase
does not stock parts for this item.
If you need parts,
whether they are missing or damaged,
STOP!
Missing A Part?
No Need To Go Back To
The Store
Call us between 9:00 AM and 4:30 PM
Eastern Time Monday through Friday
For further assistance,
please visit us at
Call Toll Free:
TEL: 1-877-539-7436
FAX: 1-877-539-7439
READ THESE INSTRUCTIONS COMPLETELY BEFORE STARTING ASSEMBLY
SEPARATE AND IDENTIFY ALL OF THE PARTS,MAKING SURE THAT
YOUHAVE ALL OF THEPARTSLISTED.
IF YOU DO NOTLOCATE ALL OF THE PARTS LISTED, INSPECT THE
PACKING MATERIAL FOR SMALL PARTSTHAT MAYHAVEBECOME
SEPARATED DURING SHIPMENT.
IF YOU EXPERIENCEANY DIFFICULTY DURING ASSEMBLYOR IF ANY
PARTS ARE MISSING OR DAMAGED,CALL THE HELP LINE AT
1-877-539-7436 BEFORERETURNING THIS ITEM TO THE STORE.
PROVIDE THEFOLLOWING INFORMATION WHEN CALLING:
1-MODEL NUMBER OF THEPRODUCT.
2-PARTNUMBER AND MATERIAL CODE OF THE PARTFROM THE PARTS
LIST.
MOST PROBLEMS CAN BERESOLVED WITHOUT RETURNING THIS
PRODUCT TO THERETAILER.
Warranty
•This product is covered by Courtyard Creations Inc.'s one–year limited warranty.
•Proof of purchase (dated register receipt) is required for warranty claims.
•It remains the customer’s responsibility for freight and packing charges to and from the service center.

RWS6298
LISTA DE PARTES
1
2
3
4
5
61
1
1
1
7
8
9
4
4
2
1
1
RESPALDO
BRAZO
IZQUIERDO
BRAZO
DERECHO
TORNILLO M6*15
TORNILLO M6*30
ASIENTO TORNILLO M6*45
LLAVE ALLEN DE 4MM
LLAVE ESPAÑOLA DE 10MM
RWS6298-CS03-1
RWS6298-CS02-1
RWS6298-CS01-2
RWS6298-CS01-3
PÁGINA 1 DE 3V-3 COURTYARD CREATIONS INC.
17C40A0705001YX
17C40A0710001YX
17C40A0716001YX
17KAA0101----Y4
17KAC3101----Y3
FIGURA 1
Utilice los tornillos correctos, según se indica. No apriete ninguno de los tornillos hasta que la silla
esté completamente ensamblada.
No tire el empaque hasta que haya comprobado que tiene todas las partes y los accesorios
necesarios.
No deje que los niños se acerquen durante el ensamblado. Este producto contiene piezas
pequeñas que los niños pueden ingerir. Mientras usen este producto, los niños siempre deberán
estar bajo la supervisión directa de un adulto.
Conserve estas instrucciones para referencia futura.
Cuando se comunique con el centro de servicio, proporcione siempre el siguiente código de
control de calidad (FQC, por sus siglas en inglés).
!
!
!
!
!
Atención:
Asegúrese de que todos los tornillos necesarios
para cada uno de los pasos coincidan con la figura
correspondiente para que el ensamblado sea
correcto.
1
2
6
#6 TORNILLO M6*30
30
NÚMERO GRATUITO DEL CENTRO DE SERVICIO
TEL: 1-877-539-7436
FAX: 1-877-539-7439
ALTO ¡NO DEVUELVA ESTE PRODUCTO A LA TIENDA!
INSTRUCCIONES DE ARMADO
ATENCIÓN: ESTE PRODUCTO NO ES PARA USO COMERCIAL; ESTÁ
DISEÑADO ÚNICAMENTE PARA USO RESIDENCIAL.
No. DE
PARTE
CÓDIGO DE
MATERIAL PARTE CANT.
Paso 1:
Sujete la parte trasera del asiento (#2) al respaldo
(#1) con ayuda de los tornillos (#6).
Deje los tornillos flojos. Consulte la figura 1.

V-3
Nota:
Las etiquetas marcadas como “L” (izq.) y “R” (der.)
en los brazos (#3 y #4) deben coincidir con la figura
2 para que el ensamblado sea correcto.
PÁGINA 2 DE 3
FIGURA 2
PRODUCTO ENSAMBLADO
FIGURA 3
Paso 2:
Coloque el brazo izquierdo (#3) sobre una
superficie no abrasiva, como puede ser una
alfombra. Sujete la parte trasera del asiento (#2)
al brazos (#3 y #4) con ayuda de los tornillos
(#5 y #6). Deje los tornillos flojos.
Consulte la figura 2.
Paso 3:
Sujete el brazo izquierdo (#3) y el brazo derecho
(#4) al respaldo (#1) con ayuda de los tornillos
(#7). Asegúrese de apretar completamente todos
los tornillos. Consulte la figura 3.
Paso 4:
Consulte la imagen del producto ensamblado.
Cleaning and Maintenance
• Lave las partes del bastidor con agua y jabón suave, enjuague bien, y seque el bastidor por
completo. No utilice lejía, ácido, ni otros disolventes en las partes del bastidor.
•Se recomienda cubrir su silla con una funda cuando no esté en uso.
• Revise y apriete todos los tornillos y medios de fijación periódicamente para garantizar el
funcionamiento adecuado y la seguridad de su silla.
•Para prolongar la vida y la belleza de su silla, le recomendamos almacenarla en un lugar seco y bien
protegido en las temporadas del año en que no la use.
3
7
1
L
4
3
5
5
6
2
4
R
#5 TORNILLO M6*15
15
#7 TORNILLO M6*45
45
#6 TORNILLO M6*30
30
ALTO ¡NO DEVUELVA ESTE PRODUCTO A LA TIENDA!

V-3 PÁGINA 3 DE 3
La tienda donde adquirió este artículo no tiene partes
sueltas en existencia.
Si necesita alguna pieza,
ya sea por extravío o daño,
¡ALTO!
¿Le falta alguna pieza?
No es necesario que regrese
a la tienda
Lo atenderemos de 9:00 am a 4:30 pm,
hora del Este, de lunes a viernes
Si requiere más ayuda,
escríbanos a
llame sin costo al:
TEL.: 1-877-539-7436
FAX: 1-877-539-7439
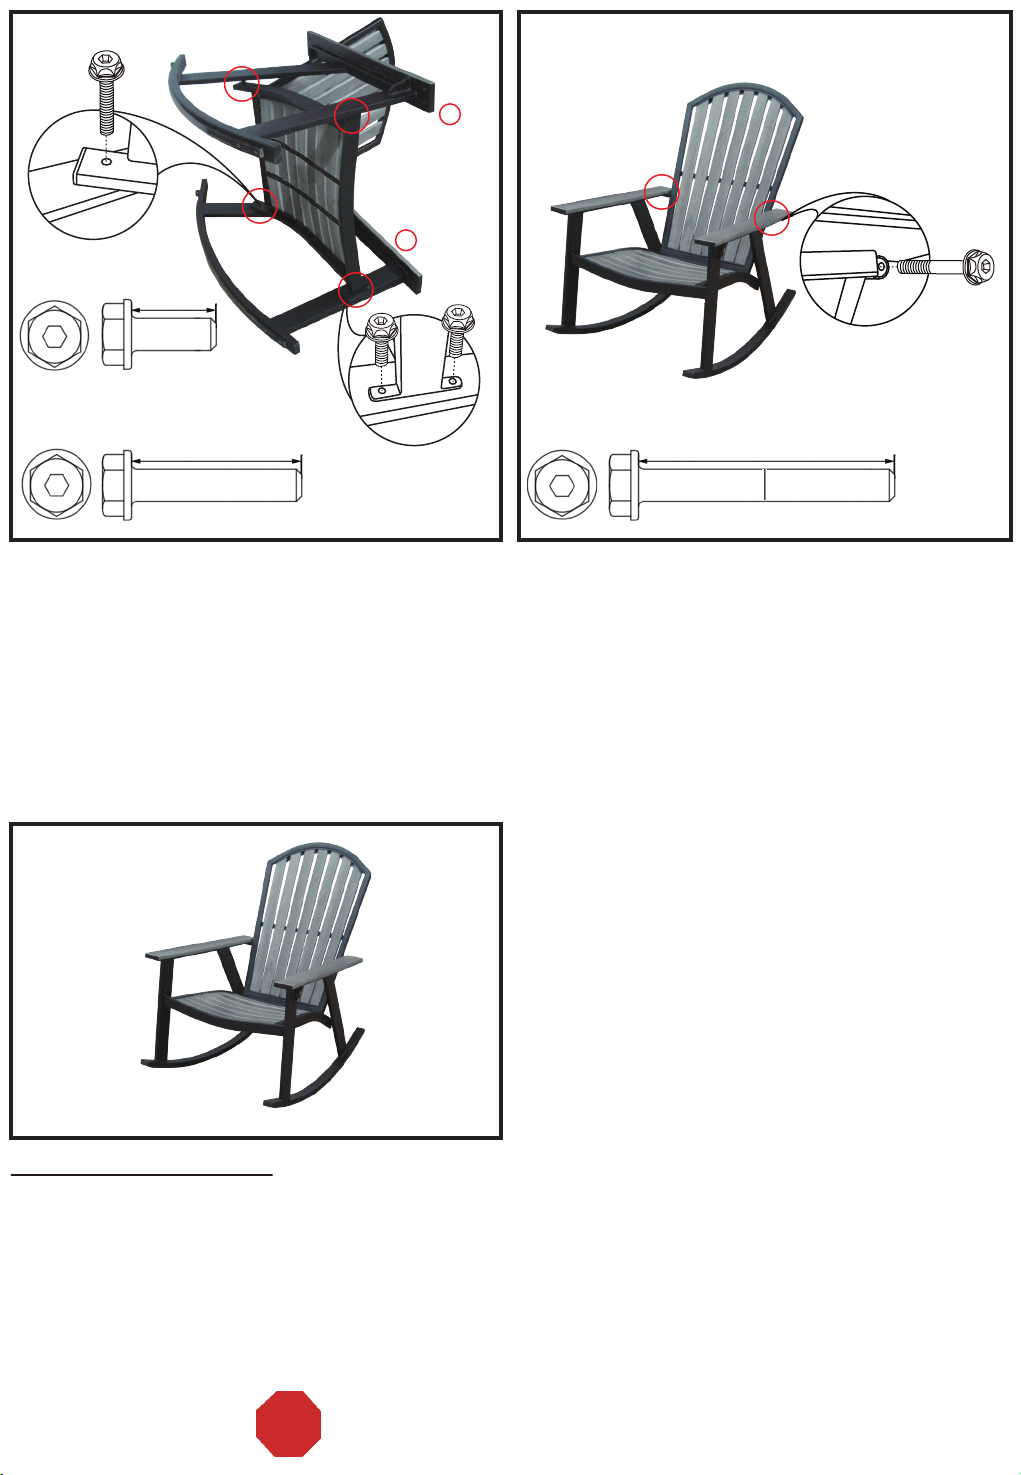
LEA ESTAS INSTRUCCIONES COMPLETAMENTE ANTES DE EMPEZAR EL ARMADO
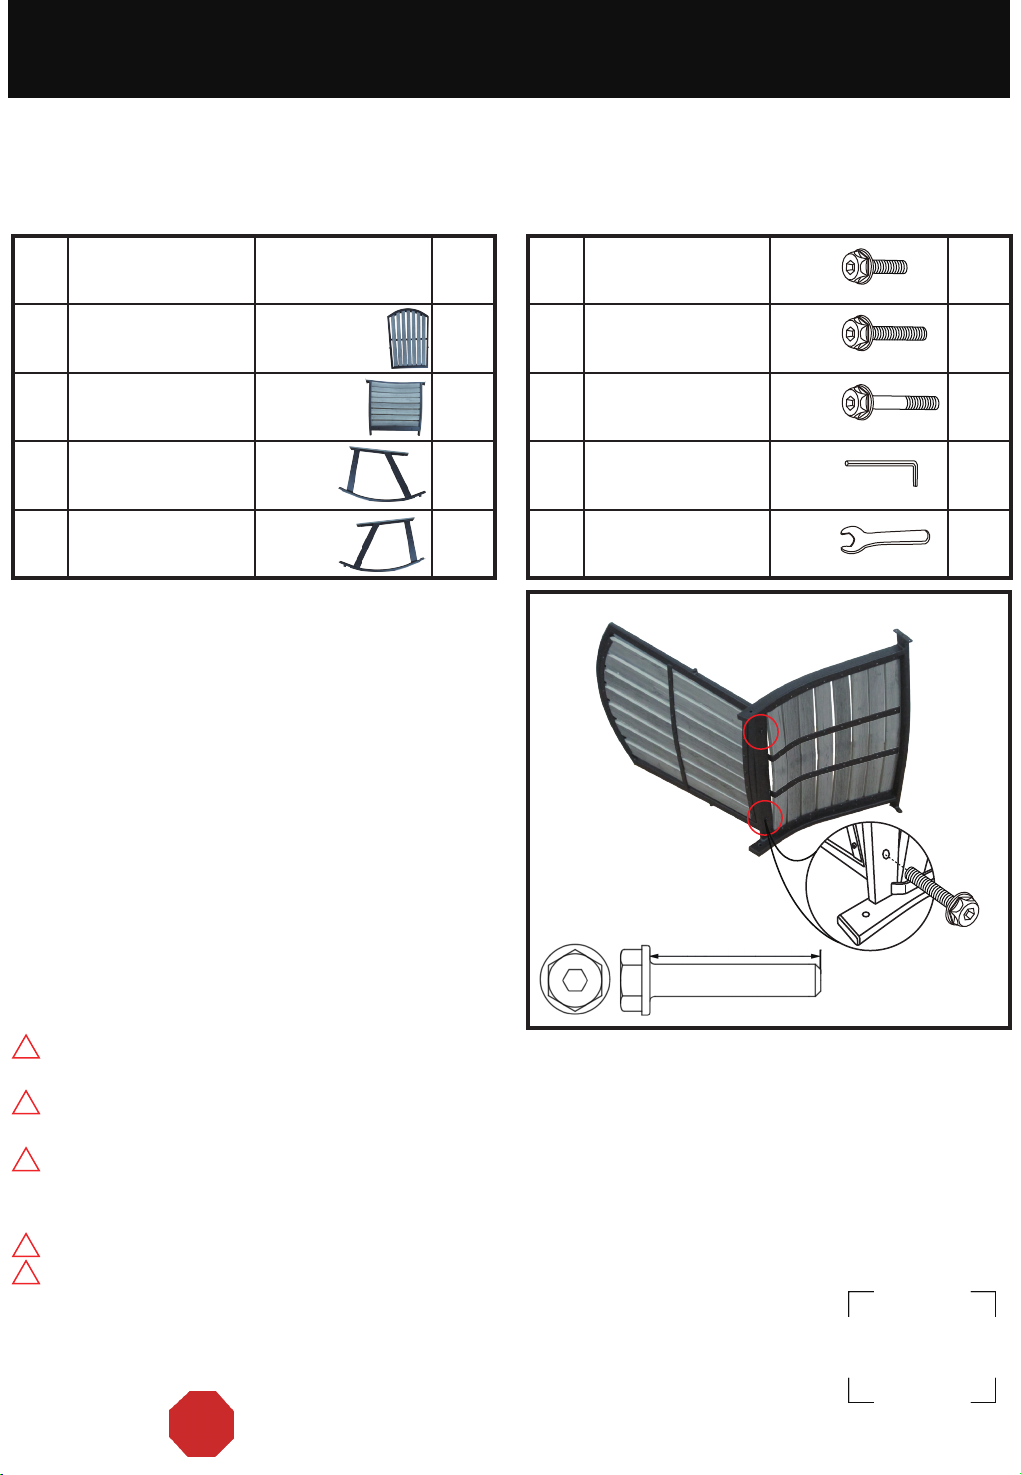
SEPARE E IDENTIFIQUE TODAS LAS PARTES Y ASEGÚRESE DE
QUE TENGA TODAS LAS PARTES DE LA LISTA.
SI NO ENCUENTRA TODAS LAS PARTES DE LA LISTA, REVISE EL
MATERIAL DE EMPAQUE. LAS PARTES PEQUEÑAS A VECES SE
SEPARAN DURANTE EL TRASLADO.
SI TIENE DIFICULTADES PARA ENSAMBLAR EL PRODUCTO O SI
ALGUNA PIEZA ESTÁ DAÑADA O FALTA, LLAME A LA LÍNEA DE
AYUDA AL 1-877-539-7436 ANTES DE DEVOLVER EL PRODUCTO A
LA TIENDA.
CUANDO LLAME, PROPORCIONE LA SIGUIENTE INFORMACIÓN:
1-NÚMERO DE MODELO DEL PRODUCTO
2-NÚMERO DE PARTE Y CÓDIGO DE MATERIAL SEGÚN LA LISTA DE
PARTES
LA MAYORÍA DE LOS PROBLEMAS PUEDEN RESOLVERSE SIN
NECESIDAD DE DEVOLVER EL PRODUCTO A LA TIENDA.
Garantía
•Este producto está cubierto por una garantía limitada de un año con Courtyard Creations Inc.
•Para cualquier reclamación de la garantía es necesario presentar el comprobante de compra (recibo
de caja registradora con fecha).
•El cliente será responsable por los cargos de empaque y envío a y desde el centro de servicio.
ALTO ¡NO DEVUELVA ESTE PRODUCTO A LA TIENDA!
Table of contents
Languages:
Other Rich Context Indoor Furnishing manuals
Popular Indoor Furnishing manuals by other brands

meubar
meubar LOVINA BAR7 Assembly instruction

Lorell
Lorell 69424 Assembly instructions

Rev-A-Shelf
Rev-A-Shelf 9" Two-Tier Basket installation instructions

Woodcrest
Woodcrest 3154 Assembly instructions

Aico
Aico MICHAEL AMINI Penthouse 9033000-130 Assembly instructions

PLACES OF STYLE
PLACES OF STYLE Dover 335 Assembly instructions

for Living
for Living Beacon Hill Linen Tower 063-3876-8 Assembly instructions

OVE
OVE OJV-22 quick start guide

CB2
CB2 MONOLITH Assembly instructions

Bensons for Beds
Bensons for Beds SUSIE STK799902 Assembly lnstructions

Lorell
Lorell LLR60536 Assembly instructions

Office Star Products
Office Star Products Ave Six Curves Bench CVS20 quick start guide