RICICLANDIA CARLOMARTELLO Hammerhead shark User manual

INSIEME A: Multistrato di betulla 4 mm
n.50 elementi pretagliati a frattura prestabilita
SET A: 4 mm Birch plywood
n.50 pre-cut elements with pre-established fracture
INSIEME B: Multistrato di betulla 4 mm
n.2 elementi pretagliati a frattura prestabilita
SET B: 4 mm Birch plywood
n.2 pre-cut elements with pre-established fracture
INSIEME C: Multistrato di betulla 4 mm
n.8 elementi pretagliati a frattura prestabilita
SET C: 4 mm Birch plywood
n.8 pre-cut elements with pre-established fracture
INSIEME D: Multistrato di betulla 4 mm
n.18 elementi pretagliati a frattura prestabilita
SET D: 4 mm Birch plywood
n.18 pre-cut elements with pre-established fracture
INSIEME E: Multistrato di betulla 4 mm
n.18 elementi pretagliati a frattura prestabilita
SET E: 4 mm Birch plywood
n.18 pre-cut elements with pre-established fracture
INSIEME F: Multistrato di betulla 4 mm
n.18 elementi pretagliati a frattura prestabilita
SET F: 4 mm Birch plywood
n.18 pre-cut elements with pre-established fracture
INSIEME G: Multistrato di pioppo 8 mm
n.27 elementi pretagliati a frattura prestabilita
SET G: 8 mm Poplar plywood
n.27 pre-cut elements with pre-established fracture
INSIEME H: Cartonlegno 1 mm
n. 20 elementi pretagliati a frattura prestabilita
SET H: 1 mm Wooden board
n. 20 pre-cut elements with pre-established fracture
INSIEME I: Multistrato di betulla 4 mm
n. 2 elementi pretagliati a frattura prestabilita
SET I: 4 mm Birch plywood
n. 2 pre-cut elements with pre-established fracture
Elemento singolo“p” Tondino di tiglio di 6mm
Single element “p” 6mm linden rod
1
“CARLOMARTELLO” - Hammerhead shark
Instructions r01 - may 2021
The kit is mainly composed of “assemblies” of pieces (mostly in birch plywood)
pre-cut and held together by small jumpers. While other elements, due to size or
material, are included individually. The kit, in a corrugated cardboard box and
sealed as a guarantee of integrity with shrink lm.
COMPOSITION OF THE KIT
CARLOMARTELLO
Istruzioni r01 – maggio 2021
Il kit è composto principalmente da“assiemi”di pezzi (per lo più in multistrato
di betulla) pretagliati e tenuti insieme fra loro da piccoli ponticelli. Mentre altri
elementi, a motivo della dimensione o del materiale, sono inclusi singolarmente.
Il kit, in scatola di cartone ondulato e sigillato come garanzia di integrità con
pellicola termoretraibile.
COMPOSIZIONE DEL KIT
LOT. IL15-R01

COSA SERVE PER IL MONTAGGIO
WHAT IS REQUIRED FOR ASSEMBLY
LEGENDA / LEGEND
Piano non pregiato di cartone, legno ecc. su cui tagliare, montare, incollare, lubricare ecc.
Expendable table of cardboard, plastic wood etc. to cut, assembly, glue, lubricate on, etc.
Piccola candela bianca (togliere la vaschetta metallica e lo stoppino).
Small white candle (remove metal tray and wick).
Taglierino a lama trapezoidale retrattile,
a marchio CE, idoneo ad essere usato da maggiori di 14 anni.
Trapezoidal blade cutter of the retractable type,
CE mark suitable for use from 14 years.
Mollette da bucato, morsetti, pesi, nastro adesivo di carta ecc ,
per bloccare i pezzi incollati
Clothes pegs, clamps, weights, paper tape, etc., to block glued pieces
Forbici a punta tonda per cimare il midollino
Round tip scissors for trimming the wicker.
Piccolo martello.
Small hammer.
Piccolo cacciavite a stella.
Small star screwdriver. Colla vinilica
Vinyl glue
Bicchiere, barattolo, o altro piccolo contenitore
lavabile e riutilizzabile per la colla.
Glass, jar, or other small washable
and reusable container to hold glue.
Piccolo pennello o stuzzicadenti ,
per stendere la colla sui pezzi da incollare.
Small brush or toothpick ,
to spread the glue on the pieces to be glued.
Spugnetta inumidita di acqua per pulire la colla in eccesso.
Wet sponge for cleaning excess glue.
Piccolo pezzo di carta vetrata titolo 80/120
per pulire i pezzi incollati e asportare eventuali inperfezione.
Small piece of 80/120 sandpaper to clean the glued pieces
and remove any inperfection.
Pazienza, ordine, pulizia…
e una buona dose di manualità
Patience, order, cleanliness…
and a good dose of manual skill
Nel caso di errore di incollaggio usare del solvente per sciogliere la colla, poi ripulire ed asciugare
gli elementi e quindi incollare in modo corretto. In case of error of gluing use nail solvent to dissolve
the glue, clean and dry the elements concerned, glue everything again, in the right way.
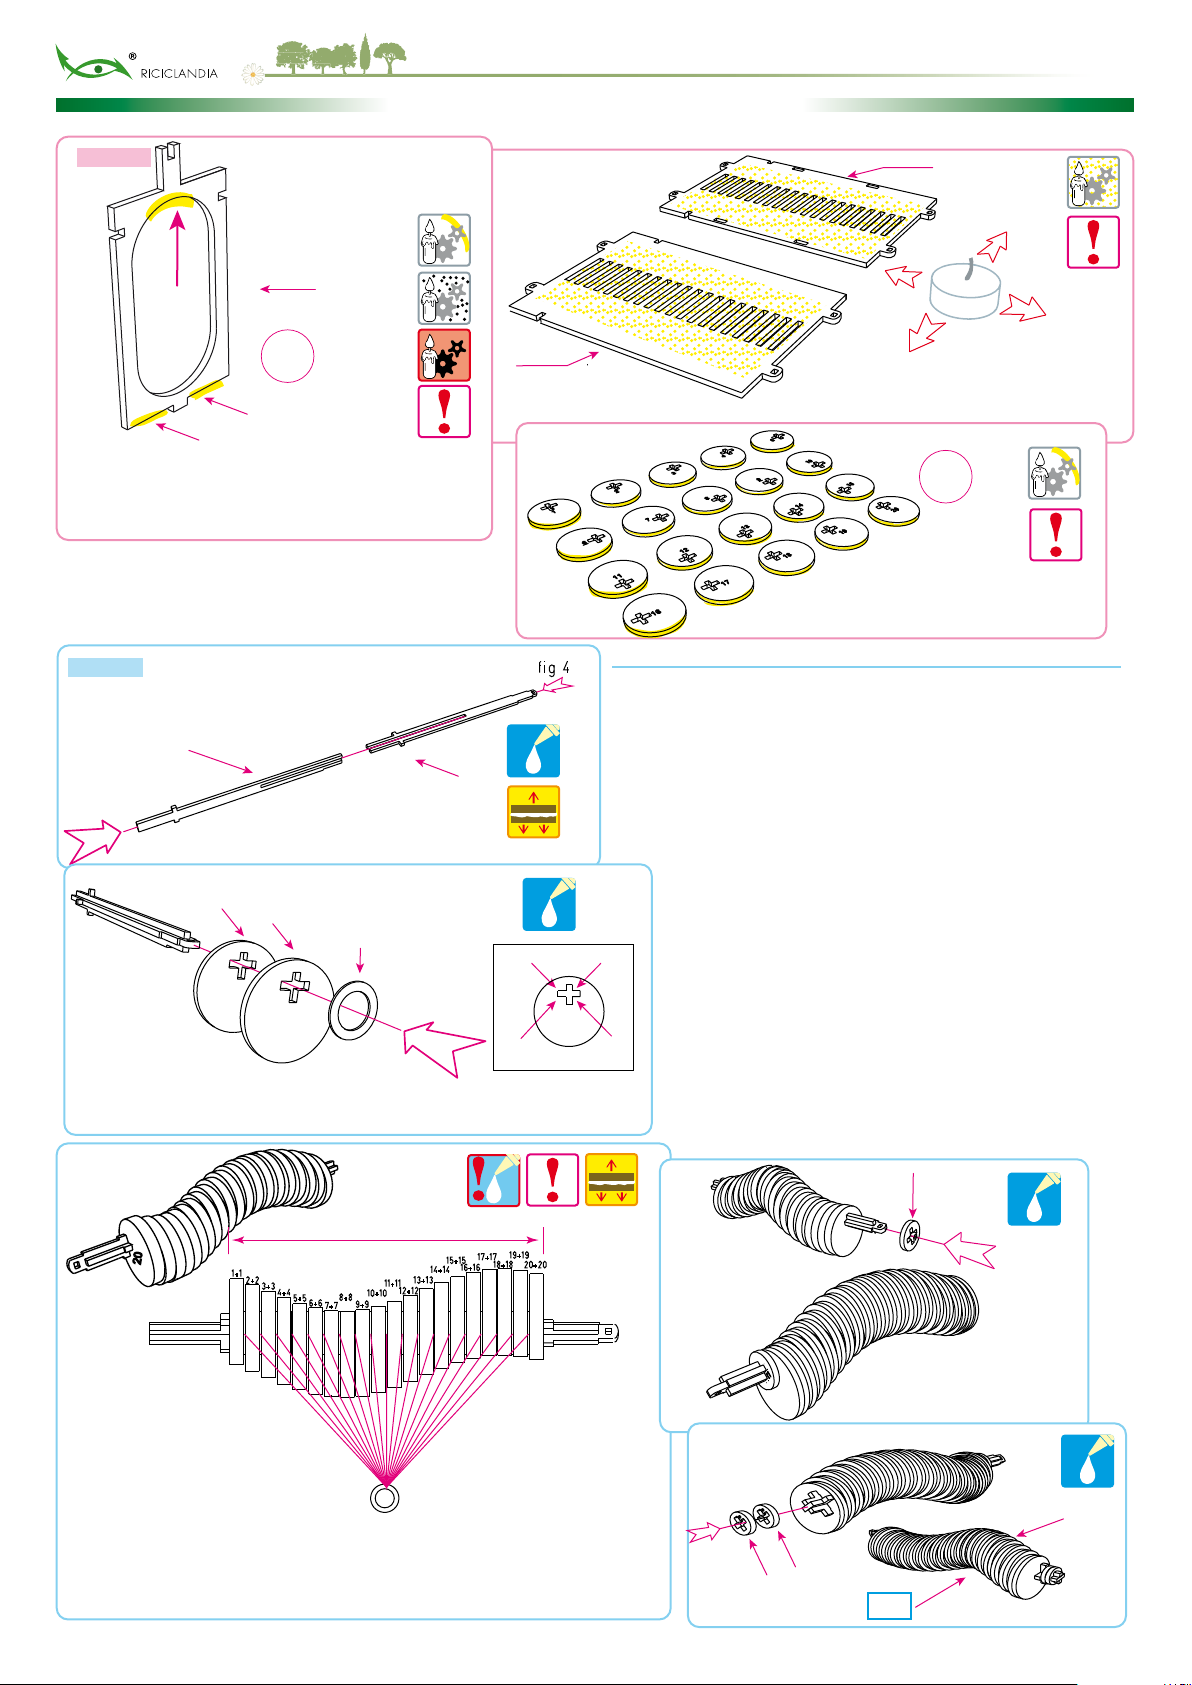
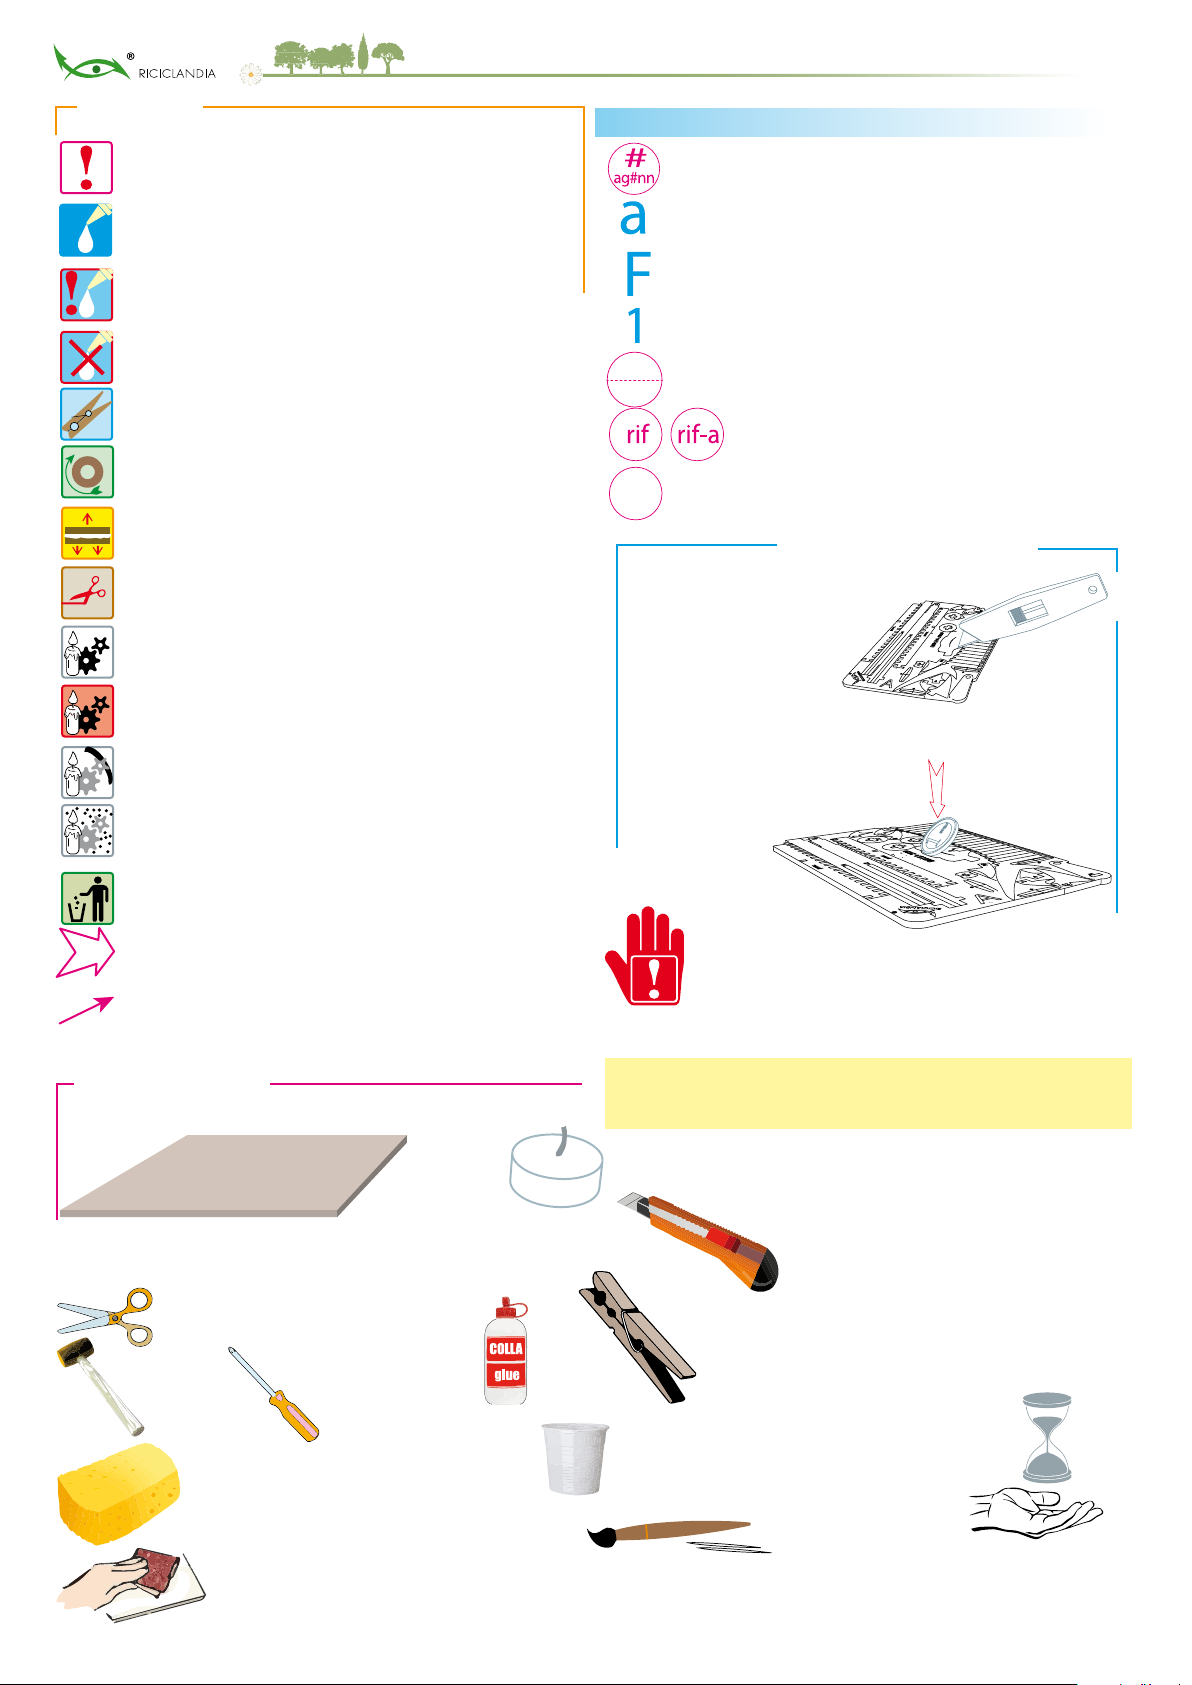
COME PROCEDERE / HOW TO ASSEMBLE
Liberare gli elementi necessari al montaggio
via via che servono. Per farlo, prima incidere
i ponticelli che tengono l’elemento
sull’insieme, da ambo le parti.
Release the elements necessary for
assembly as they serve. To do so, rst
engrave the bridges that hold the element on the whole, on both sides.
Premere con il bordo di una moneta sui
ponticelli già incisi per liberare gli elementi.
Press on the already engraved bridges by the edge
of a coin, to free the elements.
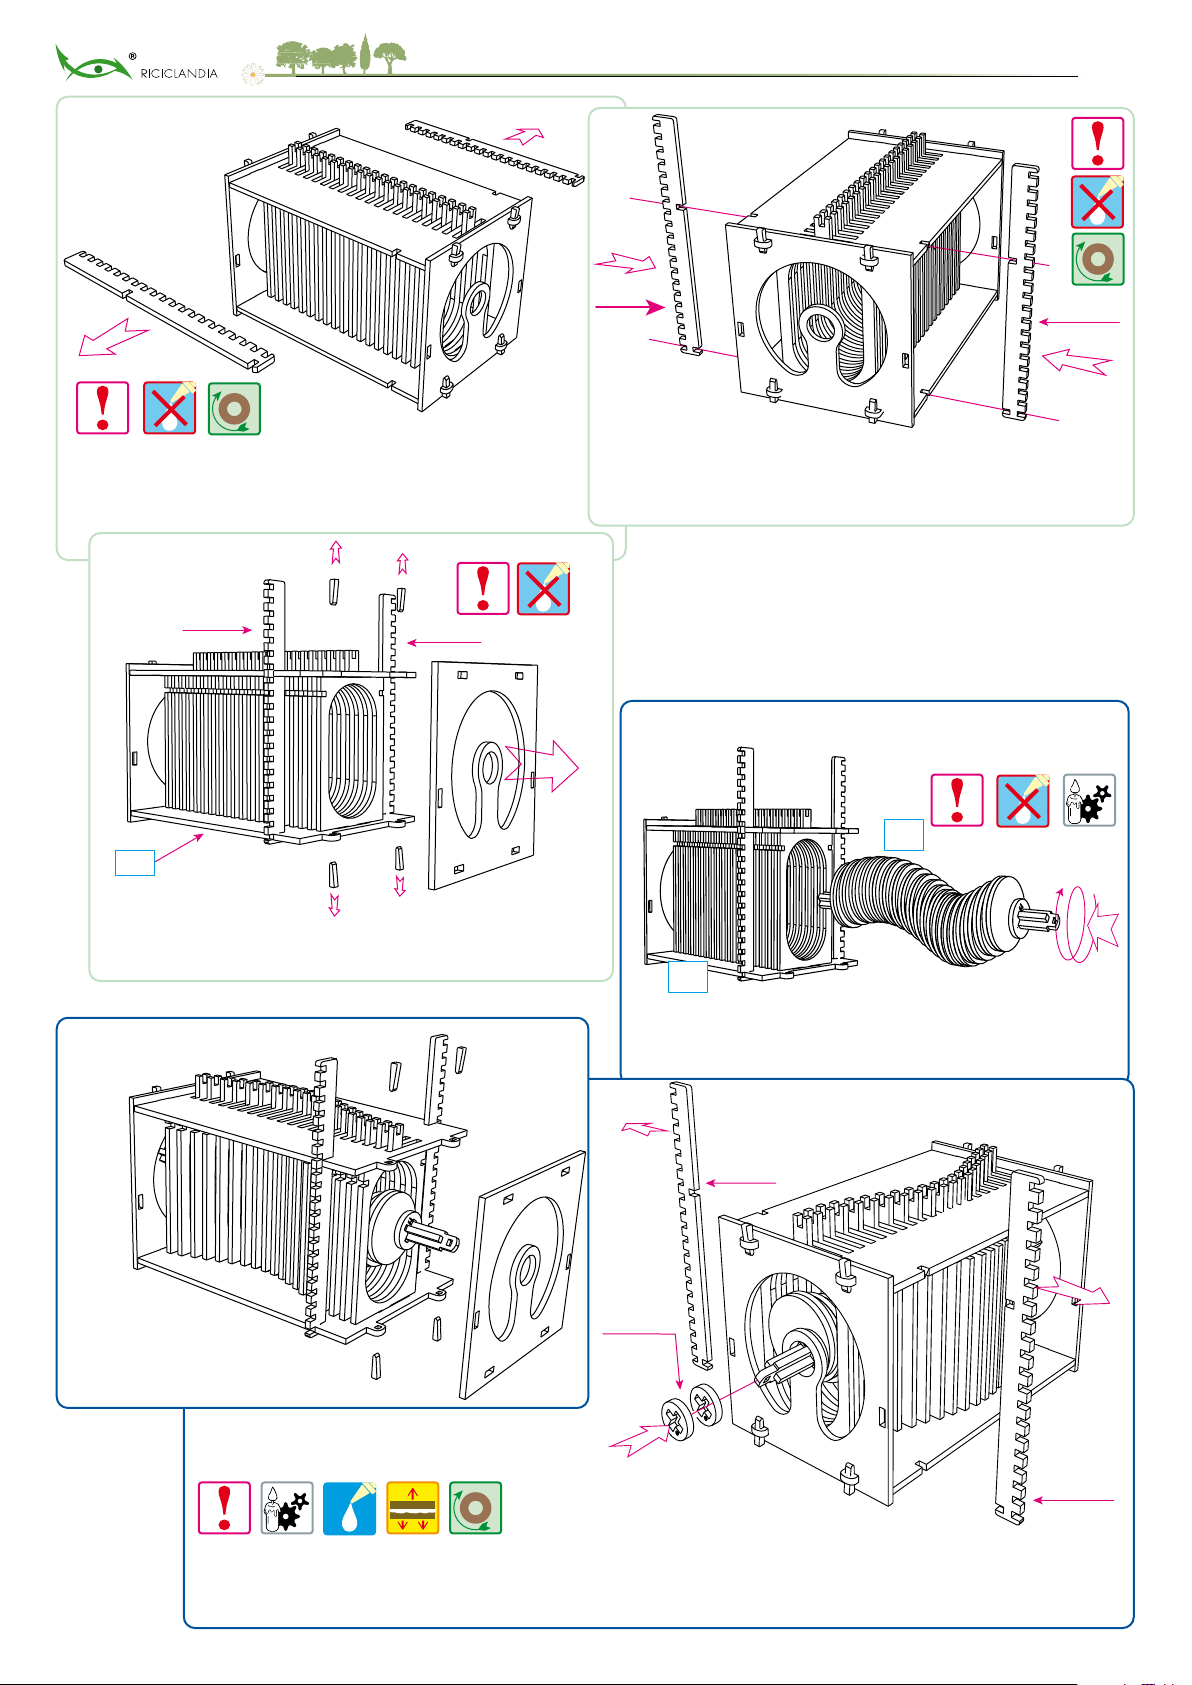
IMPORTANTE ! Seguire le istruzioni punto per punto e nella giusta sequenza.
Prima di incollare gli elementi eseguire sempre un montaggio a secco delle
varie parti. Scegliere sempre la parte migliore da mettere in vista.
IMPORTANT ! Follow the instructions in detail, step by step the right sequence. Always dry-assenbly
the various parts before gluing the elements Always choose the best part to put in view.
Attenzione importante passaggio dicoltoso leggere le note..
Pay attention/Important/ dicult step/ read notes.
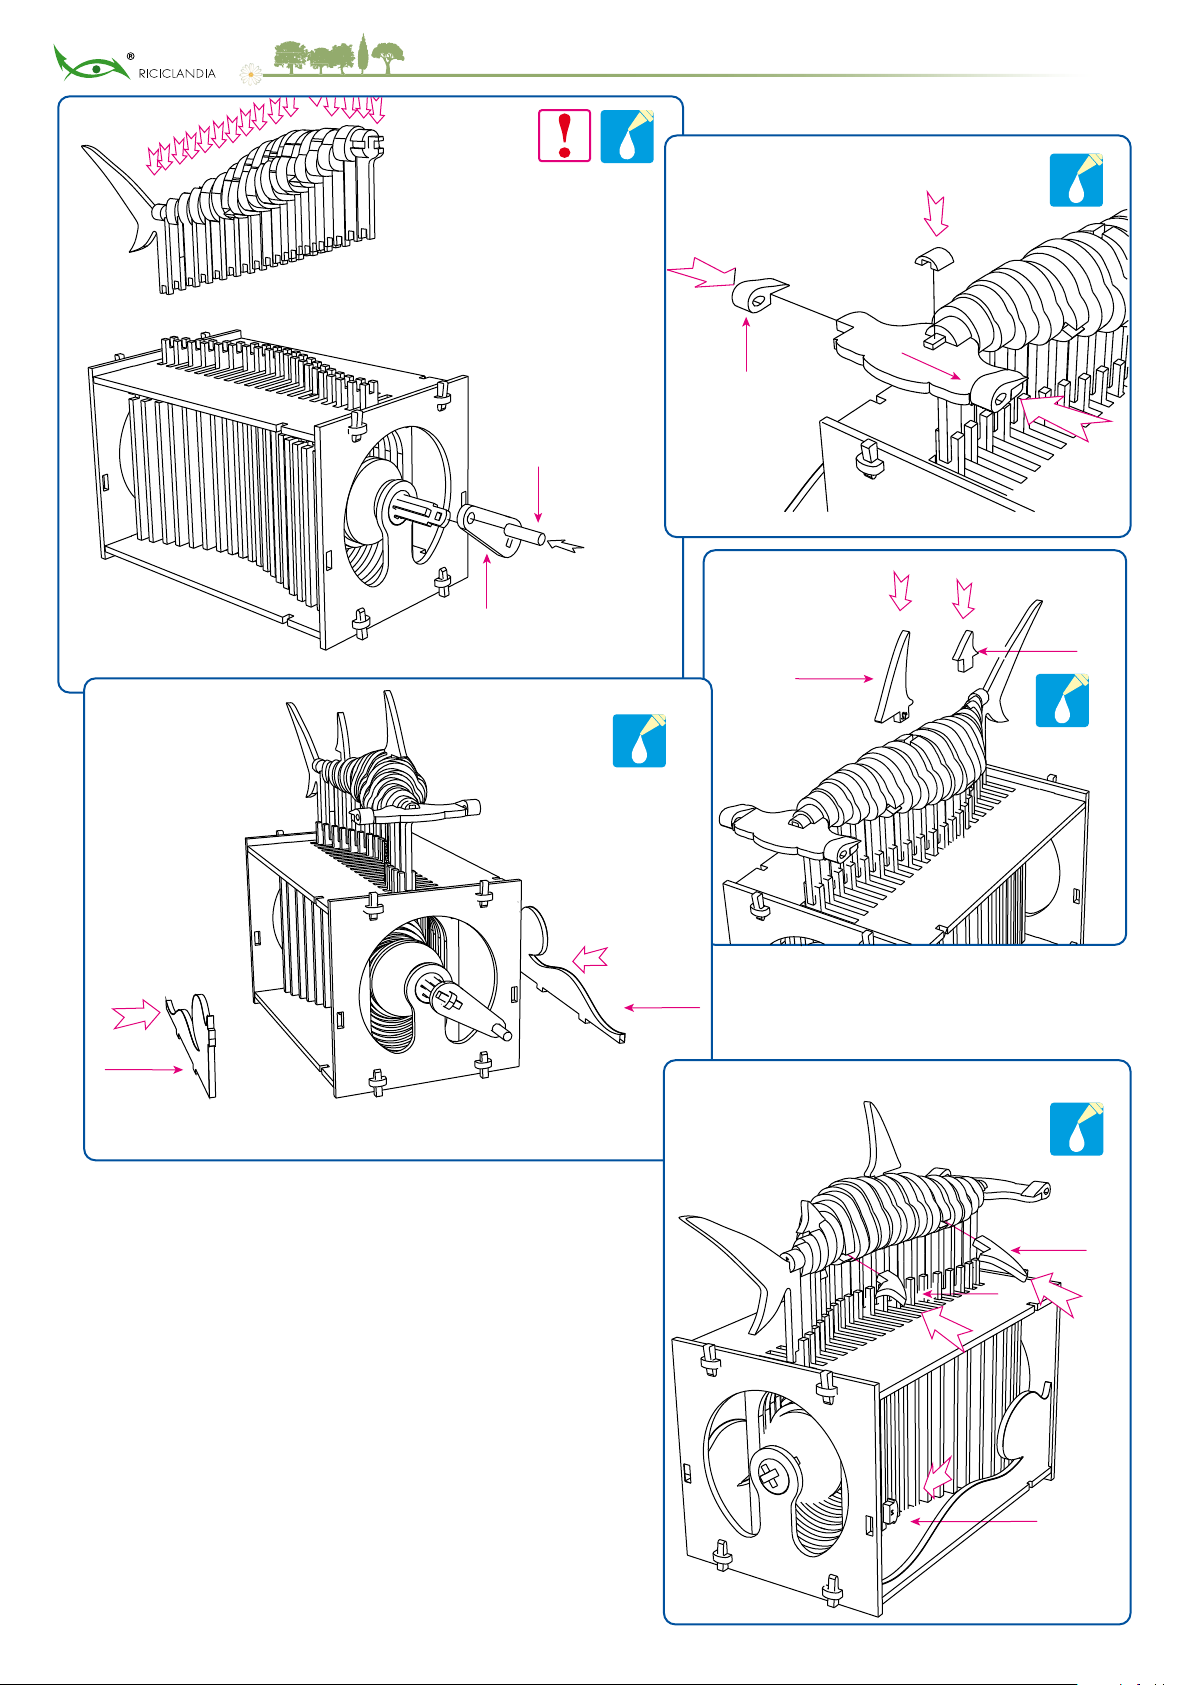
Incollare (se seguito dall’identicativo di un elemento, incollare solo quell’elemento).
Glue (if it is followed by the identier of an element, glue only that element).
Incollare con cautela - Non incollare le parti che dovranno muoversi o ruotare.
Glue carefully/pay attention and glue the moving or rotating parts properly.
Non Incollare (se seguito dall’identicativo di un elemento non incollare solo quell’elemento).
Do not glue! (if it is followed by the identier of an element, DO NOT glue only that element).
Bloccare le parti appena incollate con morsetti, nastro adesivo, pesi.
Block the parts just glued by pegs / adhesive tape/ loads.
Dopo incollato controllare il libero movimento degli elementi.
After gluing check the free rotation of elements that must be in motion.
Accertarsi che la colla sia secca prima di procedere ad altre fasi con lo stesso aggregato.
Make sure that the glue is dry before carrying out other phases with the same aggregate.
Tagliare le eccedenze - Leggere le avvertenze di sicurezza.
Cut the excess in lenght of the wicker pivots).
Lubricare le parti soggette a sfregamento / rotazione con cera di candela o parana.
Lubricate the parts that are subject to rubbing and /or rotation by candle wax/paran...
Lubricare come descritto nelle note.
Lubricate as described in the notes.
Lubricare sulla costa colorata di nero con cera o parana.
Lubricate specically on the black coloured thickness by rubbing with candle wax or paran.
Lubricare specicatamente sul piano“puntinato”con cera o parana.
Lubricate specically on the dotted table by rubbing the surface with wax or paran.
Parte da gettare via a ne montaggio.
Part to be thrown away at the end of assembly.
Direzione in cui deve essere spinto, premuto o inserito l’elemento.
It indicates what direction the mounting element has to be pushed/pressed/inserted/directed.
Indica l’elemento da scegliere per comporre l’aggregato.
Indicates the element to choose to compose the aggregate.
Aggregato ricavato dall’assemblaggio di più elementi. Aggregate obtained from the assembly
of several elements.
Lettera minuscola: elemento base componente un aggregato e/o modello. Lowercase letter:
basic element component of an aggregate and / or model.
Lettera maiuscola: insieme componente il modello da montare - raggruppa vari elementi.
Capital letter: component set of the model to be assembled - groups various elements.
Elemento non inserito in un insieme o tabella, ma componente un aggregato o il modello.
(no tondini - no perni). Element not inserted in a set or table, but component of an aggregate
or model (no rods - no pins).
Tondini di vario diametro, già tagliati o da tagliare, (Ø diametro, L lunghezza in mm).
Rods of various diameters, already cut or to be cut, (Ø diameter, L length in mm).
Marcatori di riferimento (lettera, numero o simbolo).
Reference markers (letter, number or symbol).
Ripetere l’operazione il numero delle volte indicato
Repeat the operation the number of times indicated
IDENTIFICAZIONE ELEMENTI - ELEMENTS IDENTIFICATION
ø 6mm
L 20mm
x2
2

step #2
g 04 f1
f2
g 07
ISTRUZIONI E SEQUENZA DI MONTAGGIO / INSTRUCTIONS AND ASSEMBLY SEQUENCE
Lubricare sul piano interno degli elementi nelle quattro direzioni.
Lubricate on the internal side of the elements in the 4 directions.
a2
a1
L’albero a croce di supporto delle camme è asimmetrico. Infatti
delle 4 alette che formano la croce solo 3 sono uguali, 1 è più corta.
Ciò per permettere il posizionamento sequenziale delle camme che
quindi possono essere inserite solo per un verso. Inserire le camme
a coppia con lo stesso numero iniziando dal nº 1 no al nº 20. Le
coppie di camme devono essere inserite sempre con il numero
rivolto dallo stesso lato; intervallando ogni coppia con un rondella
distanziatrice di carton-legno. L’ultima rondella non deve essere
inserita. Incollare solo la prima e l’ultima coppia di camme.
The cross support shaft of the cams is asymmetrical. In fact, only 3
wings are alike, aniong the 4 that form the cross. This allows a correct
sequential positioning of the cams that can therefore be inserted only
in one direction. Insert the pair cams with the same number starting
from No. 1 and ending with No. 20. The cam pairs must be always
inserted with the number facing the same side; spacing each pair by
a spacer washer. The last board washer is not to be inserted. Glue
only the rst and last pair of cams.
g 05
f1 + f2
1+1
1
1
1
11+1
1
cartonlegno 1mm
1mm woodem carton
lato basso / low side
lato alto / high side
IMPORTANTE! Accertarsi che la misura del pacchetto camme sia di 171,5 mm +/-0.5 mm. Se è più lunga compattare il pacchetto, se è più
corta aggiungere una rondella di carton-legno nel punto più adatto. Solo dopo aver accertato la lunghezza del pacchetto incollare l’ultima
camma. IMPORTANT! Make sure the cam pack size is 171.5mm +/- 0.5mm. If it is longer to compact the package, if it is shorter add a
cardboard-wood washer in the most suitable place. Only after having ascertained the length of the package glue the last cam.
Rondella distanziatrice in cartonlegno da 1mm
Totale nº 19 rondelle. L’ultima non va montata.
Spacer washer in wood board. Tot.nº 19 washers.
The nal one is not to be assembled
171,5 mm +/- 0,5
step #1
g 01
c
INDISPENSABILE !! Lubricare anche sull’altro lato dell’elemento
nelle stesse posizioni. Ripetere su tutti i 20 elementi“c”
INDISPENSABLE !! Lubricate also on the other side of the element
in the same positions. Repeat on all 20 elements "c"
x20
g 03
LUBRIFICAZIONE INDISPENSABILE !!
Lubricare sul bordo tutte e 40 le camme.
ESSENTIAL LUBRICATION !!
Lubricate all 40 cams on their edge.
x20
g 02
g 08
t1
g 09
#02
(s x 2)
ss
#02
aggregato nito
Accoppiare incollandole, le camme con lo stesso numeroper ottenere un unico elemento dello spessore di 8mm.
Couple by gluing the cams with the same number to obtain a single element with a thickness of 8mm.
3

g 19
retro
back
fronte
front
# 2
Inserire l’aggregato #2 nell’aggregato #4 imprimendo all’#2 una rotazione in moda da fare la
strada con le camme sui setti mobili e adattare la posizione i setti“c”al prolo dell’albero #2.
Insert aggregate #2 into aggregate #4 by giving #2 a rotation so that it can make its way with the
cams on the moving septa and adapt the position of septa "c" to the prole of tree #2.
MONTAGGIO FINALE
nal assembly
# 4
g 16 g 17
g 18
g 20
retro
back
provv.
provv.
aggregato #4 nito
retro
back
fronte
front
fronte
front
provv.
ee
e
# 4 e
provv.
fronte
front
Invertire il verso dei due provvisori ed andare a riagganciarli nelle tacche
dei due elementi“a”(base e top).
Reverse the direction of the two provisional elements and hang them up in
the notches of the two elements "a" (base and top).
Togliere le due dime provvisorie solo dopo aver inserito i cunei. Provare a far scorrere tutti i
20 setti interni lungo le asole degli elementi“a”e vericare il uido movimento.
Remove the two provisional templates only after inserting the wedges. Try to slide all 20
internal septa along the slots of the elements "a" and check the uid movement.
Solo dopo aver ben bloccato i provvisori staccare i cunei che reggono il frontale e togliere il frontale.
Only after having well locked the temporary detach the wedges that hold the front and removing the front.
Reinserire il frontale“b”e reinserire i 4 cunei
di bloccaggio. NON INCOLLARE.
Insert the front "b" and insert the 4 locking wedges.
DO NOT GLUE.
s
g 21
Cuscinetto
Bearing
s+s
s
(s x 2)
provv.
provv.
Incollare i due“cuscinetti ”s”all’elemento aggregato #2 facendo attenzione ad non incollarli al frontale.Vericare il uido movimento dell’albero a camme. Rodare il meccanismo con 30-50
giri. Nel caso di collaudo positivo, incollare i cunei di bloccaggio del frontale. Rimuovere le dime provvisorie. Glue the two "s" bearings to the aggregated element #2 taking care not to glue them
to the front. Check the uid motion of the camshaft. Break in the mechanism with 30-50 turns. In the case of positive testing, glue the locking wedges on the front. Remove the temporary templates.
step #3
step #4
g 10
g 11
g 12
g 13 g 14
g 15
Liberare dall’insieme“G”gli elementi contrassegnati da 1 a 20.
Free from the set "G" the items marked 1 to 20.
Liberare dall’insieme“A”gli elementi numerati da 1 a 20.
Free from the set "A" the elements numbered from 1 to 20.
Abbinare, incollandoli, gli elementi numerati staccati dall’insieme “A”
con i corrispondenti elementi numerati staccati dall’insieme“G”,
formando così i nuovi aggregati rinominati AG#1, AG#n…, AG#20.
Glue together the numbered elements detached from the set "A" with
the corresponding numbered elements detached from the set "G"
forming the new aggregates renamed AG#1, AG#n…, AG#20.
AG#1 AG#2 AG#3 AG#4 AG#5 AG#6 AG#7 AG#8 AG#9 AG#10 AG#11 AG#12 AG#13 AG#18 AG#19AG#19AG#14 AG#15 AG#17AG#16
Fare attenzione alla scelta della base (elemento a1) e a quella delTop (a2).
NON INCOLLARE. Si consiglia di inserire prima tutti i 20 elementi“c”nei due
provvisori, poi procedere a inserire il pacchetto nei 2 elementi di base e del top.
Pay attention to the choice of the base (element a1) and of the Top (a2).
DO NOT GLUE. It is recommended to insert rst all the elements "c" in the two
provisional, then proceed to insert the package in the 2 basic elements and top.
a2 (top)
provv.
provv.
c (n. 20 pz) tacca
notch
tacca
notch
a1 (base)
e (cunei / wedges)
a2 (top)
b (fronte / front)
b (retro / back)
a1 (base) NON INCOLLARE. Fare attenzione che le tacche
presenti sugli elementi a1 ed a2 siano rivolte
dallo stesso lato. Scegliere con attenzione i lati
da esporre.
DO NOT GLUE. Make sure that the notches on a1
and a2 elements are directed from the same
side. Carefully choose the sides to be exposed.
4

g 19
retro
back
fronte
front
# 2
Inserire l’aggregato #2 nell’aggregato #4 imprimendo all’#2 una rotazione in moda da fare la
strada con le camme sui setti mobili e adattare la posizione i setti“c”al prolo dell’albero #2.
Insert aggregate #2 into aggregate #4 by giving #2 a rotation so that it can make its way with the
cams on the moving septa and adapt the position of septa "c" to the prole of tree #2.
MONTAGGIO FINALE
nal assembly
# 4
g 16 g 17
g 18
g 20
retro
back
provv.
provv.
aggregato #4 nito
retro
back
fronte
front
fronte
front
provv.
ee
e
# 4 e
provv.
fronte
front
Invertire il verso dei due provvisori ed andare a riagganciarli nelle tacche
dei due elementi“a”(base e top).
Reverse the direction of the two provisional elements and hang them up in
the notches of the two elements "a" (base and top).
Togliere le due dime provvisorie solo dopo aver inserito i cunei. Provare a far scorrere tutti i
20 setti interni lungo le asole degli elementi“a”e vericare il uido movimento.
Remove the two provisional templates only after inserting the wedges. Try to slide all 20
internal septa along the slots of the elements "a" and check the uid movement.
Solo dopo aver ben bloccato i provvisori staccare i cunei che reggono il frontale e togliere il frontale.
Only after having well locked the temporary detach the wedges that hold the front and removing the front.
Reinserire il frontale“b”e reinserire i 4 cunei
di bloccaggio. NON INCOLLARE.
Insert the front "b" and insert the 4 locking wedges.
DO NOT GLUE.
s
g 21
Cuscinetto
Bearing
s+s
s
(s x 2)
provv.
provv.
Incollare i due“cuscinetti ”s”all’elemento aggregato #2 facendo attenzione ad non incollarli al frontale.Vericare il uido movimento dell’albero a camme. Rodare il meccanismo con 30-50
giri. Nel caso di collaudo positivo, incollare i cunei di bloccaggio del frontale. Rimuovere le dime provvisorie. Glue the two "s" bearings to the aggregated element #2 taking care not to glue them
to the front. Check the uid motion of the camshaft. Break in the mechanism with 30-50 turns. In the case of positive testing, glue the locking wedges on the front. Remove the temporary templates.
step #3
step #4
g 10
g 11
g 12
g 13 g 14
g 15
Liberare dall’insieme“G”gli elementi contrassegnati da 1 a 20.
Free from the set "G" the items marked 1 to 20.
Liberare dall’insieme“A”gli elementi numerati da 1 a 20.
Free from the set "A" the elements numbered from 1 to 20.
Abbinare, incollandoli, gli elementi numerati staccati dall’insieme “A”
con i corrispondenti elementi numerati staccati dall’insieme“G”,
formando così i nuovi aggregati rinominati AG#1, AG#n…, AG#20.
Glue together the numbered elements detached from the set "A" with
the corresponding numbered elements detached from the set "G"
forming the new aggregates renamed AG#1, AG#n…, AG#20.
AG#1 AG#2 AG#3 AG#4 AG#5 AG#6 AG#7 AG#8 AG#9 AG#10 AG#11 AG#12 AG#13 AG#18 AG#19AG#19AG#14 AG#15 AG#17AG#16
Fare attenzione alla scelta della base (elemento a1) e a quella delTop (a2).
NON INCOLLARE. Si consiglia di inserire prima tutti i 20 elementi“c”nei due
provvisori, poi procedere a inserire il pacchetto nei 2 elementi di base e del top.
Pay attention to the choice of the base (element a1) and of the Top (a2).
DO NOT GLUE. It is recommended to insert rst all the elements "c" in the two
provisional, then proceed to insert the package in the 2 basic elements and top.
a2 (top)
provv.
provv.
c (n. 20 pz) tacca
notch
tacca
notch
a1 (base)
e (cunei / wedges)
a2 (top)
b (fronte / front)
b (retro / back)
a1 (base) NON INCOLLARE. Fare attenzione che le tacche
presenti sugli elementi a1 ed a2 siano rivolte
dallo stesso lato. Scegliere con attenzione i lati
da esporre.
DO NOT GLUE. Make sure that the notches on a1
and a2 elements are directed from the same
side. Carefully choose the sides to be exposed.
55

1
20
g 22
g 23
g 24
g 25
aggregati AF#1, AG#…, AG#20
G 21
A 4
A 12
Montare gli aggregati da AG#1 a AG#20 in
successione numerica a iniziare dal fondo
sulla scatola del meccanismo, sulle tacche
predisposte dei 20 setti.
Asseble the aggregates from AG#1 to AG#20
in numerical sequence starting from the
bottom on the box of the mechanism, on the
notches of the 20 septa.
retro
back
fronte
front
p
q
W
W
q
Completare il montaggio di particolari.
Complete the assembly of single components.
g 26
A 15
A 7
z
PULIZIA Durante il montaggio è possibile che gli elementi si possano macchiare, ed è possi-
bile che i pezzi pretagliati (di legno grezzo) presentino qualche asperità. Per risolvere questi
problemi si consiglia di eettuare una pulizia locale con carta abrasiva ne (grana 80/100).
Questa operazione deve essere eseguita sotto il controllo di un adulto, data la potenziale noci-
vità delle polveri inalabili.
CONSERVAZIONE Una volta montato l’oggetto non necessita di manutenzioni particola-
ri: spolverare di tanto in tanto con un pennello morbido per evitare l’accumulo di polvere.
COSA FARE SE
•Durante lo“smontaggio” degli insiemi e la liberazione degli elementi pretagliati si rompe
o si danneggia o si scheggia un pezzo necessario al montaggio:
–Non gettare i pezzi danneggiati ma incollarli subito con colla vinilica ripristinando l’ele-
mento (il materiale del quale sono fatti è realizzato a strati. Una possibile discontinuità
del materiale può determinare piccole rotture).
•Durante il montaggio viene erroneamente sbagliata un’operazione di incollaggio:
–Se l’incollaggio è fresco e le parti si separano, ripulirle la supercie di contatto con carta ve-
trata e/o con solvente per unghie (vedi istruzioni di sicurezza), poi procedere nuovamente
con il montaggio seguendo le istruzioni. Se l’incollaggio è secco e le parti non si staccano
procedere allo scollamento con l’ausilio di un batuolo di ovatta imbevuta in solvente per
smalti da unghie (vedi istruzioni di sicurezza), tamponando più volte le parti interessate
no a che le parti si staccano, poi procedere come sopra.
•Risultano mancanti o danneggiati uno o più elementi (Attenzione: la confezione all’acquisto
dovrà essere integra e completa dell’involucro sigillante):
–richiedere via e-mail a [email protected] i pezzi mancanti indicando: modello e lotto di
produzione (Lot), allegare lo scontrino di acquisto, indicando nome, cognome e indirizzo
per la spedizione, n. di telefono per contatti.
•Se l’oggetto già montato si danneggia in maniera lieve:
– Procedere come ai punti 1 e 2. Se vengono danneggiate altre parti o se serve la sostituzio-
nomamente il pezzo, oppure fare una richiesta con le stesse indicazioni di cui al punto 3
precedente, indicando come oggetto:“Richiesta materiali per sostituzione”.
CLASSIFICAZIONE In base al cap. 10 dirett. Giocattoli 2009/48 il presente oggetto è assimilato
ai prodotti destinati a collezionisti adulti di età pari o superiore a 14 anni (10.1.2 punto 2). Non
necessita di marchio CE, ma sottostà alle regole del Codice di Consumo (dcl. 206/2009 e agg.).
SMALTIMENTO Il prodotto è formato da materiali non classicabili come riuti speciali e/o
pericolosi, pertanto i riuti sviluppati sia in fase di montaggio che a ne vita del prodotto
possono essere trattati come normali riuti domestici. Si consiglia comunque di informarsi
presso gli uci territoriali competenti per lo smaltimento consapevole.
GARANZIA Il prodotto è coperto dalla garanzia legale, prevista dalla legge vigente al mo-
mento dell’acquisto, di 2 anni. Eventuali usi impropri(*) o danneggiamenti del prodotto non
dipendenti da trasporto o da rottura di pezzi dentro la confezione (che dovrà essere integra e
sigillata al momento dell’acquisto), non sono coperti da garanzia. (* Si intende: Uso continuo
dei meccanismi. Mancata lubricazione. Montaggio eseguito male. Uso eccessivo di collante.
Altro uso non espressamente considerato nelle presenti istruzioni ed avvertenze).
MANUALE Aggiornamenti nel sito web: www.riciclandia.it
e-mail: posta@riciclandia.it
CLEANING During assembly it is possible that the elements can get stained, and it is possi-
ble that the pre-cut pieces (of raw wood) show some roughness.To solve these problems
it is recommended to carry out a local cleaning with ne abrasive paper (80/100 grit).
This operation must be performed under the supervision of an adult, given the potential
harmfulness of inhalable dust.
STORAGE Once assembled, the object does not require special maintenance: dust from time
to time with a soft brush to avoid the accumulation of dust.
WHAT TO DO IF
• During the“disassembly”of the assemblies and the freeing of the pre-cut elements, a piece
necessary for assembly breaks or is damaged or chipped:
–Do not throw away the damaged pieces but glue them immediately with vinyl glue restor-
ing the element (the material they are made of is made in layers. A possible discontinuity
of the material can cause small breaks).
•During assembly, a gluing operation is mistakenly mistaken:
–If the bond is fresh and the parts separate, clean the contact surface with sandpaper and
/ or nail polish remover (see safety instructions), then proceed with the assembly again
following the instructions. If the gluing is dry and the parts do not come o, proceed
with the detachment with the aid of a cotton swab soaked in nail polish remover (see
safety instructions), dabbing the aected parts several times until the parts detach, then
proceed as above.
•One or more elements are missing or damaged (Attention: the packaging upon purchase
must be intact and complete with the sealing wrapper):
–request the missing pieces by e-mail to [email protected] indicating: model and pro-
duction lot (Lot), attach the purchase receipt, indicating name, surname and shipping
address, n. phone for contacts.
•If the object already mounted is slightly damaged:
–Proceed as per the previous points 1 and 2. If other parts are damaged or the damage is such
tails of the shape of the piece to be reconstructed independently, or request with the same
indications as in point 3 above, indicating as object:“Request for replacement materials”.
PRODUCT CLASSIFICATION According to chap. 10 direct Toys 2009/48 this object is simi-
lar to products intended for adult collectors aged 14 or over (10.1.2 point 2). It does not re-
quire the CE mark, but is subject to the rules of the Consumer Code (dcl. 206/2009 and adj.).
DISPOSAL The product is made up of materials that cannot be classied as special and /
or hazardous waste, therefore waste designed both during assembly and at the end of the
product’s life can be treated as normal household waste. However, it is advisable to inquire
at the competent local oces for responsible disposal.
WARRANTY The product is covered by the legal warranty, provided for by the law in force
at the time of purchase, of 2 years. Any improper use (*) or damage to the product not de-
pendent on transport or breaking of pieces inside the package (which must be intact and
sealed at the time of purchase), are not covered by warranty. (*We mean: Continuous use
of the mechanisms. Lack of lubrication. Bad assembly. Excessive use of glue. Other use not ex-
pressly considered in these instructions and warnings).
MANUAL Updates on the website: www.riciclandia.it
e-mail: posta@riciclandia.it
6

PULIZIA Durante il montaggio è possibile che gli elementi si possano macchiare, ed è possi-
bile che i pezzi pretagliati (di legno grezzo) presentino qualche asperità. Per risolvere questi
problemi si consiglia di eettuare una pulizia locale con carta abrasiva ne (grana 80/100).
Questa operazione deve essere eseguita sotto il controllo di un adulto, data la potenziale noci-
vità delle polveri inalabili.
CONSERVAZIONE Una volta montato l’oggetto non necessita di manutenzioni particola-
ri: spolverare di tanto in tanto con un pennello morbido per evitare l’accumulo di polvere.
COSA FARE SE
•Durante lo“smontaggio” degli insiemi e la liberazione degli elementi pretagliati si rompe
o si danneggia o si scheggia un pezzo necessario al montaggio:
–Non gettare i pezzi danneggiati ma incollarli subito con colla vinilica ripristinando l’ele-
mento (il materiale del quale sono fatti è realizzato a strati. Una possibile discontinuità
del materiale può determinare piccole rotture).
•Durante il montaggio viene erroneamente sbagliata un’operazione di incollaggio:
–Se l’incollaggio è fresco e le parti si separano, ripulirle la supercie di contatto con carta ve-
trata e/o con solvente per unghie (vedi istruzioni di sicurezza), poi procedere nuovamente
con il montaggio seguendo le istruzioni. Se l’incollaggio è secco e le parti non si staccano
procedere allo scollamento con l’ausilio di un batuolo di ovatta imbevuta in solvente per
smalti da unghie (vedi istruzioni di sicurezza), tamponando più volte le parti interessate
no a che le parti si staccano, poi procedere come sopra.
•Risultano mancanti o danneggiati uno o più elementi (Attenzione: la confezione all’acquisto
dovrà essere integra e completa dell’involucro sigillante):
–richiedere via e-mail a [email protected] i pezzi mancanti indicando: modello e lotto di
produzione (Lot), allegare lo scontrino di acquisto, indicando nome, cognome e indirizzo
per la spedizione, n. di telefono per contatti.
•Se l’oggetto già montato si danneggia in maniera lieve:
– Procedere come ai punti 1 e 2. Se vengono danneggiate altre parti o se serve la sostituzio-
nomamente il pezzo, oppure fare una richiesta con le stesse indicazioni di cui al punto 3
precedente, indicando come oggetto:“Richiesta materiali per sostituzione”.
CLASSIFICAZIONE In base al cap. 10 dirett. Giocattoli 2009/48 il presente oggetto è assimilato
ai prodotti destinati a collezionisti adulti di età pari o superiore a 14 anni (10.1.2 punto 2). Non
necessita di marchio CE, ma sottostà alle regole del Codice di Consumo (dcl. 206/2009 e agg.).
SMALTIMENTO Il prodotto è formato da materiali non classicabili come riuti speciali e/o
pericolosi, pertanto i riuti sviluppati sia in fase di montaggio che a ne vita del prodotto
possono essere trattati come normali riuti domestici. Si consiglia comunque di informarsi
presso gli uci territoriali competenti per lo smaltimento consapevole.
GARANZIA Il prodotto è coperto dalla garanzia legale, prevista dalla legge vigente al mo-
mento dell’acquisto, di 2 anni. Eventuali usi impropri(*) o danneggiamenti del prodotto non
dipendenti da trasporto o da rottura di pezzi dentro la confezione (che dovrà essere integra e
sigillata al momento dell’acquisto), non sono coperti da garanzia. (* Si intende: Uso continuo
dei meccanismi. Mancata lubricazione. Montaggio eseguito male. Uso eccessivo di collante.
Altro uso non espressamente considerato nelle presenti istruzioni ed avvertenze).
MANUALE Aggiornamenti nel sito web: www.riciclandia.it
e-mail: [email protected]
CLEANING During assembly it is possible that the elements can get stained, and it is possi-
ble that the pre-cut pieces (of raw wood) show some roughness.To solve these problems
it is recommended to carry out a local cleaning with ne abrasive paper (80/100 grit).
This operation must be performed under the supervision of an adult, given the potential
harmfulness of inhalable dust.
STORAGE Once assembled, the object does not require special maintenance: dust from time
to time with a soft brush to avoid the accumulation of dust.
WHAT TO DO IF
• During the“disassembly”of the assemblies and the freeing of the pre-cut elements, a piece
necessary for assembly breaks or is damaged or chipped:
–Do not throw away the damaged pieces but glue them immediately with vinyl glue restor-
ing the element (the material they are made of is made in layers. A possible discontinuity
of the material can cause small breaks).
•During assembly, a gluing operation is mistakenly mistaken:
–If the bond is fresh and the parts separate, clean the contact surface with sandpaper and
/ or nail polish remover (see safety instructions), then proceed with the assembly again
following the instructions. If the gluing is dry and the parts do not come o, proceed
with the detachment with the aid of a cotton swab soaked in nail polish remover (see
safety instructions), dabbing the aected parts several times until the parts detach, then
proceed as above.
•One or more elements are missing or damaged (Attention: the packaging upon purchase
must be intact and complete with the sealing wrapper):
–request the missing pieces by e-mail to [email protected] indicating: model and pro-
duction lot (Lot), attach the purchase receipt, indicating name, surname and shipping
address, n. phone for contacts.
•If the object already mounted is slightly damaged:
–Proceed as per the previous points 1 and 2. If other parts are damaged or the damage is such
tails of the shape of the piece to be reconstructed independently, or request with the same
indications as in point 3 above, indicating as object:“Request for replacement materials”.
PRODUCT CLASSIFICATION According to chap. 10 direct Toys 2009/48 this object is simi-
lar to products intended for adult collectors aged 14 or over (10.1.2 point 2). It does not re-
quire the CE mark, but is subject to the rules of the Consumer Code (dcl. 206/2009 and adj.).
DISPOSAL The product is made up of materials that cannot be classied as special and /
or hazardous waste, therefore waste designed both during assembly and at the end of the
product’s life can be treated as normal household waste. However, it is advisable to inquire
at the competent local oces for responsible disposal.
WARRANTY The product is covered by the legal warranty, provided for by the law in force
at the time of purchase, of 2 years. Any improper use (*) or damage to the product not de-
pendent on transport or breaking of pieces inside the package (which must be intact and
sealed at the time of purchase), are not covered by warranty. (*We mean: Continuous use
of the mechanisms. Lack of lubrication. Bad assembly. Excessive use of glue. Other use not ex-
pressly considered in these instructions and warnings).
MANUAL Updates on the website: www.riciclandia.it
e-mail: [email protected]
7

min.
90
CARLOMARTELLO
Scatola di montaggio di modellino dinamico (in scala non
denita) relativo ad una interpretazione del movimento
di uno squalo martello.
Il kit è composto principalmente da“assiemi” di pezzi (per
lo più in multistrato di betulla) pretagliati e tenuti insieme
fra loro da piccoli ponticelli.
Mentre altri elementi, a motivo della dimensione o del
materiale, sono inclusi singolarmente.
Il kit, confezionato in scatola di cartone ondulato e
sigillato come garanzia di integrità con pellicola
termoretraibile.
“CARLOMARTELLO” Hammerhead shark
Dynamic model kit (in undened scale) related to an
interpretation of the movement of a hammerhead shark.
The kit is mainly composed of “assemblies” of pieces
(mostly in birch plywood) pre-cut and held together by
small jumpers.
While other elements, due to size or material, are inclu-
ded individually.
The kit, packaged in a corrugated cardboard box and
sealed as a guarantee of integrity with shrink lm.
riciclandia.it • ideedileonardo.it
Questo prodotto non è un giocattolo ed è idoneo ad essere
montato e/o manipolato da maggiori di 14 anni. Istruzioni
in italiano. The product is not a toy. It is capable of being
mounted and / or manipulated by people over 14 years old.
12 cm
29 cm
12 cm
23 cm
7 426813 525555
marchio registrato di MultiTranciati srl, Via dei Fossi, 15, 53048 Rigomagno - Sinalunga (Siena) - Italy
made in Italy pensato, progettato
e prodotto in Toscana
oggetto
Table of contents
Popular Toy manuals by other brands

Dancing Wings Hobby
Dancing Wings Hobby SCG38 instruction manual

Lionel
Lionel Amusement Park Swing Ride owner's manual

marklin
marklin 22211 manual

IKEA
IKEA Lillabo 904.699.60 manual

Zapf Creation
Zapf Creation Baby Annabell 703243 manual

Mattel
Mattel Barbie Little Lands Fairytopia Mermaidia Playset... instructions