Riello UPS NetMan 204 User manual


- 2 -
INTRODUCTION
Thank you for choosing our product.
The accessories described in this manual are of the highest quality, carefully designed and built in
order to ensure excellent performance.
This manual contains detailed instructions on how to install and use the product.
This manual must be stored in a safe place and CONSULTED BEFORE USING THE DEVICE
for proper usage instructions as well as maximum performance from the device itself.
NOTE: Some images contained in this document are for informational purposes only and may not
faithfully demonstrate the parts of the product they represent.
Symbols used in this manual:
Warning
Indicates important information that must not be ignored.
Information
Provides notes and useful suggestions for the User.
SAFETY
This part of the manual contains SAFETY precautions that must be followed scrupulously.
The device has been designed for professional use and is therefore not suitable for use in
the home.
The device has been designed to operate only in closed environments. It should be
installed in rooms where there are no inflammable liquids, gas or other harmful substances.
Take care that no water or liquids and/or foreign bodies fall into the device.
In the event of a fault and/or impaired operation of the device, do not attempt to repair it but
contact the authorized service centre.
The device must be used exclusively for the purpose for which it was designed. Any other
use is to be considered improper and as such dangerous. The manufacturer declines all
responsibility for damage caused by improper, wrong and unreasonable use.

- 3 -
ENVIRONMENTAL PROTECTION
Our company devotes abundant resources to analyzing environmental aspects in the development
of its products. All our products pursue the objectives defined in the environmental management
system developed by the company in compliance with applicable standards.
Hazardous materials such as CFCs, HCFCs or asbestos have not been used in this product.
When evaluating packaging, the choice of material has been made favoring recyclable materials.
Please separate the different material of which the packaging is made and dispose of all material in
compliance with applicable standards in the country in which the product is used.
DISPOSING OF THE PRODUCT
The device contains internal material which (in case of dismantling/disposal) are considered
TOXIC, such as electronic circuit boards. Treat these materials according to the laws in force,
contacting qualified centers. Proper disposal contributes to respect for the environment and human
health.
© The reproduction of any part of this manual, even in part, is prohibited unless authorized by the
manufacturer.
The manufacturer reserves the right to change the product described at any time without prior notice for
improvement purposes.

- 4 -
CONTENTS
DESCRIPTION ____________________________________________________ 6
OVERVIEW ____________________________________________________________6
PACKAGE CONTENTS _____________________________________________________6
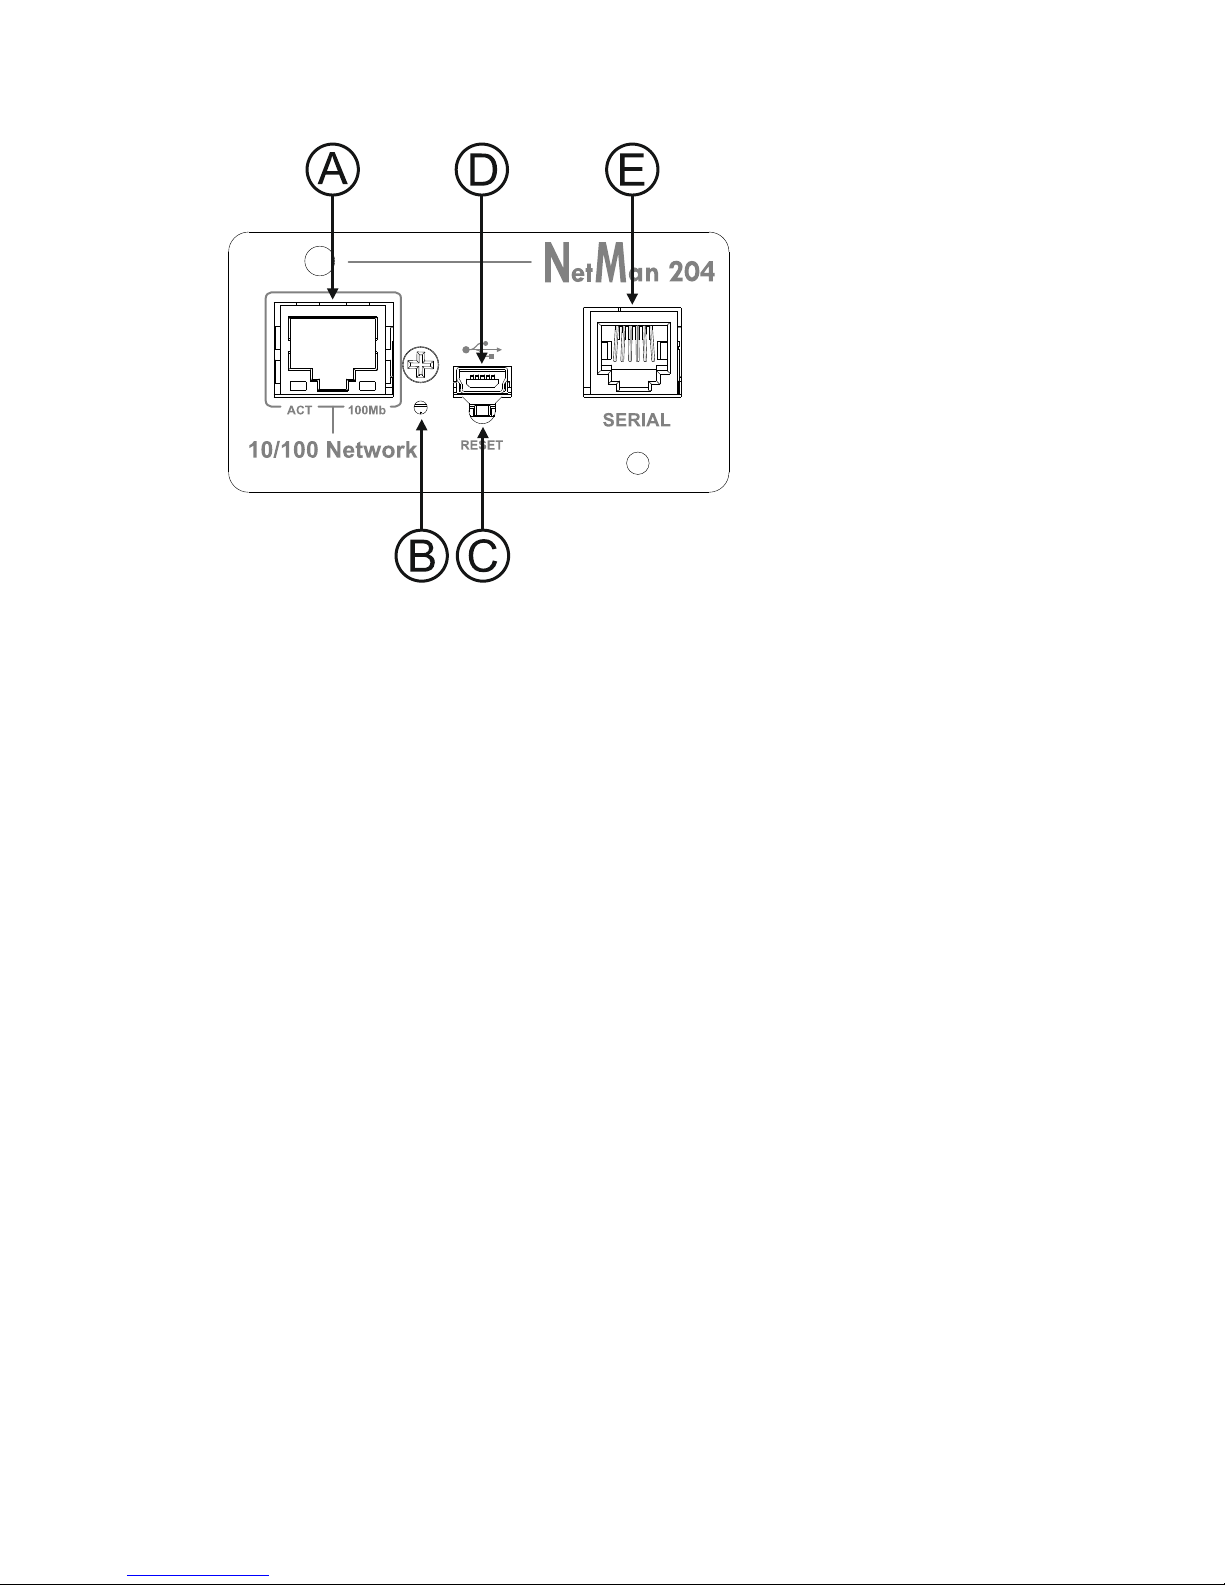
FRONT PANEL __________________________________________________________7
Network port _____________________________________________________________ 7
Micro-USB port ___________________________________________________________ 7
Serial port _______________________________________________________________ 7
LED_____________________________________________________________________ 7
GSM Modem _____________________________________________________________ 8
Reset button _____________________________________________________________ 8
USERS _______________________________________________________________8
NETWORK SERVICES _____________________________________________________9
SSH_____________________________________________________________________ 9
Serial network ____________________________________________________________ 9
Wake-on-LAN_____________________________________________________________ 9
HTTP____________________________________________________________________ 9
SNMP ___________________________________________________________________ 9
UDP_____________________________________________________________________ 9
Modbus TCP/IP __________________________________________________________ 10
BACnet/IP_______________________________________________________________ 10
FTP ____________________________________________________________________ 10
Syslog _________________________________________________________________ 10
Email___________________________________________________________________ 10
Reports_________________________________________________________________ 10
DEVICE VALUES AND EVENTS HISTORY LOG ARCHIVE _____________________________11
Eventlog________________________________________________________________ 11
Datalog (only for UPS devices) _____________________________________________ 11
ENVIRONMENTAL SENSORS (OPTIONAL)_______________________________________12
Available sensors ________________________________________________________ 12
INSTALLATION __________________________________________________ 12
CONFIGURATION ________________________________________________ 13
OVERVIEW ___________________________________________________________13
Configuration via HTTP/HTTPS _____________________________________________ 13
Configuration via USB ____________________________________________________ 14
Configuration via SSH ____________________________________________________ 14
CONFIGURATION MENU DESCRIPTION ________________________________________15

- 5 -
Start menu ______________________________________________________________ 15
Setup __________________________________________________________________ 17
IP config________________________________________________________________ 18
WEB CONFIGURATION____________________________________________ 19
Network configuration ____________________________________________________ 20
Device configuration______________________________________________________ 21
Data log ________________________________________________________________ 22
UDP Firewall ____________________________________________________________ 23
Wake on Lan address_____________________________________________________ 24
SNMP __________________________________________________________________ 25
MODBus/BACNET________________________________________________________ 26
JSON __________________________________________________________________ 27
Syslog configuration _____________________________________________________ 28
Date & Time configuration _________________________________________________ 29
NTP & Timezone configuration _____________________________________________ 30
Email configuration_______________________________________________________ 31
Email logic______________________________________________________________ 33
GSM Modem ____________________________________________________________ 34
Sensors ________________________________________________________________ 35
Sensors Config __________________________________________________________ 36
Password recovery_______________________________________________________ 38
Wi-Fi setup (optional card required) _________________________________________ 39
Expert mode ____________________________________________________________ 40
CONFIGURATION OF SEVERAL DEVICES _______________________________________40
FIRMWARE UPGRADE ____________________________________________ 41
FIRMWARE UPGRADE VIA HTTP ____________________________________________41
FIRMWARE UPGRADE VIA FTP _____________________________________________41
SNMP CONFIGURATION___________________________________________ 42
MODBUS TCP/IP PROTOCOL_______________________________________ 44
BACNET/IP CONFIGURATION ______________________________________ 48
SERIAL PORT CONFIGURATION____________________________________ 50
TECHNICAL DATA________________________________________________ 51
NETWORK CABLE ______________________________________________________51
OPERATING AND STORAGE CONDITIONS_______________________________________51

- 6 -
DESCRIPTION
OVERVIEW
NetMan 204is an accessory that allows device management through a LAN (Local Area Network);
the accessory supports all the main network protocols (SNMP v1, v2 and v3, TCP/IP, HTTP and
MODBUS) and is compatible with Ethernet 10/100Mbps IPv4/6 networks. The device can therefore
be integrated easily into medium and large-sized networks.
NetMan 204 also records device values and events in the history log archive and can manage
optional environmental sensors (not supplied with the device, but provided separately)
PACKAGE CONTENTS
NetMan 204
USB cable
Quick start

- 7 -
FRONT PANEL
A: Network port
B: Led
C: Reset button
D: Micro-USB port
E: Serial port
Network port
NetMan 204 connects to 10/100 Mbps Ethernet networks by means of connector RJ45. The LEDs
built into the connector describe the status of the network:
Left LED
SOLID YELLOW: NetMan204 has detected a valid link.
FLASHING YELLOW: NetMan204 is receiving or transmitting data packets.
Right LED
SOLID GREEN: NetMan204 is connected to a network operating at 100 Megabits per second.
Micro-USB port
NetMan 204 makes available an USB communication port through which it is possible to configure
it (see paragraph “Configuration via USB”).
Serial port
NetMan 204 makes available a serial communication port to which you can connect environmental
sensors (not supplied with the device, but provided separately).
LED
This led describes the status of NetMan 204:
SOLID RED: NetMan 204 is not communicating with the device (verify PRTK Code).
FLASHING RED: the DHCP server does not have assigned a valid IP address to NetMan 204.
OFF: regular working.

- 8 -
GSM Modem
NetMan 204 can send a notification SMS if one or more alarm conditions occur. The SMS can be
sent to up to three recipients and they can be sent for seven different kinds of alarm.
An external GSM modem (optional accessory) and a SIM card are required. For more details, see
paragraph “GSM Modem”
Reset button
The reset button allows to restart the NetMan204 or to load a default configuration with a
predefined static IP address.
To reset NetMan204: keep press the reset button until the red led start flashing (ca. 2 seconds)
and then release it.
To load a configuration with predefined static IP address: keep press the reset button; first the
led starts flashing, then turns to solid red (ca. 10 seconds). When the led is solid red, release the
reset button and the NetMan 204 will reboot with:
IP address: 192.168.0.204
Netmask: 255.255.0.0
SSH service enabled
HTTP service enabled
HTTP and SSH service are enabled temporarily without changing the configuration saved
in non-volatile memory.
USERS
It is possible to access to NetMan 204 with three different users (admin / fwupgrade / user).
Username
Default password
Privileges
admin
admin
user with right to modify the configuration
fwupgrade
fwupgrade
user with right to upgrade the firmware
user
user
user with right to read and download the log files

- 9 -
NETWORK SERVICES
NetMan 204 implements a series of services based on the main network protocols. These services
can be activated or deactivated according to requirements (see paragraph “Configuration”). A brief
description for each of these is given below.
SSH
By means of a SSH client (available on all the main operating systems) a remote connection with
NetMan 204 can be established to change its configuration (see paragraph “Configuration via
SSH”).
Serial network
To emulate a point-to-point serial connection through the network (TCP/IP protocol) in order to use
special function service software.
Wake-on-LAN
NetMan 204 can send “Wake-on-LAN” command for remote computers boot.
HTTP
Using the HTTP (Hyper Text Transfer Protocol), is possible to configure the NetMan 204 and the
status of the device can be monitored by means of a web browser without having to install
additional software. All the most popular web browsers are supported; only most recent version of
browsers are supported.
SNMP
SNMP (Simple Network Management Protocol) is a communication protocol that allows a client
(manager) to make requests to a server (agent). NetMan 204 is an SNMP agent.
To exchange information, manager and agent use an addressing technique called MIB
(Management Information Base). There is a MIB file for each agent, defining which variables can
be requested and the respective access rights. The agent can also send messages (TRAP) without
a prior request from the manager, to inform the latter of particularly important events. SNMPv3 is
the evolution of SNMP and introduces new important features related to security.
UDP
UDP (User Datagram Protocol) is a low level network protocol that guarantees speed in the
exchange of data and low network congestion. It is the protocol used by the UPSMon software for
monitoring and control of the device.
The UDP connection uses the UDP 33000 port by default but can be configured on other ports
according to requirements.

- 10 -
Modbus TCP/IP
The device status can be monitored by means of the standard network protocol MODBUS TCP/IP.
Modbus TCP/IP is simply the Modbus RTU protocol with a TCP interface that runs on Ethernet.
BACnet/IP
The device status can be monitored by means of the standard network protocol BACnet/IP.
BACnet (Building Automation and Control networks) is a data communication protocol mainly used
in the building automation and HVAC industry (Heating Ventilation and Air-Conditioning).
FTP
FTP (File Transfer Protocol) is a network protocol used for file exchange. NetMan 204 uses this
protocol for:
1. download of files of the device values and events history log archive (Datalog and Eventlog);
2. download and upload of configuration files;
3. firmware upgrade.
In both cases a client FTP is required, configured with these parameters:
Host: hostname or NetMan 204 IP address;
User: see chapter “Users”;
Password: current password.
The connection can also be established using a web browser (all the most popular web browsers
are supported), by inserting the hostname or IP address of the NetMan 204.
Syslog
Netman 204 can send events to a syslog server over UDP. This service allow to centralize the log
of the IT infrastructure on a single server, in order to have them consumed on the preferred way.
Email
NetMan 204 can send a notification e-mail if one or more alarm conditions occur. The e-mails can
be sent to up to three recipients and they can be sent for seven different kinds of alarm.
SMTP (Simple Mail Transfer Protocol) is the protocol used to send the e-mails. The port is
configurable. For more details, see paragraph “Configuration”
Reports
NetMan 204 can send periodic e-mails with an attachment containing the files of the device values
and events history log archive.
This service can be used to periodically save the history log archives.
The “Email” service must be enabled in order to send reports; the reports are sent to all the
addresses configured for this service (for more details see paragraph “Configuration”).

- 11 -
DEVICE VALUES AND EVENTS HISTORY LOG ARCHIVE
NetMan 204 records the device values (Datalog) and events (Eventlog) in a history log database.
Eventlog
The Eventlog service is always active and records all relevant device events in the ‘event.db’ file.
The file can be downloaded via FTP or can be viewed through the web page without credentials.
With the “Email report” service, is sent a .csv with the event of the last day or week according to
your setting. The data are saved in circular list mode; thus the most recent data are saved by
overwriting the oldest data.
Datalog (only for UPS devices)
The Datalog service records the main data of the UPS in the ‘datalog.db’ file.
This service writes a record each hour at 00 minutes, which summarizes the data of the past hour:
values are recorded at their minimum, maximum and medium. Records older than one year get
overwritten with new records.
The file can be downloaded via FTP or can be viewed through the web page (only the most
important values are shown on the web page) without credentials.
With the “Email report” service, the last records (last day or last 7 days according to your settings)
will be sent in a .csv format.

- 12 -
ENVIRONMENTAL SENSORS (OPTIONAL)
It is possibile to connect to NetMan 204 the environmental sensors for monitoring temperature,
humidity and digital input/output.
The information provided by these sensors can be showed with the device monitoring and control
software or with a web browser.
The values provided by the sensors may also be requested with SNMP according to the RFC 3433
standard (MIB files on the download site).
Available sensors
Temperature: detects the environmental temperature in °C.
Humidity & Temperature: detects the relative humidity in % and the environmental
temperature in °C.
Digital I/O & Temperature: detects the environmental temperature in °C and features a
digital input and a digital output.
It is possible to connect up to 3 environmental sensor to a NetMan 204 (for sensor
installation please see the sensors’ manual).
INSTALLATION
1. Remove the cover of the device expansion slot by removing the two retaining screws.
2. Insert NetMan 204 in the slot.
3. Secure Netman 204 in the slot using the two screws removed previously.
4. Connect the device to the network by means of connector RJ-45 (see “Specifications for the
cabling of the network cable”)

- 13 -
CONFIGURATION
OVERVIEW
NetMan 204 can be configured via USB, via SSH or via HTTP.
NetMan 204 comes provided as factory default with DHCP enabled and with the following
services active: SSH, HTTP, SNMP, UDP and FTP.
In order to change the configuration of NetMan 204, you have to log in as admin (default
password “admin”).
5
NetMan 204 needs approx. 2 minutes to become operational from when it is powered up
or after a reboot; before this time the device may not respond to commands that are sent
to it.
Configuration via HTTP/HTTPS
In order to change the configuration via http/https, you have to insert in your web browser the
hostname or IP address of the NetMan 204 and then log in as admin (default password: "admin").
The HTTPS service uses TLS (transport layer security) in order to provide cryptographic
security. However, the certificate used is self-signed and therefore the web browser may
prompt a security alert; in this case you can ignore the alert and proceed with the
configuration of NetMan 204.
Once login has been effected, you can browse through the menus to configure the NetMan 204.
In order to make a new configuration effective, it is necessary to save it. Some changes
are applied immediately, while other require a reboot of the NetMan 204 (as required with
a pop-up by your web browser).

- 14 -
Configuration via USB
To configure NetMan 204 via USB it is necessary to:
Connect, with the USB cable provided, the micro-USB port with the USB port of a PC with
Windows operating system.
If not previously installed, install the USB driver (after driver installation, a virtual COM
named “NetMan 204 Serial” will be present in device manager).
Execute a terminal emulation program with the following settings:
COMn (1), 115200 baud, no parity, 8 databits, 1 stop bit, no flow control.
(1) COMn = COM port assigned to “NetMan 204 Serial” by device manager.
Press the “Enter” key of the PC.
At the login prompt, enter “admin”.
At the password prompt, enter the current password (default password: "admin").
During password’s typing, no character is shown.
Once login has been effected, the screen of the start menu is displayed. From this screen it is
possible to access the various menus to change NetMan 204 settings (see paragraph “Start menu”
and following paragraphs).
Configuration via SSH
To configure NetMan 204 via SSH it is necessary to:
Execute a SSH client on a PC connected in a network to NetMan 204 set with the IP
address of the device to be configured.
At the login prompt, enter “admin”.
At the password prompt, enter the current password (default password: "admin").
During password’s typing, no character is shown.
For proper configuration of NetMan 204, you must configure the SSH client so that
the backspace key sends "Control-H".
Please verify the keyboard options of your SSH client.
Once login has been effected, the screen of the start menu is displayed. From this screen it is
possible to access the various menus to change NetMan 204 settings (see paragraph “Start menu”
and following paragraphs).

- 15 -
CONFIGURATION MENU DESCRIPTION
Start menu
Once login has been effected via SSH or USB, a screen like the following is displayed:
/------------------------/
/ Netman 204 /
/------------------------/
Setup..........:<--
View status....:
Change password:
Service log....:
Wi-Fi setup....:no card installed
Factory reset..:
Expert mode....:
inet addr:10.1.30.68 Bcast:10.1.255.255 Mask:255.255.0.0
Press [ESC] for logout
SysVer. S16-1 - AppVer. 02.01.000
Function
Description
Setup
To enter main configuration menu
View status
To see the status of the device
Change password
To modify the password (see also Password recovery)
Service log
To generate a log file of the card (when requested by the service)
Wi-Fi setup
To configure Wi-Fi connection
For Wi-Fi connection, an optional card is required. The Wi-Fi card is not
provided with NetMan 204 but it has to be purchased separately.
Factory reset
Restore factory configuration
Expert mode
To enter Expert mode (more information at paragraph “Expert mode”)
To move within this menu and the following menus, use the keys as described in the following
table; the arrow or the cursor shows the current selection.

- 16 -
Key
Function
Direction keys (Arrow up, down, right, left)
To move the cursor within the menus
Tab
Goes on to next option
Enter (1)
Choice of submenu
Confirmation of characters entered
Esc (1)
Exit main menu (2)
Return to previous menu
(1) Some keys can have a different function depending on the menu.
(2) To exit from a menu a confirmation (‘Y’ or ‘N’) is required after pressing the ESC key.

- 17 -
Setup
The main configuration menu displays a screen like the following:
/------------------------/
/ Setup /
/------------------------/
IP config......:<--
Wi-Fi setup....:
Enable Sensors.:
Sensors Config.:
Expert mode....:
Factory reset..:
Press [Esc] to quit
SysVer. S16-1 - AppVer. 02.01.000
From this main menu it is possible to access the various submenus, the function of each of which
is shown in the table below.
Menu
Function
IP config
To configure the network parameters
Wi-Fi setup
To configure Wi-Fi connection
For Wi-Fi connection, an optional card is required. The Wi-Fi card is not
provided with NetMan 204 but it has to be purchased separately.
Enable Sensors
To enable the environmental sensors
Sensors Config
To configure the environmental sensors
Expert mode
To enter Expert mode (more information at paragraph “Expert mode”)
Factory reset
Restore factory configuration

- 18 -
IP config
/------------------------/
/ IP config /
/------------------------/
Hostname.......:ups-server
IP address/DHCP:DHCP
Netmask........:
Gateway........:
Primary DNS....:
Secondary DNS..:
With this menu the main network parameters can be set as described in the following table.
Field
Parameters to be inserted
Hostname
Enter the NetMan 204 host name
IP address/DHCP
Enter the IP address for a static IP; enter “DHCP” for a dynamic IP
Netmask
Enter the netmask to be used together with the static IP address
Gateway
Enter the name or the address of the network gateway
Primary DNS
Enter the name or the address of the preferred DNS to be used
Secondary DNS
Enter the name or the address of the alternative DNS to be used
If a static IP address is assigned to the device, all the fields must be configured with the
network parameters. If a dynamic IP address is assigned, just enter ‘dhcp’ in the “IP
Address/DHCP” field and provide a hostname; all the other options should be ignored
because these are automatically configured with DHCP
After pressing “ESC” and “Y” to confirm exit from the menu, a screen similar to the image below is
displayed. Press the “ENTER” key to return to the main menu and the configuration will be
immediately applied.
eth0 Link encap:Ethernet HWaddr 00:02:63:04:07:b1
inet addr:10.1.11.19 Bcast:10.1.255.255 Mask:255.255.0.0
inet6 addr: fe80::202:63ff:fe04:7b1/64 Scope:Link
UP BROADCAST RUNNING MULTICAST MTU:1500 Metric:1
RX packets:145877 errors:0 dropped:0 overruns:0 frame:1
TX packets:4899 errors:0 dropped:0 overruns:0 carrier:0
collisions:0 txqueuelen:1000
RX bytes:12740380 (12.1 MiB) TX bytes:2115614 (2.0 MiB)

- 19 -
WEB CONFIGURATION
After setting up the network, all the settings are available on the web configuration when logged is
as “admin” user. Is not possible to have multiple concurrent sessions.
The login password must contain alphanumeric characters and these special
characters: ,._+:@%/-. No other characters are allowed to avoid malicious script
injections.
.
Please note that user “fwupgrade” and “user” are not allowed to log in on the web page. Either use
“admin” or enter without password.

- 20 -
Network configuration
On the web page, is possible to configure in depth the network services of NetMan 204.
Field
Parameters to be inserted
Hostname
Enter the NetMan 204 host name
Static IP/DHCP
Choose between static IP or dynamic IP
IP Address
Enter the IP address
Netmask
Enter the netmask to be used together with the static IP address
Gateway
Enter the name or the address of the network gateway
Primary DNS
Enter the name or the address of the preferred DNS to be used
Secondary DNS
Enter the name or the address of the alternative DNS to be used
Enable SSH
protocol
Enables the SSH service
Enable FTP
protocol
Enables the FTP protocol
Enable Serial
network
tunneling
Enables the serial network tunnelling protocol
Enable HTTP
Enables HTTP service
HTTP port
Enter the port where HTTP service is started (default: 80)
Enable HTTPS
Enable HTTPS service
HTTPS port
Enter the port where HTTPS service is started (default: 443)
Enable UDP
Enables UDP/UPSMon service
Other manuals for NetMan 204
1
Table of contents
Other Riello UPS Network Card manuals
Popular Network Card manuals by other brands

Eaton
Eaton Powerware Series Quick start instructions

Brainboxes
Brainboxes UC-268 Specification sheet

HP
HP Memory Modules user guide

SMC Networks
SMC Networks EZ Card 10 user guide

D-Link
D-Link DFE-580TX manual

Planet Networking & Communication
Planet Networking & Communication ENW-9702 Quick installation guide

ZyXEL Communications
ZyXEL Communications AG-120 release note

Lava Computer
Lava Computer Lava 2SP-550 installation manual

Boca Systems
Boca Systems Wireless LAN Card M73-APO01-810 Quick installation guide

Linksys
Linksys WUSB300N user guide

Toshiba
Toshiba MTX NEMA 3R MV brochure

MGE UPS Systems
MGE UPS Systems minislot 66244 user manual