Riotoro SPITFIRE X1S PLUS User manual

RACING STYLE GAMING CHAIR
SPITFIRE X1S PLUS

1
Thank you for purchasing the SPITFIRE X1S PLUS!
Welcome to RIOTORO
The SPITFIRE X1S PLUS pro-level gaming chairs are designed with
exceptional ergonomics, easy setup and maximum comfort for
extended gaming sessions or daily use.
The SPITFIRE X1S PLUS is featured packed including multi-directional
arm rests, height-adjustable mechanism, fully reclining backrest,
removable lumbar and neck support cushions. Allowing the maximum
level of customization to ensure you get the perfect seating position.
The bucket design enhances the overall gaming experience and
provides the perfect balance of comfort and expected performance
during the most intense gaming sessions.

SPITFIRE X1S PLUS RACING STYLE GAMING CHAIR
4
5
7
8
Before You Begin
- Exploded view
- What is in the box
- Precautions
- Requirements
1
2Ready, Setup, Go
- Specifications
- Install the castors
- Install the piston
- Install the base
- Install the armrest
- Install the seat and bottom assembly
- Install the bottom and back assembly
- Install the side trim
- Personalization
- Connecting power
- Bluetooth pairing
- Customizing RGB lighting
3Top / Front Panel Assembly
- General Maintenance
- Limited product warranty ("Limited Warranty")
- Recommended parts
23
24
25
10
11
12
13
14
15
16
17
18
19
20
21
2
CONTENTS

Before You Begin
1
www.riotoro.com/chairs

SPITFIRE X1S PLUS RACING STYLE GAMING CHAIR
13
8
3
51
2
64
79
10
11
12
Exploded view
1. 3D Armrest
2. Performance Castors
3. Left Support Trim
4. Wheel Base
5. RGB backrest
6. Piston
7. Piston Cover
8. Adjustable Base
9. Seat
10. Lumbar Pillow
11. Neck Pillow
12. Right Support Trim
13. 3D Armrest
Before You Begin 4

SPITFIRE X1S PLUS RACING STYLE GAMING CHAIR
Backrest structure Join backrest and seat
Adjustable base Backrest and height
adjustment
1
7
Backrest trim Cover backrest and seat
joints
Backrest trim Cover backrest and seat
joints
Seat Build your gaming chair
RGB backrest with
bluetooth speaker
1
1
1
1
1
1
Build your gaming chair
4
WHAT’S IN THE BOX
QTY
ITEM IMAGE USEDESCRIPTION
1
2
3
5
Before You Begin 5
6
Pillow Back support

SPITFIRE X1S PLUS RACING STYLE GAMING CHAIR
M8 x 25.0mm Screws
Wheel base Castor installation
Screw caps 4
17 Cover screw holes
2Securing components
5 x 140.0 mm Screws 2
16 Securing trim
15
wrench / screw driver Secure all screws
RGB remote control Change colors / effects 1
Performance castors Provide chair mobility
Piston Support your weight and
adjust chair height
3D armrest
1
1
5
1
2
1
Support your arms during
chair use
11
WHAT’S IN THE BOX
QTY
ITEM IMAGE USEDESCRIPTION
8
9
10
12
13
14
Piston cover Protect piston from dirt
and provide aesthetics
Before You Begin 6

SPITFIRE X1S PLUS RACING STYLE GAMING CHAIR
Please take the following precautions:
- Handle all components with care.
- Remove all components for protective packaging and sort them out
- To avoid damaging components do not use of sharp objects.
- Before moving to the next step, make sure the components are
securely fastened.
PRECAUTIONS
Before You Begin 7
SPITFIRE X1S PLUS RACING STYLE GAMING CHAIR
Before You Begin 8
Note: Handle all components with care, should you need any assistance go to www.riotoro.com/support
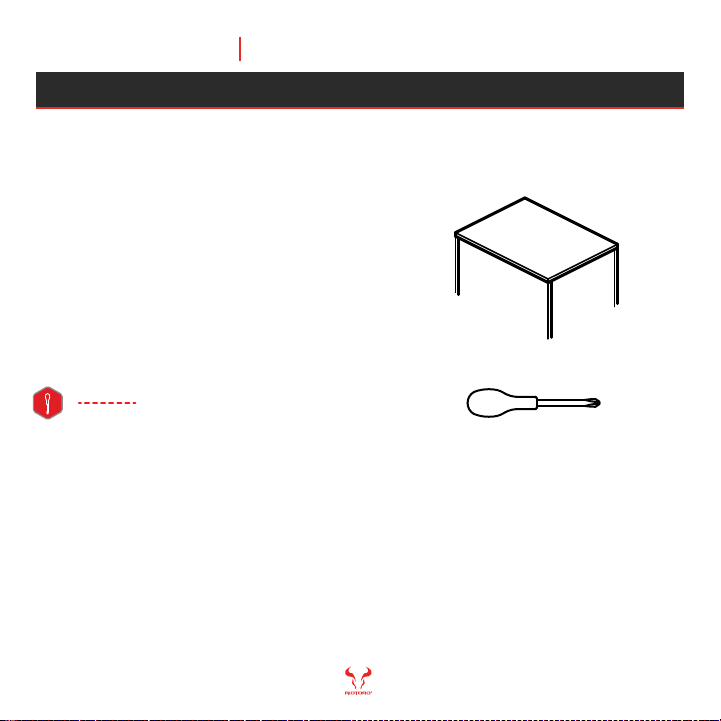
REQUIREMENTS
In order to configure the SPITFIRE X1S PLUS you will need:
1. A flat working area (e.g. desk or table)
with sufficient space
2. A magnetic Phillips screw driver
This means you need to have the Phillips screw driver
available in order to complete this assembly.

Ready, Setup, Go
2
www.riotoro.com/chairs

SPITFIRE X1S PLUS RACING STYLE GAMING CHAIR
- Bluetooth:
- RGB:
- Power bank:
- Back Structure:
- Back Trim:
- Back Waist:
- Fabric:
- Armrest:
- Seat Materials:
- Seat Frame:
- Pillow:
- Gas Lift:
- Base:
- Wheels:
- Recline:
- Hight Adjustment:
- Swivel:
- Max Weight:
GENERAL
SPECIFICATIONS
No
No
No
Metal and Foam
Synthetic Leather and Foam
No
Synthetic Leather
3D Arm
Molded Foam / PU Leather
Metal
Yes, Lumbar Support
Lant Three Class
Nylon
Ultra Quiet, High Traffic, Colored Nylon
Up to 170 Degrees
Yes
Yes, 360 Degrees
300.0 lbs
Chapter 1 10
SPITFIRE X1S PLUS RACING STYLE GAMING CHAIR
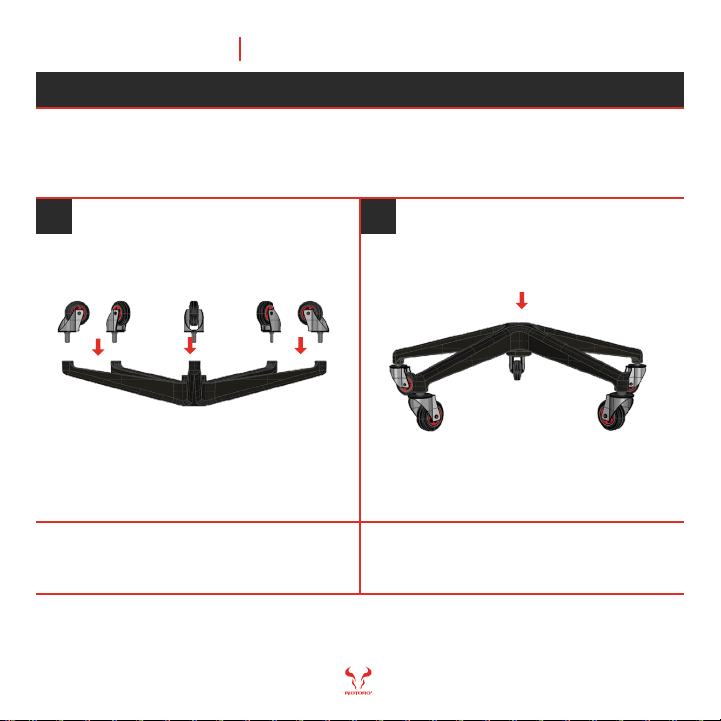
Position the wheel base with the holes looking
upwards and insert each castor. You will hear a
clicking sound once it is in position.
Once all castors are placed securely in position
turn over, place on the floor and from the center
firmly press downwards to ensure a tight fit.
Place each castor on the respective hole located in the wheel base.
1 2
Chapter 1 11
INSTALL THE CASTORS
SPITFIRE X1S PLUS RACING STYLE GAMING CHAIR
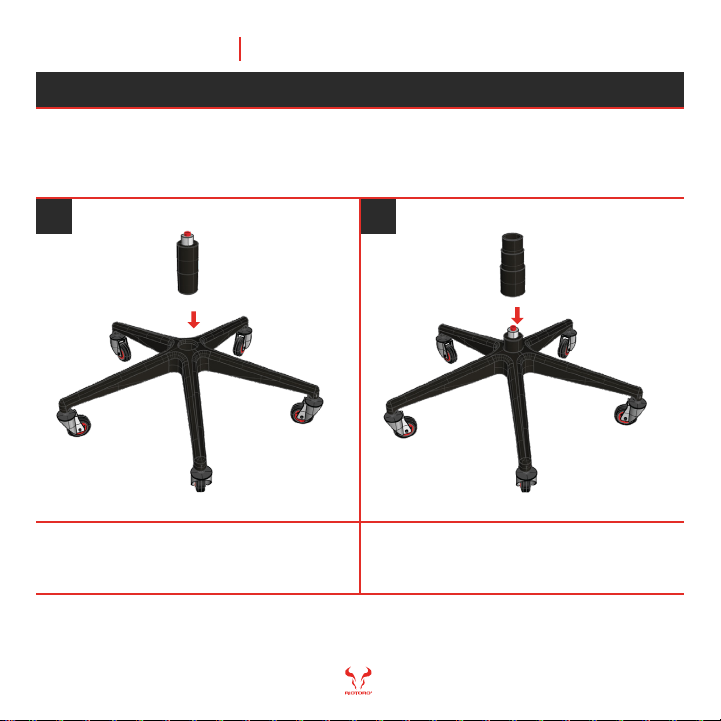
Thread the piston through the wheel base. Once the piston is in place, simply put the piston
cover on top of it.
Gather the piston and piston cover and install to the wheel base.
1 2
Note: both piston and piston cover might be lose at this point, do not worry as both will be secured into place once
the base of the chair is installed on top.
Chapter 1 12
INSTALL THE PISTON

SPITFIRE X1S PLUS RACING STYLE GAMING CHAIR
Note: remember to be careful with the 3.5 mm RGB Jack as damaging it will hinder the RGB lighting functionality.
Gather four M8x25.0mm screws, the Allen wrench, the seat and adjustable base
to proceed with the installation.
Align the adjustable base mounting holes and the
seat mounting holes.
3.5 mm RGB Jack
Secure the adjustable base to the seat by using
the provided hex screws and tool.
Chapter 2
1 2
INSTALL THE BASE
13
Screw orderScrew order

SPITFIRE X1S PLUS RACING STYLE GAMING CHAIR
Note: remember to be careful with the 3.5 mm RGB Jack as damaging it will hinder the RGB lighting functionality.
Gather four M8x25.0mm screws, both armrest and the Allen wrench to proceed
with the installation.
Align the armrest mounting holes with the seat
mounting holes and secure it place by using the
provided hex screws and tool.
Repeat the same process as previous armrest.
Chapter 2
1 2
INSTALL THE ARMREST
14

SPITFIRE X1S PLUS RACING STYLE GAMING CHAIR
Note: remember to be careful with the 3.5 mm RGB Jack as damaging it will hinder the RGB lighting functionality.
Assemble the seat and base as a single unit.
Place the seat on top of the piston and push down
the seat to make sure it is threaded.
Make sure that both backrest side supports are in
an upright position in order to proceed with the
backrest installation.
Chapter 2
1 2
INSTALL THE SEAT AND BOTTOM ASSEMBLY
15

SPITFIRE X1S PLUS RACING STYLE GAMING CHAIR
Note: remember to be careful with the 3.5 mm RGB Jack as damaging it will hinder the RGB lighting functionality.
Secure the backrest to the bottom assembly in order to proceed to next step.
Align the backrest support with the adjustable
base hole and slide it into position.
1 2
INSTALL THE BOTTOM AND BACK ASSEMBLY
Chapter 2 16
Secure the backrest to the supports on both sides
of the chair and hook up the 3.5 mm RGB jack in
the seat and backrest.

SPITFIRE X1S PLUS RACING STYLE GAMING CHAIR
Cover the side structure supports with the provided trim.
Attach the long structure support on the left side
of the chair with the provided screw and place
screw cover.
Attach the short structure support on the right
side of the chair with the provided screw and
place screw cover.
1 2
INSTALL THE SIDE TRIM
Chapter 2 17
SPITFIRE X1S PLUS RACING STYLE GAMING CHAIR
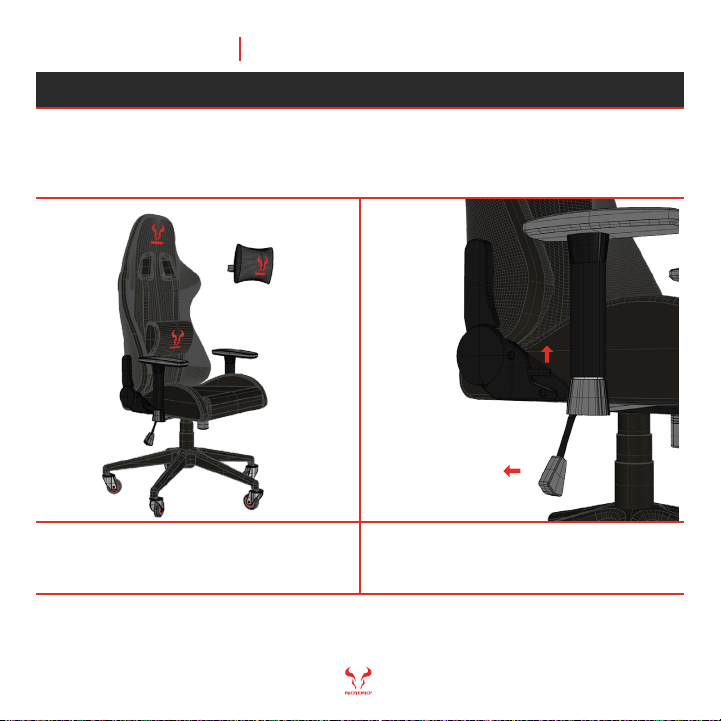
As a final step attach the neck and back support pillows to the chair.
Unbuckle both pillows and attach them to the
chair. Using either of the pillows is optional, their
purpose is to provide back support if needed.
Adjust the seat and backrest to the desired
position.
Note: be careful with your fingers when adjusting the height as the spring mechanism is quite strong and it may
potentially hit your fingers against the base.
PERSONALIZATION
Chapter 2 18
pull leaver to the side
pull leaver up

SPITFIRE X1S PLUS RACING STYLE GAMING CHAIR
The Spitfire X1S PLUS has been designed with full mobility in mind, for that
reason in order to power the lights you must connect the chair to a power bank.
Take out the USB power cable out of the backrest
pocket.
Connect USB power cable to power bank and
place them inside backrest pocket.
Note: Power bank not included, for extended gaming session it is recommended to use a 20000 mAh power bank.
CONNECTING POWER
Chapter 2 19
This manual suits for next models
1
Table of contents
Other Riotoro Indoor Furnishing manuals

Popular Indoor Furnishing manuals by other brands

Regency
Regency LWMS3015 Assembly instructions

Furniture of America
Furniture of America CM7751C Assembly instructions

Safavieh Furniture
Safavieh Furniture Estella CNS5731 manual

PLACES OF STYLE
PLACES OF STYLE Ovalfuss Assembly instruction

Trasman
Trasman 1138 Bo1 Assembly manual

Costway
Costway JV10856 manual


