Rippton CatchX User manual

USER MANUAL
CATCHX BAIT BOAT

pg. 1
Preface
Please take the time to read and understand this manual. Your CatchX Bait
Boat will deliver years of trouble-free usage when used and maintained
correctly.
Declaration
The policy is one of continuous improvement and we reserve the right to
change product specifications without prior notice. Illustrations are for guidance
purposes only.

pg. 2
CatchX Bait Boat
CATALOGUE
1. What’s in the package? ......................................................................... 3
2. Technical Parameter ............................................................................. 5
3. Features .................................................................................................6
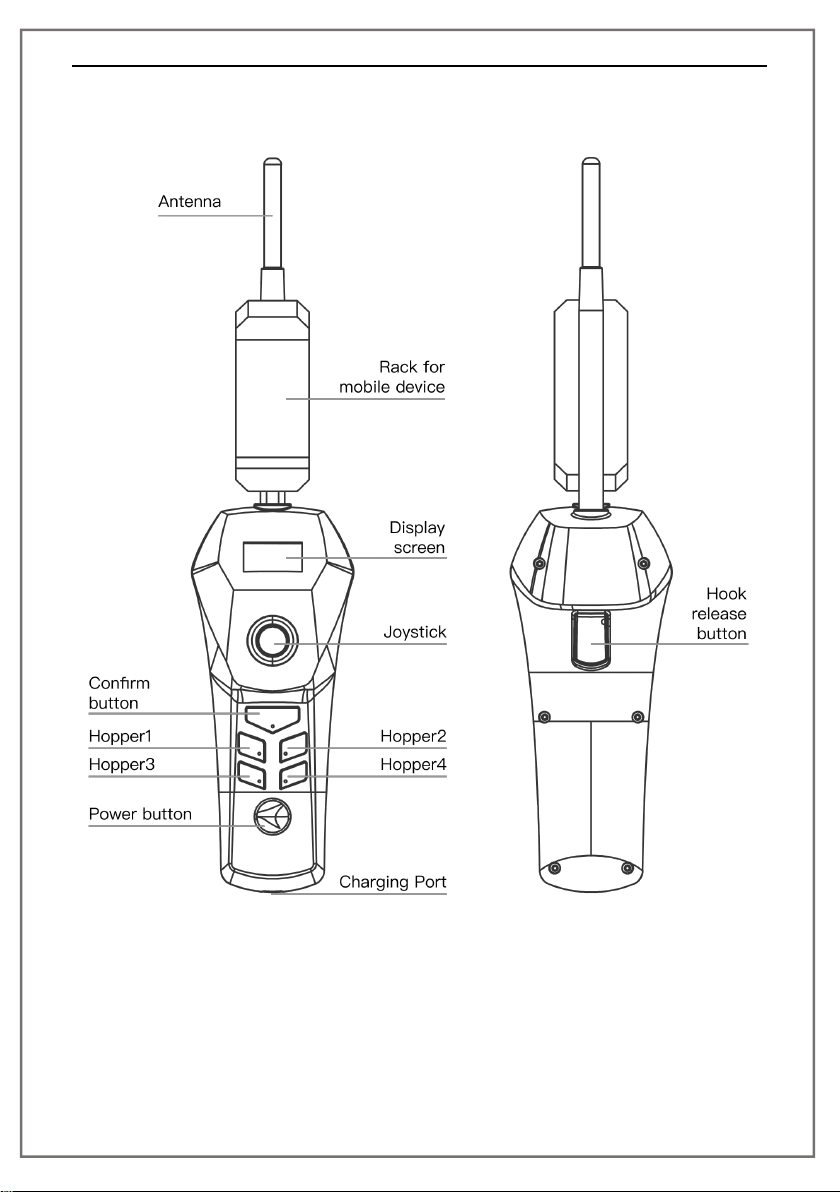
4. Overview ................................................................................................7
5. Charging .............................................................................................. 10
6. Remote Control ................................................................................... 16
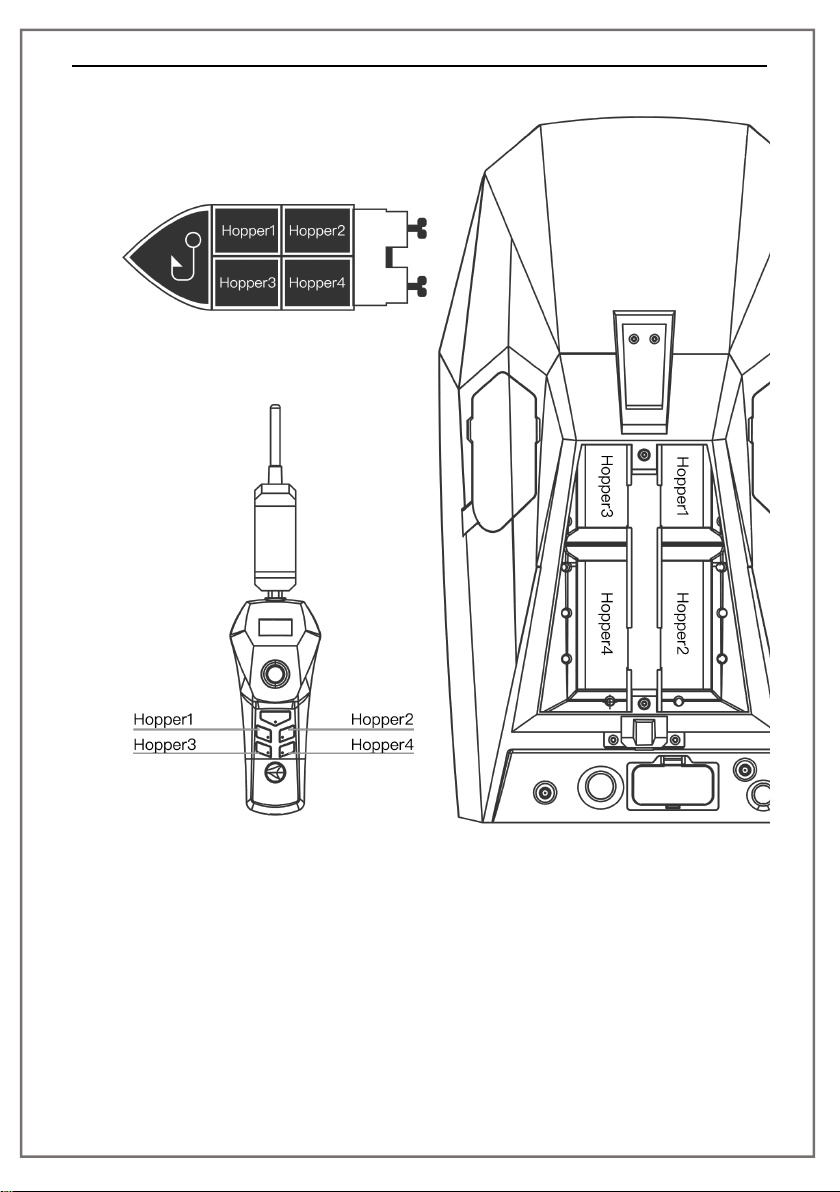
7. How to Control CatchX? ......................................................................17
8. APP Function .......................................................................................26
9. Tips ...................................................................................................... 38
10. Support ................................................................................................ 41
11. Warranty .............................................................................................. 42

pg. 3
1. What’s in the package?
Your CatchX Bait Boat contains the following items as standard:
1) User manual x 1
2) CatchX bait boat x 1
3) Remote control x 1
4) Battery x 2
5) Charger for boat (without taking the battery out) x 1
6) Charger for Remote control x 1
7) Adapt cable for solely charging the battery x 1
Note: Although the battery could be taken out of the boat for charging
separately, we still strongly recommend you charge the battery inside the
boat.

pg. 4

pg. 5
2. Technical Parameter
Device name
Weight
Dimensions
Number of hoppers and hook
release
Max speed
Max payload
Waterproof level
Boat lights
Operating temperature
Transmitter Power (EIRP)
Operating range
Radio frequency
Remote control
OLED Screen
Max transmission distance
Wi-Fi
Wi-Fi Transmitter Power (EIRP)
Battery
Battery type
Capacity
Voltage
PACK
CatchX Smart Bait Boat
6.6KG (including battery)
H: 293mm W: 358mm L: 615mm
4 independent hoppers, 1
independent hook release
1m/s
3KG (≈0.75 kg per hopper)
Splash resistant on top, other
parts fully waterproof.
1 front white LED light belt; 1 rear
red LED light belt
-10~45℃
8dBm max
0 ~ 800m
2.4GHZ data transmission
0.96 inches
800m
2412 ~ 2484MHz
17±2 dBm
Cylindrical Li-ion Battery Pack
8000mAh * 2
11.1V
3S4P
*We strongly recommend using the chargers supplied by Rippton for
trouble-free charging.

pg. 6
3. Features
Autopilot
Users can set the route in advance using the RIPPTON APP or
remote control, for full/semi-automatic driving purposes.
APP
Please scan the QR below, or search “RIPPTON” in APP Store (for
iOS system) or Google Play, Samsung Galaxy Store or Huawei App
Store, to download the RIPPTON for your mobile device. Installing
the app requires Android System 8.0 or above and iOS 9.0 or above.
Lighting System
CatchX has one front white LED light belt and one rear red LED light
belt.
Remote Control
The max transmission range is about 800m.
Standby Time
CatchX is able to stand by for 8 hours in water after being switched
on, provided the motor remains stationary.

pg. 7
4. Overview

pg. 8
1) The remote control isn’t waterproof, please keep it away from contact
with water.
2) The remote control will issue a warning tone when reaching a low level
of power.

pg. 9
The picture above is able to clearly show the layout of each hopper button
on the remote control and the corresponding hopper set on the boat.

pg. 10
Once the baits loaded in the hopper(s) have been released, you could
use your hand to bring the bottom board back to the original position
shown as the picture above.

pg. 11
5. Charging
5.1. CatchX Charger
5.1.1.Parameter
Name
12.6V 5A lithium battery charger
Input
Input voltage
100~240Vac
Input frequency
50/60Hz
Input current
1.5A max
Output
Output voltage
+12.6VDC
Charging current
5A
Nominal power
63.0W
5.1.2. How to charge the battery of CatchX?
Color of LED on battery
charger
What it stands for?
Red
Being charged
Green
Charging completed
• Direct charging :5.5/2.5 DC charging port (please refer to Picture1).
Please note that both batteries must be inside the boat together when
direct charging;
Or

pg. 12
• Charging the batteries separately after taking those out of the battery
compartment (please refer to Picture3). When charging completed, please
reconnect the batteries to the compartment (please refer to Picture4), and
ensure all the plugs are placed in the right position.

pg. 13
Picture 3. Use your hand or a screwdriver to unlock the battery
compartments, and then take the batteries out of them.
Picture 4. Reconnect the batteries to the compartment upon the charging
completion, and then re-lock the compartments by the screwdriver.
5.2. Remote Control Charger
5.2.1.Parameter
Name
5V3A power adapter
Input
Input voltage
100~240Vac
Input frequency
50/60Hz

pg. 14
Input current
1.0A max
Output
Output voltage
+5VDC
Charging current
3A
Nominal power
15W
5.2.2.How to charge the remote control
Please refer to the picture below:
5.2.3. Notice
1) For CatchX charger:
Operating temperature:0℃~40℃
Storage temperature:-20~80℃
In compliance with CE standard
Please immediately stop using the charger if it gets broken or has
water inside.
2) For CatchX battery
When you set out to operate the CatchX bait boat and its remote
control for the first time, please fully charge the new batteries.

pg. 15
It may take 2-3 hours to fully charge the remote control.
It may take 4-6 hours to fully charge CatchX when both batteries are
inside. Please be sure the power switch is off.
It may take 2-3 hours to fully charge one CatchX battery when it has
been taken out of the battery compartment. Please ensure that both
batteries are fully charged before they are put into the battery
compartment. Under all circumstance, the power level of the two
batteries should be equivalent or have only very tiny difference.
3) Storage of battery
For long-term storage, please ensure the power switches of both the
CatchX and its remote control are turned off, and the power level of the
CatchX battery is greater than 80%. If not, the battery will be
over-discharged due to a failure of normal use.
Storage temperature:-20℃~45℃(within one month).
To avoid decreasing the battery lifetime, the battery should be fully
charged every two months, as long-term storage will have a negative
impact.

pg. 16
6. Remote Control
6.1.Home Screen
The “Home Screen” of the remote control is shown as below:
6.2.Task Interface
The “Task Interface” is to help you set the home point of your automatic
task, select and save the waypoints therein, and then carry it out.
A short press on the joystick will enter “Task Interface” from “Home Screen”
(push the joystick upwards to exit “Task Interface”);
When staying on “Task Interface”, the joystick of the remote control is no
longer able to control the boat for sailing, but only move the UI cursor
thereon.
6.3.How to Connect CatchX with Remote Control?
(The RC is automatically is connected when you first open it; you don’t have to
do it unless you get the RC repaired or replaced.)

pg. 17
When connecting CatchX with its remote control, please keep
them switched off, and follow the next 3 steps:
1) Long press “Hopper1” button and
short press “Power Button” on the
remote control at the same time, in
order to enter the frequency matching
mode.
2) Then short press the power button of
the boat, the frequency of the remote
control will automatically match with
that of the boat.
3) The screen of the remote control will
give a notice to inform whether the
frequency matching has succeeded.
7. How to Control CatchX?
7.1. Preparation
Ensure both the CatchX Bait Boat and its remote control are fully
charged and bring the CatchX to the side of the freshwater area where
you plan to go fishing.
7.2. CatchX Turning On/Off
When pressing the power button of the boat, the boat will emit a “di”
sound 3 times. Then after about 10 seconds, the CatchX Bait Boat will
be turned on with another “di” sound, and both the head light belt and
the tail light belt will flash simultaneously. If you need to turn it off, just
press the power button again.

pg. 18
7.3. Remote Control Turning On/Off
For turning on the remote control, please long press the power button of
the remote control for 3 seconds, when it will vibrate slightly, and its
screen will lighten up with a boot animation, and vice versa for turning it
off.
7.4. Calibration for Remote Control
(The RC is well calibrated when you first open it; you don’t have to do it unless
you get the RC repaired or replaced.)
1) Please press and hold on the “Hopper 2” button, then long press
the power button of the remote control, it will go to “Calibration
Interface” automatically.
2) Move the joystick to the maximum extent in all directions, so as to
obtain the largest value of the joystick’s moving range, and then
press the “Confirmation” button.
3) Ensure the joystick stays precisely on center for obtaining the
mid-value of the joystick’s moving range, and then press the
“Confirmation” button. The whole calibration process for the remote
control has been completed.
4) Long press the joystick again to exit the current interface.

pg. 19
7.5. Unlock
The user needs to place the CatchX on the ground first and turn it on.
Move the joystick to the right end for 3 seconds, and the motors will
start to spin. This means your CatchX has been unlocked for use, and
you can use the joystick to control the boat sailing on the water.
7.6. Sailing
By moving the joystick in each direction (i.e. up, down, right and left),
CatchX will follow your order to go forward / backward or make a right /
left turn, respectively.
7.7. Set Home Point
Home point is the co-ordinate that CatchX will return to after the task
has been completed. Prior to carrying out any task, the user needs to
set the home point.
1) Drive the boat to a point that you intend to set as the home point;
2) On “Task Interface”, please move the UI cursor to “H” and then
short press the hook release button on the back of the remote
control to set the home point. At the center of the screen, “Set
success” or “Set fail” will appear for your notification.
Other manuals for CatchX
2
Table of contents
Other Rippton Boat manuals