Pakboats XT-15 solo Installation instructions

AssemblyInstructions
and
User’sManual
XT‐15/XT‐17soloandXT‐16double

AssemblyInstructionsandUser’sManualforXT‐15andXT‐16.
Content:
1. General
2. Frame
3. InstallingFrameinSkin
4. InstallingSeat
5. InstallingDeck
6. Disassemby/packing
7. Preparingforfirsttimeassembly
8. RepairandMaintenance
GENERAL
YournewPakboatsXTserieskayakincludesmanyuniquefeaturestohelpyouenjoyahigh‐performance
touringkayakthatpacksintoasingle,compactbag.
Thekeytomakingasleek,full‐lengthfoldingkayakwithexcellentperformanceistogivethehullthe
rightstiffness.TheXTaccomplishesthisbyconnectingtheframe’sgunwale‐andchinerodstoformanI‐
beamoneachsideofthekayak.TheI‐beamsareformedbyseveral22‐inchsectionsthatarefirmly
lockedtogetherbysteelpinsattachedtoeachcrossrib.EachcrossribconnectstobothI‐beams,and
togethertheyformalightweightframewithintegritythatisuniqueinsuchalighthull.
Becausethehulliscompletelysymmetrical,itisalmostimpossibletoassembletheframeincorrectly.
Placethesmallestcrossribsclosesttoeachendandthewidestatthecenter,theninstallthecrossribs
ontheI‐beamswiththeflatslatsfacingintotheboat.
Theend‐to‐endtensionoftheskinismadebyidenticaltensioningstemsateachend.Simplyclipthe
stemsintotheendsoftheskinandoperatethetensioninghandles.
Hereareallthepartsyou
need.Crossribsandstems
ontheleft,keelandside
beamsfoldedatthetop
center.Blackskinand
seat,reddeck,andthe
pretzelnexttothedeckis
thecockpitcoaming.You
willneedthebluepump
too.
Figure1Alltheparts

THEFRAME
1. Toassembletheframe,startbyunfoldingthesidebeams.Removethe
strapfromeachbeamandconnecttheshockcordedsections.Seepicture.
2. Placeoneofthebeamsonthegroundwiththeflatslatsfacingup.Layout
thecrossribswiththewidestonesatthecenter,narrowestateachend.
Layoutthekeel(longsinglerodwithplasticlatchclips)nexttothebeam.
3. Theplasticclipatthecenterofeachcrossribwillconnecttoacorrespondinglatchclipatthe
keel(seeFigure5).Startingfromoneendofthebeam,turnoneendcrossribsothattheopen
sideoftheplasticclipfacesintothelatchcliponthekeel.Thisisjusttogettherightorientation.
Donotconnecttothekeelyet.
4. ThereareholesdrilledinthetubesateachjointwhereI‐beam
modulescometogether.Theholesfacetheotherparallelrod.Insertthe
steelpinatthetipofthecrossribintotheholeintherodthatisaway
fromyou.Anothersteelpinisattachedtotheleverthatisabout5inches
fromthetipofthecrossrib.Makesuretheleverisintheopenposition,
insertitssteelpinintocorrespondingholeintherodclosesttoyou,and
snaptheleverclosedagainstthecrossrib.DONOTFORCETHEPINS.They
shouldgoineasily.
5. Repeatwiththerestofthecrossribs.Pleasenotethatonelatchclipon
theendofthekeelfacestheoppositedirectionoftheothers.
6. Startingfromthecenter,connecttheotherI‐beamtothecrossribs.
7. Layouttheframewiththecrossribcentersfacingup.
8. Startingwiththelatchclipthatfacesthe
oppositedirectionoftheothers,connectthe
keeltothecrossribsandsecurethelatcheswith
theelasticbands.Toconnecteachlatch,
separatethekeeljointjustenoughtogetthe
endofthelatchpastthecrossrib.
9. Inserttheendsofeachbeam
throughthefabricloopsonthestems
asshowninFigure6.
10. THEFRAMEISNOWCOMPLETE.Turnitrightsideup.
Figure2Unfolding
I‐beams
Figure3Installingcrossrib
Figure4Addingtheother
I‐beam
Figure5Addingthekeel
Figure6Connectingthestemstothe
frame

INSTALLINGTHEFRAMEINTHESKIN
1. Layouttheskinandfoldoutthesidestoexposethebottom.
2. Placetheframeinsidetheskin,liftthehandleatthebottomof
eachstemtoaverticalposition.Clipthetopofeachstemtothe
smallpieceofaluminumtubeboltedtothetipsoftheskin.Press
thehandlesdowntoahorizontalposition.
3. Foldthesidesoftheskin
overthetop(gunwale)rodofthe
frame.Securebypullingstrings(attachedtotheedgeoftheskin
ateachcrossribposition)downunderthehookatthebottom
ofeachribpinlever,onehalfloopatthetime.Note:Eachstring
formsacompleteloop.Bothhalvesmustbeunderthehookto
providethecorrecttension.
4. Ateachendtherearestraps
insteadofstrings.Withtheedgeofthe
skinfoldedoverthegunwale,pullthe
strapendwiththemalebuckleunder
thebottomrodtotheskinsideandup
tothefemalebuckle.Tighten.Repeat
withtheotherstraps.
5. Inflatethetopcellsofthe
inflatabletubes.
INSTALLINGTHESEAT(S)
1. Locatetheseat.Itshouldhaveshockcordedaluminumrodsin
channelsacrossundertheseat.Locateshortaluminumrodswith
C‐clipsateachend.Theserodsconnecttheseat’scrossrods.The
thicksideoftheC‐clipsshouldfaceup(Figure11).Note:The
inflatableendoftheseatshouldfaceforward.Itisyourthigh
support.
2. (IntheXT‐15andXT‐16
solo)Placetheseatinthekayak
withtheforwardcrosstubeend
clipsrestingonthelower(chine)rodinsidethe‘X’formedby
theflatbracesatthecenterofthekayak.
(IntheXT‐17)Placetheforwardcrosstuberightbehindthe
centercrossrib.
(InXT‐16double)Placethebowseatwiththeforwardcrosstubeendclipsinsidethe3rd‘X’
fromthebow.Placethesternseatwiththerearcrosstubejustinfrontofthe2ndcrossribfrom
Figure7Clipthestemtotheskin
Figure8Hookstringloopstotheframe
Figure9Securingthestraps
Figure10Inflatetheuppercells
Figure11Addingtheseatsiderails
Figure12Securingseatstraps

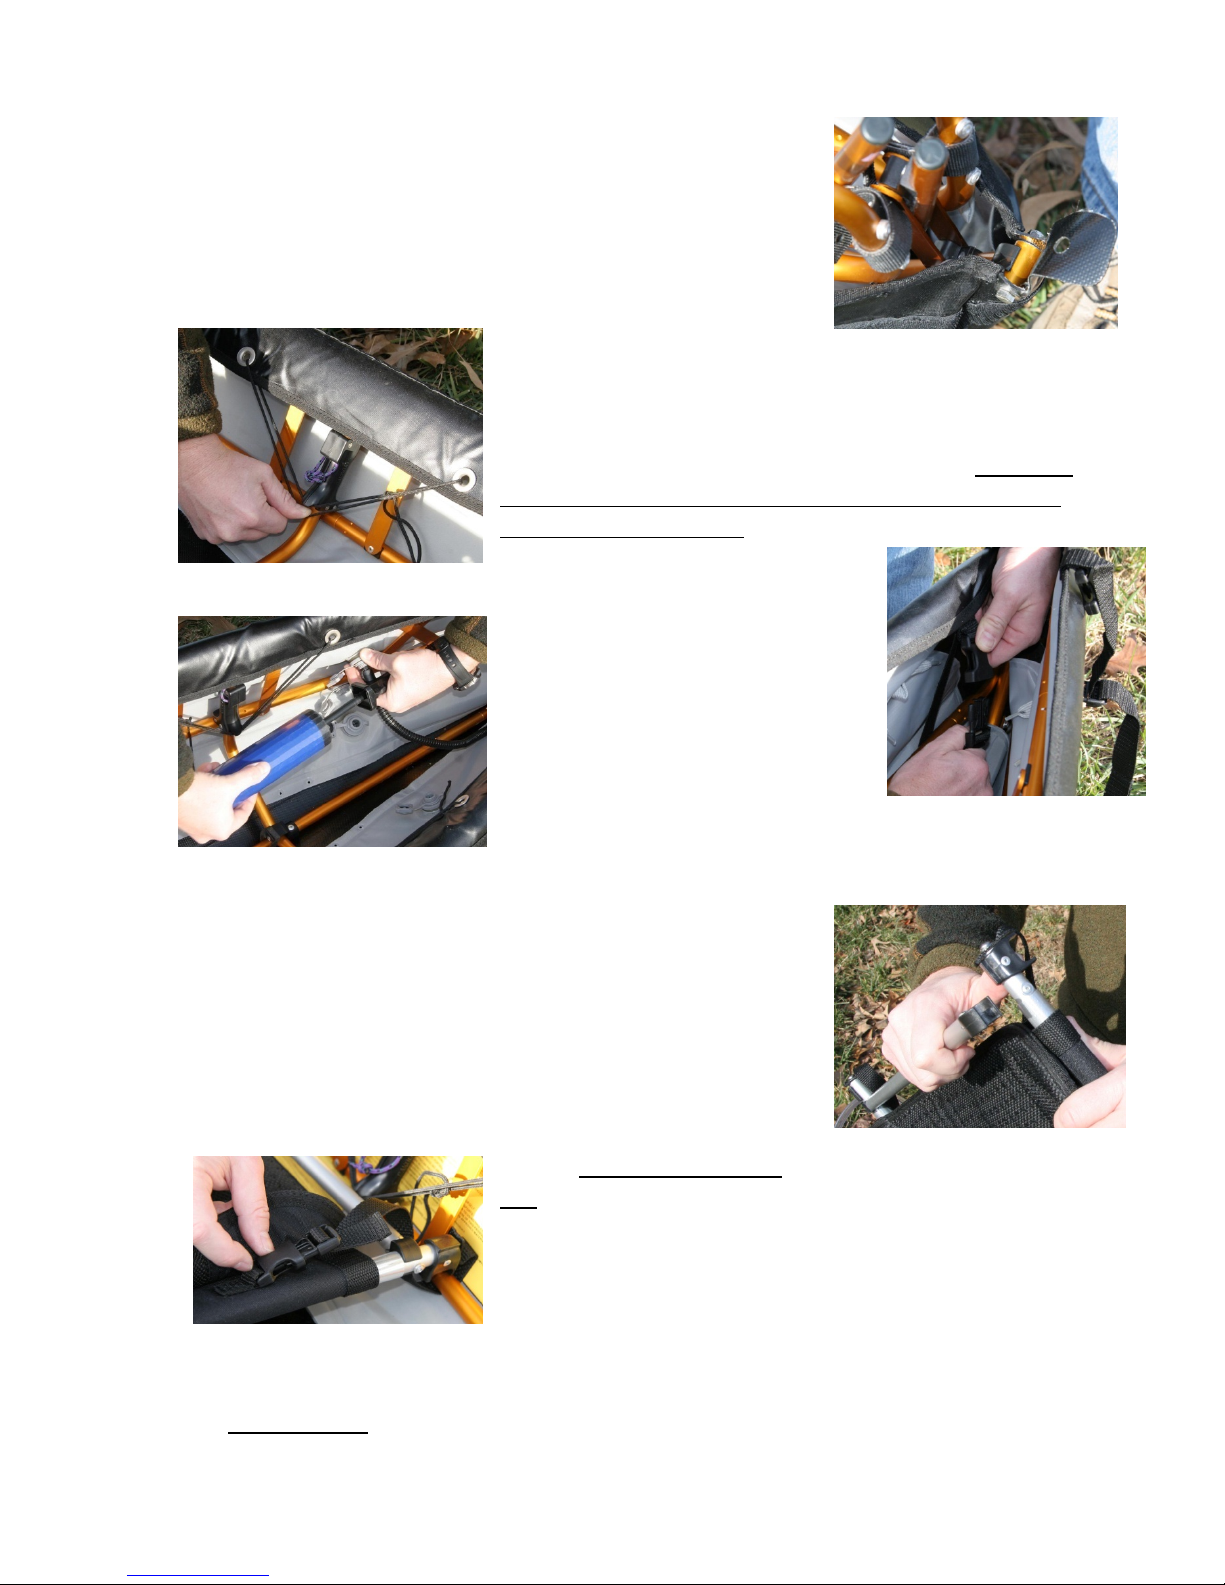
thestern.Pulleachseatstrapunderthechinerod,overtheseatsiderodandtothebuckle
undertheseat.Repeatattheothercornersandtightenthestrapswell.Theseatisnowsecure.
Inflatethethighsupport(fillbutdonotpressurize).Youcanletairouttomaketheseat
comfortablelater.
3. Inflatetheremaining4cellsoftheinflatablesidetubes.Theycanbeashardasisfairlyeasyto
dowiththepumpthatcomeswiththekayak.
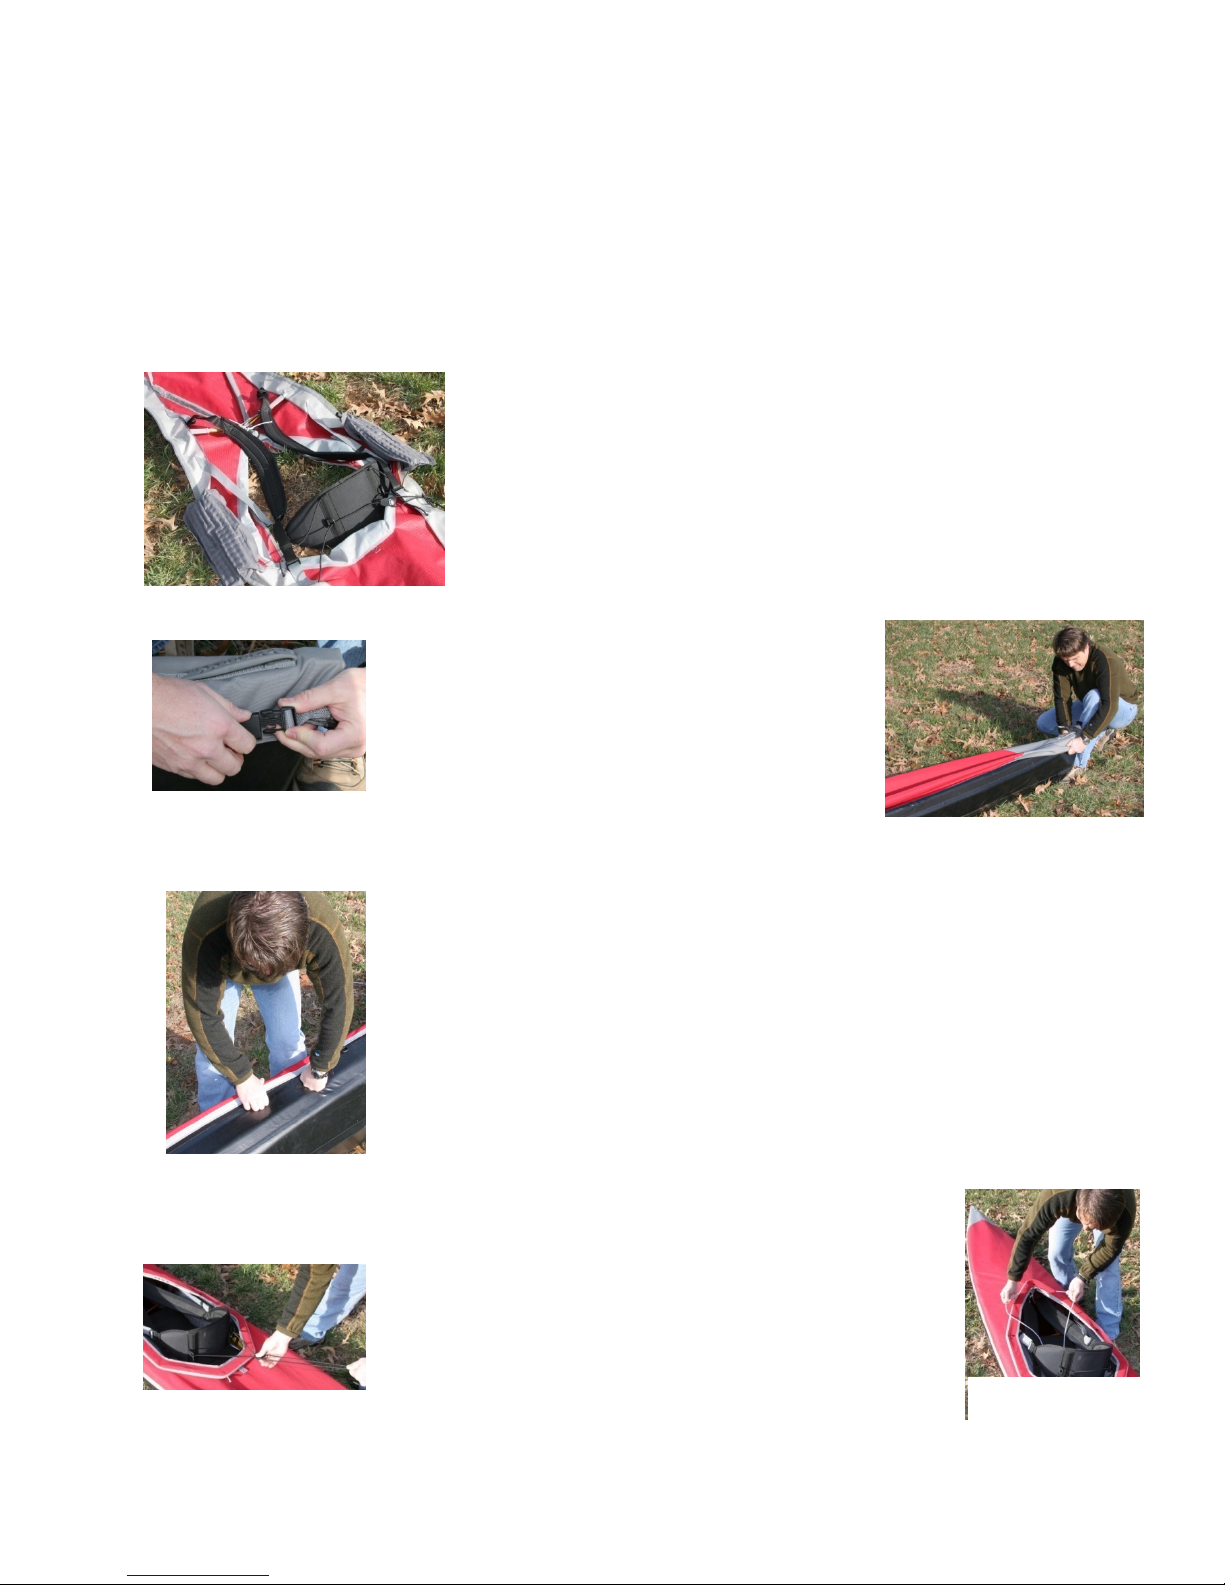
INSTALLINGTHEDECK
1. Layoutthedeckupsidedown.Insertthediagonalrodsinto
sleevesontheundersideofthedeckinfrontofthecockpitandclose
withVelcrotabs.Apeakedaluminumcrosspieceshouldbeinplace
justinfrontofthecockpit.Makesureitwillpointuponcethedeck
isinstalled.Abackbandshouldbeinplaceattherearofthecockpit.
Note:Ifyouhavethighstraps,theyshouldremainpermanently
installedunderthedeck.Theselfinflatinghippadsattachwithsnaps
eachtimethekayakisassembled.
2. Hookthebowendofthedeckover
thebow.MakesurenoneoftheVelcrodecksealis
touchingtheoutsideofthehull.Movetothestern,
andwithyourfootagainstthesternendofthehull,
pullhardonthedecksoitisquitetight.Thensecure
partoftheVelcroseal.Securethesternendofthe
deckwithendstraps.
3. LineuponesideofthedeckwiththehullVelcrostripandpress
againstittosecure.
4. PullthedecktightacrosstheboatandsettheVelcrosealonthe
otherside.Itiseasiestifthekayakisonitssideandyoucanpressdownon
thesidetocompressthehullslightly.
5. Unfoldandassembletheshockcordedcockpitrim.Insertthewide
endofthecockpitrimunderthedecktotherear,farenoughtogetthe
pointedbowendintoplace.Setthesnap.Settheothertwosnaps(oneon
eachsideofthecockpit).Pullthecockpitrimupsoitissnugagainstthetop
ofthecockpitsleeve.
6. Locatetheelasticcordunderthesternendofthe
cockpitsleeve.Pullitforwardaroundthecockpit,pulltight
andrunitbacksoitloopsaroundthecockpittwice.
7. Tightentheelasticcordatthebackofthebackband.
8. Attachtheselfinflatinghippadsifyouhavethem.
Yourkayakisreadytogoonthewater.Getintotheseatand
letairoutofthethighsupportuntilitfeelscomfortable.
Figure13Thedeck
Figure14Stretchandsecurethe
deckatthestern
Figure15Securetheend
Figure16Compressing
thehulltomatchVelcro
Figure17Elasticcord
aroundcockpit
Figure18Tightenbackband
cord

DISASSEMBLY/PACKING
Thisisprettystraightforward.Itismoreorlessthesameastheassemblyprocess–inreverse.Butit
maybehelpfultopointoutsomedetails.
1. Removetheinflatablehippads(ifyouhavethem).Openthevalvesandrollthepadsuptight.
Closethevalves.
2. Loosenthebackbandcordtomakeiteasiertorollupthedeck.Undotheelasticcordaround
thecockpit.Removethecockpitrim.Foldupthecockpitrimbysteppingonthesternendand
liftingthebowend.Makesureallthepartsaredisconnectedfromeachother.Twistthebow
end180degreesandmoveitdowntothesternend.Thisfoldsthecockpitrimassmallasitcan
get.
3. Undothestrapsatthebackofthedeckandpeelthedeckoffthehull.Turnthedeckupside
down.Removethestraightrodsinfrontofthecockpit(butleavethealuminumcrosspiecein
place),placetheselfinflatinghippads(orientedacrossthedeck)nexttothebackbandandroll
upthedeck.Note:Backband,peakedaluminumcrosspiece,andthighstrapscanstay
permanentlyinstalledinthedecktomakeassembly/disassemblyquickerandeasier.
4. Openalltheairvalvestoletairoutofthehullsidetubesandundoallthestringsandstraps
securingthehullskintothealuminumframe.Pullupthehandlesonthetighteningstemsto
relievethetightnessoftheskin.Unhooktheskinfromtheframeandremovetheframefrom
theskin.
5. Foldtheskinlengthwise.Thefirstfoldalongtheedgeofthekeelreinforcementstrip.Thenfold
inhalf(alsolengthwise).Startingfromtheendoppositetheairtubevalves,foldtheskinintoa
lengththatjustfitsinsidethebag.
6. Removetheseatandopenthethighsupportvalve.Removethestemsfromtheframe.Remove
thecrossribsfromtheframe.FoldupthekeelandsideI‐beams,andsecurethefoldedside
beamswiththeshortstraps.
PREPARINGFORFIRSTTIMEASSEMBLY
YourXTkayakmayarrivewithoutthebackbandandangledcrossbraceinfrontofthecockpit
preinstalledinthedeck.Figure13willhelpyouinstallthesepartscorrectly.Thefollowingwillhelpyou
along.
BackBand.
1. Locatethebackband,theelasticcord,andthecordlock.SeeFigure13.
2. Locatethetwowebloopsatoneedgeofthebackpadandinserttheelasticcordthroughboth
loopswiththemid‐pointofthecordbetweenthem.Placethebackbandonthe(upsidedown)
deckasshowninFigure13.Insertanendoftheelasticcordthroughtheforwardgrommeton
theflapunderthedeckonthesameside,thenthroughthereargrommet,thenthroughtheD‐
ringonthebackpad.Repeatontheoppositesideofthebackpadanddeck.Insertbothendsof
theelasticcordthroughthecordlock.

3. Threadthestrapsattachedtotheflapsunderthedeckthroughthebucklesontheendsofthe
backpad.
ThighStrap(thisisanoptionalaccessory).
WiththedeckplacedupsidedownasshowninFigure13,placethethighstrapswiththemeshside
facingupandthehooksclosetothebow.Threadwebbingateachendofthethighstrapsintobuckles
ontheflapsunderthedeck.Attachthehooksontheinsideofthethighstrapstotheelasticcordloop
underthefrontofthecockpit.
HipPad(thisisanoptionalaccessory).
Attachthehippadstothesnapsontheflapsunderthedeck.Eachpadfitsonbothsidesofthedeck.Itis
mostconvenienttoplacethehippadswiththevalvesfacingforward.
Pleasenote:Ifthepadshavebeenstoredemptyofair,youmayneedtoblowthemupbymouth.They
willselfinflateiftheyhaverecentlybeeninflated.
REPAIRANDMAINTENANCE
Themostcommonrepairswillbeabrasionsorpuncturestotheboatskin.Thoseareeasilyrepairedwith
thesuppliedrepairkit.
1. Cutapatchlargeenoughtocoverthedamagedareaplusa¾”(2cm)areaaroundthedamage.
Roundthecorners.Makesuretherepairareaandthepatchareclean.Coverbothwithathin
layerofadhesive.Waitfortheadhesivesurfacestofeeldrytothetouch.Applypatch.Theboat
cangobackonthewaterimmediately,butthebondwillcontinuetocureforabout24hours.
2. Fortemporaryframerepairswerecommendducttape–withwoodensplintsasneeded.
3. DoNOTuseducttapeonfabricsurfacesunlessyouhaveto.Itmakesarealmess,and
permanentpatchesarereallyeasy.
Thereisnoregularmaintenanceneeded,butwerecommendthatyouletthekayakdrybeforeputtingit
inlongtermstorage.Thekayakcanbestoredpackedorassembled.Thebestisacoolanddryplace.
Coldanddryisfinetoo–evenwellbelowfreezing.Butweavoidhandlingtheboatwhenitisextremely
cold.
WEHOPEYOUWILLHAVEMANYYEARSOFPLEASUREWITHYOURPAKBOATSXT.

SCANSPORT,INC.
P.O.BOX700(234MAYSTREET)
ENFIELD,NEWHAMPSHIRE03748,USA
This manual suits for next models
2
Table of contents
Other Pakboats Boat manuals
Popular Boat manuals by other brands

Edgewater Networks
Edgewater Networks 265CC owner's manual

Linder
Linder SPORTSMAN 445 Basic owner's manual

Alpacka Raft
Alpacka Raft Ultralight series owner's manual

Bayliner
Bayliner 245 Cruiser owner's manual

Zodiac
Zodiac MilPro Grand Raid Series owner's manual

Linder
Linder SPORTSMAN 445 Basic owner's manual

Lowell
Lowell DOWNEAST 36 instructions

Yamaha
Yamaha SUV1200 WaveRunner 2004 Owner's/operator's manual

Ocean Kayak
Ocean Kayak TORQUE Owner's manual supplement

LDC Racing Sailboats
LDC Racing Sailboats RS600 owner's manual

Banzai
Banzai 2-IN-1 SLIDE & BOUNCE COMBO PARK Assembly instructions

GRAVITAS
GRAVITAS R2781 manual