RITAR HR Series User manual

HR
RITAR INTERNATIONNAL GROUP LIMITED
Technical Manual
HR Series VRLA Battery

Contents
Item Page
Prolegomenon
1 Application Range
2 Check
3 Storage before Installation
4 Installation Cautions
5 Battery Installation
6 Battery Features
7 Working Principle
8 Battery Charge, Discharge & Life
9 Record
10 Maintenance
11 Common Faults & Solutions
1
2
2
1
2
3
4
4
5
8
9
10
Prolegomenon
In order to install and use RITAR HR series battery correctly and safely, please read this technical manual and other data
together with battery carefully for a comprehensive understanding.
Pay attention to safety during installation to avoid accident.
I t is required for users to read this manual carefully and keep it well.
If you have any questions about the Technical Manual or any technical problems, please contact us or our local agent.
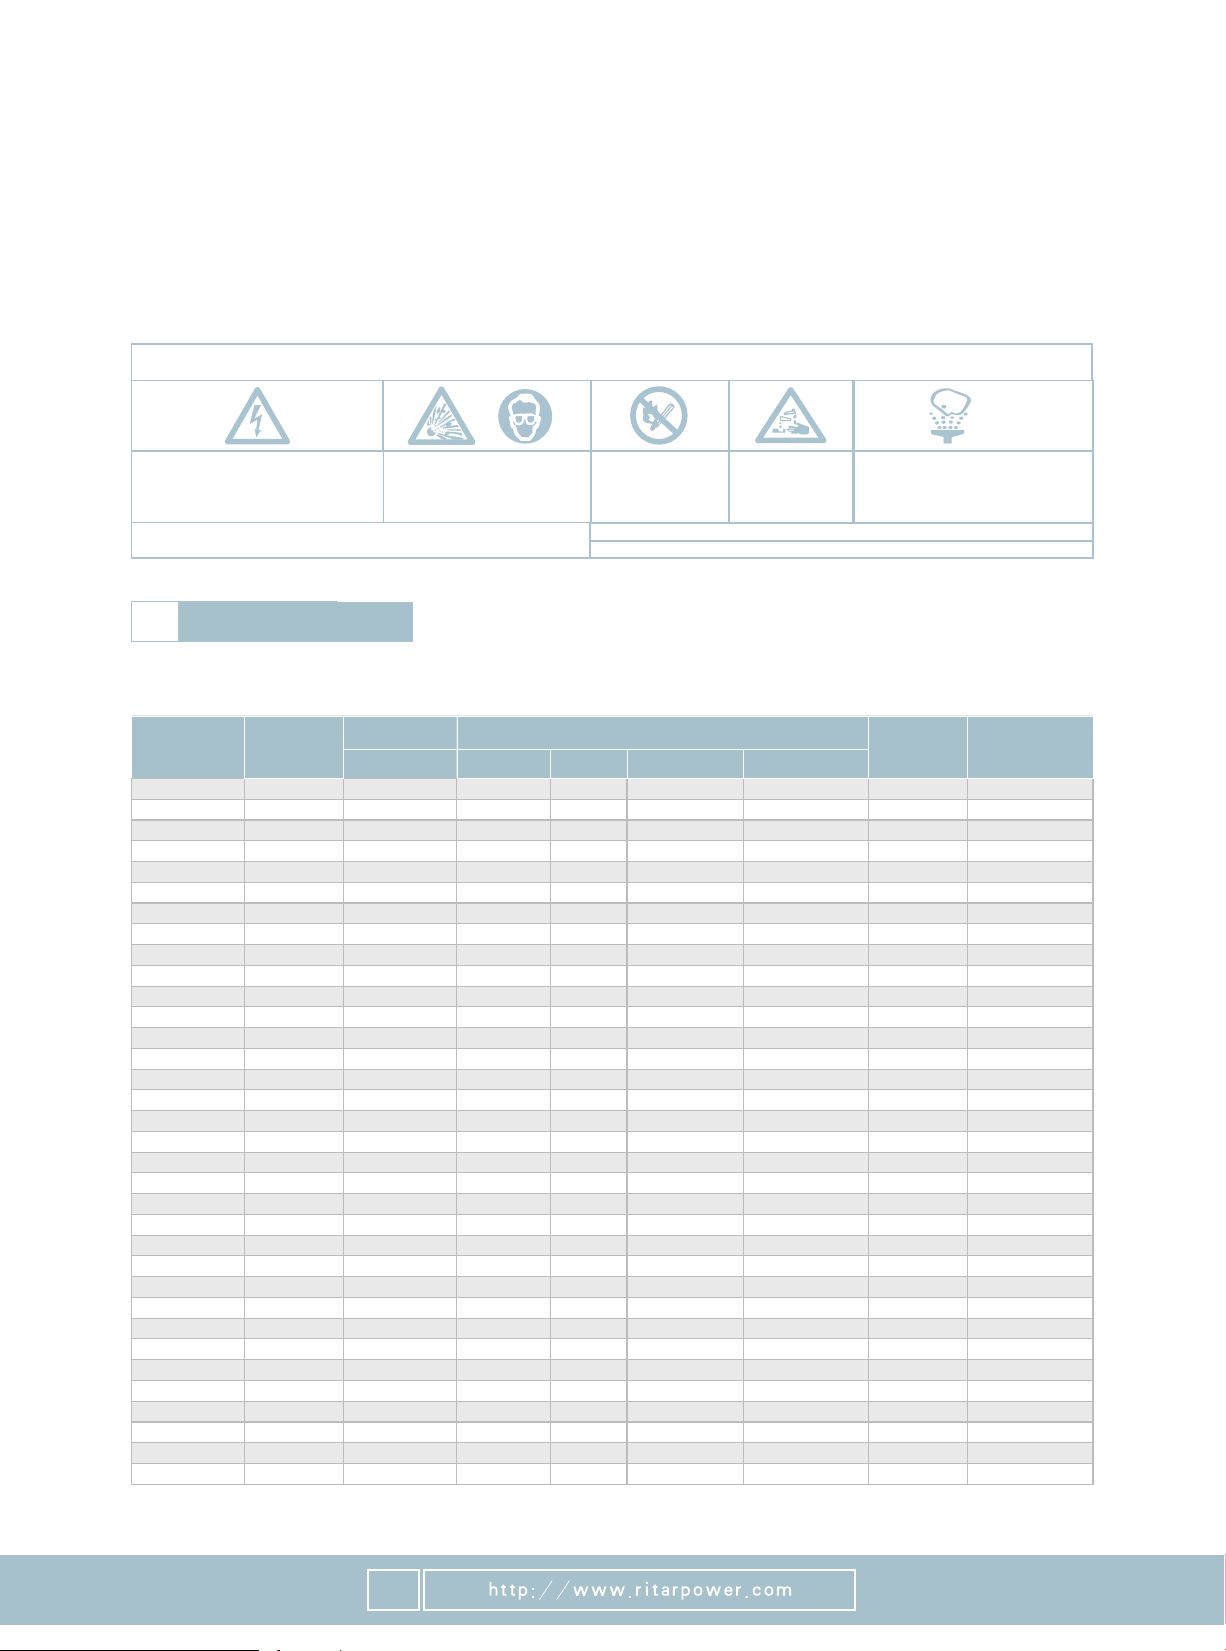
Dangerous!
High Voltage……
Don't touch any terminals or connectors
without insulation to avoid electric shock.
Eyes Protection:
Gas from explosion may harm eyes
or even cause blindness.
Prohibition:
Sparks, fire and
smoking.
Vitriol:
May cause blindness
or severe burns.
Wash eyes with clean water immediately
and go to see a doctor.
Do not loosen the safety vales.
Please read carefully the installing and using instructions in this manual.
Keep the battery in a well ventilated environment when in operation.
Battery maintenance and repair should be conducted by experienced technicians.
1Application Range
This manual is applied to RITAR HR series SLA battery (hereafter referred to as battery).
1
HR6-630W
HR6-850W
HR6-16W
HR6-18W
HR6-20W
HR6-22W
HR6-28W
HR6-32W
HR6-36W
HR12-16W
HR12-18W
HR12-20W
HR12-20BW
HR12-22W
HR12-28W
HR12-32W
HR12-36W
HR12-38W
HR12-48W
HR12-50W
HR12-60W
HR12-68W
HR12-70W
HR12-80W
HR12-88W
HR12-96W
HR12-104W
HR12-125W
HR12-150W
HR12-200W
HR12-240W
HR12-280W
HR12-340W
HR12-380W
6
6
6
6
6
6
6
6
6
12
12
12
12
12
12
12
12
12
12
12
12
12
12
12
12
12
12
12
12
12
12
12
12
12
(W)
630
850
16
18
20
22
28
32
36
16
18
20
20
22
28
32
36
38
48
50
60
68
70
80
88
96
104
125
150
200
240
280
340
380
25.5
33.0
0.68
0.70
0.72
0.75
1.10
1.15
1.35
1.32
1.50
1.51
1.45
1.55
2.08
2.20
2.60
2.45
3.50
4.20
4.65
4.90
5.60
6.20
6.30
8.10
8.60
10.2
12.4
16.5
19.5
24.8
29.0
30.5
F12(M8)
F14(M8)
F2
F2
F2
F2
F2
F2
F2
F2
F2
F2
F2
F2
F2
F2
F2
F2
F2
F13(M5)
F13(M5)
F13(M5)
F13(M5)
F13(M5)
F18(M5)
F13(M5)
F13(M5)
F11(M6)
F11(M6)
F11(M6)
F11(M6)
F11(M6)
F12(M8)
F12(M8)
260
243
70
70
70
70
151
151
151
90
90
90
151
90
151
151
151
151
151
181
181
181
181
181
181
166
166
195
198
229
350
260
306.5
328
180
187
47
47
47
47
34
34
34
70
70
70
50
70
65
65
65
65
98
77
77
77
77
77
77
178
178
130
166
138
167
169
168.5
172
245
275
99
99
99
99
94
94
94
101
101
101
95
101
94
94
94
94
95
167
167
167
167
167
167
125
125
155
169
211
182
211
210
215
252
275
105
105
105
105
100
100
100
107
107
107
101
107
100
100
100
100
101
167
167
167
167
167
167
125
125
168
169
216
182
216
215
220
Model Voltage
(V)
Capcity
15min/1.67VPC Dimension(mm)
Lenght Width Height Total Height
Weight
(Kg) Terminal

3Storage before Installation
1 Storage Environment
If the battery is not installed immediately after being received, please store it in a clean, ventilated and dark place at
around 5~30 .
2 Storage Time
Due to self-discharge, the battery capacity will lose gradually in storage. Do not store the battery for more than 12
months or it will affect the battery performance eternally. After being stored for 6 months, the battery should be
equalize charged in voltage of 2.35 ± 0.1V/cell for 24 hours and hereafter should be equalize recharged at regular
intervals ( at least once every 6 months). A relatively high storage temperature will accelerate the battery
self-discharge; from 20 when the temperature increases every 10 , recharging interval should be reduced half.
For example, when the battery is stored at 35 , its initial charging or recharging interval should be 3 months. If the
battery is not charged properly, its performance and life will be affected and cause the normal guarantee invalid.
4Installation Cautions
2
2Check
1. After receiving the batteries, please check the packing and make sure the batteries are intact. Avoid bumping
during carrying, and be careful when open the cartons.
2.Please open the cartons near the installation place and check appearance and quantity of the battery accessories
after opening.
3.It's difficult to detect leakage if there are slight damages on the battery shell. Please check carefully and make
sure there is no damage or leakage on the battery shell.
4 . If the battery falls to the ground or its shell is bumped abnormally, please report the details to our company for
confirmation and aftermath arrangement.
1 .
B e f o r e
touchi
ng the
b
HR12-380SW
HR12-450W
HR12-520W
HR12-580W
HR12-570W
HR12-570SW
HR12-600W
HR12-650W
HR12-690W
HR12-780W
HR12-850W
12
12
12
12
12
12
12
12
12
12
12
380
450
520
580
570
570
600
650
690
780
850
30.0
36.5
44.0
47.0
46.0
45.0
56.0
61.0
63.5
72.0
80.5
F12(M8)
F12(M8)
F12(M8)
F12(M8)
F12(M8)
F12(M8)
F12(M8)
F10(M8)
F10(M8)
F10(M8)
F10(M8)
306.5
407
340
340
483
340
532
522
522
522
521
168.5
177
173
173
170
173
207
240
240
240
268
210
225
280
280
241
280
214
219
219
219
220
215
225
287
287
241
287
219
224
224
224
225
(W)
Model Voltage
(V)
Capcity
15min/1.67VPC Dimension(mm)
Lenght Width Height Total Height
Weight
(Kg) Terminal

5Battery Installation
3
1. Install the battery according to installation drawing.
Please leave at least 1000mm passageway as maintenance space.
2. Install Connectors
Before connection, clean battery terminals to metallic shining. Apply the Vaseline onto battery terminals to
prevent large resistance oxide; then install connectors. After installing all battery connectors, make sure all
positive(+/red)and negative(-/black)terminals are connected properly according to the installation
figures;
Then tighten the connecting screws in the torque of 12.4Nm with an insulative moment spanner.
3. Measure Voltage
After installing the connectors, measure the terminal voltage of the whole battery bank, which should be
about the total of the cell voltage of series batteries. If they are inconsistent, please check the battery
polarity and recheck the battery connection in a proper torque.
4. Cell Number
Stick the self-adhesive labels of cell number and system polarity sign at prominent position of relevant cells.
The first cell at the positive connecting terminal should be marked as No.1 and the rest is marked by
analogy.
5. Install Battery Shield
After checking the voltage and arranging the cell numbers, put the shield at the top of the batteries.
6. Safety Warning
After completion of battery installation, danger warning should be posted at prominent position to prevent
safety accidents.
6. Fix the bolts and nuts on the connection terminals of the battery to the specified torque; otherwise it may
cause sparks or damages to the terminals.
7. Please clean the battery shell and cover with a damp cloth; to prevent static and spark, do not use a duster or
a dry cloth to clean the battery. It's prohibited to use organic solvent such as rubber solution or naphtha,
which will cause the battery shell cracking.
8. In normal operation, there is no dissociative electrolyte attached on the shell since the battery gets fully
sealed. However, if the battery shell is damaged, dissociative vitriol is possible to leak. In case electrolyte
splashes onto eyes, skin or clothes, flush it with a large quantity of water. If it splashes into eyes, after
rinsing with water, please go to see a doctor promptly.
9. Make sure the positive(+/red) and negative(-/black)terminals are connected properly, otherwise it will
cause fire or damages to the battery or charger.
10. Please use the following protection equipments when you carry, install and maintain batteries.
1)Safety goggles or protective face-shield;
2)Acid-resistant gloves;
3)Acid-resistant apron, safety shoes;
4)Proper carrying instruments;
5)Insulation instruments.
11. Battery poles, terminals and accessories contain lead or lead compounds; lead and some other chemical
substances in battery are harmful to human body.
7Working Principle
4
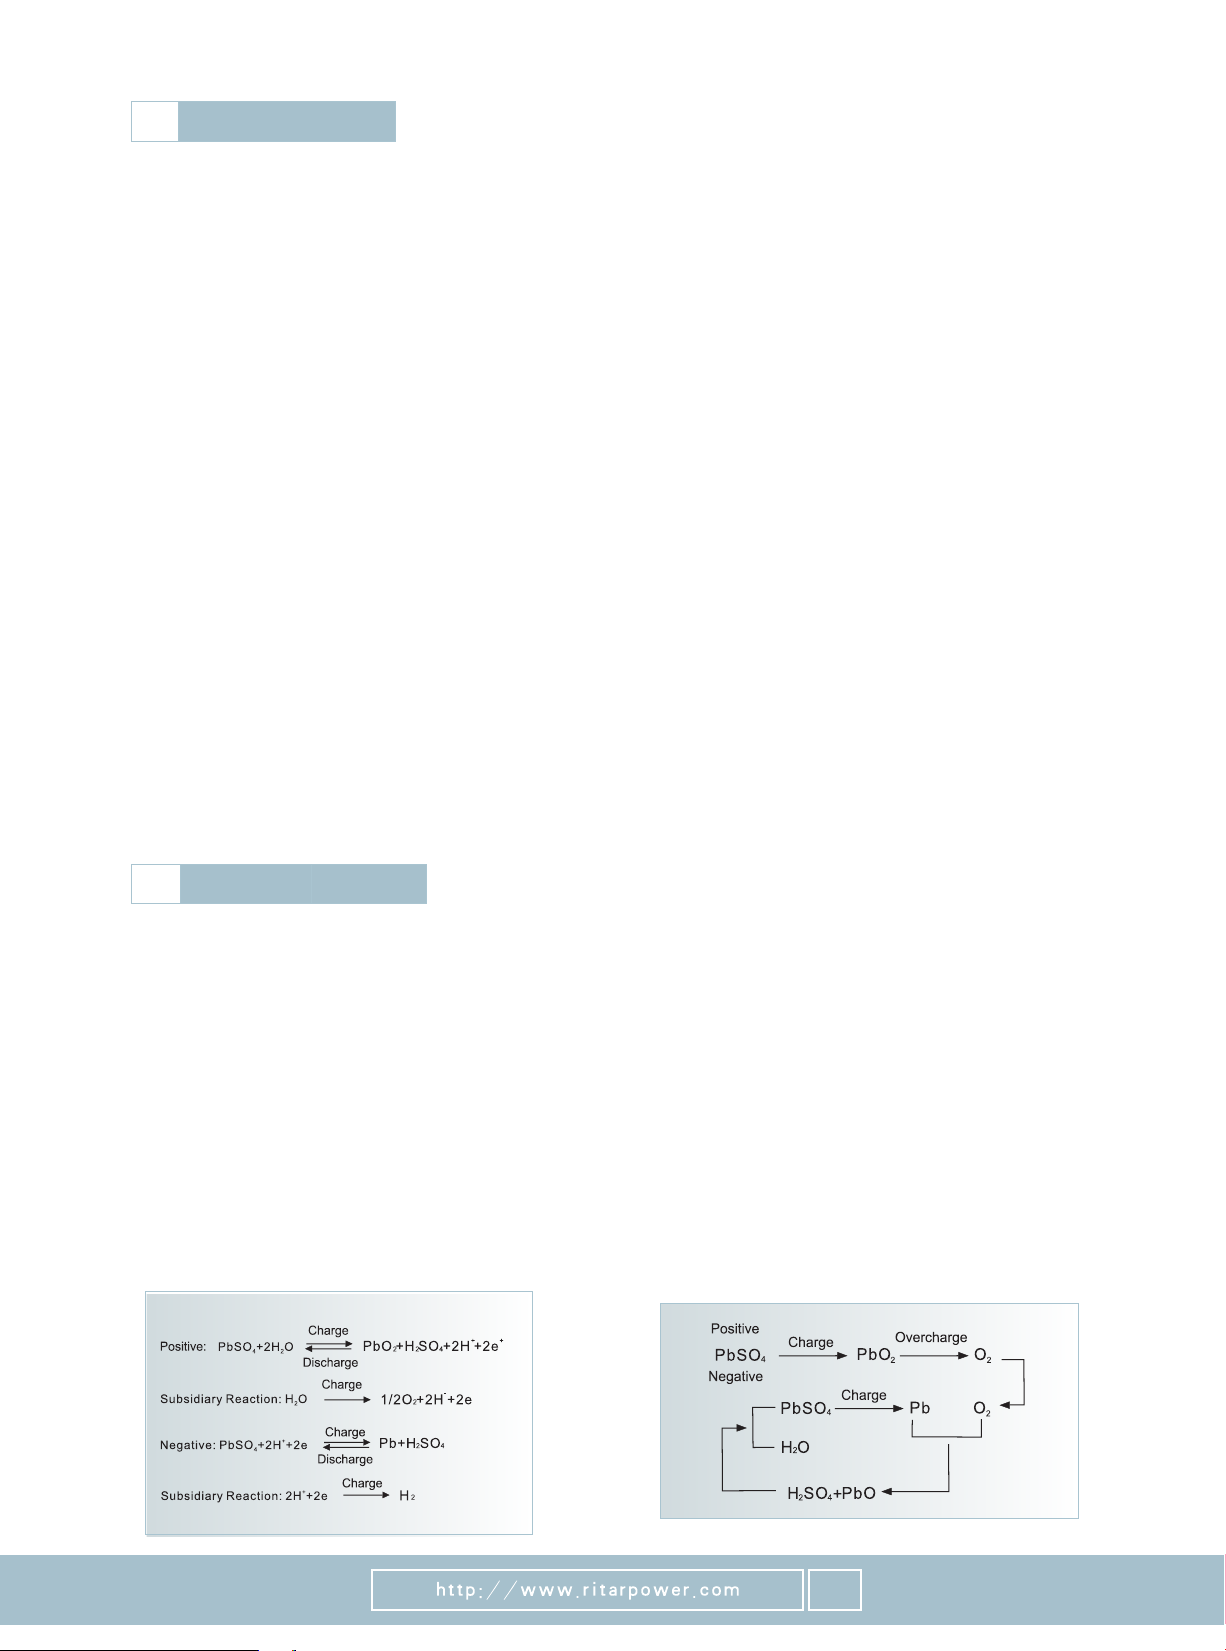
1.Electrochemistry
A lead-acid battery is an electrical storage device that converts electrical energy into potential chemical
energy; when needed the stored chemical energy can be converted back into electrical energy again to be
supplied to external systems. In the discharge state, part of PbO at the positive turns into PbSO , and part of
2 4
Pb at the negative also turns into PbSO4. In this electro-chemical reaction, both positive and negative
electrodes generate PbSO . In the charging state, the lead sulfate(PbSO ) at the positive and negative turns
4 4
into PbO and Pb, respectively. When in discharging, the concentration and density of H SO decreases
2 2 4
gradually; while in charging, it increases. Battery charging and discharging are realized by electrochemical
reactions.
2. Oxygen Combination
The positive plate generates oxygen gas in the final stage of charging. Under the condition of excessive
additives at the negative, oxygen spreads to the negative plates through PE compound separator and reacts
with spongy lead and forms lead oxide and then turns into lead sulfate and water. Keep the negative plates in
depolarization or under charge state so that the battery cannot reach the over potential of oxygen gassing.
Thus the battery avoids oxygen gassing and water loss and is made a maintenance free sealed storage
battery.
4
6Battery Features
1. Long Service Life
Heavy duty lead-calcium grids ensure mild corrosion and enable a long designed service life of 18 years standby use
under optimal float charge conditions and below optimal operating temperature of 20 .
2. Excellent and High Efficient Discharge
RITAR batteries are equipped with low resistant plates and conducting parts, which decrease the internal resistance and
ensure the highest discharging efficiency.
3. Sextuple Sealed Construction
Valve regulated sealed construction and sextuple strengthened sealing on terminals and posts prevent electrolyte leakage,
and guarantee the air tight and liquid tight state of batteries in normal operation and prevent external air from entering
battery inner.
4. Low Self Discharge
Because of the use of lead-calcium grids alloy, RITAR batteries have low self discharge and reliable performance. In room
temperature, self discharge ratio per month of RITAR battery is about 3% of the battery capacity.
5. High Security
RITAR batteries are equipped with explosion-proof safety valves to prevent production of redundant gas. And the
construction is designed to prevent setting fire to the internal battery in case sparkles approach.
6. High Efficiency of Recovery
Unique formulas are used in lead paste of positive post and ensure the battery can be recharged easily to a normal level.
7. No Electrolyte Stratification
Special additives are use in electrolyte to give it a gelatinous consistency without flowing, leaking or stratification, and
make all parts of plates react evenly.
8.Radial Plate Grid
The plate is of radial structure. The internal resistance of radial grid is smaller than that of vertical grid. The smaller the
internal resistance is, the better the discharge performance is.
9.Bold Lead Parts
By increasing the cross-sectional area of lead parts, the high current discharge capacity of battery can be improved.

8 Battery Charge, Discharge & Life
1. Charge Characteristics
2. Charge Curve of Float Use
3. Relationship between Float Charge Voltage and Environment Temperature
At general temperature (5 ~30 ), float charge voltage is 13.6V~13.8V. The batteries for float charge service
adopt the constant voltage but limited current method. The initial current is 0.1C A and the maximum current
10
is 0.2C A.
10
1) At 25 , the float charge voltage of 12V battery is 2.27V per cell.
2) When the ambient temperature changes, the float charge voltage should be adjusted. The
temperature compensation coefficient is -3Mv/ , i.e., U float= 2.27 – 0.003(t-25) * n.
0.0 4
0.0 8
0.1 2
0.1 6
0.2 0
0.2 4
0.2 8
Charge Characteristic Curve of Float Use
Charge Volume (%)
Charge Current (A)
Charge Voltage (V)
Charge Time (Hr)
Charge Voltage
Charge Volume
Discharge
Charge wi th Constant Voltage
& Limited C urrent :
Charge Voltage: 2.30V/Cell
Charge Cu rrent: 0.2C A
10
Temperature: 25℃/77℉
5
(lead sulfatesponge lead) (lead sulfatedioxide alumina)
water sulfuric acid, proportion rise)sulfuric acid water, proportion decrease)
(sponge leadlead sulfate) (dioxide aluminalead sulfate)
Charge condition is one of the most important factors in battery use. The battery performance and service life
are directly related to its charging methods and charging parameters in using. The battery is recommended to
be charged at the temperature range of 5-30℃ . At any temperature lower than 5℃ or higher than 35℃ it will
cause undercharge or overheating and then decrease the battery life.

6
4. Equalizing Charge Parameters
In the process of using batteries, due to the individual differences and temperature differences of batteries,
long term floating charge operation will result in unbalanced battery terminal voltage (backward battery). In
order to avoid the deterioration of this imbalance trend, it is necessary to increase the charging voltage of the
battery bank and charge the battery bank to equalize the whole battery bank. Proper equalizing voltage and
equalizing frequency are the basis of long life and reliability of battery. Equalizing charge is not recommended
in the normal use of VRLA batteries, because equalizing charge will increase water loss and grid corrosion,
which will cause early failure.
Equalizing charge requirements for RITAR battery are as follows:
The equalizing charging voltage is related to the ambient temperature. The equalizing charging voltage of
single cell is 2.43V-2.47V/cell at 25 . If the temperature changes, adjust the equalizing voltage in time,
and the equalizing voltage temperature compensation coefficient is - 4MV / .
Equalize charge batteries 1 time after three months of fully float charge operation according to the
specified voltage. Discharge batteries 100% before equalizing charge.
Equalizing charge setting: equalizing charge voltage is 2.43~2.47V/cell @25 and equalizing charge
time is 12 or 24 hours (when the charge current at the end stable about 2~3 hours ,stop equalize and switch
to float ).
Under special circumstances, if the battery is cycle used continuously for more than 20 times, it needs to
be equalize charged once.
In the battery bank, if there is a backward battery, and the single voltage is lower than 2.18V in floating
charge state; or after the battery is replaced in the battery bank, it needs equalizing charge.
The batteries for cycle service adopt the constant
voltage but limited current method. At 20 ~25 ,
the charge voltage of HR series battery is 2.40V
per cell; the initial charge current is not larger than
0.2C A and the battery fully charges in approximately
10
24 hours.
In the final stage of charging, if the charge current
value remains unchanged for 3 hours, it indicates
that the battery is fully charged.
5.Charge Curve of Cycle Use
2.60
2.40
2.20
2. 0
1. 8
1. 6
2.42
2. 3 6
0.30
0. 2 4
0. 1 8
0.12
0. 0 6
Charge Characteristic Curve of Cycle Use
Charge Volume (%)
Charge Current (A)
Charge Voltage (V)
Charge Voltage
Charge Volume
Discharge
Charge with Constant Voltage
& Limited Current :
Charge Voltage: 2.40V/Cell
Charge Current: 0.2C A
10
Temperature: 25℃/ 77℉
Charge Time (Hr)
5
6. Supplementary Charging
Due to self discharge, battery stocked longtime,
the capacity reduce slowly, the relationship
between capacity reservation, temperature and
stock time as right curves.
Supplementary Charging adopts the constant
voltage but limited current method.
Initial charging current is 0.05 C – 0.3 C ,
10 10
charging voltage is 2.43 ± 0.05V/Cell, generally
charge for 24~36 hours. After longtime storage,
before use, battery should be makeup charged.
Surplus Capacity (%)
Capacity Reservation Curves
No need of supplementa ry
charging. Used in floa t
charge.
Supplementary Charging
is required.
Supplementary Charging
performance will be affected.
It is prohi bited to leave
the battery standing
till this s tate.
Storage Time (Month)

7. Discharge Characteristic
Discharge characteristic curves are as right:
Discharge Capacity vs Temperature
Storage Time (Month)Charge Voltage (V/Cell)Maximum Charge Current(A)Charge Time(Hr)
2.43
2.43
0.3C 10
0.3C 10
24
36
Storage Time vs Charge Voltage and Charge Time
3~6
6~12
Temperature vs Capacity Curve
120
110
100
80
60
40
0-40 -30 -20 -1 0 -0 10 20 30 4 0 50 Temperature
(℃ )
Effective Capacity (%)
10Hr rate discharge:K=0.006/℃;5Hr rate discharge:K=0.007/℃
3Hr rate discharge:K=0.008/℃;1Hr rate discharge:K=0.010/℃
C25 Discharge capacity at 25 (AH)
Ct Discharge capacity at t (AH)
t Environment temperature during discharge ( )
K Temperature compensation coefficient
Temperature vs Capacity Curve
7
According to the difference of discharge rate,
the cutoff voltage is also different. Larger
discharge current sets lower cutoff voltage;
reversely, smaller discharge current sets
higher cutoff voltage. Normally the battery
cutoff voltage of single cell discharge is set at
1.8 0 – 1.60V. The discharge capacity
decreases with the increase of discharge
current; the discharge capacity increases with
the decrease of discharge current. 1C A
10
0. 55 C A
0. 25 C A
10
10
1 2 3 5 10 20 3 0 6 0 2 3 5 10 20
2. 1 0
2. 0 5
2. 0 0
1. 9 5
1. 9 0
1. 8 5
1. 8 0
1. 7 5
1. 7 0
1. 6 5
1. 6 0
1. 5 5
1. 5 0
Mi n H r
Note:C =10Hr nominal capacity
10
Discharge Characteristic Curves
Termial Voltage (V)
0.1C A
10
0.165C A
10
Battery discharge capacity is related with temperature. Lower temperature, lower discharge
capacity; higher temperature, higher discharge capacity. But over high temperature will seriously
damage the battery lifetime. The best working temperature for battery is 20- 25℃. The discharge
capacity at a certain temperature Ct vs the discharge capacity at 25℃ C25 have below relationship:

Float Charge
Voltage(V)
2. 3 0 15. 0 10 .6 7. 5 3. 7 1. 9
20 C 25C 30 C 40 C 50 C
Battery Actual Float Life at Different Temperature (Year)
8. Float Life Characteristic
Float Life Characteristic Curves
20 30 40 50 C
68 8 6 104 122 F Temperature
20
16
10
14
8
6
4
5
3
2
1.4
1
Life(Year)
Float Charge Voltage: 2.30V/Cell
Float Lifetime vs Temperature
According to Arrhenius equation, battery design life
fluctuates with temperature, temperature increases
every 10℃, the float lifetime is cut by half.
K1:Equal constant at T1 temperature
K2:1 Equal constant at T2 temperature
Ea : activation energy
-1 -1
R:air constant,8.3143J·mole ·K
T1:environment temperature during
discharge,K
T2: standard temperature 293K
8
At recommended float charging situation at 25℃, HR series battery design life is over 15 years. Battery's usage lifetime is
related with ambient temperature, depth of discharge, discharge rate and float charging voltage. In real usage, deep
discharge, frequent discharge, incorrect float charging voltage will effect the battery lifetime directly.
9Record
The operating record of stationary batteries is very important for battery maintenance and protection. This information is
useful for user to confirm battery life and adjust the longevity.
Battery is allowed to operate at a temperature lower than 25℃, however, the charging time will be relatively long. After
installing batteries and a week of float charge, it's required to record the following information:
1)Battery terminal voltage
2)Charger voltage
3) Float charging voltage of each battery
4)Internal resistance of each battery. Within the same battery, put the meter that tests internal resistance at the two
terminals that is in farthest diagonal position.
5)Environment temperature
6) Check if all the connecting points have been fixed to the proper torque (12.4N.M). Use a milliohmmeter to test
internal resistance of each connecting strip. Conduct the test according to the probe potion on the instruction manual.
If the data range is 20% bigger than that during installation, fix screws again to the torque of 11.3N.M. If the data
remains high, please wipe terminals and the interface between terminals and connecting strips.

10 Maintenance
9
Put on a mask or a pair of protective glasses when approach batteries, make sure not put batteries next to fire/
smoking place.
Proper maintenance can prolong battery life and help it meet the design requirements. A good battery
maintenance program can help to judge when battery need to be replaced. If the maintenance way differs from
this manual, users can make the maintenance program according to battery usage and using reliability. All
maintenance needs to be executed by professionals.
1.Inspection
Try to make all inspection under float charging conditions. Inspection should be conducted according to
instruction manual from the supplier and record all test data for future collation.
1.1 Monthly inspection
General inspection items and record of every month are as follows:
1.1.1 Float charging voltage of all batteries.
1.1.2 Output current and voltage of charger.
1.1.3 Ambient temperature, ventilation and monitor equipments.
1.1.4 Visual inspection of battery bank appearance:
1)Inspect battery appearance: Check whether there is corrosive phenomenon on terminals, connectors,
battery racks.
2)Clean batteries, racks and battery region.
3)Inspect whether there is crack or leakage on battery.
4)Inspect whether there is deformation of battery and rack.
1.2 Quarterly inspection
Quarterly inspection includes the following items; please record all the inspection data. ( Need to collate with
previous records.)
1) Internal resistance of each battery cell;
2) Temperature on negative terminals of each battery cell;
3) Inspect connect resistance at random ( at least check 10% or 6 connectors), if resistance is significantly
higher than the initial value, then need to check all connectors' resistance and dig out reason. (Notice: Please
inspect different connectors every quarter.)
1.3 Yearly inspection and initial inspection
For Yearly inspection and initial inspection, conduct the following checking and record items.
1)Check and record internal resistance of all connectors;
2)Try to check AC current and voltage from rectifier.
1.4 Special inspection
Batteries need inspection to check if they get damaged in special situations (such as over-discharge, abuse
use due to charging machine failure, etc). The inspection includes all yearly checking items and needs to make
records.
2. Ripple Voltage of rectifier
We recommend ripple Voltage of rectifier should not be bigger than 0.5% of charging voltage, and librating
ripple time should be shorter than 8 millisecond.

10
11 Common Faults & Solutions
1
2
3
4
5
6
7
No. Common Faults Solutions
Acid leakage Please contact the supplier for solutions.
Crack
Low floating voltage of single cell
High temperature on battery pole and
cell
Abnormal Appearance
Grounding Fault
Abnormal connect & inner
resistance
Please contact the supplier for solutions.
After 24-48hrs equalization charger, still low, please contact the supplier for
solutions.
Check whether the connection is good, inspect charger, ventilation and charging
current.
Clean dust, and check leakage or ground faulty. The battery bank shall be
insulated from the ground.
Please contact the supplier for solutions.
Check whether the connection is good, inspect charger, ventilation and
charging current.
3. Battery cleaning
Use cloth soaked in water or carbonic acid water to clear battery and cover.
4. Capacity test
If batteries work properly, no need to check capacity. Check capacity only when battery capacity is in doubt.
When battery is in discharge, the cut-off voltage should not be lower than the requirement in the technical
manual.
Before capacity testing, make sure battery get fully charged for more than 48 hours under float charge, if not,
make a equalization charge for 24 hours. Let batteries rest and cool down for 8-24 hours and then conduct
capacity test.
Other manuals for HR Series
1
This manual suits for next models
45
Table of contents
Other RITAR Camera Accessories manuals


