Ritter EBT User manual

Einbaubrottopf EBT
de Wissenswertes zum ritter
Einbaubrottopf und Einbauanleitung
en Everything you need to know about
the ritter built-in bread bin and
installation instructions
cs Informace k vestavnému chlebníku
ritter a návod k vestavbě
hu Fontos információk a ritter beépíthető
kenyértartóról és beépítési útmutató
pl Co warto wiedzieć o chlebaku do
zabudowy ritter oraz instrukcja
montażu
ru Встраиваемая хлебница.
Необходимая информация для
встраиваемой хлебницы ritter и
Руководство по монтажу

A

B
C
D
E F

de Wissenswertes zum ritter Einbaubrottopf und
Einbauanleitung 2
en Everything you need to know about the ritter
built-in bread bin and installation instructions 6
cs Informace k vestavnému chlebníku ritter
10
hu
kenyértartóról és beépítési útmutató 14
pl
18
ru
22

Jeder von uns isst, statistisch gese-
hen, täglich vier bis sechs Scheiben
Brot. Alles in allem ein knappes
halbes Pfund am Tag.
Das ist gut so, denn im Brot, beson-
ders dem aus ganzem Schrot und
vollem Korn, steckt konzentriert
sehr vieles von dem, was der
Mensch zum Leben braucht. Der
Keimling, die Schale und die Rand-
schichten des ungeschälten Getrei-
dekorns enthalten lebenswichtige
Vitamine, Mineral- und Ballaststoffe.
Wie lange ein Brot aufbewahrt
werden kann, hängt von der Sorte
und vor allen Dingen von der Aufbe-
wahrung ab. Schimmel ist der ärgste
Feind des Brotes. Vor allen Dingen
bei Wärme blüht der Schimmel.
Ganze Brote, entsprechend dem
nachstehenden Gebrauchshinweis
im Brottopf richtig gelagert, sind
kaum gegen Schimmel anfällig.
Ganze Brote werden daher auch
nicht mit Sorbinsäure konserviert.
Anders aber das bereits geschnitten
und verpackt gekaufte Brot. Hier fehlt
die rundherum schützende Kruste.
Die Scheiben bieten den Schimmel-
pilzen eine breite Angriffsäche.
Im ritter Einbaubrottopf aus
Steingut wird das Brot biologisch
richtig und gesund aufbewahrt.
Das Brot durchlebt im ritter
Einbaubrottopf seinen natürlichen
Alterungsprozess und die
broteigenen Aromastoffe entfalten
sich frei. Der ritter Einbaubrottopf
ist der natürliche Platz für Brot. In
ihm bleibt es auch noch nach Tagen
eine gesunde Köstlichkeit, nahrhaft
und bekömmlich.
Die vom frischen Brot ausströ-
mende Feuchtigkeit wird vom
Deckel des Brottopfes aufgenom-
men und je nach Bedarf wieder an
das Brot zurückgegeben. Deshalb
ist der Deckel auf der Unterseite
porös. Er wirkt wie ein Schwamm.
Außen ist er, wie auch der Brottopf,
lebensmittelgerecht glasiert. Die im
Deckel gespeicherte Feuchtigkeit
kann nicht verdunsten. Der natür-
liche Feuchtigkeitsgehalt des Brotes
bleibt lange erhalten und das Brot
trocknet nicht vorzeitig aus.
Brot, als natürliches Lebensmittel,
braucht für seinen natürlichen Alte-
rungsprozess Sauerstoff. Seitliche
Luftlöcher, die gleichzeitig zum
Unterfassen dienen, sorgen für die
notwendige Luftzirkulation und das
Brot erstickt nicht.
Steingut ist für seine isolierenden
Eigenschaften gegenüber wech-
selnden Temperaturen bekannt. Der
ritter Einbaubrottopf aus Steingut
hält die Brottemperatur weitgehend
gleich. Das ist für die biologisch
richtige Aufbewahrung sehr wichtig,
denn das Brot braucht eine gleich
bleibende Temperatur.
WISSENSWERTES ZUM RITTER EINBAUBROTTOPF AUS STEINGUT
MIT FRISCHHALTE-FUNKTIONSDECKEL
2
Deutsch

GEBRAUCHSHINWEISE
Ofenfrisches Brot muss vor dem
Aufbewahren gut ausgekühlt sein.
•Entfernen Sie regelmäßig die
alten Brotkrümel und reinigen Sie
den Brottopf mit einem feuchten
Tuch.
•Wischen Sie den Brottopf gele-
gentlich mit Essigwasser aus, das
beugt zusätzlich der Schimmelbil-
dung vor.
•Bewahren Sie das Brot ohne jede
Verpackung im Brottopf auf.
wenn das Brot zu schnell
austrocknet?
Wenn der Brottopf noch neu ist
oder längere Zeit nicht benutzt
wurde, kann es möglich sein, dass
der Brottopf-Deckel nicht die not-
wendige Feuchtigkeit gespeichert
hat.
•Stellen Sie, am besten über
Nacht, ein Schälchen mit Wasser
in den Brottopf.
Der Deckel nimmt die notwendige
Feuchtigkeit auf, die dann wie-
derum an das Brot abgegeben
wird.
bei Schimmelbildung?
Das könnte der Fall sein, wenn
die Feuchtigkeit zu hoch und der
Luftaustausch zu gering ist.
•Reinigen Sie den Topf mit Essig-
wasser und stellen Sie ihn dann
für etwa eine Stunde bei
ca. 250 Grad in den Backofen.
Die Schimmelpilze werden
dadurch abgetötet.
Vorsicht!
Den Brottopf in den kalten
Backofen stellen und erst nach dem
Auskühlen herausnehmen!
Falls Schimmelbefall im Deckel
auftreten sollte, setzen Sie sich
bitte mit dem ritter Kundendienst in
Verbindung.
Noch ein kleiner Tipp:
Weißbrot-Produkte werden im Kera-
mik-Brottopf weich, sind aber nach
kurzem Aufbacken wieder knusprig
und wie frisch.
3

4
LIEFERUMFANG
Bild A:
Pos Bezeichnung Anzahl
1 Brottopf 1x
2 Brottopf-Deckel 1x
3 Tragrohr 1x
4 Befestigungsschraube,
vormontiert
2x
5 Befestigungsschraube,
vormontiert
4x
6 Deckelträger, vormontiert 2x
7 Lüftungsrosette 1x
8 Fixierwinkel 6x
9 Sockelplatte 12x
10 seitlicher Haltewinkel
(Tragrohrlager)
2x
11 Deckelauage 1x
12 Befestigungsschraube
–ASPA Pan Head 3,5 x 17
(ohne Sockelplatten)
–ASPA Pan Head 3,5 x 25
(für eine Sockelplatte)
–ASPA Pan Head 3,5 x 30
(für zwei Sockelplatten)
9x
9x
9x
13 Befestigungsschraube 4x13 2x
14 Befestigungsschraube 6x13,5 1x
15 Fächerscheibe 3x
- Bohrschablone 2x
VORBEREITUNG
Entfernen Sie alle Auszüge, die sich über
dem für den Brottopf bestimmten Auszug
benden.
FIXIERWINKEL FÜR BROTTOPF
MONTIEREN
Bild B:
•Markieren Sie mithilfe eines Anschlag-
winkels eine rechte Bezugslinie im Aus-
zugsboden im Abstand von 43 mm zur
Korpusinnenseite.
Bild C:
•Legen Sie die Bohrschablone mit der
unteren Seite an der Auszugsfront und
mit der rechten Seite an der Bezugslinie
an.
•Bohren Sie die Löcher für die Befestigung
der Fixierwinkel (8).
•Ermitteln Sie die maximale Zargenhöhe.
Übersteigt die Höhe 150 mm, müssen die
Fixierwinkel mit einer Sockelplatte (9),
übersteigt sie 158 mm, mit zwei Sockel-
platten unterlegt werden.
•Fixieren Sie die beiden rechten und den
vorderen Fixierwinkel mit jeweils zwei
Befestigungsschrauben (12).
•Befestigen Sie die beiden linken und
den hinteren Fixierwinkel mit je einer
Befestigungsschraube (12) und Fächer-
scheibe (15).
Ziehen Sie die Schrauben noch nicht
fest, so dass die Position der Fixierwinkel
einstellbar bleibt.
•Setzen Sie den Brottopf auf die Fixierwin-
kel auf:
– Schriftzug "ritter" ist von vorn lesbar
– Brottopf liegt an den rechten und am
vorderen Fixierwinkel an.
•Positionieren Sie die einstellbaren
Fixierwinkel links und hinten so, dass der
Brottopf leicht, aber möglichst spielfrei
einsetzbar und herausnehmbar ist.
•Fixieren Sie die Position der linken und
des hinteren Fixierwinkels.
EINBAUANLEITUNG
Deutsch

5
BEFESTIGUNGEN FÜR BROTTOPF-
DECKEL MONTIEREN
•Stellen Sie den Brottopf (1) in den
(eingesetzten) Auszug.
•Kürzen Sie ggf. das Tragrohr (3) auf die
richtige Länge (Korpusinnenbreite minus
8 mm).
•Führen Sie ggf. das Tragrohr in die
Deckelträger (6) ein.
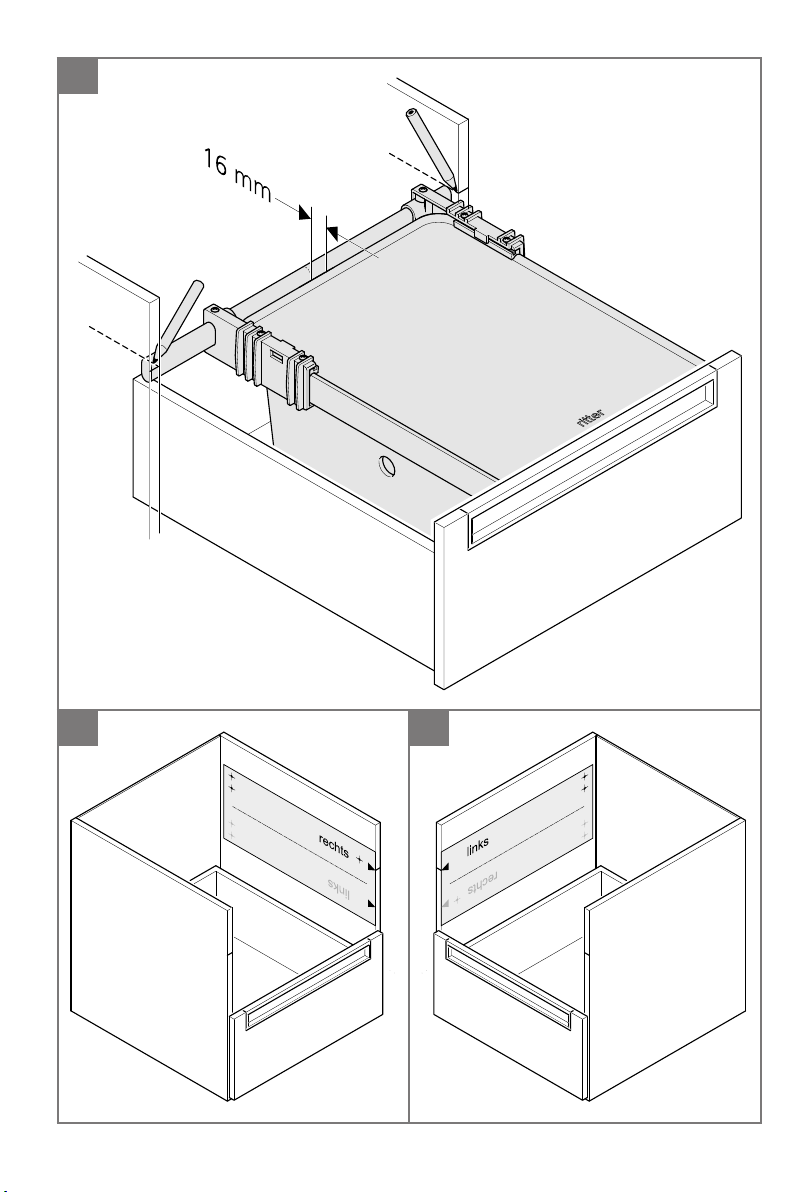
•Richten Sie das Tragrohr parallel zum
Brottopf-Deckel (2) im Abstand von
16 mm aus (Bild D).
•Legen Sie den Brottopf-Deckel auf den
Brottopf auf:
– Schriftzug "ritter" ist von vorn lesbar
– Brottopf-Deckel liegt an der Auszugs-
front an
Bild D:
•Ziehen Sie den Auszug so weit heraus,
dass das Tragrohr an der vorderen Kante
der Korpusseite anliegt.
•Markieren Sie die Oberkanten des Trag-
rohrs an der linken und rechten Korpusin-
nenseite.
•Entnehmen Sie den Brottopf-Deckel und
den Brottopf.
•Entfernen Sie den Auszug.
Bild E:
•Markieren Sie mithilfe der Bohrschablone
und einem Spitzkörner an der rechten
Korpusinnenseite:
– die Löcher für den rechten
Haltewinkel (10)
– die Löcher für die Deckelauage (11)
Bild F:
•Markieren Sie mithilfe der Bohrschablone
und einem Spitzkörner an der linken
Korpusinnenseite die Löcher für den
linken Haltewinkel (10).
•Bohren Sie die markierten Löcher
(Ø4,5 mm x 10 mm).
Deutsch
LÜFTUNGSROSETTE EINBAUEN
•Bohren Sie das Loch für die Lüftungsro-
sette (7) (Ø44 mm):
–an der Korpusrückseite
–mittig in Höhe des Brottopfes
•Setzen Sie die Lüftungsrosette ein.
FERTIGSTELLUNG
•Stecken Sie die Haltewinkel (10) in die
Bohrungen und xieren Sie sie mit den
Befestigungsschrauben (13).
•Setzen Sie den Brottopf-Deckel (2) mit
dem Tragrohr (3) in die Haltewinkel ein.
• Montieren Sie die Deckelauage (11) mit
der Befestigungsschraube (14).
•Setzen Sie den Auszug ein.
•Stellen Sie den Brottopf in den Auszug.
•Überprüfen Sie die Position der Deckel-
auage:
– Deckelauage schließt vorne bündig
mit Brottopf ab
– Die Deckelauage darf beim Heraus-
ziehen des Auszugs nicht seitlich am
Brottopf schleifen
•Stellen Sie ggf. die Position der Deckel-
träger (6) nach.
•Fixieren Sie alle Schrauben.

Looked at statistically, each of us
eats four slices of bread every
day. All in all, this is equivalent to
roughly half a pound a day.
And this is a good thing, because
bread - in particular wholemeal
bread - is full of everything we need
to eat in concentrated form. The
shoots, husk and surface layers of
the unhusked grain contain essen-
tial vitamins, mineral nutrients and
bres.
How long bread can be kept for
depends on the type of bread and
how it is to be stored. Mould is
bread‘s worst enemy. And mould
ourishes wherever there is heat.
Complete loafs of bread, when
stored correctly in the bread bin as in
the Instructions for Use opposite, are
hardly susceptible to mould. Com-
plete loafs of bread are therefore not
preserved using sorbic acid.
However, it is different for bread that
has already been sliced and packed.
This is because the protective crust
surround is missing. The slices pro-
vide a large area for mould fungus
to attack.
In the ritter earthenware built-in
bread bin, the bread is stored in a
biologically correct and healthy man-
ner. When in the ritter built-in bread
bin, the bread undergoes a natural
ageing process and the bread's
inherent avouring can then freely
develop. The ritter built-in bread bin
is the best place to keep your bread.
Even after several days in the bin it
will remain a healthy delicacy, full of
nutrition and digestible.
The moisture released by fresh
bread is absorbed by the lid of
the bread bin and - depending
on requirements - returned to the
bread. This is why the lid is porous
on its underside. It acts like a
sponge. On the outside, it is just
like the bread bin: glazed and suit-
able for storing food. The moisture
stored in the lid cannot then evapo-
rate. The bread‘s natural moisture
content is retained for a longer
period, thus preventing the bread
from drying out too quickly.
Bread, as a natural food, needs
oxygen for its natural ageing proc-
ess. Holes at the side, which can
also be used for picking the bin up,
provide the necessary air circula-
tion, thus preventing the bread from
asphyxiating.
Earthenware is well known for its
insulating properties against chang-
ing temperatures. The ritter earth-
enware built-in bread bin ensures
that the bread temperature mainly
remains at a uniform level. This is
very important for biologically cor-
rect storage, because bread needs
a temperature that remains con-
stant.
EVERYTHING YOU NEED TO KNOW ABOUT THE RITTER EARTHEN-
WARE BUILT-IN BREAD BIN WITH FUNCTIONAL KEEP-FRESH LID
English
6
INSTRUCTIONS FOR USE
Bread fresh from the oven must be
properly cooled before being put
into storage.
•Regularly remove any old bread
crumbs and clean the bread bin
using a damp cloth.
•Wipe down the bread bin occa-
sionally using vinegar, this helps
to prevent any mould from form-
ing.
•Do not wrap the bread in anything
before placing it into the bread
bin.
if the bread dries out too
quickly?
If the bread bin is still new or if it
has not been used for an extended
period, then it may be that the
bread bin lid has not absorbed the
necessary degree of moisture.
•The best thing to do, is place a
bowl of water into the bread bin
and leave it overnight.
The lid will then absorb the
required moisture, which then in
turn is released to the bread.
if mould starts to form?
This could be the case if there is too
much moisture and an insufcient
level of air replacement.
•Clean the bin using vinegar and
place it for roughly one hour at
approx. 250 degrees Celsius in
the baking oven.
This will kill off any mould fungus.
Caution!
Place the bread bin into the cold
baking oven and do not remove
until after the cooling process is
over!
If you should detect any mould in
the lid itself, please contact the
ritter Service.
One more small tip:
White bread products will go soft in
the ceramics bread bin, but if you
bake them for a few minutes they
will be crisp and fresh again.
7

8
DELIVERY CONTENTS
Figure A:
Designation Number
1 Bread bin 1x
2 Bread bin lid 1x
3 Supporting pipe 1x
4 Fastening screw, preassembled 2x
5 Fastening screw, preassembled 4x
6 Lid carrier, preassembled 2x
7 Ventilation bezel 1x
8 Fastening angle 6x
9 Baseplate 12x
10 Side retaining bracket
(supporting pipe bearing)
2x
11 Lid supporting surface 1x
12 Fastening screw
–ASPA Pan Head 3.5 x 17
(without baseplates)
–ASPA Pan Head 3.5 x 25
(for one baseplate)
–ASPA Pan Head 3.5 x 30
(for two baseplates)
9x
9x
9x
13 Fastening screw 4x13 2x
14 Fastening screw 6x13.5 1x
15 Serrated lock washer 3x
- Drilling template 2x
PREPARATION
Remove all drawers that are located above
the drawer intended for the bread bin.
MOUNTING FASTENING ANGLE FOR
BREAD BIN
Figure B:
•Use a stop angle to mark out a right-hand
reference line in the base of the drawer at
a distance of 43 mm to the inside of the
carcass.
Figure C:
•Place the drill template, with the under-
side, onto the front of the drawer and
with the right-hand side up against the
reference line.
•Drill the holes with which the fastening
angle (8) is to be mounted.
•Determine the maximum case height.
If the height is in excess of 150 mm, the
fastening angle must be tted with a
baseplate (9), if it is higher than 158 mm,
two baseplates have to be used.
•Attach the two right-hand and the front
fastening angles, using two fastening
screws each (12).
•Attach the two left-hand and the rear
fastening angles, using one fastening
screw each (12) and a serrated lock
washer (15).
Do not tighten the screws yet so that the
position of the fastening angles can still
be adjusted.
•Mount the bread bin onto the fastening
angle:
– The "ritter" emblem should be visible at
the front.
– The bread bin should make contact with
the right and front fastening angles.
•Position the adjustable fastening angles
at the left and rear so that the bread bin
can be inserted and removed easily, but
with zero-clearance, if possible.
•Secure the position of the left-hand and
rear fastening angles.
INSTALLATION INSTRUCTIONS
English

9
MOUNTING BREAD BIN LID
FASTENINGS
•Place the bread bin (1) into the (inserted)
drawer.
•Shorten the supporting pipe (3) to the
correct length (inner carcass width minus
8 mm).
•If necessary, route the supporting pipe
into the lid rack (6).
•Align the supporting pipe parallel to the
bread bin lid (2) at a distance of 16 mm
(Figure D).
•Place the bread bin lid onto the bread bin:
– The "ritter" emblem should be visible at
the front.
– The bread bin lid should contact the
front of the drawer
Figure D:
•Pull the drawer out far enough, so that
the supporting pipe makes contact with
the front edge of the carcass side.
•Mark the upper edge of the supporting
pipe on the left and right of the inside of
the carcass.
•Remove the bread bin lid and the bread
bin.
•Remove the drawer.
Figure E:
•Use the drill template and a centre punch
to mark the following on the right-hand of
the carcass interior:
– the holes for the right retaining
bracket (10)
– the holes for the lid carrier (11)
Figure F:
•Use the drill template and a centre punch
to mark the holes for the left retaining
bracket (10) on the left of the carcass
interior.
•Drill the marked holes (Ø4.5 mm x 10 mm).
INSTALLING VENTILATION BEZEL
•Drill the hole for the ventilation bezel (7)
(Ø44 mm):
–on the rear side of the carcass
–in the centre, level with the bread bin
•Insert the ventilation bezel.
FINALISATION
•Insert the retaining brackets (10) into the
bores and fasten them in place using the
fastening screws (13).
•Insert the bread bin lid (2) with the sup-
porting pipe (3) into the retaining brack-
ets.
•Mount the lid carrier (11) using the fasten-
ing screw (14).
•Insert the drawer.
•Place the bread bin into the drawer.
•Check the position of the lid carrier:
– The lid carrier ts ush to the front of
the bread bin
– The lid carrier must not contact the side
of the bread bin when the drawer is
pulled out
•If necessary, adjust the position of the lid
carrier (6).
•Tighten all screws.
English
10
Podle statistik sní každý z nás
denně v průměru čtyři až šest kra-
jíců chleba. Celkem tedy téměř čtvrt
kilogramu každý den.
Je to dobře, protože chléb, pře-
devším ten celozrnný, obsahuje
v koncentrované podobě velmi
mnoho látek, které člověk potřebuje
k životu. Semena, slupky a plevy
neloupaných obilnin obsahují
životně důležité vitamíny, minerály
a vlákninu.
Doba, po kterou chléb vydrží čerstvý,
závisí na druhu a především na způ-
sobu skladování. Největším nepří-
telem chleba jsou plísně. A plísním
nejvíce prospívá teplo. Když správně
podle následujícího návodu k použití
skladujete v chlebníku celý bochník,
je hrozba vzniku plísně minimální.
Bochníky není potřeba konzervovat
kyselinou sorbovou.
Předem nakrájený a zabalený chléb
se ale chová jinak. Chybí mu uza-
vřená ochranná kůrka. Krajíce nabí-
zejí plísním rozsáhlou živnou půdu.
Ve vestavném kameninovém
chlebníku ritter je chléb uložen
biologicky správně a zdravě.
Ve vestavném chlebníku ritter
chléb stárne přirozeně a uvolňuje
přirozené vonné látky. Chlebník
ritter je pro chléb přirozeným
místem. Ještě po několika dnech
v chlebníku je výživnou a zdravou
pochoutkou.
Víko chlebníku zachycuje vlhkost
vycházející z čerstvého chleba
a podle potřeby ji chlebu vrací.
Proto je víko na spodní straně
porézní. Chová se jako houba.
Zvenčí je stejně jako chlebník
glazováno a vyhovuje předpisům
pro skladování potravin. Vlhkost
uchovaná ve víku se nemůže odpa-
řovat. Přirozená vlhkost chleba tak
zůstane dlouho zachována a chléb
předčasně nevysychá.
Chléb je přírodní potravina a ke
svému přirozenému stárnutí potře-
buje kyslík. O potřebnou cirkulaci
vzduchu, aby se chléb nedusil, se
postarají postranní větrací otvory,
za které lze chlebník také uchopit.
Kamenina je známá svými izolač-
ními vlastnostmi při proměnlivé
teplotě. Vestavný chlebník ritter
z kameniny udržuje chléb v dlou-
hodobě stabilní teplotě. To je velmi
důležité pro správné biologické
uchovávání, protože chléb vyžaduje
konstantní teplotu.
INFORMACE KE KAMENINOVÉMU VESTAVNÉMU CHLEBNÍKU
10
11
Čerstvý chléb musí před uložením
řádně vychladnout.
• Pravidelně odstraňujte staré
drobinky a čistěte chlebník vlhkým
hadříkem.
• Občas chlebník vytřete octovou
vodou, která představuje další
prevenci tvorby plísní.
• Chléb ukládejte do chlebníku bez
jakýchkoli obalů.
vysychá?
U nového nebo dlouho nepoužíva-
ného chlebníku se může stát, že
v sobě víko chlebníku nemá dosta-
tek vlhkosti.
•Postavte do chlebníku misku
s vodou, nejlépe přes noc.
Víko absorbuje potřebné množství
vlhkosti, kterou později uvolní na
chléb.
Ke vzniku plísní může dojít při příliš
vysoké vlhkosti a malé výměně
vzduchu.
• Vyčistěte chlebník octovou vodou
a vložte ho přibližně na hodinu do
trouby vyhřáté na 250 stupňů.
Tím plíseň odstraníte.
Pozor!
Ponechejte chlebník v troubě
a vyjměte ho až po vychlazení!
Pokud plíseň napadne víko, obraťte
se na oddělení služeb zákazníkům
společnosti ritter.
Bílé pečivo v keramickém chlebníku
změkne, ale po krátkém dopečení
je opět křupavé a jako čerstvé.
11

12
OBSAH DODÁVKY
Obrázek A:
Popis
1 Chlebník 1x
2 Víko chlebníku 1x
3Nosná tyč 1x
4Upevňovací šroub
(již namontovaný)
2x
5Upevňovací šroub
(již namontovaný)
4x
6Držák víka (již namontovaný) 2x
7Větrací růžice 1x
8Upevňovací prvek 6x
9Podložka 12x
10 Postranní držák
(pro nosnou tyč)
2x
11 Podpěra víka 1x
12 Upevňovací šroub
–Hlava ASPA, 3,5 x 17
(bez podložky)
–Hlava ASPA, 3,5 x 25
(jedna podložka)
–Hlava ASPA, 3,5 x 30
(dvě podložky)
9x
9x
9x
13 Upevňovací šroub 4 x 13 2x
14 Upevňovací šroub 6 x 13,5 1x
15 Vějířovitá podložka 3x
-Montážní šablona 2x
Vytáhněte všechny zásuvky umístěné nad
zásuvkou určenou pro chlebník.
CHLEBNÍK
Obrázek B:
• Pomocí úhelníku vyznačte na dně
zásuvky ve vzdálenosti 43 mm od vnitřní
stěny skříňky pravou referenční čáru.
Obrázek C:
• Položte montážní šablonu spodní stranou
k vnitřní stěně čela zásuvky a pravou
stranou na referenční čáru.
• Vyvrtejte otvory pro upevňovací prvky (8).
• Změřte maximální výšku bočnic. Pokud
jsou vyšší než 150 mm, musíte upevňo-
vací prvky podložit jednou podložkou (9).
Při větší výšce než 158 mm použijte dvě
podložky.
• Oba pravé a přední upevňovací prvek
připevněte vždy dvěma šrouby (12).
• Oba levé a zadní upevňovací prvek
připevněte vždy jedním šroubem (12)
s vějířovitou podložkou (15).
Tyto šrouby zatím neutahujte napevno,
protože budete nastavovat přesnou
polohu upevňovacích prvků.
• Nasaďte na upevňovací prvky chlebník:
– Nápis „ritter“ musí být čitelný zepředu
– Položte chlebník na pravé a přední
upevňovací prvky.
• Nastavitelné upevňovací prvky vlevo
a vzadu nastavte tak, aby mezi ně bylo
možné chlebník lehce vložit a vyjmout,
avšak bez větší vůle.
• Utáhněte levé a zadní upevňovací prvky.
Čeština

13
• Vložte chlebník (1) do (nasazené)
zásuvky.
• Je-li to třeba, zkraťte nosnou tyč (3) na
správnou délku (vnitřní rozměr skříňky
mínus 8 mm).
• Je-li to třeba, vložte nosnou tyč do držáku
víka (6).
• Nastavte nosnou tyč paralelně s víkem
chlebníku (2), do vzdálenosti 16 mm od
víka (obrázek D).
• Položte víko na chlebník:
– Nápis „ritter“ musí být čitelný zepředu
– Víko se musí dotýkat čela zásuvky.
Obrázek D:
• Vytáhněte zásuvku natolik, až bude
nosná tyč na přední hraně skříňky.
• Na levé i pravé vnitřní stěně skříňky
vyznačte polohu horní hrany nosné tyče.
• Vyjměte víko i chlebník.
• Vytáhněte zásuvku.
Obrázek E:
• Podle montážní šablony vyznačte důlčí-
kem na pravé vnitřní stěně skříňky tyto
body:
– Otvory pro pravý postranní držák (10)
– Otvory pro podpěru víka chlebníku (11)
Obrázek F:
• Podle montážní šablony vyznačte důlčí-
kem na levé vnitřní stěně skříňky otvory
pro levý postranní držák (10).
• Vyznačené otvory vyvrtejte
(Ø4,5 mm x 10 mm).
Čeština
• Vyvrtejte otvor pro větrací růžici (7)
(Ø44 mm):
–na zadní straně skříňky,
–uprostřed výšky chlebníku.
• Nasaďte větrací růžici na místo.
SESTAVENÍ
• Nasaďte postranní držáky (10) do otvorů
a upevněte je šrouby (13).
• Nasaďte do postranních držáků víko
chlebníku (2) s nosnou tyčí (3).
• Pomocí šroubu (14) připevněte podpěru
víka (11).
• Nasaďte zásuvku na místo.
• Vložte do zásuvky chlebník.
• Zkontrolujte polohu podpěry víka:
– Podpěra víka musí vpředu přesně dolé-
hat na chlebník
– Podpěra víka se nesmí při vytahování
zásuvky pohybovat po straně chlebníku
• Podle potřeby upravte polohu držáku
víka (6).
• Utáhněte všechny šrouby.
14
A statisztikák szerint naponta négy-
hat szelet kenyeret fogyasztunk. Ez
naponta kb. negyed kilót kenyeret
jelent.
Ez jó is így, mivel a kenyérben,
különösen a teljes kiőrlésű kenyér-
ben nagyon koncentráltan megtalál-
ható sok minden, amire az emberi
szervezetnek szüksége van. A
hántolatlan gabonaszem csírája és
maghéja létfontosságú vitaminokat,
ásványi anyagokat és ballasztanya-
gokat tartalmaz.
A kenyér fajtájától és a tárolás
módjától függ, hogy mennyi ideig
tárolható egy kenyér. A kenyér
legádázabb ellensége a penész.
A hő különösen kedven a penész
kialakulásának. Ha az egész (nem
szeletelt) kenyeret a mellékelt hasz-
nálati utasításnak megfelelően a
kenyértartóban tároljuk, akkor azon
nagyon kis valószínűséggel kelet-
kezik penész. Ezért az egész (nem
szeletelt) kenyérbe nem is tesznek
tartósítószert (szorbinsavat).
Ezzel szemben a szeletelt és cso-
magolt kenyeret tartósítani kell.
Ennek oka, hogy ezeket nem veszi
körbe a „védelmező” kenyérhéj. Így a
penész sokkal nagyobb felületen tud
„támadni”.
A kerámiából készült ritter beépít-
hető kenyértartó biológiai szem-
pontból helyes és egészséges táro-
lást biztosít a kenyérnek. A ritter
beépíthető kenyértartóban a kenyér
a napok során természetes módon
változik, azaz a kenyértartó nem
gátolja meg a kenyér saját, termé-
szetes ízanyagainak kialakulását.
A ritter beépíthető kenyértartó a
megfelelő, természetes tárolóhely
a kenyér számára. A beépíthető
kenyértartóban tárolt kenyér még
napok elteltével is egészséges,
ízletes, tápláló és könnyen emészt-
hető marad.
A friss kenyérből távozó nedvessé-
get a kenyértartó fedőlapja felfogja,
és szükség esetén visszavezeti
a kenyérbe. A fedőlap alsó oldala
lyukacsos. Ezért az szivacsként
funkcionál. Kívülről, akárcsak az
egész kenyértartó, élelmiszer-táro-
lási célnak megfelelő bevonattal
van ellátva. A fedőlapban eltárolt
nedvesség nem párolog el. Így a
kenyér képes hosszan megőrizni
természetes nedvességtartalmát,
és nem szárad ki idő előtt.
A kenyér természetes tárolásához
oxigénre is szükség van. Az oldalsó
szellőzőlyukak, amelyek a kenyér-
tartó kiemelésekor/ kihúzásakor
fogóként is szolgálnak, gondos-
kodnak a levegő megfelelő áram-
lásáról, hogy a kenyér ne "fulladjon
meg".
FONTOS INFORMÁCIÓK A KERÁMIÁBÓL KÉSZÜLT, FRISSEN
KENYÉRTARTÓRÓL
14
Magyar

15
A kerámia nagyon jó hőszigetelő.
Ennek köszönhetően a kerámiából
készült ritter beépíthető kenyértartó
egyenletes hőmérsékletet biztosít
a kenyér számára. Ez rendkívül
fontos a biológiai szempontból
helyes tároláshoz, mivel a kenyér-
nek állandó hőmérsékletre van
szüksége.
HASZNÁLATI UTASÍTÁS
Friss, még meleg kenyeret ne
tegyünk a kenyértartóba - várjuk
meg, míg jól kihűl.
• A kenyértartóból rendszeresen
távolítsuk el a morzsákat, és rend-
szeresen töröljük ki a kenyértartót
nedves kendővel.
• Alkalmanként ecetes vízzel is
töröljük ki a kenyértartót, mivel ez
is hozzájárul a penészképződés
megelőzéséhez.
• A kenyértartóban csomagolás
nélkül tároljuk a kenyeret.
ha a kenyér túl hamar kiszárad?
H a kenyértartó még új, vagy ha
hosszabb ideig nem használták,
előfordulhat, hogy a kenyértartó
fedőlapjában nincs megfelelő meny-
nyiségű nedvesség eltárolva.
• Tegyünk - a legjobb, ha egész
éjszakára - egy tál vizet a kenyér-
tartóba.
A fedőlap így megfelelő meny-
nyiségű nedvességet tud elraktá-
rozni, amelyet a kenyér szükség
esetén fel tud venni.
Túl sok elraktározott nedvesség
vagy elégtelen levegőáramlás ese-
tén előfordulhat penészképződés.
• Ecetes vízzel töröljük ki a kenyér-
tartót, és tegyük kb. egy órára
kb. 250 fokos sütőbe.
Ez elpusztítja a penészgombákat.
Figyelem:
A kenyértartót a hideg sütőbe
tegyük be, és csak akkor vegyük ki,
ha már kihűlt.
Ha a kenyértartó fedőlapjában kép-
ződne penész, a ritter ügyfélszol-
gálathoz kell fordulni.
Még egy apró tipp:
A fehérkenyér a kerámia kenyértar-
tóban megpuhul, de rövid melegí-
tés után ismét olyan ropogós lesz,
mintha teljesen friss lenne.
15

16
A CSOMAG TARTALMA
A ábra:
Megnevezés Darab-
szám
1Kenyértartó 1x
2Kenyértartó-fedőlap 1x
3Tartócső 1x
4Rögzítőcsavar, előszerelt 2x
5Rögzítőcsavar, előszerelt 4x
6Fedőlap-tartó. előszerelt 2x
7Szellőzőlap 1x
8Rögzítősarok 6x
9 Talplemez 12x
10 Oldalsó tartósarok
(tartócső-csapágy)
2x
11 Fedőlap-rátét 1x
12 Rögzítőcsavar
–ASPA Pan Head 3,5 x 17
(talplemezek nélkül)
–ASPA Pan Head 3,5 x 25
(egy talplemezhez)
–ASPA Pan Head 3,5 x 30
(két talplemezhez)
9x
9x
9x
13 Rögzítőcsavar 4x13 2x
14 Rögzítőcsavar 6x13,5 1x
15 Alátétkarika 3x
- Lyuksablon 2x
A kenyértartónak szánt ókhely fölül távo-
lítsa el az összes ókot.
KENYÉRTARTÓRA
B ábra:
• Ütköző derékszög segítségével jelöljön ki
a ók fenekén, a belső faltól 43 mm távol-
ságra, jobbra egy referenciavonalat.
C ábra:
•A lyuksablont helyezze el úgy, hogy az
alsó fele a ók elejére, a jobb oldala
pedig a referenciavonalra essen.
• Fúrja ki a lyukakat a rögzítősarkak (8)
rögzítéséhez.
• Számolja ki az oldalrész maximális
magasságát. Ha a magasság meghaladja
a 150 mm-t, akkor a rögzítősarkakat egy
talplemezzel (9) kell alátámasztani; ha a
magasság meghaladja a 158 mm-t akkor
pedig két talplemezzel.
• Két-két rögzítőcsavarral (12) rögzítse a
jobb oldali és az elülső rögzítősarkakat.
• Egy-egy rögzítőcsavarral (12) rögzítse
a bal oldali és a hátsó rögzítősarkakat,
illetve az alátétkarikát (15).
A csavarokat még ne húzza teljesen
feszesre, hogy a rögzítősarkak helyzetén
még lehessen módosítani.
• Helyezze a kenyértartót a rögzítősarkakra
úgy,
– hogy a "ritter" felirat elöl legyen.
– hogy a kenyértartó a jobb oldali és
elülső rögzítősarkakra felfeküdjön.
• A bal oldali és hátsó, állítható
rögzítősarkakat úgy állítsa be, hogy a
kenyértartó könnyen és lehetőleg játék
nélkül betehető és kivehető legyen.
• Rögzítse a bal oldali és hátsó
rögzítősarkakat.
BEÉPÍTÉSI ÚTMUTATÓ
Magyar
Table of contents
Languages:
Popular Indoor Furnishing manuals by other brands


Organized Living
Organized Living freedomRail Garage Assembly instructions

Dinex
Dinex DXSU2T1D10 operating & maintenance manual

Matt Blatt
Matt Blatt MBCESC2DCNA user guide

Kvik
Kvik MH969-060 manual

Presidential Billiards
Presidential Billiards KARIBA installation instructions

Axley
Axley 790-209 operating instructions