RMS OLYMPIC 1911 User manual
Manual for building the 1:1200
Manual for building the 1:1200Manual for building the 1:1200
Manual for building the 1:1200
RMS OLYMPIC 1911 model
RMS OLYMPIC 1911 modelRMS OLYMPIC 1911 model
RMS OLYMPIC 1911 model
________________________________________________________________
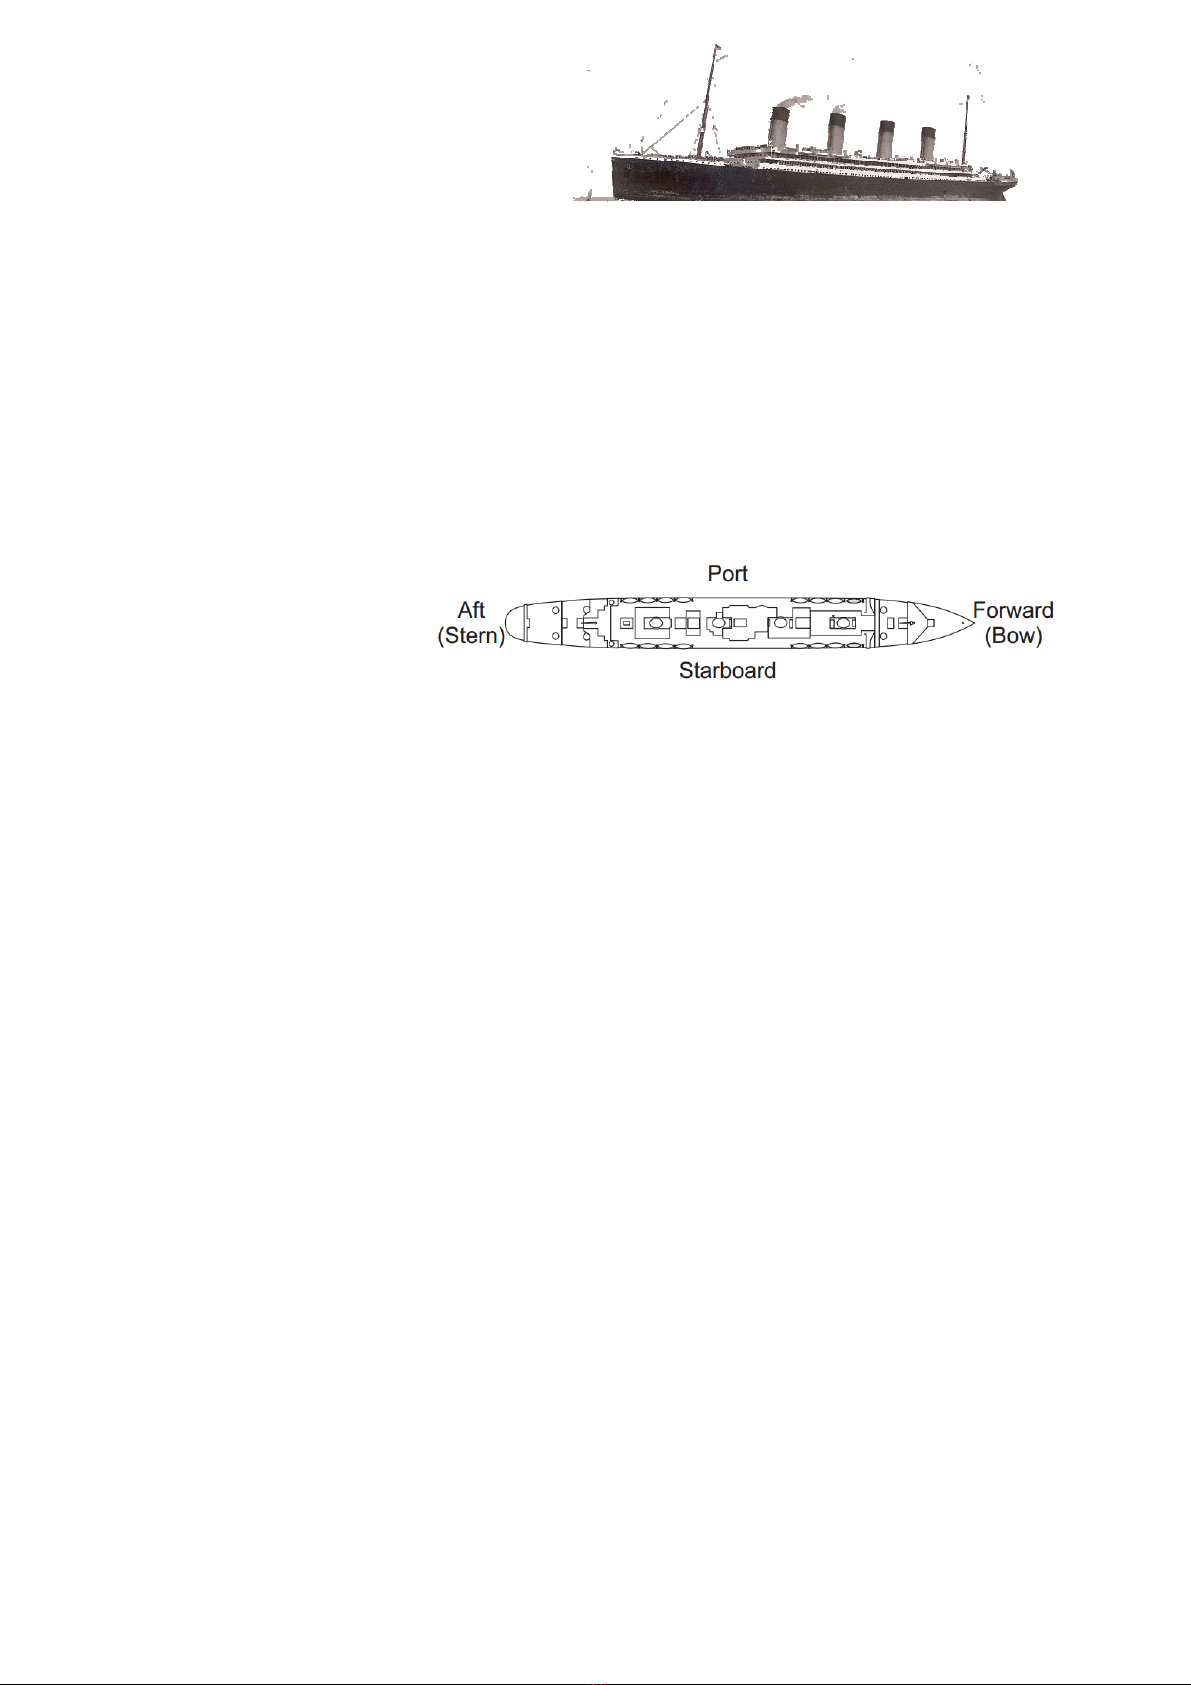
In these instructions, the terms forward (bow) and aft (stern) refer to the
front and rear ends of the ship. Port and starboard refer to the left and
right sides. Scoring of parts is indicated by thin black lines outside the partís
outline, and by dashed or shaded lines on the partís surface. For
small parts such as the deckhouses and cranes it is recommended that
outside corners (ëmountainí folds) are scored by gently scribing the score
line with a knife resulting in a sharp corner when folded . Score parts before
cutting them out. In the diagrams, subassemblies are identified by
a number within a circle (e.g. ), corresponding to the step in which it was
assembled.
Step 1: Laminate the
lateral formers to
heavy card stock,
such that the
combined thickness is
about 1mm or 0.04 inches. Cut out the formers after laminating. Assemble
the lengthwise former (step 2) taking care to only glue the central (blue
shaded) area and allowing the flaps at the bottom to fold outward. Cut the
upper profile after gluing and fold as shown in the diagrams. Assemble the
internal structure by gluing the lateral formers into slots in the lengthwise
former (step 3). Some pieces must be oriented such that the printed side
faces aft; these are labelled as such. Attach the well deck stiffeners (step 4)
into the appropriate slots.
At this stage the model should be attached to either a temporary work base
(step 5) or to the optional display base (step 6). This prevents the frame
from warping during subsequent steps. If using a temporary base, apply only
a small amount of glue so the ship may be later detached easily.
Attach the forecastle and poop decks to the frame (step 7). The forward tip of
the forecastle will protrude slightly beyond the front of the frame.
The shaping and attaching of the hull surfaces are somewhat challenging.
Dry-fitting and careful attention to the drawings will help. Attach the
connecting strips to the main and stern sections of the starboard hull
surface (step 8). To avoid gaps, bend the parts as closely as possible to
match the contour of the frame before gluing the stern section to the main
section. Repeat for the port hull parts and glue port and starboard together
at the rudder only (step 9). Slide the hull pieces around the frame from the
stern, such that the rudder is positioned underneath the stern overhang
(step 10). The rear edge of the hull plating should align with the centre of
the rearmost lateral former. Beginning at the stern and working forward,
glue the hull surface to the frame. The well deck cutouts on the top of the
hull should match the fore and aft bulkheads of the well decks. Finally, join
the port and starboard surfaces where they meet at the bow. Form the
counter plating into shape (step 11) and attach over the stern framework. If
you are using a temporary work base, the ship may be detached now.
Fold and attach the decks and bulkheads just behind the forward well deck
(step 12) and in front of the aft well deck (step 13). The aft promenade deck

B48 has a somewhat complex shape and requires precise scoring and careful
folding. Attach the boat deck (step 14) so that the top of the longitudinal
formers protrude through the holes in the deck.
Steps 15 through 20 show the assembly of the various deckhouses to the
boat deck, beginning aft and working forward. Several of these require
careful folding, so close attention to the drawings is recommended. Blue
locating marks are printed on the boat deck indicating the position of the
deckhouses.
Bend the wheelhouse bulwark B14 to shape (step 21) and attach to the front
of the boat deck, adding the wing roofs B13. Build and attach the officers
quarters and wheelhouse to the boat deck (step 22) such that the front of
the wheelhouse abuts the front face of the bulwark added in the previous
step. It may be necessary to trim slightly the rear edge of part B51 to achieve
a snug fit against the deckhouse aft. Attach the promenade deck sides (step
23), with the raised bulwarks protruding above the boat deck and the front
edge nested beneath the bridge wing overhangs as shown in the diagram.
A typical electric crane assembly is shown in step 24. Attach the cranes and
cargo hatches as shown in the diagram (step 25). Fold and attach the
docking bridge to the stern (step 26). The forward cargo hatch, breakwater
and anchor crane are added in step 27.
Step 28 shows a typical funnel assembly. Note that the funnels are not
identical in size. A letter is printed on the connecting strip, corresponding
with the letter at the funnelís location on the deckhouse roof. Also, the
funnel cap for the aft funnel is different from the other three funnels.
Attach the funnels (step 29) with the seam facing the stern, so that the
funnels slope aft slightly.
Build and attach the compass platform (step 30). For greater realism you
may replace the bottom support B42 with four legs made from wire.
A template for shaping the two masts is shown on the parts sheet.
Toothpicks whittled or sanded to size, or stretched plastic sprue, are
recommended for these parts. Build and attach the crowís nest and insert
the masts into the holes in the deck (step 31). The base of the masts
should rest in notches cut into the internal former. If desired, shrouds
(supporting cables for the masts) can be made from fine wire or nylon line.
Attach the upper ends of the shrouds to the mast and the lower ends to the
outer edge of the well deck.
Construct the lifeboats as shown (step 32). There are three sizes of lifeboat,
attached to the upper decks as indicated in the diagram.
Enjoy your build and show us your results!
Jerry Vondeling
& Ralph Currell
Januari 14th 2013.
Pre 1912 refit appearance


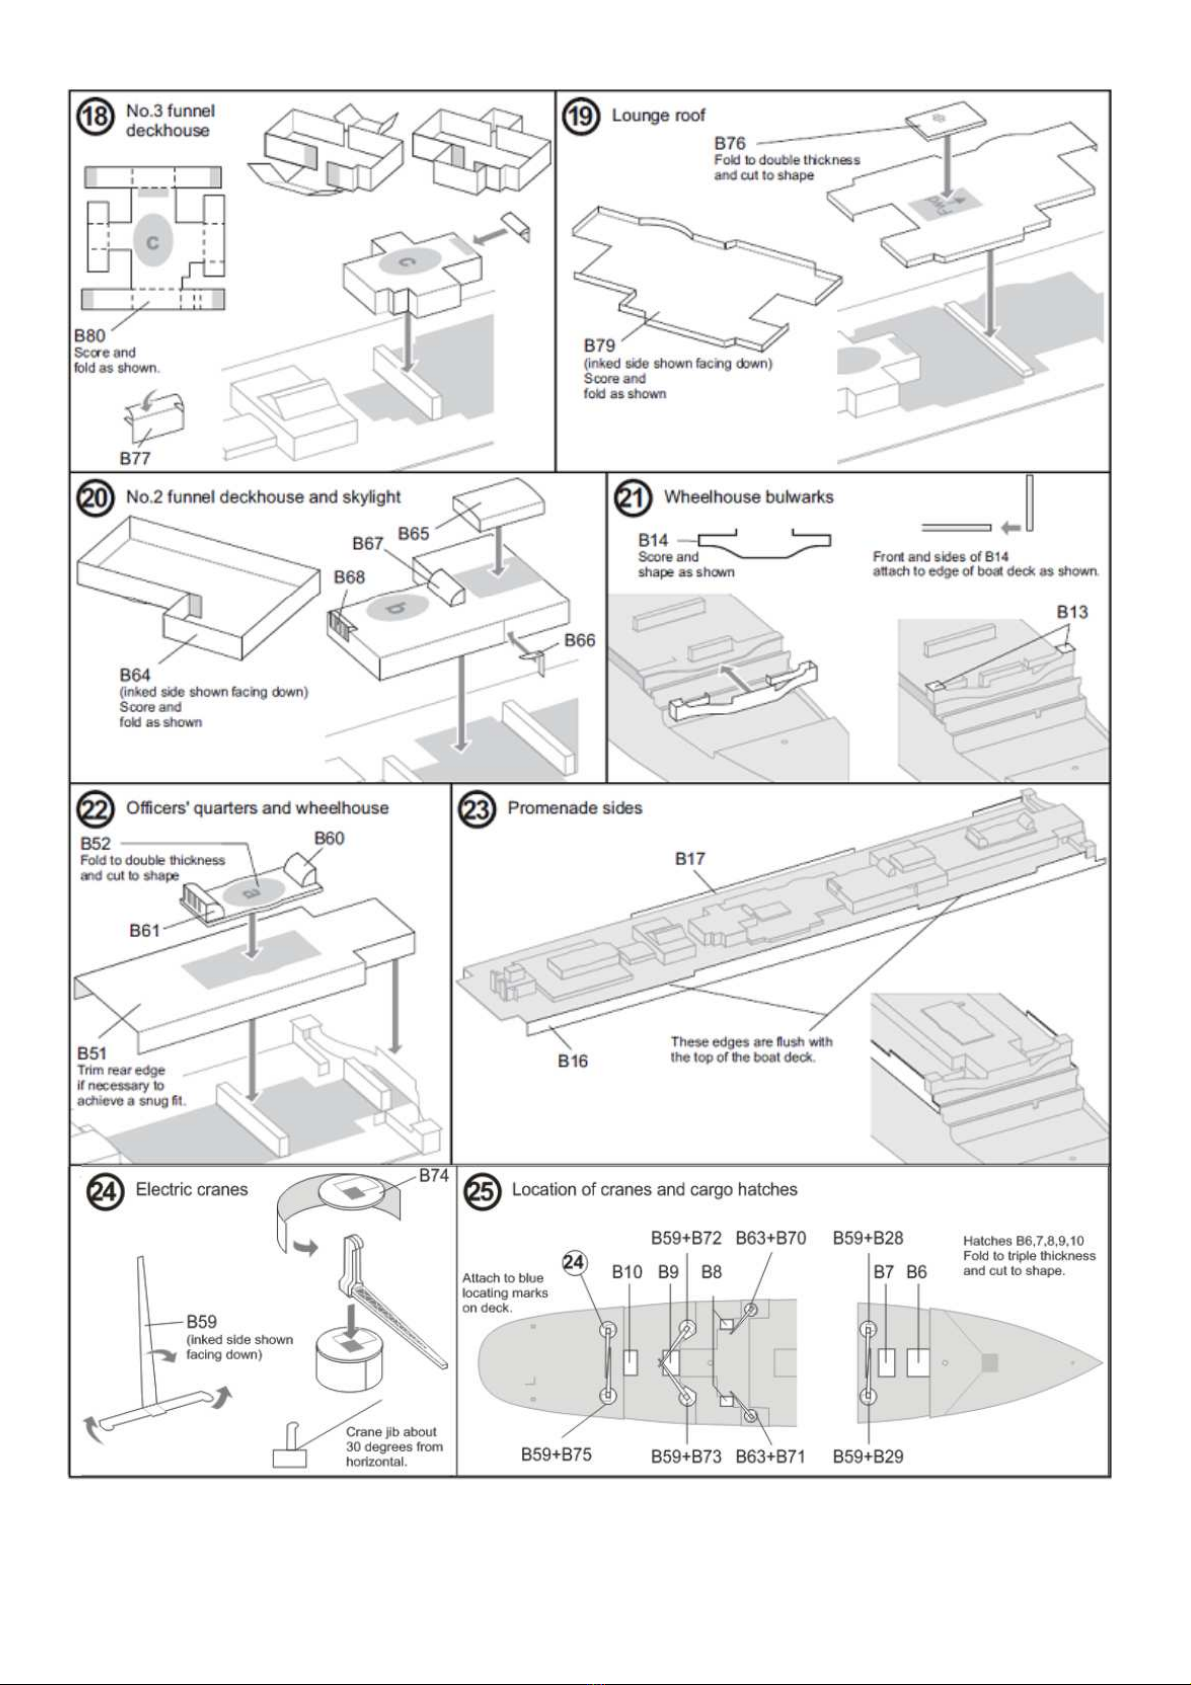
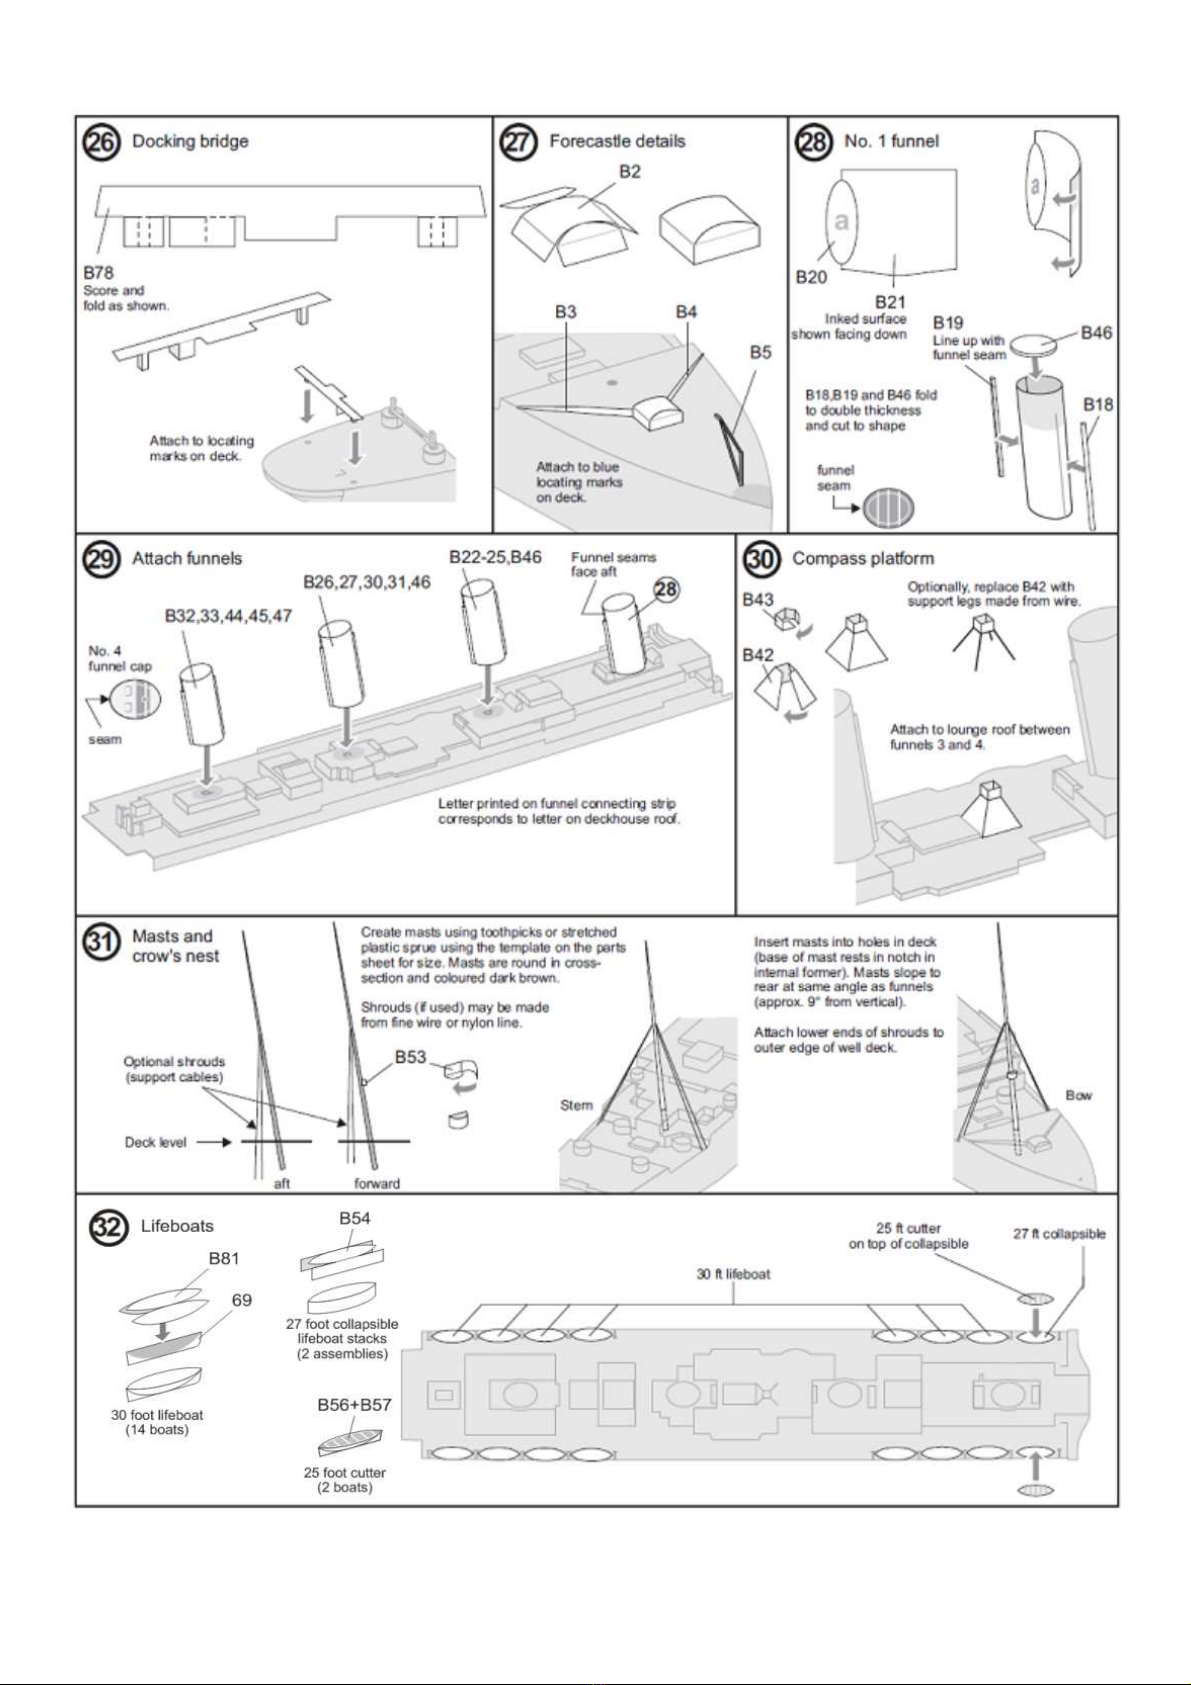
Table of contents
Popular Toy manuals by other brands

Step 2
Step 2 Lifestyle Custom Kitchen 8569 manual

LaserPegs
LaserPegs National Geographic OCEANS quick start guide

V-tech
V-tech Go! Go! Smart Friends Summering Seashell... Parents' guide

V-tech
V-tech Call & Chat Learning Phone user manual

LaserPegs
LaserPegs HELICOPTER V2.0 1270 Model instructions

Best Choice Products
Best Choice Products SKY4742 user manual

V-tech
V-tech First Responder Smart Rescue Set instruction manual

Tyco R/C
Tyco R/C N.S.E.C.T. Robotic Attack Creature J9863 instructions

Spinmaster
Spinmaster NINJABOTS manual

WATT AGE
WATT AGE Micro Flyer operating instructions

V-tech
V-tech Spin & Learn Top user manual

V-tech
V-tech Sing & Discover Piano user manual


