RoadScan Canada PBC4 Operator's manual
RoadScan Canada
PBC4
USER INSTRUCTION MANUAL

Introduction
Product Overview
Thank you for choosing the PBC4. This Full HD resoluon, one-push power on to record, daylight only
camera, with simple funcons (i.e. no rear viewing screen) camera is sturdy, compact, and lightweight.
This camera is very user friendly and an excellent choice for Law Enforcement Agents and Security!
Specifications:
Item
Specification
Sensor Pixel
4 MP
Video Resoluon
1296P30, 1080P30, 720P60, 720P30, 480P30
Wide Angle
140° wide angle image without deformity
Memory Capacity
Built-in 16G/32G/64G (standard storage is 32G)
Connuous Recording Time
8-10 hours
Posioning System
Built-in GPS
Page 1

Basic Operations Description
1. Power On / Record – Slide the switch on the right side of the camera (from the back) so that
the switch is covering the OFF label. The camera will power on, emit a chime, a “recording
started” voice warning and will begin recording.
2. Power off / Stop Recording – Slide the switch on the right side of the camera (from the back)
so that the switch is covering the REC label. The camera will stop recording and shut down.
3. Reset – **Please note before using the buon that: It is recommended to ONLY USE THE RESET
BUTTON IN EMERGENT SITUATIONS ONLY WHEN THE CAMERA IS WORKING ABNORMALLY (i.e.
THE CAMERA FREEZES). Aer you have pressed the Reset Buon, turn the camera off then back
on again and the camera should work properly.
Voice Alarm
In three situaons the camera will emit a voice alarm:
1. When you power on the camera, the camera will emit a voice alarm stang: “ RECORDING
STARTED…”.
2. When the camera’s baery is depleng, the camera will emit a voice alarm stang: “ LOW
BATTERY…” .
3. When there is only 200mb of storage remaining, the camera will emit a voice alarm stang:
“ CARD FULL, CARD FULL…” .
4. When you change the sengs on the camera and then apply these changed sengs via a
computer connecon ( See Change Settings Instructions ), aer you disconnect the camera from
the computer, the camera will emit a voice alarm stang: “ UPDATE SETTINGS…” .
Charging
Place the camera into the charging dock so that the Lens side of the camera is facing the LED on the
front of the dock. Plug the USB cord into the back of the dock and aach the other side of the USB
into a power source, for example, a computer, or plug the USB into a charging dock and aach the
dock into a power outlet. You may also use a car charger to charge your camera.
Page 2

GPS and GPS Player Instructions
GPS Instructions:
To ensure that GPS works properly, please follow these condions ( Please See Change Settings
Instructions to learn to Turn GPS on ):
1. Enable GPS in “Apply Sengs.CAM” file in your camera’s folder via USB connecon to a
computer.
2. Aer GPS seng has inially been turned on, turn on the camera and GPS signal will eventually
reach the camera (it may take up to 10 minutes for a GPS connecon). NOTE: GPS should be
used outside; GPS will not work properly indoors.
GPS Player Instructions:
NOTE: An alternave to the GPS player file: player.exe, which comes with your camera, is Datakam,
which can be downloaded from roadscancanada.ca/dash-body-cameras
1. To access the GPS Player insert your camera into the charging dock and plug the dock into
your computer via the USB cable.
2. Find your camera’s folder locaon on your computer. It should appear as a D, E, F or G drive.
3. Once your camera’s folder is located, open the GPS Player folder.
Figure 1
Page 3

4. The “player.exe” file should then appear.
Figure 2
5. Open player.exe file and the following program should appear (NOTE your computer should
have an internet connecon so the GPS route of the video recordings can load via Google
Maps):
Figure 3
Page 4

GPS Player Features
Play
Refresh the Playlist
Copy File to Certain Location
Stop Video Playback
Pause Video Playback
Remove from Playlist
Add file to the Playlist
Figure 4
Delete file Completely
All of your video recording files from your camera will appear in the player.exe
Page 5

Change Settings Instructions:
To change the settings on your camera follow the instructions below:
1. To access the sengs on your camera you must plug your camera into the charging dock
and connect the charging dock into your computer via the USB cord.
2. Find your camera’s folder locaon on your computer. It should appear as a D, E, F or G drive.
3. Once the folder is located select the “Apply Settings.CAM” file, right-click and open with:
notepad (Windows), TextEdit (Mac), or an alternate text editor program.
Figure 5
Page 6
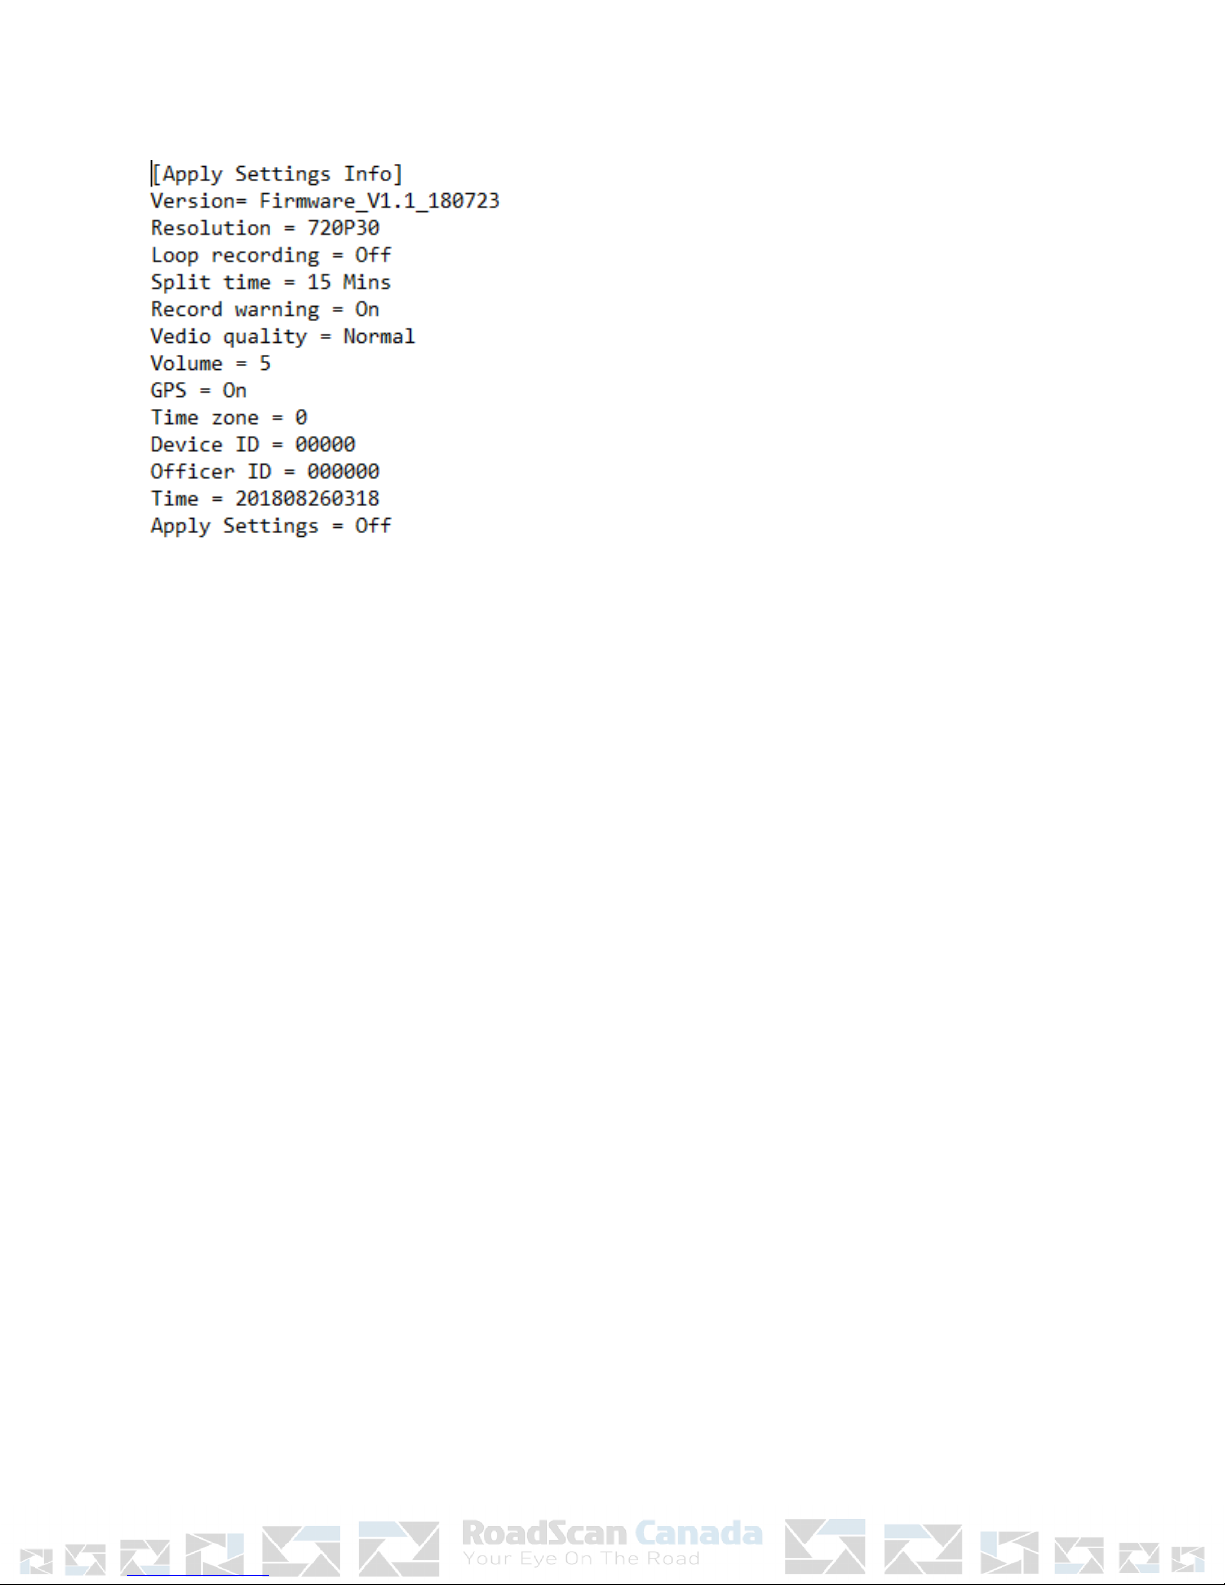
4. Once opened you will see the following screen:
Figure 6
This is the settings menu for your cameras.
IMPORTANT:
●Please note the next set of instructions below carefully before altering the menu
●Be sure to note the Changeable Menu Feature Options that follow the below
instructions as they are the only options for the camera. Other options will not work:
1. When altering the menu options only change what is on the right half of the ‘=’ sign.
2. DO NOT attempt to manipulate the menu functions by deleting or inserting new lines.
3. The first 2 lines of the menu options ([Apply Setting Info] and Version) cannot be deleted.
4. After you change a setting, change the “Apply Setting” feature (the last feature in the
settings menu) to ‘On’ and then save (press either control S or command S depending on
if you use Windows or Apple)
5. If You attempt to set the right side of the ‘=’ sign to an option other than one of the
options listed below and apply the settings, the camera will change the setting back to
the most recent setting (Example: If you change volume from 5 to 13 and apply the
setting, the camera will switch the setting back to 5 automatically).
Page 7

Changeable Menu Features:
1. Resolution: Changes the video resoluon of the camera. Opons are 1296P30, 1080P30, 720P60, 720P30,
480P30
2. Loop Recording: This seng makes it so that when the camera reaches its storage capacity, Loop Recording
will begin to delete the first recorded data, replacing it with the newly recording data, and connue to delete
and replace the data follows the firstly recorded data. This will connue unl it reaches the end of the
camera’s storage space, in which case the process repeats. Opons are: On and Off
3. Split Time: Video recordings are split into segments (different files) to more easily manage video files.
Opons are 5, 15, and 30 minutes.
4. Record Warning: Having this funcon on enables the video record voice warning that occurs when you start
a video recording (turn on the camera). Opons are On and Off.
5. Volume: The volume seng controls the amount of sound that all the camera’s tones make. Opons are 0 to
12.
6. GPS: The GPS seng allows the camera to make a GPS connecon to show the route and posion in the
world that the camera was in while recording. Opons are On and Off ( See GPS and GPS Player Instructions) .
7. Time Zone: Set this to -7 for PST and -6 to MST and connue to increase the seng onward as you travel
east. Sengs are -12 to 12.
8. Device ID: Give your camera a unique ID. Must be 5 characters total and can be either leers (upper or lower
case) or numbers only.
9. Officer ID: This funcon is used to idenfy a specific person to whom the camera is associated with. Must be
6 characters total and can be either leers (upper or lower case) or numbers only.
10. Time: Please set as XXXX year xx month xx day XX hour XX minute, for a total of 12 numbers, for example
201601120959
11. Apply Settings: When you are finished changing the sengs change this funcon from “Off” to “ On” and
save the file. There will be a voice alarm stang: “ UPDATE SETTINGS…”.
NOTE: Figure 7
●After changing the settings you must change the “Apply Setting” function to “On” and then save the file. If
you don’t the settings will not be updated.
Page 8

IMPORTANT
This guide provides important informaon on the use and operaon of your RSC PBC4 and the
images/features shown throughout the manual are subject to change without noce due to system
and firmware upgrades. Please read all the informaon carefully prior to using the product for the
best performance and to prevent any damage/ injuries or misuse of the device(s). Customers are
encouraged to have read through this complete user’s manual before using the RSC PBC4. Any
unapproved changes or modificaons will void your warranty. Please ensure to have a complete
understanding of the following condions and restricons.
NOTE: Please check your Provincial Motor Vehicle Act and Regulaons pertaining to the use of this
camera while operang your vehicle. It is illegal in most areas to operate a camera while driving.
CONDITIONS
Please read the following messages to make sure your working environment is suitable if the camera is
intended for use in the vehicle.
•If your vehicle does not cut off power to your cigaree lighter port, then you may
•have to manually turn off or unplug the charger to prevent it from overheang.
•The temperature should be kept between –10˚C and 50˚C (14˚F to 122˚F).
•Avoid pung the product in places where temperature or humidity may change
•rapidly.
•Keep it dry, dustless and avoid lens exposure in direct sunlight.
•Keep product away from heat sources such as electric heaters.
•Do not use the camera near harmful chemicals.
•Do not place product near any strong magnec objects
•It might influence the normal operaon of the product if used at the fringe range of
•normal temperature. Please turn off the power when not in use.
•Do not disassemble the product.
•Do not shake or strike the product.
•Please obey the local government’s environment protecon policy.1
Page 9

RESTRICTIONS:
●When using this product, the safety precauons below must be taken to avoid possible legal
liabilies and damages. Retain and follow all product safety and operang instrucons. Observe
all warnings in the product operang instrucons. To reduce the risk of bodily injury, electric
shock, fire and damage to the equipment, observe the following precauons.
●PLEASE NOTE that under certain circumstances, audio/video recording may be PROHIBITED by
law. This device should be used only in compliance with all applicable Federal, Provincial and
local statutes.
●• DO NOT disassemble this product. Opening or removing covers may expose you to dangerous
voltages or other risks. Incorrect reassembly can cause electric shock during subsequent use.
●• DO NOT use this product unless knowledge of the law, Federal, Provincial and local
governments pertaining to use of the product is fully understood. To infringe on one’s privacy,
spying intercepng and related acvies are illegal and punishable by law. Monitoring one’s
private acvies without consent is illegal and this product is not designed or manufactured for
these purposes.
●• DO NOT use this product to carry out any illegal acvies such as sneak preview, etc.
RoadScan Canada Inc shall not be responsible for any consequences of illegal conducts made by
users.
●• DO NOT put the plasc packaging bags in reach of children or babies. Plasc bags can create a
suffocaon hazard when placed over the nose and mouth.
●• DO NOT plug the AC adapter into the outlet in improper situaons.
●• Plugging in an AC adapter with wet hands might cause electric shock.
●• Plugging in the AC adapter unsteadily might cause fire or electric shock.
●• DO NOT cover the AC adapter when it is connected to an outlet, place the adapter near
heaters, or put it on the floor which is equipped with a heater. The above menoned operaon
might cause fire or incidents.
WARRANTY
●RoadScan Canada Inc warrants that this product will be free from defects in tle, materials and
manufacturing workmanship for one year or otherwise specified on the product packaging. This
limited warranty shall commence from the date of purchase. RoadScan Canada Inc products
warranty is not transferable and is limited to the original purchaser. If the product is found to
be defecve then, as your sole remedy and as the manufacturer’s only obligaon, RoadScan
Canada Inc will repair or replace the product. This warranty shall not apply to products that
have been subjected to abuse, misuse, abnormal electrical or environmental condions, normal
wear and tear, or any condion other than what can be considered normal use. Warranty
Disclaimer RoadScan Canada Inc makes no other warranes, express, implied or otherwise,
regarding this product, and specifically disclaims any warranty for merchantability or fitness for
a parcular purpose.
Page 10

LIMITATION OF LIABILITY
●The liability of RoadScan Canada Inc, arising from this warranty and sale shall be limited to a
refund of the purchase price. In no event shall RoadScan Canada Inc be liable for costs of
procurement of substute products or services, or for any lost profits, or for any consequenal,
incidental, direct or indirect damages, however caused and on any theory of liability, arising
from this warranty and sale. These limitaons shall apply notwithstanding any failure of
essenal purpose of any limited remedy.
Page 11
Other manuals for PBC4
1
Table of contents
Other RoadScan Canada Camcorder manuals


