Roadview RV-500F User manual

135*75

Table of Contents
10 What’s in the Box
11 Parts
13 Cautions for Installation and Use
14 Main Unit Installation
18 Assembling/Disassembling Main Unit and Mount
19 Features and Instructions
27 Viewer
39 Product Specications

3
Safety Warnings and Cautions
The following contains important information for ensuring safety of the user and preventing potential damage or inconvenience due to
improper use. Please read the following warnings and cautions thoroughly before using the product.
Failure to follow safety warnings may lead to serious injury or death.
Warnings
Cautions
Failure to follow cautions may lead to injury or property damages.
*The safety warnings and cautions are categorized as below, depending on the level of
potential risks and damages that may result from improper use.

4
Warnings
Do not disassemble, or modify the product on your own or
install the product in a way other than intended.
Improper installation, disassembly, or modication of the product
may cause product to malfunction. Such malfunctions are not
covered under product warranty.
Before installing the product, make sure that the vehicle's
ignition is turned o.
Installing the product while the ignition is on may result in electric
shock or accident.
Do not operate the product while driving.
Operating the product while you driving may cause an accident. If
you need to operate the product, do so after coming to a full stop
in a safe location.
Do not install the product on where it may obstruct the
driver's view or cause any kind of disturbance to driver.
Installing the product in such positions may lead to an accident.
Do not operate the product if it malfunctions.
If any foreign matters or water has entered the product or if the
product releases smoke, stop using the product immediately and
contact Customer Support.
Do not use this product when it is not functioning properly.
Continuing use of the product may lead to an accident.
Do not drop the product in water or store it in a humid
environment for an extended period of time.
If the product is damaged by water or humidity, contact your
retailer or Customer Support.
Maintain the appropriate temperature (0°C to 60°C)
during use.
Operating the product beyond this temperature range may
lower the product’s performance and/or damage the hardware.

5
Warnings
Do not place water, beverages, chemicals, or other
potentially harmful items near the product.
It may damage the product or cause malfunctions.
When installing the product, make sure it does not
interfere with the operation of other onboard devices,
such as airbags.
Failure to do so may interrupt proper operation of such devices
and cause injuries.
Do not apply heat to the product using a furnace,
microwave, or hair drier.
It may cause explosions, deformations, or defects.
Use the product only with recommended voltage.
It may lead to a product malfunction or a re.
Do not expose the product to direct sunlight for an
extended period of time during summer.
It may lead to a product malfunction or a re.
Firmly install the product on a proper position.
If it is not attached rmly, the product may fall while driving, and
may cause trac accidents.
Always use genuine parts and accessories from manufacturer.
Using non-genuine parts or accessories may lead to malfunctions or defects.
(Except external accessories ; GPS, SD card)
*We recommend that you should use MLC TYPE CLASS 10(UHS-Ⅰ) SD card in your country.

6
Cautions
Avoid strong impact to the product.
It may damage the product or cause malfunctions.
Keep the camera lens clean at all times.
Failure to keep the camera lens clean may lower quality of
recordings.
Be careful when you touch this product while in use. The
heat generated from the product may cause burn injuries.
Prolonged continuous use of this product may generate heat and
cause burn injuries.
Using the product in a vehicle with a tinted windshield
may alter the video recording.
Dramatic changes in the surroundings such as brightness
or backlight may degrade video recording quality.
Video recording quality may be aected in situations where
brightness changes quickly, such as entering and exiting tunnels,
or when facing strong backlight.
Event Recording may not be initiated if external impact is
not strong enough.
In such case, you can use the Manual Recording button to record
the event.
Do not touch this product with greasy or wet hands.
It may damage the product or cause malfunctions.
Do not operate the product with a sharp objects such as
nails or awls.
It may damage the product or cause malfunctions.

7
Manufacturer is not responsible for product damage and loss of data due to potential product malfunction brought on by an
accident or any other event.
Cautions
Do not place the product near a magnet or areas with
strong magnetic elds.
It may damage the product or cause malfunctions.
Check the condition of the product and recording quality
on regular basis.
Make sure that the Micro SD card inserted in the product is
working properly. If any problems are found, stop using the
product and contact Customer Support.
This product supports Micro SDHC cards (8 to 32 GB, class
10 or higher).
Always backup important data to an external storage
medium.
If the data must be preserved for a long period of time, always
backup the data to an additional storage medium.

8
Please use only genuine Micro SD card provided by the
manufacturer.
Use of third-party Micro SD cards may cause data loss or damage
the product.
When purchasing or using a new Micro SD cards, make sure
that the Micro SD card size is supported by the product.
This product supports Micro SD cards up to 32 GB and Class 10
or higher.
When removing the Micro SD card from the product, turn
o the power and make sure that Power LED is turned o.
Removing the Micro SD card while power is on, may cause data
loss, data corruption or product malfunction.
Always check the correct side of the Micro SD card when
inserting, and insert it all the way.
If the Micro SD card is not inserted correctly, it may cause the
product to malfunction.
Your Micro SD card is a consumable product with a limited
lifespan. After a certain period of time, the memory card
may be too damaged to recording videos properly.
Frequently check the recordings and format the Micro SD card at
least once a week (File System: FAT32). If the memory card cannot
function properly, please replace it with new one.
If you do not format the SD card for a long time “SD card must be
formatted”can be guided by the sound.
Do not disassemble or modify Micro SD card.
Such actions may cause data loss or damage the product.
You should always backup important data to another
storage medium.
If the data must be preserved for a long period of time, always
backup the data to an additional storage medium.
Micro SD card is an essential part. Please read the following instructions carefully. The manufacturer will not take any liability concerning loss of data or
damage to Micro SD card.

9
Features
Full HD (1920*1080) images at 30fps Various recording functions with 180° rotating
lens
High quality 140° wide-angle lens Functional design for easy attachment,
detachment and portability
Low power consumption, Low-heat circuit
design
Support of various recording modes
(innite, manual, event)
Easy operating instructions with voice guide
10
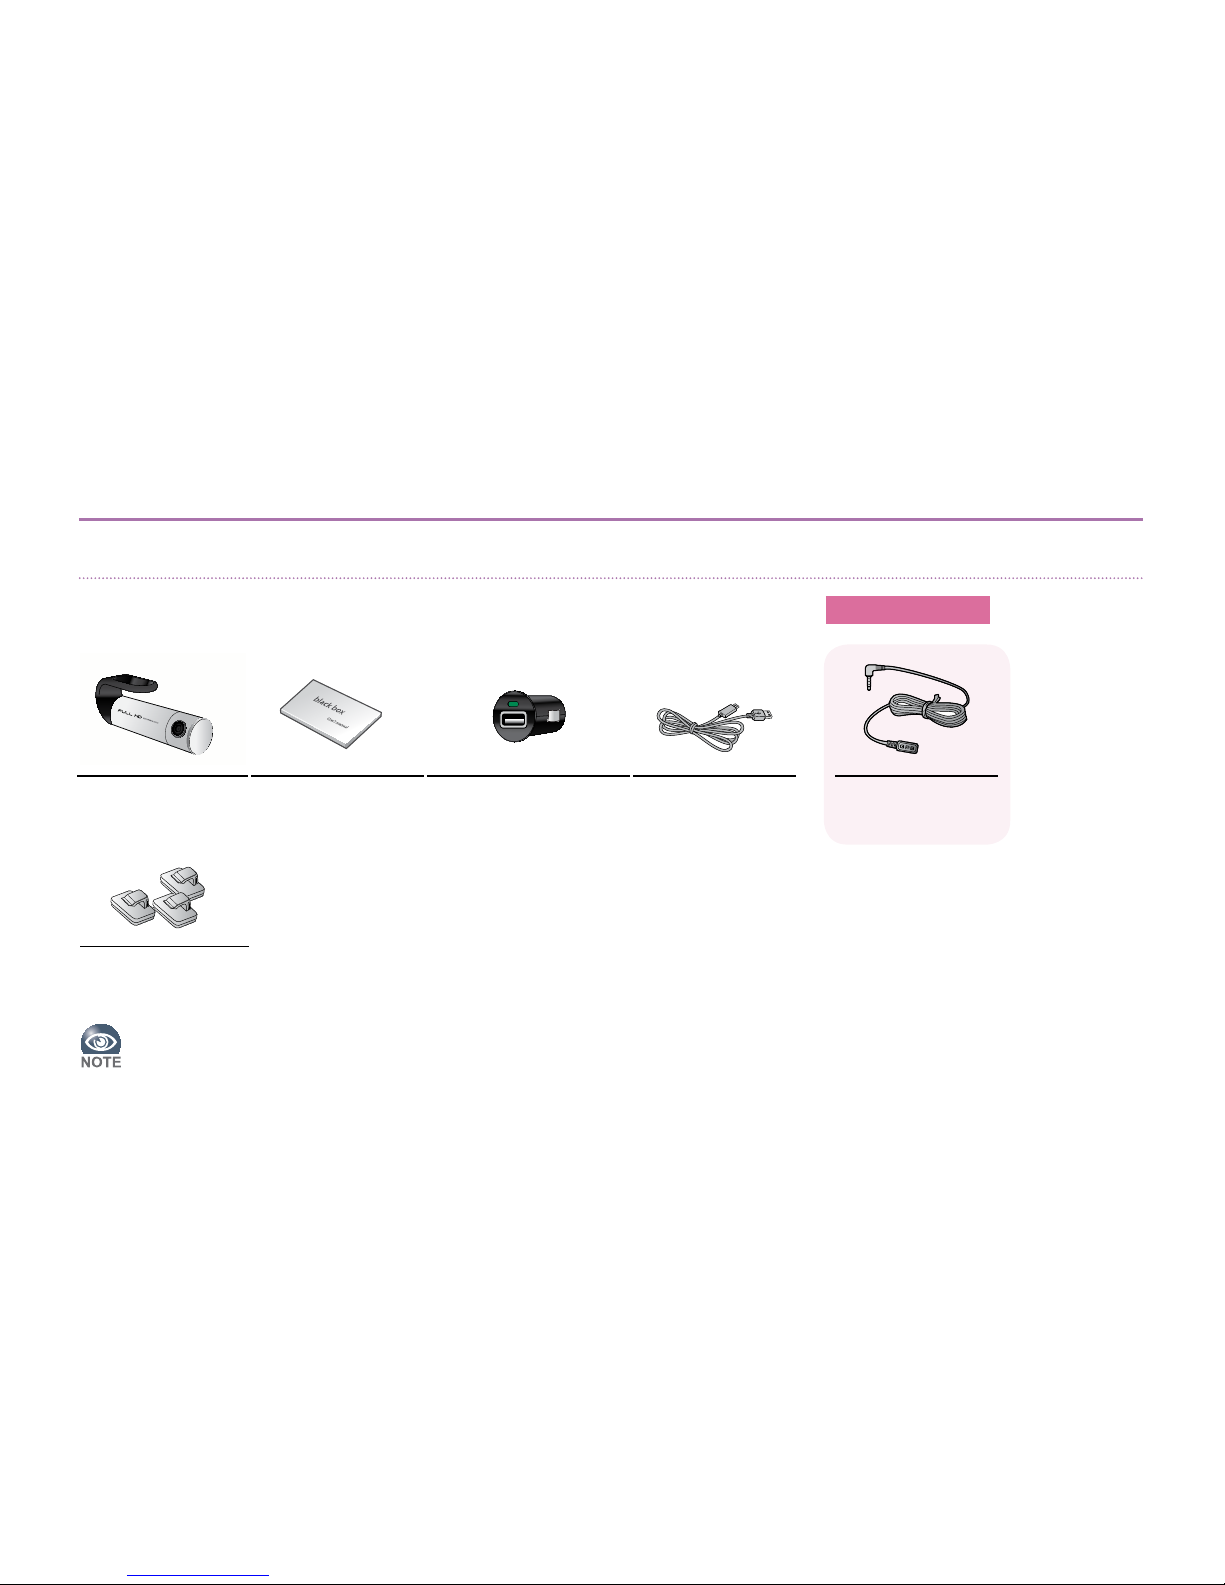
Main Unit User’s manual USB car cigarette jack Micro USB cable
Cable clips
What’s in the Box
•User’s Manual can also be downloaded from the manufacturer’s web site.
www.sdsystem.com
GPS module
Sold separately
The parts included in your package may not look identical with the following gures.
And some parts can be changed without notice.

11
Parts
1
Vehicle Mount For installing on a glass
2
Camera Lens For Video recording camera
3
Front LED Indicates operating status in the front
4
Status LED
1. MIC(RED LED): Indicates the microphone’s
status (ON/OFF)
2. GPS(GREEN LED): Indicates a status of a GPS
connection
3. REC(GREEN LED): Indicates a status of video
recording
5
Microphone Records audio
6
Manual Recording
Button Turns manual recording
7
Snapshot Button Photographing, Micro SD card formatting
8
MIC Button MIC ON/OFF, Voice guidance ON/OFF
9
Speaker For audio
1
4
57
68
2
3
9

12
※Please insert a Micro SD card to the right direction.
※The gures shown in this manual may vary from the actual product.
※The contents of this manual are subject to be change without notice.
1
DC-IN connector For connecting USB power cable
2
GPS/AV OUT
connector
For the use of connecting to an external
GPS antenna, and external video device
3
Micro SD card slot Slot for inserting Micro SD card
3
21

13
Cautions for Installation and Use
Installation
Please read the followings before you install the product.
•Please read the User’s Manual carefully before installing the product.
•Before installing, turn o the ignition of your vehicle and remove the keys.
•Always keep your windshield glass clean to obtain high quality video recordings.
•If the product is equipped with a GPS module, keep it distant from other electronic devices (such as Hi-Pass or satellite navigation systems) to prevent radio interference.
•The quality of video recordings may varies depending on location and brightness.
•Dark tinting or metallic coating on the windshield may lower GPS reception and darken the video recordings
If the product falls o while driving, it may lead to accidents or serious injuries. Before installing the product, be sure to
remove all foreign substances or dust from the windshield surface.
Micro SD Card
Before using your Micro SD card, please check the following.
•Make sure that the Micro SD card is genuine. Use of non-genuine Micro SD cards may result in data loss.
•When inserting and removing the Micro SD card from the product, turn the ignition o and wait until Operation LED is o. If the Micro SD card is removed while the product is powered on,
warning will be sounded. When the Micro SD card is removed, the product cannot complete the video recording. The video recording may be deleted partially. In some cases, the Micro SD card
will no longer be usable.

14
Main Unit Installation
Inserting and Removing Micro SD Card
2Insert the card until you
feel a click inside the
slot.
1Press the SD card gently,
and the tip of the Micro
SD card will pop out of
the slot.
2Remove the Micro SD
card completely.
1Insert the Micro SD card
as shown in the gure.
Inserting
Removing

15
Recommended Installation Method
To position the lens in the optimal position, it is recommended that you assemble the Main Unit and the Mount before installing
the product.
Methods of connecting to the power
1. Connect the USB car cigarette jack to your car.
2. Connect the USB power cable of the black box to the
cigarette jack.
•The USB car cigarette jack can be fallen out, due to car shaking.
•Please make sure the cable is rmly connected, before turn on
the power.
To obtain the optimal video recording,
install this product in front of rear-view
mirror at the center of windshield.
If the product cannot be installed as described above, it can be installed at left or
right from the mirror thanks to the product’s wide viewing angle (140 degrees).
When installed o center, the recorded videos may not be aimed at the center of
the road.
Recommended
Installation Position

16
1Clean the surface of the
windshield where the
product will be mounted
using a dry fabric.
2Remove protective lm from
the double-sided tape on the
Mount.
3Attach mount to the
windshield rmly.
Do not install the product on
where it may obstruct the
driver’s view or cause any kind of
disturbance to driver.
4Connect GPS to the exclusive
socket
* GPS is sold separately. Before
connecting and disconnecting,
please make sure that the power
is shut o.

17
Quality of video recordings may dier depending on the installed position and angle.
5After connect to the USB
power cable, check the
operating status.
* It should be connected to the
DC-IN socket, and DC 5V power is
used.
6Change a direction of lens on
the main unit as you want.

18
Assembling/Disassembling Main Unit and Mount
The Main Unit and the Mount can be disassembled as shown below.
Disassembling
Assembling

19
Features and Instructions
Power On/O
This product does not have a power button. Once it is connected to a constant power source, LED indicator will be turned on and
start recording.
Please read the followings before using the product.
•Do not operate the product while you are driving.
•Micro SD card must be inserted in the product to record videos.
•A warning will sound if SD card is removed while recording, and the video recording may be partially deleted.
Power On Power O
•Rec LED: Green Light Flickers
•Security LED: On
•Voice: “Please drive safely today.”/ “Image is recording now.”
•REC LED: O
•Security LED: O
•Voice: “Image recording has concluded.”

20
Video Recording
Recording will start once the product is connected to a power
source and Micro SD card is inserted.
•This feature will not operate while Event Recording is in
progress.
•The name of manual recording le will contain“B”.
•Press button shortly to start
manual recording. An audio
notication will be played.
•It records 15 seconds before
and after the button is pressed,
to a total 30 seconds.
•Sound: Ding-dong Ding-dong~
•LED : Front LED, REC LED ikers
quickly.
•Front LED: Blue Light ickers
•Status LED: REC(Green) ickers
Front
Status
Manual Recording
Used to record videos manually.
Table of contents
Other Roadview Dashcam manuals


