Roav SmartCharge F3 User manual

Model: R5132
51005001270 V01
User Manual
Roav SmartCharge F3

日本語 01
日本語 01
English 16
目次
02 取扱説明書
安全上のご注意
パッケージ内容
外観
LEDディスプレイガイド
07 はじめに
08 FMトランスミッター
1.F3のボタンを使用する
2.RoavChargerアプリを使用する
11 音楽再生
12 ハンズフリー通話
13 デバイスを充電する
14 仕様
15 注意事項

02 日本語 日本語 03
取扱説明書
安全上のご注意
本説明書をお手元に大切に保管してください。本説明書に
はカーチャージャーであるRoav SmartCharge F3 (R5132) の安
全と操作に関する重要な説明が書かれています。
本製品をご使用になる前に必ず本説明書内のすべての項目
に目を通してください。説明書の記載に沿わないご使用に
よる製品の故障については、保証の対象外となります。
• 本製品に水がかからないようにしてください。
• 非推奨の付属品やメーカーが販売している付属品を使用
すると発火や感電、怪我をする危険があります。
• 本製品が傷ついている場合は使用せずに専門の修理業者
に修理を依頼してください。
• 本製品を分解しないでください。修理が必要になった場
合は専門の修理業者に依頼してください。不適切な改造
は感電や発火の危険があります。
• 感電を防ぐため、本製品の掃除やメンテナンスの前には
プラグを抜いてください。電源を切るだけでは危険防止
になりません。
• 発火や感電を防ぐため、出力端子同士を接続しないでく
ださい。
• 長時間、直射日光の当たる環境下に置くことは避けてく
ださい。故障の原因となる場合があります。
• 爆発の危険性があるので、本製品を直接火に近づけない
でください。
• 磁場の強い場所で本製品を使用しないでください。
• 清潔で柔らかい布で掃除をしてください。洗剤や油は使
用しないでください。
• 注意 - 発火を防ぐため、ヒューズは同じ型で同じ規格の
ものと取り換えてください。ヒューズの規格は63V DC /
7Aです。
• 常に法律を遵守し、道路上に注意を払い、安全運転をお
心がけください。運転中の不注意は重大な事故、けがに
つながる可能性があります。運転中の本製品の使用はお
客様の責任で、十分に注意して行ってください。
04 日本語 日本語 05
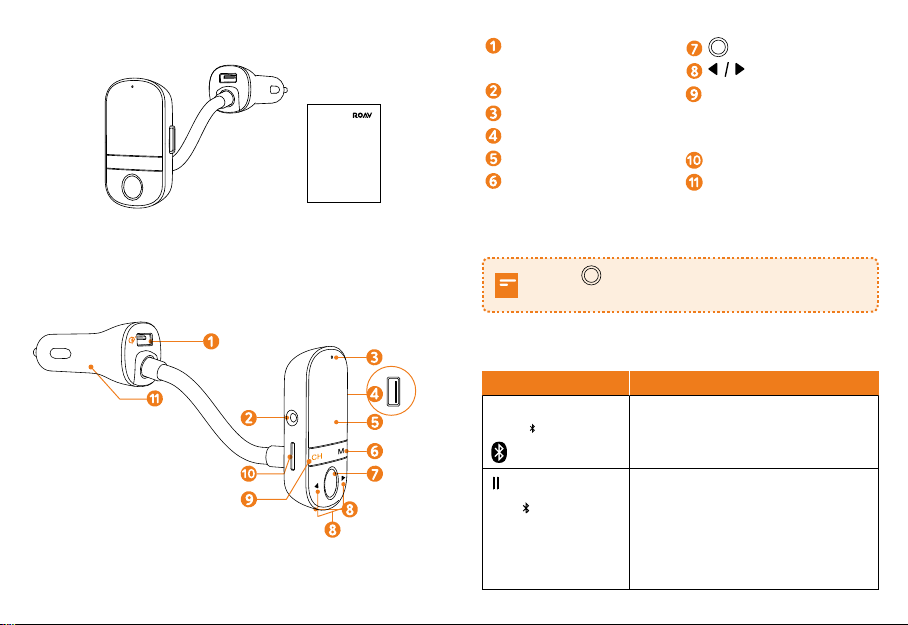
パッケージ内容
Owner’s Manual
ManualRoav SmartCharge F3
外観
マニュアル
Quick Charge 3.0
USB充電ポート
AUX端子
マイク
USB充電ポート
LEDディスプレイ
M/ モードボタン
• 押すと別のモードに
切り替わります。
/ 多機能ボタン
CH
• 押すとFM周波数を
表示します。
microSDカードスロット
カーチャージャー
注意: を5秒間押し続けると、電源をオン /
オフします。
LED ディスプレイガイド
LEDディスプレイ 状態
NOTCONNECTED
の点滅
Bluetoothが接続していません
FM 90.0
*
FM周波数は、デフ
ォルト設定によって
異なることがあり
ます。
Bluetoothの接続完了
Roav SmartCharge F3 取扱説明書
06 日本語 日本語 07
LEDディスプレイ 状態
NO CARD
microSDカードが検出されません
WAITING... microSDカードの読み取り中です
CARD ERROR
カードエラーが発生し、カードを
読み取れません
NO USB DISK USBメモリが検出されません
WAITING...
USBメモリを読み取り中です
USB ERROR
エラーが発生し、USBメモリを読み
取れません
1
Mを押し続けます
USBメモリが読み取られると、次の
音楽モードが左から右の順に表示さ
れます:
シャッフル、すべてリピート、1曲リ
ピート
注意:UIは予告なく変更されることがあります。
はじめに
本製品を車内のシガーソケットに挿入してください。
エンジンがかかると、自動的にLED画面が表示され、
Roav ロゴと車のバッテリーの現在の電圧が表示されま
す。
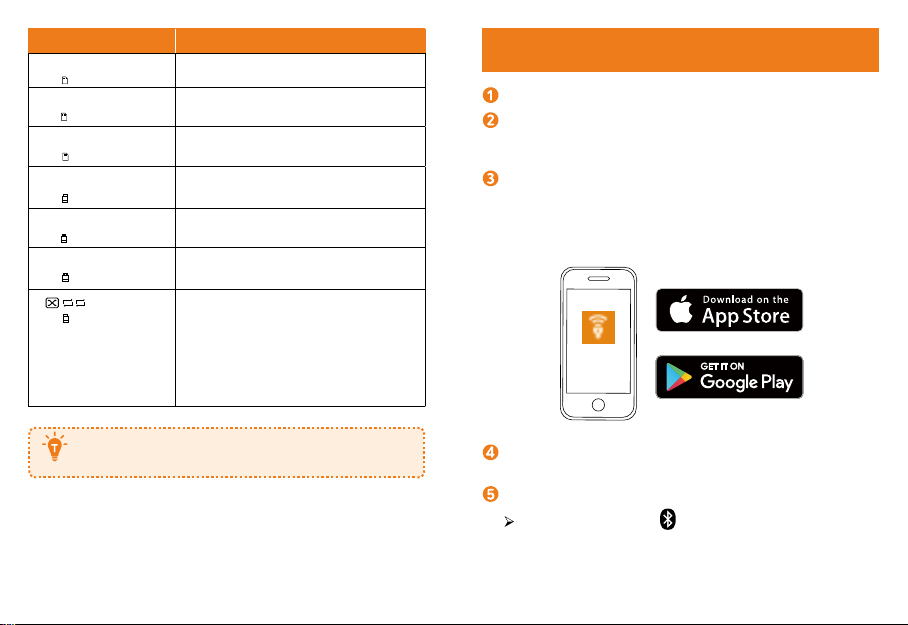
App Store (iOS 10.2
以降を実行しているスマートフォン
)
またはGoogle Play (Android 5.0以降を実行しているスマ
ートフォン) で「Roav Charger」と検索してアプリをダ
ウンロードしてください。
Roav Charger
お使いの スマートフォンでBluetoothをオンにして、使
用可能なBluetoothデバイスを検索してください。
「Roav F3_XXXX」を選択して接続してください。
正常に接続されると が点滅を停止します。
08 日本語 日本語 09
Roav F3_XXXX
FMトランスミッター
Roav SmartCharge F3により、 FM信号を使ってスマートフ
ォンを車両のステレオに接続できます。2通りの設定方法
があります。
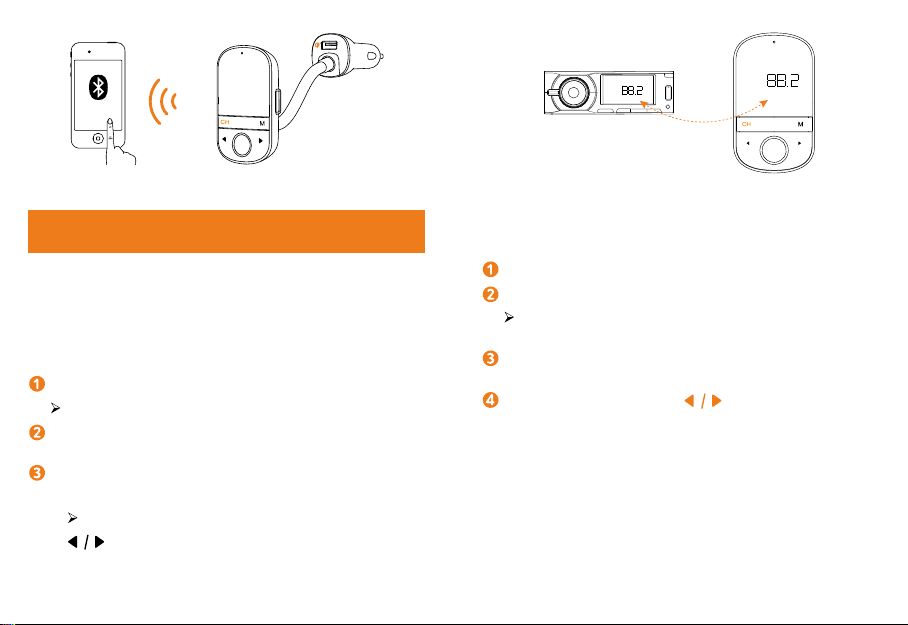
1. F3 のボタンを使用する
F3を初めて使用する場合、CH を1秒間押し続けます。
F3が空いているFM周波数を検索し始めます。
車両のFMラジオをオンにして、F3に設定したFM周波数
に合わせます。
FM周波数をカスタマイズする方法。
a. F3でCH を押します。
FM周波数がLED画面に表示されます。
b. を押してFM周波数を選択します。送信周波数
とラジオで合わせた周波数が一致するようにしてく
ださい。
FM
FM
2. Roav Charger アプリを使用する
Roav Chargerアプリの画面上の指示に従って、FM信号経由
で接続を行います。
「FM」をタップします。
「SmartScan」をタップします。(図a)
Roav Chargerアプリが、空いている周波数を検索し始
めます。
プリセット局を長押しすると、局をカスタマイズでき
ます。
スライダーを調整するか、 をタップしてラジオ周
波数を選択します。(図b)

10 日本語 日本語 11
90
MHz
Set
76
MHz
90
MHz
76
MHz
SmartScan
83.2
MHz
Preset stations ?
76.1
MHz
89.9
MHz
ab
「設定」をタップします。選択すると、以前のプリセ
ット局は新しいプリセット局に置き換えられます。
車両のFM ラジオをオンにして、周波数をRoav Charger
アプリに設定した周波数に合わせて調整します。
スマートフォンでオーディオを再生します。
カーステレオからオーディオが聞こえます。
また、3.5mmのAUXケーブルを使用して、カー
チャージャーを車両のステレオに接続すること
もできます。
音楽再生
本製品がお使いのスマートフォンと正しく接続すると、多
機能ボタン を押してスマートフォンから音楽を再生で
きます。音楽はFM トランスミッターやAUX端子経由で、
車両のサウンドシステムにストリーミングされます。ま
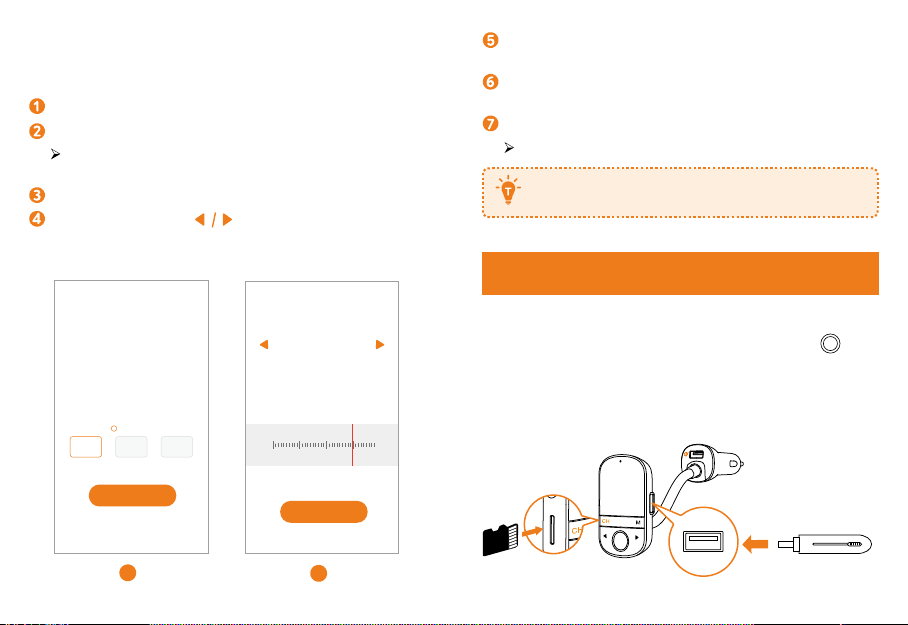
た、USBメモリまたはmicroSDカードを挿入して、これらの
デバイスに保存されている音楽を楽しむこともできます。
USB
再生 / 一時停止 を押す
前の曲/ 次の曲 を押す
音楽モードの選択 M を長押しした後、 を押す

12 日本語 日本語 13
通話時のエコー音や車内騒音をさらに低減するには、Roav
スマートカーチャージャーのAUXライン出力ソケットとカ
ーオーディオシステムのAUX INソケットに3.5 mm AUXケ
ーブル (付属していません) を接続します。
FM
AUX IN
ハンズフリー通話
本製品がお使いのスマートフォンと正しく接続すると、ハ
ンズフリー通話ができます。
通話を開始/終了する ボタンをタップする
通話を拒否する ボタンを2秒間長押し
デバイスを充電する
本製品には、2つのUSB充電ポート (5V/1A出力ポートと
Quick Charge 3.0ポート) があります。22Wの最大出力で2台
のデバイスを同時に充電できます。

14 日本語 日本語 15
仕様
注意:仕様は予告なく変更されることがあります。
DC入力:12V - 24V
Quick Charge 3.0出力:3.6V-6.5V 3A , 6.5V-9V 2A,
9V-12V 1.5A
Bluetooth: V4.2
Bluetooth通信距離:10 m / 32.8 ft
USBオーディオ形式:.mp3 .wma .flac .wav
FM周波数範囲:78-90 MHz
FM通信範囲:2 m / 78.7 in
USBファイルシステム:FAT, FAT32, exFAT
使用時温度範囲: -20°C ~ 40°C/ -4°F ~ 104°F
保管温度範囲: -40°C ~ 85°C/ -40°F ~ 185°F
注意事項
本製品は、欧州連合が定めた電波干渉防止の要件
に適合しています。
本製品は、リサイクルおよび再利用が可能な高品
質の素材 / 部品で設計、製造されています。
この記号は、当該製品を家庭廃棄物として廃棄で
きないことを表しています。本製品は、リサイク
ルのために適切な回収施設に引き渡す必要があり
ます。天然資源、健康、環境の保護のため、正し
い廃棄手順およびリサイクルにご協力ください。
本製品の廃棄およびリサイクルに関する詳しい情
報は、お住まいの自治体や、廃棄物回収施設、ま
たは本製品を購入された販売店までお問い合わ
せください。
商標
AppleおよびAppleロゴは、米国その他の国で登録された
Apple Inc.の商標です。 App Storeは米国およびその他の国
で登録されたApple Inc.のサービスマークです。
Google PlayとGoogle Playのロゴは、Google LCC.の商標
です。

16 English English 17
Table of Contents
17 Safety Instructions
Important Safety Instructions
What’s Included
At a Glance
LED Display Guide
21 Getting Started
23 FM Transmitter
1. Use the F3
2. Use the Roav Charger App
25 Playing Music
27 Hands-Free Calling
27 Charging Your Devices
28 Specifications
29 Notice
Safety Instructions
Important Safety Instructions
SAVE THESE INSTRUCTIONS – This manual contains important
safety and operating instructions for the car charger of Roav
SmartCharge F3 (R5132).
Please read and understand all instructions before using this
product. If damage is caused by failure to follow the instructions,
the warranty does not apply.
• Read all instructions and cautionary markings before using
this product.
• Do not expose to rain, moisture, or snow.
• Use of an attachment is not recommended or sold by the
manufacturer may result in a risk of fire, electric shock, or
injury to persons.
• Do not operate this car charger if it has received a sharp blow,
been dropped, or otherwise damaged in any way; take it to a
qualified service person.
• Do not disassemble this car charger; take it to a qualified
service person when service or repair is required. Incorrect
reassembly may result in a risk of electric shock or fire.
• To reduce risk of electric shock, unplug this car charger before
attempting any maintenance or cleaning. Turning o controls
will not reduce this risk.
• To reduce risk of fire or electric shock, do not interconnect
output terminations.

18 English English 19
What’s Included
Owner’s Manual
ManualRoav SmartCharge F3
At a Glance
• Avoid long exposure to direct sunlight, which may cause
damage to the device.
• Exposing this product to open flames may cause it to explode.
• Do not use this product in strong magnetic fields.
• Use a dry, soft lint-free cloth to clean. Do not use any
corrosive cleaner or oil to clean.
• CAUTION - For continued protection against risk of fire,
replace only with the same type and ratings of fuse, fuse
rating is 63V DC / 7A.
• Always obey trac laws and pay attention to the road. Do
not attempt to use this device while driving, as some features
are limited while the vehicle is in motion. Failure to pay full
attention to the operation of your vehicle could result in
death, serious injury or property damage. You assume total
responsibility and risk for using this device.

20 English English 21
LED Display Status
WAITING...
Reading a microSD card
CARD ERROR A card error has occurred and the card
cannot be read.
NO USB DISK
No USB drive detected
WAITING...
Reading a USB drive
USB ERROR
A USB error has occurred and the USB
drive cannot be read.
1Press and hold M.
When the USB drive or microSD card is
read, music mode shows from left to right:
Shue, Repeat All, Repeat One
The UI is subject to change without notice.
Getting Started
Plug Roav SmartCharge F3 into your vehicle’s cigarette
lighter socket.
Start your vehicle’s engine.
The LED display will light up, and show the Roav logo and
current voltage of the car battery.
Quick Charge 3.0 USB port
AUX socket
Microphone
USB port
LED display
M/Mode button
• Press to switch between
dierent modes.
/ Multi-function button
CH
• Press to display the FM
frequency.
MicroSD card slot
Car Charger
Press and hold for 5 seconds to power on/o.
LED Display Guide
LED Display Status
NOTCONNECTED
flashes
Bluetooth not connected
FM
90.0
*The FM frequency
may vary depending
on the default setting.
Bluetooth connected
NO CARD
No microSD card detected

22 English English 23
FM Transmitter
The Roav SmartCharge F3 allows you to connect your phone to
your car’s stereo via FM signal. There are two ways to set up:
1. Use the F3
Press and hold CH for one second when using the F3 for the
first time.
F3 begins to search an unoccupied FM frequency.
Turn on the FM radio in your car and tune it to the FM
frequency set on the F3.
To customize your FM frequency:
a. Press CH on F3.
FM frequency displays on the LED screen.
b. Press to select a FM frequency. Make sure the
transmitting frequency matches the frequency your radio
is tuned to.
FM
FM
Download the Roav Charger app from the App Store
(smartphones running iOS 10.2 or higher) or Google Play
(smartphones running Android 5.0 or higher).
Roav Charger
Enable Bluetooth on your smartphone and search for
available Bluetooth devices.
Select “Roav F3_XXXX”and connect.
Once successfully connected, will stop flashing.
Roav F3_XXXX
24 English English 25
Tap “Set”. Once chosen, the previous presets are replaced by
the new ones.
Turn on the FM radio in your car and tune to a frequency that
matches the frequency set on the Roav Charger App.
Play audio from your phone.
You will hear the audio from the car stereo.
You can also connect the car charger to your car’s
stereo by using a 3.5mm AUX cable.
Playing Music
When the car charger F3 is successfully connected to your
smartphone, you can press the multi-functional button to
play music from your phone. Music can then be streamed to
your car’s sound system via FM transmitter or the AUX socket.
You can also insert a USB flash drive or a microSD card to enjoy
music that is stored on these devices.
USB
2. Use the Roav Charger App
Follow the on-screen instructions in the Roav Charger app to
complete connection via FM Radio.
Tap the “FM radio”.
Tap “SmartScan” (Figure a).
The Roav Charger App begins to search an unoccupied
frequency.
Press and hold one preset station to customize stations.
Adjust the slider or tap to choose a radio frequency
(Figure b).
90
MHz
Set
76
MHz
90
MHz
76
MHz
SmartScan
83.2
MHz
Preset stations ?
76.1
MHz
89.9
MHz
ab

26 English English 27
Hands-Free Calling
When the car charger is successfully connected to your
smartphone, you can enjoy convenient hands-free calling.
Answer / End a call Press
Reject a call Press and hold for 2
seconds
Charging Your Devices
Roav SmartCharge F3 has two USB charging ports (one 5V/1A
output port and one Quick Charge 3.0 port). You can charge two
devices at the same time with a maximum output of 22W.
Play / Pause Press
Previous / Next track Press
Select a music mode Press and hold M. Press
To further reduce echo and background noise on your calls and
music, you can connect a 3.5 mm AUX cable (not provided)
to the AUX socket of the car charger and the AUX-In socket of
your car’s audio system.
FM
AUX IN

28 English English 29
Notice
This product complies with the radio interference
requirements of the European Community.
Declaration of Conformity
Hereby, Anker Innovations Limited declares that this device is in
compliance with the essential requirements and other relevant
provisions of Directive 2014/53/EU. For the declaration of
conformity, visit the Web site www.goroav.com.
This product can be used across EU member states.
The product shall only be connected to a USB Interface of
version 2.0 or higher.
The device complies with RF specifications when the device
used at 20mm from your body.
BT Operating Frequency Range: 2402-2480 MHz; BT Max
Output Power: 8dBm
The following importer is the responsible party (contact for EU
matters only)
Importer: Anker Technology (UK) Ltd
Importer Address: Suite B, Fairgate House, 205 Kings Road,
Tyseley, Birmingham, B11 2AA, United Kingdom
This product is designed and manufactured with
high quality materials and components, which can
be recycled and reused.
Specifications
Specifications are subject to change without notice.
DC input: 12V - 24V
Quick Charge 3.0 output: 3.6V-6.5V 3A , 6.5V-9V 2A,
9V-12V 1.5A
Bluetooth: V4.2
Bluetooth transmission distance: 10 m / 32.8 ft
USB audio format: .mp3 .wma .flac .wav
FM frequency range: 78-90 MHz
FM transmission range: 2 m / 78.7 in
USB file system: FAT, FAT32, exFAT
Operating temperature range: -20°C to 40°C/ -4°F to 104°F
Storage temperature range: -40°C to 85°C/ -40°F to 185°F

30 English English 31
can be determined by turning the equipment off and on, the user
is encouraged to try to correct the interference by one or more
of the following measures: (1) Reorient or relocate the receiving
antenna. (2) Increase the separation between the equipment and
receiver. (3) Connect the equipment into an outlet on a circuit
different from that to which the receiver is connected. (4) Consult
the dealer or an experienced radio/TV technician for help.
FCC Radio Frequency Exposure Statement
The device has been evaluated to meet general RF exposure
requirements. The device can be used in fixed/mobile exposure
condition. The min separation distance is 20cm.
The following importer is the responsible party:
Company Name: Fantasia Trading LLC
Address: 9155 Archibald Avenue, Suite 202,
Rancho Cucamonga , CA 91730, USA
Telephone:1-909-484-1530
Trademark
Apple and the Apple logo are trademarks of Apple Inc.,
registered in the U.S. and other countries. App Store is a service
mark of Apple Inc., registered in the U.S. and other countries.
Google Play and the Google Play logo are trademarks of Google
LLC.
This symbol means the product must not be
discarded as household waste, and should be
delivered to an appropriate collection facility for
recycling. Proper disposal and recycling helps
protect natural resources, human health and the
environment. For more information on disposal
and recycling of this product, contact your local
municipality, disposal service, or the shop where
you bought this product.
FCC Statement
This device complies with Part 15 of the FCC Rules. Operation
is subject to the following two conditions: (1) this device may
not cause harmful interference, and (2) this device must accept
any interference received, including interference that may cause
undesired operation.
Warning: Changes or modifications not expressly approved
by the party responsible for compliance could void the user's
authority to operate the equipment.
Note: This equipment has been tested and found to comply
with the limits for a Class B digital device, pursuant to Part 15 of
the FCC Rules. These limits are designed to provide reasonable
protection against harmful interference in a residential
installation.
This equipment generates uses and can radiate radio frequency
energy and, if not installed and used in accordance with
the instructions, may cause harmful interference to radio
communications. However, there is no guarantee that interference
will not occur in a particular installation. If this equipment does
cause harmful interference to radio or television reception, which

Customer Service
カスタマーサービス
18-month limited warranty
十八 ヵ月限定保証
Lifetime technical support
テクニカルサポート
support@anker.com
03-4455-7823 (営業時間:平日9:00-17:00)
@GoRoav @GoRoav
Other manuals for SmartCharge F3
1
This manual suits for next models
1
Table of contents
Other Roav Transmitter manuals

Popular Transmitter manuals by other brands


Status Instruments
Status Instruments SEM210X User instruction

SABINE
SABINE SW70-T Quick setup guide

Zaxcom
Zaxcom ZMT user manual

Transmitter Solutions
Transmitter Solutions Firefly3 manual

BWI Eagle
BWI Eagle AIR-EAGLE SR 38-1400-DC Product information bulletin

HBC-Radiomatic
HBC-Radiomatic spectrum 1 M operating instructions


