Robert Dyas 5059413794698 User manual

ASSEMBLY & PRODUCT CARE
PRE-ASSEMBLY PREPARATION
5059413794698 / 5059413872754 / 5059413872761
Thank you for purchasing this PRODUCT. Please read the instructions carefully before use to
ensure safe and satisfactory operation of this product.
Please check the pack contents before attempting to assemble this product. A full checklist of
components is given in this leaflet. If any components are missing, please contact the retailer from
whom you bought this product.
This product is HEAVY, it should be assembled as near as possible to the point of use. TAKE
CARE WHEN LIFTING to avoid personal injury and (or) damage to the product.
This product takes approximately 10 MINUTES to assemble with 1 PEOPLE.
The fittings pack contains SMALL ITEMS which should be KEPT AWAY FROM YOUNG
CHILDREN.
Read this leaflet in full before commencing assembly.
Please ensure instructions are read in full before attempting to assemble this product
You will need Philips Screwdriver (Not included)
Pellet Pizza Oven

FITTINGS AND PARTS CHECKLIST
IMPORTANT: To avoid damage to floor we would advise parts are assembled inside the open
packaging, or lay onto a clean carpet or banket.
A
B
C
F
G
H
I
J
Part Description
Main Body 1
4
1
3
12
1
1
1
Standing Leg
Vent Pipe
D 1Vent Pipe Lip
E 1Front Cover
Pizza Stone
Pellet Basket
Front Handle
Pellet Mesh
Rear Handle
K 5
Nut Set M6 x 12 mm
M 1M5 Screw
N 1Pellet Scoop
Image Qty
L 5
Nut Set M4 x 8 mm

STEP BY STEP ASSEMBLY INSTRUCTIONS
* Tool required: Philips Screwdriver(Not included)
* Note: Make sure that the entire plastic protection has been
removed before assembly!
1. Attach the Standing Legs(B) to the bottom of the oven Main Body(A) and spin to fix.
2. Use the Philips Screwdriver(Not included) to fasten the Vent Pipe Lid(D) to the top of Vent Pipe(C)
with M5 Screw(M)
3. Insert the Vent Pipe(C) into the Main Body(A).
4. Attach the Rear Handle(J) to the Pellet Basket(G), and fasten with Nut Set(K) by Philips
Screwdriver(Not included).
5. Insert the Pellet Mesh(H) into the Pellet Basket(G)
6. Insert the Pellet Basket(G) to the back of the Main Body(A).
7. Insert the Pizza Stone(F) into the Main Body(A).
8. Attach the Font Handle(I) to the Front Cover(E), and fasten with Nut Set(L) by Philips
Screwdriver(Not included).
* The front cover is for covering the front gate when needed
Now the assembly is completed!
DO NOT FULLY TIGHTEN THE BOLTS BEFORE ASSEMBLING ALL OF THE PARTS.
Please read these instructions carefully before starting assembly. We suggest you carry out the
assembly on a soft surface like a carpet, so as to avoid scratching the paint. Please note because
of the nature of cast metal, you may find roughness on the surface which enhances the beauty of
the product and is not a defect.

PREPARATION OF THE PIZZA OVEN
Ignition of the pellets
Required for ignition
100% Hardwood Pellet
* Above are not included in this package
Fire Starters Fire Torch
• Make sure the door is closed and only open it when you add or remove food.
• Fill your pellet box 80% with 100% hardwood pellets.
• Place a natural grill lighter on the lip of your pellet box. We recommend that you do not use
petroleum-based barbecue lighters, as they cause unwanted aromas.
• Light the grill lighter. If you use a blowtorch instead of a grill lighter, point it at the pellets for
about 40 seconds until they burn.
• Slide the pellet box into the stove.
• Once your starter pellets are completely burnt out, gradually add small amounts of pellets.
Danger of burns! Keep children away from the stove and beware of fi re
coming out of the stove. Always use fi reproof oven gloves! Use the
handle when you fi ll pellets to the pellet box.

BAKING INSTRUCTIONS
FOOD COOKING GUIDES
1 Slide the pizza stone into the oven for preheating.
2 Let the pizza stone preheat for 20-30 minutes.
3 When the temperature reaches 250 °C to 300 °C, push the pizza dough onto thestone.
Before baking, add a little extra flour to the pizza dough to prevent it from baking.
4 Turn the pizza every 30-40 seconds to make it cook more evenly and bake for about 10 minutes.
5 Take the pizza out of the oven and enjoy it.
Food
Pizza(Thin)
Steak
Sausage
Pork
Lamp chop
Chicken wings
1-2 min
3 min
4 min
6 min
6 min
6 min
15 minBread
Cook Time

SAFETY INSTRUCTIONS
• Read the instructions before using the appliance.
• Keep this manual for future reference.
• Allow at least 122 cm of space around the unit to other objects or house walls.
• Ensure that the ventilation openings of the unit are not blocked.
• Place the unit on a level surface.
• Install the unit so that it is protected from direct draughts and from dripping water or rain.
• Do not move the unit during use.
• The unit must not be changed.
• This device must be kept away from fl ammable materials during use.
• Children from 8 years of age, mentally, sensory and physically handicapped persons may only use
the device if they have been thoroughly familiarised with the functions and safety precautions by
a supervisor responsible for them and understand the associated risks.
WARNING
Risk of injury! Failure to follow the instructions may result in a dangerous
fi re or explosion. It is the responsibility of the consumer to ensure that the
grill is properly assembled, installed and maintained. Failure to follow the
instructions in this manual may result in personal injury and/or property
damage.
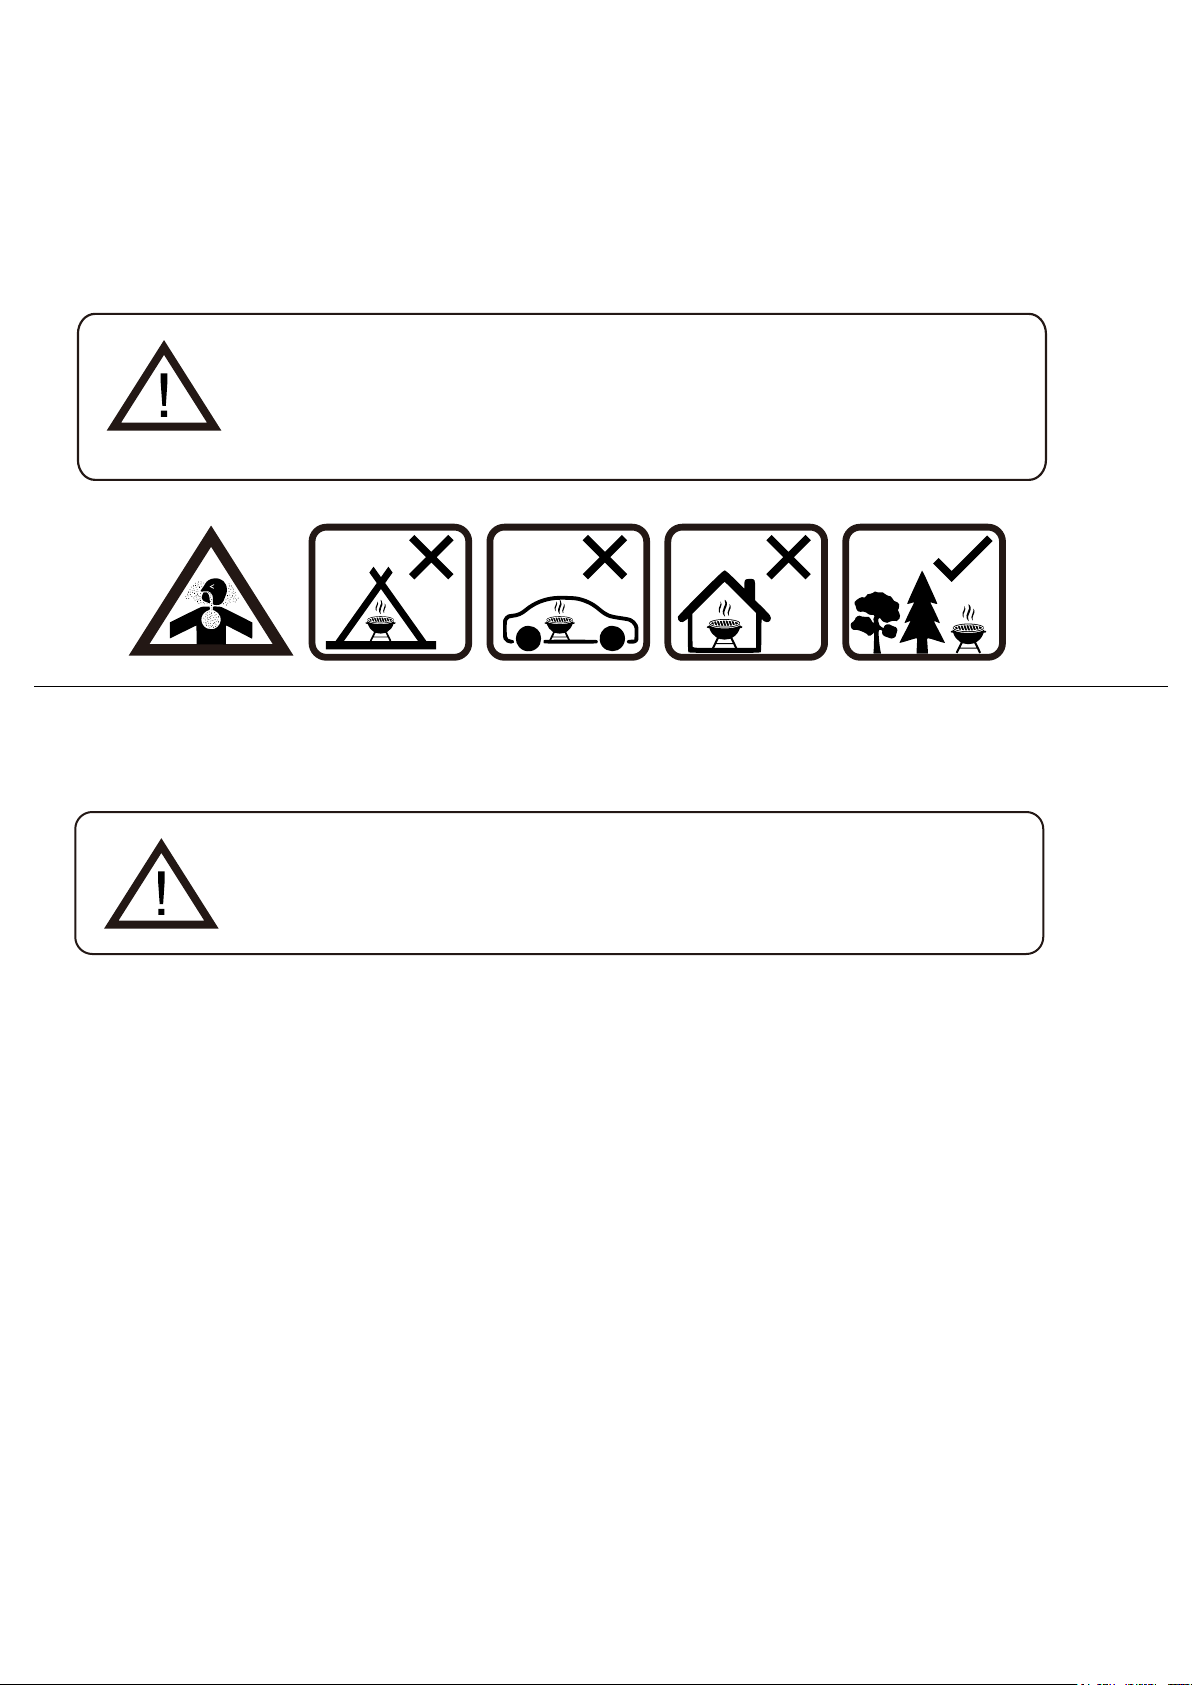
WARNING
Danger of suffocation! The pizza oven is intended for outdoor use only. It
must not be used in buildings, garages or other enclosed areas. Toxic
fumes can form which can lead to suffocation.
CAUTION
Risk of burns! All accessible parts can be very hot. Before cleaning, wait
until the appliance has cooled down completely and keep small children
away from the appliance.
CAUTION
Danger of burns! This oven becomes very hot, do not move it during
operation.
Special notes on operation
• Use protective gloves when operating the oven.
• The furnace must be placed on a safe, level surface before use.
• The oven must be heated up at least 30 minutes before the fi rst cooking and the fuel must be kept
red-hot for at least 30 minutes.
CLEANING AND CARE
Outer surfaces
Use a solution of hot water and mild detergent or baking powder for cleaning. Then
rinse with water and let the oven dry completely.
Inner surfaces
Note: Do not use abrasive cleaners or scouring pads for cleaning.
Note: Never use oven cleaner for cleaning!
• If the inner surface of the grill looks like fl aking paint, burnt-in fat has turned into carbon and is fl
aking off.
• Clean the grill thoroughly with hot soapy water solution. Then rinse with water and allow the grill to
dry completely.
Inside of the grill base
• Remove any residue with a brush, scraper or cleaning pad and then wash it off with a soapy water
solution. Then rinse with water and allow to dry completely.
• Remove any carbon deposits after each use.
Risk of burns! All accessible parts can be very hot. Wait until the unit has
cooled down completely before cleaning.
• Do not use the stove indoors!
• Do not use alcohol or petrol to light or relight the stove! Use only fi relighters that
comply with EN 1860-3!
• Keep children and pets away from the stove.
• Do not bake or grill before the fuel has an ash layer.
• The maximum fi lling capacity for pellets is 500 g.
WARNING
Danger of suffocation! The oven is intended for outdoor use only. It must
not be used in buildings, garages or other closed areas. Toxic fumes may
form, which can lead to suffocation.
This manual suits for next models
2
Table of contents


