Robinson Polytunnels 8ft Wide Polytunnel User manual


8ft Wide Polytunnel Assembly Instructions
Copyright © Robinson Polytunnels 2014 - 2018 2
CONTENTS
Section Page
1. FOUNDATION TUBES: Option A –Hammered-In Foundation Tubes 3
2. FOUNDATION TUBES: Option B –Ground Anchor Plates 4
3. FOUNDATION TUBES: Option C –Concreted Foundation Tubes 5
4. STEEL FRAME ASSEMBLY & INSTALLATION 6
5. TIMBER END FRAME ASSEMBLY & INSTALLATION 8
6. TIMBER BASE RAIL (OPTION) 9
7. TIMBER SIDE RAIL (OPTION) 11
8. ROLL UP CURTAIN (OPTION) 13
9. END PANELS & SIDE NETTING (INCLUDED WITH TIMBER SIDE RAIL OPTION) 15
10. FITTING THE ANTI HOT SPOT TAPE 16
11. FITTING THE POLYTHENE –TRENCHING METHOD 17
12. FITTING THE POLYTHENE –POLYTHENE TO BASE RAIL 19
13. FITTING THE POLYTHENE –POLYTHENE TO SIDE RAIL 21
14. DOOR ASSEMBLY & INSTALLATION 23
PARTS LIST 25
POLYTUNNEL MAINTENANCE 28
8ft Wide Polytunnel Assembly Instructions
Copyright © Robinson Polytunnels 2014 - 2018 3
Work Safely
When you tackle a job it is important to work safely. Please consider the following points when building your
Polytunnel.
Keep your work area tidy. A tidy site is a safe site.
Use the correct tools for the job.
Wear gloves where practical. Components may have sharp edges. Timber may have splinters.
Take care when using tools such as hammer, spade, drill, knife, scissors.
Consider other people, particularly children.
Tools Required
You will require a few tools to assemble your Polytunnel which are usually available in most households.
Hammer
Wood saw
Spirit level
Cordless drill
9mm drill bit
String line (optional)
Staple gun (optional) or stapler
13mm spanners or sockets
Tape measure
Scissors or craft knife
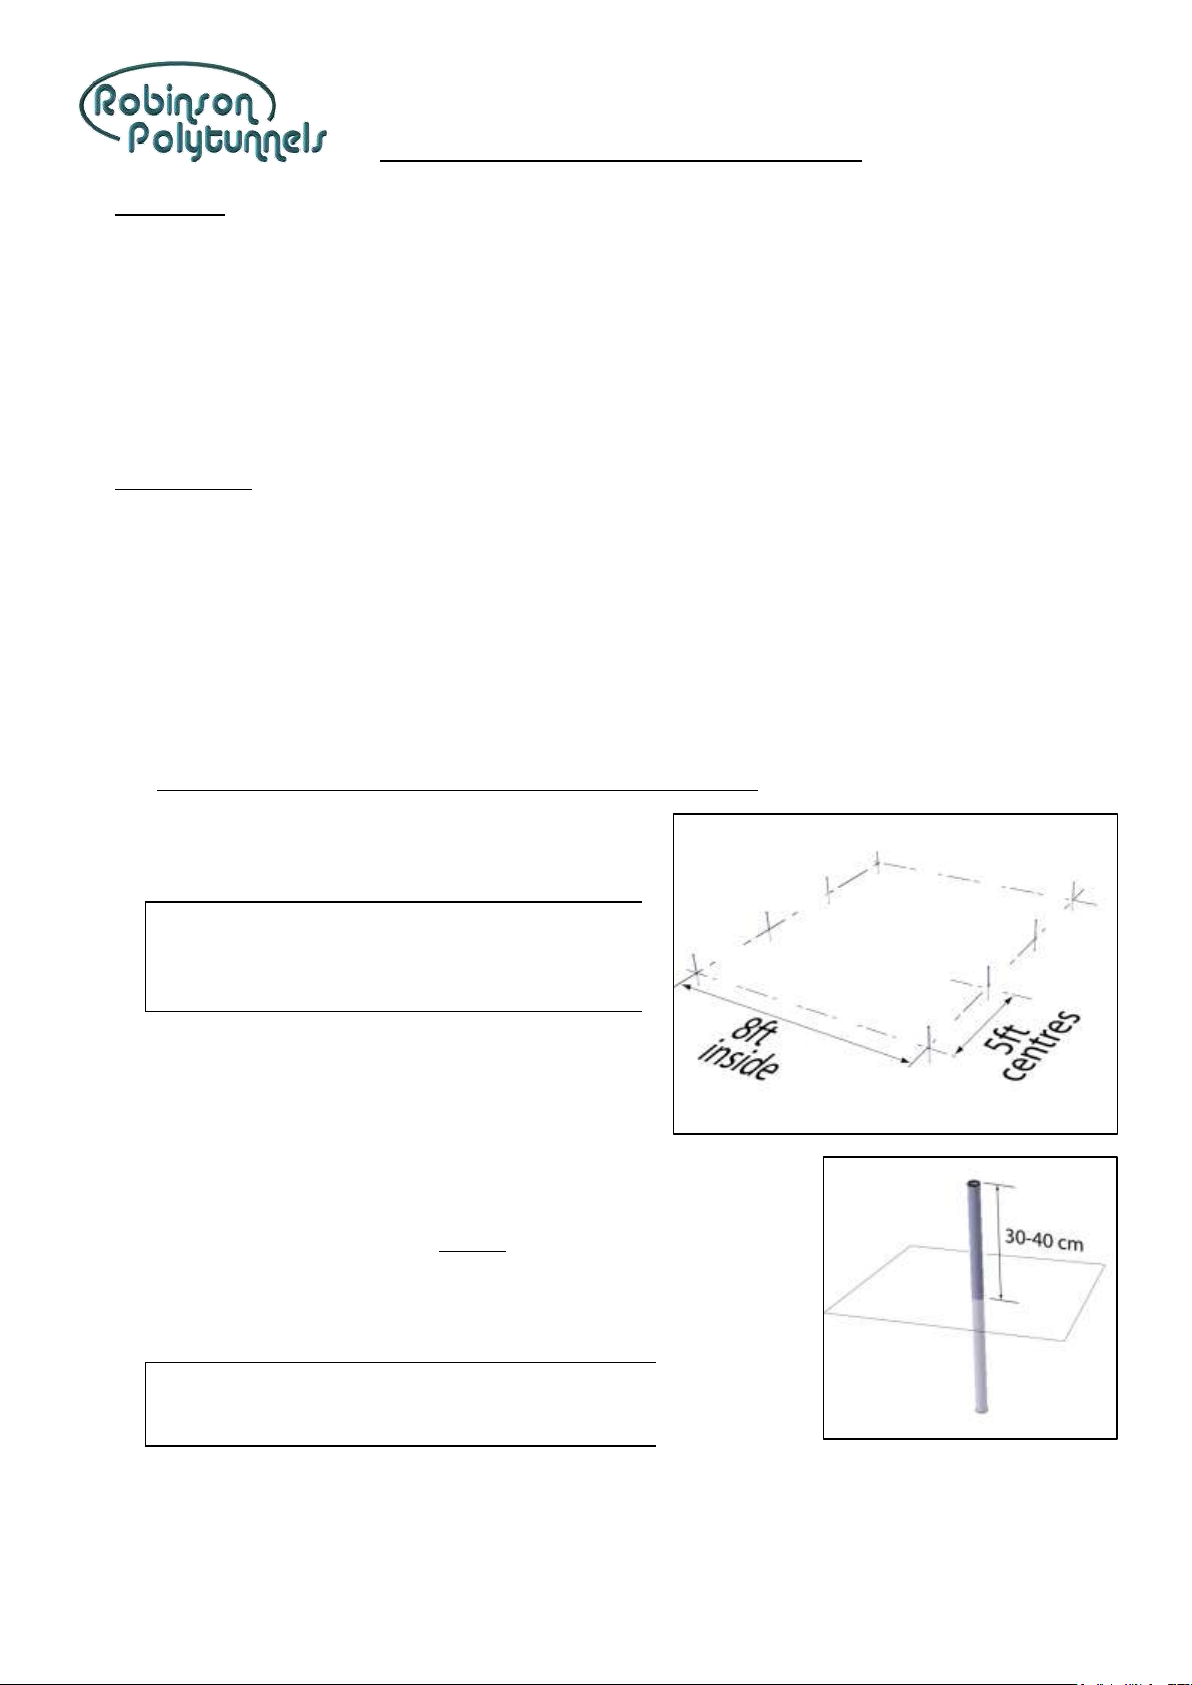
1. FOUNDATION TUBES: Option A –Hammered-In Foundation Tubes (Suitable for trenched polythene only)
1Set two string lines to the width of the polytunnel
(8ft apart). Ensure they are parallel.
Tip! It’s best to put your polytunnel on a flat, level site.
A fall lengthways is easy to accommodate. A fall
sideways should be limited to about 6” over the
width of the polytunnel.
2Set another string line for the end of the polytunnel.
Ensure the “end” string line is perpendicular to the
“length” string lines.
3Hammer the first two corner Foundation Tubes into the ground.
These will be positioned just outside the “length” string lines and just
touching the “end” string line. Ensure the Foundation Tubes are
vertical.
Tip! Use a piece of wood on top of the Foundation Tube
to ensure that the tube does not become
“mushroomed”.
4Hammer in the remaining Foundation Tubes at 5ft centres until the full length is reached.

8ft Wide Polytunnel Assembly Instructions
Copyright © Robinson Polytunnels 2014 - 2018 4
2. FOUNDATION TUBES: Option B –Ground Anchor Plates
1Set two string lines to the width of the polytunnel.
Ensure they are parallel.
Tip! It’s best to put your polytunnel on a flat, level site.
A fall lengthways is easy to accommodate. A fall
sideways should be limited to about 10cm over the
width of the polytunnel.
2Set another string line for the end of the polytunnel.
Ensure the “end” string line is perpendicular to the
“length” string lines.
3Mark the ground at each foundation position, to the outside
of the “length” string lines at 5ft centres until the full length is
reached.
4Temporarily remove the string lines so they don’t get in the
way whilst digging.
5Dig a hole for each Foundation Tube, approximately 25cm
square x 35cm deep.
6Slot the ground anchor plates onto the bottom end of the
Foundation Tubes. And lock in place with the Starlock
Washers. Starlock Washers are inserted using the short piece
of tube.
a. With the foundation tube upside-down, slot the 6mm
Concrete Tie Bar (steel rod) into the pre-punched hole
in the Foundation Tube.
b. Slot the Ground Anchor Plate onto the bottom end of
the Foundation Tube, to rest on the Concrete Tie Bar.
c. Hold the short piece of tube over the starlock washer on the bottom end of the Foundation Tube
and tap the short tube with a hammer until the washer is located on the Foundation Tube, right
up to the Ground Anchor Plate.
7Reinstate the string lines.
8Insert the Foundation Tube and anchor plate assembly into the excavated holes, to the outside of the
string line. Make sure the Foundation Tubes are vertical, touching the string line and spaced at 5ft
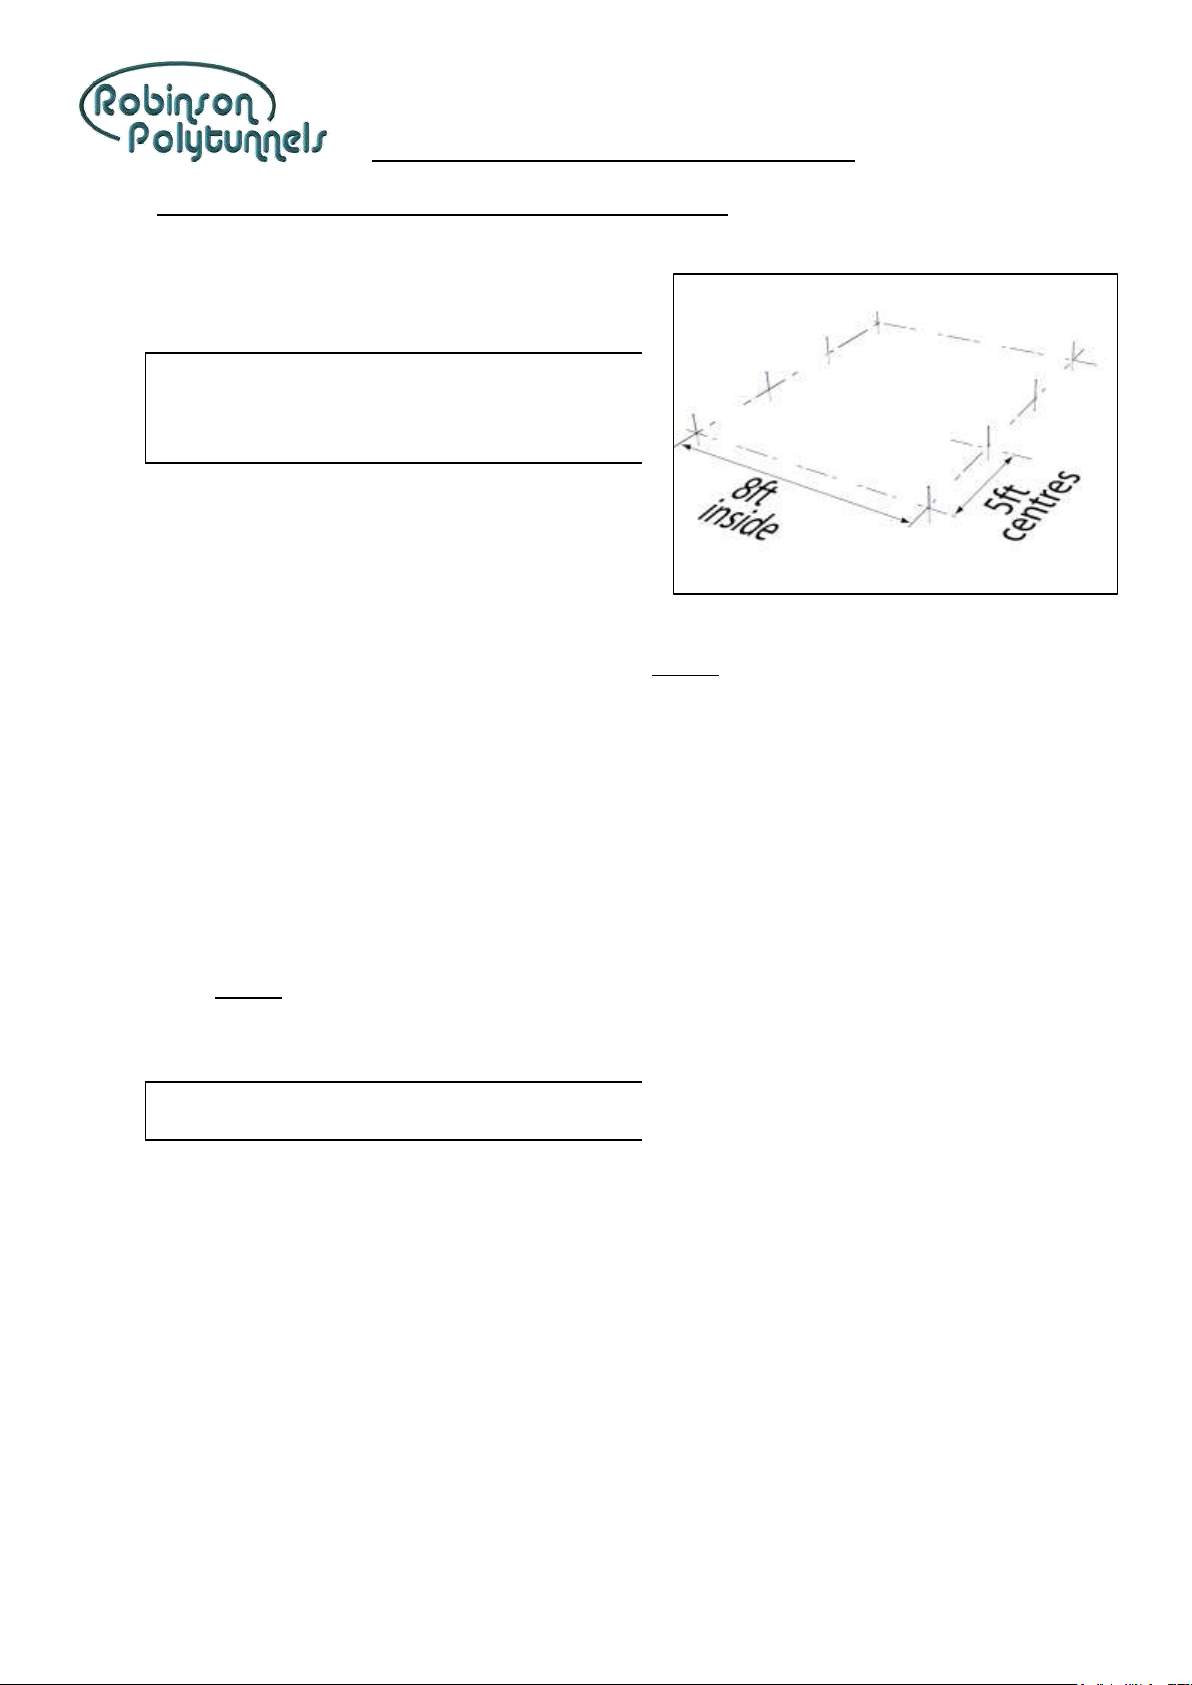
centres. The Foundation Tubes should be protruding above ground by approximately 40cm.
9Backfill the excavated holes, checking that the Foundation Tubes are still in the correct position. Stamp
on the soil to ensure the soil is well-compacted.
8ft Wide Polytunnel Assembly Instructions
Copyright © Robinson Polytunnels 2014 - 2018 5
3. FOUNDATION TUBES: Option C –Concreted Foundation Tubes (Suitable for base rail or trenched
polythene)
1Set two string lines to the width of the polytunnel
(8ft apart). Ensure they are parallel.
Tip! It’s best to put your polytunnel on a flat, level site.
A fall lengthways is easy to accommodate. A fall
sideways should be limited to about 6” over the
width of the polytunnel.
2Set another string line for the end of the polytunnel.
Ensure the “end” string line is perpendicular to the
“length” string lines.
3Mark the ground at each foundation position, to the outside of the “length” string lines at 5ft centres
until the full length is reached.
4Temporarily remove the string lines so they don’t get in the way whilst digging.
5Dig a hole for each Foundation Tube, approximately 25cm square x 35cm deep.
6Reinstate the string lines.
7Fill the excavated holes with freshly-mixed concrete.
8Put a steel rod through the hole in the foundation tube. Slot the Foundation Tubes into the concrete, to
the outside of the string lines. Make sure the Foundation Tubes are vertical, touching the string line and
spaced at 5ft centres. The Foundation Tubes should be protruding above ground by approximately 40cm.
Tip! Allow the concrete to set before you try to install
the framework!
Table of contents
Other Robinson Polytunnels Lawn And Garden Equipment manuals


Popular Lawn And Garden Equipment manuals by other brands

Sunforce
Sunforce SOLAR user manual

GARDEN OF EDEN
GARDEN OF EDEN 55627 user manual

Goizper Group
Goizper Group MATABI POLMINOR instruction manual

Rain Bird
Rain Bird 11000 Series Operation & maintenance manual

Cub Cadet
Cub Cadet BB 230 brochure

EXTOL PREMIUM
EXTOL PREMIUM 8891590 Translation of the original user manual


Vertex
Vertex 1/3 HP Maintenance instructions

GHE
GHE AeroFlo 80 manual

Land Pride
Land Pride Post Hole Diggers HD25 Operator's manual

Yazoo/Kees
Yazoo/Kees Z9 Commercial Collection System Z9A Operator's & parts manual

Premier designs
Premier designs WindGarden 26829 Assembly instructions

Snapper
Snapper 1691351 installation instructions