Robitussin DH-835 User manual

OWNER’S MANUAL
3 US GALLONS (11.3 LITERS) OUTPUT PER DAY
*
COOL MOISTURE HUMIDIFIER
Model DH-835
*Output dependent on room temperature and humidity.
Robitussin®is a registered trademark of Whitehall-Robins Healthcare.

READ AND SAVE THESE SAFETY
INSTRUCTIONS BEFORE USING THIS
HUMIDIFIER
WHEN USING ELECTRICAL APPLIANCES, BASIC PRECAUTIONS
SHOULD ALWAYS BE FOLLOWED TO REDUCE THE RISK OF
FIRE, ELECTRIC SHOCK, AND INJURY TO PERSONS,
INCLUDING THE FOLLOWING:
1. Always place this humidifier on a firm, flat and level surface. This humidifier may not
work properly on an uneven surface.
2. Place this humidifier in an area where it is not accessible to children.
3. Do not place the humidifier near any heat sources such as stoves, radiators, and heaters.
4. Before using the humidifier, check the power cord for any signs of damage. If the
cord is found to be damaged, DO NOT USEand return the humidifier to the
manufacturer under the warranty agreement for repair.
5. This appliance has a polarized plug (one blade is wider than the other). To reduce the
risk of shock, this plug is intended to fit only one way in a polarized outlet. If the plug
does not fit fully in the outlet, reverse the plug. If it still does not fit, contact a qualified
electrician. DO NOTattempt to defeat this safety feature.
6. To disconnect the humidifier, first turn controls to the OFF position, then grip the plug
and pull it from the wall outlet. Never pull by the cord.
7. A loose fit between the AC outlet (receptacle) and plug may cause overheating and a
distortion of the plug. Contact a qualified electrician to replace loose or worn outlet.
8. The humidifier should always be unplugged and emptied when not in operation or
while being serviced or cleaned.
9. Never tilt or attempt to move the humidifier while it is operating or filled with water.
UNPLUG the humidifier before moving.
10. This humidifier requires regular cleaning. Refer to the CLEANING instructions provided.
Never clean the humidifier in any manner other than as instructed in this manual.
IMPORTANT SAFETY
INSTRUCTIONS

Thank you for purchasing a Robitussin®Natural Cool Moisture™ Humidifier.
HO W D OE S IT W OR K ?
NATURAL COOL MOISTURE™ SYSTEM
Dry air is pulled through the Natural Cool Moisture™ system and a quiet fan blows out
invisible, moisture-balanced air. Unwanted minerals and bacteria from the water are
trapped inside the Natural Cool Moisture™ filter. When the unit is running you will not
see or feel a “mist”. You will know your humidifier is putting moisture into the air as you
watch the water level in your tank decrease throughout the day.
WHAT I S H E A LT H S H I E L D
™ A NT I MI C RO BI A L
?
Your Robitussin Natural Cool Moisture™ filter has been designed using new
HealthShield™* technology which prevents surface growth and migration of mold,
fungus and bacteria in the filter for its life - approximately one season. Keep in mind,
depending on your water quality, mineral deposits can still clog or discolor the filter,
affect its life and that of the humidifier.
M OD E L - D H - 835 :
Your humidifier is made up of these parts:
*HealthShield is registered with the
Environmental Protection Agency (EPA).
Motor Housing Water Tank
Fill Cap
Base
Natural Cool
Moisture™ Filter
11. Turn the humidifier OFF if the relative humidity exceeds 60%, or if you notice
moisture on the inside of your windows. For proper humidity reading use a
hygrometer, which is available in many hardware and department stores or by
ordering one from manufacturer (see CARE PRODUCTS).
INTRODUCTION

•Remove the water tank by grasping handle and pulling
straight up. Set aside (Fig. 1).
•Lift up on the motor housing to remove and set aside
(Fig. 2). Remove the Natural Cool Moisture™ filter
from the base before filling the unit with water. Soak
filter in a sink full of cool water to help reduce mineral
build up and place back in the humidifier while wet.
DO NOT SQUEEZE OR WRING OUT THE NATURAL
COOL MOISTURE™ FILTER. To help extend the life of
your filter repeat this step each time you fill your
humidifier.
• Turn the Water Tank upside down so that the Fill Cap is
facing up; unscrew the Fill Cap by turning it counter-
clockwise and set aside.
•
Fill the Water Tank with COOL tap water (Fig. 3). Distilled
water is not necessary as the water is filtered by the
Natural Cool Moisture™ filter.
DO NOT USE HOTWATER.
Doing so may damage the humidifier.
•Replace the fill cap by turning it clockwise . DO
NOT OVER TIGHTEN. Turn the Water Tank right-side up.
NOTE: WHEN CARRYING THE FILLED WATER TANK
PLEASE USE THE HANDLE AND PLACE YOUR OTHER
HAND UNDER THE TANK FOR ADDITIONAL SUPPORT.
NOTE: We recommend that the humidifier be disinfected prior to first use. Please see
CLEANING instructions.
•Select a firm, level, flat location - at least six inches (15 cm) from any wall for proper
air flow (Fig. 1). Place the humidifier on a water-resistant surface, as water can
damage furniture and some flooring.
The manufacturer will not accept responsibility for property damage caused by water
spillage.
Fig. 1
Fig. 3
Fig. 2
SET UP
FILLING

•Place the Motor Housing back into the base.
•Position the Water Tank in the humidifier and push into place. Some water will empty
into the base.
•Once the filled tank has been positioned, do not attempt to move the humidifier. If it
has to be moved, unplug the humidifier and remove the water tank first.
CAUTION: DO NOT POUR WATER INTO THE GRILLE ON TOP OF THE HUMIDIFIER.
DOING SO MAY DAMAGE THE HUMIDIFIER OR CAUSE PERSONAL INJURY.
POWER
CAUTION: DO NOT PLUG IN THE HUMIDIFIER WITH WET HANDS AS AN ELECTRICAL
SHOCK COULD OCCUR.
• With the power switch in the OFF position, plug the filled humidifier into a polarized
120V outlet. DO NOT FORCE THE POLARIZED PLUG INTO THE OUTLET; it will only fit
one way.
HUMI D ITY CONT ROL
1. Set the fan speed to the desired position (Fig. 4).
HIGH: For fast humidifying
MED: For everyday moisture control
LOW: For quieter nighttime operation
2. Set the Moisture Control knob (Humidistat) on HIGH,
by turning the dial counter-clockwise to the
largest black dot before “+” sign (Fig. 4).
NOTE: If the humidifier fan will not start or restart when
you select a fan speed, the Moisture Control may be
set too low. Turn the dial counter-clockwise to
the largest black dot before the “+” sign. The Desired
Humidity light will be Off when the unit is producing
moisture (Fig. 4).
Turn the humidifier OFF if the humidity level feels too moist or you notice
condensation forming on the walls and/or windows.
Fig. 4
(HIGH) (LOW)
FILLING (cont.)
OPERATION

MOISTURE CONTROL KNOB/HUMIDISTAT
The Moisture Control Knob allows you to adjust and select the humidity level to your
personal preference. Your humidifier will turn on and off throughout the day and night to
maintain the desired humidity level you have selected.
HOW T O SET T H E M OI S TU R E CO N TROL
KNOB/HUMIDISTAT
First run the humidifier per the operation instruction with the Moisture Control knob set to
its highest setting, to the largest black dot before the “+” sign (Fig. 4).
• Let the humidifier run on high for a least one hour or until
your room has reached a comfortable humidity level.
•At this point, slowly turn your Moisture Control knob
clockwise until the humidifier shuts off and the Desired
Humidity light comes on (Fig. 5).
•Now that your Moisture Control knob is set, the humidifier
will automatically turn back on when your room drops
below your comfort setting and will automatically turn off again when the setting is
reached.
Fig.5
FEATURES
WEEKLY CLEANING
We recommend cleaning the humidifier once a week, more often if you have hard water,
notice a build up of impurities or detect unpleasant odors.
Cleaning involves two steps SCALE REMOVAL and DISINFECTING. Be sure to perform
these in the proper order to avoid harmful chemical interactions.
•First, turn off and unplug the humidifier.
• Remove the Water Tank and Motor Housing.
•Remove the Natural Cool Moisture™ filter from the Base.
•Empty any water from the Base.

STEP ONE:
SCALE REMOVAL
BASE
1. Fill the Base with either:
•1 cup (8 oz.) of undiluted white
vinegar or
• Use DuraRinse™ Humidifier
Cleaner, part no. AC816, following
the instructions on the bottle.
2. Let solution stand for 20 minutes.
3. With the vinegar or DuraRinse™ in
the Base clean all interior surfaces
with a soft cloth or brush to help
remove scale.
4. Rinse the Base thoroughly with
water to remove scale and cleaning
solution.
STEP TWO:
DISINFECTING
WATER TANK/BASE
1. Fill the Water Tank with:
•1 teaspoon of household bleach
and
•1 gallon (3.8 litres) of water
Pour some of this solution into the
Base.
2. Let solution stand for 20 minutes.
3. Rinse with water until the odor of
bleach is gone.
NOTE: THE USE OF OTHER WATER TREATMENT PRODUCTS AND CHEMICALS
MAY CAUSE DETERIORATION OF THE FILTER OR DAMAGE THE HUMIDIFIER,
THEREBY HINDERING THE HUMIDIFIER’S EFFECTIVENESS.
WEEKLY CLEANING (cont.)
NOTE: REMOVEFILTER BEFORECLEANING.
Failure to remove filter during cleaning will destroy the filter .

NOTE:DO NOT ATTEMPT TO CLEAN THE NATURAL COOL MOISTURE™ FILTER WITH
ANY CHEMICAL SOLUTIONS, DOING SO WILL DAMAGE THE FILTER.
•HealthShield™ prevents the surface growth and migration of mold, fungus, algae, and
bacteria. It is normal for a filter to discolor from mineral build-up. This will vary
depending on water quality.
• DO NOT clean the filter using any chemical solution.
•If a Natural Cool Moisture™ filter appears to be clogged by hard water or mineral
deposits, soak it in a sink full of cool water for 10 minutes. DO NOT SQUEEZE OR
WRING OUT THE NATURAL COOL MOISTURE™ FILTER. Always place filter back in
the humidifier wet.
• To prevent mineral deposits use DuraFree™ Humidifier Water Softener, part no.
AC817, each time the Water Tank is refilled.
•Always purchase Honeywell or Duracraft Brand Natural Cool Moisture™ filters as the
fan motor of this humidifier and the Natural Cool Moisture™ filter are designed to
function efficiently as a set. Using any other filter could damage the motor or reduce
the humidifier’s performance.
•Be sure to empty water from the Water Tank and Base when not in use.
•Follow weekly CLEANING instructions when the humidifier will not be used for at least
one week or more, or at the end of the season.
•At the end of the season, remove and throw away the filter; do not store with a used
filter.
•Dry the humidifier completely before storing. DO NOT store with water inside the Base
or Water Tank.
•Pack the unit in its original carton and store in a cool, dry location.
•Before next use, remember to install a new filter and clean the humidifier.
PROLONGING THE LIFE OF THE FILTER AND
MAINTAINING A CLEAN HUMIDIFIER
END-OF-THE-SEASON AND STORAGE

Q: I hear the fan turning, but I don’t see any mist. Is my humidifier operating pr operly?
A: Dry air is pulled through the Natural Cool Moisture™ system and a fan disperses
invisible, moisture balanced air. There is no “mist” emitted. When operating normally
you will feel only cool air coming from the unit. Monitor the water level in your Tank/
Base. If you notice a decrease in the Water Tank over 24 hours then the unit is
operating normally.
Q: My unit has been running for several hours. I hear the fan spinning, but I do not
notice the water level in the tank decreasing.
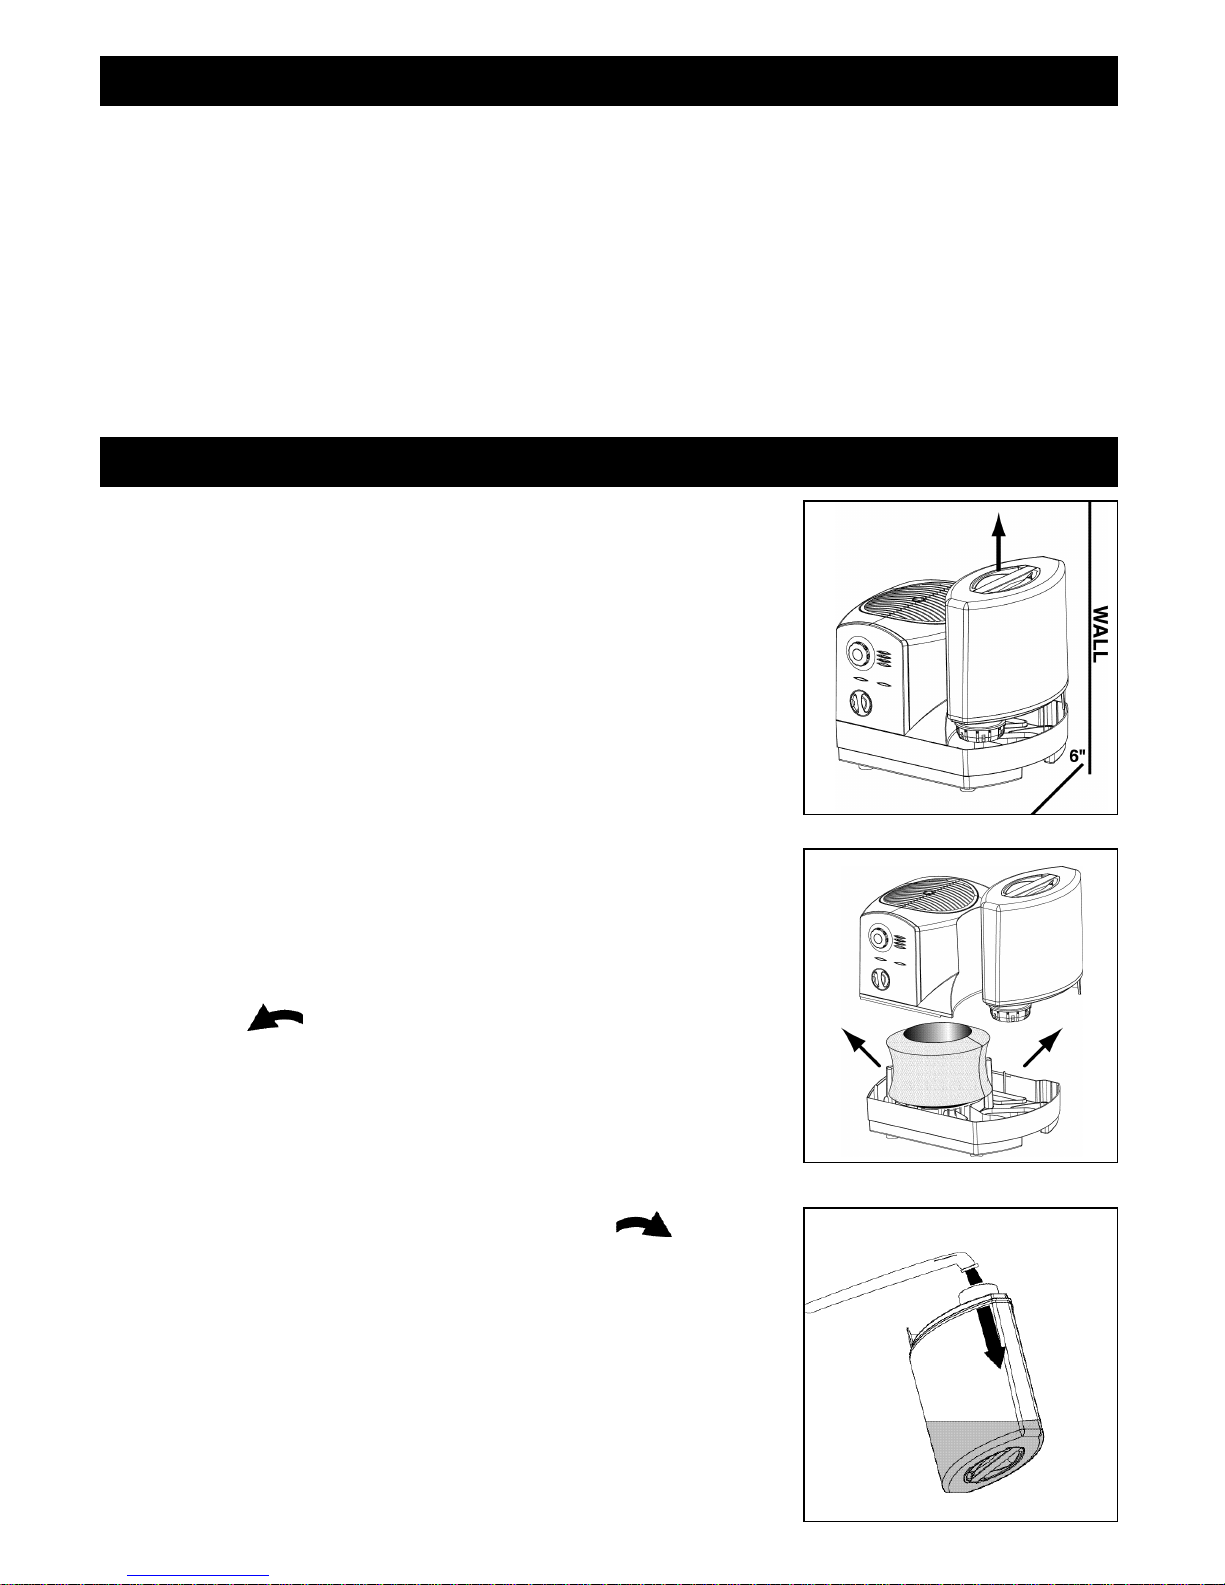
A: First, check the Natural Cool Moisture™ filter to be sure it is wet. If the pad appears
dry, remove it from the Base and gently rinse under cool water. Reposition wet filter
in the Base. You may also want to note the current moisture level in your home. If the
humidity level is over 60% the unit will not put out much moisture as your air is
already saturated.
Q: The humidifier is not running (the fan is not even spinning), but all (or some) of the
lights are on.
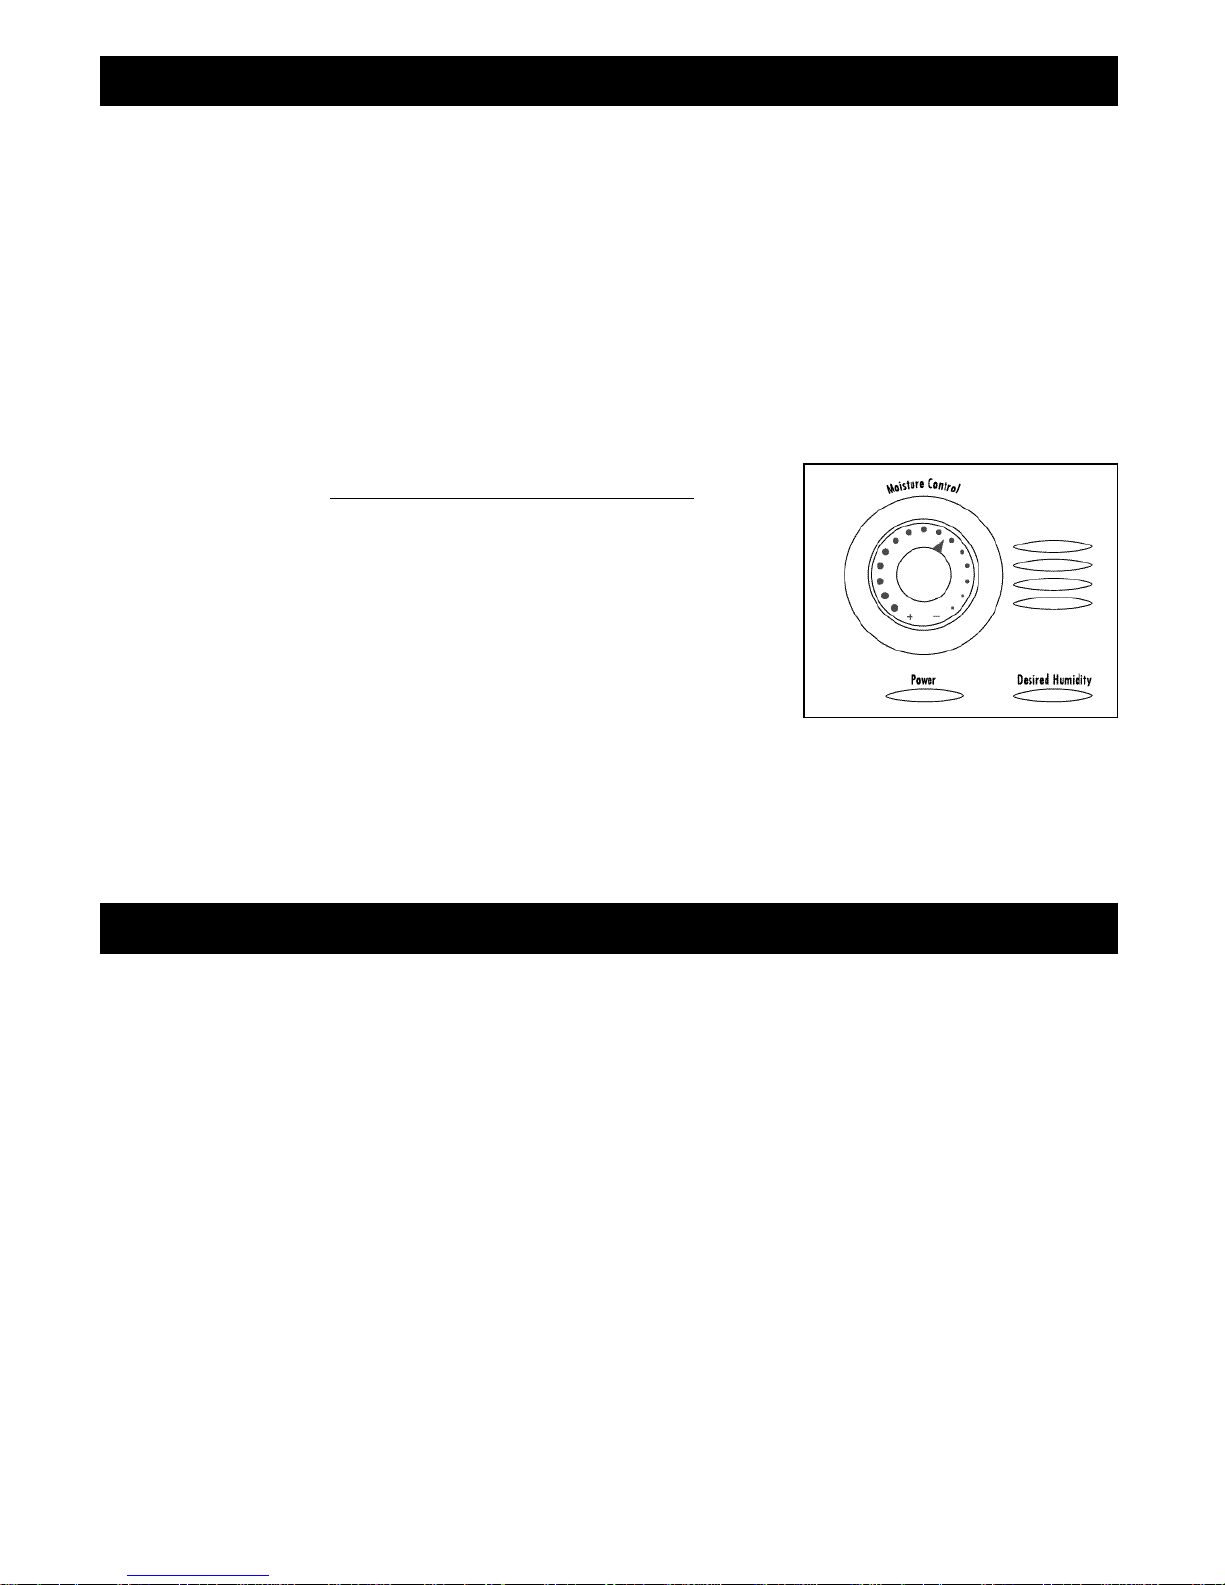
A: If the Desired Humidity light is ON: The Moisture Control knob may be set too low.
Moving the Moisture Control knob to the highest black dot before the “+” sign should
restart the unit.
Q: The Moisture Control knob was set according to the manual, but the humidifier
never seems to turn back on. Is something wrong?
A: The Moisture Control knob may be set too low. Moving the Moisture Control knob to
the highest black dot before the “+” sign should restart the unit. Reset the Moisture
Control knob following the instructions under FEATURES.
Q: The Moisture Control knob was set according to the manual, but the humidifier
never seems to turn off. Is something wrong?
A: The Moisture Control knob may be set too high. Reset the Moisture Control knob
following the instructions under FEATURES.
Q: My filter has turned light brown and rust colored. Do I need a new filter?
A: Probably not. Since your filter has been made with HealthShield™ technology the
change in colour indicates only a mineral deposit. Soak filter in a sink full of cool
water to help break up deposits. The discoloration may remain but will not affect the
humidifier’s performance.
TROUBLE SHOOTING

PRICE
If your local retailer is out of stock, replacement parts and care products may be ordered
directly from the manufacturer. You can call 1-800-332-1110 to order with a
MasterCard, Visa, or Discover or fill out the form below and mail it along with a check
or money order (sorry no COD’s accepted) to:
Honeywell
Consumer Service Center
250 Turnpike Road
Southborough, MA 01772 USA
Please allow four to six weeks for delivery.
Massachusetts residents please add 5% Sales Tax.
Item Item No. Qty. U.S. Canada Total
Natural Cool Moisture™ Filter, one per pack AGW835 $14.00 $20.30
DuraFree®Humidifier Water Softener (32 oz.) AC817 5.00 7.25
DuraRinse®Humidifier Cleaner (32 oz.) AC816 5.00
Water Tank and Fill Cap DH835-1 19.99 29.00
Fill Cap DH835-2 9.99 14.50
HAC555 19.99 29.00
SUBTOTAL
MA Residents add 5% Sales Tax /Canadian residents only add 5% GST
Shipping and Handling (US res. add $4.95/Canadian res. add $7.25)
TOTAL ENCLOSED
Name Check or Money Order Enclosed
Address Credit Card No.
Exp. Date
Day Time Phone Signature
Digital Hygrometer and
Thermometer (F°/C°)
Measure room temperature and
humidity level. Free standing; can
be used anywhere in the room.
7.25
CARE PRODUCTS

The Model DH-835 Humidifier is rated 0.6 Amps at 120V AC, 60 Hz.
NOTE: IF YOU EXPERIENCE A PROBLEM WITH YOUR HUMIDIFIER’S POWER UNIT,
PLEASE SEE THE WARRANTY FOR INSTRUCTIONS. PLEASE DO NOT ATTEMPT TO OPEN
OR REPAIR THE HUMIDIFIER YOURSELF. DOING SO WILL VOID THE WARRANTY AND
COULD CAUSE DAMAGE OR PERSONAL INJURY. IF THE PROBLEM PERSISTS, PLEASE
CONTACT THE CONSUMER SERVICE CENTER.
Mail questions or comments to:
Honeywell
Consumer Service Center
250 Turnpike Road
Southborough, MA 01772 USA
e-mail: [email protected]
Please be sure to specify model number.
Call us toll-free at: 1-800-332-1110
or visit our website at:
www.honeywell.com/yourhome
ELECTRICAL RATINGS
CUSTOMER ASSISTANCE

©2000 All rights reserved. P/N: 035-00409-001
Honeywell A/W: 043-50140-001
HU4108.00 R1
THREE YEAR LIMITED WARRANTY TERMS AND CONDITIONS
You should first read all instructions before attempting to use this product. The enclosed Customer
response card should be filled out and r eturned within 7 days of pur chase.
A. This 3 year Limited Warranty applies to repair or replacement of product found to be
defective in material or workmanship during the warranty period. This warranty does
not apply to damage resulting from commercial, abusive, unreasonable use, or
supplemental damage. Defects that are the result of normal wear and tear will not be
considered manufacturing defects under this warranty.
You should first read all
instructions before attempting to use this product.
THE MANUFACTURER IS NOT LIABLE
FOR INCIDENTAL OR CONSEQUENTIAL DAMAGES OF ANY NATURE. ANY IMPLIED
WARRANTY OF MERCHANTABILITY OR FITNESS FOR A PARTICULAR PURPOSE ON
THIS PRODUCT IS LIMITED IN DURATION TO THE DURATION OF THIS WARRANTY.
Some jurisdictions do not allow the exclusion or limitation of incidental or
consequential damages, or limitations on how long an implied warranty lasts, so the
above limitations or exclusions may not apply to you. This warranty gives you specific
legal rights, and you also may have other rights which vary from jurisdiction to
jurisdiction. This warranty applies only to the original purchaser of this product from
the original date of purchase.
B. At its option, the manufacturer will repair or replace this product if it is found
defective in material or workmanship within the warranty period. Defective product
should be returned to the place of purchase in accordance with store policy.
Thereafter, while within the warranty period, any defective product should be returned
to the manufacturer.
NOTE: THIS WARRANTY DOES NOT COVER THE NATURAL COOL MOISTURE™
FILTER, WHOSE PERFORMANCE WILL DEPEND UPON THE CONDITION OF THE WATER
USED IN THE HUMIDIFIER.
C. This warranty does not cover damage resulting from any unauthorized attempts to
repair or from any use not in accordance with the instruction manual.
D. Return defective product, freight paid, with proof of purchase and $10 U.S. / $14.50
CAN check or money order for handling, return packing and shipping charges, to:
In the U.S. In Canada
Honeywell Honeywell
ATTN: Returns Department ATTN: Returns Department
4755 Southpoint Drive 510 Bronte Street
Memphis, TN 38118, U.S.A Milton, ON L9T 2X6, Canada
1-800-332-1110 1-800-332-1110
LIMITED WARRANTY

GUIDE D'UTILISATION
HUMIDIFICATEUR À VAPEUR FRAÎCHE
À RENDEMENT DE 11,3 LITRES (3 GALLONS US) PAR JOUR*
MODÈLES DH-835
* Le rendement est fonction de la température et du degré d’humidité d’une pièce.
Robitussin® est une marque de commerce déposée de Whitehall-Robins Healthcare.

LIRE ET CONSERVER CES INSTRUCTIONS
DE SÉCURITÉ AVANT D'UTILISER
L'HUMIDIFICATEUR.
L'UTILISATION D'APPAREILS ÉLECTRIQUES NÉCESSITE DES
PRÉCAUTIONS ÉLÉMENTAIRES AFIN DE RÉDUIRE LES RISQUES
D'INCENDIE, DE CHOC ÉLECTRIQUE OU DE BLESSURES. PARMI
LES PRÉCAUTIONS À OBSERVER, ON COMPTE LES SUIVANTES:
1. Il convient de toujours placer l’humidificateur sur une surface ferme, dégagée et bien
horizontale, puisqu’il pourrait ne pas fonctionner adéquatement sur une surface inégale.
2. Placer l'humidificateur hors de la portée des enfants.
3. Ne pas placer l'appareil près de sources de chaleur telles que poêles, radiateurs ou
appareils de chauffage.
4. Avant d'utiliser l'humidificateur, vérifier que le cordon d'alimentation n'est pas
endommagé. Si le cordon est endommagé, NE PAS UTILISER L'APPAREIL, mais plutôt
le retourner au fabricant pour une réparation selon les termes de la garantie.
5. Ce produit est équipé d'une fiche polarisée (fiche dont l'une des lames est plus large
que l'autre). Afin de réduire les risques de choc électrique, cette fiche ne peut être
insérée que d'une seule manière dans la prise de courant polarisée. Si la fiche ne
s'insère pas complètement dans la prise, tourner la fiche. Si la fiche ne s'insère
toujours pas dans la prise, contacter un électricien. ÉVITER de contourner le dispositif
de sécurité que constitue la fiche polarisée.
6. Pour débrancher l'appareil, régler le bouton de contrôle à la position OFF, puis
enlever la fiche de la prise de courant. Ne jamais débrancher l’appareil en tirant sur
le cordon d’alimentation.
7. Une mauvaise connexion entre la sortie de courant alternatif et la fiche peut provoquer
un échauffement excessif et une déformation de la fiche. Demander à un électricien
qualifié de remplacer les prises de courant lâches ou usées.
8. Toujours débrancher et vider l'appareil quand celui-ci ne sert pas ou durant son
entretien ou son nettoyage.
9. Éviter d’incliner ou de déplacer l’humidificateur quand il fonctionne ou qu’il est rempli
d’eau. DÉBRANCHERl'appareil avant de le bouger.
IMPORTANTES INSTRUCTIONS
DE SÉCURITÉ

Merci d’avoir acheté un humidificateur à vapeur fraîche Robitussin®.
C OM M E NT L’HU MIDIF ICAT E U R F ON C T ION NE - T- IL?
SYSTÈME NATURAL COOL MOISTURE
MD
L'air sec passe dans le système Natural Cool MoistureMD, et un ventilateur silencieux
disperse un air invisible, équilibré en humidité. Les minéraux et bactéries indésirables
présents dans l’eau sont retenus par le filtre Natural Cool MoistureMD. L’appareil ne produit
pas de «brume» que l’on peut voir ou sentir. C’est en observant le niveau d’eau qui baisse
dans le réservoir tout au long de la journée que l’on sait que l’humidificateur disperse de
l’humidité dans l’air.
QU ’ES T- C E Q UE L A T E CH NO L OG I E HE A LTHS HIELDM D
AN TIM IC ROB IE NNE ?
Le filtre Natural Cool MoistureMD de Robitussin®a été conçu à partir de la nouvelle
technologie HealthShieldMD qui prévient la prolifération et la migration des moisissures,
champignons et bactéries dans le filtre durant toute sa durée de service, soit environ une
saison. Il faut toutefois se rappeler que, selon la qualité de l’eau qui est utilisée dans
l’humidificateur, les dépôts de minéraux peuvent quand même obstruer ou décolorer le
filtre et diminuer sa durée de service et celle de l’humidificateur.
10. Cet humidificateur nécessite un nettoyage régulier. Consulter les instructions de
NETTOYAGE ci-jointes. Ne jamais nettoyer l'appareil d'une autre manière que celle
prescrite dans le présent guide.
11. Couper le fonctionnement de l’humidificateur si l'humidité relative dépasse 60 p. 100
ou si de l’humidité se forme à l’intérieur des fenêtres. Afin d'obtenir des relevés précis
du degré d'humidité, utiliser un hygromètre. Ils sont vendus en quincaillerie et dans
les grands magasins et peuvent être commandés du fabricant (consulter la section
PRODUITS D’ENTRETIEN).
INTRODUCTION

MO DÈ L E - D H -8 35
L’humidificateur est composé des éléments suivants:
* HealthShield est homologué par
l’Environmental Protection Agency (EPA).
Boîtier du
moteur Réservoir
Bouchon de
remplissage
Base
Filtre Natural
Cool MoistureMD
REMARQUE: On recommande de désinfecter l’humidificateur avant de l'utiliser pour la
première fois. Consulter les instructions de la section intitulée NETTOY AGE.
• Placer l'humidificateur sur une surface ferme et de niveau, à une distance d’au moins
15 cm (6 po) de tout mur, pour permettre une bonne circulation d’air (Fig. 1). Placer
l’humidificateur sur une surface résistant à l’eau, car l'eau peut endommager les
meubles et certains revêtements de sol.
Le fabricant ne pourra nullement être tenu responsable des dégâts causés par des
déversements d’eau.
INSTALLATION

• Enlever le réservoir en tenant la poignée et en tirant vers
le haut (Fig. 1).
• Soulever le boîtier du moteur. Mettre de côté (Fig. 2).
Retirer le filtre Natural Cool MoistureMD de la base avant
de remplir l’appareil d’eau (Fig. 2). Faire tremper le filtre
dans un évier rempli d’eau fraîche, afin d’aider à
réduire l’accumulation de minéraux, et replacer le filtre
encore mouillé dans l’appareil. ÉVITER DE PRESSER OU
DE TORDRE LE FILTRE NATURAL COOL MOISTUREMD.
Répéter cette opération à chaque remplissage de
l’humidificateur en vue de prolonger la durée de service
du filtre.
• Retourner le réservoir de sorte que le bouchon de
remplissage soit dirigé vers le haut. Dévisser le bouchon
de remplissage en tournant dans le sens contraire des
aiguilles d’une montre . Mettre le bouchon de côté.
•
Remplir le réservoir avec de l’eau FRAÎCHE du robinet
(Fig. 3). Il n’est pas nécessaire d’utiliser de l’eau distillée,
puisque l’eau est filtrée par le filtre Natural Cool
MoistureMD. NE PAS UTILISER D’EAU CHAUDE,au risque
d’endommager l’appareil.
• Replacer le bouchon de remplissage en le tournant dans
le sens des aiguilles d’une montre . ÉVITER DE
TROP SERRER. Retourner le réservoir pour le remettre en
position normale.
REMARQUE: POUR TRANSPORTER LE RÉSERVOIR REMPLI
D’EAU, UTILISER LA POIGNÉE ET PLACER UNE MAIN
SOUS LE RÉSERVOIR POUR OBTENIR UN MEILLEUR
SUPPORT.
REMPLISSAGE
Fig. 1
Fig. 3
Fig. 2
15cm

• Replacer le boîtier du moteur sur la base.
• Placer le réservoir sur l’humidificateur et appuyer dessus pour s’assurer qu’il est bien en
place. Une certaine quantité d’eau se déversera dans la base.
• Une fois le réservoir rempli et mis en place, ne pas tenter de déplacer l’humidificateur.
S’il faut le déplacer, débrancher d’abord l’appareil et retirer le réservoir.
ATTENTION: NE PAS VERSER D’EAU À TRAVERS LA GRILLE SITUÉE SUR LE DESSUS DE
L’HUMIDIFICATEUR, AU RISQUE D’ENDOMMAGER L’APPAREIL OU DE CAUSER DES
BLESSURES.
M ISE E N M ARCHE
ATTENTION: ÉVITER D’AVOIR LES MAINS MOUILLÉES AU MOMENT DE BRANCHER
L’HUMIDIFICATEUR, AU RISQUE DE RECEVOIR UN CHOC ÉLECTRIQUE.
• Régler le bouton marche-arrêt à la position OFF et brancher l’humidificateur rempli
dans une prise de courant polarisée de 120 V. ÉVITER DE FORCER POUR FAIRE
ENTRER LA FICHE POLARISÉE DANS LA PRISE DE COURANT; la fiche ne s’insère que
d’une seule manière dans la prise.
RÉ GL AG E DE L A P R OD UC TI O N
D’HUMIDITÉ
1. Régler la vitesse du ventilateur à la position désirée
(Fig. 4).
ÉLEVÉE: pour atteindre rapidement le degré d’humidité
désiré.
MOYENNE: pour un fonctionnement quotidien
normal.
FAIBLE: pour un fonctionnement plus silencieux
pendant la nuit.
2. Régler le bouton de contrôle du degré d’humidité
(humidostat) à la position HIGH en tournant le cadran
dans le sens contraire des aiguilles d’une montre
jusqu’au point noir le plus gros avant le signe « + »
(Fig. 4).
REMARQUE:Si le ventilateur de l’humidificateur ne se
met (ou remet) pas en marche une fois que la
commande de vitesse du ventilateur a été réglée à la
position désirée, il se peut que l’humidostat soit réglé trop bas. Tourner le cadran dans
le sens contraire des aiguilles d’une montre jusqu’au point noir le plus gros
avant le signe « + ». Le voyant d’HUMIDITÉ DÉSIRÉE (DESIRED HUMIDITY) s’éteint
lorsque l’appareil produit de la vapeur (Fig. 4). Couper le fonctionnement de
l’humidificateur si le degré d’humidité devient trop élevé ou si une condensation se
forme sur les murs ou les fenêtres.
Fig. 4
(HIGH) (LOW)
REMPLISSAGE (suite)
FONCTIONNEMENT

BOU TO N DE C ONTR ÔL E D U DE GR É D’HUMI DI TÉ /
HUMIDOSTAT
Le bouton de contrôle du degré d’humidité permet de régler le degré d’humidité souhaité.
L’humidificateur suit un cycle «marche/arrêt» continu pour maintenir le degré d’humidité
choisi.
R É G L A G E D U B O U T O N D E C O N T R Ô L E D U
D E G R É D ’ H U M I D I T É / H U M I D O S TAT
Suivre d’abord les instructions de fonctionnement en réglant le bouton de contrôle du
degré d’humidité à la position la plus élevée, soit jusqu’au point noir le plus gros avant le
signe « + » (Fig. 4).
• Laisser fonctionner l’humidificateur au réglage le plus élevé
pendant au moins une heure ou jusqu’à ce que la pièce ait
atteint un degré d’humidité confortable.
• À ce point, tourner lentement le bouton de contrôle du
degré d’humidité dans le sens des aiguilles d’une montre
jusqu’à ce que l’humidificateur cesse de fonctionner et que
le voyant d’humidité désirée (Desired Humidity) s’allume
(Fig. 5).
• Maintenant que le bouton de contrôle du degré d’humidité est réglé, l’humidificateur se
mettra automatiquement en marche lorsque le degré d’humidité descendra au-dessous
du degré préréglé et cessera automatiquement de fonctionner quand ce degré sera
atteint.
Fig.5
On recommande de nettoyer l’humidificateur une fois par semaine ou plus souvent si l’eau
du robinet est dure, s’il se produit une accumulation d’impuretés ou si l’appareil dégage
une odeur désagréable.
Le nettoyage régulier s’effectue en deux étapes, soit L’ENLÈVEMENT D’INCRUSTATION et
la DÉSINFECTION. S’assurer d’effectuer ces opérations dans l’or dre afin d’éviter une
interaction dangereuse des produits chimiques.
• Régler le bouton de contrôle à OFF et débrancher l'humidificateur.
• Enlever le réservoir et le boîtier du moteur.
•Retirer de la base le filtre Natural Cool Moisture MD.
• Jeter l’eau restant dans la base.
REMARQUE: ENLEVER LE FILTRE AVANT D’EFFECTUER LE NETTOYAGE.
Le fait de ne pas retirer le filtre avant d’effectuer
le nettoyage entraînera la destruction du filtre.
CARACTÉRISTIQUES
NETTOYAGE HEBDOMADAIRE

1RE ÉTAPE:
ENLÈVEMENT DE L’INCRUSTATION
BASE
1. Remplir la base avec:
•1 tasse (250 mL) de vinaigre blanc
non dilué ou
•le nettoyant pour humidificateurs
DuraRinseMD, article no AC-816, en
suivant les instructions figurant sur la
bouteille.
2. Laisser agir la solution pendant 20
minutes.
3. Sans enlever le vinaigre ou la solution
DuraRinseMD, nettoyer toutes les
surfaces intérieures au moyen d’une
brosse souple ou d’un linge, afin
d’enlever l’incrustation.
4. Rincer à fond la base avec de l’eau,
afin d’enlever l’incrustation et la
solution nettoyante.
2E ÉTAPE:
DÉSINFECTION
RÉSERVOIR / BASE
1. Remplir le réservoir avec:
•une cuiller à thé de blanchiment
au chlore et
• 4 litres (1 gallon) d’eau
Verser un peu de cette solution dans
la base.
2. Laisser agir pendant 20 minutes.
3. Rincer à l’eau jusqu’à ce que l’odeur de
l’agent de blanchiment ait disparu.
REMARQUE: L’UTILISATION D’AUTRES PRODUITS DE TRAITEMENT D’EAU ET DE
PRODUITS CHIMIQUES PEUT ENDOMMAGER LE FILTRE OU L’HUMIDIFICATEUR, EN
DIMINUANT AINSI LE RENDEMENT.
NETTOYAGE HEBDOMADAIRE (suite)
Table of contents
Languages:
Other Robitussin Humidifier manuals
Popular Humidifier manuals by other brands

Air Naturel
Air Naturel HYGRO-D operating instructions

nor-tec
nor-tec MH Series Engineering manual

AIRINNOVATIONS
AIRINNOVATIONS MH-701C Instruction manual and warranty information

AIRINNOVATIONS
AIRINNOVATIONS MH-801B instruction manual

AIRINNOVATIONS
AIRINNOVATIONS Clean Mist MH-512 Instruction manual and warranty information

N'oveen
N'oveen MUH240 user manual

Perfect Aire
Perfect Aire PAU14 user manual

Hunter
Hunter 33116 owner's guide

HygroMatik
HygroMatik FlexLine manual

Scarlett
Scarlett comfort SC-AH986M10 instruction manual

ecofort
ecofort ecoQ HumidAir E250 manual

Skuttle Indoor Air Quality Products
Skuttle Indoor Air Quality Products 592-9 installation instructions