Robitussin DH-975 Series User manual

OWNER’S MANUAL
WARM MOISTURE HUMIDIFIER
Model DH-975 Series
HUMIDIFICATEUR ÀVAPEUR CHAUDE
Série de modèles DH-975
HUMEDECEDOR DE HUMEDAD RECALENTADO
Modelo del Serie DH-975
* Output dependent on room temperature and humidity.
* Le rendement est fonction de la température et du degré d’humidité d’une pièce.
*La extracción depende de la temperatura y humedad de la habitación.
Robitussin® is a registered trademark of Whitehall-Robins Healthcare
Robitussin® est une marque déposée de Whitehall-Robins Healthcare
Robitussin® es una marca registrada de Whitehall-Robins Healthcare
HU4074.01 DH-975 Eng OM 8/3/01 12:57 PM Page 1


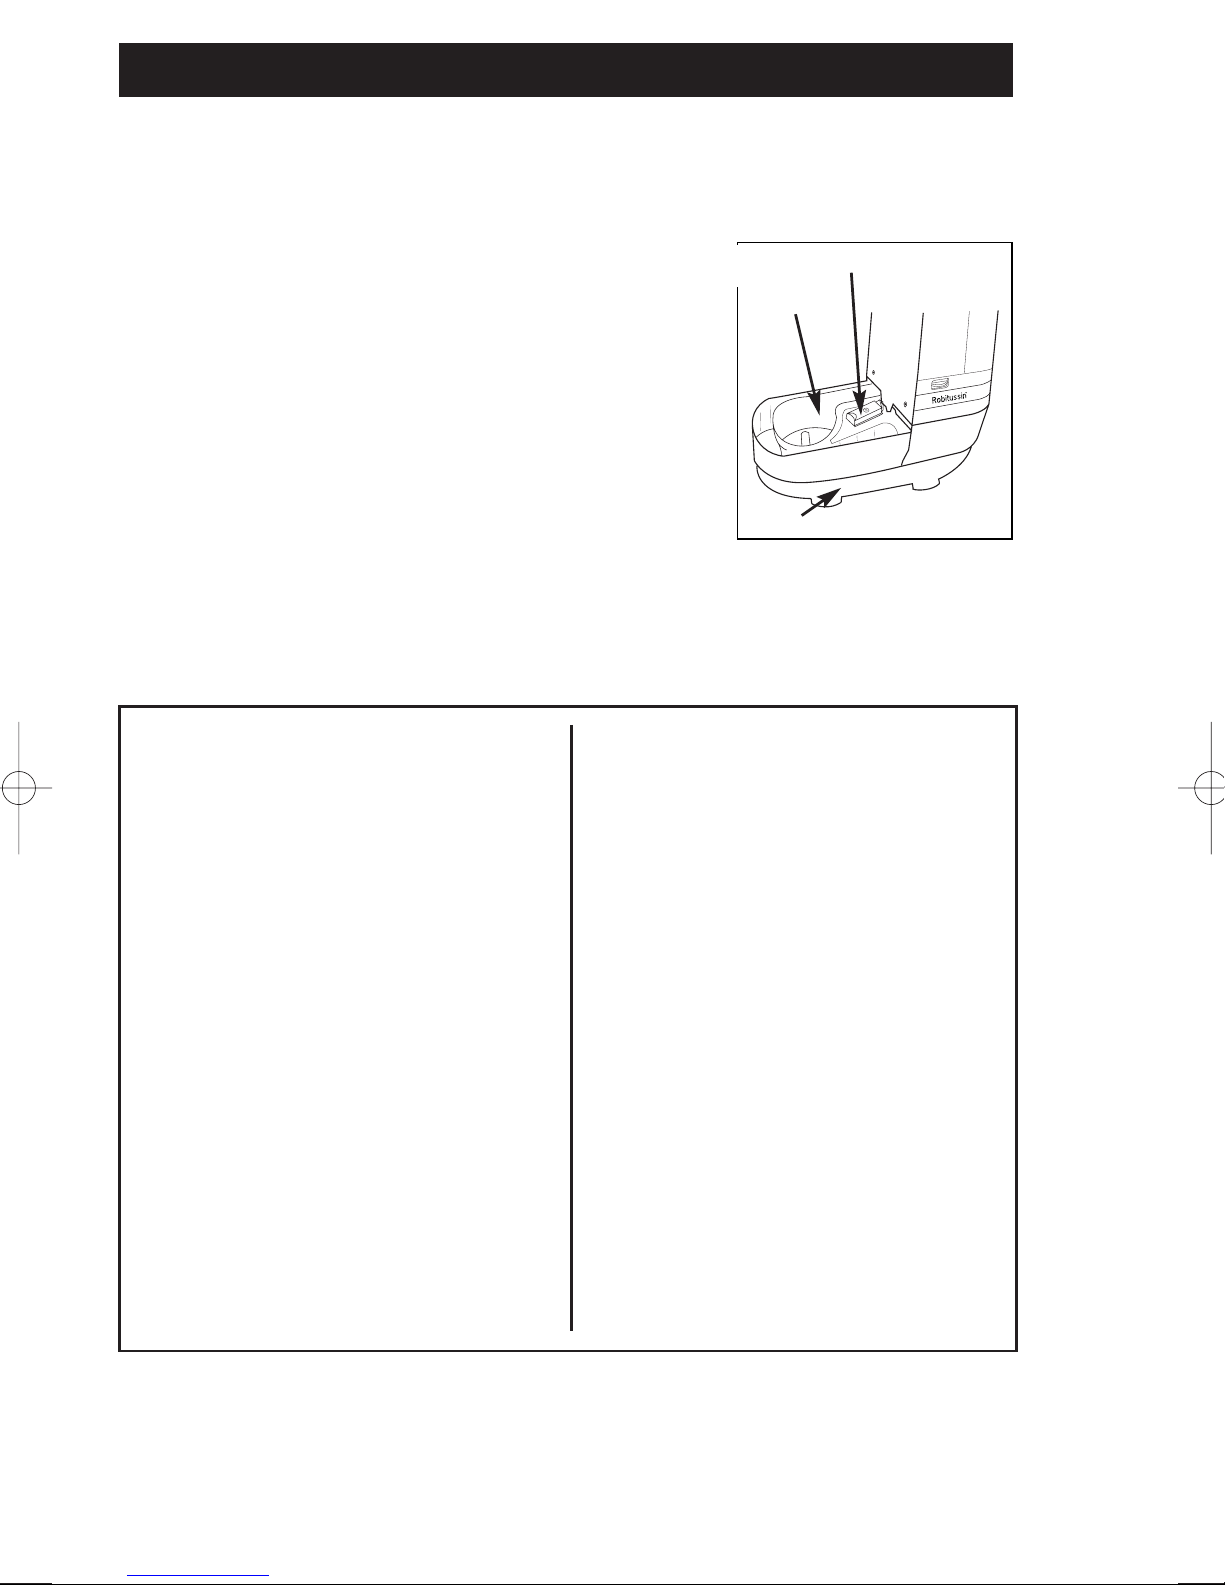
1. Always place this humidifier on a firm, flat and level surface. This humidifier may
not work properly on an uneven surface.
2. CAUTION: To reduce the risk of burns, place this humidifier in an area where it is
not accessible to children.
3. Do not place the humidifier near any heat sources such as stoves, radiators, and
heaters.
4. Before using the humidifier, check the power cord for any signs of damage. If the
cord is found to be damaged, DO NOT USE and return the humidifier to the
manufacturer under the warranty agreement for repair.
5. This appliance has a polarized plug (one blade is wider than the other). To reduce
the risk of shock, this plug is intended to fit only one way in a polarized outlet. If
the plug does not fit fully in the outlet, reverse the plug. If it still does not fit, contact
a qualified electrician. DO NOT attempt to defeat this safety feature.
6. To disconnect the humidifier, first turn controls to the OFF position, then grip the
plug and pull it from the wall outlet. Never pull by the cord.
7. A loose fit between the AC outlet (receptacle) and plug may cause overheating
and a distortion of the plug. Contact a qualified electrician to replace loose or
worn outlet.
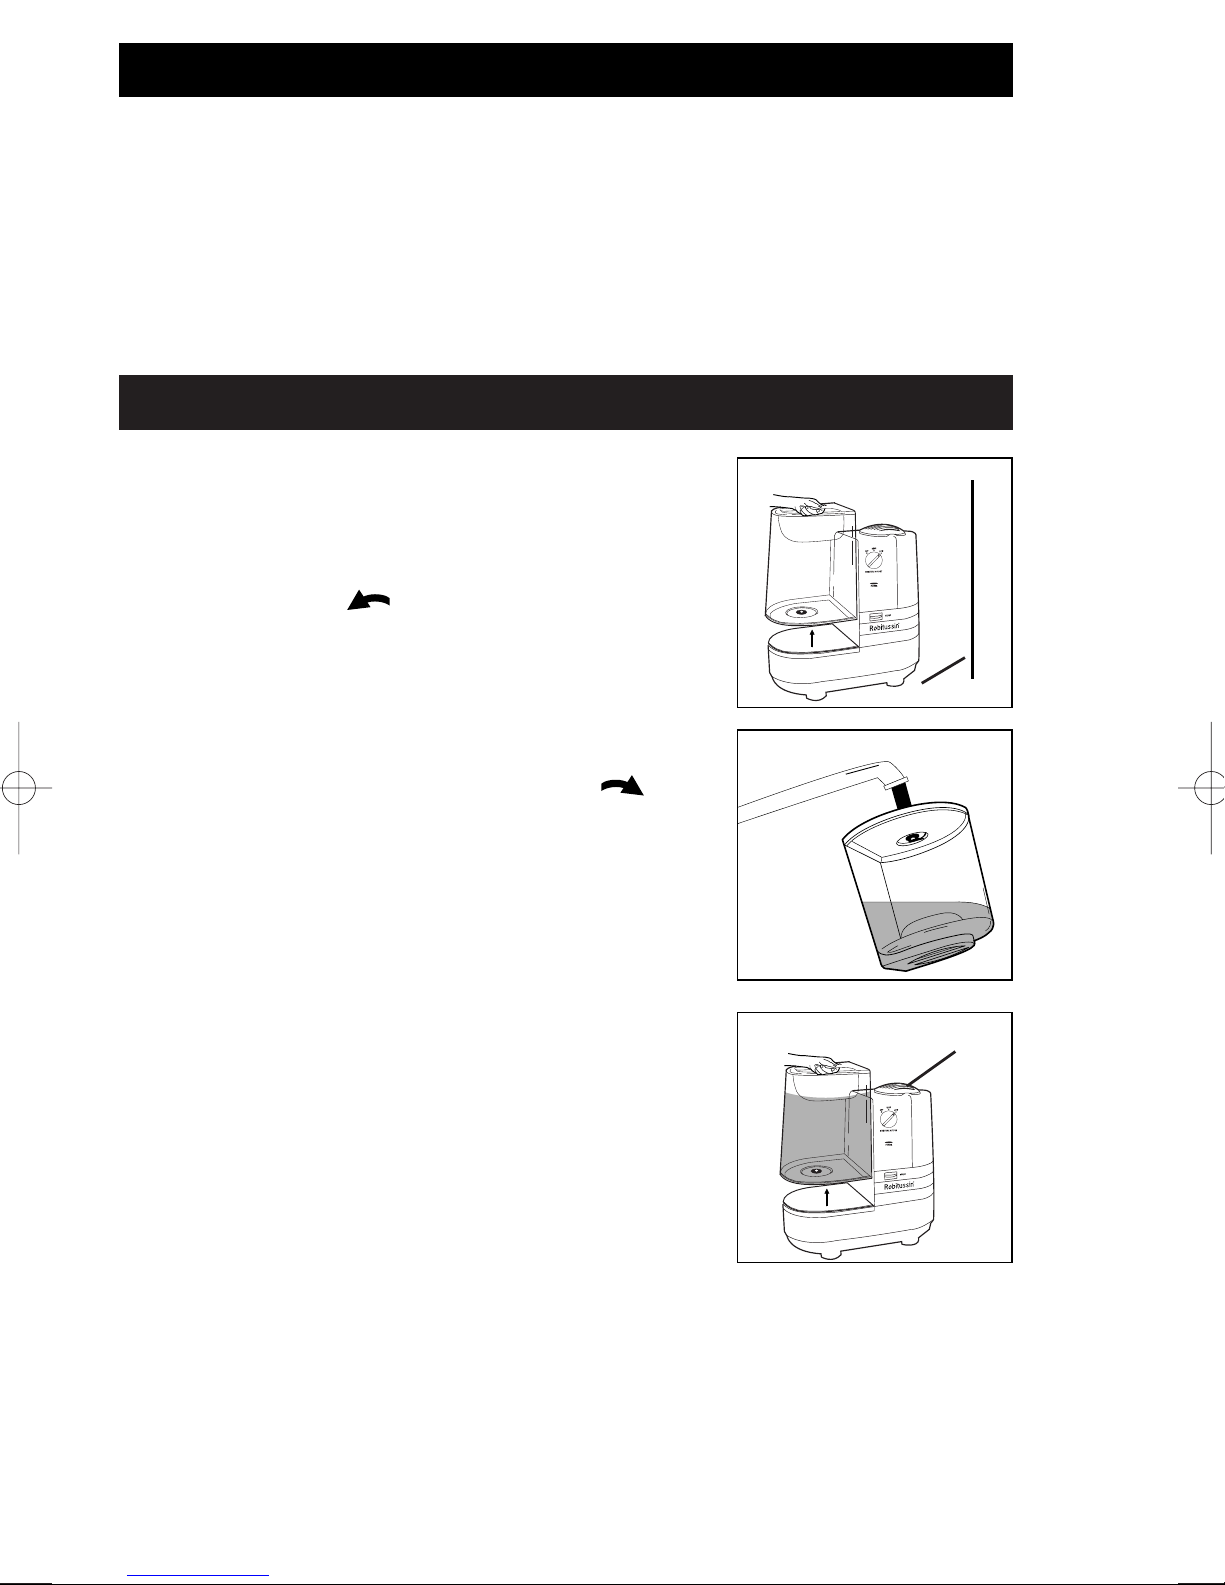
8. The humidifier should always be unplugged and emptied when not in operation
or while being serviced or cleaned.
9. Never tilt or attempt to move the humidifier while it is operating or filled with
water. UNPLUG the humidifier before moving.
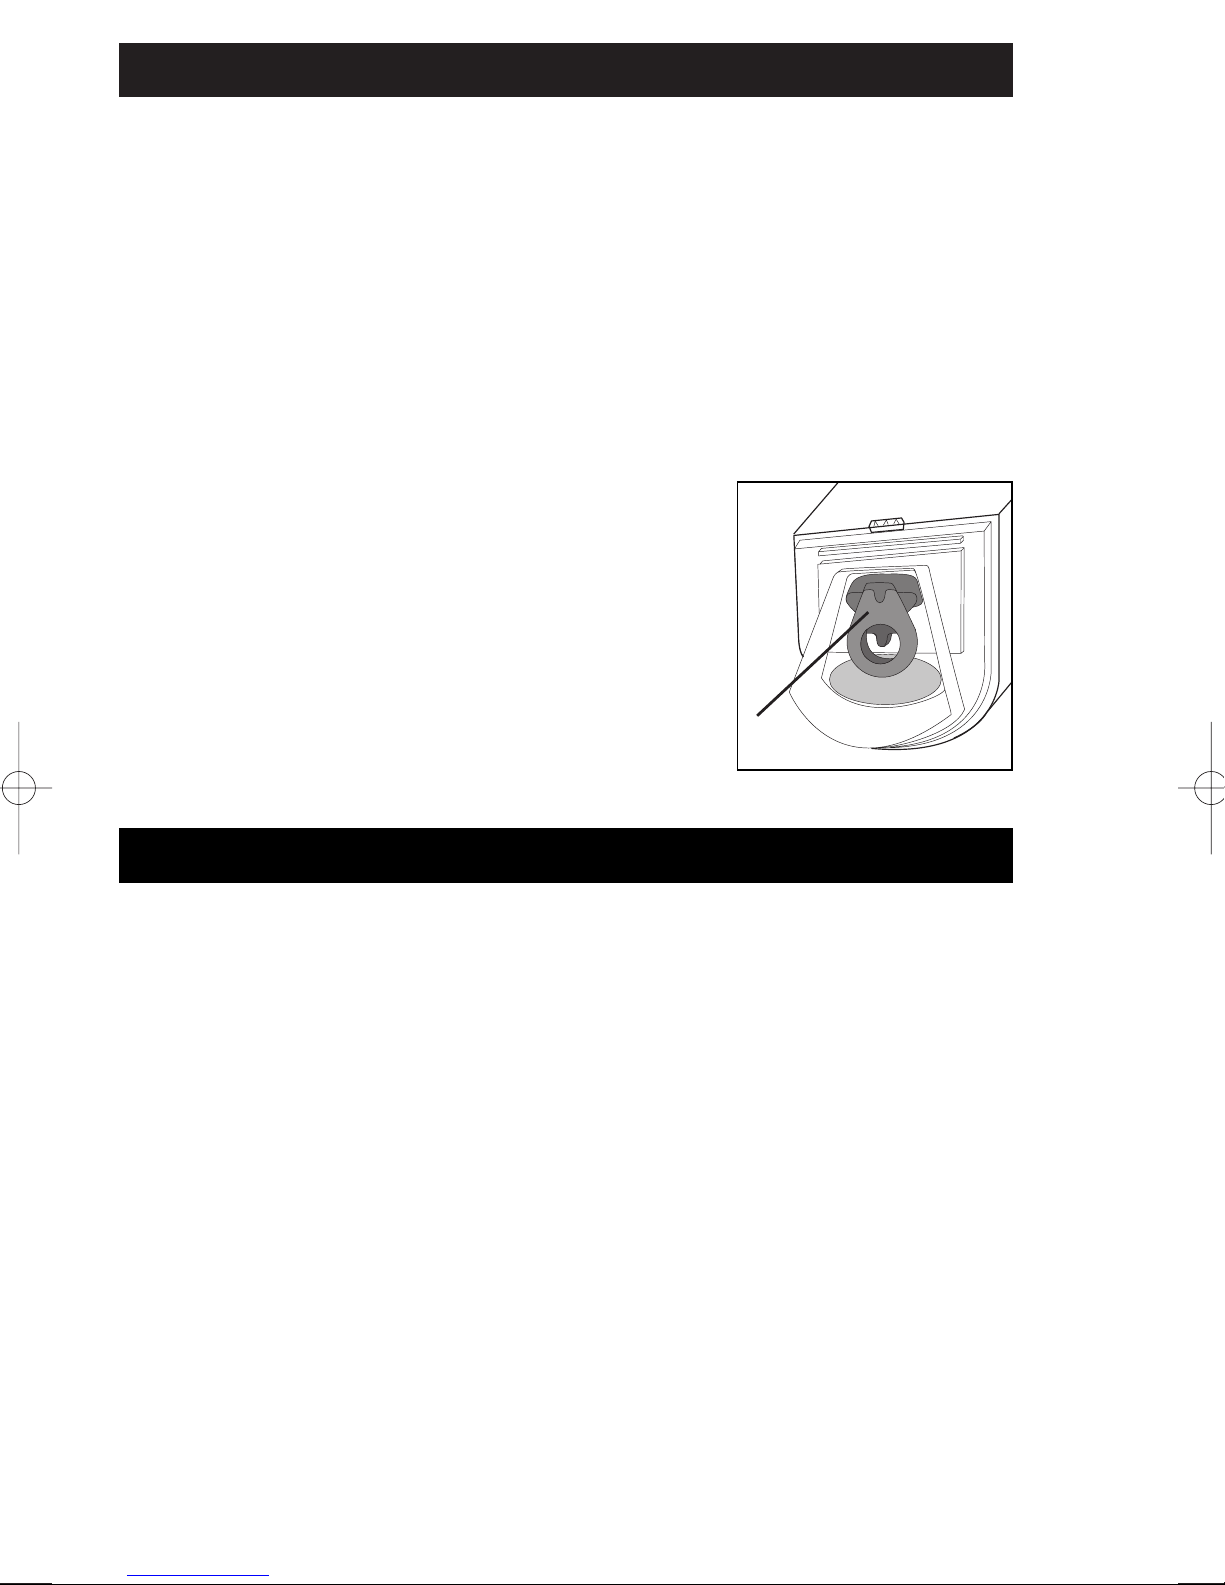
10. This humidifier requires regular cleaning. Refer to the CLEANING instructions
provided. Never clean the humidifier in any manner other than as instructed in
this manual.
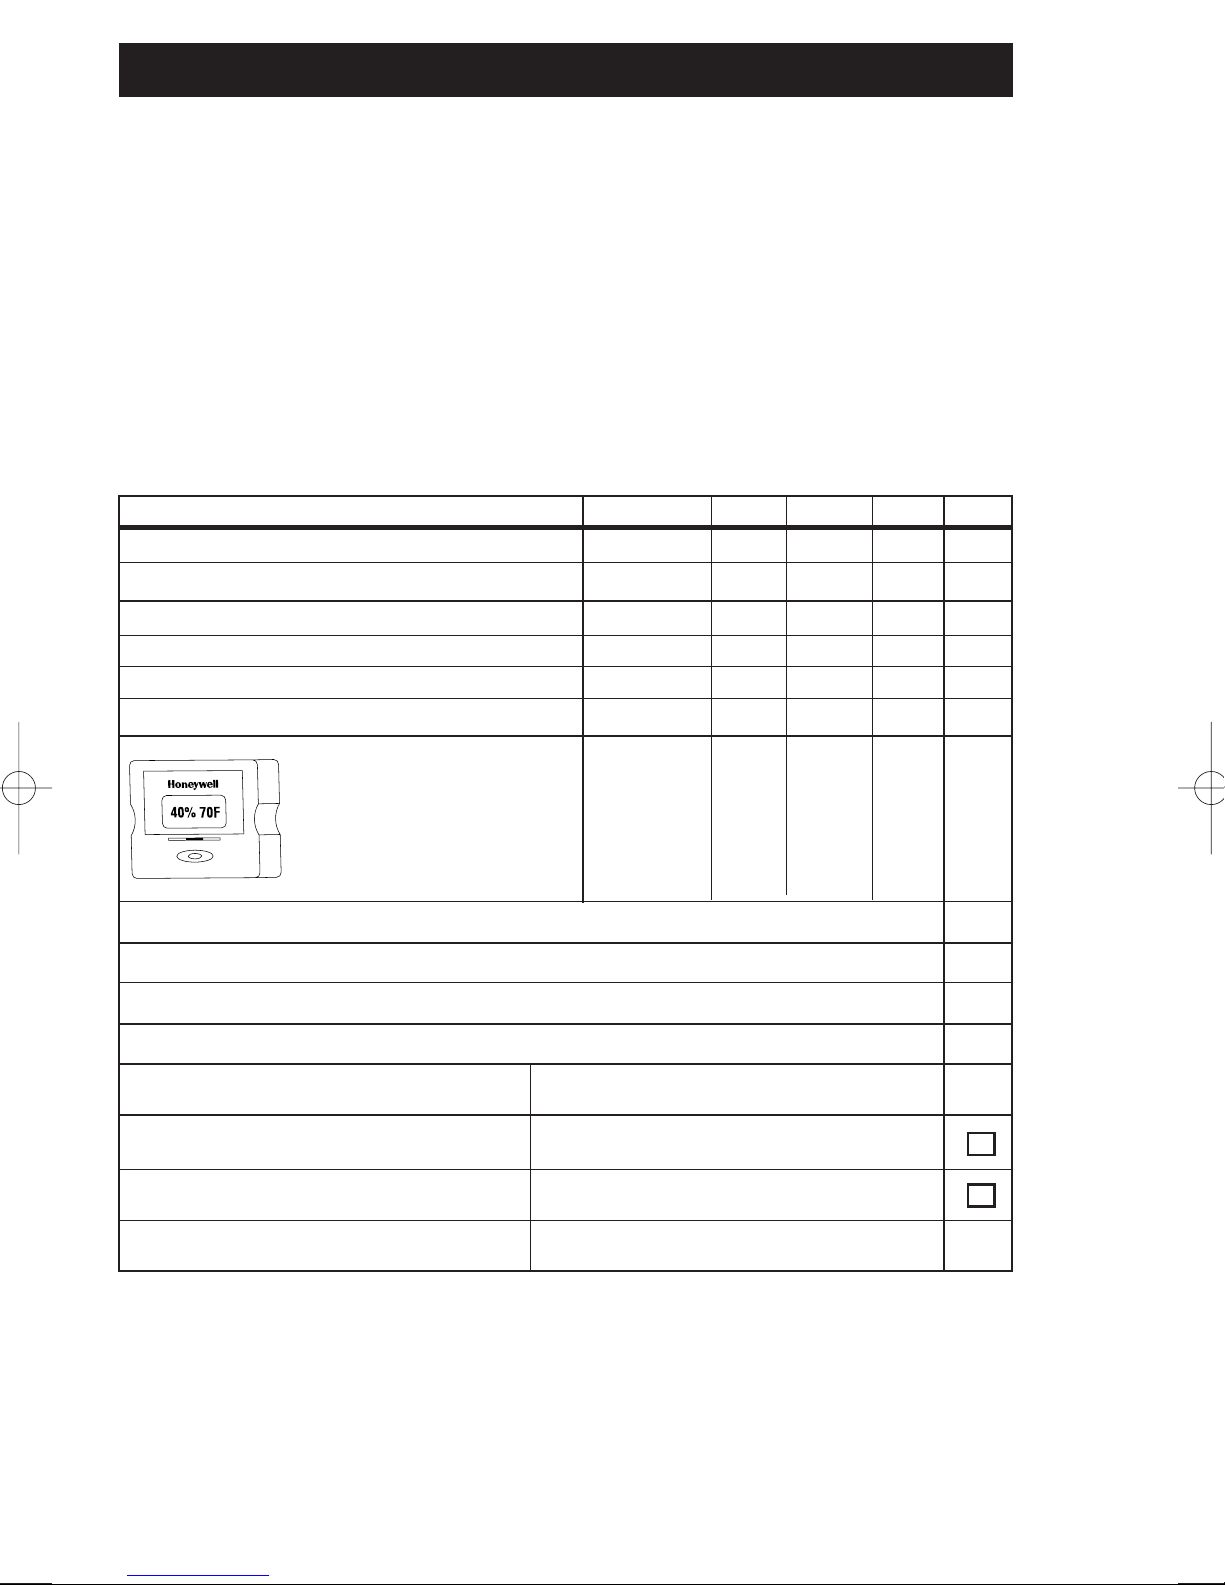
11. Turn the humidifier OFF if the relative humidity exceeds 60%, or if you notice
moisture on the inside of your windows. For proper humidity reading use a
hygrometer, which is available in many hardware and department stores or by
ordering one from Honeywell. (See CARE PRODUCTS).
12. DO NOT touch the steam vapor. Steam can cause burns.
IMPORTANT SAFETY
INSTRUCTIONS
When using electrical appliances, basic precautions
should always be followed to reduce the risk of fire,
electric shock, and injury to persons, including the
following:
READ AND SAVE THESE SAFETY
INSTRUCTIONS BEFORE USING
THIS HUMIDIFIER
HU4074.01 DH-975 Eng OM 8/3/01 12:57 PM Page 2

Thank you for purchasing a Robitussin®Warm Moisture Humidifier.
HOW DOES IT WORK?
Water passes into the Power Unit where it is heated and purified. The Warm
Moisture system then pulls the air through the top vent and spreads invisible
moisture-balanced air into the room.
MODEL DH-975
Your humidifier is made up of these parts:
Water Tank Power Unit
Base
Fill Cap
Grille with
Medicine
Cup
Removable Tray
INTRODUCTION
HU4074.01 DH-975 Eng OM 8/3/01 12:57 PM Page 3

•Remove the water tank by grasping the handle and
pulling straight up. Set aside (Fig. 1).
•Turn the Water Tank upside down so that the Fill Cap
is facing up; unscrew the Fill Cap by turning it
counter-clockwise and set aside.
•
Fill the Water Tank with COOL tap water (Fig. 2).
Distilled water is not necessary as the water is purified
by the heating element.
DO NOT USE HOT WATER.
Doing so may damage the humidifier.
•Replace the fill cap by turning it clockwise . DO
NOT OVER TIGHTEN.
NOTE: WHEN CARRYING THE FILLED WATER TANK,
PLEASE USE THE HANDLE AND PLACE YOUR OTHER
HAND UNDER THE TANK FOR ADDITIONAL SUPPORT.
•Turn the Water Tank right side up. Position the tank
into the humidifier and push it into place (Fig. 3).
•Some water will flow into the Removable Tray when
the filled tank is properly in place.
•Once the filled tank has been positioned, do not
attempt to move the humidifier. If it has to be moved,
unplug the humidifier and remove the water tank first.
CAUTION: DO NOT POUR WATER INTO THE GRILLE ON
TOP OF THE HUMIDIFIER (Fig. 3). DOING SO MAY
DAMAGE THE HUMIDIFIER OR CAUSE PERSONAL
INJURY.
NOTE: We recommend that the humidifier be disinfected prior to first use. Please
see WEEKLY CLEANING instructions.
•Select a firm, level, flat location - at least six inches (15 cm) from any wall for
proper air flow (Fig. 1). Place the humidifier on a water-resistant surface, as
water can damage furniture and some flooring.
The manufacturer will not accept responsibility for property damage caused by
water spillage.
Fig.1
➡
Fig.2
Fig.3
WALL
6"
Grille
FILLING
SET UP
HU4074.01 DH-975 Eng OM 8/3/01 12:57 PM Page 4

POWER
CAUTION: DO NOT PLUG IN THE HUMIDIFIER WITH WET HANDS AS AN
ELECTRICAL SHOCK COULD OCCUR.
•Plug the filled humidifier into a polarized 120V outlet. DO NOT FORCE THE
POLARIZED PLUG INTO THE OUTLET; it will only fit one way.
HUMIDITY OUTPUT
1. Set the Power Knob to the desired position (Fig 4).
HIGH: For fast humidifying.
LOW: For more gradual humidification.
NOTE: You will not hear a difference when turning the
humidifier from High to Low.
2. Press down and release the Start lever to TURN ON
the humidifier.
NOTE: Allow 5-10 minutes for the humidifier to begin
producing moisture.
3. THE START LEVER MUST BE PRESSED EVERY TIME
THE WATER TANK IS REMOVED FROM THE BASE
OR REFILLED.
Fig.4
OPERATION
HU4074.01 DH-975 Eng OM 8/3/01 12:57 PM Page 5

MEDICINE CUP:
A medicated vapor can be distributed into the air by using the Medicine Cup at the
top of the Power Unit (Fig. 5).
TO ADD MEDICINE TO THE MEDICINE CUP
1. Turn the humidifier OFF and allow at least 10 minutes for the unit to cool.
2. Lift the Grille with Medicine Cup from the Power Unit (Fig. 5).
3. Fill the cup halfway with liquid medicine.
4. Carefully place Grille with Medicine Cup back into the Power Unit.
5. After use, remove the Grille with Medicine Cup and clean with warm water or
in the dishwasher. Replace the clean, dry Grille with Medicine Cup into the
Power Unit.
WARNING: DO NOT use any liquid medicines other than those specifically
recommended for use with a steam vaporizer or warm humidifier. DO NOT pour
medicine directly through the Grille opening or add it to the Water Tank.
The manufacturer assumes no responsibility for consequences resulting from the
uses of medicine in this humidifier.
Fig.5 Grille with
Medicine Cup
Place medicine
here
FEATURES
HU4074.01 DH-975 Eng OM 8/3/01 12:57 PM Page 6

We recommend cleaning the humidifier weekly, more often if you have hard water
or notice a build-up of impurities or detect unpleasant odors.
Cleaning involves two steps SCALE REMOVAL and DISINFECTING. Be sure to
perform these in the proper order to avoid harmful
chemical interactions.
•First, turn off and unplug the humidifier. Wait at least
10 minutes for the unit to cool.
•Remove the Water Tank.
•To remove the Power Unit, pull the Latch to release
(found under the Water Tank) and lift the Power Unit
(Fig. 6). Turn upside-down to check condition of
heating element. If build-up of minerals is heavy, follow
the CLEANING THE HEATING ELEMENT instructions.
Set the Power Unit aside.
•Empty any water from the Base and Removable Tray.
STEP ONE:
SCALE REMOVAL
REMOVABLE TRAY:
1. Fill the Removable Tray (Fig. 6) with
either:
•1 cup (8 oz.) undiluted white vinegar
or
•Use DuraRinse®Humidifier Cleaner,
part no. AC-816, following bottle
instructions.
2. Let solution stand for 20 minutes.
3. With the vinegar or DuraRinse®in the
Removable Tray clean all interior
surfaces with a soft cloth or brush to
help remove scale.
4. Rinse the Removable Tray thoroughly
with water to remove scale and
cleaning solution.
STEP TWO:
DISINFECTING
WATER TANK/REMOVABLE TRAY
1. Fill the Water Tank with:
•1 teaspoon of household bleach
and
•1 gallon of water.
Pour some of this solution into the
Removable Tray.
2. Let solution stand for 20 minutes.
3. Rinse with water until the odor of
bleach is gone.
NOTE: THE USE OF OTHER WATER
TREATMENT PRODUCTS, CHEMICALS,
SOAPS, DETERGENTS OR ABRASIVE
CLEANSERS NOT RECOMMENDED IN
THE MANUAL MAY CAUSE DAMAGE TO
THE HUMIDIFIER OR AFFECT
PERFORMANCE.
-
910 Fig.6
Fig.6 Latch
Removable
Tray
Base
Power
Unit
WEEKLY CLEANING
HU4074.01 DH-975 Eng OM 8/3/01 12:57 PM Page 7

If the unit stops producing mist, even while there is water in the tank, the mineral
build-up may need to be removed from the heating element of the Power Unit.
How often you perform this special maintenance depends upon the hardness of the
water you are using and how quickly mineral deposits form on the interior surfaces
of the humidifier.
DO NOT clean the heating element under running water. Doing so may cause
damage or personal injury.
1. Unplug the humidifier. Allow at least 10 minutes for the unit to cool.
2. The heating element is on the bottom of the Power Unit. To access it, remove the
Power Unit by pulling on the Latch (found under the
Water Tank) and lifting the Power Unit (Fig. 6).
3. Turn it upside down. BE SURE IT HAS COOLED
SUFFICIENTLY.
4. Use a non-metallic brush or a soft, dry cloth to wipe
the outer surfaces of the heating element (Fig. 7).
Some deposit may remain, but should not interfere
with the operation of the unit.
•Follow WEEKLY CLEANING instructions when the humidifier will not be used for at
least one week or more, or at the end of the season.
•Dry the humidifier completely before storing. DO NOT store with water inside the
Removable Tray, Base, or Water Tank.
•Pack the unit in its original carton and store in a cool, dry location.
•Before next use, remember to clean the humidifier.
Fig.7
Heating
Element
CLEANING THE HEATING ELEMENT
END-OF-THE-SEASON CARE AND STORAGE
HU4074.01 DH-975 Eng OM 8/3/01 12:57 PM Page 8

If your local retailer is out of stock, replacement parts and care products may be ordered
directly. You can call 1-800-332-1110 to order with a MasterCard, Visa, Discover or fill out
the form below and mail it along with a check or money order (sorry no COD’s accepted)
to:
Honeywell
Consumer Service Center
250 Turnpike Road
Southborough, MA 01772
Please allow four to six weeks for delivery.
Massachusetts residents please add 5% Sales Tax.
Item Item No. Qty. U.S. CAN Total
Water Tank DH975-1 A $ 14.99 $ 21.75
Tank Cap DH975-2 A 5.00 7.25
Removable Tray DH975-3 15.00 21.75
Grille with Medicine Cap DH975-4 A 5.00 7.25
Power Unit DH975-5 A 20.00 29.00
DuraRinse®Humidifier Cleaner (32 oz.) AC-816 5.00 7.25
HAC555 19.99 29.00
SUBTOTAL
MA Residents add 5% Sales Tax / Can. Residents only add 7% GST
Shipping and Handling (US res. add $4.95 / Can. res. add $7.25)
TOTAL ENCLOSED
Name Check or Money Order Enclosed
Address Credit Card No.
Exp. Date
DAY TIME PHONE SIGNATURE
Measures room temperature and
humidity level. Free standing; can
be used anywhere in the room.
PRICE
03
050100
DRYCOMFORTDAMP
%
Digital Hygrometer and
Thermometer (F°/C°)
CARE PRODUCTS
HU4074.01 DH-975 Eng OM 8/3/01 12:57 PM Page 9

Models DH-975 Series are rated 2.30 Amps at 120V, 60 Hz.
NOTE: IF YOU EXPERIENCE A PROBLEM WITH YOUR HUMIDIFIER’S POWER UNIT,
PLEASE SEE THE WARRANTY FOR INSTRUCTIONS. PLEASE DO NOT ATTEMPT TO
OPEN OR REPAIR THE HUMIDIFIER YOURSELF. DOING SO WILL VOID THE
WARRANTY AND COULD CAUSE DAMAGE OR PERSONAL INJURY. IF THE
PROBLEM PERSISTS PLEASE CONTACT THE CONSUMER SERVICE CENTER.
Mail questions or comments to:
Honeywell
Consumer Service Center
250 Turnpike Road
Southborough, MA 01772
e-mail: [email protected]
Please be sure to specify model number.
Call us toll-free at:
1-800-332-1110
Or visit our website at:
www.honeywell.com/yourhome
CUSTOMER ASSISTANCE
ELECTRICAL RATINGS
HU4074.01 DH-975 Eng OM 8/3/01 12:57 PM Page 10

Limited Warranty Terms and Conditions
You should first read all instructions before attempting to use this product. The enclosed
Customer Response card should be filled out and returned within 7 days of purchase.
A. This 3 year limited warranty applies to repair or replacement of product found to be
defective in material or workmanship during the warranty period. This warranty does
not apply to damage resulting from commercial, abusive, unreasonable use or
supplemental damage. Defects that are the result of normal wear and tear will not
be considered manufacturing defects under this warranty. You should first read the
instruction manual before attempting to use this product. THE MANUFACTURER IS
NOT LIABLE FOR INCIDENTAL OR CONSEQUENTIAL DAMAGES OF ANY NATURE. ANY
IMPLIED WARRANTY OF MERCHANTABILITY OR FITNESS FOR A PARTICULAR
PURPOSE ON THIS PRODUCT IS LIMITED IN DURATION TO THE DURATION OF THIS
WARRANTY. Some jurisdictions do not allow the exclusion or limitation of incidental
or consequential damages, or limitations on how long an implied warranty lasts, so
the above limitations or exclusions may not apply to you. This warranty gives you
specific legal rights, and you also may have other rights which vary from jurisdiction
to jurisdiction. This warranty applies only to the original purchaser of this product
from the original date of purchase.
B. At its option, the manufacturer will repair or replace this product if it is found to be
defective in material or workmanship within the warranty period. Defective product
should be returned to the place of purchase in accordance with store policy.
Thereafter, while within the warranty period, any defective product should be
returned to the manufacturer.
C. This warranty does not cover damage resulting from any unauthorized attempts to
repair or from any use not in accordance with the instruction manual.
D. Return defective product, freight paid with proof of purchase and
$5 US/$7.25 Can. check or money order for handling, return packing and shipping
charges, to manufacturer:
In the US: In Canada
Attn: Returns Department Attn: Returns Department
4755 South Point Drive 510 Bronte Street
Memphis, TN 38118 USA Milton, ON L9T 2X6, Canada
1-800-332-1110 1-800-332-1110
© 2001 All Rights reserved. Honeywell P/N: 035-02342-002
A/W: 043-50049-002
3 YEAR LIMITED WARRANTY
HU4074.01 DH-975 Eng OM 8/3/01 12:57 PM Page 11

GUIDE D'UTILISATION
WARM MOISTURE HUMIDIFIER
Model DH-975 Series
HUMIDIFICATEUR À VAPEUR CHAUDE
Série de modèles DH-975
HUMEDECEDOR DE HUMEDAD RECALENTADO
Modelo del Serie DH-975
* Output dependent on room temperature and humidity.
* Le rendement est fonction de la température et du degré d’humidité d’une pièce.
*La extracción depende de la temperatura y humedad de la habitación.
Robitussin® is a registered trademark of Whitehall-Robins Healthcare
Robitussin® est une marque déposée de Whitehall-Robins Healthcare
Robitussin® es una marca registrada de Whitehall-Robins Healthcare
HU4074.01 DH-975 FR OM 8/3/01 12:56 PM Page 1


L'utilisation d'appareils électriques nécessite des précautions
élémentaires afin de réduire les risques d'incendie, de choc
électrique ou de blessures. Parmi les précautions à observer, on
compte les suivantes :
1. Il convient de toujours placer l’humidificateur sur une surface ferme, dégagée
et bien horizontale, puisqu’il pourrait ne pas fonctionner adéquatement sur une
surface inégale.
2. ATTENTION : Pour prévenir les risques de brûlure, placer humidificateur
hors de la portée des enfants.
3. Ne pas placer l'appareil près de sources de chaleur telles que poêles,
radiateurs ou appareils de chauffage.
4. Avant d'utiliser l'humidificateur, vérifier que le cordon d'alimentation n'est pas
endommagé. Si le cordon est endommagé, NE PAS UTILISER L'APPAREIL, mais
plutôt le retourner au fabricant pour une réparation selon les termes de la garantie.
5. Ce produit est équipéd'une fiche polarisée (fiche dont l'une des lames est plus
large que l'autre). Afin de réduire les risques de choc électrique, cette fiche ne
peut être insérée que d'une seule manière dans la prise de courant polarisée.
Si la fiche ne s'insère pas complètement dans la prise, tourner la fiche. Si la
fiche ne s'insère toujours pas dans la prise, contacter un électricien. ÉVITER de
contourner le dispositif de sécuritéque constitue la fiche polarisée.
6. Pour débrancher l'appareil, régler le bouton de contrôle àla position OFF, puis
enlever la fiche de la prise de courant. Ne jamais débrancher l’appareil en
tirant sur le cordon d’alimentation.
7. Une mauvaise connexion entre la sortie de courant alternatif et la fiche peut
provoquer un échauffement excessif et une déformation de la fiche. Demander
àun électricien qualifiéde remplacer les prises de courant lâches ou usées.
8. Toujours débrancher et vider l'appareil quand celui-ci ne sert pas ou durant son
entretien ou son nettoyage.
9. Éviter d’incliner ou de déplacer l’humidificateur quand il fonctionne ou qu’il est
rempli d’eau. DÉBRANCHER l'appareil avant de le bouger.
10. Cet humidificateur nécessite un nettoyage régulier. Consulter les instructions
de NETTOYAGE ci-jointes. Ne jamais nettoyer l'appareil d'une autre manière
que celle prescrite dans le présent guide.
11. Couper le fonctionnement de l’humidificateur si l'humiditérelative dépasse 60
p.100 ou si de l’humiditése forme àl’intérieur des fenêtres. Afin d'obtenir des
relevés précis du degréd'humidité, utiliser un hygromètre. Ils sont vendus en
quincaillerie et dans les grands magasins et peuvent être commandés de
Honeywell (consulter la section produits d’entretien).
12. ÉVITER de toucher la vapeur; elle peut provoquer des brûlures.
IMPORTANTES
INSTRUCTIONS DE SÉCURITÉ
LIRE CES INSTRUCTIONS DE SÉCURITÉ
AVANT D'UTILISER L’HUMIDIFICATEUR.
HU4074.01 DH-975 FR OM 8/3/01 12:56 PM Page 2

Merci d’avoir achetéun humidificateur àvapeur chaude de Robitussin®. Pour plus
d’information sur la gamme complète de nos produits, visitez notre site Web, à
www.honeywell.com/yourhome.
COMMENT L’HUMIDIFICATEUR FONCTIONNE-T-IL?
L’eau passe dans le bloc moteur, oùelle est chauffée et purifiée. Le système Warm
Moisture aspire alors l’air par l’orifice d’évacuation situésur le dessus de l’appareil
et disperse un air invisible, équilibréen humidité.
MODÈLE DH-975 :
L’humidificateur est composédes éléments suivants :
INTRODUCTION
Réservoir Bloc moteur
Base
Bouchon de
remplissage
Grille avec
contenant à
médicament
Plateau amovible
HU4074.01 DH-975 FR OM 8/3/01 12:56 PM Page 3

INSTALLATION
•Enlever le réservoir en tenant la poignée et en tirant
vers le haut (Fig. 1).
•Retourner le réservoir de sorte que le bouchon de
remplissage soit dirigévers le haut. Dévisser le
bouchon de remplissage en tournant dans le sens
contraire des aiguilles d’une montre Mettre le
bouchon de côté.
•
Remplir le réservoir avec de l’eau FRAÎCHE du robinet
(Fig. 2). Il n’est pas nécessaire d’utiliser de l’eau distillée,
puisque l’eau est purifiée par l’élément chauffant. NE PAS
UTILISER D’EAU CHAUDE, au risque d’endommager
l’appareil.
•Replacer le bouchon de remplissage en le tournant
dans le sens des aiguilles d’une montre. ÉVITER
DE TROP SERRER.
REMARQUE : POUR TRANSPORTER LE RÉSERVOIR REMPLI
D’EAU, UTILISER LA POIGNÉE ET PLACER UNE MAIN SOUS
LE RÉSERVOIR POUR OBTENIR UN MEILLEUR SUPPORT.
•
Retourner le réservoir pour le remettre en position
normale. Placer le réservoir sur l’humidificateur et
appuyer dessus pour s’assurer qu’il est bien en place
(Fig. 3).
•Au moment oùle réservoir plein est correctement mis
en place, il laisse échapper un peu d’eau dans le
plateau amovible.
•Une fois le réservoir rempli et mis en place, ne pas
tenter de déplacer l’humidificateur. S’il faut le déplacer, débrancher d’abord
l’appareil et retirer le réservoir.
ATTENTION : NE PAS VERSER D’EAU ÀTRAVERS LA GRILLE SITUÉE SUR LE DESSUS DE
L’HUMIDIFICATEUR (FIG. 3), AU RISQUE D’ENDOMMAGER L’APPAREIL OU DE CAUSER DES
BLESSURES.
REMARQUE : On recommande de désinfecter l’humidificateur avant de l'utiliser pour
la première fois. Consulter les instructions de la section intitulée NETTOYAGE
HEBDOMADAIRE.
•Placer l'humidificateur sur une surface ferme et de niveau, àune distance d’au
moins 15 cm (6 po) de tout mur, pour permettre une bonne circulation d’air (Fig 1).
Placer l’humidificateur sur une surface résistant àl’eau, car l'eau peut
endommager les meubles et certains revêtements de sol.
Le fabricant ne pourra nullement être tenu responsable des dégâts causés par des déversements d’eau.
Fig. 1
➡
Fig. 2
Fig. 3 Grille
MUR
6"
REMPLISSAGE
HU4074.01 DH-975 FR OM 8/3/01 12:56 PM Page 4

MISE EN MARCHE
ATTENTION : ÉVITER D’AVOIR LES MAINS MOUILLÉES AU MOMENT DE
BRANCHER L’HUMIDIFICATEUR, AU RISQUE DE RECEVOIR UN CHOC ÉLECTRIQUE.
•Brancher l’humidificateur rempli dans une prise de courant polarisée de 120 V.
ÉVITER DE FORCER POUR FAIRE ENTRER LA FICHE POLARISÉE DANS LA PRISE
DE COURANT; la fiche ne s’insère que d’une seule manière.
RÉGLAGE DE LA PRODUCTION D’HUMIDITÉ
1. Régler le bouton marche-arrêt àla position désirée
(Fig. 4).HIGH : (ÉLEVÉ) : pour atteindre rapidement
le degréd’humiditédésiré
LOW : (FAIBLE) : pour un résultat plus
graduel.
REMARQUE : L’appareil n’émet pas un son différent
lorsqu’on passe du réglage High au réglage Low.
2. Appuyer sur le levier de mise en marche (START)
pour mettre l’appareil en marche.
REMARQUE : Compter entre 5 et 10 minutes pour que
l’humidificateur commence àproduire de la vapeur.
3. IL FAUT APPUYER SUR LE LEVIER DE MISE EN
MARCHE CHAQUE FOIS QUE LE RÉSERVOIR EST
ENLEVÉDE LA BASE OU QU’IL EST REMPLI.
Fig. 4
FONCTIONNEMENT
HU4074.01 DH-975 FR OM 8/3/01 12:56 PM Page 5

CONTENANT ÀMÉDICAMENT :
L’humidificateur peut émettre une vapeur médicamenteuse grâce au contenant à
médicament qui se trouve sur le dessus de l’appareil (Fig. 5).
CARACTÉRISTIQUES
POUR METTRE UN MÉDICAMENT DANS LE CONTENANT ÀMÉDICAMENT
1. Régler le bouton marche-arrêt àla position OFF et laisser refroidir
l’humidificateur pendant au moins 10 minutes.
2. Soulever la grille avec le contenant àmédicament du bloc moteur (Fig. 5).
3. Ajouter le médicament liquide en s’assurant de ne remplir le contenant qu’à
moitié.
4. Replacer soigneusement la grille avec le contenant àmédicament dans le
bloc moteur.
5. Après usage, retirer de l’humidificateur la grille avec le contenant à
médicament et les nettoyer àl’eau chaude ou au lave-vaisselle. Replacer la
grille avec le contenant àmédicament, propres et secs, dans le bloc moteur.
MISE EN GARDE : Utiliser UNIQUEMENT un médicament liquide expressément
recommandépour l’usage dans un appareil àvaporisation ou un humidificateur àvapeur
chaude. ÉVITER de verser le médicament directement àtravers la grille ou dans l’eau du
réservoir.
Le fabricant n’assume aucune responsabilitéconcernant les conséquences de
l’utilisation de médicaments dans cet humidificateur.
Grille avec contenant
àmédicament
Fig. 5
Mettre le
médicament ici
HU4074.01 DH-975 FR OM 8/3/01 12:56 PM Page 6

1RE ÉTAPE :
ENLÈVEMENT DE
L’INCRUSTATION
PLATEAU AMOVIBLE :
1. Remplir le plateau amovible (Fig. 6)
avec :
•1 tasse (250 mL) de vinaigre blanc
non diluér. ou
•Le nettoyant pour humidificateurs
DuraRinseMD, article no AC-816, en
suivant les instructions figurant sur
la bouteille.
2. Laisser agir la solution pendant 20 minutes.
3. Sans enlever le vinaigre ou la solution
DuraRinse®, nettoyer toutes les
surfaces intérieures au moyen d’une
brosse souple ou d’un linge, afin
d’enlever l’incrustation.
4. Rincer àfond le plateau amovible avec
de l’eau, afin d’enlever l’incrustation et
la solution nettoyante.
2E ÉTAPE :
DISINFECTING
RÉSERVOIR / PLATEAU AMOVIBLE
1. Remplir le réservoir avec :
•cuiller àthéde blanchiment au chlore
et
•4 litres (1 gallon) d’eau
Verser une quantitéde cette solution
dans le plateau amovible.
2. Laisser agir la solution pendant 20 minutes.
3. Rincer àl’eau jusqu’à ce que l’odeur de
l’agent de blanchiment ait disparu.
REMARQUE : L’UTILISATION D’AUTRES
PRODUITS DE TRAITEMENT D’EAU, DE
PRODUITS CHIMIQUES, DE SAVON, DE
DÉTERGENTS OU DE NETTOYANTS
ABRASIFS NON RECOMMANDÉS DANS LE
PRÉSENT GUIDE PEUT ENDOMMAGER
L’HUMIDIFICATEUR OU EN DIMINUER LE
RENDEMENT.
On recommande de nettoyer l’humidificateur une fois par semaine ou plus souvent
si l’eau du robinet est dure, s’il se produit une accumulation d’impuretés ou si
l’appareil dégage une odeur désagréable.
Le nettoyage régulier s’effectue en deux étapes, soit L’ENLÈVEMENT D’INCRUSTATION
et la DÉSINFECTION. S’assurer d’effectuer ces opérations dans l’ordre afin d’éviter une
interaction dangereuse des produits chimiques.
•Régler le bouton de contrôle àOFF et
débrancherl'humidificateur. Laisser refroidir
l’humidificateur pendant au moins dix minutes.
•Enlever le réservoir.
•Enlever le bloc moteur en tirant sur le bouton de
verrouillage (situésous le réservoir) et en
soulevant le bloc moteur (Fig. 6). Renverser le
bloc moteur pour vérifier l’état de l’élément
chauffant. Si on constate une accumulation importante de minéraux, suivre les
instructions de la section NETTOYAGE DE L’ÉLÉMENT CHAUFFANT.
Mettre le bloc moteur de côté.
•Jeter l’eau se trouvant dans la base et le plateau amovible.
NETTOYAGE HEBDOMADAIRE
Fig. 6
base
Plateau
amovible
Bouton de
verrouillage
Bloc
moteur
HU4074.01 DH-975 FR OM 8/3/01 12:56 PM Page 7
Table of contents
Languages:
Other Robitussin Humidifier manuals
Popular Humidifier manuals by other brands

Air Naturel
Air Naturel HYGRO-D operating instructions

nor-tec
nor-tec MH Series Engineering manual

AIRINNOVATIONS
AIRINNOVATIONS MH-701C Instruction manual and warranty information

AIRINNOVATIONS
AIRINNOVATIONS MH-801B instruction manual

AIRINNOVATIONS
AIRINNOVATIONS Clean Mist MH-512 Instruction manual and warranty information

N'oveen
N'oveen MUH240 user manual

Perfect Aire
Perfect Aire PAU14 user manual

Hunter
Hunter 33116 owner's guide

HygroMatik
HygroMatik FlexLine manual

Scarlett
Scarlett comfort SC-AH986M10 instruction manual

ecofort
ecofort ecoQ HumidAir E250 manual

Skuttle Indoor Air Quality Products
Skuttle Indoor Air Quality Products 592-9 installation instructions