Robotouch RBT09 User manual

robotouch'
RBT09
Mu lti-fu nction Foldable
Motorized Treadmill
t[15 -06- il 5

a
a
a
a
a
a
a
a
a
Motor power: 1500W
Scope ofoperating speed: 1.0-14 (km/h)
Gradient regulating range: 0-1 5olo
Scope of time display: 0.00-99.59 (min: s)
Scope of distance display: 0.00-99.9 (km)
Scope of heart rate: 50-200 (bpm)
Scope of calorie display: 0-999 (calories)
Floor area: 17 I X7 4x 132cm
Effective usable fl oor are a: 122X 42cm
Features
X Oversized blue-backlight LCD information display window;
X 6 built-in running procedures;
X High power and tone quality sound, audio input function;
X Fat measuring function;
X Four speed direct election function;
X Four gradient direct election function;
X Speed and gradient regulation through handle;
X Multi{ayeranti-vibrationdevice;
X Over current and overload protection device;
X Attached functions like massage, waist twisting and sit-up, etc.
ll. Product introduction
Electronic meter
Massage head
Upright pole-horizontal pipe
Uprlght pole of
massage head
Left upright pole
Hand-held heart rate
Right upright pole
Motor protecting cover
Edge
Rlght rear
regulating box
Running
irame
Under framo
1-3-
@
lll. Product explosion diagram
,c3
lA/
Itf w
Wfr
YW
\l/
\
f-'..
^ \ ."-a
\Ll ll:\
\
a'
Y.i
:
$
{o
tl :
l-
/+
l\ \
/)
J4
Qr\
I\

lV. Particular sheet of explosion diagram
S/N Part name otv. S/N Part name Otv.
DC motor 46 Air sorinq sleeve 1
2 Power switch 47 Treadle housino I
JMassaoe head 48 Sorino leaf 1
4Black qaskel 249 o76 runninq board roller 2
5Fuse holder 150 Foot oad 4
6 Rectanole 40 x 80 internal bulkhead 2 51 Anti-loosino cliD 1
7Small foot pad 2 52 Hook foot foam 2
IM6(O18x 1.0) curved qasket washer 453 Motor cushion pad 4
9 M8(o30 x 1 .5) bio flat washer 54 Edqe sDacer buckle 6
10 M10(O20 x 1.5) small flat washer 455 Elonqated slot cord Dluq 2
11 M6(O11.5x 1.0)small flat washer t56 M10 stop nut 4
12 M8(o16x 1.2)small flal washer 18 E1 M6 stoo nut 6
'13 M8(o24 x 2.0) curued small washer 458 MB stoD nut 7
14 30 X 'l 5 rectanoular tube bulkhead 2 59 M4 X 12 bio flat head cross screws 4
15 G25 bulkhead 460 M4 X 8 bio flat head cross screws 17
16 G32 internal bulkhead 2 61 M8x 30 hexaoon sockel head 4
17 40 X 20 square tube bulkhead 2 o2 ir8x45 hexaqon socket head caD screw 1
18 G54 foot roller 2 63 M8 x Tshexaoon socket head cao screw 3
19 Rear drum 64 M10X40pan hexagon socket head cap
screw 1
20 Line clip 65 M10x65pan hexagon socket head cap
screw 1
21 AntFvibration pad 6 66 M12x80pan hexagon socket head cap
screw 2
G32 armrest bulkhead 2 67 MB x 100pan hexagon socket head cap
screws 3
23 Tear-proof armrest 2 68 M8 x 16pan hexagon socket head cap
screws 4
24 Running board 69 M8 X 30pan hexagon socket head cap
screws 1
25 Running belt 70 M8 x 40pan hexagon socket head cap
screws 2
26 Motor protecting cover 71 M8 X 45pan hexagon socket head cap
screws 1
27 Motor bottom cover 172 M8X 50pan hexagon socket head cap
screw z
28 Lefl rear regulating box MB X 55pan hexagon socket head cap
screw 5
29 Rioht rear reoulatino box 74 M6 X 40 countersunk cross screws b
30 Edoe 2 75 M8 X 16 hexaoon head caD screw 3
31 Hand-held heart rate 2 76 M6x 12 round head cross screws 2
32 Upright pole horizontal pipe decorative 277 M5 x 1 2 big flat cross screws 5
JJ Upriqht pole horizontal piDe weldment lo Waist twistino disk 1
34 Massaqe head uotioht Dole weldment 79 Motor bell 1
35 Electronic control olate 80 Cord anchoraoe (small size) 1
36 Liftino motor 81 Fore drum 1
37 Air sorino 82 Meter head 1
38 Tear-proof hook foot 2 83 ST 4.2x 12 countersunk cross tapping
screw 6
39 lJDrioht oole weldment (riohtl 84 M4 X 20 flat cross taooino screw 2
40 lJorioht Dole weldment (lefr) 85 M5 x 20 bio flat cross taooino screw 4
4'l Erector weldmenl 86 M4 x I bio flat cross taDDino screw 2
42 M10x30pan hexagon socket head cap 287 M8 spring gasket 9
JMotor base weldmenl 88 White qasket 4
44 Runninq frame weldment 89 M10(030x2) middle flat washer 2
45 Under frame weldmenl
-4- -5-
V. Assembly step
All parts of electric treadmill have been strictly assembled and debugged before the ex works. An electric
lreadmill can be easily assembled into if the installation is carried out by observing following steps.
Step l: lnstallation of uprioht oole: open the packing
box, take out the treadmill, insert the left upright
pole (lhere is no connector lug in the bottom of the
upright pole) into the under frame, and use a M8x
16 pan hexagon socket head cap screw (with
curved washer) for fixation, and two MBx55pan
hexagon socket head cap screws (with flat washer)
for locking. Next, couple the line of the right upright
pole (there is connector lug in the bottom of the
upright pole) wilh the line of under frame, then
insert the under frame. Use a MBX 16 pan hexagon
socket head cap screw (with curved washer) for
fixation, and two M8X55pan hexagon socket head
Step lll:
the massaoe head: take out the upright pole
components of the massage head, use one pan
hexagon socket head cap screw (M8 x 55, with
gaskets) to fix the upright pole components to the
upright pole horizontal pipe, and use one pan
hexagon sockel head cap screw (MBX100) to fix
lhe upright pole components to the under frame.
cap screws (with flat washeo for locking. Please
note that the six screws should not be firmly locked
for the moment.
Step ll: Apply the
decorative cover of the upright pole horizontal pipe
to the upright pole horizontal pipe. Then, use two
pan hexagon socket head cap screws (M8x100,
with curued washer) to fix the upright pole
horizontal pipe. The screws should not be firmly
Jixed for now.
Then, tighten the screws installed in the above
mentioned three steps.
Step lV: lnstallation of meter head: couple the wire
in the lefr and right handles with the wire in the
meter Use four tapping screws (M5 x 20, with
curved washer) to fix the mete( then insert the wire
end into the holes of the long slot of the amrest
pipes.

Step V: lake out the
massage head, put it to the clip of the components
of the massage frame, and use three hexagon
head cap screws (MB x 16, wilh gaskets) to lock it.
Step Vl: Loosen the anti-loosino clip, and_unscrew
the round head screws (MOX12) which fixes the
anti-loosing clip,
Step Vll: Fold the treadmill frame, and confirm whether the treadmill frame is in the central position between the
left and right armrests. lf it is not in the central position, unscrew the screws in Steps I - lll to adjust the distance
between the running board and the armresls, and lhen gradually tighten screws to check whether all parts of
treadmill are tightened. Start the treadmill at a low speed to check whelher all parts of the running belt are running
flexibly and the tightness of running belt is appropriate such that the running belt is impartial and skid-free (see the
"Daily servicing and maintenance of electric treadmill"). After the inspection, move the treadmill to a proper
position for use.
Vl. Electronic meter display and functional operation
1. Sketch of electronic meter and function display
-6- -7 -
2. Description for electronic meter window
'1. 'SPEED'window: Display the current speed value under the operation state, at the same
time, the pointer points at corresponding speed. The scope of speed display: 1.0-14KM/H.
2. "TIME/PULSH" Window: Display the operating time and heart rate.
3. 'DIS/CAL/INCL" Window: three values display in turn at the time interval of 5s: display the
exercise distance, the burn calorie values of the exercisers and the lift gradient.
W
ru
'ffi
ffi
w
W
8."
9."
10
try.
o " WA " lcon: Refers to mute
" lcon: Refers to the sound is on.
7. " lcon: Refers to Time countdown Mode.
" lcon: Refers to Distance countdown Mode.
" lcon: Refers to Calorie countdown Mode.
" lcon: Refers to Programming Mode.
3. Description for button
1. "Programming" is Program Key: under the standby state, press this key can choose 7 different
kinds of running programs from "0: 00", "P l -P6-FAT' in order (FAT is physical detection function);
manual mode is the running mode defaulted by the system, and the default speed of the manual
mode is 1.OKM/H ("0: 00"is manual mode, and the P1-PO is built-in program).
2 "Mode" is mode selection, switching and confirming key:
2.1 Under the standby state, press this key can choose "0: 00", "15: 00", "1.0" and "50" in
order ("0: 00" is manual mode, "15:00" is time countdown mode, "1.0" is distance
countdown mode and the "50" is calorie countdown mode.). When select various kinds
of modes, the "Speed-up" Key and "Speed-down" Key both can be used to set relevant
countdown values. After the setting, the "Start" Key is pressed to start the treadmill.
2.2 Under the fat measuring state, press this key can select: Category of parameters.
3. "Start" is the start key: when the power is on and the safety lock is locked, the treadmill can be
started by pressing this key at any time.
4- "Stop' is stop/reset key: During the exercise, this key can be pressed to stop and reset the treadmill.
5. "Speed-up" and "Speed-down" are speed up and speed down key: under the standby state,
they are used to adjust the set value. After the start, they are used to adjust the speed, their

adjustment amplitude value is 0.1 Km/times, and when press them continuously more than
0.5s, the speed will continuously increase or reduce automatically.
6. "3, 6, I and 12" is speed shortcut key: Under the operation of the treadmill, speed can be
directly adjusted by pressing these keys.
7. "Gradient ascending" and "Gradient descending" is "Lift-up" Key and "Lift-down' Key: under
the standby state, they are used to adjust the set value. After the start, they are used to adjust
the lift, the adjustment amplitude value is 1o/o, and when press them continuously more than
0.5s, and the lift will continuously increase or reduce automatically.
8."0o/o,4o/o,8olo and 127o" is liff shortcut key: when the treadmill is operating, this key can be
used to directly adjust the lift.
4. Description for operation
'1. Turn on the power supply switch of the treadmill, the treadmill gives a sound of "Bi Bf,
emplace the safety switch, and enter into standby state.
2. Under the standby state, is the treadmill is started by pressing the "Start' Key (it is defaulted
by the system as manual mode P0), then the treadmill will start at 1KM in 3s (the window displays
3-2-1). The operating speed (1-14Km/H) of the treadmill can be adjusted by pressing the
"Speed-up or Speed-down" Key or the "SPEED+|" Key on the handle, or directly select the
required speed by pressing speed shortcut key "3Km/H, 6Km/H, 9Km/H and 12Km/H". The
gradient (1o/t15o/o) of the treadmill can be adjusted by pressing the 'Gradient asaending or
descending" Key or the "INCLINE+!" Key on the handle, or directly select the required gradient by
pressing the gradient shortcut key "0%, 4o/o, 8o/o and 12%".
3. Under the treadmill operating state, the treadmill can be stopped by pressing the "Stop' Key.
4. Under the treadmill operating state, please remove the safety switch immediately, if accidents
happen to the exercisers, and the treadmill will emergently stop operating.
5. Under the standby state, press the "Mode" Key can select the settings in turn: exercise
countdown time, exercise countdown running mileage, exercise countdown burn calorie. Press the
"Speed-up and Speed-down' or "Gradient ascending and descending" Key can adjust the time,
exercise mileage and burn calorie. Press the "Start' Key to start the treadmill after the values are
set.
6. Under the standby state, press the "Programming" Key can choose 7 different kinds of running
programs from "0: 00", "P1-P6-FAT" in order (FAT is physical detection function); "0:00" is manual
mode, and P1-P6 is built-in mode. Press the Start" Key to start the treadmill after the program is
selected. FAT is physical detection function, and see "fat measuring function" for detailed
operation.
5. Description for functions
'1. Tum on the power; the magnetic safety switch is correctly attached to the safety switch
position under the electronic meter.
2. Under the standby state, press the "Start" Key, and the treadmill will start at a lowest speed
in 3s countdown. The speed can be adjusted by pressing the "Speed-up and Speed-down" Key,
Speed shortcut Key or the Key on the right armrest. The gradient can be adjusted by pressing
the 'Gradient ascending and descending" Key, Gradient shortcut Key or the Key on the left
armrest. Press the "Stop" Key or directly removing the safety lock can stop the operation. The
"Time" Window displays the counting number positively from "0.00-99.59", and when the time
reaches 99.59, the treadmill will stop.
3. Countdown Mode:
Press this Mode key can select: time countdown, distance countdown and calorie
countdown. Corresponding window will display the default value and flash. At this time,
press the "Speed-up and Speed-down" Key to adjust to the required value. Press the
"Start' Key, and the treadmill will start at a lowest speed afier 3s countdown. The speed
can be adjusted by pressing the "Speed-up and Speed-down" Key, Speed shortcut Key or
the Key on the right armrest. The gradient can be adjusted by pressing the "Gradient
ascending and descending" Key, Gradient shortcut Key or the Key on the left armrest.
When the value countdown on the window turns to 0, the treadmill will slows down slowly
to stop, the gradient turns to 0%. The treadmill also can be stopped by pressing the "Stop"
Key or directly removing the safety lock.
a Countdown Mode is mainly used to make an exercise goal for yourself, such as
running for 30 minutes, 5 miles or burning 50KCL calories. When the goals are
continuously achieved, you can slowly increase the amount of exercise to
achieve the purpose of healthy exercise,
3.1 Time countdown Mode
Under the standby state, press the Mode Key to enter the nme countdown Mode, the Time
Window will display the default value and flash, the exercise time can be set by pressing the
"Speed-up and Speed-down' Key or "Gradient ascending and descending" Key, and the
setting range is 5:00-99:00. Press the "Start" Key after the setting is accomplished, and then
the treadmill will start to run after 3s. The speed can be adjusted by pressing the "Speed-up
and Speed-down' Key or Speed shortcut Key. The gradient can be adjusted by pressing the
"Lift-up" Key and "Lift-down" Key or Lift shortcut Key. Pressing the "Stop" Key will stop the
treadmill. Time countdown will decrease progressively from set value to zero, when the
countdown turns to zero, the treadmill will slow down steadily to stop, and enters into standby
state after it completely stops.
3.2 Mileage countdown Mode
Under the standby state, continuously press the Mode Key twice to enter the Distance
countdown Mode, the Distance Window will display the default value and flash, at this time,
pressing the "Speed-up and Speed-down" Key or "Gradient ascending or descending' Key
can set the exercise distance, and the scope of distance setting is 0,5-99.9. Press the "Start"
Key again after the setting is accomplished, and then the treadmill will start to run after 3s.
The speed can be adjusted by pressing the "Speed-up and Speed-down" Key or Speed
shortcut Key. The gradient can be adjusted by pressing the "Lift-up" Key and "Lifi-down" Key
or Lift shortcut Key. Pressing the "Stop" Key can stop the treadmill. 'llme countdown will
decrease progressively from set value to zero, when the countdown tums to zero, the
treadmill will slow down steadily to stop, and enters into standby state after it completely
stops.
3. 3 Calorie countdown Mode
Under the standby state, continuously press the Mode Key three times to enter the Calorie
countdown Mode, the Calorie Window will display the default value and flash, at this time,
pressing the "Speed-up and Speed-down" Key or "Gradient ascending or descending" Key
can adjust the calorie required to burn (calorie), and the sefting range of calorie is: 10-999.
Press the "Start" Key again after the setting is accomplished, and then the treadmill will start
to run after 3s. The speed can be adjusted by pressing the'Speed-up and Speed-down" Key
or Speed shortcut Key. The gradient can be adjusted by pressing the "Lit-up" Key and
"Lift-down" Key or Lift shortcut Key. Pressing the "Stop" Key can stop the treadmill. Calorie
countdown will decrease progressively from set value to zero, when the countdown turns to
zero, the treadmill will slow down steadily to stop, and enters into standby state after it
completely stops.
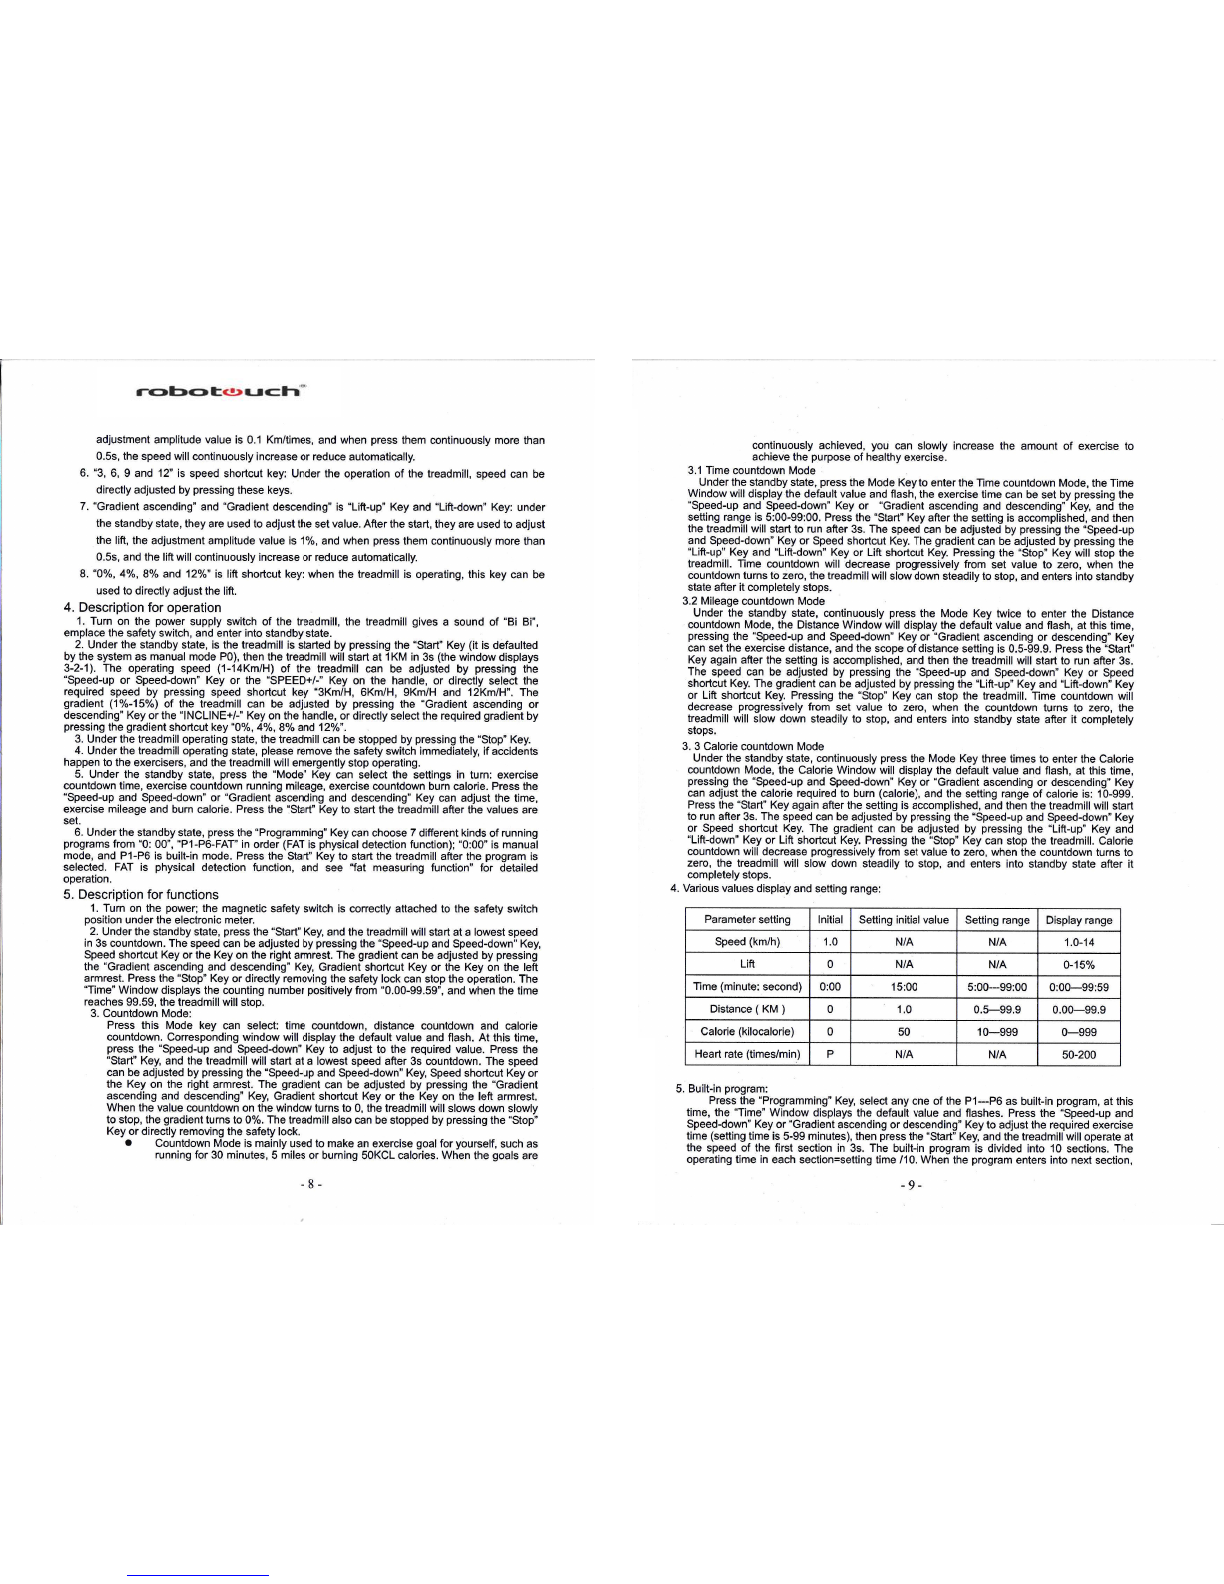
4. Various values display and setting range:
,fl
Parameter setting lnitial Setting initial value Setting range Display range
Speed (km/h) 1.0 N/A N/A 1.O-14
Lift 0N/A N/A 0-1,yo
Time (minute: second) 0:00 15:00 5:00--99:00 0:00-99:59
Distance ( KM )01.0 0.5-99.9 0.00-99.9
Calorie (kilocalorie) 050 10-999 0-999
Heart rate (times/min) PN/A N/A 50-200
5. Built-in program:
Press the "Programming" Key, select any one of the P1--P6 as built-in program, at this
time, the "Time'Window displays the default value and flashes. Press the "Speed-up and
Speed-down" Key or'Gradient ascending or descending" Key to adJust the required exercise
time (setting time is 5-99 minutes), then press the'Start" Key, and the treadmill will operate at
the speed of the first section in 3s. The built-in program is divided into 10 sections. The
operating time in each section=setting time /10. When the program enters into next section,
-8- -9-

I
the system gives a sound of "Bi-Bi- Bi', and the speed of the system will change along with
the program section. Meantime, the speed can be changed through pressing the "Speed-up",
'Speed-down" or Speed shortcut Key, and the gradient can be adjusted by pressing the
"Lift-up" Key and "Lift-down" Key or Lift shortcut Key. But when the program enters into next
section to operate, it will return to the speed ol that section. When the operation of all
sections is completed, and the program is completed, the system gives a sound of 'Bi-Bi- Bi".
The treadmill slows down till to stop and enter to standby state.
Attached tablel:
Data Table for Built-in Program
\\meinteruat
erogrrr-\ Set time/I0 = The operating time in each section
1234567 8 I10
P1 Speed 3 36555 4443
Gradient 2 3 457I5421
P2 Speed 3344555664
Gradient 135246 853 6
P3 Speed 33567I6433
Gradient 2432424134
P4 Speed 3 6 667 7 7 333
Gradient 436567 4 321
P5 Speed 3II8I76 3 2 2
Gradient 43435 6 6432
P6 Speed 2 5 67777733
Gradient 3255643542
6. Fat measuring Mode:
Under the standby state, press the "Program" Key to the last item to enter the physical
indexes ( FAT ) detection function. Press the "Mode" Key to select the category of the
parameters (gender, age, body height and body weight), when a parameter category is selected,
press the "Speed-up and Speed-down" Key to adjust the parameters. When all parameters are
adjusted, press the "Mode" Key again to enter into the F-5 physical detection interface. At this
time, you should hold handle-type heart rate metering plate with both hands. Your physical
indexes will be displayed in 4-5s.
The physical indexes (FAT) are used to display the relation between the body weight and
body weight rather than body proportion. The FAT is applicable to any male and female and can
provide the weight adjusting basis for people along with other healthy indexes. ldeal FAT should
be in range ol 20-25. lt means too thin when the value is lower than 19, the ovenirreight when
the value is in range ot 25-29 and the obesity when the value exceed 30. (The said data are
used for reference and cannot be used as medical data.)
lnput Parameter Display and Setting Range
F-1 Gender Male (01) Female (02)
F-2 Age 10-99 years old
F-3 Body height 100-220 cM
F-4 Body weight 20-150 KG
F-5 Physical
index
<19 Too thin
:(20-*25) ldeal
:(25___29) Ovenareight
>30 Obesity
7. Heart-beat measurement (hand-held heart-beat measurement):
Hold the holding sheet steel with both hands. The heart-beat value can be displayed in
the Heart-beat Window after about 5-10s, ln order to obtain accurate heart-beat value, the
heart-beat value should be measured at the stop of the treadmill. Moreover, the holding time
cannot be shorter than 30s. The holding heart-beat measurement data are only used as the
reference of exercise degree rather than medical data.
8. Media and sound functions:
The treadmill can accept outer audio input and inner radio. When the music or other
sound signals are played, it should be ensured that the power amplifier ls not in the mute state.
When an outer audio device (such as MP3) is inserted to the audio input through the audio
cable, the music can be played.
6. Standby function
lf the treadmill is not operated for more than 10 min, the system will shut down all displays
and enter into standby state. The system can be restarted by pressing any button.
7. Functions of safety lock:
Under any state, removing the safety lock can emergently stop the treadmill. At the
emergency shutdown of the treadmill, the window displays "---", and the buzzer gives an
alarming sound of "B8", At this time, any operation (excluding shutdown) cannot be carried out
for the treadmill, and reset all data. After the safety lock is correctly reinstalled, the treadmill
enters into the standby state again and waits for input command.
Vll. Use method and safety protection for treadmill
1. Debugging of treadmill
1.1 After the installation is completed, position the safety lock to the conesponding position
of electronic meter.
1.2 Before the powering, inspect whether the power ground wire is well grounded and pull
the running belt with hands to check whether it can run flexibly without any abnormal
sound.
1.3 Plug in the power supply and open the power supply lock. Then, all windows on the
electronic meter show the initial values and the running belt is still.
1.4. Press the "Start" Key; after counting for (3, 2, 1), the treadmill starts operating at a low
speed (the operating speed is 1 km/h). Observe whether the treadmill and electronic
meter can operate normally.
1.5. Press the "Speed-up" Key, .Speed-down', "Gradient ascending" and "Gradient
descending' Key to observe whether the regulation is normal.
1.6 Press the "Stop" Key or pull in the safety lock, and the treadmill will stop operating. Tum off
the power switch and unplug the power supply.
- tl-
r0-

2. Operating instructions
After being debugged, the electric treadmill can be put into use:
2.1 Plug the power supply in the household AC220t10%, The outlet must be provided with
aoprooriate oroundino wire.
2.2 Emplace the safety lock and press "Start" Key, and then the running belt will operate slowly
(the speed is about'1 km/h). The speed per hour is displayed on the meter.
2.3 lf the treadmill needs to be accelerated, press the "Speed-up" Key and the buzzer's "tick"
indicates one level up. The maximum speed per hour is 14km/h.
2.4.|t the treadmill gradient needs to be accelerated, press the "Gradient ascending" Key and
the buzzer's "tick" indicates one level up. The maximum gradient is 15%.
2.5 lf you cannot wait for the deceleration while running on the treadmill at a high speed, you
can pull out the safety switch and the treadmill will immediately stop.
2.6 When the exercise is over, press the "Stop" Key after the speed is slowed down, and the
treadmill will slowly stop.
2.7. Folding operation: During the folding operation, restore and stop the treadmill firstly, and
switch off the power supply. Unplug the power supply in the front of treadmill, please be
sure that the air spring casing is firmly stuck, then remove or leave the treadmill. When
the treadmill is placed down, stamp the air spring casing with feet, loosen the air spring
casing, and then slowly set the treadmill level in order, as shown in the following figure:
3. Safety protection for treadmill
3.1. ln any emergency, as long as the exerciser turns off the safety switch, the treadmill will
be power off. Therefore, when you are exercising, please be sure to clip the safety lock
on the appropriate position the on your clothes to ensure the safety.
3.2. When the treadmill belt skids or the running belt is stuck, the motor will stop in about 5s.
Vlll. Precautions
1. Circuit
1.1 Avoid using other electric appliances in the same power supply circuit. The power supply
circuit must be able to supply over 8.3A electricity current.
1.2 lt is required that the service voltage should be in the range of 220Vt10%. The voltage
beyond this range may lead to the abnormal operation.
'1.3 After being used, the treadmill should be immediately unplugged.
1.4 ln Winter, certain humidity should be kept indoors to avoid strong static electricity.
1.5 lf the power wire is damaged afrer use. please go to soecified products distributor for
replacement or ourchase.
2. Placing environment
2,'l lt is only proper for the treadmill to be placed indoors for protection against humidity. lt is
forbidden to splash water on the treadmill. lt is forbidden to place any foreign materials
on or inserted them in the treadmill.
2.2 During the operation of the treadmill, the motor will generate a small number of sparks,
so the treadmill should be placed at a drafty place and kept away from explosives.
2.3 When the treadmill is used, ensure its fore and rear feet reliably contact the ground. lf
the ground surface is uneven, it should be stably padded with carpet or rubber plate.
2.4 Pay attention to the interior hygiene usually to reduce indoor dust because its sensibility
may be influenced by the dust adhered on the electronic components.
3. Precautions before or during exercise
3.'l For your safety, wear sports clothes and select suitable sports shoes when using the
treadmill. lt is strictly forbidden to exercise on the treadmill with bare feet.
3.2 It is not allowed for two or more persons to do exercises on the treadmill at the same
time.
3.3 Prepare a towel before running to prevent sweat from dropping on the running belt and
being thrown into the enclosure to damage the electric appliance.
3.4 The beginner can get on the treadmill only after he stands on the edge to test several
times with one foot and feels capable of keeping up with the speed of the running belt.
3.5 The treadmill has enough motor power. ln principle, the zero start can be realized, but to
extend the service life of the treadmill, it is suggested that you should stand on both
edges of the treadmill and get on it for exercise after the normal start.
3.6 lt is strictly forbidden to get on and offfrom the rear end as it is very easy for people to
tumble in such way.
3.7 The strength should be equal when the hands are on the armrests and run on it straightly
to avoid belt deflection.
3.8 When people run in a normal state, the two hands should be moved from the armrests.
The arms can be swung boldly so that the exercise result will be better.
3,9. The stop lock should be pressed when get off the treadmill. Don't get off the treadmill until
the running belt stops completely.
3,10 Keep the child away from the running treadmill for fear that the hand or the clothes may
clamped by the running belt to cause serious injury.
3.1'l lt is strictly forbidden to touch the working running belt by hands.
4. Additional precautions
4.1 The cardiac should not use the electric treadmill alone.
4.2 Determine the running speed according to your physical conditions; and the sick should
not use the treadmill or use it under the instruction of a doctor.
4.3 The heart rate sensor is not a medical facility and the detection results are for reference
only.
lX. Daily servicing and maintenance of electric treadmill
During the daily use of the treadmill, the following should be noted for the maintenance.
1, Keep the treadmill clean
1.1 The service life of the treadmill can be significantly extended by keeping clean. Often
wipe the running board and footboard exposed on the two sides of the running belt.
Reduce long-term accumulation of the dust and dirt under the running belt.
'1.2 The running belt can be wiped with soft cloth dipped with soapsuds. Don't let the water
flow to the bottom of the running belt and into the shield.
t2- 13-

'1.3 Regularly check each bolt and nut. Please tighten and fix them immediately with tools if
they are loose.
1.4 Regularly check whether the groove of the motor belt is clean. lf there are residual, they
must be cleaned off to avoid unnecessary vibration when it is used.
1.5 Regularly clean the electric control system and the dust surrounding the motor to ensure
normal operation of the treadmill.
2. Lubrication
2.1 A bottle of special lubricating oil for running board is attached. Running board surface
should be evenly lubricated with special lubrication regularly to avoid the damage of
running belt and running board caused by the temperature rise due to the friction between
them, and to reduce the load of the motor. (Note: the child should not play with it in fear of
eating by mistake)
2.2 Atter the treadmill has been used for a while, the running belt and running board should
be lubricated with the special lubricant. The lubricating time interval is different according
to the usage cycle, and the references are shown below:
2.3 L
Usage time of treadmill Lubricating time interval
Less than 3 hours usaqe time per week Once for three months
3-6 hours usage time per week Once for one month
More than 6 hours usaoe time oer week Once for ten davs
the riqht and left adiustment bolts at the rear end of the
treadmill with special tools, lift the running belt about t0-1Scm, pour a good amount of
special lubricating oil on the top surface of the running board, and smear it evenly and
tighten the running belt. (For adjustment method, see the "Adjusting method for the
tightness of running belt') The over lubrication should be avoided. As for the lubrication, it
is by no means "the more the better". Please remember: reasonable lubrication is an
important factor to extend the service life of the treadmill!
3. Judgment for friction:
The frictional force ofthe running board and running belt can be increased by uncleanness
or reduction of lubricant, which may damage the motor and control panel. The excessive
frictional force is characterized with followings:
3.1 Under the power off condition, it is arduous to drive the belt by feet, or even the belt
cannot be driven;
3.2 The treadmill runs at an intermediate speed. The running belt completely stops as soon
as the safety switch is turned off;
3.3 The increment of frictional force may cause the damage of motor or control panel, short
circuit, tripping, fuse burn-out, etc,
4. Adjustment for the tightness of running belt:
4.1 Although all treadmills have been adjusted at exworks, the running belt may become
loose after the treadmill is used for some time. The maintenance is mainly carried out by
the user. lf the running belt is too loose, the skidding phenomenon of running belt and
drum will occur when you step on the running belt. But excessive tightness is not good
either because it may damage the motor, running belt and drum, increase the running
noise of the treadmill, etc. ln general condition, it is better to lift the two sides of running
belt 5-6cm awayfrom the running board.
4,2 Judgment method for tightness of running belt:
Adjust the treadmill speed to 1.5 km/h, grasp the armrest forcefully with both hands and
prevent the operating of running belt with feet. At this time, iljhe-running-b-eJt-stqps
r-unning"-tbe fl,ont-dr,um-aontlnuea runrung, but the running belt continues running after
being released, indicating that the running belt is excessively loose. Meanwhile, the user
may feel the halt at sometimes, and the long-term use under the loose state may shorten
the service life of running belt. Therefore, adjustment should be done timely.
4.3 Adjusting method for the tightness of running belt: After the treadmill is used for some time,
the halt may be felt while you are running on it, which is caused by the excessive loose
running belt. The tightening adjustable bolt of the right and left rear regulating box is used
to adjust the tightness and deflection. lt is the core component of the adjustment of the
complete treadmill.
Adjusting method (note: the clockwise means tightening and the anticlockwise means
loosening. All the tightening and loosening as shown below stand for clockwise and
anticlockwise respectively.) After the treadmill is used for some time, the running belt will
get extended slightly. lf you feel the skidding running bet, it shows the running belt is too
loose. Thus, tighten the adjustable bolts of rear cover at both sides at the same time by 1/4
circle until no skidding or halt is felt while you are running on the treadmill.
5. Adjustment for deflection of running belt:
As for all treadmills, although the running belt has been adjusted at exworks, the running
belt may suffer the deflection after the treadmill is used for some time. This is attributed to
following reasons:
5.1 The treadmill body is placed unevenly.
5.2 While exercising on the treadmill, the user fails to run on the central position of the running
belt.
5.3 The strength of user's feet is uneven.
5.4 Adjustment for deflection: lt only takes a few minutes to recover artificial deflection by
no-load operation. As for the non-recoverable deflection, the running belt adjusting bolts
should be adjusted with the auxiliary special tools by half a circle. For example, if the
deflection is leftward, clockwise adjust the left adjusting bolts or anticlockwise adjust the
right adjusting bolts, and if the deflection is rightward, clockwise adjust the right adjusting
bolts or anticlockwise adjust the left adjusting bolts. The deflections of running belt are
mainly maintained and repaired by the user. As the deflection may seriously damage the
running belt, the deflection should be timely corrected if any.
6. Adjustment for motor belt:
6.1 As for all treadmills, although the motor belt has been adjusted at exworks, the running belt
may suffer the halt after the treadmill is used for some time, because the motor belt gets
loose.
6.2 Method for judging the tightness of motor belt: Adjust the treadmill speed to 1 .5 km/h, grasp
the armrest forcefully with both hands and prevent the operating of running belt with feet. At
this time, if the running belt and front drum stop running simulianeously, but the running belt
continues running after being released, indicating that the motor belt is excessively loose.
Meanwhile, the user may feel the halt at sometimes, and the long-term use under the loose
state may shorten the service life of motor belt. Therefore, adjustment should be done
timely.
6.3 Solution: Use special tools to clockwise adjust the motor belt adjusting bolts for several
circles until the user cannot feel the halt. This adjustment is mainly carried out the by user.
Adjusting method for motor belt: Clockwise adjust the motor belt adjusting bolts by half a
circle with auxiliary tools.
Special attention: As for the motor belt, it is not the tighter the better. The tightness should
be adjusted as required. The service life of the running belt may be shortened if it is too
tight.
-t4- t5 -
Table of contents
Other Robotouch Treadmill manuals