Robust RB-ET 2620 User manual

RB-ET 2620
Art.-Nr.: 34.013.53 I.-Nr.: 11015
7
EManual de instrucciones original
Orilladora/Bordeadora Electrica
GB Original operating instructions
Grass Trimmer
PManual de instruções original
Roçador de relva
DOriginalbetriebsanleitung
Rasentrimmer
Anl_RB_ET_2620_SPK7.indb 1Anl_RB_ET_2620_SPK7.indb 1 08.06.15 09:0808.06.15 09:08

- 2 -
1
2
1
12
3
6
4
2
10
11
914
7
8
9
412
Anl_RB_ET_2620_SPK7.indb 2Anl_RB_ET_2620_SPK7.indb 2 08.06.15 09:0808.06.15 09:08

- 3 -
3 4a
4b 4c
5a 5b
12
5
4
12
14
A
2
3867
9
Anl_RB_ET_2620_SPK7.indb 3Anl_RB_ET_2620_SPK7.indb 3 08.06.15 09:0808.06.15 09:08

- 4 -
5c 6
9
7 8
9
10
13
B
10a
Anl_RB_ET_2620_SPK7.indb 4Anl_RB_ET_2620_SPK7.indb 4 08.06.15 09:0808.06.15 09:08

- 5 -
10b
11
ABCD E F G H
Anl_RB_ET_2620_SPK7.indb 5Anl_RB_ET_2620_SPK7.indb 5 08.06.15 09:0808.06.15 09:08

E
- 6 -
Índice de contenidos
1. Instrucciones de seguridad
2. Descripción del aparato y volumen de entrega
3. Uso adecuado
4. Características técnicas
5. Antes de la puesta en marcha
6. Manejo
7. Cambio del cable de conexión a la red eléctrica
8. Mantenimiento, limpieza y pedido de piezas de repuesto
9. Eliminación y reciclaje
10. Solucion de Problemas
Anl_RB_ET_2620_SPK7.indb 6Anl_RB_ET_2620_SPK7.indb 6 08.06.15 09:0808.06.15 09:08

E
- 7 -
Peligro! - Leer el manual de instrucciones para reducir cualquier riesgo de sufrir daños
Anl_RB_ET_2620_SPK7.indb 7Anl_RB_ET_2620_SPK7.indb 7 08.06.15 09:0808.06.15 09:08

E
- 8 -
Peligro!
Al usar aparatos es preciso tener en cuenta una
serie de medidas de seguridad para evitar le-
siones o daños. Por este motivo, es preciso leer
atentamente estas instrucciones de uso. Guardar
esta información cuidadosamente para poder
consultarla en cualquier momento. En caso de
entregar el aparato a terceras personas, será
preciso entregarles, asimismo, el manual de ins-
trucciones.
No nos hacemos responsables de accidentes o
daños provocados por no tener en cuenta este
manual y las instrucciones de seguridad.
1. Instrucciones de seguridad
Peligro!
Lea todas las instrucciones de seguridad e
indicaciones. El incumplimiento de dichas inst-
rucciones e indicaciones puede provocar descar-
gas, incendios y/o daños graves. Guarde todas
las instrucciones de seguridad e indicacio-
nes para posibles consultas posteriores.
Explicación de la placa de indicación situada
en el aparato (véase fig. 12)
A¡Aviso!
B¡Es preciso observar atentamente estas
instrucciones de uso antes de la puesta en
marcha!
C¡Ponerse protección para los oídos y para la
vista!
D¡Proteger de la humedad!
E¡Desenchufar el cable antes de comprobar
posibles daños en las conexiones!
F¡Mantener a terceras personas alejadas de la
zona de peligro!
G¡La herramienta sigue funcionando!
Leer detenidamente el manual de instruccio-
nes
Familiarizarse con los dispositivos de mando y
regulación y el manejo adecuado del aparato.
Este aparato no ha sido concebido para ser utiliz-
ado por personas (incluyendo niños) cuyas capa-
cidades estén limitadas física, sensorial o psíqui-
camente, o que no dispongan de la experiencia
y/o los conocimientos necesarios. Las personas
aptas deberán recibir formación o instrucciones
necesarias sobre el funcionamiento del aparato
por parte de una persona responsable para su
seguridad.Vigilar a los niños para asegurarse de
que no jueguen con el aparato.
¡Atención! Por razones de seguridad no deben
utilizar la segadora niños ni adolescentes me-
nores de 16 años, ni personas que no conozcan
este manual de instrucciones.
Guarde las instrucciones en un lugar seguro para
su posterior uso.
• Antes de cada uso, inspeccione visualmente
el aparato. No utilice el aparato si los dispo-
sitivos de seguridad están deteriorados o
desgastados. Nunca ponga fuera de funcion-
amiento los dispositivos de seguridad.
• No poner la recortadora de césped en fun-
cionamiento si los cables están dañados o
desgastados.
• Dejar de utilizar la máquina cuando haya
personas, especialmente niños, o animales
domésticos en las inmediaciones.
• Utilice el aparato exclusivamente para la
aplicación prevista en este manual de inst-
rucciones.
• Usted es responsable de la seguridad en la
zona de trabajo.
• Antes de empezar el trabajo, inspeccione la
superficie que desea cortar. Retire cualquier
eventual cuerpo extraño. Durante el trabajo,
preste atención a la presencia de cuerpos
extraños. Si a pesar de todo encuentra un
obstáculo durante el corte, apague el aparato
y retire el obstáculo.
• Trabaje únicamente en buenas condiciones
de visibilidad.
• Trabaje siempre en posición estable y segura.
Tenga cuidado en caso de retroceder. ¡Se
corre el riesgo de tropezarse!
• Nunca deje el aparato sin vigilancia en el
lugar de trabajo. En caso de interrumpir su
trabajo, guarde el aparato en un sitio seguro.
• En caso de interrumpir su actividad para acu-
dir a otra zona de trabajo, es imprescindible
apagar el aparato antes de desplazarse.
• No utilice el aparato con tiempo lluvioso o en
un entorno húmedo o mojado.
• Preserve el aparato de la humedad y de la
lluvia.
• Antes de poner el aparato en marcha, asegú-
rese que el hilo de nailon no está en contacto
con piedras ni con otros objetos.
• Lleve siempre durante el trabajo prendas de
vestir adecuadas, para evitar heridas en la
cabeza, manos o pies. Para ello, póngase
casco, gafas de seguridad (o una pantalla
Anl_RB_ET_2620_SPK7.indb 8Anl_RB_ET_2620_SPK7.indb 8 08.06.15 09:0808.06.15 09:08

E
- 9 -
protectora), botas altas (o zapatos con fuer-
tes suelas y un pantalón de tela resistente) y
guantes de trabajo.
• Mientras el aparato esté en marcha, ¡mantén-
galo siempre alejado del cuerpo!
• No ponga el aparato en marcha si está dado
la vuelta o si no está en posición de trabajo.
• Apague el motor y desenchufe el aparato cu-
ando no lo esté utilizando, cuando lo deje sin
vigilancia, mientras lo está inspeccionando,
si el cable de alimentación está deteriorado,
cuando retire y/o cambie la bobina y mientras
traslada el aparato de un lugar a otro.
• Mantenga el aparato alejado de otras perso-
nas, en especial de los niños y de los anima-
les; entre la hierba cortada y lanzada al aire
pueden hallarse piedras y otros objetos.
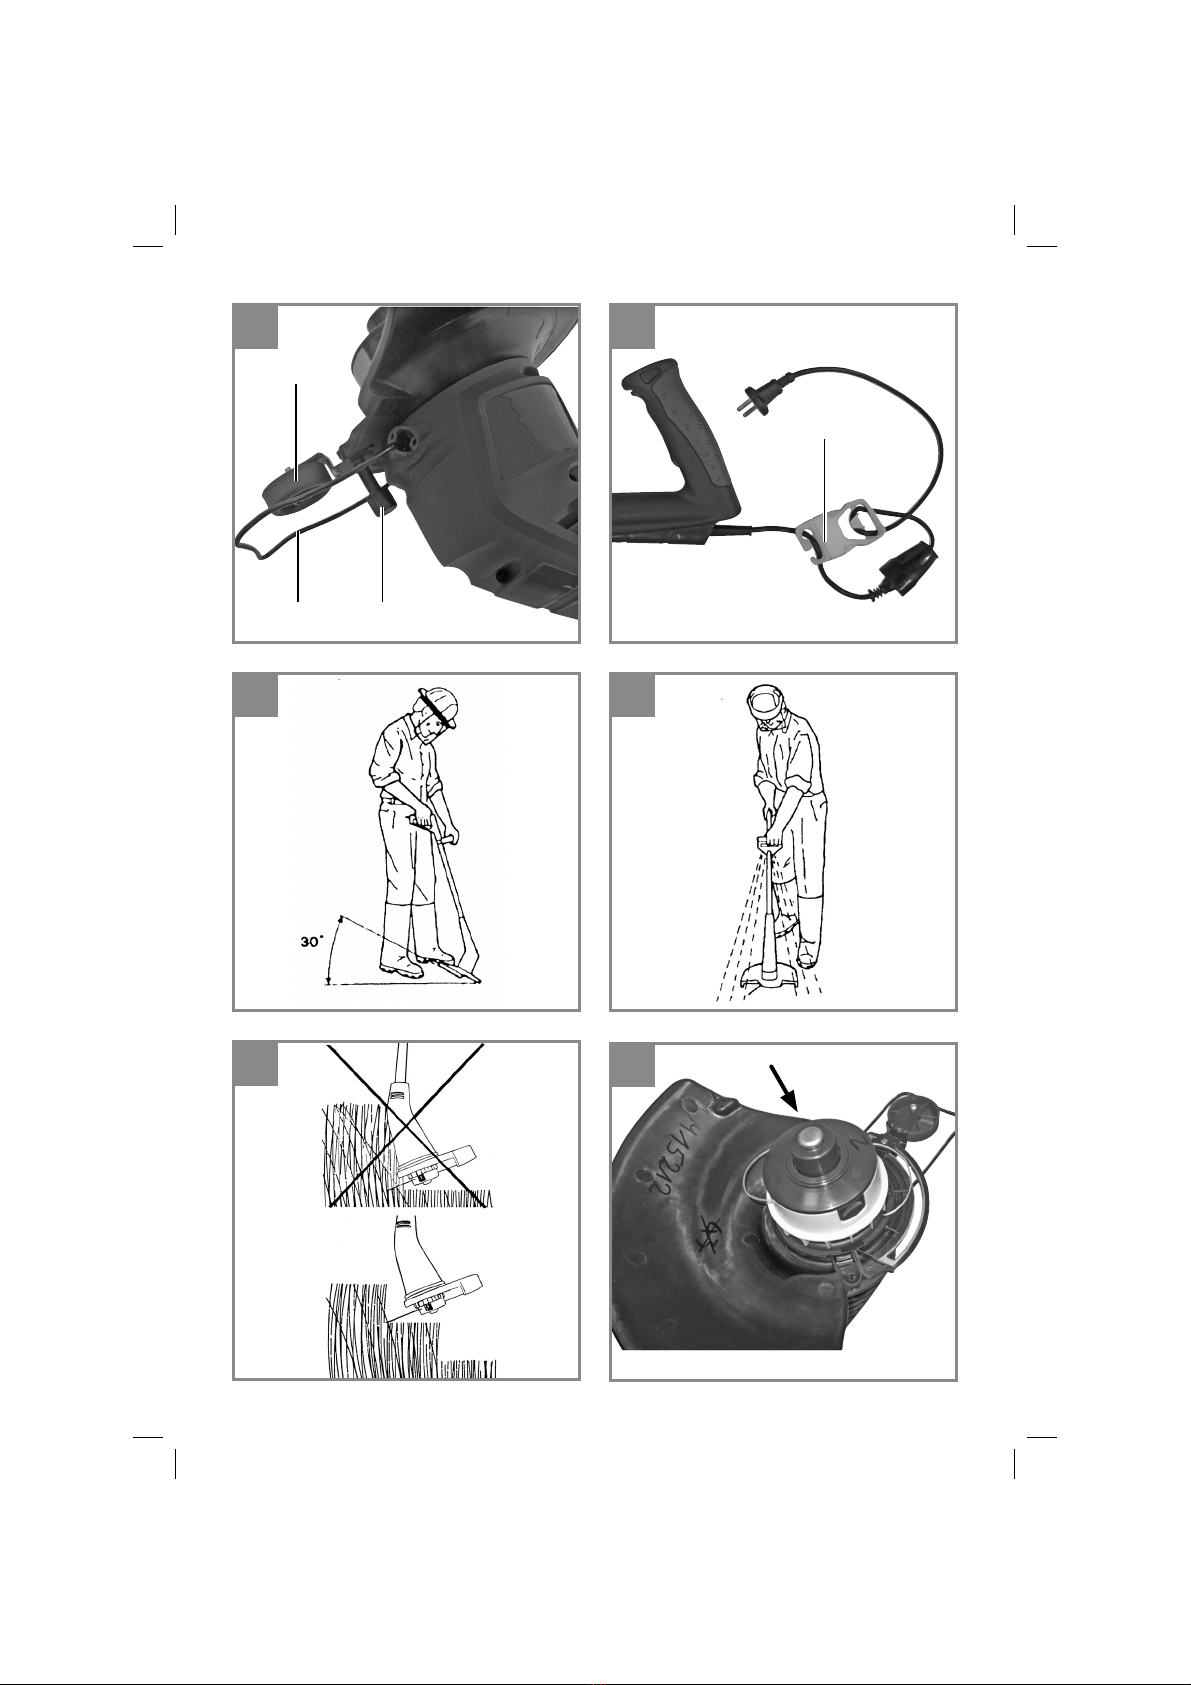
• Mientras trabaje, mantenga una distancia
mínima de 5 metros con respecto a otras per-
sonas o animales.
• No corte objetos duros. Se evita así el riesgo
de heridas y de deterioro del aparato.
• Utilice el borde de la pieza de protección
para mantener el aparato alejado de muros,
de alteraciones de la superficie así como de
objetos frágiles.
• No utilice el aparato sin la pieza de protec-
ción.
¡ATENCIÓN ! La pieza de protección re-
sulta esencial para su seguridad y la de las
otras personas, así como para lograr un fun-
cionamiento correcto de la máquina. La inob-
servancia de esta norma conlleva la pérdida
de los derechos de la garantía, además de
suponer una fuente de peligro potencial.
• No intente detener con las manos el dispositi-
vo de corte (hilo de nailon). Espere siempre a
que se pare por sí solo.
• Utilice únicamente el hilo de nailon original.
En ningún caso sustituya este hilo de nailon
por alambres metálicos.
• Tenga cuidado de no herirse con el dispositi-
vo que corta siguiendo el largo del hilo.
• Asegúrese de que las ranuras de aire no es-
tén sucias.
• Tras el uso, desenchufe el aparato y verifique
que no se ha deteriorado.
• Nunca intente cortar otra hierba que no sea la
que crece en el suelo. No intente, por ejemplo
cortar hierba que sobresale en muros, pie-
dras, etc.
• Dentro de la zona de trabajo de la segadora
el usuario es responsable ante terceros de
los daños causados por el uso del aparato.
• No atraviese carreteras ni caminos de grava
con el aparato en marcha.
• Cuando no utilice el aparato, guárdelo en un
sitio seco y fuera del alcance de los niños.
• Utilice el aparato siguiendo únicamente las
instrucciones descritas en este manual, y
manténgalo siempre en posición vertical con
respecto al suelo. Cualquier otra posición es
peligrosa.
• Verifique con regularidad que los tornillos es-
tán bien apretados.
• La tensión local debe coincidir con la especi-
ficada en la placa indicadora.
• Inspeccione con regularidad el cable de
conexión para detectar señales de daño o
de alteración.Tan sólo utilice el aparato si el
cable de conexión está en perfecto estado.
• Los cables de conexión utilizados no deben
ser más ligeros que los cables de tubo fle-
xible HO7RN-F, de acuerdo a la norma DIN
57282/VDE 0282, con un diámetro mínimo
de 1,5mm2. Los enchufes de conexión deben
contar con tomas de tierra, y la conexión
debe quedar protegida del agua.
• Si se daña el cable durante el uso, será pre-
ciso desenchufar el aparato de inmediato.
NO TOCAR EL CABLE ANTES DE DESEN-
CHUFARLO.
• Cualquier daño en el cable de conexión debe
ser reparado por el fabricante o por el encar-
gado de su servicio postventa, evitando así
cualquier peligro.
• El aparato sólo podrá ser alimentado a través
de un dispositivo de protección (RCD) de cor-
riente por defecto con un nivel de activación
de máx. 30 mA.
• Asegúrese siempre que las superficies que
desea cortar queden libres de cables o de
cualquier otro objeto.
• Cuando necesite levantar el aparato para
trasladarlo, pare el motor y espere a que la
herramienta se detenga. Si se aleja del apa-
rato, pare el motor y desenchufe el cable de
la corriente.
• Antes de enchufar el aparato a la corriente,
asegúrese de que ningún elemento rotativo
esté dañado y que la bobina de hilo quede
colocada y ajustada correctamente.
• En ningún caso golpee objetos duros con el
aparato mientras está cortando, si quiere evi-
tar heridas al usuario y daños al aparato.
• En cuestiones de mantenimiento utilice exclu-
sivamente piezas de recambio originales.
Anl_RB_ET_2620_SPK7.indb 9Anl_RB_ET_2620_SPK7.indb 9 08.06.15 09:0808.06.15 09:08

E
- 10 -
• Tan sólo confíe las reparaciones a un electri-
cista especializado.
• Inspeccione el aparato en busca de señales
de desgaste o de daño antes de ponerlo en
marcha y después de cualquier tipo de golpe,
y lleve a cabo inmediatamente las reparacio-
nes necesarias.
• Mantenga siempre las manos y los pies
alejados del dispositivo de corte, sobre todo
cuando ponga en marcha el motor.
• Tras haber tirado un nuevo hilo, vuelva a po-
ner la máquina en posición de trabajo antes
de volver a ponerla en marcha.
• No utilice nunca piezas de recambio ni acce-
sorios que no estén previstos o recomenda-
dos por el fabricante.
• Desenchufe la máquina de la corriente antes
de realizar la inspección de la misma, su lim-
pieza u otro trabajo, y cuando no esté siendo
utilizada.
• Sólo utilizar la máquina a la luz del día o con
suficiente iluminación.
• Mantener la alargadera alejada de las cu-
chillas.
Atención: ¡El hilo de nailon sigue girando
por inercia tras haber desconectado el apa-
rato!
¡La herramienta sigue en marcha por inercia!
2. Descripción del aparato y
volumen de entrega
2.1 Descripción del aparato (fig. 1/2)
1. Cable de conexión
2. Empuñadura superior
3. Interruptor ON/OFF
4. Empuñadura adicional
5. Dispositivo de retención para la empuñadura
adicional
6. Dispositivo de retención
7. Barra superior
8. Barra inferior
9. Cubierta de protección
10. Tornillo para el montaje de la cubierta de pro-
tección
11. Bobina de hilo
2.2 Volumen de entrega
Sirviéndose de la descripción del volumen de
entrega, comprobar que el artículo esté completo.
Si faltase alguna pieza, dirigirse a nuestro Ser-
vice Center o a la tienda especializada más cer-
cana en un plazo máximo de 5 días laborales tras
la compra del artículo presentando un recibo de
compra válido. A este respeto, observar la tabla
de garantía de las condiciones de garantía que se
encuentran al final del manual.
• Abrir el embalaje y extraer cuidadosamente
el aparato.
• Retirar el material de embalaje, así como los
dispositivos de seguridad del embalaje y para
el transporte (si existen).
• Comprobar que el volumen de entrega esté
completo.
• Comprobar que el aparato y los accesorios
no presenten daños ocasionados durante el
transporte.
• Si es posible, almacenar el embalaje hasta
que transcurra el periodo de garantía.
Peligro!
¡El aparato y el material de embalaje no son
un juguete! ¡No permitir que los niños jue-
guen con bolsas de plástico, láminas y pie-
zas pequeñas! ¡Riesgo de ingestión y asfixia!
• Manual de instrucciones original
Anl_RB_ET_2620_SPK7.indb 10Anl_RB_ET_2620_SPK7.indb 10 08.06.15 09:0808.06.15 09:08

E
- 11 -
3. Uso adecuado
El aparato está indicado para cortar el césped en
jardines privados o de hobby.
Se define como jardines privados o de hobby
todos aquellos que no formen parte de instalacio-
nes públicas, parques, polideportivos, calles, así
como zonas agrícolas o forestales. La observan-
cia de las instrucciones de uso especificadas por
el fabricante constituye un requisito indispensable
para manejar el aparato de forma adecuada.
¡Atención! El aparato no debe emplearse
para triturar material con el fin de obtener
compost, puesto que se podrían producir da-
ños personales y materiales.
Utilizar la máquina sólo en los casos que se indi-
can explícitamente como de uso adecuado. Cual-
quier otro uso no será adecuado. En caso de uso
inadecuado, el fabricante no se hace responsable
de daños o lesiones de cualquier tipo; el respon-
sable es el usuario u operario de la máquina.
Tener en consideración que nuestro aparato no
está indicado para un uso comercial, industrial o
en taller. No asumiremos ningún tipo de garantía
cuando se utilice el aparato en zonas industria-
les, comerciales o talleres, así como actividades
similares.
4. Características técnicas
Tensión de red: .............................. 230 V ~ 50 Hz
Potencia .................................................... 260 W
Circunferencia de corte Ø ...........................20 cm
Revoluciones n0...............................12000 r.p.m.
Hilo de corte Ø......................................... 1,2 mm
Nivel de presión acústica LpA ................. 81 dB(A)
Nivel de potencia acústica LWA ............... 94 dB(A)
Vibración ahv ........................................... 3,5 m/s²
Peso ...........................................................1,5 kg
5. Antes de la puesta en marcha
5.1 Montaje de la recortadora de césped (fig.
3-5b)
• Encajar la barra superior (fig. 3/pos. 7) con la
barra inferior (fig. 3/ pos. 8) en el sentido de
la flecha hasta que el dispositivo de retención
(fig. 3/ pos. 6) se enclave bien en la barra
superior.
• Retirar el juego de tornillos de la empuñadura
adicional (fig. 2/pos. 4).
• Deslizar la empuñadura adicional (fig. 4/ pos.
4) sobre la barra superior (fig. 4/ pos. 7) y
fijar con el juego de tornillos retirado anteri-
ormente.
• Colocar la cubierta de protección (fig. 5a/
pos. 9) sobre el cabezal del motor y girar ha-
cia la izquierda hasta el tope.
• Atornillar la cubierta de protección (fig. 5b/
pos. 10).
5.2 Ajuste del mango adicional:
Colocar la recortadora de césped de forma
estable sobre el suelo. Aflojar el dispositivo de
retención de la empuñadura adicional (fig. 4/ pos.
5) y ajustar la posición óptima de la empuñadura.
El dispositivo de retención se fija apretando el
tornillo.
6. Manejo
La recortadora de césped dispone de un sistema
prolongador de hilo parcialmente automático. Al
accionar el sistema prolongador, el hilo se alarga
automáticamente, de forma que siempre corta
el césped con el ancho óptimo. Tener en cuenta
que una activación frecuente del sistema prolon-
gador aumenta el desgaste del hilo.
Advertencia: cuando la máquina se ponga en
funcionamiento por primera vez, la cuchilla de la
cubierta de protección cortará el extremo rema-
nente del hilo de corte que sobresalga.
Si el hilo es demasiado corto durante la primera
puesta en marcha, pulsar el botón de la bobina
de hilo y tirar con fuerza del hilo. El hilo se acorta
automáticamente hasta alcanzar una longitud
óptima.
Anl_RB_ET_2620_SPK7.indb 11Anl_RB_ET_2620_SPK7.indb 11 08.06.15 09:0808.06.15 09:08

E
- 12 -
Para obtener un mejor rendimiento de su produc-
to siga las siguientes instrucciones
• No utilicela sin la pieza de protección
• No corte la hierba cuando está mojada, ob-
tendrá mejores resultados cuando la hierba
esté seca.
• Conectar el cable de red a la alargadera y
fijar ésta a la descarga de tracción de cable
(figura 6 / pos.A).
• Para conectar la recortadora de césped,
pulsar el botón de bloqueo de conexión (fig.
6/ pos. B) y a continuación el interruptor ON/
OFF (fig. 6/ pos. 3).
• Para detener la segadora, deje de apretar el
interruptor de puesta en marcha/parada (figu-
ra 6 / posición 3).
• No acerque la segadora al césped hasta que
el interruptor esté pulsado, es decir, cuando
el aparato ya esté en marcha.
• Para cortar bien incline el aparato de lado y
avance conservando un ángulo de inclinación
de aproximadamente 30º (ver figuras 8 y 9).
• Cuando la hierba sea muy larga, córtela por
etapas, comenzando por cortar la punta (ver
figura 10).
• Utilice el dispositivo de guía del borde de cor-
te, así como la tapa protectora, para evitar un
desgaste innecesario del hilo.
• Para prevenir un desgaste innecesario del
hilo, evite el contacto con objetos duros.
Utilización de la recortadora de césped como
recortabordes (fig. 11)
Para cortar los bordes de setos y césped, se
puede emplear la recortadora de césped de la
siguiente forma:
• Volver a separar las mitades de la barra pre-
sionando el dispositivo de retención (fig. 3/
pos. 6).
• Girar las dos mitades 180° y volver a encajar-
las entre ellas (fig. 3).
• Asegurarse de que encajen correctamente.
• De esta forma se pasa de recortadora de
césped a recortabordes, pudiendo practicar-
se cortes verticales al césped.
7. Cambio del cable de conexión a la
red eléctrica
Cuando el cable de conexión a la red de este
aparato esté dañado, deberá ser sustituido por
el fabricante o su servicio de asistencia técnica
o por una persona cualificada para ello, evitando
así cualquier peligro.
8. Mantenimiento, limpieza y pedido
de piezas de repuesto
Desenchufar siempre antes de realizar algún
trabajo de limpieza.
8.1 Limpieza
• Reducir al máximo posible la suciedad y
el polvo en los dispositivos de seguridad,
las rendijas de ventilación y la carcasa del
motor. Frotar el aparato con un paño limpio o
soplarlo con aire comprimido manteniendo la
presión baja.
• Se recomienda limpiar el aparato tras cada
uso.
• Limpiar el aparato con regularidad con un
paño húmedo y un poco de jabón blando. No
utilizar productos de limpieza o disolventes ya
que se podrían deteriorar las piezas de plá-
stico del aparato. Es preciso tener en cuenta
que no entre agua en el interior del aparato.
• Eliminar los residuos acumulados en la cu-
bierta de protección con un cepillo
8.2 Cambio de la bobina de hilo
¡Atención! ¡Desenchufar el aparato antes de
cambiar la bobina de hilo!
• Presionar lateralmente las superficies mar-
cadas en la cubierta de la bobina y retirarlas
con la bobina (fig 7a).
• Retirar la bobina de hilo gastada.
• Introducir los extremos del hilo de la nueva
bobina en los ojetes de la cubierta de la bobi-
na (fig. 7b) y dejar que el hilo se asome unos
10 cm.
• Volver a insertar la cubierta con la bobina en
el alojamiento de la misma.
• El hilo de nailon se acorta automáticamente
hasta alcanzar una longitud óptima con la
primera puesta en marcha.
¡Atención! Los trozos de hilo de nailon que
salgan proyectados pueden provocar lesio-
nes!
Anl_RB_ET_2620_SPK7.indb 12Anl_RB_ET_2620_SPK7.indb 12 08.06.15 09:0808.06.15 09:08

E
- 13 -
8.3 Mantenimiento
No hay que realizar el mantenimiento a más
piezas en el interior del aparato.
8.4 Pedido de piezas de recambio:
Al solicitar recambios se indicarán los datos
siguientes:
• Tipo de aparato
• No. de artículo del aparato
• No. de identidad del aparato
• No. del recambio de la pieza necesitada.
9. Eliminación y reciclaje
El aparato está protegido por un embalaje para
evitar daños producidos por el transporte. Este
embalaje es materia prima y, por eso, se puede
volver a utilizar o llevar a un punto de reciclaje.
El aparato y sus accesorios están compuestos de
diversos materiales, como, p. ej., metal y plástico.
Depositar las piezas defectuosas en un contene-
dor destinado a residuos industriales. Informarse
en el organismo responsable al respecto en su
municipio o en establecimientos especializados.
10. Solucion de Problemas
El aparato no se pone en marcha:
verifique que el cable eléctrico está correctamen-
te enchufado e inspeccione los fusibles.
En caso de que el aparato siga sin funcionar
estando la tensión en condiciones, envíelo a la
dirección indicada del servicio de post-venta.
Anl_RB_ET_2620_SPK7.indb 13Anl_RB_ET_2620_SPK7.indb 13 08.06.15 09:0808.06.15 09:08

GB
- 14 -
Table of contents
1. Safety regulations
2. Layout and items supplied
3. Proper use
4. Technical data
5. Before starting the equipment
6. Operation
7. Replacing the power cable
8. Cleaning, maintenance and ordering of spare parts
9. Disposal and recycling
10. Troubleshooting
Anl_RB_ET_2620_SPK7.indb 14Anl_RB_ET_2620_SPK7.indb 14 08.06.15 09:0808.06.15 09:08

GB
- 15 -
Danger! - Read the operating instructions to reduce the risk of inquiry
Anl_RB_ET_2620_SPK7.indb 15Anl_RB_ET_2620_SPK7.indb 15 08.06.15 09:0808.06.15 09:08

GB
- 16 -
Danger!
When using equipment, a few safety precautions
must be observed to avoid injuries and damage.
Please read the complete operating manual with
due care. Keep this manual in a safe place, so
that the information is available at all times. If
you give the equipment to any other person, give
them these operating instructions as well.
We accept no liability for damage or accidents
which arise due to non-observance of these inst-
ructions and the safety information.
1. Safety regulations
The corresponding safety information can be
found in the enclosed booklet.
Danger!
Read all safety regulations and instructions.
Any errors made in following the safety regula-
tions and instructions may result in an electric
shock, fire and/or serious injury.
Keep all safety regulations and instructions
in a safe place for future use.
Explanation of the warning signs on the ma-
chine (see Fig. 12)
AWarning!
BRead the instruction manual before starting!
C Wear eye protection and ear plugs!
DProtect from moisture!
EPull out the mains plug before checking a da-
maged power cable!
FKeep other people out of the danger area!
GThe equipment continues to rotate!
Read the complete operating manual with
due care.
Acquaint yourself with the controls and how
to use the tool.
This appliance is not intended for use by persons
(including children) with reduced physical, sen-
sory or mental capabilities, or lack of experience
and knowledge, unless they have been given
supervision or instruction concerning use of the
appliance by a person responsible for their safety.
Children should be supervised to ensure that they
do not play with the appliance.
Important!
For safety reasons the grass trimmer is not to
be used by children, young people under 16
years of age, or any other persons who are
not acquainted with these directions for use.
Keep the instruction manual in a safe place
for later use.
• Examine the grass trimmer each time before
you use it. Do not use the trimmer if any sa-
fety devices are damaged or worn. Never put
safety devices out of operation.
• Do not use the grass trimmer if the cables are
damaged or worn.
• Stop using the equipment when there are
people – particularly children – or pets nearby.
• Use the grass trimmer only for the purpose
specified in these instructions.
• You are responsible for safety in your work
area.
• Inspect the items you want to cut before star-
ting to work. Remove any foreign objects you
find. Watch out for foreign objects while you
work. If you still hit upon an obstacle while
cutting, turn off the grass trimmer and remove
the obstacle.
• Work only in good visibility.
• Always make sure of your footing while wor-
king. Be careful when stepping backwards.
Risk of stumbling!
• Never leave the grass trimmer unattended at
your work place. Store the trimmer in a safe
place during interruptions.
• If you interrupt your work to move to a diffe-
rent position it is imperative to switch off the
grass trimmer while you are moving there.
• Never use the grass trimmer in the rain or in
moist or wet conditions.
• Protect the grass trimmer from the damp and
rain.
• Before you switch on the grass trimmer, make
sure that there are no stones or other objects
touching the nylon line.
• Always wear suitable clothing to protect your
head, hands and feet from injury.Wear a
helmet, goggles or visor, high boots or strong
shoes, long trousers made of tough material,
and work gloves.
• Be sure to hold the grass trimmer away from
your body when it is switched on!
• If the grass trimmer is turned over or if it is not
in working position, do not switch it on.
• Switch off the motor and pull out the power
plug when you are not using the grass trim-
mer, when you leave the trimmer unattended,
when you are checking the trimmer, if the
Anl_RB_ET_2620_SPK7.indb 16Anl_RB_ET_2620_SPK7.indb 16 08.06.15 09:0808.06.15 09:08

GB
- 17 -
power cable is damaged, when you want to
remove and replace the spool, and when you
are moving the trimmer to another location.
• Keep the grass trimmer away from other
persons, particularly children and pets.There
may be stones and other objects in the flying
cut grass.
• Keep at least 5 m away from other persons
and animals when you are working with the
grass trimmer.
• To prevent injury to yourself and damage to
the grass trimmer, never cut against hard
objects.
• Use the edge of the guard to keep the grass
trimmer away from walls, changes of surface
and fragile objects.
• Never use the grass trimmer without a guard.
CAUTION! The guard is vital for your
safety and for the safety of others, and it is
also essential for the grass trimmer to work
correctly. Failure to observe this instruction
will not only create a potential hazard, it will
also result in the loss of your rights under
the warranty.
• Never try to stop the cutter (nylon line) with
your hands. Wait until it stops by itself.
• It is imperative to use only the original nylon
line. Never use metal wire instead of the nylon
line.
• Beware of injuring yourself on the line cutting
device.
• Keep the air vents clear of dirt.
• After use, unplug the machine and check it for
damage.
• Never attempt to cut grass that is not growing
on the ground. For example, do not try to cut
grass growing on walls, rocks, etc.
• Within the working radius of the grass trim-
mer the user is responsible for any damage
caused to third persons by use of the trimmer.
• Never cross roads or pebble paths with the
grass trimmer switched on.
• When you are not using the grass trimmer,
keep it in a dry place out of the reach of child-
ren.
• Use the grass trimmer only as described in
these directions for use and always hold it
vertical to the ground. All other positions are
dangerous.
• Check the screws regularly to see that they
are properly tightened.
• The mains voltage must be the same as the
voltage specified on the rating plate.
• Check the power cable regularly for signs of
damage or aging. Never use the grass trim-
mer if the power cable is in less than perfect
condition.
• Power cables used with the trimmer must not
be of a lighter duty class than HO7RN-F rub-
ber-insulated flexible cables according to DIN
57282 / VDE 0282 with a minimum diameter
of 1.5 mm2. Plug connectors must be equip-
ped with earthing contacts and the coupling
must be rain-water-protected.
• If the cable is damaged during operation, dis-
connect it immediately from the power supply.
DO NOT TOUCH THE CABLE BEFORE IT
IS DISCONNECTED FROM THE POWER
SUPPLY.
• To prevent danger, damaged power cables
must be replaced by the manufacturer or by a
service company authorized by the manufac-
turer to carry out the work.
• The equipment may only be powered via an
earth-leakage circuit breaker (RCD) with a
maximum operating current of 30 mA.
• Keep cables and other objects out of the area
you want to cut.
• If you have to lift the grass trimmer to move it,
switch off the motor and wait for the rotating
tool to stop. Before you leave the trimmer,
switch off the motor and pull out the power
plug.
• Before you connect the grass trimmer to the
power supply, make sure that none of its
moving parts are damaged and that the line
spool is correctly inserted and fastened.
• Never cut against hard objects when using
the grass trimmer.This is imperative to avoid
causing injury to the user and damage to the
trimmer.
• Use only original replacement parts for repair
and maintenance purposes.
• Have repairs carried out only by a qualified
electrician.
• Examine the grass trimmer for signs of wear
or damage each time before you use it and
after any collisions. Have essential repairs
carried out without delay.
• Always keep your hands and feet away from
the cutting mechanism, particularly when you
switch on the trimmer.
• After pulling out new line, always return the
trimmer to normal working position before you
switch it on again.
• Never use replacement parts or accessories
which are not foreseen or recommended by
Anl_RB_ET_2620_SPK7.indb 17Anl_RB_ET_2620_SPK7.indb 17 08.06.15 09:0808.06.15 09:08

GB
- 18 -
the manufacturer.
• Pull out the power plug before carrying out
any inspection, cleaning or other work on the
trimmer and whenever it is not being used.
• Use the equipment only in broad daylight or in
well-lit conditions.
• Keep the extension cable away from cutting
tools at all times.
Important: The nylon line continues to
rotate for a few seconds after the motor is
switched off.
The equipment does not start.
2. Layout and items supplied
2.1 Layout (Fig. 1/2)
1. Power cable
2. Upper handle
3. ON/OFF switch
4. Additional handle
5. Lock for additional handle
6. Lock
7. Top handlebar
8. Bottom handlebar
9. Guard hood
10. Screw for mounting the guard hood
11. Line spool
2.2 Items supplied
Please check that the article is complete as
specified in the scope of delivery. If parts are
missing, please contact our service center or the
sales outlet where you made your purchase at
the latest within 5 working days after purchasing
the product and upon presentation of a valid bill
of purchase. Also, refer to the warranty table in
the service information at the end of the operating
instructions.
• Open the packaging and take out the equip-
ment with care.
• Remove the packaging material and any
packaging and/or transportation braces (if
available).
• Check to see if all items are supplied.
• Inspect the equipment and accessories for
transport damage.
• If possible, please keep the packaging until
the end of the guarantee period.
Danger!
The equipment and packaging material are
not toys. Do not let children play with plastic
bags, foils or small parts. There is a danger of
swallowing or suffocating!
• Original operating instructions
3. Proper use
The equipment is designed for cutting lawns and
small areas of grass in private and hobby gar-
dens.
Equipment designed for use in private and hobby
gardens is regarded as unsuitable for use in pub-
lic facilities, parks and sports centers, along road-
ways, or in agriculture and forestry.The operating
instructions as supplied by the manufacturer must
be kept and referred to in order to ensure that the
equipment is properly used and maintained.
Important. This equipment must not be used
for composting purposes (shredding) as this
could result in injury or damage to property.
The machine is to be used only for its prescribed
purpose. Any other use is deemed to be a case
of misuse.The user / operator and not the manu-
facturer will be liable for any damage or injuries of
any kind caused as a result of this.
Please note that our equipment has not been de-
signed for use in commercial, trade or industrial
applications. Our warranty will be voided if the
machine is used in commercial, trade or industrial
businesses or for equivalent purposes.
Anl_RB_ET_2620_SPK7.indb 18Anl_RB_ET_2620_SPK7.indb 18 08.06.15 09:0808.06.15 09:08

GB
- 19 -
4. Technical data
Mains voltage ................................ 230 V ~ 50 Hz
Power ........................................................ 260 W
Cutting circle............................... Diameter 20 cm
Revolutions n0.................................... 12000 rpm
Cutting line diameter ............................... 1.2 mm
LpA sound pressure level ........................ 81 dB(A)
LWA sound power level ........................... 94 dB(A)
Vibration ahv........................................... 3.5 m/s²
Weight ........................................................1.5 kg
5. Before starting the equipment
5.1 Assembly of the Grass trimmer (Fig. 3-5b)
• Assemble the upper long handle (Fig. 3/
Item 7) and lower long handle (Fig. 3/Item 8)
together in the direction of the arrow, until the
lock (Fig./Item 6) is securely engaged in the
upper long handle.
• Remove the screw set from the additional
handle (Fig. 2/Item 4).
• Mount the additional handle (Fig. 4/Item 4)
onto the upper long handle and secure it with
the aforementioned screw set.
• Place the guard hood (Fig. 5a/Item 9) on the
motor head and turn it anticlockwise until it
reaches the stop.
• Secure the guard hood with screws (Fig. 5b/
Item 10).
5.2 Adjusting the additional handle:
Place the grass trimmer on a firm surface. Undo
the lock of the additional handle (Fig. 4/Item 5)
and move the additional handle to its optimal
position. Lock the handle in place by retightening
the lock.
6. Operation
The grass trimmer has a semi-automatic line
extension system. Each time you activate the
semi-automatic line extension system, the line
is automatically extended to ensure that you can
cut your lawn with the perfect cutting width at all
times. Please note that the more often you activa-
te the semi-automatic line extension system, the
more the line will wear.
Note: If the line is too long when you use the
equipment for the first time, the surplus end of it
will be cut by the blade on the guard hood.
If the line is too short when you start the machi-
ne for the first time, press the knob on the line
spool and pull the line hard.When you start the
equipment again the line will be cut to the perfect
length automatically.
Your grass trimmer will work at its best if you ob-
serve the following instructions:
• Never use the grass trimmer without its safety
devices.
• Do not cut grass when it is wet.The best re-
sults are had on dry grass.
• Connect the power cable to the extension
cable and fasten this to the strain-relief clamp
(Figure 6/Item A).
• To switch on your grass trimmer press the sa-
fety lock-off (Figure 6 / Item B) and then press
the ON/OFF switch (Figure 6 / Item 3).
• To deactivate the grass trimmer, let go of the
On/Off switch (Figure 6 / Item 3).
• Do not move the grass trimmer against the
grass until the switch is pressed, i.e. wait until
the trimmer is running.
• For the correct cutting action, swing the grass
trimmer to the side as you walk forward, hol-
ding it at an angle of approx. 30° as you do so
(see Figure 8 and Figure 9).
• Make several passes to cut long grass shor-
ter step by step from the top (see Figure 10).
• Make full use of the edge guide and the guide
hood in order to avoid unnecessary line wear
(see Figure 13 and Figure 14).
• Keep the grass trimmer away from hard ob-
jects in order to avoid unnecessary line wear.
Using the grass trimmer as an edge trimmer
(Fig. 11)
To cut he edges of lawns and flower beds, the
grass trimmer can be converted as follows:
• Separate both halves of the long handle
again by pressing the stop (Fig. 3/Item 6).
• Connect the two halves again once they have
been turned through 180° (Fig. 3).
• Secure correct engagement.
• Now you have converted the grass trimmer to
an edge trimmer for cutting the lawn vertically.
Anl_RB_ET_2620_SPK7.indb 19Anl_RB_ET_2620_SPK7.indb 19 08.06.15 09:0808.06.15 09:08

GB
- 20 -
7. Replacing the power cable
If the power cable for this equipment is damaged,
it must be replaced by the manufacturer or its
after-sales service or similarly trained personnel
to avoid danger.
8. Cleaning, maintenance and
ordering of spare parts
Always pull out the mains power plug before star-
ting any cleaning work.
8.1 Cleaning
• Keep all safety devices, air vents and the
motor housing free of dirt and dust as far as
possible. Wipe the equipment with a clean
cloth or blow it with compressed air at low
pressure.
• We recommend that you clean the device
immediately each time you have finished
using it.
• Clean the equipment regularly with a moist
cloth and some soft soap. Do not use
cleaning agents or solvents; these could
attack the plastic parts of the equipment. En-
sure that no water can seep into the device.
• Use a brush to remove deposits from the
safety guard.
8.2 Replacing the line spool
Important. Make sure that you pull out the power
plug before replacing the line spool!
• Press the sides of the spool cover as shown
and remove the cover (Figure 7a).
• Remove the empty line spool.
• Thread the ends of the line on the new line
spool through the eyelets in the spool cover
(Fig. 7b) and allow approx. 10 cm of line to
project.
• Fit the spool cover and spool back into the
spool mounting.
• When you start the equipment again the line
will be cut to the perfect length automatically.
Important. Bits of the nylon line could cause injury
when being flung out.
8.3 Maintenance
There are no parts inside the equipment which
require additional maintenance.
8.4 Ordering replacement parts
Please quote the following data when ordering
replacement parts:
• Type of machine
• Article number of the machine
• Identification number of the machine
• Replacement part number of the part required
9. Disposal and recycling
The unit is supplied in packaging to prevent its
being damaged in transit.This packaging is raw
material and can therefore be reused or can be
returned to the raw material system.
The unit and its accessories are made of various
types of material, such as metal and plastic. De-
fective components must be disposed of as spe-
cial waste. Ask your dealer or your local council.
10. Troubleshooting
The machine will not work:
Check that the power cable is connected properly
and check the mains fuses.
If the machine will not work despite the voltage
supply being OK, send it to the specified after-
sales service address.
Anl_RB_ET_2620_SPK7.indb 20Anl_RB_ET_2620_SPK7.indb 20 08.06.15 09:0808.06.15 09:08
This manual suits for next models
1
Table of contents
Languages:
Other Robust Trimmer manuals