Rocktrail z29592 User manual

HandHeld WeatHer Station
Operation and Safety Notes
tragbare WetterStation
Bedienungs- und Sicherheitshinweise
Kannettava SääaSema
Käyttö- ja turvallisuusohjeet
bärbar väderStation
Bruksanvisning och säkerhetsanvisningar
bærbar vejrStation
Betjenings- og sikkerhetshenvisninger
3
Z29592

GB/IE Operation and Safety Notes Page 4
FI Käyttö- ja turvaohjeet Sivu 35
SE Bruksanvisning och säkerhetsanvisningar Sidan 65
DK Brugs- og sikkerhedsanvisninger Side 93
DE/AT/CH Bedienungs- und Sicherheitshinweise Seite 123

3
5
6
7
8
9
10
11
12
13
1 2 3 4

4 GB/IE
Introduction
Intended Use....................................................................Page 6
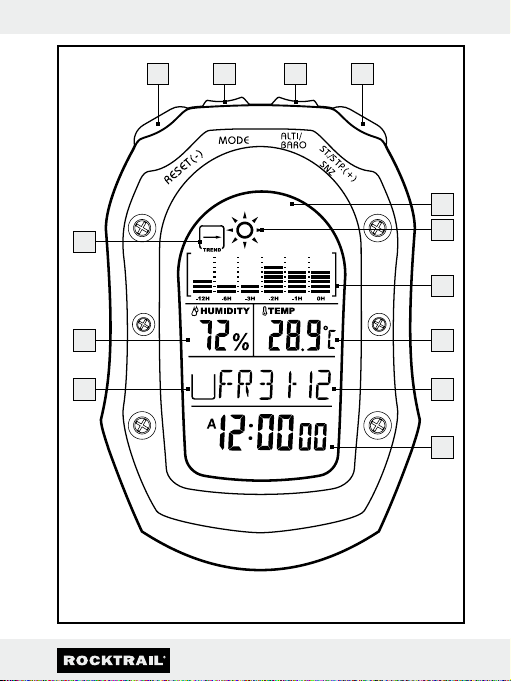
Description of parts and features ...................................Page 7
Technical data .................................................................Page 8
Scope of Supply..............................................................Page 9
General Safety Information.......................Page 9
Safety Instructions for the Battery ...................................Page 11
Starting the weather station up..............Page 12
Regulating the default settings
for language, time, date, time zone ...............................Page 13
Deactivating/activating the display ..............................Page 16
Switching the touch beep on/off...................................Page 16
Switching off the automatic display/
activating the sleep function ...........................................Page 17
Setting the alarm time and activating the daily alarm...Page 18
Activating the hourly alarm.............................................Page 19
Using the stopwatch........................................................Page 19
Timing/storing and retrieving lap times ........................Page 20
Using the countdown counter.........................................Page 21
Displaying the world times..............................................Page 22
Using the barometer........................................................Page 23
Adjusting the barometer..................................................Page 24
Using the altimeter...........................................................Page 25
Adjusting the altimeter.....................................................Page 26

5GB/IE
Measuring the difference in height.................................Page 26
Weather forecast.............................................................Page 27
Reading off the temperature and humidity ....................Page 28
Retrieving the maximum and minimum values...............Page 29
Battery display.................................................................Page 31
Changing the battery ......................................................Page 31
Cleaning and Maintenance..........................Page 32
Disposal.........................................................................Page 32
Declaration of conformity.............................Page 34

6 GB/IE
Handheld Weather Station
Q
Introduction
Familiarise yourself with the product before using it
for the first time. In addition please refer carefully
to the operating instructions below and the safety
advice. Use the product only as described and for the
indicated purpose. Keep these instructions in a safe place.
If you pass the product on to anyone else, please ensure
that you also pass on all the documentation.
Q
Intended Use
The portable weather station displays the temperature
in Celsius (°C) or Fahrenheit (°F), the air humidity in per
cent (% RH) and their maximum and minimum values. The
weather station also displays the weather forecast, the time
in 12/24-hour clock modes and the date. In addition, the
weather station also has an alarm and calendar function as
well as a barometer and an altimeter. Other uses or changes
to the device are considered to be contrary to the intended
use and may result in personal injury and /or damage to the
device. The manufacturer accepts no liability for damage

7GB/IE
caused through the use of the device in contradiction of its
intended use. The device is not intended for commercial use.
Q
Description of parts and features
1RESET button
2MODE button (“configuration”)
3ALTI/ BARO button (“altimeter/barometer”)
4ST./STP button (start/stop)
5Display
6Weather symbol
7Barometric pressure bar display
8Temperature display
9Date display
10 Time display
11 Daily alarm display
12 Relative humidity display
13 Barometric pressure trend display

8 GB/IE
Q
Technical data
Temperature
Resolution: 0.1°C (0.1 °F)
Measuring range: –10 - +60 °C
14 - +140 °F
Humidity
Resolution: 1% RH (% RH – relative humidity =
% relative humidity)
Measuring range: 25 - 99%
Altimeter
Resolution: 1m
Measuring range: –706 m - 9164m
–2316 ft - 30065ft
Barometer
Resolution: 0.1mb /hPa (millibar/hectopascal)
Measuring range: 300mb /hPa - 1100mb/ hPa
Battery: 1x Lithium button cell 3V
(CR 2032) (included in delivery)

9GB/IE
Q
Scope of Supply
Please check the supplied items immediately after unpacking
the device to ensure that there is nothing missing and that
the product and all of its parts are in perfect condition.
1x Portable weather station
1x Button cell Lithium 3V (CR 2032) (pre-installed)
1x Directions for use
General Safety Information
J WARNING!
DANGER TO LIFE AND
ACCIDENT HAZARD FOR TODDLERS
AND SMALL CHILDREN! Never allow
children to play unsupervised with the packaging material.
There is a danger of suffocation from the packaging
material. Children frequently underestimate the dangers.
Children should be kept away from the product at all times.
This is not a toy.
mDANGER TO LIFE! Batteries can be swallowed, which
may represent a danger to life. If a battery has been
swallowed, medical help is required immediately.
J Children or persons who lack the knowledge or experi-
ence to use the device or whose physical, sensory or

10 GB/IE
intellectual capacities are limited must never be allowed
to use the device without supervision or instruction by a
person responsible for their safety. Children must never
be allowed to play with the device.
J Do not use the device if it is damaged. Damaged devices
represent a danger of death from electric shock!
J Do not use the device in hospitals or medical facilities, as
otherwise this may result in malfunctions of life-support
systems.
J Do not expose the device to
- extreme temperatures,
- strong vibrations,
- heavy mechanical loads,
- direct sunlight.
Otherwise there is a danger that the device will be
damaged.
J Do not expose the device to an extremely high electro-
magnetic field. This may impair the correct functioning of
the device. Electrostatic charge can result in malfunction
of the device. In case of malfunctions remove the battery
shortly and replace it again.
J Please note that the guarantee does not cover damage
caused by incorrect handling, non-compliance with the
operating instructions or interference with the device by
unauthorised individuals.

11GB/IE
J Under no circumstances should you take the device apart.
Improper repairs may place the user in considerable
danger. Repairs should only be carried out by specialist
personnel.
Safety Instructions for the Battery
J Remove the battery from the device if it is not going to
be used for a prolonged period.
gCAUTION! DANGER OF EXPLOSION! The battery
must never be recharged!
J Ensure correct polarity when inserting the battery! This
is indicated in the battery compartment.
J If necessary, clean the battery and device contacts
before inserting the battery.
J Remove a spent battery immediately from the device.
There is an increased danger of leaks!
J Batteries must not be disposed of in the normal domestic
waste!
J Every consumer is legally obliged to dispose of batteries
in the proper manner!

12 GB/IE
J Keep the battery away from children; do not throw it in
the fire, short-circuit it or take it apart.
J Use batteries of the same type only.
J If the above instructions are not complied with, the
battery may discharge itself beyond its end voltage.
There is a danger of leaking. If the battery has leaked
inside your device, you should remove it immediately in
order to prevent damage to the device!
J Avoid contact with the skin, eyes and mucous membranes.
Any parts of the body coming into contact with battery
acid should be rinsed off with copious amounts of water
and/ or a doctor contacted if necessary!
Q
Starting the weather station up
Note: When setting it up, if you do not press any button
within 60 seconds, the weather station will automatically
return to the output mode.
j During the set-up procedures, press and keep the RESET
1or ST./STP. buttons 4pressed down. This will
accelerate the set-up.

13GB/IE
Q
Regulating the default settings
for language, time, date, time zone
j Press the MODE button 2as often as necessary until
the date display 9(day of the week mode) appears
in the display 5.
j Hold the MODE button 2down for two seconds to
get to the set-up mode.
j Press the RESET button 1or ST./STP. Button 4to select
the language you wish to have fort the date display 9.
j Press the MODE button 2to set the time zone.
j Using the RESET button 1or the ST./ STP. button 4
to choose between the following time zones:
1. Casablanca CAS GMT +0
2. Dublin DUB GMT +0
3. Lisabon LIS GMT +0
4. London LON GMT +0
5. Munich AGB GMT +1:00
6. Amsterdam AMS GMT +1:00
7. Barcelona BCN GMT +1:00
8. Berlin BER GMT +1:00
9. Brussels BRU GMT +1:00
10.Copenhagen CPH GMT +1:00
11.Frankfurt FRA GMT +1:00
12.Luxembourg LUX GMT +1:00
13.Lyon LYN GMT +1:00
14.Oslo OSL GMT +1:00
15.Paris PAR GMT +1:00
16.Rome ROM GMT +1:00
17.Stockholm STO GMT +1:00
18.Stuttgart STR GMT +1:00
19.Vienna VIE GMT +1:00
20.Zurich ZRH GMT +1:00
21.Athens ATH GMT +2:00
22.Cairo CAI GMT +2:00
23.Cape Town CPT GMT +2:00
24.Helsinki HEL GMT +2:00
25.Istanbul IST GMT +2:00
26.Jerusalem JER GMT +2:00
27.Moscow
MOW
GMT +3:00
28.Dubai DXB GMT +4:00

14 GB/IE
j Press the MODE button 2to set the daylight saving time
(DST).
j Switch it on or off with the RESET button 1or ST./ STP.
button 4.
Note: Only switch the daylight saving time on if you
are in a region in which the daylight saving time applies.
j Press the MODE button 2again in order to set the
seconds.
j When the second display flashes, use the RESET button 1
or ST./STP. button 4to set it to 0.
j Press the MODE button 2to set the minutes.
j When the minute display flashes, use the RESET button 1
29.Karachi KHI GMT +5:00
30.New Delhi DEL GMT +5:30
31.Dhaka DAC GMT +6:00
32.Bangkok BKK GMT +7:00
33.Jakarta JKT GMT +7:00
34.Beijing BJS GMT +8:00
35.Hong Kong HKG GMT +8:00
36.Manila MNL GMT +8:00
37.Shanhai PVG GMT +8:00
38.Singapore SIN GMT +8:00
39.Taipei TPE GMT +8:00
40.Seoul SEL GMT +9:00
41.Tokyo TYO GMT +9:00
42.Melbourne MEL GMT +10:00
43.Sydney SYD GMT +10:00
44.Noumea
NOU
GMT +11:00
45.Auckland AKL GMT +12:00
46.Honolulu HNL GMT -10:00
47.Anchorage ANC GMT -9:00
48.Los Angeles LAX GMT -8:00
49.San Francisco SFO GMT -8:00
50.Vancouver YVR GMT -8:00
51.Denver DEN GMT -7:00
52.Chicago CGX GMT -6:00
53.Mexico MEX GMT -6:00
54.New York JFK GMT -5:00
55.Lima LIM GMT -5:00
56.Toronto YTO GMT -5:00
57.Caracas CCS GMT -4:00
58.Santiago SCL GMT -4:00
59.Buenos Aires BUE GMT -3:00
60.Rio de Janeiro RIO GMT -3:00

15GB/IE
or ST./STP. button 4to set the value you wish to have.
j Press the MODE button 2to set the hours.
j When the hour display flashes, use the RESET button 1
or ST./STP. button 4to set the value you wish to have.
j Press the MODE button 2to set the year. Use the RESET
button 1or ST./STP. button 4to set the current year.
j Press the MODE button 2to set the month. Use the
RESET button 1or ST./STP. button 4to set the current
month.
j Press the MODE button 2to set the day. Use the RESET
button 1or ST./STP. button 4to set the current day.
j Press the MODE button 2, to set the date format.
j Use the RESET button 1or the ST./ STP. button 4to
choose between the formats of month/ day or day/
month.
j Press the MODE button 2to select the hour format.
j Use the RESET button 1or the ST./ STP. button 4to
choose between the 12-hour or 24-hour format.
j Press the ALTI/BARO button 3to leave the set-up mode
if needed.

16 GB/IE
Q
Deactivating/activating the display
You can deactivate the display 5to save battery power.
Note: The clock will still work even if the display 5has
been deactivated.
j Press the MODE button 2as often as necessary until
the date display 9(day of the week mode) appears
in the display 5.
j Press the ALTI/BARO button 3down for about 5 second
in order to deactivate the display 5.
j Press one of the buttons 1, 2, 3, 4to re-activate
the display 5.
Q
Switching the touch beep on/off
The weather station has a touch tone function. When it is
activated, a sound is made when you press a button.
j Press the MODE button 2as often as necessary until
the date display 9(day of the week mode) appears
in the display 5.
j Hold the MODE button 2down for two seconds to
get to the set-up mode.

17GB/IE
j Press the MODE button 2as often as necessary until
you get to set-up procedure for switching the touch
beep function on/ off (BEEP).
j Press the RESET button 1or the ST./STP. button 4to
switch the touch tone on or off.
j Press the ALTI/BARO button 3to leave the set-up mode.
Q
Switching off the automatic display/
activating the sleep function
If the sleep function is on, the display 5will switch itself off
if no button has been pressed for 48 hours.
j Press the MODE button 2as often as necessary until
the date display 9(day of the week mode) appears
in the display 5.
j Hold the MODE button 2down for two seconds to
get to the set-up mode.
j Press the MODE-button 2as often as necessary until
you get to the set-up to switch the sleep function on/off
(SLEEP).
j Press the RESET button 1or the ST./STP. button 4,
to switch the sleep function on or off.
j Press the ALTI/BARO button 3to leave the set-up mode.

18 GB/IE
Q
Setting the alarm time and
activating the daily alarm
j Press the MODE button 2as often as necessary until
ALM appears in the display 5.
j Using the ST./STP. button 4to choose daily alarm
1 or daily alarm 2.
j Hold the MODE button 2down for 2 seconds. The
symbol hr flashes.
j Press the RESET 1or ST./STP. 4button to set the
value you wish to have. The symbol will appear in
the display 5.
j Press the MODE button 2again to set the minutes.
j Press the RESET 1or ST./STP. 4button to set the
value you want.
j Press the ALTI/BARO button 3to leave the set-up mode.
j Press the RESET button 1to activate or deactivate the
daily alarm.
Note: If the daily alarm is switched on the symbol
will appear in the display 5.
The alarm will sound for 30 seconds every day at the
set time.
j Press button 1,2or 3to stop the alarm sounding.
j If you press the ST./STP. button 4when the alarm is
sounding, you will activate the snooze function ( ).

19GB/IE
The alarm sound will stop and will be re-activated after
8 minutes.
j Press any button to leave the snooze function.
Q
Activating the hourly alarm
j Press the MODE button 2as often as necessary until
ALM appears in the display 5.
j Press the RESET button 1down for 2 seconds to
switch the hourly alarm on or off.
Note: If the hourly alarm is switched on, the symbol
will appear in the display 5. The alarm tone will sound
on the hour every hour. The alarm consists of a single
beep sound.
Q
Using the stopwatch
The weather station has a stopwatch function. You can
measure minutes, seconds and hundredths of seconds.
Before using it for the first time, the stopwatch will read 0.
j Press the MODE button 2as often as necessary until
CHR appears in the display 5.
j Press the ST./ STP. button 4to start the stopwatch.

20 GB/IE
Press the button again to stop the stopwatch.
j The display 5will indicate the time between start
and stop.
j If you press the ST./STP. button 4again, the time will
continue to run again.
j Press the RESET button 1for 2 seconds to reset the
stopwatch display to 0 again.
Note: With time measurements longer than one hour,
the hours, minutes and seconds are indicated in the
time display.
Q
Timing/storing and
retrieving lap times
Timing and storing lap times
You can time and store up to 10 lap times.
j Press the MODE button 2as often as necessary until
CHR appears in the display 5.
j Press the ST./ STP. button 4to start the stopwatch.
j Press the RESET button 1to time a lap.
The lap number will flash in the time display 10 and the
lap time will be indicated in the display 5for about
10 seconds. After that, the time will continue.
j Press the RESET button 1again to time another lap.
Other manuals for z29592
1
This manual suits for next models
1
Table of contents
Languages:
Other Rocktrail Weather Station manuals