Rocktron MIDI Mate User manual

MIDI Mate
Footswitchable MIDI Controller
May be covered by one or more of the following: U.S.Patents #4538297, 4647876, 4696044, 4745309, 4881047, 4893099 and 5124657. Other
patents pending. Foreign patents pending.
USER'S MANUAL
Version 2

PRECAUTIONS
NOTE:ITISVERYIMPORTANTTHATYOUREADTHISSECTIONTOPROVIDE
YEARSOFTROUBLEFREEUSE. THISUNITREQUIRESCAREFULHANDLING.
All warnings on this equipment and in the operating instructions should be adhered to and
all operating instructions should be followed.
Do not use this equipment near water. Care should be taken so that objects do not fall and
liquidsarenotspilledintotheunitthroughanyopenings.
The power cord should be unplugged from the outlet when left unused for a long period of
time.
DONOTATTEMPTTOSERVICETHISEQUIPMENT. THISEQUIPMENTSHOULD
BESERVICEDBYQUALIFIEDPERSONNELONLY. DONOTMAKEANYINTER-
NALADJUSTMENTSORADDITIONSTOTHISEQUIPMENTATANYTIME. DO
NOTTAMPERWITHINTERNALELECTRONICCOMPONENTSATANYTIME.
FAILURETOFOLLOWTHESEINSTRUCTIONSMAYVOIDTHEWARRANTYOF
THISEQUIPMENT,ASWELLASCAUSINGSHOCKHAZARD.
POWER REQUIREMENTS
This unit accepts power from the 9VAC/1.5A adaptor supplied with the unit.
OPERATING TEMPERATURE
Do not expose this unit to excessive heat. This unit is designed to operate between 32° F
and 104° F (0° C and 40° C). This unit may not function properly under extreme tempera-
tures.
Copyright ©1993
All Rights Reserved

Contents
Introduction ........................................................................................ 1
MIDI ................................................................................................................. 1
MIDI Channel .................................................................................................. 1
MIDI Commands ............................................................................................. 2
Quick Setup ........................................................................................ 4
Features and Operation ..................................................................... 6
BANK ACCESS ............................................................................................... 8
INSTANT ACCESS ....................................................................................... 10
CONTROLLER ACCESS .............................................................................. 11
Editing the MIDI Mate ................................................................... 14
Title Editing ................................................................................................... 17
MIDI Channel Editing .................................................................................... 19
Controller Assignment Editing ...................................................................... 21
Programmable Patch Changes Editing......................................................... 24
Factory Reinitialization .................................................................... 26
Expression Pedal "Y" Cords ........................................................... 28
MIDI Implementation ........................................................................ 29

1
CongratulationsonyourpurchaseoftheRocktronMIDIMate™!
The MIDI Mate™ provides many different features and modes of opera-
tion. Its modes of operation range from very simple (transmitting a single
programchangeon a single MIDIchannel)tocomplex (such as transmit-
ting six program changes on six separate MIDI channels, five control
changeson fiveseparateMIDIchannelsand acontinuouscontrolchange
on a separate MIDI channel). The MIDI Mate™ is capable of sending
threedifferentkinds of MIDIcommandson a specifiedMIDIchannel to
anyMIDIdevice.
To use the MIDI Mate™ to its full potential requires some under-
standingof MIDIcommands and specifications.
MIDI MIDI standsforMusicalInstrumentDigitalInterface,and isan
industrystandardsystemforcommunicationbetweenmusicalequipment.
Some MIDI devices only transmit MIDI messages, these are calledtrans-
mitters. There are other MIDI devices which can only receive MIDI
messages, these are called receivers. In addition, there are also MIDI
devices that both receive and transmit MIDI messages which can be called
receivers or transmitters. A receiver may be thought of as a MIDI "ear",
that is to say that it listens but never speaks. A MIDI transmittermay be
thought of as a MIDI "mouth", that is to say it speaks, but never listens. A
device that canboth transmit and receiveMIDI may be thoughtof as having
a MIDI "ear" and a MIDI "mouth" that allows it to both listen and speak.
A very simple MIDI setup requires only that there be aMIDI transmitter
and a MIDI receiver - one to speak and one to listen. More complex MIDI
setupsmay have devices that speak and listen to each other at the same
time. The MIDI Mate™ is a MIDItransmitter, capable of changing
parameters on MIDI receivers.
MIDI Channel
A MIDI channel is simply a way of encoding a command so that
multiple devices may talk to each other using the same physical wires.
Unlessmessagesareencodedforthesamechannel,thetransmitted
message will be ignored by the receiving device. By encoding signals in
this manner, the MIDI Mate™ can tell a particular receiving device to
perform a certain task while simultaneously telling a different receiving
Introduction

2
MIDI Mate™ Manual
device to do something else. Each receiving device only acts on the com-
mandintended forit.
MIDI Commands
Themostcommon type of MIDIcommandistheMIDIprogram
change (often called a patch change). This command is intended to recall the
programmed settings of a receiving device. A programmable device, such as
theRocktronProGAP™guitarpreamp,mayhaveparameterssuchasthegain
set to 40, the bass level set to 5dB, and the output level set to 10dB. These
settings can then be stored in preset #10. Each time the ProGAP™ receives
program change 10, these settings are recalled.
Another type of MIDI command is theMIDI control change. This
command is used to set a single parameter on a receiving unit to a specific
value. The preset of the receiving device is not changed, only the value of
the specified parameter. The specified parameter on the receiving device is
mapped to a number called acontrol number. A transmitting device sending
a control change will specify the MIDI channel, the control number, and the
value that the specified parameter should change to, or thecontroller value.
The controller value is a number from 0 to 127 that the receiving device
attaches to an actual parameter value.
How a device responds to a MIDI control change depends on both the
device and the parameter. Some devices will not understand a MIDI control
change and will simply ignore it. Other devices, like the Rocktron
ProGAP™, will respond to MIDI control changes. All of the parameters that
determinethesound of theProGAP™can be adjustedthroughMIDI control
changes. The ProGAP™ has 64 values for each parameter with each
parameter value corresponding to a different controller value. A convenient
way to perform MIDI control changes on these parameters is to use a
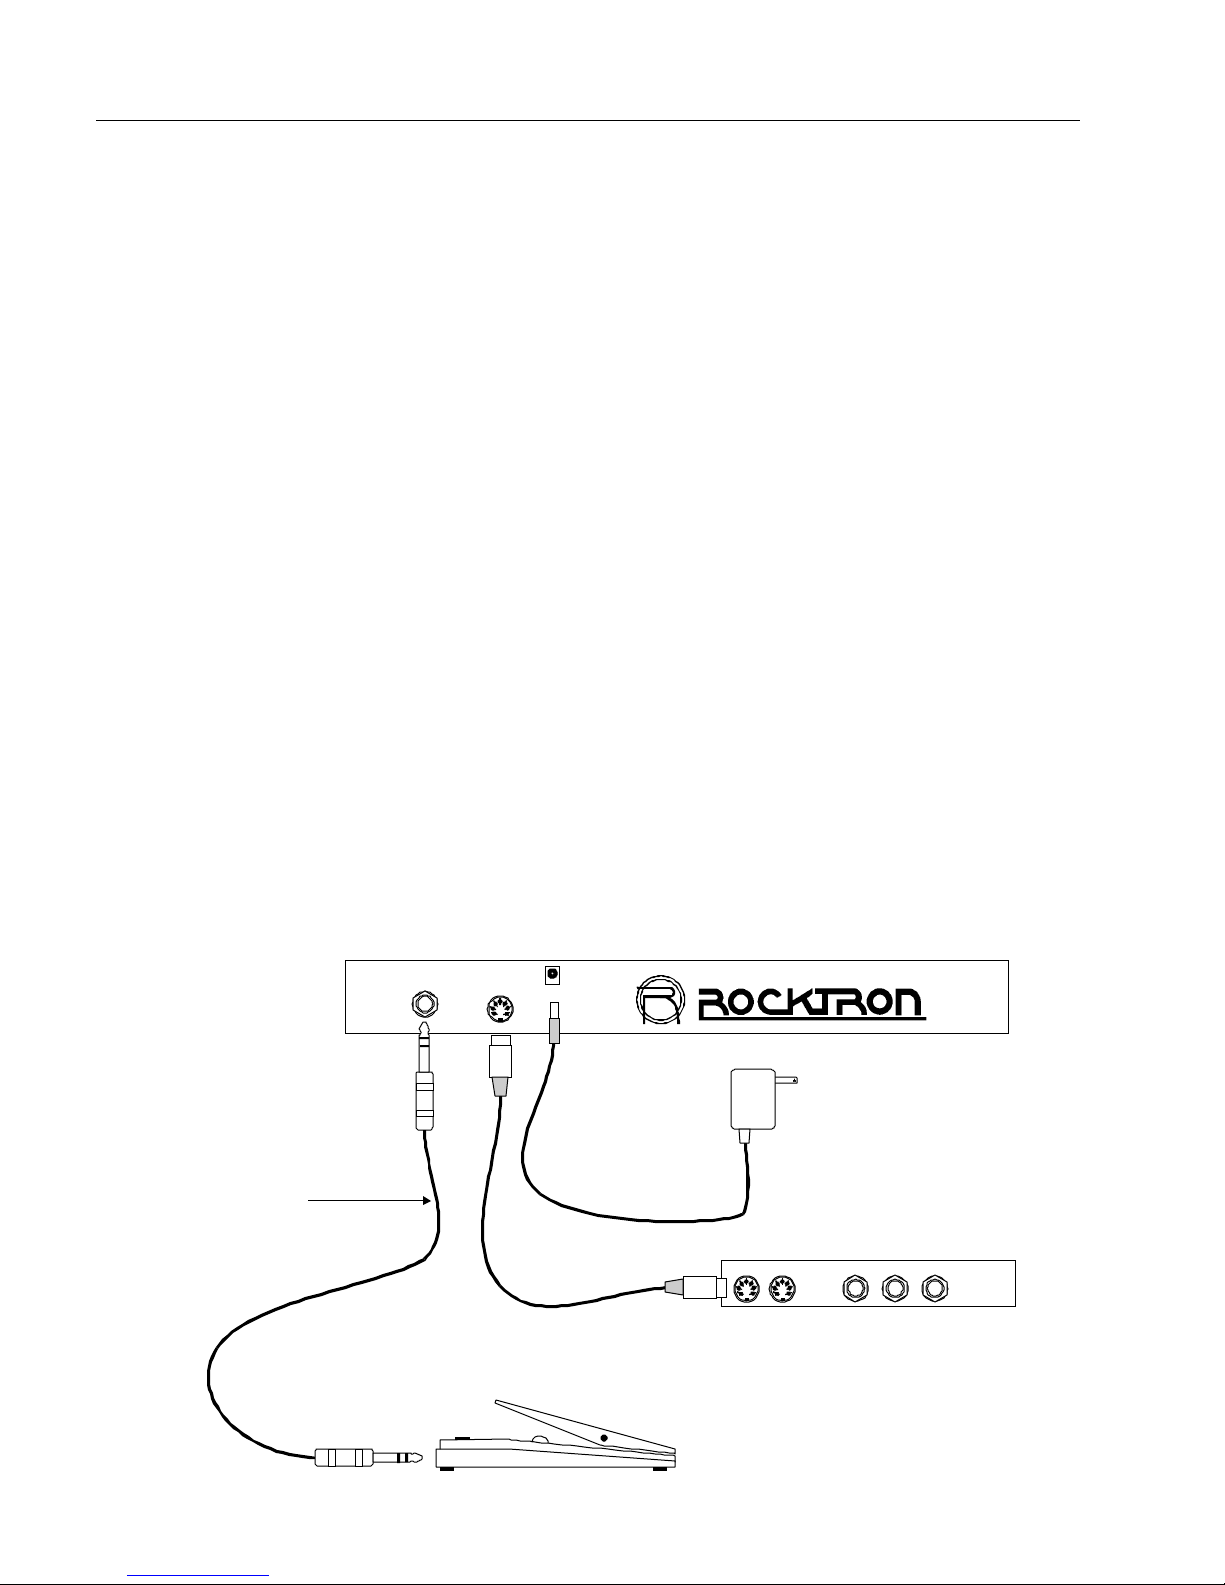
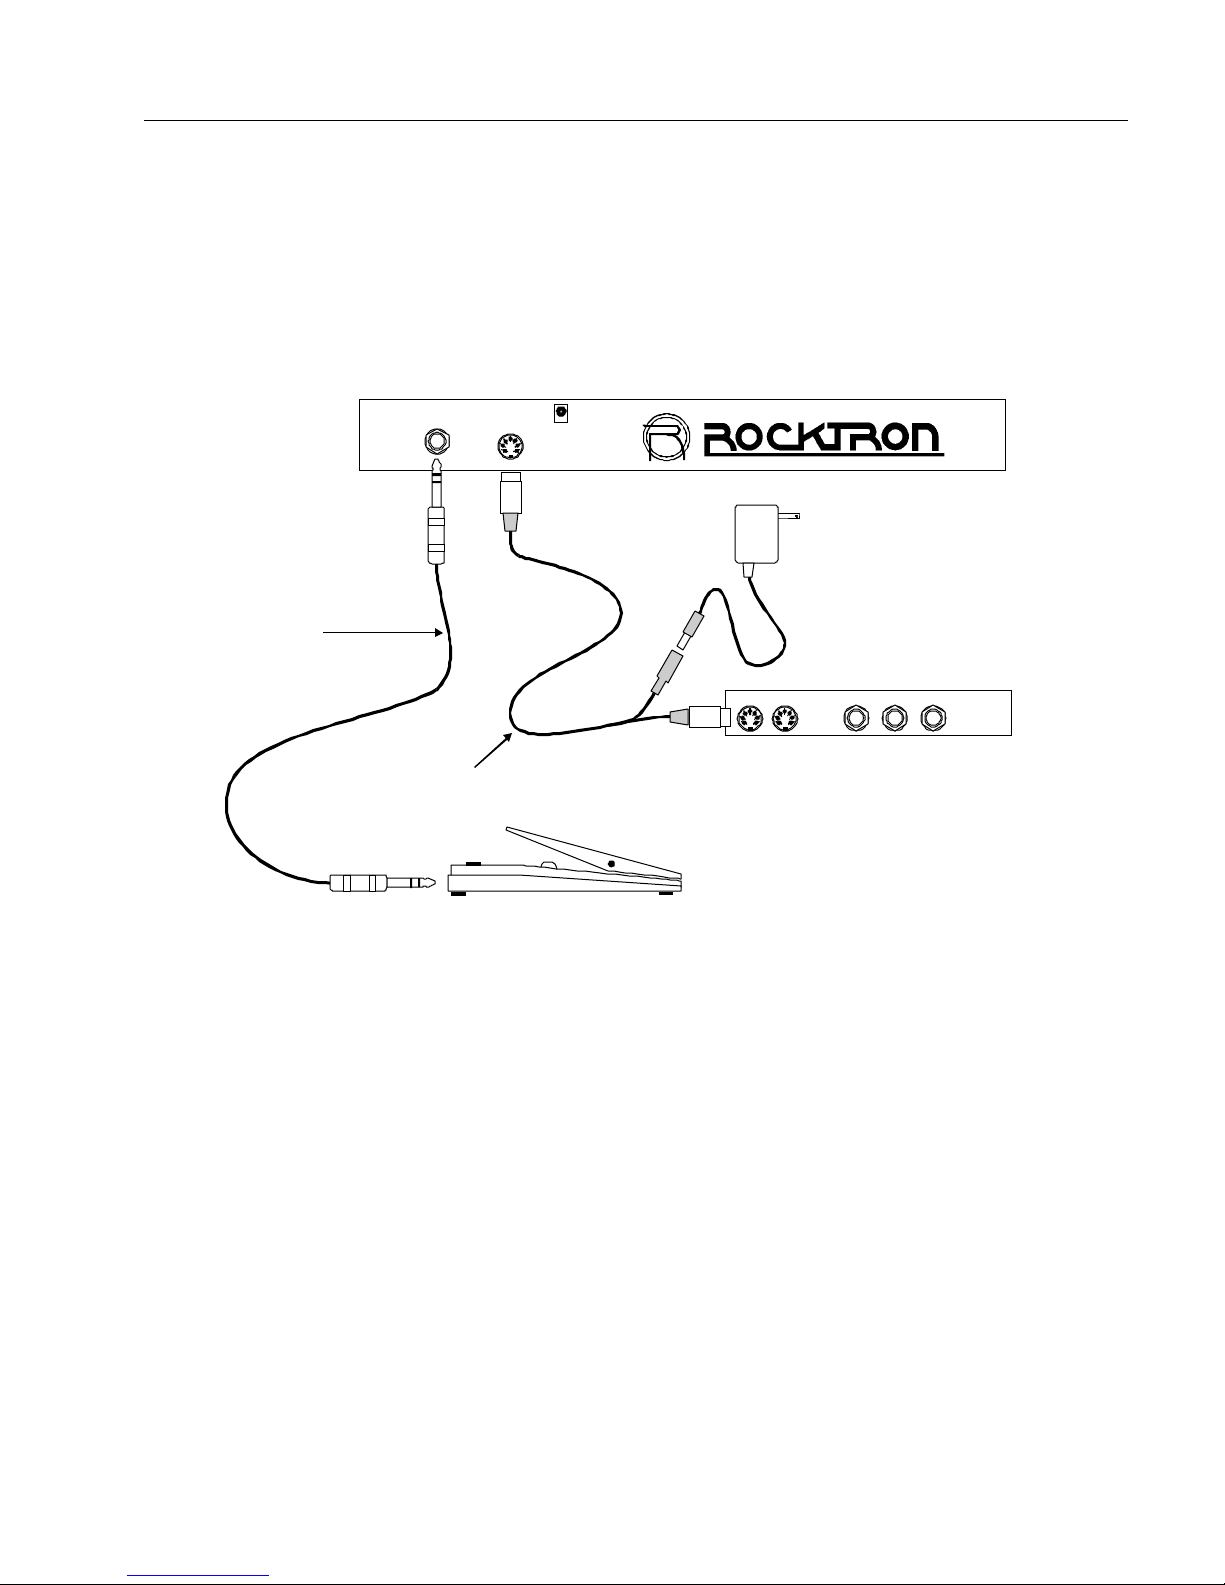
continuous controller. An expression pedal, volume pedal, fader, or any
potentiometer that can be plugged into the MIDI Mate™ qualifies as a
continuous controller. As the continuous controller resistance is changed, a
new controller value is sent to the receiving device. For example, if an
expression pedal is plugged into the MIDI Mate™, the pedal control number
is set to 10, and the ProGAP™'s output level is mapped to control number
10, moving the pedal back and forth causes the output level to change. To
achieve this, all that must be done is to match control numbers between the
parameter of the receiving device and the pedal of the transmitting device. It
isimportanttorememberthattheMIDIchannelsofthetransmittingand
receiving devices must also match.

3
The loop and controls on the Rocktron ProGAP™ can be changed
through MIDI control changes as well. Since the loop and controls can have
only an on or off status, they are conveniently called on/off controllers. For
on/off controllers, a control change command with a controller value of less
than 64 is interpreted to be off. A value greater than 63 is interpreted to be
on.

4
MIDI Mate™ Manual
To start using the MIDI Mate™ right away, use a 5 pin MIDI connec-
torandplugoneendintotheMIDIOUTjackof the MIDI Mate™. Plug the
other end into the MIDI IN jack of a MIDI receiving device. Plug the adaptor
supplied with the MIDI Mate™ into the POWER jack of the MIDI Mate™.
Plug the adaptor into a nearby compatible wall socket.
NowassignSET1'sMIDIchannelto the same MIDI channel of the
device that is receiving MIDI. Press the 2ND button so that the 2ND LED
lights.NowpresstheEDITFUNCTION SELECT "à"buttontwice, until
"MIDI Channels" scrolls across the display. Allow the scrolling to finish,
and "S1CH 1" will be displayed. This shows that SET1 is assigned to MIDI
channel 1. To change the MIDI channel to match a receiving device's MIDI
channel,usethe BANK (ADJUST)buttons. Whenfinished, press the2ND
buttontoturnoffthe2NDLED.
Now the MIDI Mate™ will send the program change displayed by
the three character display to any MIDI receiver on the same channel.
Quick Setup
Typical Quick Setup:
9VAC ADAPTOR
MIDI RECEIVING DEVICE
EXPRESSION PEDAL
PEDAL MIDI OUT POWER
9VAC-800mA
PHANTOM POWER
MID I IN
¼" STEREO TO
¼" STEREO CORD
See page 28 for information on
expression pedal cords.

5
The power cord may be plugged into a special MIDI "Y" cord (Rocktron
Part# 006-1097) to power the MIDI Mate through pins 6 and 7 of the MIDI
Mate MIDI OUT jack. Rocktron also has a 5 to 5 pin MIDI cable (Part# 001-
1095) and 7 to 7 pin MIDI cable (Part# RMM900) available to power the MIDI
Mate through phantom power on other products.
Rocktron also offers an expression pedal stereo "Y" cord (Part# 006-
1107).
Quick Setup using a MIDI "Y" cord:
MIDI "Y" CORD
EXPRESSION PEDAL
MIDI RECEIVING DEVICE
9VAC ADAPTOR
PEDAL POWER
9VAC-800mA
(PHANTOM POWER)
MIDI OUT
MIDI IN
¼" STEREO TO
¼" STEREO CORD
See page 28 for information on
expression pedal cords.

6
MIDI Mate™ Manual
Features and Operation
The MIDI Mate features:
• Three modes of operation-
Bank Mode - Allows you to change presets within a bank of ten
presets with the touchof a single button.
Instant Mode- Allows you to change instantly from preset 01 to 99
withthe touchof twobuttons.
Controller Mode - Allows you to change presets within a bank of 5
presets with the touch of a single button, as well as access 5 buttons
whichcansendMIDI on/off control commandswith the touchofa
singlebutton.
• Eight character personal titles for each preset.
• Display of current MIDI program.
• LED over each button for instant recognition of preset.
• Phantom power supply.
• Expression pedal ready.
• MultipleMIDIprogramchangesonseparate MIDI channels.
• Multiple MIDI control changes.
• User friendly editing procedure.

7
BANK
INSTANT
CONTROLLER
ACCESS 2ND 0 1 2 3 4
5 6 7 8 9
BANK
(ADJUST)
EDIT PRESET
SELECT
EDIT FUNCTION
SELECT
STORE
These buttons provide
dual functions
Personal
title
Determines
the function
of the dual
function
buttons
Use to select
Bank, Instant or
Controller Access
modes
99 MIDI 99
MIDI 9999
MIDI 9999
Function of dual function buttons
with 2ND L.E.D. off
(This accesses the function printed below
each button)
Current program
number
Basic operating features...
Function of dual function buttons
with 2ND L.E.D. on
(This accesses the function printed above
each button)
TITLES
MIDI CHANNELS
CONTROLLER ASSIGN
PROGRAM CHANGES
TITLES
MIDI CHANNELS
CONTROLLER ASSIGN
PROGRAM CHANGES
BANK
I NST ANT
CO NTROL LE R
ACCESS 2ND 0 1 2 3 4
5 6 7 8 9
BANK
(ADJUS T)
EDIT P RESET
SELECT
EDIT F UNCTI ON
SELECT
STO RE
BANK
I NST ANT
CO NTROL LE R
ACCESS 2ND 0 1 2 3 4
5 6 7 8 9
BANK
(ADJUS T)
EDIT P RESET
SELECT
EDIT F UNCTI ON
SELECT
STO RE

8
MIDI Mate™ Manual
BANK ACCESS
(Any program that starts with the same first 2 numbers may be chosen with
the touch of a single button)
WhileinBankmode(2NDLEDoff),theusermaychangepresets
within the current bank (bank numbers are 0 - 12). For example, the MIDI
Mate™ powers on in bank "0". By touching a button while the"Rocktron
MIDI Mate™" message is scrolling, the number of the pressed button will
betheMIDI programchangesent on itsassignedchannel. The bank number
and the preset number are displayed in the three character numeric display.
Tochangethe bank ontheMIDIMate™, press the2NDbuttonuntil the 2ND
LED lights. Now the BANK (ADJUST) "á" or "â" button may be pressed
tochangethe banknumber. TheBANK (ADJUST) "á"and"â"buttons
maybehelddown to scroll through thedifferentbanknumbers. When the
button is released, the selected bank number will flash on and off. At this
point button numbers 2 thru 9 may be pressed to send the corresponding
MIDI program change. The 2ND LED does not need to be turned off unless
preset change 0 or 1 within the chosen bank is desired. This cuts down on
the number of buttons needed to be pressed while in the Bank access mode.

9
BANK
INSTANT
CONTROLLER
ACCESS 2ND 0 1 2 3 4
5 6 7 8 9
BANK
(ADJUST)
EDIT PRESET
SELECT
EDIT FUNCTION
SELECT
STORE
BANK
INSTANT
CONTROLLER
ACCESS 2ND 0 1 2 3 4
5 6 7 8 9
BANK
(ADJUST)
EDIT PRESET
SELECT
EDIT FUNCTION
SELECT
STORE
BANK
INSTANT
CONTROLLER
ACCESS 2ND 0 1 2 3 4
56789
BANK
(ADJUST)
EDIT PRESET
SELECT
EDIT FUNCTION
SELECT
STORE
To change from bank 0 to 12
(The "Bank" is the first two digits of a three digit program number)
MIDI 9912
Bank display
blinking
Step 2
Use the "Bank"
buttons to
select the bank.
Step 1
Press the
"2ND" button to
turn the 2ND
L.E.D. on
MIDI 127127
MIDI 123123
Step 3
Press the
"2ND" button to
turn the 2ND
L.E.D. off
Step 5
To continue changing programs in the same bank, press the last number of the
program. Any other program that starts with the same first two numbers may be
selected with a single button.
TITLES
MIDI CHANNELS
CONTROLLER ASSIGN
PROGRAM CHANGES
Step 4
Press the last number of the
desired program (for example,
pressing 3 while in bank 12
changes to program 123)
TITLES
MIDI CHANNELS
CONTROLLER ASSIGN
PROGRAM CHANGES
TITLES
MIDI CHANNELS
CONTROLLER ASSIGN
PROGRAM CHANGES

10
MIDI Mate™ Manual
BANK
INSTANT
CONTROLLER
ACCESS 2ND 0 1 2 3 4
56789
BANK
(ADJUST)
EDIT PRESET
SELECT
EDIT FUNCTION
SELECT
STORE
INSTANT ACCESS
(Changes to any program from 01 to 99 with the touch of 2 buttons)
The Instant mode allows the user to instantly change presets with the
touch of two buttons. First be sure the INSTANT LED is lit, and the 2ND
LED is off. Now press any combination of two buttons to change to the
correspondingprogram. Forexample,by pressing button 0 andthenbutton
1, the MIDI Mate™ will transmit program change 1. By pressing the 9 button
twice, the MIDI program change 99 will be sent, and so on. The bank "á"
and "â" function works in the Instant mode the same as it works in the Bank
mode, thereby allowing access to presets 100 thru 128 while in the Instant
mode.
MIDI 11
Step 1
Press the "0"
button
Step 2
Press the "1"
button
To change to program 74:
Step 1
Press the "7" button
Step 2
Press the "4" button
To change to program 99:
Step 1
Press the "9" button
Step 2
Press the "9" button
TITLES
MIDI CHANNELS
CONTROLLER ASSIGN
PROGRAM CHANGES

11
CONTROLLER ACCESS
(To send a single MIDI on/off control change command with the touch of a
button)
The Controller access mode allows for the use of on/off MIDI control
changes. Buttons 5-9 on the MIDI Mate™ may be assigned to a control
number, and when that button is pressed a MIDI control change will be
transmittedcorrespondingto the assigned controlnumber. Acommonuse for
this feature is to have direct remote control over another device's parameters
withoutchangingpresets. Forexample,the Rocktron ProGAP™hasMIDI
controllable control functions and a loop. If the ProGAP™ 's loop is set to
control number 9, and button 5 on the MIDI Mate™ is set to control number
9, the ProGAP™ loop can now be turned on or off by pressing button 5 on
the MIDI Mate™ . This cuts down on the number of presets needed because
now presets do not need to be duplicated (for example, one with the loop on
and one with the loop off).
The status of the parameter that is being turned on/off by the MlDI
Mate™ is stored by the MlDI Mate™ also, thereby sending the correct MIDI
control change command (on or off) when the program is changed. For every
button assigned to a control number, a control change will be sent every time
the preset is changed. For example, if buttons 5, 6, 7 and 8 are set to control
numbers 11, 12, 13 and 14 respectively, every time a program change is
madefourMIDIcontrolchangecommands(controlchanges11,12,13,14)
would be sent on the corresponding MIDI channels. These four control
changes would send the status (on/off) of the controls that were last stored for
that preset. To store a controller"On", make sure that the CONTROLLER
Access LED is lit, and that the corresponding MIDI channel is not set to
"Off", then press the button of the assigned control number so that the LED
above the button is lit. A lit LED above the button means the controller is on,
and an unlit LED above the button means the controller is off. Set the control
status for all the assigned buttons in this fashion. For buttons not assigned to
a control number, the LED above them will not light. Once all the LEDs are
set to represent the correct status (on or off) of all assigned controllers, then
this status can be stored with the current preset by first pressing the 2ND
button so that the 2ND LED lights. Then press the STORE button."Stored"
will flash briefly on the display showing that the current status has been
stored. (This is the only function for the STORE button.)
Buttons 0-4 may be used to change presets while in the Controller

12
MIDI Mate™ Manual
BANK
INSTANT
CONTROLLER
ACCESS 2ND 0 1 2 3 4
5 6 7 8 9
BANK
(ADJUST)
EDIT PRESET
SELECT
EDIT FUNCTI ON
SELECT
STORE
access mode. To change preset banks, press the 2ND button so that the 2ND
L.E.D. is lit, then press the Bank"á" or "â" buttons to select the desired
bank. Presets are grouped in banks of 5 in the Controller Access mode.
Therefore, if you are currently in bank 55 and button 1 is pressed, preset 56
will be recalled and the L.E.D. above button 1 will be lit. Consider each
button# as a value that will be added to the current blinking bank# if pressed.
preset should be "on", then that status must be stored "on" for that
preset, and for every preset the control is desired "on".
Preset Buttons
Controller Buttons
Set assigned buttons (see "Controller Assignment Edit" section) and set controller MIDI channel (see "MIDI
Channel Edit" section).
L.E.D. "on" sends control ON command (control value of 127).
L.E.D. "off" sends control OFF command (control value of 0).
Button functions in Controller
access mode:
TITLES
MIDI CHANNELS
CONTROLLER ASSIGN
PROGRAM CHANGES
MIDI 99
99

13
BANK
INSTANT
CO NTROLLER
ACCESS 2ND 0 1 2 3 4
56789
BANK
(ADJUST)
EDIT PRESET
SELECT
EDIT FUNCTION
SELECT
STORE
BANK
INSTANT
CO NTROLLE R
ACCESS 2ND 0 1 2 3 4
5 6 7 8 9
BANK
(ADJUST)
EDIT PRE SET
SELECT
EDIT FUNCTION
SELECT
STORE
Storing the current status
(To store the status of on/off buttons in the current program)
STORED99
Step 1
Turn on the 2ND
L.E.D. by pressing
the 2ND button.
MIDI 9999
Step 3
Press the 2ND button to turn the 2ND
L.E.D. off. Now each time program 99
is recalled, this configuration of on/off
buttons is recalled.
Step 2
Press the STORE button
(The MIDI Mate will display
"STORED" briefly).
TITLES
MIDI CHANNELS
CONTROLLER ASSIGN
PROGRAM CHANGES
TITLES
MIDI CHANNELS
CONTROLLER ASSIGN
PROGRAM CHANGES

14
MIDI Mate™ Manual
The editing features of the MIDI Mate™ are designed to be helpful
byincorporatingscrollingmessages and requiring the leastnumberofbuttons
to press as possible. The MIDI Mate™ automatically stores the choices that
the user makes to make it easier for the user to edit parameters. The STORE
button does not store the choices in the editing mode - it has no function in the
editing mode. The parameters which can be edited include: titles, MIDI
channels, assignable controller numbers and additional patch changes. The
MIDIMate™ incorporatesaunique editingfeatureusing theEDITPRESET
SELECT buttons. These buttons allow the user to change the preset that is
beingeditedwithout leaving theeditingmode.
Anytimethatthe2NDLEDislit,theEDITPRESETSELECTbuttons
will increment ("á") or decrement ("â") the current preset by one. These
buttons may also be held down to scroll through the presets. This feature
allows the user to enter the edit mode, do all the editing necessary for all the
presets, then exit the edit mode with the least number of buttons pressed. The
editing is divided into four sections - "Titles", "MIDI Channels", "Controller
Assignment" and "Program Changes" - and can be accessed while in any
access mode. The editing functions are accessible by pressing theEDIT
FUNCTION SELECT "ß" and "à" buttons. The editing parameters can be
adjustedbyusingtheBANK (ADJUST)"á"and"â"buttons.
The editing mode may be initiated in any of the access modes by
pressing the 2ND button so that the 2ND LED is lit. Then press theEDIT
FUNCTION SELECT "à" button. "Title Edit" will scroll across the dis-
play. If theEDIT FUNCTION SELECT "à" button is pressed a second time
before the scrolling is complete, "MIDI Channels" will scroll across the
display. If theEDIT FUNCTION SELECT "à" button is pressed a third
time before the scrolling is complete, "Controller Assignment" will scroll
across the display. And if theEDIT FUNCTION SELECT "à" button is
pressed a fourth time before the scrolling is complete, "Programmable
Patch Changes" will scroll across the display, thereby completing the cycle
of all four editing sections.
ContinuingtopresstheEDITFUNCTIONSELECT"à"button
Editing the MIDI Mate

15
before the scrolling is complete will return the user to "Title Edit", and
continuerepeatingthefoursections.
BypressingtheEDITFUNCTIONSELECT"ß"button,thefour
editing sections will appear in reverse order from that above. The EDIT
PRESETSELECTbuttonswillincrementordecrementthepresetbeing
edited in any of these four editing sections. To exit the edit mode, press the
2ND button so that the 2ND LED is off, or change the access mode by press-
ing the ACCESS button. The editing LED will flash as long as the MIDI
Mate™ is in the editing mode.
TheEDITFUNCTIONSELECTbuttonsallowyoutoscrollthroughthe
available function headings for editing. Referring to the figure on the
following page, repeatedly pressing the "à" button will scroll through the
function headings in a clockwise fashion, while the "ß" button will scroll
counter-clockwise.

16
MIDI Mate™ Manual
To access the menu below each heading, wait for the scrolling of the selected
heading to complete. The EDIT FUNCTION SELECT buttons may then be used
to scroll through the contents of each menu.
To avoid accessing the menu below a heading and move to the next heading,
press the EDIT FUNCTION SELECT button again before the scrolling of the
current heading is complete.
PRESS "2ND" ANYTIME TO EXIT EDITING
CHARACTER 1
CHARACTER 2
CHARACTER 3
CHARACTER 4
CHARACTER 5
CHARACTER 6
CHARACTER 7
CHARACTER 8
PROGRAMMABLE
PATCH CHANGES
CONTROLLER
ASSIGNMENT
TITLE
EDIT
MIDI
CHANNELS
5 6
EDIT FUNCTION
SELECT
TITLES
MIDI CHANNELS
CONTROLLER ASSIGN.
PROGRAM CHANGES
MIDI Mate top view
PEDL (OFF, 0-120)
RATE (1-50)
BTN5 (OFF, 0-120)
BTN6 (OFF, 0-120)
BTN7 (OFF, 0-120)
BTN8 (OFF, 0-120)
BTN9 (OFF, 0-120)
Pedal Controller Number
Pedal Scan Rate
Button 5 Control Change Number
Button 6 Control Change Number
Button 7 Control Change Number
Button 8 Control Change Number
Button 9 Control Change Number
SET2 (OFF, 1-128)
SET3 (OFF, 1-128)
SET4 (OFF, 1-128)
SET5 (OFF, 1-128)
SET6 (OFF, 1-128)
Set 2 Program Change#
Set 3 Program Change#
Set 4 Program Change#
Set 5 Program Change#
Set 6 Program Change#
S1CH (OFF, 1-16)
S2CH (OFF, 1-16)
S3CH (OFF, 1-16)
S4CH (OFF, 1-16)
S5CH (OFF, 1-16)
S6CH (OFF, 1-16)
B5CH (OFF, 1-16)
B6CH (OFF, 1-16)
B7CH (OFF, 1-16)
B8CH (OFF, 1-16)
B9CH (OFF, 1-16)
PEDC (OFF, 1-16)
Set 1 Program Change MIDI Channel
Set 2
Set 3
Set 4
Set 5
Set 6
Button 5 Control Change MIDI Channel
Button 6
Button 7
Button 8
Button 9
Pedal
TITLES
MIDI CHANNELS
CONTROLLER ASSIGN
PROGRAM CHANGES

17
BANK
INSTANT
CO NTROLLER
ACCESS 2ND 0 1 2 3 4
56789
BANK
(ADJUST)
EDIT PRESET
SELECT
EDIT FUNCTION
SELECT
STORE
Title Editing
Enter the editing mode while in any access mode by pressing the 2ND
buttonsothatthe2NDLEDlights. NowpresstheEDIT FUNCTION
SELECT "à" button so that "Title Edit" scrolls across the display. Allow
the scrolling to finish to enter the Title Edit mode. Once the scrolling has
finished, the title of the current preset will be displayed with the decimal
point of the first character of the title flashing. TheBANK (ADJUST) buttons
may now be pressed to scroll through the available characters that maybe
used in the titles. When a character is selected, theEDIT FUNCTION
SELECT"à" button can be pressed to store the character in memory and
advance to the next character for editing.
All of the characters in the title mode can be edited in this fashion.
TheEDITFUNCTIONSELECT buttonsareused tomovethe cursor
(flashing decimal point) to the character position that you wish to edit.
Pressing theEDIT FUNCTION SELECT "ß" button will allow the user to
edit the character one place to the left of the current character. If the far left
character has been edited and editing is complete, theEDIT FUNCTION
SELECT"ß"buttonmaybepressedto enter the Programmable Patch
Changes edit mode. Pressing the Edit Function Select "à" button allows the
next character to the right to be edited. If the far right character has been
editedandediting iscomplete,theEDIT FUNCTIONSELECT "à"button
may be pressed to enter the MIDI Channels edit mode.
Step 1
Press the
"2ND" button to
turn the 2ND
L.E.D. on
Step 2
Press the EDIT FUNCTION SELECT
"à" button ("TITLE EDIT" will scroll
across the display).
Wait for the scrolling to finish.
To enter the TITLE EDIT mode:
(The TITLE EDIT mode may be initiated while in any access mode)
TITLES
MIDI CHANNELS
CONTROLLER ASSIGN
PROGRAM CHANGES
TITLE ED99
Table of contents
Other Rocktron Recording Equipment manuals