Roller ROLLER'S Protector 2 L User manual

ROLLER’S Protector
2
L
ROLLER’S Protector
2
M
Albert Roller GmbH &
Co KG • Werkzeuge und Maschinen • Neue Rommelshauser Straße 4 • 71332 Waiblingen
Deutschland • Telefon +49 7151 1727-0 • Telefax +49 7151 1727-87 • www.albert-roller.de
deu Betriebsanleitung
..........................................
deu Betriebsanleitung..........................................deu Betriebsanleitung
6
eng Instruction Manual
......................................
eng Instruction Manual ......................................eng Instruction Manual
12
fra Notice d’utilisation
......................................
17
ita Istruzioni d’uso
............................................
23
nld Handleiding
..................................................
nld Handleiding..................................................nld Handleiding
29
swe Bruksanvisning
...........................................
swe Bruksanvisning ...........................................swe Bruksanvisning
35
dan Brugsanvisning
...........................................
dan Brugsanvisning ...........................................dan Brugsanvisning
40
fi n Käyttöohje
....................................................
45
slv Navodilo za uporabo
...................................
50

1
Fig. 1
Fig. 3
Fig. 5
Fig. 2
Fig. 4
Fig. 6
2

Fig. 7
Fig. 9
Fig. 8
Fig. 10
“Click”
2x
3

17
13
14
8
21
22
21
16
27
4
1
5
2
11
20
19
24
27
9
12
25
26
3
7
9
23
10
Fig. 12
Fig. 11
Fig. 13
4

Fig. 14
Fig. 15
Fig. 16
5

Originalbetriebsanleitung
Fig.
1–16
1 Behälter
2 Saugeroberteil
3 Verriegelung Saugeroberteil
4 Tragegriff
5 Lenkrolle/Lenkrolle mit Arretierung
6 Halterung für Flächensaugvorsatz
nass/trocken
7 Laufrad
8 Schalter Saugleistung
9 Filterabdeckung
10 Flachfaltenfi lter
11 Verschlussstopfen für Saug-
schlauch-Anschlussstutzen
(ROLLER’S Protector 2 M)
12 Saugschlauch-Anschlussstutzen
13 Saugschlauch
14 Wahlschalter Saugschlauch-
durchmesser
(ROLLER’S
Protector 2 M)
15 Adapter Saugschlauch/
Elektrowerkzeug
16 Steckdose für Elektrowerkzeug mit
Ein-/Ausschaltautomatik
17 Griffstück
18 Fugensaugvorsatz nass/trocken
19 Saugrohr
20 Flächensaugvorsatz nass/trocken
300 mm
21 Ein-/Ausschalte
r/Schalter
automatische Filterreinigung
22 El
ektroden zur Füllstands-
begrenzung
23
Halterung für Fugensaugvorsatz
23 Halterung für Fugensaugvorsatz23
nass/trocken, Griffstück,
Saugrohre, Adapter Saug-
schlauch/Elektrowerkzeug
24
Luftaustritt
25
Lufteintritt Motorkühlung
25 Lufteintritt Motorkühlung25
26
Halterung für Anschlussleitung
26 Halterung für Anschlussleitung26
und Saugschlau
ch
27 Einschubfächer für Adapter
Saugschlauch/Elektrowerkzeug
und Fugensaugvorsatz nass/
trocken 300 mm
Allgemeine Sicherheitshinweise für Elektrowerkzeuge
WARNUNG
WARNUNG
Lesen Sie alle Sicherheitshinweise, Anweisungen, Bebilderungen und tech-
nischen Daten, mit denen dieses Elektrowerkzeug versehen ist.
Versäumnisse
bei der Einhaltung der nachfolgenden Anweisungen können elektrischen Schlag,
Brand und/oder schwere Verletzungen verursachen.
Bewahren Sie alle Sicherheitshinweise und Anweisungen für die Zukunft auf.
Der in den Sicherheitshinweisen verwendete Begriff „Elektrowerkzeug“ bezieht sich
auf netzbetriebene Elektrowerkzeuge (mit Netzleitung) oder auf akkubetriebene
Elektrowerkzeuge (ohne Netzleitung).
1) Arbeitsplatzsicherheit
a) Halten Sie Ihren Arbeitsbereich sauber und gut beleuchtet.
Unordnung oder
unbeleuchtete Arbeitsbereiche können zu Unfällen führen.
b)
Arbeiten Sie mit dem Elektrowerkzeug nicht in explosionsgefährdeter Umgebung,
in der sich brennbare Flüssigkeiten, Gase oder Stäube befi nden.
Elektrowerk-
zeuge erzeugen Funken, die den Staub oder die Dämpfe entzünden können.
c) Halten Sie Kinder und andere Personen während der Benutzung des Elektro-
werkzeugs fern.
Bei Ablenkung können Sie die Kontrolle über das Elektrowerkzeug
verlieren.
2) Elektrische Sicherheit
a) Der Anschlussstecker des Elektrowerkzeugs muss in die Steckdose passen.
Der Stecker darf in keiner Weise verändert werden. Verwenden Sie keine
Adapterstecker gemeinsam mit schutzgeerdeten Elektrowerkzeugen.
Unveränderte Stecker und passende Steckdosen verringern das Risiko eines
elektrischen Schlages.
b) Vermeiden Sie Körperkontakt mit geerdeten Oberfl ächen wie von Rohren,
Heizungen, Herden und Kühlschränken.
Es besteht ein erhöhtes Risiko durch
elektrischen Schlag, wenn Ihr Körper geerdet ist.
c) Halten Sie Elektrowerkzeuge von Regen oder Nässe fern.
Das Eindringen von
Wasser in ein Elektrowerkzeug erhöht das Risiko eines elektrischen Schlages.
d) Zweckentfremden Sie die Anschlussleitung nicht, um das Elektrowerkzeug
zu tragen, aufzuhängen oder um den Stecker aus der Steckdose zu ziehen.
Halten Sie die Anschlussleitung fern von Hitze, Öl, scharfen Kanten oder
sich bewegenden Teilen.
Beschädigte oder verwickelte Anschlussleitungen
erhöhen das Risiko eines elektrischen Schlages.
e) Wenn Sie mit einem Elektrowerkzeug im Freien arbeiten, verwenden Sie
nur Verlängerungsleitungen, die auch für den Außenbereich geeignet sind.
Die Anwendung einer für den Außenbereich geeigneten Verlängerungsleitung
verringert das Risiko eines elektrischen Schlages.
f)
Wenn der Betrieb des Elektrowerkzeugs in feuchter Umgebung nicht vermeidbar
ist, verwenden Sie einen Fehlerstromschutzschalter.
Der Einsatz eines Fehler-
stromschutzschalters vermindert das Risiko eines elektrischen Schlages.
3) Sicherheit von Personen
a) Seien Sie aufmerksam, achten Sie darauf, was Sie tun, und gehen Sie
mit Vernunft an die Arbeit mit einem Elektrowerkzeug. Benutzen Sie kein
Elektrowerkzeug, wenn Sie müde sind oder unter dem Einfl uss von Drogen,
Alkohol oder Medikamenten stehen.
Ein Moment der Unachtsamkeit beim
Gebrauch des Elektrowerkzeugs kann zu ernsthaften Verletzungen führen.
b) Tragen Sie persönliche Schutzausrüstung und immer eine Schutzbrille.
Das Tragen persönlicher Schutzausrüstung, wie Staubmaske, rutschfeste
Sicherheitsschuhe, Schutzhelm oder Gehörschutz, je nach Art und Einsatz des
Elektrowerkzeugs, verringert das Risiko von Verletzungen.
c) Vermeiden Sie eine unbeabsichtigte Inbetriebnahme. Vergewissern Sie sich,
dass das Elektrowerkzeug ausgeschaltet ist, bevor Sie es an die Stromver-
sorgung und/oder den Akku anschließen, es aufnehmen oder tragen.
Wenn
Sie beim Tragen des Elektrowerkzeugs den Finger am Schalter haben oder das
Elektrowerkzeug eingeschaltet an die Stromversorgung anschließen, kann dies
zu Unfällen führen.
d) Entfernen Sie Einstellwerkzeuge oder Schraubenschlüssel, bevor Sie das
Elektrowerkzeug einschalten.
Ein Werkzeug oder Schlüssel, der sich in einem
drehenden Teil des Elektrowerkzeugs befi ndet, kann zu Verletzungen führen.
e) Vermeiden Sie eine abnormale Körperhaltung. Sorgen Sie für einen sicheren
Stand und halten Sie jederzeit das Gleichgewicht.
Dadurch können Sie das
Elektrowerkzeug in unerwarteten Situationen besser kontrollieren.
f) Tragen Sie geeignete Kleidung. Tragen Sie keine weite Kleidung oder
Schmuck. Halten Sie Haare und Kleidung fern von sich bewegenden Teilen.
Lockere Kleidung, Schmuck oder lange Haare können von sich bewegenden
Teilen erfasst werden.
g) Wenn Staubabsaug- und -auffangeinrichtungen montiert werden können,
sind diese anzuschließen und richtig zu verwenden.
Verwendung einer
Staubabsaugung kann Gefährdungen durch Staub verringern.
h) Wiegen Sie sich nicht in falscher Sicherheit und setzen Sie sich nicht über
die Sicherheitsregeln für Elektrowerkzeuge hinweg, auch wenn Sie nach
vielfachem Gebrauch mit dem Elektrowerkzeug vertraut sind.
Achtloses
Handeln kann binnen Sekundenbruchteilen zu schweren Verletzungen führen.
4) Verwendung und Behandlung des Elektrowerkzeugs
a) Überlasten Sie das Elektrowerkzeug nicht. Verwenden Sie für Ihre Arbeit
das dafür bestimmte Elektrowerkzeug.
Mit dem passenden Elektrowerkzeug
arbeiten Sie besser und sicherer im angegebenen Leistungsbereich.
b) Benutzen Sie kein Elektrowerkzeug, dessen Schalter defekt ist.
Ein Elek-
trowerkzeug, das sich nicht mehr ein- oder ausschalten lässt, ist gefährlich und
muss repariert werden.
c) Ziehen Sie den Stecker aus der Steckdose und/oder entfernen Sie einen
abnehmbaren Akku, bevor Sie Geräteeinstellungen vornehmen, Einsatzwerk-
zeugteile wechseln oder das Elektrowerkzeug weglegen.
Diese Vorsichts-
maßnahme verhindert den unbeabsichtigten Start des Elektrowerkzeugs.
d) Bewahren Sie unbenutzte Elektrowerkzeuge außerhalb der Reichweite von
Kindern auf. Lassen Sie keine Personen das Elektrowerkzeug benutzen,
die mit diesem nicht vertraut sind oder diese Anweisungen nicht gelesen
haben.
Elektrowerkzeuge sind gefährlich, wenn Sie von unerfahrenen Personen
benutzt werden.
e) Pfl egen Sie Elektrowerkzeuge und Einsatzwerkzeug mit Sorgfalt. Kont-
rollieren Sie, ob bewegliche Teile einwandfrei funktionieren und nicht
klemmen, ob Teile gebrochen oder so beschädigt sind, dass die Funktion
des Elektrowerkzeugs beeinträchtigt ist. Lassen Sie beschädigte Teile vor
dem Einsatz des Elektrowerkzeuges reparieren.
Viele Unfälle haben ihre
Ursache in schlecht gewarteten Elektrowerkzeugen.
f) Halten Sie Schneidwerkzeuge scharf und sauber.
Sorgfältig gepfl egte Schneid-
werkzeuge mit scharfen Schneidkanten verklemmen sich weniger und sind leichter
zu führen.
g) Verwenden Sie Elektrowerkzeug, Einsatzwerkzeug, Einsatzwerkzeuge
usw. entsprechend diesen Anweisungen. Berücksichtigen Sie dabei die
Arbeitsbedingungen und die auszuführende Tätigkeit.
Der Gebrauch von
Elektrowerkzeugen für andere als die vorgesehenen Anwendungen kann zu
gefährlichen Situationen führen.
h) Halten Sie Griffe und Grifffl ächen trocken, sauber und frei von Öl und Fett.
Rutschige Griffe und Grifffl ächen erlauben keine sichere Bedienung und Kontrolle
des Elektrowerkzeugs in unvorhergesehenen Situationen.
5) Service
a) Lassen Sie Ihr Elektrowerkzeug nur von qualifi ziertem Fachpersonal und
nur mit Original-Ersatzteilen reparieren.
Damit wird sichergestellt, dass die
Sicherheit des Elektrowerkzeugs erhalten bleibt.
Sicherheitshinweise für Trocken- und Nasssauger,
Entstauber
WARNUNG
WARNUNG
Lesen Sie alle Sicherheitshinweise, Anweisungen, Bebilderungen und tech-
nischen Daten, mit denen dieses Elektrowerkzeug versehen ist.
Versäumnisse
bei der Einhaltung der nachfolgenden Anweisungen können elektrischen Schlag,
Brand und/oder schwere Verletzungen verursachen.
Bewahren Sie alle Sicherheitshinweise und Anweisungen für die Zukunft auf.
●
Saugen Sie niemals asbesthaltige Stoffe.
Asbest gilt als krebserregend.
●
Saugen Sie nur Stoffe die für das elektrische Gerät zugelassen sind.
Die
Stoffe können krebserregend sein.
●
Benutzen Sie das elektrische Gerät nur, wenn Sie alle Funktionen voll
einschätzen können und ohne Einschränkungen durchführen können oder
entsprechende Anweisungen erhalten haben.
Eine sorgfältige Einweisung
verringert Fehlbedienung und Verletzungen.
●
Das elektrische Gerät darf nicht von Personen (einschließlich Kinder) mit
verringerten physischen, sensorischen oder mentalen Fähigkeiten oder
Mangel an Erfahrung und Wissen benutzt werden. Kinder sind zu beauf-
sichtigen, um sicherzustellen, dass sie nicht mit dem elektrischen Gerät
spielen.
Andernfalls besteht die Gefahr von Fehlbedienung und Verletzungen.
deu deu
6

●
Saugen Sie mit dem elektrische Gerät keine brennbaren oder explosiven
Flüssigkeiten, zum Beispiel Benzin, Öl, Alkohol, Lösemittel. Saugen Sie
keine heißen oder brennenden Stäube. Betreiben Sie das elektrische Gerät
nicht in explosionsgefährdeten Räumen.
Die Stäube, Dämpfe oder Flüssig-
keiten können sich entzünden oder explodieren.
●
Das elektrische Gerät ist geeignet zum Saugen von trockenen Stoffen und
durch geeignete Maßnahmen auch zum Saugen von Flüssigkeiten.
Das
Eindringen von Wasser in das elektrische Gerät erhöht das Risiko eines elektri-
schen Schlages.
●
Bei Austritt von Stau
b (z. B. Filterdurchbruch) das elektrische Gerät sofort
abschalten.
Vor erneuter Inbetriebnahme muss die Störung beseitigt werden.
●
Bei Austritt von Schaum oder Flüssigkeit das elektrische Gerät so
fort
abschalten.
Die Einrichtung zur Füllstan
dsbegrenzung regelmäßig reinigen und
auf Anzeichen von Beschädigung untersuchen
●
Wenn der Betrieb des elektrischen Geräts in feuchter Umgebung nicht
vermeidbar ist, verwenden Sie einen Fehlerstromschutzschalter.
Der Einsatz
eines Fehle
rstromschutzschalters vermindert das Risiko eines elektrischen Schlages.
●
Schließen Sie das elektrische Gerät an ein ordnungsgemäß geerdetes
Stromnetz an.
Steckdose und Verlängerungskabel müssen einen funktionsfähigen
Schutzleiter besitzen.
●
Benutzen Sie das elektrische Gerät nicht mit beschädigtem Kabel, Stecker
oder Schalter. Berühren Sie beschädigte Kabel, Stecker oder Schalter nicht
und ziehen Sie den Netzstecker, wenn das Kabel, der Stecker oder Schalter
während des Arbeitens beschädigt wird.
Beschädigte Kabel, Stecker oder
Schalter erhöhen das Risiko eines elektrischen Schlages.
●
Überfahren oder quetschen Sie das Kabel nicht. Ziehen Sie nicht am Kabel,
um den Stecker aus der Steckdose zu ziehen oder das elektrische Gerät
zu bewegen.
Beschädigte Kabel erhöhen das Risiko eines elektrischen Schlages.
●
Ziehen Sie den Stecker aus der Steckdose, bevor Sie Geräteeinstellungen
vornehmen, Zubehörteile wechseln oder das elektrische Gerät weglegen.
Diese Vorsichtsmaßnahme verhindert den unbeabsichtigten Start des elektrischen
Geräts.
●
Sorgen Sie für gute Belüftung am Arbeitspla
tz.
●
Lassen Sie das elektrische Gerät niemals unbeaufsichtigt laufen. Schalten
Sie das elektrische Gerät bei längeren Arbeitspausen aus, ziehen Sie den
Netzstecker und entfernen Sie alle Schläuche/Stecker. Von elektrischen
Geräten können Gefahren ausgehen, die zu Sach- und/oder Personenschäden
führen können, wenn sie unbeaufsichtigt sind.
●
L
assen Sie Kinder das elektrische Gerät nicht unbeaufsichtigt benutzen.
Kinder können sich verletzen.
●
Lassen Sie das elektrische Gerät nur von qualifi ziertem Fachpersonal und
nur mit Original-Ersatzteilen reparieren.
Damit wird sichergestellt, dass die
Sicherheit des elektrischen Geräts erhalten bleibt.
●
Das elektrische Gerät enthält gesundheitsgefährdenden Staub. Lassen Sie
Leerungs- und Wartungsvorgänge, einschließlich der Beseitigung der
Staubsammelbehälter, nur von Fachleuten durchführen. Eine entsprechende
Schutzausrüstung ist erforderlich. Betreiben Sie den Sauger nicht ohne
das vollständige Filtersystem.
Sie gefährden sonst Ihre Gesundheit.
●
Prüfen Sie vor der Inbetriebnahme den einwandfreien Zustand des Saug-
schlauchs. Lassen Sie dabei den Saugschlauch am elektrischen Gerät
montiert, damit nicht unbeabsichtigt Staub austritt.
Sie können sonst Staub
einatmen.
●
Schalten Sie das elektrische Gerät sofort aus, sobald Schaum oder Wasser
austritt und entleeren Sie den Behälter.
Das elektrische Gerät kann sonst
beschädigt werden.
●
Das elektrische Gerät darf nicht als Wasserpumpe benutzt werden.
Das
elektrische Gerät ist bestimmt für das Aufsaugen von Luft- und Wassergemisch.
●
Benutzen Sie das elektrische Gerät nicht als Sitzgelegenheit.
Sie können
das elektrische Gerät beschädigen.
●
Verwenden Sie das Netzkabel und den Saugschlauch sorgfältig.
Sie können
andere Personen damit gefährden.
●
Reinigen Sie das elektrische Gerät nicht mit direkt gerichtetem Wasserstrahl.
Das Eindringen von Wasser in das Saugeroberteil erhöht das Risiko eines
elektrischen Schlages.
●
Es ist notwendig, eine ausreichende Luftwechselrate L in dem Raum vorzu-
sehen, wenn die Abluft in den Raum zurückgeht. Nationale Vorschriften
beachten.
●
Vor dem Gebrauch muss die Bedienungsperson mit Informationen, Anwei-
sungen und Schulungen für den Gebrauch der Maschine und der Stoffe,
für die sie benutzt werden soll, einschließlich des sicheren Verfahrens der
Beseitigung des aufgenommenen Materials, versorgt werden. Die Bedie-
nungsperson sollte die für die zu handhabenden Materialien geltenden
Sicherheitsbestimmungen einhalten.
Symbolerklärung
WARNUNG
WARNUNG
G
efährdung mit einem mittleren Risikograd, die bei Nichtbe-
achtung den Tod oder schwere Verletzungen (irreversibel) zur
Folge haben könnte.
VORSICHT
VORSICHT
Gefährdung mit einem niedrigen Risikograd, die bei Nichtbe-
achtung mäßige Verletzungen (reversibel) zur Folge haben
könnte.
HINWEIS
HINWEIS
Sachschaden, kein Sicherheitshinweis! keine Verletzungsgefahr.
Sicherheitssauger der Staubklasse L
Sicherheitssauger der Staubklasse M
WARNUNG: Dieses Gerät kann gesundheitsgefährdende
Stäube enthalten.
Warnung
Vor Inbetriebnahme Betriebsanleitung lesen
Augenschutz benutzen
Atemschutzmaske benutzen
Gehörschutz benutze
n
Handschutz benutzen
Elektrisches Gerät entspricht der Schutzklasse I
Umweltfreundliche Entsorgung
Flachfaltenfi lt
er
Polyethylenbeutel
1. Technische D
a
ten
Bestimmungsgemäße Verwendung
WARNUNG
WARNUNG
ROLLER’S Protector 2 L
und
ROLLER’S Protector 2 M
sind für die gewerbliche
ROLLER’S Protector 2 M sind für die gewerblicheROLLER’S Protector 2 M
Verwendung bestimmt, z. B. in Handwerk, Industrie und Werkstätten, zum Saugen
von nicht brennbaren, nicht asbesthaltigen, trockenen Stäuben, nicht brennbaren
Flüssigkeiten, die beim Arbeiten mit Schlitz- und Trennmaschinen oder mit Kern-
bohrmaschinen anfallen, sowie zur Baustellenreinigung. Alle anderen Verwendungen
sind nicht bestimmungsgemäß und daher nicht zulässig.
ROLLER’S Protector 2 L
und
ROLLER’S Protector 2 M
sind sogenannte Sicher-
ROLLER’S Protector 2 M sind sogenannte Sicher-ROLLER’S Protector 2 M
heitssauger, die gemäß EN 60335-2-69 geprüft, zertifi ziert und zum Saugen von
gesundheitsgefährdenden Stäuben geeignet sind:
●
ROLLER’S Protector 2 L
entspricht der
Staubklasse L
(leicht) nach EN 60335-
2-69 und darf zur Abscheidung von Staub mit einem Expositions-Grenzwert/
Arbeitsplatzgrenzwert (AGW) > 1 mg/m³ verwendet werden. Bei Saugern für die
Staubklasse L wird das Filtermaterial geprüft. Der
ma
ximale Durchlassgrad
beträgt
≤
1%. Es gibt keine speziellen Entsorgungsvorschriften.
●
ROLLER’S Protector 2 M
entspricht der
ROLLER’S Protector 2 M entspricht derROLLER’S Protector 2 M
Staubklasse M
(mittel) nach EN 60335-
Staubklasse M (mittel) nach EN 60335-Staubklasse M
2-69 und darf zur Abscheidung von Staub mit einem Expositions-Grenzwert/
Arbeitsplatzgrenzwert (AGW) > 0,1 mg/m³ verwendet werden. Sauger dieser
Klasse werden als Gesamtgerät geprüft. Der
ma
ximale Durchlassgrad beträgt
≤
0,1%. Die Entsorgung muss staubarm erfolgen.
Beim Bearbeiten mineralischer Baustoffe, z. B. Beton, Stahlbeton, Mauerwerk aller
Art, Estrich aller Art, Naturstein, fällt in hohem Maß quarzhaltiger, gesundheitsge-
fährdender mineralischer Staub (Quarzfeinstaub) an. Das Einatmen von Quarzfein-
staub ist gesundheitsschädlich. Die Richtlinie 89/391/EWG über die Durchführung
von Maßnahmen zur Verbesserung der Sicherheit und des Gesundheitsschutzes
der Arbeitnehmer bei der Arbeit verpfl ichtet den Arbeitgeber, eine entsprechende
Gefährdungsbeurteilung am Arbeitsplatz des Arbeitnehmers durchzuführen, die
eventuell anfallende Staubbelastung zu ermitteln und zu bewerten und die erforder-
lichen Schutzmaßnahmen festzulegen. Die deutsche technische Regel für Gefahr-
stoffe TRGS 559 „Mineralischer Staub“, stellt hierzu in Anlage 1 fest, dass Arbeiten
mit Schlitz- und Trennmaschinen der Expositionskategorie 3 zuzuordnen sind, sofern
die Wirksamkeit der Absaugung
nicht nachgewiesen wurde.
Nach EN 60335-2-69 ist zum Saugen von gesundheitsgefährdeten Stäuben mit einem
Expositions-Grenzwert/Arbeitsplatzgrenzwert (AGW) > 0,1 mg/m³ ein Durchlassgrad
des Saugers
≤
0,1% vorgeschrieben. Beim Schlitzen und Trennen mineralischer
Baustoffe ist deshalb in der Regel mindestens ein Sicherheitssauger/Entstauber der
Staubklasse M einzusetze
n, damit die auftretenden gesundheitsgefährdenden Stäube
von Maschinen wirkungsvoll abgesaugt werden. Sicherheitssauger/Entstauber der
Staubklasse M sind a
ls Gesamtgerät (einschließlich des Flachfaltenfi lters) geprüft und
erreichen eine Reinigungswirkung, die eine weitgehend gefahrlose Reinluftrückführung
in den Arbeitsbereich gestattet. Die EN 60335-2-69 entsprechenden Sicherheitssauger/
deu deu
7

2. In
betriebnah
me
2.1. Elektrischer Anschluss
WARNUNG
WARNUNG
Netzspannung beachten!
Vor Anschluss des
Netzspannung beachten! Vor Anschluss desNetzspannung beachten!
elektrischen Gerätes prüfen, ob
Vor Anschluss des elektrischen Gerätes prüfen, obVor Anschluss des
die auf dem Leistungsschild angegebene Spannung der Netzspannung entspricht.
Elektrogeräte der Schutzklasse I nur an eine Steckdose/Verlängerungsleitung
mit funktionsfähigen Schutzkont
akt anschließen. Auf Baustellen, in feuchter
Umgebung oder bei vergleichbaren Aufstellarten das Elektrogerät nur über
30mA-Fehlerstrom-Schutzeinrichtung (FI-Schalter) am Netz betreiben, der die
Energiezufuhr unterbricht, sobald der Ableitstrom zur Erde 30 mA für 200 ms
überschreitet.
2.2. Inbetriebnahme (Fig. 1
bis
Fig.
3)
Das mitgelieferte Zubehör dem Behälter (1) und Karton entnehmen.
ROLLER’S Protector 2 L
und
Protector 2 M
sind mit einem Anti-Statik-System
ausgestattet. Entstehen durch Reibung statische Aufl adungen, können diese
mit einem elektrisch leitenden Saugschlauch E mit elektrisch leitendem Griffs-
tück E an das Saugeroberteil übertragen und von dort abgeleitet werden.
Funkenbildung und Stromstöße werden dadurch verhindert. Der elektrisch
leitende Saugschlauch ist im Lieferumfang
ROLLER’S Protector 2 M
enthalten,
ROLLER’S Protector 2 M enthalten,ROLLER’S Protector 2 M
für
ROLLER’S Protector 2 L
als Zubehör lieferbar. Die Saugleistung kann mit
dem Schalter Saugleistung (8
) ein
gestellt werden.
2.3. Flachfaltenfi lter auswählen, einsetzen bzw. auswechseln (Fig.
12
)
12)12
VORSICHT
VORSICHT
Das elektrische Gerät darf niemals ohne Flachfaltenfi lter verwendet werden.
Netzstecker ziehen. Filterabdeckung (9) öffnen und prüfen, ob der geeignete
Flachfaltenfi lter (10) eingesetzt
ist. Der
Flachfaltenfi lter Polyester (PES) ist zum
ist. Der Flachfaltenfi lter Polyester (PES) ist zum ist. Der
Nass- und Trockensaugen geeign
et. Der Flachfaltenfi lter PES von ROLLER’S
ist zum Saugen von Stäuben der Staubklasse L und M zugelassen.
Zum Wechse
ln des Flachfaltenfi lters (10) Filterabdeckung (9) öffnen, Flachfal-
tenfilter (10) heraus nehmen und in einem staubdichten
Polyethylenbeutel
entsorgen. Geeignete Atemschutzmaske, z. B. Partikel fi ltrierende Halbmaske
FFP2, und Einwegkleidung benutzen. Nationale Vorschriften beachten. Filterauf-
nahme reinigen und neuen geeigneten Flachfaltenfi lter (10) mit Dichtlippe nach
oben zeigend einsetzen. Filterabdeckung (9) schließen bis diese hörbar einrastet.
2.
4. Vl
iesfi lterbeutel, Nassfi lterbeutel,
4. Vliesfi lterbeutel, Nassfi lterbeutel, 4. Vl
Polyethylenbeutel
auswählen, einsetzen
bzw. auswechseln
2.4.1. Filterbeutel,
Polyethylenbeutel
auswähl
Polyethylenbeutel auswählPolyethylenbeutel
en:
Vl
iesfi lterbeutel sind zum Saugen von Stäuben der Staubklasse L und M und
Vliesfi lterbeutel sind zum Saugen von Stäuben der Staubklasse L und M und Vl
für eine staubarme Entsorgung zugelas
sen. Nas
sfi lterbeutel trennen beim
Saugen von Schmutzwasser das Wasser von den eingesaugten Feststoffen.
Der
Polyethylenbeutel
vereinfacht die Schmutzentsorgung und verhindert
Polyethylenbeutel vereinfacht die Schmutzentsorgung und verhindertPolyethylenbeutel
Schmutzablagerungen im Behälter (1). Der
Polyethylenbeutel
ist zum Saugen
Polyethylenbeutel ist zum SaugenPolyethylenbeutel
gesundheitsgefährdender Stäube nicht zugelassen. Folgende Einsatzfälle
werden für die verschiedenen Beutel empfohl
en:
1.1. Lieferumfang (Fig. 1)
ROLLER’S Protector 2 L:
Elektrischer Trocken- Nasssauger, Saugschlauch 4 m, Griffstück, 2 Metallsaugrohre, Flächensaugvorsatz nass/trocken, Bürstenstreifen,
Gummilippen, Adapter Saugschlauch/Elektrowerkzeug Protector 2, Fugensaugvorsatz, Vliesfi lterbeutel, Flachfaltenfi lter PES, Betriebsanleitung
ROLLER’S Protector 2 M: Elektrischer Trocken- Nasssauger, Saugschlauch E 4 m, Griffstück E, 2 Metallsaugrohre, Flächensaugvorsatz nass/trocken, Bürstenstreifen,
Gummilippen, Adapter Saugschlauch/Elektrowerkzeug Protector 2, Fugensaugvorsatz, Vliesfi lterbeutel, Polyethylenbeutel, Flachfaltenfi lter
PES, Betriebsanleitung
1.2. Artikelnummern
ROLLER’S Protector 2 L ROLLER’S Protector 2 M
Trocken- und Nasssauger
185600 185601
Vl
iesfi lterbeutel, Polyestervlies, 5er-Pack 185511 185511
Vliesfi lterbeutel, Polyestervlies, 5er-Pack 185511 185511Vl
Nassfi lterbeutel, Papier-Polyester-Spinnvlies, 5er-Pack 1855
12
Polyethylenbeutel, 1
0er-Pack 185513 1855
13
Fl
achfaltenfi lter PES, Polyester, 1er-Pack 185515 185515
Saugrotor 180160 180160
Wasserabsaugvorrichtung 183606 183606
1.3. Betriebsdaten
Behälterinhalt
31
l
31
l
Füllmenge Flüssigkeit
17
l
17 l17
17
l
17 l17
max. Durchfl ussmenge
140
m³/h
140 m³/h140
143
m³/h
143 m³/h143
max. Unterdruck
230
hPa (
230 hPa (230
hPa (
230
mbar, 3,
230 mbar, 3,230
4
psi)
237
hPa (
237 hPa (237
hPa (
237
mbar, 3,4 psi)
237 mbar, 3,4 psi)237
Saugschlauch Länge
4,0
m
4,0 m4,0
4,0
m
4,0 m4,0
Saugschlauchdurchmesser
21, 27, 32, 35, 40
mm
21, 27, 32, 35, 40
mm
21, 27, 32, 35, 40 mm21, 27, 32, 35, 40
1.4. Arbeitstemperaturbereich
–10 bis +40°C –10 bis +40°C
1.5. Elektrische Daten
220–240 V~; 50–60 Hz 220–240 V~; 50–60 Hz
Nennleistung Sauger 1200 W 1200 W
Zulässige Leistung Steckdose für Elektrowerkzeu
ge1)
100–2200 W 100–2200 W
Leistungsaufnahme max. 3400 W max. 3400 W
Schutzklasse I I
Schutzart IP X4 IP X4
1)
Die zulässige, maximal angegebene Leistung für die Steckdose für Elektrowerkzeuge kann je nach Land abweichen.
1.6. Abmessungen
5
6
0×3
7
0×580 mm 5
6
0×3
7
0×580 mm
(2
2,0
"×1
4,6
"×22,8") (2
2,0
"×1
4,6
"×22,8")
1.7. Gewichte
1
3,5
kg (2
3,5 kg (23,5
9,8
lb) 1
9,8 lb) 19,8
4,2
kg (
4,2 kg (4,2
kg (
31,3
lb)
31,3 lb)31,3
1.8. Lärminformation
Arbeitsplatzbezogener Emissionswert L
pA
= 69 d
B(
A); K =
B(A); K =B(
2
d
2d2
B(
A) L
B(A) LB(
pA
= 69 d
B(
A); K =
B(A); K =B(
2
d
2d2
B(
A)
B(A)B(
(Ermittelt gemäß EN 60335-2-69)
1.9. Vibrationen
Gewichteter Effektivwert der Beschleunigung < 2,5 m/s²; K = 0,2 m/s² < 2,5 m/s²; K = 0,2 m/s²
Der angegebene Schwingungsemissionswert wurde nach einem genormten Prüfverfahren gemessen und kann zum Vergleich mit einem anderen elektrischen Gerät
verwendet werden. Der angegebene Schwingungsemissionswert kann auch zu einer einleitenden Einschätzung der Aussetzung verwendet werden.
Achtung:
Der Schwingungsemissionswert kann sich während der tatsächlichen Benutzung des elektrischen Geräts von dem Angabewert unterscheiden, abhängig
von der Art und Weise, in der das elektrische Gerät verwendet wird. In Abhängigkeit von den tatsächlichen Benutzungsbedingungen (Aussetzbetrieb) kann es erfor-
derlich sein, Sicherheitsmaßnahmen zum Schutz der Bedienperson festzulegen.
deu deu
Entstauber der Staubklasse M müssen außerdem ein ausreichendes Absaugvolumen
erreichen, weswegen die Luftgeschwindigkeit im Saugschlauch dieser Sicherheits-
sauger/Entstauber überwacht wird. Beim Unterschreiten der Luftgeschwindigkeit von
20 m/s im Saugschlauch (z. B. „Filter verstopft“) ertönt ein akustisches Signal. Die
Ursache ist sofort festzustellen und vor Weiterarbeit zu beseitigen.
Nationale Vorschriften beachten: Es wird ausdrücklich darauf hingewiesen, dass in
vielen Ländern seitens der nationalen Gesundheits-, Arbeitsschutz-. Wasserversor-
gungs- und ähnlicher Behörden zusätzliche Vorschriften hinsichtlich des sicheren
Gebrauchs derartiger Sauger zur Aufnahme und Entsorgung von gesundheitsge-
fährdenden Stäuben bestehen können.
Beim Nasssaugen entfallen die Staubvorschriften.
8

Vl
iesfi lterbeutel:
Vliesfi lterbeutel:Vl
zur Feucht- und Trockenanwendung, für normalen Schmutz, Feinstäube,
abrasive Stäube, feuchten Schmutz
Nassfi lterbeut
el (ROLLER’S Protector 2 L):
zum Nass- und Trockensaugen, für abrasive Stäube, nassen Schmutz, Flüs-
sigkeiten
Polyethylenbeutel:
zur Nass- und Trockenanwendung nicht gesundheitsgefährdender Stäube, für
normalen Schmutz, Feinstäube, abrasive Stäube, nassen Schmutz, Wasser.
Zur staubarmen Entsorgung kontaminierter Teile, z. B. des Flachfaltenfi lters.
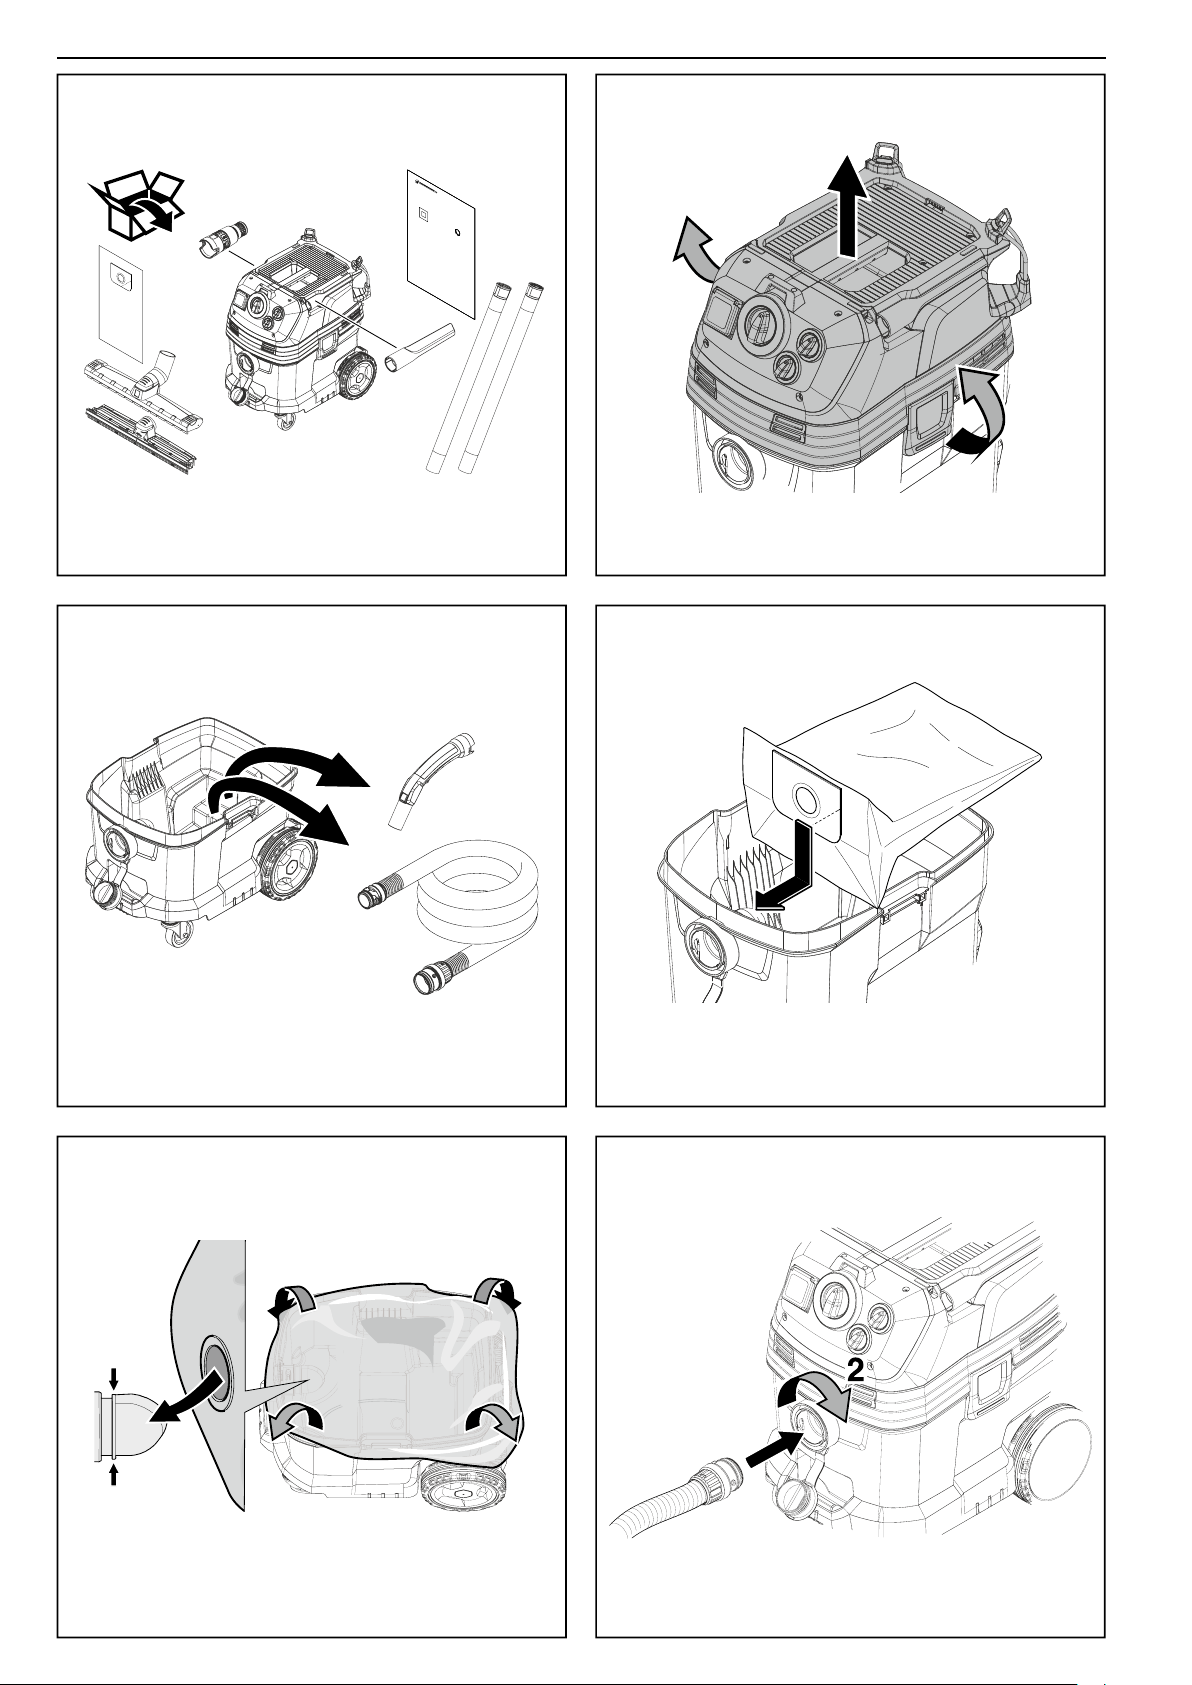
2.4.2. Filterbeutel einsetzen bzw. auswechseln (Fig.
4
)
4)4
Netzstecker ziehen. Geeignete Atemschutzmaske, z. B. Partikel fi ltrierende
Halbmaske FFP2, und Einwegkleidung benutz
en. Verriegelung Saugeroberteil
(3) öffnen und Sa
ugeroberteil (2) von Behälter (1) abnehm
en. Fil
terbeutel direkt
in den Behälter (1) einlegen, mit der runden Öffnung bis zum Anschlag auf
Saugschlauch-Anschlussstutzen (12) im Inneren des Behälters (1) schieben,
Saugeroberteil (2) auf Behälter (1) setzen, Verriegelung Saugeroberteil (3)
einrasten. Zum Auswechseln Filterbeutel vom Saugsch
lauch-Anschlussstutzen
(12) nehmen und die Öffnung des Filterbeutels mit dem Schieber, den Nassfi lter-
beutel mit
dem Kunststoffdeckel verschließen. Saugeroberteil (2) auf Behälter (1)
setz
en. Ve
rschlos
sene Filterbeutel entsorgen. Nationale Vorschriften beachten.
2.4.3.
Polyethylenbeutel
einsetzen bzw. auswechseln (Fig.
Polyethylenbeutel einsetzen bzw. auswechseln (Fig.Polyethylenbeutel
5
)
5)5
Netzstecker ziehen. Geeignete Atemschutzmaske, z. B. Partikel fi ltrierende
Halbmaske FFP2, und Einwegkleidung benutz
en. Verriegelung Saugeroberteil
(3) öffnen und Sa
ugeroberteil (2) vom Behälter (1) abnehm
en. Polyethylenbeutel
dir
ekt in den Behälter (1) einlegen, mit der kleinen runden Öffnung bis zum
direkt in den Behälter (1) einlegen, mit der kleinen runden Öffnung bis zumdir
Anschlag auf Saugschlauch-Anschlussstutzen (12) im Inneren des Behälters
(1) schieben und die große Öffnung über den Rand des Behälters (1) stülpen.
Saugeroberteil (2) auf Behälter (1) setzen, Verriegelung Saugeroberteil (3)
einrasten. Zum Auswechseln den über den Rand gestülpten
Polyethylenbeutel
nach oben ziehen und mit angebrachtem Klebestreifen verschließen. Gefüllten
Polyethylenbeutel
vom Saugschlauch-Anschlussstutzen (12) nehmen, mit
Polyethylenbeutel vom Saugschlauch-Anschlussstutzen (12) nehmen, mitPolyethylenbeutel
einem Klebeband verschließen, heraus nehmen und entsorgen. Nationale
Vorschriften beachten.
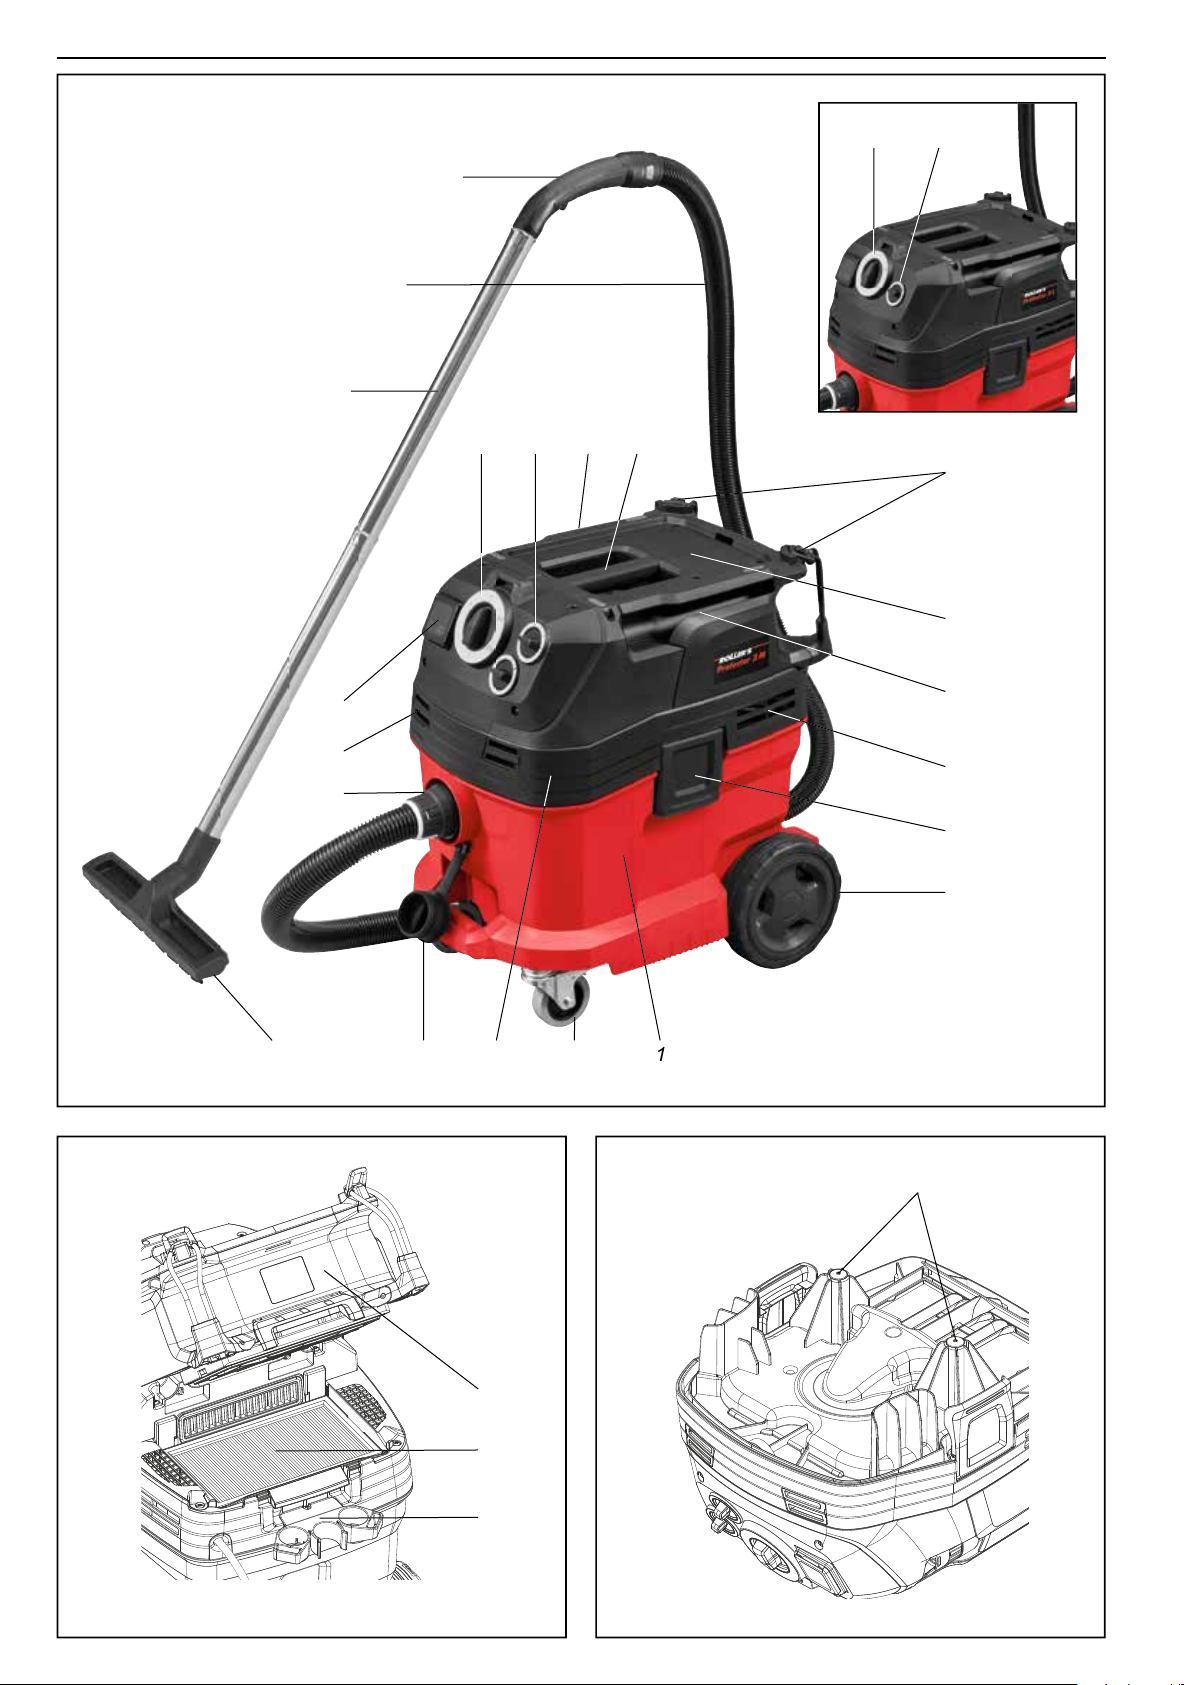
2.5. Anschluss von Elektrowerkzeugen an
ROLLER’S Protector 2 L
und
ROLLER’S Protector 2 M
(Fig.
ROLLER’S Protector 2 M (Fig. ROLLER’S Protector 2 M
7, Fig. 8
)
7, Fig. 8)7, Fig. 8
WARNUNG
WARNUNG
Die Steckdose für Elektrowerkzeuge mit elektronischer Ein-/Ausschaltautomatik
(16) am Sauger ist nur zum direkten Anschluss von Elektrowerkzeugen mit
einer aufgenommenen Leistung zwischen 100 und 2200 W bestimmt.
Bei
ROLLER’S Protector 2 M
Verschlussstopfen (11) für Saugschlauch-
ROLLER’S Protector 2 M Verschlussstopfen (11) für Saugschlauch-ROLLER’S Protector 2 M
Anschlussstutzen (1
2) heraus ziehen. Sa
ugschlauch (13) in den Saugschlauch-
Anschlussstutzen (12) bis zum Anschlag einstecken und Bajonettverschluss
mit einer Rechtsdrehung einrast
en (Fig. 6). U
m eine optimale Saugleistung zu
erzielen, sollte der Schalter Saugleistung (8) auf „max“ gestellt werde
n. Den
W
ahlschalter Schlauchdurchmesser (14) auf den verwendeten Saugschlauch-
Wahlschalter Schlauchdurchmesser (14) auf den verwendeten Saugschlauch-W
durchmesser einstell
en. Da
mit der Querschnitt des Saugschlauches so groß
wie
möglich ist, wird empfohlen den Adapter Saugschlauch/Elektrowerkzeug
(15) über den Absaugstutzen des Elektrowerkzeuges zu schieben. Adapter
Saugschlauch/Elektrowerkzeug (15)
und
Saugschlauch (13)
und Saugschlauch (13)und
zusammenstecken
und einrasten (Fig. 9).
Adapter Saugschlauch/Elektrowerkzeug (15) auf Absaug-
stutzen des zu verwendeten Elektrowerkzeuges schieben. Betriebsanleitung
des Elektrowerkzeuges beachten.
2.5.1.
Anschluss des Elektrowerkzeuges über die Steckdose von
2.5.1.
Anschluss des Elektrowerkzeuges über die Steckdose von
2.5.1.
ROLLER’S Protector 2 L
/
ROLLER’S Protector 2 M
Die Leistung des verwendeten Elektrowerkzeugs muss zwischen 100 und
2200W liegen. Betriebsanleitung des Elektrowerkzeuges beachten. Nur dann
darf die Anschlussleitung des verwendeten Elektrowerkzeugs an der Steckdose
(16) des
ROLLER’S Protector 2 L
/
ROLLER’S Protector 2 M
angeschlossen
ROLLER’S Protector 2 M angeschlossenROLLER’S Protector 2 M
werden.
2.5.2. Anschluss des Elektrowerkzeuges über eine separate Steckdose
Liegt die Leistung des verwendeten Elektrowerkzeugs außerhalb der Grenzen
100 und 2200 W, darf das Elektrowerkzeug nicht an die Steckdose (16) des
ROLLER’S Protector 2 L
/
ROLLER’S Protector 2 M
, sondern muss an eine
ROLLER’S Protector 2 M, sondern muss an eineROLLER’S Protector 2 M
separate Steckdose angeschlossen werden. Betriebsanleitung des Elektro-
werkzeuges beachten.
2.6. Baustellen- bzw. Flächenreinigung
Bei
ROLLER’S Protector 2 M
Verschlussstopfen (11) für Saugschlauch-
ROLLER’S Protector 2 M Verschlussstopfen (11) für Saugschlauch-ROLLER’S Protector 2 M
Anschlussstutzen (1
2) heraus ziehen. Sa
ugschlauch (13) in den Saugschlauch-
Anschlussstutzen (12) bis zum Anschlag einstecken und Bajonettverschluss
mit einer Rechtsdrehung einraste
n (Fig. 6). F
ür optimale Saugleistung sollte
der Schalter Saugleistung (8) auf „max“ gestellt werden. Bei
ROLLER’S Protector 2 M
Wahlschalter Saugschlauchdurchmesser (14) auf
ROLLER’S Protector 2 M Wahlschalter Saugschlauchdurchmesser (14) aufROLLER’S Protector 2 M
den verwendeten Saugschlauchdurchmesser einstellen. Griffstück (17) auf
Saugschlauch (1
3) stecken und einrasten (Fig. 9) A
m Griffstück (17) können
nach Bedarf der Fugensaugvorsatz nass/trocken (18), die Saugrohre (19), der
Flächensaugvorsatz nass/trocken (20) eingeschoben werde
n (Fig. 9). B
eim
Flächensaugvorsatz nass/trocken (20) können wahlweise Bürstenstreifen oder
Gummilippen montiert werden. Die Bürstenstreifen/Gummilippen können m
it
einem Sc
hlitzschraubendreher heraus gehebelt werde
n (Fig. 15). B
eim Einsetzen
ist zu beachten, dass die Bürstenstreifen/Gummilippen unterschiedlich lang
sind und dadurch nur jeweils in ein
en Sc
hlitz des Flächensaugvorsatzes nass/
trocken (20) passen. Gummilippen so einsetzen, dass die glatten Seiten nach
innen zeigen.
3. Betrieb
Augenschutz benutzen
Atemschutzmaske benutzen
Gehörschutz benutzen
Handschutz benutzen
WARNUNG
WARNUNG
Vor Arbeiten, bei denen gesundheitsgefährdende Stäube entstehen können,
bestimmungsgemäße Verwendung der Sauger, insbesondere erforderliche
Staubklasse prüfen und beachten.
ROLLER’S Protector 2 L und Protector 2 M wird mit dem Ein-/Ausschalter (21)
eingeschaltet. ROLLER’S Protector 2 L und Protector 2 M reinigen den Flach-
faltenfi lter (10) automatisch. Die Filterreinigung wird über mehrere hintereinander
folgende kurze Luftstöße durchgeführt. Mit dem Ein-/Ausschalter (21) kann
zwischen 4 Betriebszuständen gewählt werden:
0 Sauger aus
1 Sauger an, saugen ohne automatische Filterreinigung
2 AUTO MAX Sauger an, saugen mit automatischer Filterreinigung im
Abstand von 15 s
3 AUTO MIN Sauger an, saugen mit automatischer Filterreinigung im
Abstand von 60 s
ROLLER’S Protector 2 L
und
Protector 2 M
überwachen den Füllstand elektrisch
Protector 2 M überwachen den Füllstand elektrischProtector 2 M
leitender Flüssigkeiten, z. B. Wasser, im Behälter (1). Elektroden zur Füllstands-
begrenzung (
begrenzung (
22
) schalten den Sauger automatisch ab, sobald die elektrisch
22) schalten den Sauger automatisch ab, sobald die elektrisch22
leitende Flüssigkeit die Elektroden berühren. Beim Saugen nicht leitender
Flüssigkeiten bzw. Stäuben muss der Füllstand im Behälter (1) von Zeit zu Zeit
durch Sichtkontrolle überprüft werden.
Bei
ROLLER’S Protector 2 M
wird die Luftgeschwindigkeit durch eine elektro-
ROLLER’S Protector 2 M wird die Luftgeschwindigkeit durch eine elektro-ROLLER’S Protector 2 M
nische Volumenstromüberwachung kontrolliert. Wird der vorgeschriebene Wert
von 20 m/s unterschritten, ertönt ein akustisches Signal. Für eine korrekte
Messung muss der Wahlschalter Saugschlauchdurchmesser (14) am Sauger
auf den eingesetzten Saugschlauchdurchmesser eingestellt werden.
3.1.
Stäube und Flüssigkeiten von angeschlossenen Elektrowerkzeugen
absaugen
WARNUNG
WARNUNG
Die Steckdose für Elektrowerkzeuge mit Ein-/Ausschaltautomatik (16) am
Sauger ist nur zum direkten Anschluss von Elektrowerkzeugen mit einer
aufgenommenen Leistung zwischen 100 und 2200 W bestim
mt.
Die zulässige, maximal angegebene Leistung für die Steckdose für Elektro-
werkzeuge kann je nach Land abweichen.
3.
1.1.
Anschluss des Elektrowerkzeuges an die Steckdose von
ROLLER’S Protector 2 L
/
ROLLER’S Protector 2 M
Der Sauger ist vorbereitet wie unter 2.5. und 2.5.1. beschrieben. Sauger mit
Ein-/Ausschalter (21) einschalt
en. Wir
d das an die Steckdose für Elektrowerk-
en. Wird das an die Steckdose für Elektrowerk-en. Wir
zeuge mit Einschaltautomatik (16) angeschlossene Elektrowerkzeug einge-
schaltet, startet nahezu zeitgleich der Sauger. Wird das Elektrowerkzeug
ausgeschaltet, läuft der Sauger für ca. 15 s nach, damit der Saugschlauch (13)
entleert wird. Nach Arbeitsende muss der Sauger am Ein-/Ausschalter (21)
ausgeschaltet werden. Beim Nasssaug
en muss der Ein-/Ausschalter (21) auf „1“
gestellt werden.
3.1.2. Anschluss des Elektrowerkzeuges an eine separate Steckdose
Der Sauger ist vorbereitet wie unter 2.5. und 2.5.2. beschrieben. Sauger mit
Ein-/Ausschalter (21) einschalten. Anschließend das an eine separate Steckdose
angeschlossene Elektrowerkzeug einschalten. Nach Arbeitsende Elektrowerk-
zeug, dann Sauger ca. 15 s später zum Entleeren des Saugschlauches (13) am
Ein-/Ausschalter (21) ausschalten. Beim Nasssaug
en muss der Ein-/Ausschalter
(21) auf „1“gestellt werden.
3.2. Baustellen- bzw. Flächenreinigung
Der Sauger ist vorbereitet wie unter 2.6. beschrieben. Sauger mit Ein-/Ausschalter
(21) einschalten. Beim Nassaug
en muss der Ein-/Ausschalter (21) auf „1“gestellt
werden.
3.3. Außerbetriebnahme und Transport
ROLLER’S Protector 2 M
: Saugschlauch (13) am Saugschlauch-Anschlussstutzen
ROLLER’S Protector 2 M: Saugschlauch (13) am Saugschlauch-AnschlussstutzenROLLER’S Protector 2 M
(12) bis zum Anschlag nach links drehen und entnehmen. Verschlussstopfen
für Saugschlauch-Anschlussstutzen (11) bis zum Anschlag einsteck
en. Verrie-
gelungen Sa
ugeroberteil (3) öffnen und Saugeroberteil (2) von Behälter (1)
abnehm
en. Be
hälter (1) leeren. Geeignete Atemschutzmaske und Einwegklei-
dung benutzen. Nationale Vorschriften beachten. Saugeroberteil (2) wieder auf
Behälter (1) setzen, Verriegelungen Saugeroberteil (3) einrasten. Flächensaug-
vorsatz nass/trocken (20) mit Saugrohren (19), Griffstück (17),
Fugensaugvor-
satz
(18) können in den Halterungen (
23
) am Sauger befestigt werden.
23) am Sauger befestigt werden.23
Saugschlauch (13) und Anschlussleitung an Halterung (
26
) hängen. Position
26) hängen. Position26
des Saugers mit Lenkrolle mit Arretierung blockieren. Gereinigten und getrock-
neten Sauger in einem trockenen Raum abstellen und vor unbefugter Benutzung
sichern.
deu deu
9

4. Instandhaltung
Unbeschadet der nachstehend genannten Wartung wird empfohlen, das
Elektrogerät mindestens einmal jährlich einer autorisierten ROLLER Vertrags-
Kundendienstwerkstatt zu einer Inspektion und Wiederholungsprüfung elektrischer
Geräte einzureichen. In Deutschland ist eine solche Wiederholungsprüfung
elektrischer Geräte nach DIN VDE 0701-0702 vorzunehmen und nach Unfall-
verhütungsvorschrift DGUV Vorschrift 3 „Elektrische Anlagen und Betriebsmittel“
auch für ortsveränderliche elektrische Betriebsmittel vorgeschrieben. Darüber
hinaus sind die für den Einsatzort jeweils geltenden nationalen Sicherheitsbe-
stimmungen, Regeln und Vorschriften zu beachten und zu befolgen.
4.1. Wartung
WARNUNG
WARNUNG
Vor Wartungsarbeiten Netzstecker ziehen!
Sauger sowie die Lüftungsschlitze Luftaustritt (
24
) und Lufteintritt Motorkühlung
24) und Lufteintritt Motorkühlung24
(
(
25
) am Saugeroberteil (2) sauber halten. Nach jedem Betrieb Behälter (1)
25) am Saugeroberteil (2) sauber halten. Nach jedem Betrieb Behälter (1)25
leeren. Staubmaske sowie Einwegkleidung benutzen. Nationale Vorschriften
beachten. Saugeroberteil (2) und Behälter (1) gelegentlich mit feuchtem Tuch
reinigen.
Nach Nasssaugen Filterabdeckung (9) öffnen und Flachfaltenfi lter (10) entnehmen.
Saugeroberteil (2) vom Behälter
(1) abnehmen und Behälter leeren. Nationale
Vorschriften beachten. Zur Vermeidung von Schimmelbildung alle Teile trocknen
lassen. Danach Saugeroberteil (2) und Behälter (1) komplett montieren. Darauf
achten, dass Flüssigkeiten niemals in das Innere des Saugeroberteils (2)
gelangen. Den Sauger niemals in Flüssigkeit tauchen.
Flachfaltenfi lter, gefüllte Filterbeutel,
Polyethylenbeutel
rechtzeitig auswechseln
Polyethylenbeutel rechtzeitig auswechselnPolyethylenbeutel
bzw. Behälter (1) rechtzeitig entleeren. Elektroden zur Füllstandsbegrenzung
(
(
23
) mit Bürste reinigen und regelmäßig auf Anzeichen von Beschädigungen
23) mit Bürste reinigen und regelmäßig auf Anzeichen von Beschädigungen23
untersuchen.
Zur Wartung durch den Benutzer muss die Maschine auseinandergenommen,
gereinigt und gewartet werden, soweit es durchführbar ist, ohne dabei eine
Gefahr für das Wartungspersonal und andere Personen hervorzurufen. Geeig-
nete Vorsichtsmaßnahmen umfassen Entgiftung vor dem Auseinandernehmen,
Vorsorge für örtliche gefi lterte Zwangsentlüftung dort, wo die Maschine ausei-
nandergenommen wird, Reinigung des Wartungsbereichs und geeignete
persönliche Schutzausrüstung.
4.2. Inspektion / Instandsetzung
WARNUNG
WARNUNG
Vor Instandsetzungs- und Reparaturarbeiten Netzstecker ziehen!
Diese
Vor Instandsetzungs- und Reparaturarbeiten Netzstecker ziehen! DieseVor Instandsetzungs- und Reparaturarbeiten Netzstecker ziehen!
Arbeiten dürfen nur von qualifi ziertem Fachpersonal durchgeführt werden.
Bei Austritt von Staub (z. B. Filterdurchbruch) das elektrische Gerät sofort
abschalten.
Vor erneuter Inbetriebnahme muss die Störung beseitigt werden.
Bei Austritt von Schaum oder Flüssigkeit das elektrische Gerät sofort
abschalten.
Die Einrichtung zur Füllstandsbegrenzung regelmäßig reinigen
und auf Anzeichen von Beschädigung untersuchen
Es wird empfohlen, das elektrische Gerät nach ca. 250 Betriebsstunden oder
mindestens einmal jährlich einer autorisierten ROLLER Vertrags-Kundendienst-
werkstatt zur Inspektion/Instandhaltung einzureichen.
Ungeachtet dessen sind nationale Prüffristen für ortsveränderliche elektrische
Betriebsmittel auf Baustellen zu beachten.
Es ist mindestens einmal jährlich vom Hersteller oder einer unterwiesenen
Person eine staubtechnische Überprüfung durchzuführen, z. B. auf Beschädi-
gungen des Filters, Dichtheit des Saugers und Funktion der Kontrolleinrichtung.
Bei Saugern der Staubklasse M, die sich in verschmutzter Umgebung befanden,
sollte das Äußere sowie alle Maschinenteile gereinigt oder mit Abdichtmitteln
behandelt werden bevor sie aus einem gefährlichen Bereich genommen werden.
Alle Maschinenteile müssen als verunreinigt angesehen werden, wenn sie aus
dem gefährlichen Bereich genommen werden, und geeignete Maßnahmen
müssen ergriffen werden, um eine Staubverteilung zu vermeiden. Bei der
Durchführung von Wartungs- und Reparaturarbeiten müssen alle verunreinigten
Teile, die nicht zufriedenstellend gereinigt werden können, ausgetauscht werden.
Solche Teile müssen in undurchlässigen Beuteln für die Beseitigung solchen
Abfalls entsorgt werden. Nationale Vorschriften beachten.
5. Störung
5.1.
Störung:
Sauger läuft nicht bzw. schaltet während des Betriebs ab.
Ursache:
Abhilfe:
●
Maximaler Füllstand in Behälter (1) erreic
ht
●
Behälter leeren.
●
Anschlussleitung defe
kt
●
Anschlussleitung durch qualifi ziertes Fachpersonal oder durch eine autorisierte
ROLLER Vertrags-Kundendienstwerkstatt wechseln lassen.
●
Sauger defe
kt
●
Sauger durch autorisierte ROLLER Vertrags-Kundendienstwerkstatt prüfen/
insta
nd se
tzen lassen.
5.2.
Störung:
Sauger startet nach Entleerung des Behälters (1) nicht.
Ursache:
Abhilfe:
●
Elektroden für Füllstandsbegrenzung (
22
) sind verschmutzt.
22) sind verschmutzt.22
●
Elektroden mit z. B. einer Bürste reinigen.
●
Sauger hat Einschaltimpuls nicht erkannt.
●
Sauger am Ein-/Ausschalter (21) ausschalten und nach ca. 5 s erneut
einschalten.
5.3.
Störung:
Saugkraft lässt nach.
Ursache:
Abhilfe:
●
Saugschlauch (13), Saugrohre (19), Adapter Saugschlauch/
Elektrowerkzeug (15), Flächensaugvorsatz nass/trocken 300 mm (20),
Fugensaugvorsatz nass/trocken (18), Griffstück (17), Saugschlauch-
Anschlussstutzen (12) verstop
ft
●
Verstopfung entfernen.
●
Filterbeutel,
Polyethylenbeutel
, Behälter (1) sind gefüllt.
Polyethylenbeutel, Behälter (1) sind gefüllt.Polyethylenbeutel
●
Filterbeutel,
Polyethylenbeutel
entsorgen, Behälter leeren.
Polyethylenbeutel entsorgen, Behälter leeren.Polyethylenbeutel
●
Filterabdeckung (9) ist offen.
●
Filterabdeckung schließen.
●
Flachfaltenfi lter (10) verschmutzt/defe
kt
●
Flachfaltenfi lter wechseln.
5.4.
Störung:
Staubaustritt beim Saugen.
Ursache:
Abhilfe:
●
Einbaulage des Flachfaltenfi lters (10) fals
ch
●
Korrekte Einbaulage des Flachfaltenfi lters prüfen.
●
Flachfaltenfi lter (10) verschmutzt/defe
kt
●
Flachfaltenfi lter wechseln.
●
Saugschlauch (13) defe
kt
●
Saugschlauch wechseln.
●
Saugeroberteil (2) nicht richtig aufgesetzt/eingerast
et
●
Saugeroberteil aufsetzen und einrasten.
5.5.
Störung:
Elektroden zur Füllstandsbegrenzung (
23
) sprechen nicht an.
23) sprechen nicht an.23
Ursache:
●
Elektroden für Füllstandsbegrenzung (
23
) sind verschmutzt.
23) sind verschmutzt.23
Abhilfe:
●
Elektroden mit z. B. einer Bürste reinigen.
●
Saugen von nicht leitenden Flüssigkeit
en
●
Füllstand von Behälter (1) regelmäßig kontrollieren, Behälter rechtzeitig leeren.
deu deu
10

6. Entsorgung
Elektrische Geräte dürfen nach ihrem Nutzungsende nicht über den Hausmüll
entsorgt werden. Sie müssen nach den gesetzlichen Vorschriften ordnungs-
gemäß entsorgt werden.
7. Hersteller-Garantie
Die Garantiezeit beträgt 12 Monate nach Übergabe des Neuproduktes an den
Erstverwender. Der Zeitpunkt der Übergabe ist durch die Einsendung der
Original-Kaufunterlagen nachzuweisen, welche die Angaben des Kaufdatums
und der Produktbezeichnung enthalten müssen. Alle innerhalb der Garantiezeit
auftretenden Funktionsfehler, die nachweisbar auf Fertigungs- oder Material-
fehler zurückzuführen sind, werden kostenlos beseitigt. Durch die Mängelbe-
seitigung wird die Garantiezeit für das Produkt weder verlängert noch erneuert.
Schäden, die auf natürliche Abnutzung, unsachgemäße Behandlung oder
Missbrauch, Missachtung von Betriebsvorschriften, ungeeignete Betriebsmittel,
übermäßige Beanspruchung, zweckfremde Verwendung, eigene oder fremde
Eingriffe oder andere Gründe, die ROLLER nicht zu vertreten hat, zurückzu-
führen sind, sind von der Garantie ausgeschlossen.
Garantieleistungen dürfen nur von einer autorisierten ROLLER Vertrags-
Kundendienstwerkstatt erbracht werden. Beanstandungen werden nur anerkannt,
wenn das Produkt ohne vorherige Eingriffe in unzerlegtem Zustand bei einer
autorisierten ROLLER Vertrags-Kundendienstwerkstatt eingereicht wird. Ersetzte
Produkte und Teile gehen in das Eigentum von ROLLER über.
Die Kosten für die Hin- und Rückfracht trägt der Verwender.
Eine Aufstellung der ROLLER Vertrags-Kundendienstwerkstätten ist im Internet
unter www.albert-roller.de abrufbar. Für dort nicht aufgeführte Länder ist das
Produkt einzureichen im SERVICE-CENTER, Neue Rommelshauser Straße
4, 71332 Waiblingen, Deutschland. Die gesetzlichen Rechte des Verwenders,
insbesondere seine Gewährleistungsansprüche bei Mängeln gegenüber dem
Verkäufer sowie Ansprüche aufgrund vorsätzlicher Pflichtverletzung und
produkthaftungsrechtliche Ansprüche, werden durch diese Garantie nicht
eingeschränkt.
Für diese Garantie gilt deutsches Recht unter Ausschluss der Verweisungs-
vorschriften des deutschen Internationalen Privatrechts sowie unter Ausschluss
des Übereinkommens der Vereinten Nationen über Verträge über den interna-
tionalen Warenkauf (CISG). Garantiegeber dieser weltweit gültigen Hersteller-
garantie ist die Albert Roller GmbH & Co KG, Neue Rommelshauser Straße 4,
71332 Waiblingen, Deutschland.
8. ROLLER Vertrags-Kundendienstwerkstätten
Firmeneigene Fachwerkstatt für Reparaturen:
SERVICE-CENTER
Neue Rommelshauser Straße 4
71332 Waiblingen
Deutschland
Telefon (07151) 56808-60
Telefax (07151) 56808-64
Wir holen Ihre Maschinen und Werkzeuge bei Ihnen ab!
Nutzen Sie in der Bundesrepublik Deutschland unseren Abhol- und Bringservice
Einfach anrufen unter Telefon (07151) 56808-60, oder Download des Abhol-
auftrages unter
www.albert-roller.de
→ Kontakt → Kundendienstwerkstätten
→ Abholauftrag. Im Garantiefall ist dieser Service kostenlos.
Oder wenden Sie sich an eine andere autorisierte ROLLER Vertrags-Kunden-
dienstwerkstatt in Ihrer Nähe.
9. Teileverzeichnisse
Teileverzeichnisse siehe
www.albert-roller.de
→ Downloads → Teileverzeich-
nis
se
5.6.
Störung:
Akustisches Signal ertönt (
Protector 2 M
).
Protector 2 M).Protector 2 M
Ursache:
Abhilfe:
●
Wahlschalter Saugschlauchdurchmesser (14) nicht auf Saugschlauch-
durchmesser eingestel
lt
●
Wahlschalter entsprechend dem Saugschlauchdurchmesser einstellen.
●
Filterbeutel,
Polyethylenbeutel
, Behälter (1) sind gefüllt.
Polyethylenbeutel, Behälter (1) sind gefüllt.Polyethylenbeutel
●
Filterbeutel,
Polyethylenbeutel
entsorgen, Behälter leeren.
Polyethylenbeutel entsorgen, Behälter leeren.Polyethylenbeutel
●
Saugschlauch (13), Saugrohre (19), Adapter Saugschlauch/Elektrowerkzeug
(15), Flächensaugvorsatz nass/trocken 300 mm (20), Fugensaugvorsatz
nass/trocken (18), Griffstück (17), Saugschlauch-Anschlussstutzen (12)
verstop
ft
●
Verstopfung entfernen.
●
Filter am Lufteintritt Motorkühlung (25) verstopft
●
Lufteintritt Motorkühlung (25) öffnen (Fig. 14) und Filter reinigen.
5.7.
Störung:
Automatische Filterreinigung ohne Funkti
on
Ursache:
Abhilfe:
●
Ein-/Ausschalter (21)
auf Schalterstellung „0“ oder „1“
●
Ein-/Ausschalter
auf Schalterstellung „2 AUTO MAX“ oder „3 AUTO MIN“
stellen.
●
Sauger defekt
●
Sauger durch autorisierte ROLLER Vertrags-Kundendienstwerkstatt prüfen/
instand setzen lassen
deu deu
11

Translation of the Original Instruction Manual
Fig.
1–16
1 Tank
2 Vacuum cleaner top part
3 Lock vacuum cleaner top part
4 Handle
5 Castor/castor with brake
6 Holder for vacuum cleaner
attachment wet/dry
7 Wheel
8 Suction power switch
9 Filter cover
10 Flat folded fi lter
11 Plug for suction hose connecting
nozzle (
nozzle (
ROLLER’S Protector 2 M
)
ROLLER’S Protector 2 M)ROLLER’S Protector 2 M
12 Suction hose connecting nozzle
13 Suction hose
14 Suction hose diameter selector
switch (
switch (
ROLLER’S Protector 2 M
)
ROLLER’S Protector 2 M)ROLLER’S Protector 2 M
15 Adapter suction hose/power tool
16 Socket for power tool with
automatic on/off
17 Handle
18 Joint cleaner attachment wet/dry
19 Suction tube
20 Cleaner attachment for surfaces
wet/dry 300 mm
21
On/Off switch/automatic fi lter
cleaning switch
22
Power tool control lamp
23
Holder for joint attachment wet/dry,
handle, suction tube, adapter
suction hose/power tool
24
Air outlet
25
Air inlet motor cooling
25 Air inlet motor cooling25
26
Holder for connecting cable and
26 Holder for connecting cable and26
suction hose
27 Drawers for suction hose/power
tool adapter and joint attachment
wet/dry 300 mm
General power tool safety warnings
WARNING
WARNING
Read all safety warnings, instructions, illustrations and specifi cations provided
with this power tool.
Failure to follow all instructions listed below may result in
electric shock, fi re and/or serious injury.
Save all warnings and instructions for future reference.
The term “power tool” in the warnings refers to your mains-operated (corded) power
tool or battery-operated (cordless) power tool.
1) Work area safety
a) Keep work area clean and well lit.
Cluttered or dark areas invite accidents.
b) Do not operate power tools in explosive atmospheres, such as in the pres-
ence of fl ammable liquids, gases or dust.
Power tools create sparks which
may ignite the dust or fumes.
c) Keep children and bystanders away while operating a power tool.
Distrac-
tions can cause you to lose control.
2) Electrical safety
a) Power tool plugs must match the outlet. Never modify the plug in any way.
Do not use any adapter plugs with earthed (grounded) power tools.
Unmodi-
fi ed plugs and matching outlets will reduce risk of electric shock.
b) Avoid body contact with earthed or grounded surfaces, such as pipes,
radiators, ranges and refrigerators.
There is an increased risk of electric shock
if your body is earthed or grounded.
c) Do not expose power tools to rain or wet conditions.
Water entering a power
tool will increase the risk of electric shock.
d) Do not abuse the cord. Never use the cord for carrying, pulling or unplug-
ging the power tool. Keep cord away from heat, oil, sharp edges or moving
parts.
Damaged or entangled cords increase the risk of electric shock.
e)
When operating a power tool outdoors, use an extension cord suitable for
outdoor use.
Use of a cord suitable for outdoor use reduces the risk of electric shock.
f) If operating a power tool in a damp location is unavoidable, use a residual
current device (RCD) protected supply.
Use of an RCD reduces the risk of
electric shock.
3) Personal safety
a) Stay alert, watch what you are doing and use common sense when oper-
ating a power tool. Do not use a power tool while you are tired or under
the infl uence of drugs, alcohol or medication.
A moment of inattention while
operating power tools may result in serious personal injury.
b) Use personal protective equipment. Always wear eye protection.
Protec-
tive equipment such as a dust mask, non-skid safety shoes, hard hat or hearing
protection used for appropriate conditions will reduce personal injuries.
c) Prevent unintentional starting. Ensure the switch is in the off-position before
connecting to power source and/or battery pack, picking up or carrying the
tool.
Carrying power tools with your fi nger on the switch or energising power
tools that have the switch on invites accidents.
d) Remove any adjusting key or wrench before turning the power tool on.
A
wrench or a key left attached to a rotating part of the power tool may result in
personal injury.
e) Do not overreach. Keep proper footing and balance at all times.
This enables
better control of the power tool in unexpected situations.
f) Dress properly. Do not wear loose clothing or jewellery. Keep your hair and
clothing away from moving parts.
Loose clothes, jewellery or long hair can be
caught in moving parts.
g) If devices are provided for the connection of dust extraction and collec-
tion facilities, ensure these are connected and properly used.
Use of dust
collection can reduce dust-related hazards.
h) Do not let familiarity gained from frequent use of tools allow you to become
complacent and ignore tool safety principles.
A careless action can cause
severe injury within a fraction of a second.
4) Power tool use and care
a) Do not force the power tool. Use the correct power tool for your application.
The correct power tool will do the job better and safer at the rate for which it was
designed.
b) Do not use the power tool if the switch does not turn it on and off.
Any power
tool that cannot be controlled with the switch is dangerous and must be repaired.
c) Disconnect the plug from the power source and/or remove the battery pack,
if detachable, from the power tool before making any adjustments, changing
accessories, or storing power tools.
Such preventive safety measures reduce
the risk of starting the power tool accidentally.
d) Store idle power tools out of the reach of children and do not allow persons
unfamiliar with the power tool or these instructions to operate the power
tool.
Power tools are dangerous in the hands of untrained users.
e) Maintain power tools and accessories. Check for misalignment or binding
of moving parts, breakage of parts and any other condition that may affect
the power tool’s operation. If damaged, have the power tool repaired before
use.
Many accidents are caused by poorly maintained power tools.
f) Keep cutting tools sharp and clean.
Properly maintained cutting tools with
sharp cutting edges are less likely to bind and are easier to control.
g) Use the power tool, accessories and tool bits etc. in accordance with these
instructions, taking into account the working conditions and the work to be
performed.
Use of the power tool for operations different from those intended
could result in a hazardous situation.
h) Keep handles and grasping surfaces dry, clean and free from oil and grease.
Slippery handles and grasping surfaces do not allow for safe handling and control
of the tool in unexpected situations.
5) Service
a) Have your power tool serviced by a qualifi ed repair person using only
identical replacement parts.
This will ensure that the safety of the power tool
is maintained.
Safety instructions for dry and wet vacuum cleaner,
deduster
WARNING
WARNING
Read all safety warnings and all instructions.
Failure to follow the warnings and
instructions may result in electric shock, fi re and/or serious injury.
Save all warnings and instructions for future reference.
●
Never suck up materials containing asbestos.
Asbestos is known to cause
cancer.
●
Suck up only materials whi
ch are approved for the electrical device.
The
materials could cause cancer.
●
Only use the electrical device when you are totally familiar with all its functions
and are able to use it without restrictions or have received the appropriate
instruction.
Careful instruction reduces operating errors and injuries.
●
The electrical device may not be used by persons (including children) with
physical, sensorial or mental disabilities or lack of experience and knowl-
edge. Children must be supervised to ensure that they do not play with the
electrical device.
Otherwise there is a risk of operating errors and injuries.
●
Do not suck up infl ammable or explosive liquids, for example petrol, oil,
alcohol, solvent, with the electrical device. Do not suck up hot or burning
dusts. Do not operate the electrical device in rooms where there is a risk
of explosion.
The dusts, fumes or liquids can ignite or explode.
●
The electrical device is suitable for sucking up dry materials and, by suitable
measures, also for sucking up liquids.
Penetration of water into the electrical
device increases the risk of electric shock.
●
Switch off the electrical device immediately if dust escapes (e.g. fi lter
rupture).
The fault must be repaired before restarting.
●
Switch off the electrical device immediately if foam or liquid escapes.
Clean
the fi lling level limiting device regularly and inspect for signs of damage.
●
If use of the electrical device in a wet environment is unavoidable, use a
fault current circuit breaker.
The use of a fault current circuit breaker reduces
the risk of electric shock.
●
Connect the electrical device to a properly earthed electricity mains.
The
socket and extension cable must have a fully functional protective earth.
●
Do not use the electrical device with damaged cables, plugs or switches.
Do not touch damaged cables, plugs or switches and pull out the mains
plug if the cable, plug or switch is damaged during work.
Damaged cables,
plugs or switches increase the risk of electric shock.
●
Do not drive over or crush the cables. Do not tug the cable to pull the plug
out of the socket or move the electrical device.
Damaged cables increase
the risk of electric shock.
●
Pull the plug out of the socket before making device settings, changing
accessories or putting the electrical device away.
This safety precaution
prevents unintentional starting of the electrical device.
●
Make sure that the work place i
s well lit.
●
Never let the electrical device operate unattended. Switch off the power
tool during longer work breaks, pull out the mains plug and remove all
hoses/plugs. Electrical devices can cause hazards which lead to material damage
or injury when left unattended.
●
Do not let children use the electrical device unsupervised.
Children could
injure themselves.
●
Have the electrical device repaired only by qualifi ed technical personnel
and only with genuine spare parts.
This ensures that the safety of the electrical
device is maintained.
eng eng
12

●
The electrical device contains dust which is harmful to the health. Have
emptying and maintenance procedures, including the disposal of the dust
collection tank, carried out by specialists only. Appropriate protective
equipment is necessary. Do not operate the vacuum cleaner without the
complete fi lter system.
You could otherwise endanger your health.
●
Check the perfect condition of the suction hose before starting up. Leave
the suction hose attached to the electrical device to prevent dust from
escaping accidentally.
You could otherwise inhale dust.
●
Switch off the electrical device immediately as soon as foam or water
emerges and empty the tank.
The electrical device could otherwise be damaged.
●
The electrical device may not be used as a water pump.
The electrical device
is intended for sucking up an air and water mixture.
●
Do not use the electrical device as a seat.
You could da
mage the electrical device.
●
Use the power cable and the suction hose carefully.
You could endanger
other persons with them.
●
Do not clean the electrical device by aiming a water jet directly at it.
Pene-
tration of water into the top part of the vacuum cleaner increases the risk of
electric shock.
●
An adequate air exchange rate must be provided in the room if the exhaust
air goes back into the room. Observe the national regulations.
●
Before using, the operator must be provided with information, instructions
and training for the use of the machine and the materials for which it is to
be used, including safe disposal procedures for the sucked up material.
The operator must observe the safety regulations valid for the materials to
be handled.
Explanation of symbols
WARNING
WARNING
Danger with a medium degree of risk which could result in
death or severe injury (irreversible) if not heeded.
CAUTION
CAUTION
Danger with a low degree of risk which could result in minor
injury (reversible) if not heeded.
NOTICE
NOTICE
Material damage, no safety note! No danger of injury.
Safety vacuum cleaner of dust class L
Safety vacuum cleaner of dust class M
WARNING: This device can contain dusts that are harmful to
the health.
Warning
Read the operating manual before starting
Use eye protection
Use a respirator
Use ear protection
Use hand protection
Electrical device complies with protection class I
Environmental friendly disposal
Flat folded fi lt
er
Polythene bag
1. Technical data
Use for the intended purpose
WARNING
WARNING
ROLLER’S Protector 2 L
and
ROLLER’S Protector 2 M
are intended for commercial
ROLLER’S Protector 2 M are intended for commercialROLLER’S Protector 2 M
use, e.g. in trade, industry and workshops, for sucking up non-fl ammable, dry dusts
with no asbestos content, non-fl ammable liquids which occur during use of slitting
and cutting machines or core drilling machines and for cleaning building sites. All
other uses are not for the intended purpose and are prohibited.
ROLLER’S Protector 2 L
and
ROLLER’S Protector 2 M
are so-called safety vacuum
ROLLER’S Protector 2 M are so-called safety vacuumROLLER’S Protector 2 M
cleaners which are tested and certifi ed in accordance
with EN 60335-2-69 and are
suitable for sucking up dusts that are harmful to health:
●
ROLLER’S Protector 2 L
satisfi es
dust class L
(light) in accordance with EN
60335-2-69 and may be used for separating dust with an exposure limit/work
place limit (AGW) > 1 mg/m³. The fi lter material in vacuum cleaners for dust class
L is tested. The maximum penetration level is
≤
1 %. There are no special disposal
regulations.
●
ROLLER’S Protector 2 M
satisfi es
ROLLER’S Protector 2 M satisfi es ROLLER’S Protector 2 M
dust class M
(medium) in accordance with
dust class M (medium) in accordance withdust class M
EN 60335-2-69 and may be used for separating dust with an exposure limit/ work
place limit (AGW) > 0.1 mg/ m³. Vacuum cleaners of this class are tested as
complete units. The maximum penetration level is
≤
0.1 %. They are subject to
low-dust disposal regulations.
When working with mineral building materials, e.g. concrete, steel-reinforced concrete,
all types of masonry, all types of screed, natural stone, a high degree of mineral
dust containing quartz is produced which is harmful to the health. Inhalation of quartz
fi ne dust is harmful to the health. The Directive 89/391/EEC on the taking of meas-
ures to improve the safety and health protection of employees at work obliges the
employer to carry out an appropriate risk assessment at the employees place of
work, determine and evaluate the potential dust load and defi ne necessary protec-
tive measures. The German technical ruling for hazardous substances TRGS 559
"Mineral Dust" defi nes in Appendix 1 that work with slitting and cutting machines
must be classifi ed in exposure category 3 if the effectiveness of the extraction has
not been proven.
In accordance with EN 60335-2-69 a penetration level of
≤
0.1 % is prescribed for
sucking health hazardous dusts with an exposure limit/work place limit (AGW) of
> 0.1 mg/m³. When slitting and cutting mineral building materials at least one safety
vacuum cleaner/deduster of dust class M must usually be used so that the health
hazardous dusts from machines can be effectively extracted. Safety vacuum cleaners/
dedusters of dust class M are tested as whole units (including the fl at folded fi lter)
and achieve a cleaning effect which allows a largely safe return of clean air into the
work area. Safety vacuum cleaners/dedusters of dust class M in accordance with
EN 60335-2-69 must also achieve a suffi cient extraction volume so that the air speed
in the suction hose of these safety vacuum cleaners/dedusters is monitored. An
acoustic signal sounds on dropping below the air speed of ≥ 20 m/s in the suction
hose (e.g. "fi lter blocked"). The cause must be determined immediately and repaired
before continuing work.
Observe the national regulations: You are expressly reminded that, in many countries,
additional regulations regarding the safe use of such vacuum cleaners for clearing
up and disposal of health hazardous dusts are imposed by the national industrial
health and safety authorities, water board and similar authorities.
The dust regulations are omitted for wet vacuum cleaners.
1.1. Scope of delivery (Fig. 1)
ROLLER’S Protector 2 L: Electric dry-wet vacuum cleaner, suction hose 4 m, handle, 2 metal suction pipes, attachment for surfaces wet/dry, brush strips, rubber
lips, Protector 2 suction hose/power tool adapter, attachment for joints, felt fi lter bag, PES fl at folded fi lter, operating instructions
ROLLER’S Protector 2 M:
Electric dry-wet vacuum cleaner, suction hose E 4 m, handle E, 2 metal suction pipes, attachment for surfaces wet/dry, brush strips, rubber
lips, Protector 2 suction hose/power tool adapter, attachment for joints, felt fi lter bag, polythene bag, PES fl at folded fi lter, operating instructions
1.2. Article numbers
ROLLER’S Protector 2 L ROLLER’S Protector 2 M
Dry and wet vacuum cleaner
185600 185601
Fe
lt fi lter bag, polyester felt, pack of 5 185511 185511
Wet fi lter bag, paper-polyester woven felt, pack of 5 1855
12
Polythene bag
, pack of 10 185513 1855
13
Fl
at folded fi lter PES, polyester, pack of 1 185515 185515
Suction rotor 180160 180160
Water extraction device 183606 183606
1.3. Operating data
Tank content
31
l
31
l
Filling volume liquid
17
l
17 l17
17
l
17 l17
Max. fl ow volume
140
m³/h
140 m³/h140
143
m³/h
143 m³/h143
Max. vacuum pressure
230
hPa (
230 hPa (230
hPa (
230
mbar, 3.5 psi)
230 mbar, 3.5 psi)230
237
hPa (
237 hPa (237
hPa (
237
mbar, 3.5 psi)
237 mbar, 3.5 psi)237
Suction hose length
4.0
m
4.0 m4.0
4.0
m
4.0 m4.0
Suction hose diameter
21, 27, 32, 35, 40
mm
21, 27, 32, 35, 40 mm21, 27, 32, 35, 40
21, 27, 32, 35, 40
mm
21, 27, 32, 35, 40 mm21, 27, 32, 35, 40
eng eng
13

ROLLER’S Protector 2 L ROLLER’S Protector 2 M
1.4. Operating temperature range
–10 to +40 °C –10 to +40°C
1.5. Electrical data
220–240 V~; 50–60 Hz 220–240 V~; 50–60 Hz
Nominal power vacuum cleaner 1200 W 1200 W
Permissible power socket for power too
ls1)
100–2200 W 100–2200 W
Power consumption max. 3400 W max. 3400 W
Protection class I I
Type of protection IP X4 IP X4
1)
The specifi ed maximum permissible power for the socket for power tools can differ depending on the country.
1.6. Dimensions
560
×
560×560
370
×580 mm
370×580 mm370
560
×
560×560
370
×580 mm
370×580 mm370
(2
2.0
"×1
4.6
"×22.8") (2
2.0
"×1
4.6
"×22.8")
1.7. Weights
1
3.5
kg (2
3.5 kg (23.5
9.8
lb) 1
9.8 lb) 19.8
4.2
kg (
4.2 kg (4.2
kg (
31.3
lb)
31.3 lb)31.3
1.8. Noise information
Workplace-related emissions value L
pA
= 69 d
B(
A); K =
B(A); K =B(
2
d
2d2
B(
A) L
B(A) LB(
pA
= 69 d
B(
A); K =
B(A); K =B(
2 B(
A)
B(A)B(
(Determined according to EN 60335-2-69)
1.9. Vibrations
Weighted effective value of the acceleration < 2.5 m/s²; K = 0.2 m/s² < 2.5 m/s²; K = 0.2 m/s²
The indicated weighted effective value of acceleration has been measured against standard test procedures and can be used by way of comparison with another
device. The indicated weighted effective value of acceleration can also be used as a preliminary evaluation of the exposure.
Attention:
The indicated weighted effective value of acceleration can differ during operation from the indicated value, dependent on the manner in which the device is
used. Dependent upon the actual conditions of use (periodic duty) it may be necessary to establish safety precautions for the protection of the operator.
2. Start-up
2.1. Electrical connection
WARNING
WARNING
Mains voltage present!
Mains voltage present!Mains voltage present!
Before connecting the electrical device, check whether
the voltage given on the rating plate corresponds to the mains voltage. Only
connect electrical devices of protection class I to a socket/extension lead with a
functioning protect
ive contact. On building sites, in a wet environment or under
functioning protective contact. On building sites, in a wet environment or underfunctioning protect
similar installation conditions, only operate the electrical device on the mains
with a 30 mA fault current protection device (RCD) which interrupts the power
supply as soon as the leakage current to earth exceeds 30 mA for 200 ms.
2.2. Start-up
(Fig. 1 to Fig. 2)
Take the included accessories out of the tank (1) and box.
ROLLER’S Protector 2 L
and
ROLLER’S Protector 2 L andROLLER’S Protector 2 L
Protector 2 M
are equipped with an antistatic system.
Protector 2 M are equipped with an antistatic system.Protector 2 M
If static charges are caused by friction, these can be transmitted to the top part of
the vacuum cleaner by an electrically conductive suction hose E with electrically
conductive handle E and discharged from there. This prevents sparks and shocks.
The electrically conductive suction hose
is part of the delivery scope for the
ROLL-
ER’S Protector 2 M
and is available as an accessory for the
ER’S Protector 2 M and is available as an accessory for theER’S Protector 2 M
ROLLER’S Protector 2 L
.
The suction power can be set with the suction power switch (8).
2.3. Selecting, inserting and changing the fl at folded fi lter (Fig.
12
)
12)12
CAUTION
CAUTION
The electrical device may never be used without the fl at folded fi lter.
Pull out the mains plug. Open the the fi lter cover (9) and check whether the
suitable fl at folder fi lter (10) is inserted. The polyester (PES) fl at folded fi lter is
suitable for wet and dry cleaning. The PES fl at folder fi lter from ROLLER’S is
approved for sucking up dusts of dust class L and M.
To change the fl at folder fi lter (10), open the fi lter cover (9) take out the fl at
folder fi lter (10) and dispose of it in a dust-proof polythene bag.
Use a suitable
respirator, e.g. particle fi ltering ha
lf face mask FFP2, and disposable overalls.
Observe the national regulations. Clean the fi lter holder and insert a new suit-
able fl at folded fi lter (10) with sealing lip facing upwards. Close the fi lter cover
(9) until it snaps in audibly.
2.4.
Select a felt fi lter bag, wet fi lter bag, polythene bag, insert or change.
2.4.1. Selecting a fi lter bag, polythene bag
Felt fi lter bags are approved for sucking up dusts of dust class L and M and
for low-dust disposal. Wet fi lter bags separate the water from the sucked up
solids when extracting dirty water. The polythene bag simplifi es disposal of dirt
and prevents dirt from accumulating in the tank (1). The polythene bag is not
approved for sucking up health-hazardous dusts. The following applications
are recommended for the different bags:
Fe
lt fi lter bag:
for wet and dry applications, for normal dirt, fi ne dusts,
abrasive dusts, wet dirt
Wet fi lter bag
(ROLLER’S Protector 2 L)
:
for wet and dry extraction, for abrasive dusts, wet dirt, liquids
Polythene bag:
For wet and dry applications with dusts that are not harmful to health, for normal
dirt, fi ne dusts, abrasive dusts, wet dirt, water For low-dust disposal of conta-
minated parts, e.g. of the fl at folded fi lter.
2.4.2. Inserting and changing the fi lter bag (Fig.
4
)
4)4
Pull out the mains plug. Use a suitable respirator, e.g. particle fi ltering half face
mask FFP2, and disposable overalls. Open the vacuum cleaner top part lock
(3) and remove the vacuum cleaner top part (2) from the tank (1). Insert the
fi lter bag directly in the tank (1), push with the round opening up to the stop
on the suction hose connecting nozzle (12) inside the tank (1), place the top
part of the vacuum cleaner (2) on the tank (1), snap in the lock on the top part
of the vacuum cleaner (3). To change, remove the fi lter bag from the suction
hose connecting nozzle (12) and close the opening of the fi lter bag with the
slide and the wet fi lter bag with the plastic cap. Place the vacuum cleaner top
part (2) on the tank (1). Dispose of sealed fi lter bags. Observe the national
regulations.
2.4.3. Inserting or changing the polythene bag (Fig.5)
Pull out the mains plug. Use a suitable respirator, e.g. particle fi ltering half face
mask FFP2, and disposable overalls. Open the vacuum cleaner top part lock
(3) and remove the vacuum cleaner top part (2) from the tank (1). Insert the
polythene bag directly into the tank (1), push with the small round opening
up to the stop on the suction hose connecting nozzle (12) inside the tank (1)
and fi t the large opening over the edge of the tank (1). Place the top part of
the vacuum cleaner (2) on the tank (1), snap in the lock on the top part of the
vacuum cleaner (3). To change, pull up the polythene bag lapped over the
edge of the tank and seal with the attached adhesive strips. Remove the fi lled
polythene bag from the suction hose connecting nozzle (12), seal with adhesive
tape, remove and dispose of. Observe the national regulations.
2.5. Connecting power tools to
ROLLER’S Protector 2 L
and
ROLL-
ER’S Protector 2 M
(Fi
(Fi
g. 7, Fig. 8
)
g. 7, Fig. 8)g. 7, Fig. 8
WARNING
WARNING
The socket for power tools with automatic electronic on/off (16) on the vacuum
cleaner is only intended for direct connection of power tools with a consumed
power between 100 and 2,200 W.
In ROLLER’S Protector 2 M, pull out the plug (11) for the suction hose connecting
nozzle (12). Insert the suction hose (13) into the suction hose connecting nozzle
(12) as far as it goes and snap the bayonet catch shut by turning it to the right
(Fig. 6). The suction power switch (8) should be set to "max" to achieve optimum
suction performance. Set the suction hose diameter selector switch (14) to the
used suction hose diameter. To ensure that the cross section of the suction
hose is as large as possible, it is recommended to push the suction hose/power
tool adapter (15) over the power tool suction nozzle. Plug the suction hose/
power tool adapter (15) and suction hose (13) together and snap in (Fig. 9).
Push the suction hose/power tool adapter (15) onto the suction nozzle of the
power tool to be used. See the operating instructions of the power tool.
2.5.1. Connecting the power tool to the socket of the
ROLLER’S Protector 2 L
/
ROLLER’S Protector 2 M
The power of the used power tool must be between 100 and 2,200 W. See the
operating instructions of the power tool. Only then can the connecting cable of
the used power tool be connected to the socket (16) of the
ROLLER’S Protector 2 L
/
ROLLER’S Protector 2 M
.
2.5.2. Connecting the power tool to a separate socket
If the power of the used power tool is outside the limits o
f 100 and 2,200 W,
the power tool may not be connected to the socket (16) of the
ROLL-
ER’S Protector 2 L
/
ROLLER’S Protector 2 M
but must be connected to a
ROLLER’S Protector 2 M but must be connected to aROLLER’S Protector 2 M
separate socket. See the operating
instructions of the power tool.
eng eng
14

2.6. Building site or area cleaning
In ROLLER’S Protector 2 M pull out the plug (11) for the suction hose connecting
nozzle (12). Insert the suction hose (13) into the suction hose connecting nozzle
(12) as far as it goes and snap the bayonet catch shut by turning it to the right
(Fig. 6). The suction power switch (8) should be set to "max" for optimum suction
performance. In ROLLER’S Protector 2 M, set the suction hose diameter selector
switch (14) to the used suction hose diameter.. Push the handle (17) into the
suction hose and snap it in place (Fig. 9). The wet/dry joint attachment (18),
the suction tube (19), the wet/dry surface attachment (20) can be pushed into
the handle (17) as required. Brush strips or rubber lips can be mounted on the
wet/dry surface attachment optionally. The brush strips/rubber lips can be
levered out with a fl at blade screwdriver (Fig. 15). Please bear in mind when
inserting that the brush strips/rubber lips are different lengths and therefore
only fi t into one of the slits in the surface attachment (20). Insert the rubber lips
with the smooth sides facing inwards.
3. Operation
Use eye protection
Use a respirator
Use ear protection
Use hand protection
WARNING
WARNING
Check and observe the intended use of the vacuum cleaner, especially the
necessary dust class, before performing any work during which health hazardous
dusts could be produced.
ROLLER’S Protector 2 L and Protector 2 M is switched on with the On/Off
switch (21). ROLLER’S Protector 2 L and Protector 2 M clean the fl at folded
fi lter (10) automatically. The fi lter is cleaned by several short shots of air in rapid
succession. You can choose between 4 operating states with the On/Off switch
(21):
0 vacuum cleaner off
1 vacuum cleaner on, extraction without automatic fi lter cleaning
2 AUTO MAX vacuum cleaner on, extraction with automatic fi lter cleaning
at 15 s intervals
3 AUTO MIN vacuum cleaner on, extraction with automatic fi lter cleaning
at 60 s intervals
ROLLER’S Protector 2 L
and
Protector 2 M
monitor the fi lling level of electrically
Protector 2 M monitor the fi lling level of electrically Protector 2 M
conductive liquids, e.g. water, in the tank (1). Electrodes for limiting the fi lling
level (
level (
22
) switch off the vacuum cleaner automatically as soon as the electrically
22) switch off the vacuum cleaner automatically as soon as the electrically22
conductive liquid touches the electrodes. When sucking up non-conductive
liquids or dusts, the fi lling level in the tank (1) must be
checked visually from
time to time.
In the
ROLLER’S Protector 2 M
the air velocity is checked by an electronic
ROLLER’S Protector 2 M the air velocity is checked by an electronicROLLER’S Protector 2 M
volume fl ow monitor. An acoustic signal sounds if it drops below the prescribed
value of 20 m/s. The suction hose diameter selector switch (14) on the vacuum
cleaner
3.1.
Extracting dusts and liquids from connected power tools
WARNING
WARNING
The socket for power tools with automatic on/off (16) on the vacuum cleaner
is only intended for direct connection of power tools with a consumed power
between 100 and 2,200 W.
The specifi ed maximum permissible power for the socket for power tools can
differ depending on the country.
3.1.1. Connecting the power tool to the socket of the
ROLLER’S Protector 2 L
/
ROLLER’S Protector 2 M
The vacuum cleaner is prepared as described in 2.5. and 2.5.1. Switch the
vacuum cleaner on at the On/Off switch (21). When the power tool connected
to the socket for power tools with automatic switch-on (16) is switched on, the
vacuum cleaner starts almost simultaneously. When the power tool is switched
off, the vacuum cleaner continues running for approx. 15 s to empty the suction
hose (13). The vacuum cleaner must be switched off at the On/Off switch (21)
after completing the work. The On/Off switch (21) must be set to “1” for wet
extraction.
3.1.2. Connecting the power tool to a separate socket
The vacuum cleaner is prepared as described in 2.5. and 2.5.2. Switch the
vacuum cleaner on at the On / Off switch (21). Then switch on the power tool
connected to a separate socket. At the end of work, switch off the power tool
and then the vacuum cleaner about 15 s later at the On/Off switch (21) to allow
time for the suction hose (13) to empty.
The On/Off switch (21) must be set to
“1” for wet extraction.
3.2. Building site or area cleaning
The vacuum cleaner is prepared as described in 2.6. Switch the vacuum cleaner
on at the On / Off switch (21).
The On/Off switch (21) must be set to “1” for wet
extraction.
3.3. Shutting down and transporting
ROLLER’S Protector 2 M: Turn the suction hose (13) on the suction hose
connecting nozzle (12) as far to the left as it goes and remove. Insert the plug
for the suction hose connecting nozzle (1) as far as it goes. Open the vacuum
cleaner top part locks (3) and remove the vacuum cleaner top part (2) from the
tank (1). Empty the tank (1). Use a suitable respirator and disposable overalls
Observe the national regulations. Place the top part of the vacuum cleaner (2)
back onto the tank (1), snap in the locks on the top part of the vacuum cleaner
(3). The wet/dry surface attachment (20) with suction pipes (19), handle (17),
joint attachment (18) can be fastened in the holders (23) on the vacuum cleaner.
Hang the suction hose (13) and connecting lead on the holder (26). Block the
position of the vacuum cleaner with the castor with brake. Place the cleaned
and dried vacuum cleaner in a dry room and secure against unauthorised use.
4. Service
Notwithstanding the maintenance described below, it is recommended to have
the power tool sent to an authorised ROLLER contract service workshop at
least once a year for inspection and periodic checking of electrical devices. In
Germany, such periodic testing of electrical devices should be performed in
accordance with DIN VDE 0701-0702 and also prescribed for mobile electrical
equipment according to the accident prevention rules DGUV, regulation 3
"Electrical Systems and Equipment". In addition, the respective national safety
provisions, rules and regulations valid for the application site must be considered
and observed.
4.1. Maintenance
WARNING
WARNING
Pull out the mains plug before maintenance work!
Keep the vacuum cleaner as well as the ventilation slits of the air outlet (
24
)
24)24
and motor cooling air inlet (
25
) on the top part of the vacuum cleaner (2) clean.
25) on the top part of the vacuum cleaner (2) clean.25
Empty the tank (1) after ever use. Use a dust mask and disposable overalls.
Observe the national regulations. Clean the top part of the vacuum cleaner (2)
and the tank (1) occasionally with a damp cloth.
Open the fi lter cover (9) and remove the fl at folded fi lter (10) after wet cleaning.
Remove the top part of the vacuum cleaner (2) from the tank (1) and empty
the tank. Observe the national regulations. Let all parts dry to avoid mould.
Then completely assemble the top part of the vacuum cleaner (2) and tank (1).
Make sure that liquids never get into the inside of the top part of the vacuum
cleaner (2). Never immerse the vacuum cleaner in liquid.
Change the fl at folder fi lter, fi lled fi lter bag and polythene bag in good time or
empty the tank (1) in good time.
Clean the fi lling level limiting electrodes (
23
)
23)23
with a brush and check regularly for signs of damage.
For maintenance by the user the machine must be dismantled, cleaned and
serviced as far as possible without posing any danger to the maintenance
personnel and other persons. Suitable safety precautions include detoxifi cation
before dismantling, provision of locally fi ltered forced ventilation where the
machine is dismantled, cleaning of the maintenance area and suitable personal
safety gear.
4.2. Inspection / repair
WARNING
WARNING
Pull out the mains plug before carrying out maintenance or repair work!
This work may only be performed by qualifi ed personnel.
Switch off the electrical device immediately if dust escapes (e.g. fi lter
rupture).
The fault must be repaired before restarting.
Switch off the electrical device immediately if foam or liquid escapes.
Clean the fi lling level limiting device regularly and inspect for signs of damage.
It is recommended to send the electrical device to an authorised ROLLER
service shop for inspection/maintenance after approximately 250 operating
hours or at least once a year.
Regardless of this, the national inspection intervals for mobile electrical equip-
ment on building sites must be observed.
A dust inspection must be conducted at least once a year by the manufacturer
or an instructed person, e.g. for damage to the fi lter, tightness of the vacuum
cleaner and function of the control device. For vacuum cleaners of dust class
M which were in a contaminated environment, the outside and all machine
parts should be cleaned or treated with sealants before being removed from
the hazardous area. All parts must be considered contaminated when they are
taken out of the hazardous area and suitable measures must be taken to avoid
spreading of the dust. All contaminated parts which cannot be cleaned satis-
factorily must be changed when performing maintenance and repair work. Such
parts must be disposed of in tight bags for the proper disposal of such waste.
Observe the national regulations.
eng eng
15

6. Disposal
Electrical devices may not be thrown into the domestic waste at the end of use.
They must be disposed of according to the legal regulations.
7. Manufacturer’s Warranty
The warranty period shall be 12 months from delivery of the new product to the
fi rst user. The date of delivery shall be documented by the submission of the
original purchase documents, which must include the date of purchase and the
designation of the product. All functional defects occurring within the warranty
period, which are clearly the consequence of defects in production or materials,
will be remedied free of charge. The remedy of defects shall not extend or
renew the warranty period for the product. Damage attributable to natural wear
and tear, incorrect treatment or misuse, failure to observe the operational
instructions, unsuitable operating materials, excessive demand, use for unau-
thorized purposes, interventions by the customer or a third party or other
reasons, for which ROLLER is not responsible, shall be excluded from the
warranty
Services under the warranty may only be provided by customer service stations
authorized for this purpose by ROLLER. Complaints will only be accepted if
the product is returned to a customer service station authorized by ROLLER
without prior interference and in a fully assembled condition. Replaced products
and parts shall become the property of ROLLER.
The user shall be responsible for the cost of shipping and returning the product.
A list of the ROLLER-authorized customer service stations is available on the
Internet under www.albert-roller.de. For countries which are not listed, the
product must be sent to the SERVICE-CENTER, Neue Rommelshauser Strasse
4, 71332 Waiblingen, Deutschland. The legal rights of the user, in particular
the right to make claims against the seller in case of defects as well as claims
due to wilful violation of obligations and claims under the product liability law
are not restricted by this warranty.
This warranty is subject to German law with the exclusion of the confl ict of laws
rules of German International Private Law as well as with the exclusion of the
United Nations Convention on Contracts for the International Sales of Goods
(CISG). Warrantor of this world-wide valid manufacturer’s warranty is Albert
Roller GmbH & Co KG, Neue Rommelshauser Straße 4, 71332 Waiblingen,
Deutschland.
8. Spare parts lists
For spare parts lists, see
www.albert-roller.de
→ Downloads → Parts lists.
5. Fault
5.1.
Fault:
Vacuum cleaner does not work or switches off during operation.
Cause:
Remedy:
●
Maximum fi lling level in tank (1) reached.
●
Empty the tank
●
Mains lead defective.
●
Have the mains lead changed by qualifi ed personnel or an authorised
ROLLER customer service workshop.
●
Vacuum cleaner defective.
●
Have the vacuum cleaner checked/repaired by an authorised ROLLER
customer service workshop.
5.2.
Fault:
Vacuum cleaner does not start after emptying the tank (1).
Cause:
Remedy:
●
Electrodes for fi lling level limiting (
22
) are soiled.
22) are soiled.22
●
Clean electrodes with a brush for example.
●
Vacuum cleaner did not recognize the turn-on pulse.
●
Switch off the vacuum cleaner at the on/off switch (21) and switch on
again after about 5 s.
5.3.
Fault:
Suction force drops.
Cause:
Remedy:
●
Suction hose (13), suction tube (19), suction hose/power tool adapter (15),
wet/dry surface attachment 300 mm (20), wet/dry joint attachment (18),
handle (17), suction hose connecting nozzle (12) blocked.
●
Clear blockage
●
Filter bag, polythene bag, tank (1) are full.
●
Dispose of fi lter bag, polythene bag, empty the tank.
●
Filter cover (9) is open
●
Close fi lter cover
●
Flat folded fi lter (10) soiled/defective.
●
Change fl at folded fi lter
5.4.
Fault:
Dust escapes when sucking.
Cause:
Remedy:
●
Wrong installation position of the fl at folded fi lter (10).
●
Check correct position of the fl at folded fi lter
●
Flat folded fi lter (10) soiled/defective.
●
Change fl at folded fi lter
●
Suction hose (13) defective
●
Change suction hose.
●
Vacuum cleaner top part (2) not mounted/snapped in correctly
●
Mount and snap in vacuum cleaner top part.
5.5.
Fault:
Electrodes for fi lling level limiting (
23
) do not respond.
23) do not respond.23
Cause:
●
Electrodes for fi lling level limiting (
23
) are soiled.
23) are soiled.23
Remedy:
●
Clean electrodes with a brush for example.
●
Sucking of non-conductive liquids.
●
Check fi lling level of tank (1) regularly, empty the tank in time.
5.6.
Fault:
Acoustic signal sounds (
Protector 2 M
).
Protector 2 M).Protector 2 M
Cause:
Remedy:
●
Suction hose diameter selector switch (14) not set to suction hose diameter.
●
Set selector switch to suction hose diameter
●
Filter bag, polythene bag, tank (1) are full.
●
Dispose of fi lter bag, polythene bag, empty the tank.
●
Suction hose (13), suction tube (19), suction hose/power tool adapter (15),
wet/dry surface attachment 300 mm (20), wet/dry joint attachment (18),
handle (17), suction hose connecting nozzle (12) blocked.
●
Clear blockage
●
Filter on the air inlet motor cooling (25) blocked
●
Open the air inlet motor cooling (25) (Fig. 14) and clean the fi lter.
5.7.
Fault:
Automatic fi lter cleaning not working.
Cause:
Remedy:
●
On/Off switch (21) to switch position “0” or “1”
●
Set On/Off switch to switch position “2 AUTO MAX” or “3 AUTO MIN”.
●
Vacuum cleaner defective
●
Have the vacuum cleaner checked/repaired by an authorised ROLLER
customer service workshop
eng eng
16

Traduction de la notice d’utilisation originale
Fig.
1–16
1 Cuve
2 Partie supérieure de l’aspirateur
3 Boucle de verrouillage de la partie
supérieure
4 Poignée
5 Roulette pivotante/roulette
pivotante avec frein
6 Support pour suceur surfaces eau/
poussières
7 Grande roue
8 Bouton de puissance d’aspiration
9 Couvercle de fi ltre
10 Filtre plissé plat
11 Bouchon d’obturation de l’embout
de raccordement du tuyau
d’aspiration (
ROLLER’S
Protector 2 M
)
Protector 2 M)Protector 2 M
12 Embout de raccordement du tuyau
d’aspiration
13 Tuyau d’aspiration
14 Sélecteur de diamètre de tuyau
d’aspiration (
ROLLER’S
Protector 2 M
)
Protector 2 M)Protector 2 M
15 Adaptateur tuyau d’aspiration/outil
électrique
16 Prise de courant pour outil
électrique avec dispositif
automatique de marche/arrêt
17 Poignée
18 Suceur fentes eau/poussières
19 Tube d’aspiration
20 Suceur surfaces eau/poussières
300 mm
21
Interrupteur marche/arrêt et
nettoyage automatique du fi ltre
22
Témoin lumineux pour outil électrique
23
Support pour suceur fentes eau/
poussières, poignée, tubes
d’aspiration, adaptateur tuyau
d’aspiration/outil électrique
24
Sortie d’air
25
Entrée d’air de refroidissement
25 Entrée d’air de refroidissement25
du moteur
26
Support pour câble de raccorde-
26 Support pour câble de raccorde-26
ment et tuyau d’aspiration
27 Tiroirs pour adaptateur tuyau
d'aspiration/outil électrique et
suceur fentes eau/poussières
300 mm
Avertissements de sécurité généraux pour l’outil électrique
AVERTISSEMENT
AVERTISSEMENT
Lire tous les avertissements de sécurité, les instructions, les illustrations et
les spécifi cations fournis avec cet outil électrique.
Ne pas suivre les instructions
énumérées ci-dessous peut provoquer un choc électrique, un incendie et/ou une
blessure sérieuse.
Conserver tous les avertissements et toutes les instructions pour pouvoir s’y
reporter ultérieurement.
Le terme « outil électrique » utilisé dans les consignes de sécurité se réfère aux
outils électriques sur secteur (avec câble d’alimentation) ou aux outils électriques
sur accu (sans câble d’alimentation).
1) Sécurité de la zone de travail
a) Conserver la zone de travail propre et bien éclairée.
Les zones en désordre
ou sombres sont propices aux accidents.
b) Ne pas faire fonctionner les outils électriques en atmosphère explosive, par
exemple en présence de liquides infl ammables, de gaz ou de poussières.
Les
outils électriques produisent des étincelles qui peuvent enfl ammer les poussières
ou les fumées.
c) Maintenir les enfants et les personnes présentes à l’écart pendant l’utili-
sation de l’outil électrique.
Un utilisateur distrait risque de perdre le contrôle
de l’outil électrique.
2) Sécurité électrique
a) Il faut que les fi ches de l’outil électrique soient adaptées au socle. Ne jamais
modifi er la fi che de quelque façon que ce soit. Ne pas utiliser d’adaptateurs
avec des outils électriques à branchement de terre.
Des fi ches non modifi ées
et des socles adaptés réduisent le risque de choc électrique.
b) Éviter tout contact du corps avec des surfaces reliées à la terre telles que
et des socles adaptés réduisent le risque de choc électrique.
b) Éviter tout contact du corps avec des surfaces reliées à la terre telles que
et des socles adaptés réduisent le risque de choc électrique.
les tuyaux, les radiateurs, les cuisinières et les réfrigérateurs.
Il existe un
risque accru de choc électrique si votre corps est relié à la terre.
c) Ne pas exposer les outils électriques à la pluie ou à des conditions humides.
La pénétration d‘eau à l’intérieur d’un outil électrique augmente le risque de choc
électrique.
d) Ne pas maltraiter le cordon. Ne jamais utiliser le cordon pour porter, tirer
ou débrancher l’outil électrique. Tenir le câble de raccordement à l’abri de
la chaleur, de l’huile, des arêtes vives et des pièces en mouvement.
Des
cordons endommagés ou emmêlés augmentent le risque de choc électrique.
e) Lorsqu’on utilise un outil électrique à l’extérieur, utiliser un prolongateur
adapté à l’utilisation extérieure.
L’utilisation d’un cordon adapté à l’utilisation
extérieure réduit le risque de choc électrique.
f) Si l’usage d’un outil électrique dans un emplacement humide est inévitable,
utiliser une alimentation protégée par un dispositif à courant différentiel
résiduel (RCD).
L’usage d’un RCD réduit le risque de choc électrique.
3) Sécurité des personnes
a) Rester vigilant, regarder ce que vous êtes en train de faire et faire preuve
de bon sens dans votre utilisation de l’outil électrique. Ne pas utiliser un
outil électrique lorsque vous êtes fatigué ou sous l’emprise de drogues,
de l’alcool ou de médicaments.
Un moment d’inattention en cours d’utilisation
d’un outil électrique peut entraîner des blessures graves.
b) Utiliser un équipement de protection individuelle. Toujours porter une
protection pour les yeux.
Les équipements de protection individuelle tels que
les masques contre les poussières, les chaussures de sécurité antidérapantes,
les casques ou les protections auditives utilisés pour les conditions appropriées
réduisent les blessures.
c) Éviter tout démarrage intempestif. S’assurer que l’interrupteur est en posi-
tion arrêt avant de brancher l’outil au secteur et/ou au bloc de batteries,
de le ramasser ou de le porter.
Ne jamais porter l’outil électrique avec le doigt
sur l’interrupteur ou brancher l’outil électrique en marche au secteur (risque
d’accidents).
d) Retirer toute clé de réglage avant de mettre l’outil électrique en marche.
Un
outil ou une clé se trouvant dans une pièce en rotation de l’outil électrique peut
entraîner des blessures.
e) Ne pas se précipiter. Garder une position et un équilibre adaptés à tout
moment.
Cela permet un meilleur contrôle de l’outil électrique dans des situations
inattendues.
f) S’habiller de manière adaptée. Ne pas porter de vêtements amples ou
de bijoux. Garder les cheveux et les vêtements à distance des parties en
mouvement.
Des vêtements amples, des bijoux ou les cheveux longs peuvent
être pris dans des parties en mouvement.
g) Si des dispositifs sont fournis pour le raccordement d’équipements pour
l’extraction et la récupération des poussières, s’assurer qu’ils sont connectés
et correctement utilisés.
Utiliser des collecteurs de poussière peut réduire les
risques dus aux poussières.
h) Rester vigilant et ne pas négliger les principes de sécurité de l’outil sous
prétexte que vous avez l’habitude de l’utiliser.
Une fraction de seconde
d’inattention peut provoquer une blessure grave.
4) Utilisation et entretien de l’outil électrique
a) Ne pas forcer l’outil électrique. Utiliser l’outil électrique adapté à votre
application.
L’outil électrique adapté réalise mieux le travail et de manière plus
sûre au régime pour lequel il a été construit.
b) Ne pas utiliser l’outil électrique si l’interrupteur ne permet pas de passer
de l’état de marche à arrêt et inversement.
Tout outil électrique qui ne peut
pas être commandé par l’interrupteur est dangereux et il faut le réparer.
c) Retirer la fi che de la prise de courant et/ou retirer l’accu amovible avant
d’effectuer des réglages, de changer des pièces de l’outil utilisé ou de
ranger l’outil électrique.
De telles mesures de sécurité préventives réduisent
le risque de démarrage accidentel de l’outil électrique.
d) Conserver les outils électriques à l’arrêt hors de la portée des enfants. Ne
pas confi er l’outil électrique à des personnes qui ne sont pas familiarisées
avec son utilisation ou qui n’ont pas lu ces instructions.
Les outils électriques
sont dangereux entre les mains d’utilisateurs novices.
e) Prendre scrupuleusement soin des outils électriques et l’outil utilisé.
Vérifi er qu’il n’y a pas de mauvais alignement ou de blocage des parties
mobiles, des pièces cassées ou toute autre condition pouvant affecter le
fonctionnement de l’outil électrique. Avant l’utilisation de l’outil électrique,
faire réparer les pièces endommagées.
De nombreux accidents sont dus à
des outils électriques mal entretenus.
f) Garder affûtés et propres les outils permettant de couper.
Des outils destinés
à couper correctement entretenus avec des pièces coupantes tranchantes sont
moins susceptibles de bloquer et sont plus faciles à contrôler.
g) Utiliser l’outil électrique, l’outil interchangeable, les outils interchangeables,
etc. conformément à ces instructions en tenant compte des conditions de
travail et du travail à réaliser.
L’utilisation de l’outil électrique pour des opérations
différentes de celles prévues peut donner lieu à des situations dangereuses.
h) Il faut que les poignées et les surfaces de préhension restent sèches,
propres et dépourvues d’huiles et de graisses.
Des poignées et des surfaces
de préhension glissantes rendent impossibles la manipulation et le contrôle en
toute sécurité de l’outil dans les situations inattendues.
5) Maintenance et entretien
a) Faire entretenir l’outil électrique par un réparateur qualifi é utilisant unique-
ment des pièces de rechange identiques.
Cela assure le maintien de la sécurité
de l’outil électrique.
Consignes de sécurité pour aspirateur eau et poussières,
dépoussiéreur
AVERTISSEMENT
AVERTISSEMENT
Lire tous les avertissements de sécurité, les instructions, les illustrations et
les spécifi cations fournis avec cet outil électrique.
Ne pas suivre les instructions
énumérées ci-dessous peut provoquer un choc électrique, un incendie et/ou une
blessure sérieuse.
Conserver tous les avertissements et toutes les instructions pour pouvoir s’y
reporter ultérieurement.
●
Ne jamais aspirer des matériaux contenant de l’amiante.
L’amiante est
cancérogène.
●
Aspirer uniquement des substances autorisées pour l’appareil électrique
.
Les substances peuvent être cancérogènes.
●
L’utilisation de l’appareil électrique n’est autorisée que si l’utilisateur est
pleinement capable d’apprécier toutes les fonctions et de les exécuter sans
réserves ou s’il a reçu les instructions nécessaires.
Des instructions détail-
lées réduisent les erreurs de manipulation et les blessures.
fra fra
17

●
L'appareil électrique ne doit pas être utilisé par des personnes (enfants
compris) ayant des facultés physiques, sensorielles ou mentales réduites
ou manquant d’expérience ou de connaissances. Veiller à ce que les enfants
ne jouent pas avec l'appareil électrique.
L’utilisation présente sinon un risque
d’erreur de manipulation et de blessures.
●
Ne pas utiliser l’appareil électrique pour aspirer des liquides infl ammables
ou explosifs (essence, huile, alcool, solvants, etc.). Ne pas aspirer de
poussières chaudes ou incandescentes. Ne pas utiliser l’appareil électrique
dans des locaux où il existe un risque d’explosion.
Les poussières, vapeurs
et liquides risquent de s’enfl ammer ou d’exploser.
●
L’appareil électrique convient pour aspirer des substances sèches et, grâce
à des mesures particulières, pour aspirer des liquides.
La pénétration d’eau
dans l’appareil électrique augmente le risque de décharge électrique.
●
Si l’appareil électrique rejette de la poussière (rupture du fi ltre, etc.), arrêter
immédiatement l’appareil.
Avant de le remettre en service, éliminer le défaut.
●
Si l’appareil électrique rejette de la mousse ou du liquide, arrêter immédia-
tement l’appareil.
Nettoyer régulièrement le dispositif de limitation du niveau de
remplissage et vérifi er qu’il n’est pas endommagé.
●
Si l’utilisation de l’appareil électrique en milieu humide est inévitable, utiliser
un disjoncteur différentiel par courant de défaut.
L’utilisation d’un disjoncteur
différentiel par courant de défaut réduit le risque de décharge électrique.
●
Brancher l’appareil électrique sur un réseau correctement relié à la terre.
La prise de cour
ant et le câble de rallonge doivent posséder un conducteur de
La prise de courant et le câble de rallonge doivent posséder un conducteur deLa prise de cour
protectio
n qui fonctionne.
●
Ne pas utiliser l’appareil électrique lorsque le câble, la fi che ou l’interrupteur
sont endommagés. Ne pas toucher le câble, la fi che ou l’interrupteur
endommagés et débrancher la fi che secteur si le câble, la fi che ou l’inter-
rupteur sont endommagés pendant le travail.
Les câbles, fi ches et interrupteurs
endommagés augmentent le risque de décharge électrique.
●
Ne pas rouler sur le câble ni l’écraser. Ne pas tirer le câble pour retirer la
fi che de la prise de courant ou pour déplacer l’appareil électrique.
Les câbles
endommagés augmentent le risque de décharge électrique.
●
Retirer la fi che de la prise de courant avant d’effectuer des réglages sur
l’appareil électrique, de changer des pièces ou de ranger l’appareil.
Ces
précautions empêchent le démarrage intempestif de l’appareil électrique.
●
Veiller à ce que le lieu de travail soit bien aéré.
●
Ne jamais faire fonctionner l'appareil électrique sans surveillance. Pendant
les pauses prolongées, mettre l'outil électrique hors tension, débrancher
la fi che secteur et enlever tous les tuyaux/fi ches. Les appareils électriques
peuvent comporter des dangers pouvant entraîner des dommages matériels et/
ou corporels lorsqu'ils sont laissés sans surveillance.
●
L’appareil électrique ne doit p
as être utilisé par des enfants non surveillés.
Les enfants risqu
ent de se blesser.
●
Faire réparer l’appareil électrique uniquement par des professionnels
qualifi es utilisant des pièces d’origine.
Cela garantit le maintien de la sécurité
de l’appareil électrique.
●
L’appareil électrique contient des poussières nocives pour la santé. Faire
vider et entretenir l’appareil électrique uniquement par des professionnels,
y compris l’élimination des réservoirs à poussière. Un équipement de
protection adéquat est nécessaire.
Ne pas utiliser l’aspirateur avec un système
de fi ltre incomplet. Cela met en danger la santé.
●
Vérifi er, avant la mise en service, que le tuyau d’aspiration est en parfait
état. Ne pas démonter le tuyau d’aspiration de l’appareil électrique afi n
d’éviter que la poussière ne sorte.
La poussière risque sinon d’être inhalée.
●
Arrêter immédiatement l’appareil lorsque de la mousse ou de l’eau sort de
l’appareil et vider
la cuve
.
L’appareil électrique risque sinon d’être endommagé.
●
Ne pas utiliser l’appareil électrique comme pompe à eau.
L’appareil électrique
est prévu pour l’aspiration d’un mélange d’air et d’eau.
●
Ne pas utiliser l’appareil électrique comme siège.
L’appareil électrique risque
sinon d’être endommagé.
●
Utiliser avec précaution le câble secteur et le tuyau d’aspiration.
Ils peuvent
présenter un danger pour d’autres personnes.
●
Ne pas nettoyer l’appareil électrique au jet d’eau.
La pénétration d’eau dans
la partie supérieure de l’aspirateur augmente le risque de décharge électrique.
●
Prévoir un taux suffi sant de renouvellement de l’air L dans le local lorsque
l’air est rejeté dans le local. Respecter les réglementations nationales.
●
Avant l’utilisation de l’appareil électrique, l’utilisateur doit recevoir les
informations, les instructions et la formation nécessaires pour son utilisa-
tion et les matières à aspirer, y compris les consignes permettant d’assurer
la sécurité de l’élimination des matières aspirées. L’utilisateur doit respecter
les prescriptions applicables en matière de sécurité pour les matières à
manipuler.
Explication des symboles
AVERTISSEMENT
AVERTISSEMENT
Danger de degré moyen pouvant entraîner des blessures
graves (irréversibles), voire mortelles en cas de non-respect
des consignes.
ATTENTION
ATTENTION
Danger de degré faible pouvant entraîner de petites blessures
(réversibles) en cas de non-respect des consignes.
AVIS
AVIS
Danger pouvant entraîner des dommages matériels sans risque
de blessure (il ne s’agit pas d’une consigne de sécurité).
Aspirateur de sécurité, classe de poussière L
Aspirateur de sécurité, classe de poussière M
ATTENTION : Cet appareil peut contenir des poussières nocives
pour la santé.
Attention
Lire la notice d’utilisation avant la mise en service
Protection obligatoire de la vue
Protection obligatoire des voies respiratoires
Protection obligatoire de l’ouïe
Protection obligatoire des mains
Outil électrique répondant aux exigences de la classe de
protection I
Éliminer dans le respect de l’environnement
Filtre plissé pl
at
Sac polyéthylène
1. Caractéristiques techniques
Utilisation conforme
AVERTISSEMENT
AVERTISSEMENT
Les aspirateurs
ROLLER’S Protector 2 L
et
ROLLER’S Protector 2 M
sont destinés
ROLLER’S Protector 2 M sont destinésROLLER’S Protector 2 M
à une utilisation professionnelle dans les entreprises artisanales, l’industrie et les
ateliers et conviennent pour l’aspiration de poussières sèches, ininfl ammables et
ne contenant pas d’amiante, pour l’aspiration de liquides ininfl ammables utilisés
pour le fonctionnement des rainureuses, tronçonneuses et carotteuses et pour le
nettoyage de chantier. Toute autre utilisation est non conforme et donc interdite.
Les aspirateurs
ROLLER’S Protector 2 L
et
ROLLER’S Protector 2 M
sont des
ROLLER’S Protector 2 M sont desROLLER’S Protector 2 M
aspirateurs de sécurité contrôlés et certifi és selon la norme EN 60335-2-69, qui
conviennent pour aspirer des poussières nocives pour la santé :
●
L’aspirateur
ROLLER’S Protector 2 L
correspond à la
classe de fi ltration L
(faible) selon EN 60335-2-69 et peut être utilisé pour la séparation de poussière
d’une valeur limite d’exposition/valeur limite du poste de travail > 1 mg/m³. Le
matériau fi ltrant des aspirateurs de la classe de poussière L est contrôlé. Le
degré de perméabilité maximal est
≤
1 %. Il n’existe pas de prescriptions parti-
culières pour l’élimination.
●
L’aspirateur
ROLLER’S Protector 2 M
correspond à la
ROLLER’S Protector 2 M correspond à laROLLER’S Protector 2 M
classe de fi ltration M
(moyenne) selon EN 60335-2-69 et peut être utilisé pour la séparation de pous-
sière d’une valeur limite d’exposition/valeur limite du poste de travail > 0,1 mg/
m³. Les aspirateurs de cette classe sont contrôlés en tant qu’appareil complet.
Le degré de perméabilité maximal est
≤
0,1 %. L’élimination doit se faire de
manière à ce que le dégagement de poussière soit faible.
Le travail de matériaux de construction minéraux tels que le béton, le béton armé,
les maçonneries de tout genre, les chapes de tout genre et la pierre naturelle produit
énormément de poussière minérale nocive pour la santé contenant du quartz
(poussière fi ne de quartz). L’inhalation de poussière fi ne de quartz est nocive pour
la santé. En vertu de la directive 89/391/CEE concernant la mise en œuvre de
mesures visant à promouvoir l’amélioration de la sécurité et de la santé des travail-
leurs au travail, l’employeur a l’obligation d’effectuer une évaluation appropriée des
risques auxquels les travailleurs sont exposés au travail, de déterminer et d’appré-
cier l’exposition à d’éventuelles poussières et de défi nir les mesures de protection
nécessaires. Le règlement technique allemand relatif aux substances dangereuses
(TRGS 559 « Poussière minérale », annexe 1) classe l’utilisation de rainureuses et
de tronçonneuses dans la catégorie d’exposition 3, dans la mesure où l’effi cacité
de l’aspiration n’a pas été démontrée.
Selon la norme EN 60335-2-69, les aspirateurs utilisés pour l’aspiration de poussières
nocives pour la santé avec une valeur limite d’exposition/valeur limite du poste de
travail > 0,1 mg/m³ doivent avoir un degré de perméabilité
≤
0,1%. Par conséquent,
pour le rainurage et le tronçonnage de matériaux de construction minéraux, il est
généralement nécessaire d’utiliser au moins un aspirateur de sécurité/dépoussiéreur
de la classe de poussière M afi n d’assurer l’aspiration effi cace des poussières
nocives pour la santé produites par les machines. Les aspirateurs de sécurité/
dépoussiéreurs de la classe de fi ltration M sont contrôlés en tant qu’appareil complet
(fi ltre plissé plat compris) et atteignent un effet nettoyant permettant de rejeter l’air
purifi é dans le local de travail, généralement sans danger. Les aspirateurs de sécu-
rité/dépoussiéreurs de la classe de poussière M selon EN 60335-2-69 doivent par
fra fra
18

ailleurs atteindre un volume d’aspiration suffi sant, raison pour laquelle la vitesse de
l’air est surveillée dans le tuyau d’aspiration de ces aspirateurs de sécurité/dépous-
siéreurs. Un signal acoustique est émis lorsque la vitesse de l’air est inférieure à
20 m/s (fi ltre bouché, etc.). La cause doit alors être immédiatement déterminée et
éliminée avant la poursuite des travaux.
Respecter les réglementations nationales: dans de nombreux pays, il existe des
réglementations supplémentaires des autorités nationales responsables de la santé,
de la sécurité au travail, de l’approvisionnement en eau, etc. pour la sécurité d’uti-
lisation de tels aspirateurs utilisés pour la collecte et l’élimination de poussières
nocives pour la santé.
Les prescriptions relatives aux poussières ne sont pas valables pour l’aspiration de
liquides.
2. Mise en service
2.1. Branchement électrique
AVERTISSEMENT
AVERTISSEMENT
Tenir compte de la tension du réseau !
Avant de brancher l'appareil électrique,
Tenir compte de la tension du réseau ! Avant de brancher l'appareil électrique,Tenir compte de la tension du réseau !
vérifi er que la tension indiquée sur la plaque signalétique correspond à la
tension du réseau. Brancher les appareils électriques de la classe de protection
I uniquement à des prises de courant/rallonges équipées d'un conducteur de
protection qui fonctionne.
Sur les chantiers, dans un environnement humide
ou dans d'autres situations d'installation similaires, ne faire fonctionner l'appa-
reil électrique sur réseau qu'avec un interrupteur différentiel de 30 mA qui coupe
l'alimentation en énergie dès que le courant de fuite qui passe à la terre dépasse
30 mA pendant 200 ms.
2.2. Mise en service
(Fig. 1 et fi g. 2)
Sortir les accessoires fournis de la cuve (1) et du carton.
Les aspirateurs
ROLLER’S Protector 2 L
et
Protector 2 M
sont équipés d’un
Protector 2 M sont équipés d’unProtector 2 M
système antistatique. Si des charges électrostatiques sont produites par friction,
celles-ci peuvent être transmises à la partie supérieure de l’aspirateur par le
tuyau d’aspiration E (conducteur électrique) et la poignée E (conducteur élec-
trique), puis être éliminées de la partie supérieure afi n d’éviter la formation
d’étincelles et les pointes de surtension. Le tuyau d’aspiration conducteur
électrique est compris dans la fourniture du
ROLLER’S Protector 2 M
et est
ROLLER’S Protector 2 M et estROLLER’S Protector 2 M
disponible en accessoire pour le
ROLLER’S Protector 2 L
.
La puissance
d'aspiration est réglable avec le bouton de puissance d'aspiration (8).
2.3. Choix, mise en place et remplacement du fi ltre plissé plat (fi g.
12
)
12)12
ATTENTION
ATTENTION
Ne jamais utiliser l’appareil électrique sans fi ltre plissé plat.
Débrancher la fi che secteur. Ouvrir le couvercle de fi ltre (9) et vérifi er que le
fi ltre plissé plat (10) qui s'y trouve est approprié. Le fi ltre plissé plat polyester
(PES) convient à l'aspiration de matières sèches et de liquides. Le fi ltre plissé
plat PES ROLLER’S est autorisé pour l'aspiration de poussières des classes
de poussière L et M.
Pour remplacer le fi ltre plissé plat (10), ouvrir le couvercle de fi ltre (9), retirer
le fi ltre plissé plat (10) et l'éliminer dans un sac polyéthylène étanche à la
poussière.
Utiliser un masque de protection respiratoire approprié (masque
buco-nasal de classe FFP2 fi ltrant les particules, etc.) et des vêtements à usage
unique. Respecter les réglementations nationales. Nettoyer le logement du
fi ltre et mettre en place un nouveau fi ltre plissé plat (10) approprié en tournant
la lèvre d’étanchéité vers le haut. Fermer le couvercle de fi ltre (9) de sorte qu’il
s’enclenche de manière audible.
2.4.
Choisir, mettre en place ou remplacer le sac fi ltrant non-tissé, le sac
fi ltrant eau, le sac polyéthylène
2.4.1. Choisir le sac fi ltrant, le sac polyéthylène :
Les sacs fi ltrants non-tissé sont autorisés pour l'aspiration de poussières des
classes de poussière L et M et pour une élimination à faible dégagement de
poussière. Les sacs fi ltrants eau utilisés pour l'aspiration d'eau sale séparent
l'eau des matières solides aspirées. Le sac polyéthylène simplifi e l'élimination de
1.1. Fourniture (fi g. 1)
ROLLER’S Protector 2 L :
Aspirateur eau et poussières électrique, tuyau d'aspiration 4 m, poignée, 2 tubes d'aspiration métalliques, suceur surfaces eau/poussières,
bandes brosse, lèvres en caoutchouc, adaptateur tuyau d'aspiration/outil électrique Protector 2, suceur fentes, sac fi ltrant non-tissé, fi ltre plissé
plat PES, notice d'utilisation
ROLLER’S Protector 2 M :
Aspirateur eau et poussières électrique, tuyau d'aspiration E 4 m, poignée E, 2 tubes d'aspiration métalliques, suceur surfaces eau/pous-
sières, bandes brosse, lèvres en caoutchouc, adaptateur tuyau d'aspiration/outil électrique Protector 2, suceur fentes, sac fi ltrant non-tissé,
sac polyéthylène, fi ltre plissé plat PES, notice d'utilisation
1.2. Codes
ROLLER’S Protector 2 L ROLLER’S Protector 2 M
Aspirateur eau et poussières
185600 185601
Sa
cs fi ltrants non-tissé polyester, paquet de 5 185511 185511
Sacs fi ltrants eau, non-tissé papier/polyester, paquet de 5 1855
12
Sac polyéthylène
, paquet de 10 185513 1855
13
Fil
tre plissé plat polyester (PES), paquet de 1 185515 185515
Rotor d'aspiration 180160 180160
Dispositif d'aspiration d'eau 183606 183606
1.3. Données de service
Volume
de la cuve 31
l
31
l
Quantité de liquide
17
l
17 l17
17
l
17 l17
Débit max.
140
m³/h
143
m³/h
Pression d’aspiration max.
230
hPa
(230
mbar, 3,5 psi)
(230 mbar, 3,5 psi)(230
237
hPa
(237
mbar, 3,5 psi)
(237 mbar, 3,5 psi)(237
Longueur du tuyau d’aspiration
4,0
m
4,0 m4,0
4,0
m
4,0 m4,0
Diamètre de tuyau d’aspiration
21, 27, 32, 35, 40
mm
21, 27, 32, 35, 40 mm21, 27, 32, 35, 40
21, 27, 32, 35, 40
mm
21, 27, 32, 35, 40 mm21, 27, 32, 35, 40
1.4. Plage de température de travail
–10 à +40 °C –10 à +40°C
1.4. Plage de température de travail –10 à +40 °C –10 à +40°C1.4. Plage de température de travail
1.5. Caractéristiques électriques
220–240 V~; 50–60 Hz 220–240 V~; 50–60 Hz
Puissance nominale de l’aspirateur 1200 W 1200 W
Puissance admissible de la prise pour outils électriques 100–2200 W 100–2200 W
Puissance absorbée max. 3400 W max. 3400 W
Classe de protection I I
Degré de protection IP X4 IP X4
1)
La puissance maximale autorisée indiquée pour la prise de courant de l'outil électrique peut varier d'un pays à l'autre.
1.6. Dimensions
560
×
560×560
370
×580 mm
370×580 mm370
560
×
560×560
370
×580 mm
370×580 mm370
(2
2,0
"×1
4,6
"×22,8") (2
2,0
"×1
4,6
"×22,8")
1.7. Poids
1
3,5
kg (2
3,5 kg (23,5
9,8
lb) 1
9,8 lb) 19,8
4,2
kg (
4,2 kg (4,2
kg (
31,3
lb)
31,3 lb)31,3
1.8. Bruit
Valeur d’émission relative au poste de travail L
pA
= 69 d
B(A
); K =
B(A); K =B(A
2
d
2d2
B(A
) L
B(A) LB(A
pA
= 69 d
B(A
); K =
B(A); K =B(A
2
d
2d2
B(A
)
B(A)B(A
(Déterminé selon EN 60335-2-69)
1.9. Vibrations
Valeur effective pondérée de l’accélération < 2,5 m/s²; K = 0,2 m/s² < 2,5 m/s²; K = 0,2 m/s²
Le niveau moyen de vibrations a été mesuré au moyen d’un protocole d’essai normalisé et peut servir pour effectuer une comparaison avec un autre appareil. Le
niveau moyen de vibrations peut également être utilisé pour l’évaluation de l’exposition.
Attention!
Le niveau moyen de vibrations est susceptible de varier en fonction des conditions d’utilisation de l’appareil. En fonction de l’utilisation effective (fonction-
nement intermittent), il peut être nécessaire de prévoir des mesures spéciales de protection de l’utilisateur.
fra fra
19

la saleté et empêche les dépôts de saleté dans la cuve (1). Le sac polyéthylène
n'est pas autorisé pour l'aspiration de poussières nocives pour la santé. Les
différents sacs sont recommandés pour les usages suivants :
Sa
c fi ltrant non-tissé :
aspiration de matières sèches et humides, saleté normale, poussières fi nes,
poussières abrasives, saleté humide
Sac fi ltrant eau
(ROLLER’S Protector 2 L)
:
Aspiration eau et poussières, poussières abrasives, saletés mouillées, liquides
Sac polyéthylène:
aspiration de poussières sèches et humides inoffensives pour la santé, saleté
normale, poussières fi nes, poussières abrasives, saleté humide et eau, élimination
à faible dégagement de poussière pour objets contaminés (fi ltre plissé plat, etc.)
2.4.2. Mise en place et remplacement du sac fi ltrant (fi g.
4
)
4)4
Débrancher la fi che secteur. Utiliser un masque de protection respiratoire
approprié (masque buco-nasal de classe FFP2 fi ltrant les particules, etc.) et
des vêtements à usage unique. Ouvrir les boucles de verrouillage (3) de la
partie supérieure et enlever la partie supérieure (2) de la cuve (1). Poser
directement le sac fi ltrant dans la cuve (1), glisser l'orifi ce rond en butée sur
l'embout de raccordement du tuyau d'aspiration (12) placé à l'intérieur de la
cuve (1), placer la partie supérieure (2) sur la cuve (1), fermer les boucles de
verrouillage (3) de la partie supérieure de sorte qu'elles s'enclenchent. Pour
remplacer le sac fi ltrant, retirer le sac de l'embout de raccordement du tuyau
d'aspiration (12) et fermer l'orifi ce du sac fi ltrant avec le couvercle coulissant
ou le couvercle en matière plastique (sac fi ltrant eau). Placer la partie supérieure
(2) sur la cuve (1). Éliminer le sac fi ltrant fermé. Respecter les réglementations
nationales.
2.4.3. Mettre en place ou remplacer le sac polyéthylène (fi g. 5)
Débrancher la fi che secteur. Utiliser un masque de protection respiratoire
approprié (masque buco-nasal de classe FFP2 fi ltrant les particules, etc.) et des
vêtements à usage unique. Ouvrir les boucles de verrouillage (3) de la partie
supérieure et enlever la partie supérieure (2) de la cuve (1). Poser directement
le sac polyéthylène dans la cuve (1), glisser le petit orifi ce rond en butée sur
l'embout de raccordement du tuyau d'aspiration (12) placé à l'intérieur de la
cuve (1) et rabattre la grande ouverture sur le bord de la cuve (1). Placer la
partie supérieure (2) sur la cuve (1) et fermer les boucles de verrouillage (3)
de la partie supérieure de sorte qu'elles s'enclenchent. Pour remplacer le sac
polyéthylène, tirer le sac rabattu sur le bord vers le haut et le fermer en utilisant
le ruban adhésif dont il est muni. Retirer le sac polyéthylène plein de l'embout
de raccordement du tuyau d'aspiration (12), le fermer avec un ruban adhésif,
le retirer de la cuve et l'éliminer. Respecter les réglementations nationales.
2.5. Raccordement d’outils électriques aux aspirateurs
ROLLER’S Protector 2 L
et
ROLLER’S Protector 2 M
(fi
ROLLER’S Protector 2 M (fi ROLLER’S Protector 2 M
(fi
g. 7, fi g. 8
)
g. 7, fi g. 8)g. 7, fi g. 8
AVERTISSEMENT
AVERTISSEMENT
La prise de courant pour outils électriques avec dispositif électronique de
marche/arrêt (16), située sur l’aspirateur, est réservée au branchement d’outils
électriques dont la puissance absorbée est comprise entre 100 et 2200 W.
Sur ROLLER’S Protector 2 M, retirer le bouchon d'obturation (11) de l'embout
de raccordement du tuyau d'aspiration (12). Enfoncer le tuyau d'aspiration (13)
en butée dans l'embout de raccordement du tuyau d'aspiration (12) et enclen-
cher la fermeture à baïonnette par rotation à droite (fi g. 6). Pour obtenir une
puissance d'aspiration optimale, régler le bouton de puissance d'aspiration (8)
sur « max ». Régler le sélecteur de diamètre de tuyau d'aspiration (14) au
diamètre du tuyau d'aspiration utilisé. Pour que la section du tuyau d'aspiration
soit maximale, il est recommandé de glisser l'adaptateur tuyau d'aspiration/
outil électrique (15) sur l'embout d'aspiration de l'outil électrique. Raccorder
l'adaptateur tuyau d'aspiration/outil électrique (15) et le tuyau d'aspiration (13)
de sorte qu'ils s'enclenchent. Glisser l'adaptateur tuyau d'aspiration/outil élec-
trique (15) sur l'embout d'aspiration de l'outil électrique utilisé. Respecter les
instructions de service de l'outil électrique.
2.5.1. Branchement de l’outil électrique sur la prise de courant de l’aspirateur
ROLLER’S Protector 2 L
/
ROLLER’S Protector 2 M
La puissance de l’outil électrique utilisé doit être comprise entre 100 et 2200W.
Respecter les instructions de service de l’outil électrique. Le câble de raccor-
dement de l’outil électrique utilisé ne peut être branché sur la prise de courant
(16) de l’aspirateur
ROLLER’S Protector 2 L
/
ROLLER’S Protector 2 M
que
ROLLER’S Protector 2 M queROLLER’S Protector 2 M
dans ces conditions.
2.5.2. Branchement de l’outil électrique sur une prise de courant séparée
Si la puissance de l’outil électrique utilisé ne se situe pas entre 100 et 2200W,
il est interdit de brancher l’outil électrique sur la prise de courant (16) de l’aspi-
rateur
ROLLER’S Protector 2 L
/
ROLLER’S Protector 2 M
. L’outil électrique
doit alors être branché sur une prise de courant séparée. Respecter les
instructions de service de l’outil électrique.
2.6. Nettoyage de chantier et de surfaces
Sur ROLLER’S Protector 2 M, retirer le bouchon d’obturation (11) de l’embout
de raccordement du tuyau d'aspiration (12). Enfoncer le tuyau d'aspiration (13)
en butée dans l'embout de raccordement du tuyau d'aspiration (12) et enclen-
cher la fermeture à baïonnette par rotation à droite (fi g. 6). Pour obtenir une
puissance d'aspiration optimale, régler le bouton de puissance d'aspiration (8)
sur « max ». Sur ROLLER’S Protector 2 M, régler le sélecteur de diamètre de
tuyau d'aspiration (14) au diamètre du tuyau d'aspiration utilisé. Placer la
poignée (17) sur le tuyau d'aspiration (13). Selon les besoins, fi xer le suceur
fentes eau/poussières (18), les tubes d'aspiration (19) et/ou le suceur surfaces
eau/poussière (20) à la poignée (17) (fi g. 9). Le suceur surfaces eau/poussières
(20) peut être équipé au choix de bandes brosse ou de lèvres en caoutchouc.
Pour démonter les bandes brosse et les lèvres en caoutchouc, faire levier avec
un tournevis plat (fi g. 15). Pour monter les bandes brosse et les lèvres en
caoutchouc de longueurs différentes, placer celles-ci dans les fentes de longueur
correspondante du suceur surfaces eau/poussières (20). Monter les lèvres en
caoutchouc de sorte que les côtés lisses soient tournés vers l'intérieur.
3. Fonctionnement
Protection obligatoire de la vue
Protection obligatoire des voies respiratoires
Protection obligatoire de l’ouïe
Protection obligatoire des mains
AVERTISSEMENT
AVERTISSEMENT
Avant d’entreprendre des travaux pouvant produire des poussières nocives
pour la santé, vérifi er que l’utilisation de l’aspirateur et la classe de poussière
sont conformes et en tenir compte.
Mettre en marche ROLLER’S Protector 2 L et Protector 2 M avec l'interrupteur
marche/arrêt (21). ROLLER’S Protector 2 L et Protector 2 M nettoient automa-
tiquement le fi ltre plissé plat (10). Le nettoyage du fi ltre est réalisé par plusieurs
chasses d'air successives et brèves. L'interrupteur marche/arrêt (21) permet
de sélectionner l'un des 4 états de fonctionnement :
0 Aspirateur arrêté
1 Aspirateur en marche, aspiration sans nettoyage automatique
du fi ltre
2 AUTO MAX Aspirateur en marche, aspiration avec nettoyage automatique
du fi ltre à intervalles de 15 s
3 AUTO MIN Aspirateur en marche, aspiration avec nettoyage automatique
du fi ltre à intervalles de 60 s
Les aspirateurs
ROLLER’S Protector 2 L
et
Protector 2 M
surveillent le niveau
Protector 2 M surveillent le niveauProtector 2 M
de remplissage de liquides conducteurs électriques (eau, etc.) dans la cuve
(1). Les électrodes de limitation du niveau de remplissage (
22
) arrêtent auto-
22) arrêtent auto-22
matiquement l’aspirateur dès que le liquide conducteur électrique touche les
électrodes. Pour l’aspiration de liquides non conducteurs et de poussières, il
est nécessaire de vérifi er le niveau de remplissage
de la cuve
(1) de temps en
temps par contrôle visuel.
Sur l’aspirateur
ROLLER’S Protector 2 M
, la vitesse de l’air est contrôlée par
ROLLER’S Protector 2 M, la vitesse de l’air est contrôlée parROLLER’S Protector 2 M
un dispositif électronique de surveillance du débit. Un signal acoustique est
émis lorsqu’elle est inférieure à la valeur prescrite de 20 m/s. Pour obtenir une
mesure correcte, le sélecteur de diamètre de tuyau d’aspiration (14) doit être
réglé au diamètre du tuyau d’aspiration sur l’aspirateur.
3.1.
Aspirer les poussières et les liquides des outils électriques branchés
AVERTISSEMENT
AVERTISSEMENT
La prise de courant pour outils électriques avec dispositif automatique de
marche/arrêt (16), située sur l’aspirateur, est réservée au branchement d’outils
électriques dont la puissance absorbée est comprise entre 100 et 2200 W.
La puissance maximale autorisée indiquée pour la prise de courant de l'outil
électrique peut varier d'un pays à l'autre.
3.1.1. Branchement de l’outil électrique sur la prise de courant de l’aspirateur
ROLLER’S Protector 2 L
/
ROLLER’S Protector 2 M
L'aspirateur a été préparé conformément aux points 2.5. et 2.5.1. Mettre l'aspi-
rateur en marche avec l'interrupteur marche/arrêt (21). Dès que l'outil électrique
branché sur la prise de courant pour outils électriques avec dispositif automa-
tique de marche/arrêt (16) est mis en marche, l'aspirateur se met en marche
presque simultanément. Dès que l'outil électrique est mis à l'arrêt, l'aspirateur
s'arrête après près de 15 secondes supplémentaires afi n de vider le tuyau
d'aspiration (13). Lorsque le travail est terminé, arrêter l'aspirateur avec l'inter-
rupteur marche/arrêt (21). Pour l'aspiration eau, placer l'interrupteur marche/
arrêt (21) sur « 1 ».
3.1.2. Branchement de l’outil électrique sur une prise de courant séparée
L’aspirateur a été préparé conformément aux points 2.5. et 2.5.2. Mettre l’aspi-
rateur en marche sur l’interrupteur marche/arrêt (21). Mettre ensuite en marche
l’outil électrique branché sur la prise de courant séparée. Lorsque le travail est
terminé, arrêter l’outil électrique, puis arrêter l’aspirateur sur l’interrupteur
marche/arrêt (21) environ 15 secondes plus tard pour vider le tuyau d’aspiration
(13).
Pour l'aspiration eau, placer l'interrupteur marche/arrêt (21) sur « 1 ».
3.2. Nettoyage de chantier et de surfaces
L’aspirateur a été préparé conformément au point 2.6. Mettre l’aspirateur en
marche sur l’interrupteur marche/arrêt (21).
Pour l'aspiration eau, placer l'inter-
rupteur marche/arrêt (21) sur « 1 ».
fra fra
20
This manual suits for next models
3
Table of contents
Languages:
Other Roller Vacuum Cleaner manuals