rollie VTC 40563 User manual

Vertical Cooker
User Manual
Model No.: VTC 40563
220 – 240Va.c. 50Hz 230W
Rev 4
READ AND SAVE THESE INSTRUCTIONS
Note: The specifications and/or components of this appliance are subject to change without prior notice.

Page 2of 26
1Important Safety Instructions ................................................................ 3
2Introduction ............................................................................................. 5
3Rollie™Vertical Grill Features................................................................ 5
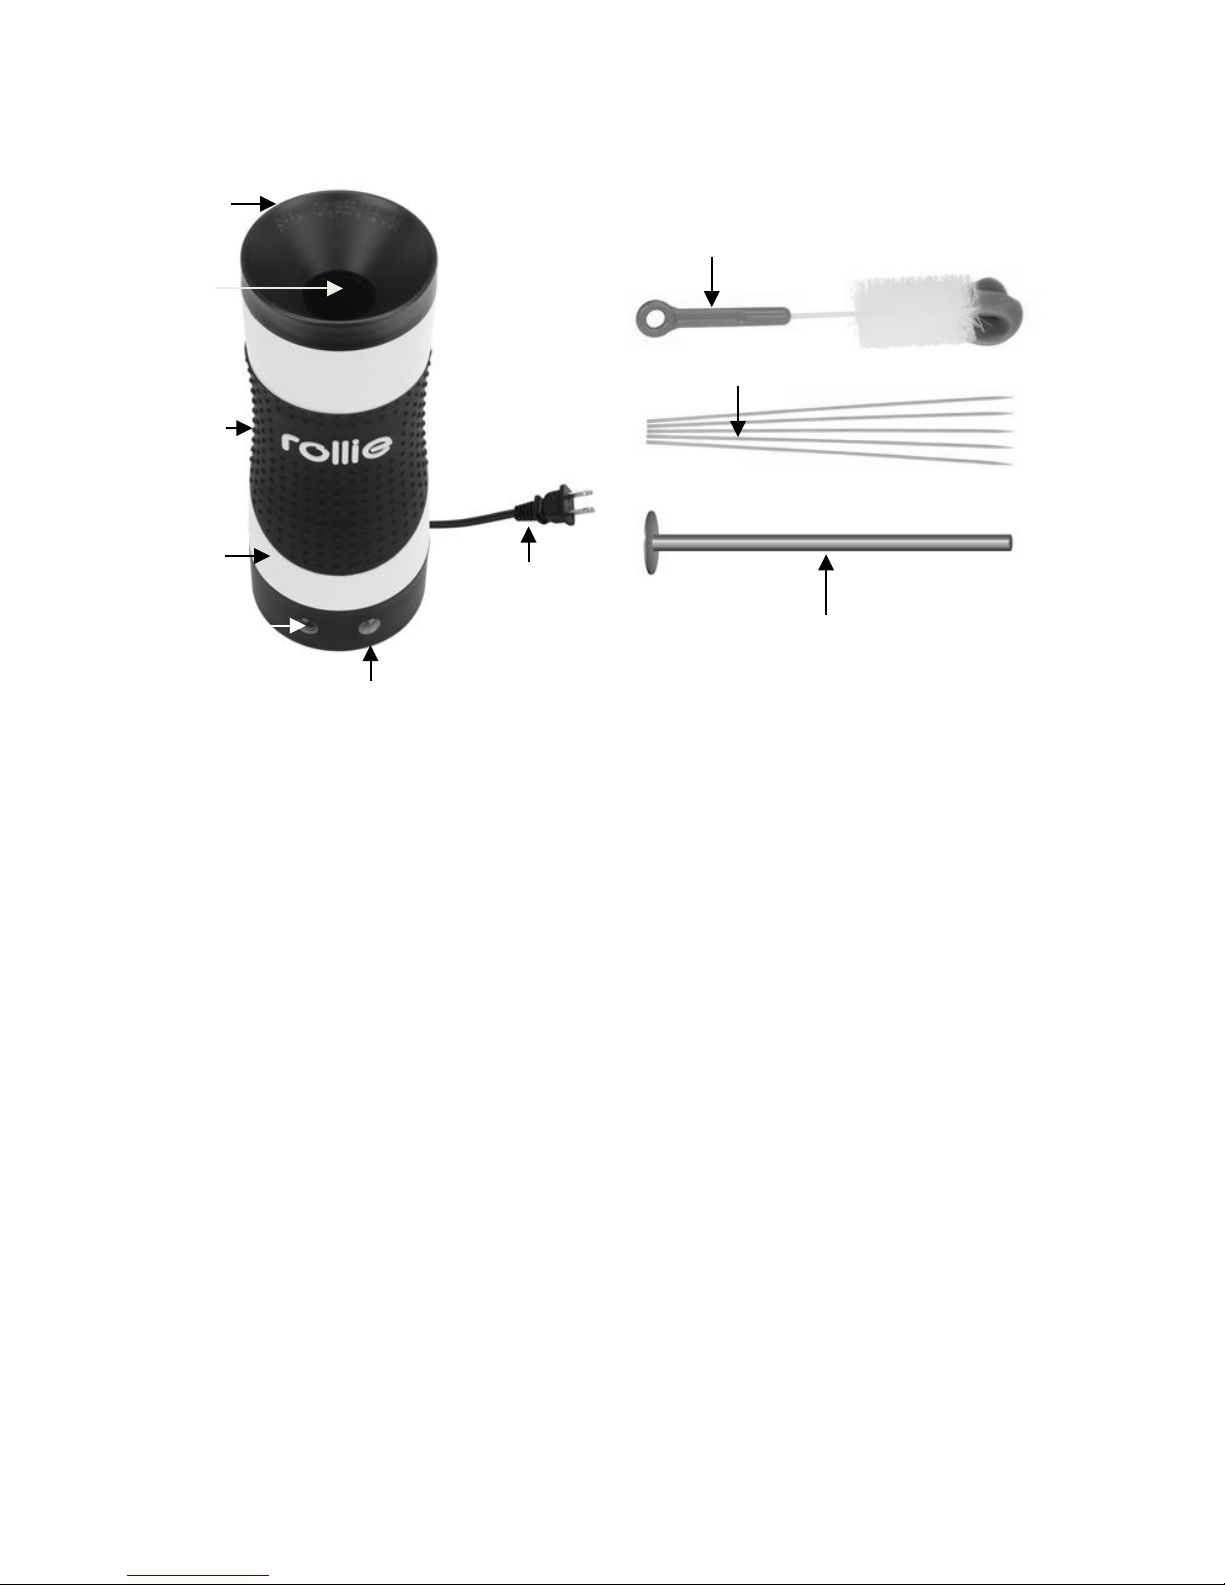
4Part Description....................................................................................... 6
5Before First Use....................................................................................... 6
6Operation ................................................................................................. 7
6.1 Basic Operation Example.................................................................. 8
7Tips ........................................................................................................... 8
8Cleaning ................................................................................................. 10
9Storage ................................................................................................... 10
10 Recipes............................................................................................... 11
10.1 Useful Tips: ..................................................................................... 11
10.2 Rollie™ Eggs................................................................................... 12
10.3 Rollie™ Egg Crackers..................................................................... 12
10.4 Rollie™ Egg Whites ........................................................................ 12
10.5 Rollie™ Feta and Egg ..................................................................... 13
10.6 Rollie™ Bacon Egg ......................................................................... 13
10.7 Rollie™ Egg Link............................................................................. 13
10.8 Rollie™ Egg in a Blanket ................................................................ 14
10.9 Rollie™ Egg Dog............................................................................. 14
10.10 Rollie™ Veggie Tortilla................................................................ 15
10.11 Rollie™ Greek Tortilla ................................................................. 15
10.12 Rollie™ Breakfast Burrito............................................................ 16
10.13 Smoked Rollie™ Tortilla.............................................................. 16
10.14 Rollie™ B.C.T.............................................................................. 17
10.15 French Toast Rollie™.................................................................. 17
10.16 Rollie™ Pancake Link ................................................................. 18
10.17 Pizza Rollie™ .............................................................................. 18
10.18 Rollie™ Pizza Stick ..................................................................... 19
10.19 BBQ Pork Rollie™....................................................................... 19
10.20 Ham and Swiss Rollie™.............................................................. 20
10.21 Cheddar Turkey Rollie™ ............................................................. 20
10.22 Cuban Rollie™ ............................................................................ 21
10.23 Vegetable Egg Rollie™ ............................................................... 21
10.24 Tuna Melt Rollie™....................................................................... 22
10.25 Rollie™ Melt Tortilla .................................................................... 22
10.26 Rollie™ Burger dog ..................................................................... 23
10.27 Chocolate Banana Rollie™ ......................................................... 23
10.28 PB & J Rollie™............................................................................ 24
10.29 Cinnamon Rollie™ ...................................................................... 24
11 Service................................................................................................ 25
12 Warranty............................................................................................. 26

Page 3of 26
1 Important Safety Instructions
WARNING Before using your appliance, please read all instructions.
•Check if the rated voltage of the appliance is compatible with the local power system.
Confirm if all the attachments are included in the package, otherwise contact the responsible
vendor.
•Children should be supervised to ensure that they do not play with the appliance. This
appliance must not be used by children.
•This appliance is not intended for use by persons (including children) with reduced physical,
sensory or mental capabilities, or lack of experience and knowledge, unless they have been
given supervision or instruction concerning use of the appliance by a person responsible for
their safety.
•Use this appliance only for its intended uses as described in manual. Do not use corrosive
chemicals or vapours with this appliance
•Unplug from electrical outlet when not in use, or cleaning. To unplug, grasp the plug and pull
from power outlet. Never pull cord.
•To avoid risk of electrical shock, do not put the appliance in water or liquid.
•Never carry the appliance by the cord.
•The use of attachments not recommended or sold by the manufacturer may cause electric
shock or injury.
•Do not operate the appliance with a damaged cord or plug. If the supply cord is damaged, it
must be replaced by the manufacturer, its service agent or similarly qualified persons in order
to avoid a hazard.
•Do not operate any appliance if the appliance malfunctions, is dropped or damaged in any
manner. Return appliance to the nearest authorised service agent or similarly qualified
person for a thorough examination, repair, electrical or mechanical adjustment.
•Do not reach for an appliance that has fallen into water. Switch ‘OFF’ at the power point and
unplug immediately.
•Do not use this appliance outdoors.
•Do not let the cord hang over the edge of a table or counter, or touch hot surfaces.
•Do not operate or place any part of this appliance on or near any hot surfaces, such as a gas
or electric burner, or in a heated oven.
•Do not use an appliance for other than its intended use.
•Do not attempt to repair or disassemble the appliance. There are no user serviceable parts.
•This product has not been designed for any uses other than those specified in this booklet.

Page 4of 26
•A short power supply cord is provided to reduce the hazards resulting from becoming
entangled in, or tripping over a longer cord. The appliance must not be operated using an
extension cord.
•Do not move this appliance when it is in operation. Extreme caution must be used with an
appliance containing hot food, hot oil or other hot liquids.
•Ensure the packaging of this appliance is disposed of properly. Keep plastic bags away from
babies and children.
•Avoid using on metal surfaces e.g. sink. Always use the product on a clean, flat, hard, dry
surface.
•Do not use materials such as a tablecloth or plastic between the unit and surface.
•This product should not be used in the immediate vicinity of water, such as a bathtub,
washbowls, swimming pool etc. where the likelihood of immersion or splashing could occur.
•Ensure the power cord is kept away from the cooking plates when in use.
•Do not leave the appliance unattended when switched on at the power point or when in use.
•This grill may generate steam while cooking. Take care to prevent injury.
•Take care when removing food from the grill.
•When using the grill, ensure that there is sufficient air space above and all sides for air
circulation. On surfaces where heat may cause a problem, an insulated hot pad is
recommended.
•A fire may occur if the appliance is covered or touching flammable material, including
curtains, draperies, walls, and the like, when in operation.
•This product is intended for normal domestic/household use only.
•This appliance is not intended to be operated by means of an external timer or separate
remote-control system.
•The temperature of accessible surfaces may be high when the appliance is operating. Avoid
touching hot surfaces, use handles and knobs.
•It is absolutely necessary to keep this appliance clean at all times as it comes into direct
contact with food.
•Be careful not to scratch the non-stick coating of the cooking chamber, as you might get little
pieces of this coating into the food. If scraping is necessary, unplug the appliance and use
only the cleaning brush supplied with the appliance.
•No liability can be accepted for any damage caused by non-compliance with these
instructions or any other improper use or mishandling of appliance.
READ AND SAVE THESE INSTRUCTIONS

Page 5of 26
2 Introduction
The Rollie™Vertical Grill is an easy and simple appliance to use. The
unique design cooks food with minimum counter space requirements and
has the ability to be used almost anywhere.
The Rollie™Vertical Grill can cook eggs and other foods in a unique variety
of ways, making it a great companion for breakfast or healthy snacks.
3 Rollie™Vertical Grill Features
Cooking Chamber: Allows you to cook up to 2 LARGE eggs at one time,
and has a non-stick coating making it easy to clean and operate.
Cool-touch Handling Surface: the unique silicone rubber section of the
appliance is a heat insulator for safe handling.
Indicator Lights: When power is on, the red light will turn ON. When
Rollie™Vertical Grill is ready, the green light will turn ON.
The Multipurpose “Packer” Rod: enables you to also use the Rollie™
Vertical Grill with meat, or batter, thus further expanding the grill’s
versatility, in a way no other grill can.
Rollie™Vertical Grill can also be used to cook using Skewers (5 wooden
skewers are included).
A cleaning brush is included.
No assembly required.

Page 6of 26
4 Part Description
1. Funnel 7. Cleaning brush
2. Cooking chamber 8. Wooden Skewers (5)
3. Silicone cool-touch ring 9.
Packer used to pack food
products in the cooking
chamber (refer to RECIPE)
4. Housing
5. Power light (Red)
6. Temperature light (Green) 10. Power cord and plug
5 Before First Use
•Remove all the protective packaging and discard thoughtfully.
•Before using for the first time, clean the surface of the cooking
chamber according to the “CLEANING” section in this manual. DO
NOT IMMERSE THE APPLIANCE IN WATER.
•When using the appliance for the first time, the unit may emit a fine
smoke from the cooking chamber. This is caused by the surface
coating on the cooking chamber cooking off. This is no cause for
alarm and is NOT harmful. It will disappear after a short time.
1
2
5
7
6
8
9
4
10
3

Page 7of 26
•Prior to first use:
1. Place the Rollie™Vertical Grill on a flat, level surface. (do not use on
metal surfaces e.g. a sink or draining board. Always use the product
on a clean, flat, hard, dry surface.
When using the grill, ensure that there is sufficient air space above
and all sides for air circulation.
On surfaces where heat may cause a problem, an insulated hot pad is
recommended.
Do not use materials such as a tablecloth or plastic between the unit
and surface.
2. Plug the appliance in a wall outlet, and allow the appliance to heat for
at least 10 minutes. Some smoke may appear which is normal.
After 10 minutes, disconnect from the power point and let the
appliance cool completely, then clean according to the paragraph
“CLEANING”.
6 Operation
•Position the appliance on a flat, heat-resistant, level surface as
described above.
•Plug the appliance into an electrical outlet and switch on. The RED
power light (5) will turn on, indicating power is supplied to the
appliance.
•The GREEN temperature indicator light (6) will stay off, which
indicates that the appliance is warming up. The GREEN temperature
indicator light will turn on when the unit at the correct temperature and
ready for use.
Note: During use, the GREEN temperature indicator light will turn on and
off regularly indicating that the appliance is maintaining the correct
cooking temperature.
Caution: During operation, the cooking chamber gets hot. The appliance
might also generate steam. Always use oven mitts for
protection, when manipulating the appliance or removing the
food from the appliance. Avoid contact with the hot surfaces.

Page 8of 26
•Once the GREEN temperature indicator light turns on (unit is ready),
use a cooking oil spray to coat the inside of the cooking chamber.
To do this, and whilst using an oven mitt, hold the unit horizontally and
apply a “non-stick cooking oil spray” into the cooking chamber
ensuring the whole surface is coated, then place the unit upright.
Do Not overspray. Just a little surface coating is enough.
6.1 Basic Operation Example
•Spray the Rollie™ cooking chamber with non-stick oil spray.
•Crack open 1 - 2 large eggs directly into the cooking chamber.
Note: Do not mix the egg yolk with the egg white (do not beat the
eggs unless it is described in the Rollie™recipe book).
•For fully cooked eggs, cook for approximately 6 - 8 minutes at which
time eggs may normally rise out of cooking chamber, otherwise you
may pour out the eggs. (a mild shaking or the use of a wooden skewer
may be necessary)
•For soft eggs, simply pour out eggs from cooking chamber after
approximately 5 ½ minutes.
7 Tips
•Prior to plugging the Rollie™Vertical Grill into a power point, make
sure the appliance is thoroughly cleaned.
•Use regular or large eggs (for best results use conventional eggs with
no additives).
•Use no more than two large eggs at one time.
•Prior to each use, spray “NON STICK COOKING OIL SPRAY” in the
cooking chamber.
•Do not mix the egg yolk with the egg white (do not beat the eggs
unless it is described in the Rollie™recipe book).
•It is normal for the first cooked product to vary from the next one.

Page 9of 26
•Cooking time may vary, depending on the type of food, initial
temperature or quantity of food to cook.
•Wooden skewers are helpful and can be used in a variety of ways:
oFor example, when inserting a rolled tortilla wrap, or a similar rolled
product into the cooking chamber, it is helpful to use a skewer for
pushing the rolled product into the cooking chamber, and making it
snug against the walls and wide open in the middle.
oWooden skewers can be inserted into the food during the cooking
cycle, to help pull the product out.
oOnly use wooden skewers, such as the ones supplied. Metallic
ones may permanently damage the non-stick coating in the
cooking chamber.
•Eggs can be cooked in a variety of ways; you do not need to wait until
the eggs are fully cooked: eggs can be poured out earlier or later, for
soft, medium, or hard cooking results.
•Scrambled eggs grow in volume when being cooked. To reduce this
effect, we recommend mixing the beaten eggs with ground crackers,
making sure not to fill the cooking chamber to more than half of its
volume.
•All food, and especially meat and poultry, should be thoroughly
defrosted before cooking.
•We recommend the use of a meat thermometer to ensure the food is
cooked thoroughly.

Page 10 of 26
8 Cleaning
•Before cleaning, unplug from the power point and wait for the
appliance to cool down completely.
•Wipe the outside of the appliance with a slightly moistened cloth.
•Using the supplied brush, apply a small amount of dish soap onto the
wet brush and thoroughly clean the cooking chamber. Rinse with
regular water. You may then place it upside down on a dry paper
towel to dry. Avoid water contact with cord, plug and indicator lights.
DO NOT IMMERSE THE APPLIANCE, POWER CORD, OR PLUG,
IN WATER OR ANY OTHER LIQUID.
•The “Packer” can be cleaned in warm soapy water. Rinse well, and
dry immediately.
•Do not clean the inside of the cooking chamber, the outside of the grill,
or the packer, with any abrasive products, scouring pads or steel wool,
as this will damage the finish.
•Do not use spray-on cleaners, solvents or chemicals.
•If there is any stubborn food baked in the cooking chamber, we advise
using vegetable oil to soften it first, and then waiting 5 minutes before
trying to remove it again with the supplied brush. You might also use
the tip of a wooden skewer to remove any stubborn residue at the
bottom of the cooking chamber.
Do Not Use Metal implements to help clean.
9 Storage
Switch off and unplug the appliance.
Coil the cable loosely. Do not kink or pull the cable tight.
Store your appliance in a cool, dry location.
Read and Save These Instructions

Page 11 of 26
10 Recipes
10.1 Useful Tips:
•The red light will indicate power is ON. When the green light turns on
for the very first time, the Rollie™ Vertical Grill is ready for use. The
green light will turn on/off during use.
•Be sure to use non-stick oil spray before each use.
•It is recommended to insert a wooden skewer in the centre of the filled
cooking chamber to assist with easy removal of the product.
Do Not Use Metal Utensils
•Use the provided packer to push down the product while filling the
cooking chamber.
•If the product begins to rise out of the cooking chamber, pour the
product onto a plate to avoid the product from flopping over after rising
completely.
•After removal of the product, you may turn the product upside down
and reinsert into the cooking chamber for about 2 minutes for a
crispier finish.
•Clean the cooking chamber between each use of a different recipe.

Page 12 of 26
10.2 Rollie™ Eggs
Ingredients:
1 or 2 large eggs
Instructions:
•Spray the Rollie™ cooking chamber with non-stick oil spray.
•Crack open 1-2 large eggs directly into the cooking chamber.
•For fully cooked eggs, cook for approximately 6-8 minutes at which time
eggs may normally rise out of cooking chamber, otherwise you may pour out
the eggs. (a mild shaking or the use of a wooden skewer may be necessary)
•For soft eggs, simply pour out eggs from cooking chamber after
approximately 5 ½ minutes.
10.3 Rollie™ Egg Crackers
Ingredients:
1 large egg
Approximately 5 round, Ø45mm crackers
1/8 cup shredded cheese
Salt and pepper to your taste
Instructions:
•Spray the Rollie™ cooking chamber with non-stick oil spray.
•In a medium size bowl, crumble crackers and add cheese. Crack 1 large
egg into bowl and add salt and pepper to taste. Gently mix ingredients
together.
•Pour the mixture directly into the cooking chamber.
•Cook for approximately 5-6 minutes, at this time the product may normally
rise out of the cooking chamber; otherwise you may pour the product out.
*For a crispier finish, turn the roll upside down and place back in the Rollie™
Vertical Grill for about 2 minutes.
10.4 Rollie™ Egg Whites
Ingredients:
3 large eggs
Instructions:
•Spray the Rollie™ cooking chamber with non-stick oil spray.
•Separate the egg whites from the yolks.
•Pour the egg whites directly into the cooking chamber.
•Cook for approximately 6-8 minutes, at this time the product may normally
rise out of the cooking chamber; otherwise you may pour the product out.

Page 13 of 26
10.5 Rollie™ Feta and Egg
Ingredients:
1 large egg
4-5 cubes of feta cheese
Instructions:
•Spray the Rollie™ cooking chamber with non-stick oil spray.
•Crack open 1 large egg directly into the cooking chamber.
•On a wooden skewer insert 4-5 small cubes of feta cheese approximately
12mm apart from each other. Insert the skewer with cheese into the centre
of the egg in the cooking chamber.
•Cook for approximately 6-8 minutes, at this time the product may normally
rise out of the cooking chamber; otherwise you may pour the product out.
10.6 Rollie™ Bacon Egg
Ingredients:
1 large egg
1 precooked bacon strip
Instructions:
•Spray the Rollie™ cooking chamber with non-stick oil spray.
•Crack open 1 large egg directly into the cooking chamber; take a wooden
skewer and insert precooked bacon strip onto the skewer, as if you were to
thread the bacon strip.
•Insert the wooden skewer with the precooked bacon strip into the centre of
the egg.
•Cook for approximately 6-8 minutes, at this time the product may normally
rise out of the cooking chamber; otherwise you may pour the product out.
10.7 Rollie™ Egg Link
Ingredients:
1 large egg
1 precooked breakfast sausage link
Instructions:
•Spray the Rollie™ cooking chamber with non-stick oil spray.
•Crack open 1 large egg directly into the cooking chamber.
•Insert the wooden skewer into the centre of the precooked sausage link and
place the sausage link into centre of the egg in the cooking chamber.
•Cook for approximately 5-7 minutes, at this time the product may normally
rise out of the cooking chamber; otherwise you may pour the product out.

Page 14 of 26
10.8 Rollie™ Egg in a Blanket
Ingredients:
1 large egg
For the blanket use: 1 thin slice of salami, ham, or meat of choice
Instructions:
•Spray the Rollie™ cooking chamber with non-stick oil spray.
•Roll your “blanket” into a tube shape, so that it will fit inside the Rollie™.
•Insert the rolled “blanket” into the bottom of the cooking chamber; you may
use a wooden skewer to assist.
•Crack open 1 large egg directly into the cooking chamber.
•Cook for approximately 6-8 minutes, at which time the product may normally
rise out of the cooking chamber; otherwise you may pour the product out.
10.9 Rollie™ Egg Dog
Ingredients:
1 large egg
1 thin hot dog
Instructions:
•Spray the Rollie™ cooking chamber with non-stick oil spray.
•Crack open 1 large egg directly into the cooking chamber.
•Insert the wooden skewer into the centre of the hot dog and place the hot
dog into the centre of the egg in the cooking chamber.
•Cook for approximately 6-8 minutes, at which time the product may normally
rise out of the cooking chamber; otherwise you may pour the product out.

Page 15 of 26
10.10 Rollie™ Veggie Tortilla
Ingredients:
1 piece tortilla/wrap
3 egg whites
1 teaspoon chopped red pepper, to your taste
1 teaspoon chopped green pepper, to your taste
1 teaspoon chopped onion, to your taste
1 teaspoon chopped spinach, to your taste
Salt and pepper to your taste
Instructions:
•Spray the Rollie™ cooking chamber with non-stick oil spray.
•Mix all ingredients together in a medium size bowl.
•Cut the tortilla/wrap to size 100 x 150mm and roll the tortilla/wrap into a tube
shape and insert into the cooking chamber.
•Pour the mixed ingredients into the cooking chamber. Fill up to 25mm below
the top of the tortilla/wrap.
•Cook for approximately 6-8 minutes, at this time the product may normally
rise out of the cooking chamber; otherwise you may pour the product out.
*For a crispier finish, turn the roll upside down and place back in the Rollie™
Vertical Grill for about 2 minutes.
10.11 Rollie™ Greek Tortilla
Ingredients:
1 piece tortilla/wrap
¼ cup frozen and thawed- chopped spinach
1/8 cup crumbled feta cheese
3 egg whites
Instructions:
•Spray the Rollie™ cooking chamber with non-stick oil spray.
•Mix all ingredients together in a medium size bowl.
•Cut the tortilla/wrap to size 100 x 150mm and roll the tortilla /wrap into a
tube shape and insert into the cooking chamber.
•Pour the mixed ingredients into the cooking chamber. Fill up to 25mm below
the top of the tortilla/wrap.
•Cook for approximately 6-8 minutes, at this time the product may normally
rise out of the cooking chamber; otherwise you may pour the product out.
*For a crispier finish, turn the roll upside down and place back in the Rollie™
Vertical Grill for about 2 minutes.

Page 16 of 26
10.12 Rollie™ Breakfast Burrito
Ingredients:
1 piece tortilla/wrap
1 large egg
1 chopped precooked sausage link
1 tablespoon of shredded cheese
Instructions:
•Spray the Rollie™ cooking chamber with non-stick oil spray.
•Mix all ingredients together in a medium size bowl.
•Cut the tortilla/wrap to size 100 x 150mm and roll the tortilla/wrap into a tube
shape and insert into the cooking chamber.
•Pour the mixed ingredients into the cooking chamber. Fill up to 25mm below
the top of the tortilla/wrap.
•Cook for approximately 8 minutes, at this time the product may normally rise
out of the cooking chamber; otherwise you may pour the product out.
*For a crispier finish, turn the roll upside down and place back in the Rollie™
Vertical Grill for about 2 minutes.
10.13 Smoked Rollie™ Tortilla
Ingredients:
1 piece tortilla/wrap
1 large egg
1 tablespoon chopped smoked trout/ salmon
1-2 teaspoon chopped goat cheese
1-2 teaspoon chopped caramelized red or raw onion
Salt and pepper to your taste
Instructions:
•Spray the Rollie™ cooking chamber with non-stick oil spray.
•Mix all ingredients together in a medium size bowl.
•Cut the tortilla/wrap to size 100 x 150mm and roll the tortilla/wrap into a tube
shape and insert into the cooking chamber.
•Pour the mixed ingredients into the cooking chamber. Fill up to 25mm below
the top of the tortilla/wrap.
•Cook for approximately 8 minutes, at this time the product may normally rise
out of the cooking chamber; otherwise you may pour the product out.
*For a crispier finish, turn the roll upside down and place back in the Rollie™
Vertical Grill for about 2 minutes.

Page 17 of 26
10.14 Rollie™ B.C.T.
Ingredients:
1 piece tortilla/wrap
1 large egg
1 tablespoon shredded cheese
1 tablespoon precooked chopped bacon
Salt and pepper to your taste
Instructions:
•Spray the Rollie™ cooking chamber with non-stick oil spray.
•Mix all ingredients together in a medium size bowl.
•Cut the tortilla/wrap to size 100 x 150mm and roll the tortilla/wrap into a tube
shape and insert into the cooking chamber.
•Pour the mixed ingredients into the cooking chamber. Fill up to 25mm below
the top of the tortilla/wrap.
•Cook for approximately 8 minutes, at this time the product may normally rise
out of the cooking chamber; otherwise you may pour the product out.
*For a crispier finish, turn the roll upside down and place back in the Rollie™
Vertical Grill for about 2 minutes.
10.15 French Toast Rollie™
Ingredients: makes 2 servings
4 slices white bread, cut into small cubes
1 large egg, whipped
½ teaspoon vanilla extract
½ teaspoon cinnamon powder or to your taste
¼ cup milk
2 teaspoon sugar
Instructions:
•Spray the Rollie™ cooking chamber with non-stick oil spray.
•In a bowl mix all the ingredients together. Make sure all bread is soaked in
the mixture.
•Place the mixture in the cooking chamber and pack down with packer while
filling, fill to about the top of where it says “Rollie” and then pack again.
•Cook for 5-6 minutes, at this time the product may normally rise out of the
cooking chamber; otherwise you may pour the product out. Serve with
maple syrup.

Page 18 of 26
10.16 Rollie™ Pancake Link
Ingredients:
¼ cup pancake batter
1 precooked sausage link
Instructions:
•Spray the Rollie™ cooking chamber with non-stick oil spray.
•Place the pancake batter into the cooking chamber.
•Insert the wooden skewer into the centre of the precooked sausage link and
place the sausage link into centre of the batter in the cooking chamber.
•Cook for approximately 8 minutes then pour the product out. Serve with
maple syrup.
10.17 Pizza Rollie™
Ingredients:
2 pieces biscuit dough
1 tablespoon tomato paste or pizza sauce
¼ cup shredded mozzarella cheese
Toppings of choice cut into small pieces
Sprinkle of shredded parmesan cheese
Instructions:
•Spray the Rollie™ cooking chamber with non-stick oil spray.
•Combine the two pieces of biscuit dough into one piece by hand.
•On a flat surface, lay the biscuit dough and flatten into a thin, round circle
about Ø75 – Ø100mm. Spread a thin layer of tomato paste onto the middle
of dough.
•Layer the mozzarella cheese in the middle of the biscuit dough and add
chopped toppings of choice. Sprinkle with shredded parmesan cheese if
desired over the top of ingredients.
•Roll the biscuit dough tightly together; thin enough to fit into the Rollie™
Vertical Grill. Pinch the ends of the roll to seal and place in the cooking
chamber. Pack the roll gently with the packer.
•Cook for approximately 6-8 minutes, at this time the product may normally
rise out of the cooking chamber; otherwise you may pour the product out.
* For a crispier finish, turn the roll upside down and place back in the Rollie™
Vertical Grill for about 2 minutes.

Page 19 of 26
10.18 Rollie™ Pizza Stick
Ingredients:
1 piece tortilla/wrap
1 teaspoon tomato paste or pizza sauce
¼ cup shredded mozzarella cheese
Any toppings of choice: chopped onions, chopped ham, chopped spinach (be
sure to cut toppings to small size)
Salt and pepper to your taste
Pinch of oregano to your taste
Instructions:
•Spray the Rollie™ cooking chamber with non-stick oil spray.
•Lay the tortilla on a flat surface and cut to size 100 x 150mm.
•Spread a thin layer of tomato paste onto the middle of tortilla/wrap.
•Place shredded mozzarella cheese, toppings, add a dash of oregano, salt
and pepper.
•Roll the tortilla/wrap thin enough to fit in Rollie™ Vertical Grill and place in
the cooking chamber.
•Cook for approximately 7 minutes then pour the product out.
* For a crispier finish, turn the roll upside down and place back in the Rollie™
Vertical Grill for about 2 minutes.
10.19 BBQ Pork Rollie™
Ingredients:
2 pieces biscuit dough
3 teaspoons precooked BBQ pork
Instructions:
•Spray the Rollie™ cooking chamber with non-stick oil spray.
•Combine the two pieces of biscuit dough into one piece by hand.
•On a flat surface, lay the biscuit dough and flatten into a thin, round circle
about Ø75 – Ø100mm. Layer with BBQ pork.
•Roll the biscuit dough tightly together; thin enough to fit into the Rollie™
Vertical Grill. Pinch the ends of the roll to seal and place in the cooking
chamber. Pack the roll gently with the packer.
•Cook for approximately 6- 8 minutes, at this time the product may normally
rise out of the cooking chamber; otherwise you may pour the product out.
* For a crispier finish, turn the roll upside down and place back in the Rollie™
Vertical Grill for about 2 minutes.

Page 20 of 26
10.20 Ham and Swiss Rollie™
Ingredients:
1 piece crescent roll dough (if you are unable to find this in your supermarket,
you can search online for a recipe)
Mayonnaise or mustard
1 slice Virginia ham
½ slice Swiss cheese, cut into pieces
Instructions:
•Spray the Rollie™ cooking chamber with non-stick oil spray.
•Lay the crescent dough on a flat surface, spread with mayonnaise/mustard
and place the ham and cheese in the centre of the dough.
•Roll the dough starting from the larger end to smaller end, folding both sides
over to close ends, roll very thin in hands to fit in Rollie™ and place in the
cooking chamber.
•Cook for approximately 8-10 minutes, at this time the product may normally
rise out of the cooking chamber; otherwise you may pour the product out.
* For a crispier finish, turn the roll upside down and place back in the Rollie™
Vertical Grill for about 2 minutes.
10.21 Cheddar Turkey Rollie™
Ingredients:
2 piece biscuit dough
1 slice smoked turkey
½ slice sharp cheddar cheese, cut into pieces
Instructions:
•Spray the Rollie™ cooking chamber with non-stick oil spray.
•Combine the two piece of biscuit dough into one in hands.
•On a flat surface, lay the biscuit dough and flatten into a thin, round circle
about Ø75 – Ø100mm.
•Place the turkey and cheese in the centre of the dough.
•Roll the biscuit dough tightly together; thin enough to fit into the Rollie™.
Pinch the ends of the roll to seal and place in the cooking chamber. Pack
the roll gently with the packer.
•Cook for approximately 8-10 minutes, at this time the product may normally
rise out of the cooking chamber; otherwise you may pour the product out.
* For a crispier finish, turn the roll upside down and place back in the Rollie™
Vertical Grill for about 2 minutes.
Table of contents
Popular Cooker manuals by other brands

Philips
Philips HD4959 user manual

Gastrodomus
Gastrodomus SW10 Installation, operating and service instructions

Electrolux
Electrolux 200372 Specification sheet

Hotpoint
Hotpoint EG 900 X S Instructions for installation and use

AEG
AEG COMPETENCE 5210V Instruction book

Bosch
Bosch HE517AB 1 Series instruction manual