ROMIX VC 11 User manual

m o d e l : VC 11
Порохотяг
Staubsauger
Vysávač
Aspirator
Прахосмукачка
Пылесос
Vysávač
Odkurzacz
I/B Version - 090630
www.romix.eu
Vacuum Cleaner
Tolmuimeja
Gebrauchsanweisung
Návod k použití
Instrucţiuni de utilizare
Инструкция за употреба
Инструкция o пользовании
Інструкція з використання
Návod na použitie
User’s manual
Kasutusjuhend
GB
D
PL
SK
RO
BG
RUS
EST
UA
CZ
Lietošanas Pamācība
LV
4
6
9
12
14
19
21
24
27
30
33
Putekļsūcējs
Instrukcja obsługi
Usisavač
HR 17 Upute za pretraživanje
VC11_IB_090630.indd 1 2009-07-22 14:09:51

A. Uchwyt
B. Wąż
C. Regulacja siły ssania
D. Rura
E. Szczotka podłogowa
F. Otwór podłączenia węża
G. Pokrywa
H. Wskaźnik zapełnienia worka
I. Włącznik/ wyłącznik
A. Uchwyt
PL
A. Handle of the hose
B. Flexible hose
C. Wind-force adjuster
D. Tube
E. Floor brush
F. Hose connector
G. Cover
H. Dust bag level indicator
I. On/off switch
A. Handle of the hose
GB
SK
A. Držiak
B. Sacia hadica
C. Regulácia sacej sily
D. Teleskopická hubica
E. Podlahová (univerzálna) hubica
F. Hubica
G. Kryt
H. Ukazovateľ plnosti vrecka
I. Vypínač
CZ
A. Držák
B. Sací hadice
C. Regulace sací síly
D. Teleskopická trubice
E. Podlahová (univerzální) hubice
F. Připojovací koncovka hadice
G. Kryt
H. Ukazatel přeplnění sáčku
I. Vypínač
A. Griff des Schlauches
B. Saugschlauch
C. Saugstärkeregelung
D. Teleskoprohr
E. Bodenbürste
F. Anschlusspunkt des Schlauches
G. Deckel des Staubsaugers
H. Staubbeutel-Füllstandsanzeige
I. Ein/Aus- Schalter
A. Griff des Schlauches
D
VC11_IB_090630.indd 2 2009-07-22 14:09:52
A. Mâner
B. Furtun
C. Regulator de putere
D. Ţeavă
E. Perie pentru podele
F. Orificiu pentru fixarea furtunului
G. Capac
H. Indicator de umplere a săculeţului cu praf
I. Întrerupător
A. Mâner
RO
RUS
A. Ручка
B. Гибкий шланг
C. Регулятор мощности
D. Телескопическая трубка
E. Щетка для пола
F. Отверстие для установки шланга
G. Покрышка
H. Индикатор наполнения мешка для пыли
I. Кнопка “Вкл./Выкл.”
A. Ручка
B. Гнучкий шланг
C. Регулятор потужності
D. Телескопічна трубка
E. Щітка для пілдлоги
F. Отвір для установки шланга
G. Кришка корпуса
H. Індикатор заповнення мішка для збору
пилу
I. Кнопка “Вкл./Викл.”
A. Ручка
UKR
BG
A. Дръжка
B. Смукателен маркуч
C. Регулатор на смукателната сила
D. Удължителна тръба
E. Четка за под
F. Съединение на маркуча
G. Капак
H. Индикатор за запълване на торбичката с прах
I. Бутон за включване
LV
A. Rokturis ierīces pārvietošanai
B. Sūcējšļutene
C. Aizbīdnis sūkšanas jaudas regulēšanai
D. Teleskopiskā caurule
E. Grīdas birste
F. Uzgalis
G. Vāks
H. Indikators
I. Ieslēgšanas/ izslēgšanas slēdzis
A. Voolikute käepide
B. Paindlikud voolikud
C. Tuule tugevuse regulaator
D. Toru
E. Põrandahari
F. Imemistoru kinnituskoht
G. Esikaas
H. Tolmukoti indikaator
I. Sisse/väljalülitamine
A. Voolikute käepide
EST
HR
A. Ručka cijevi
B. Fleksibilno crijevo
C. Prilagoditi snagu usisavanja
D. Cijev
E. Podna četka
F. Spojnica cijevi
G. Poklopac
H. Indikator napunjenosti
I. Uklj/Isklj prekidač
VC11_IB_090630.indd 3 2009-07-22 14:09:52
4
User’s manual GB
Vacuum Cleaner
Instructions for safe use
• Before use, read the manual carefully and keep it for future reference.
• Before you plug the appliance into the mains, make sure that the mains voltage is compliant
with the parameters quoted on the appliance rating plate.
• Make sure that the dust bag is mounted correctly.
• Do not use the appliance to clean away water, flammable materials or glowing ashes.
• Do not use the vacuum cleaner without the motor hood on.
• Regularly empty the dust bag.
• If the dust bag is damaged, replace it.
• If the hose, suction pipe or attachment is clogged, stop work and remove the congestion cause.
• Keep and use the appliance away from sources of high temperatures.
• Keep away from children and unauthorised persons.
• Should any alarming sounds, strange scents or smoke occur, or if any fault is disclosed, stop
work and unplug the appliance from the mains.
• Do not use the appliance when it is damaged or out of order.
• If the appliance or its power cord is damaged, it should be repaired by the manufacturer or a
specialised servicing outlet. Repairs carried out by the owner may result in loss of warranty.
• The appliance is designed for domestic use only. Do not use the appliance outdoors.
• Never pull, lift etc. the appliance by the power cord, and do not unplug it in this manner. Do
not wrap the cord round the appliance, do not bend or twist it.
• Make sure that the air discharge is not covered.
• Use the appliance according with its designed purpose. Otherwise, the warranty will
become void.
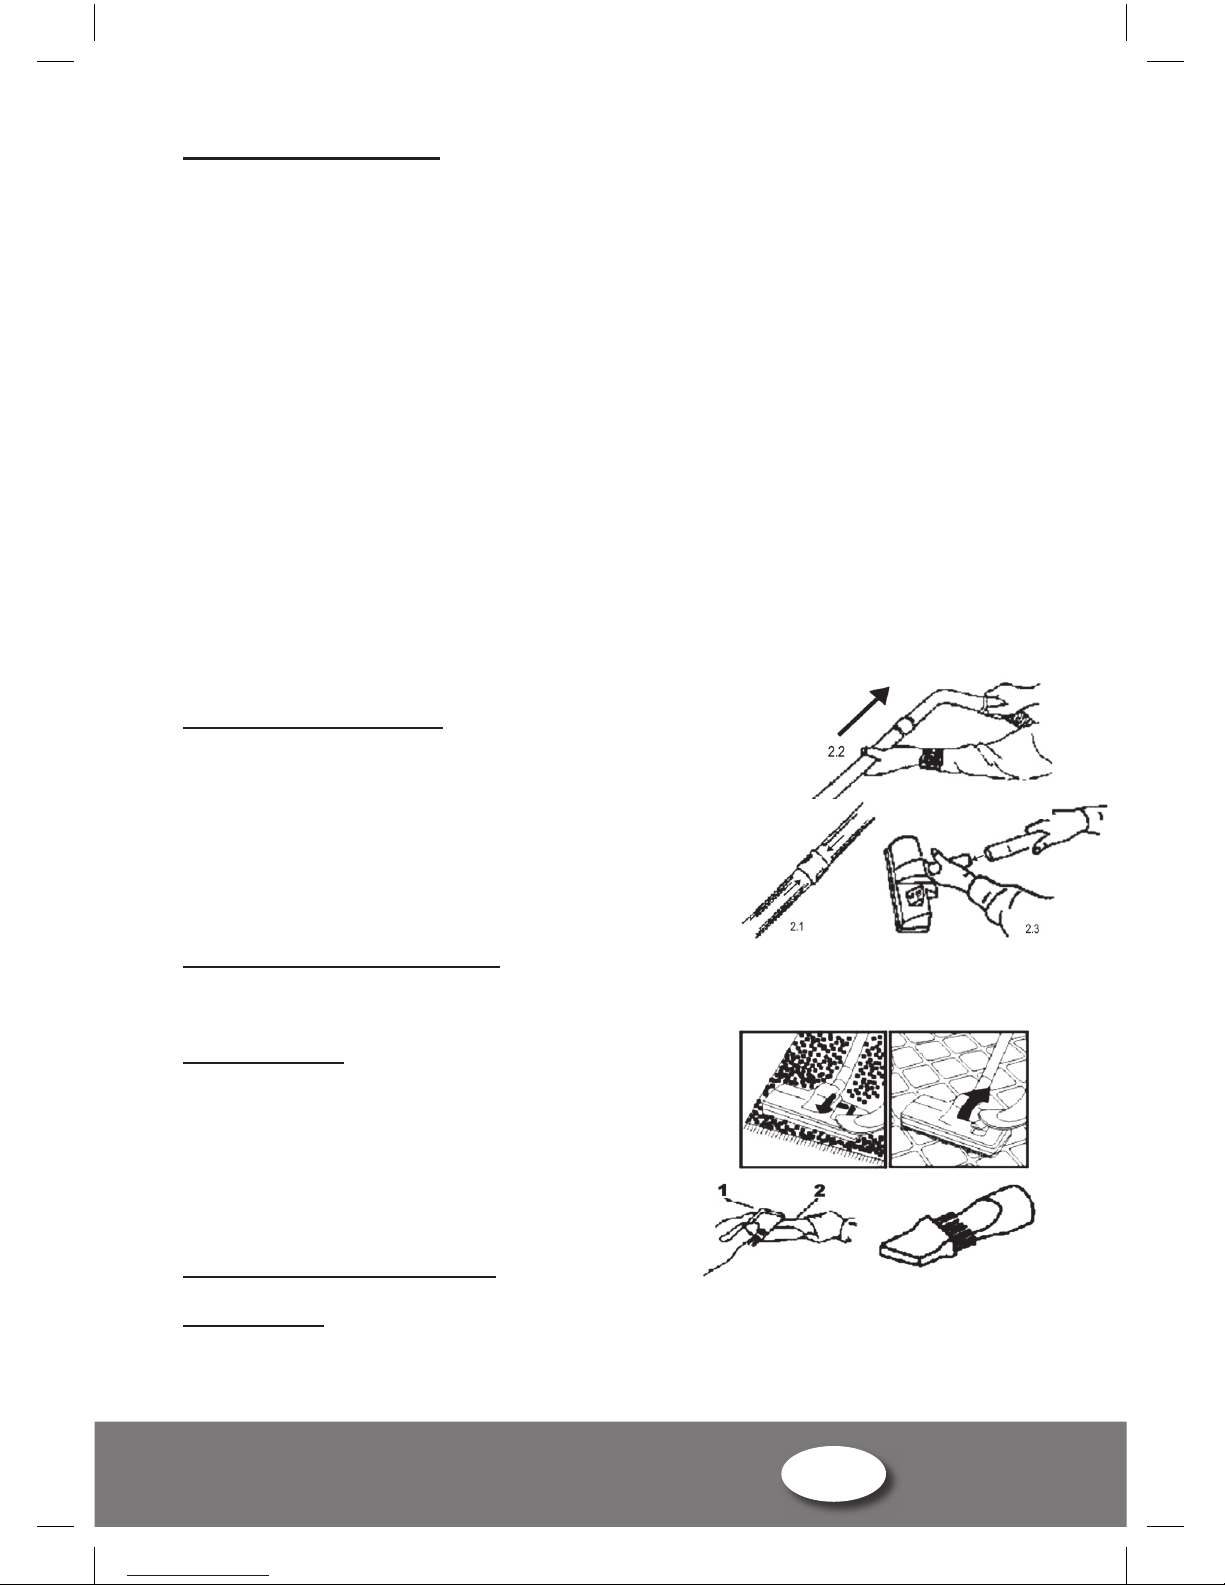
Mounting of accessories
• Before you mount any of the accessories, unplug the power cord.
• Insert the right end of the suction hose into the opening located in
the appliance housing.
• Attach the telescopic pipe in order to enlarge the manoeuvre
range. The telescopic pipe is attached to the set. Its mounting
method is presented in figures. 2.1 and 2.2.
• At the end of the pipe, mount a suitable brush attachment
(Fig.2.3).
Selection of brush attachment
The vacuum cleaner kit contains three attachments: a universal suction brush, a small, oblong
suction nozzle and a gap-cleaner. In the vacuum cleaner cover, there is a useful compartment to
store the small suction nozzle and the gap-cleaner.
• Suction brush:
The suction brush, depending on the surface to be
cleaned, can switch between its working modes; this can
be achieved by means of pressing a special button. The
button (suction) pressed forwards enables the cleaning
of soft surfaces, such as carpets or carpeting-lined areas.
Pressing the button backwards activates the brushing
mode. You can then clean hard surfaces made of wood,
synthetic materials or stone. See Fig. 3.1
• Small, oblong suction nozzle:
It is particularly useful when cleaning upholstery.
• Gap-cleaner:
To remove dust from places that are difficult to access (located by skirting boards and in gaps)
use the gap-cleaning suction attachment.
Thanks to a special add-on, this attachment can be used as a small brush; this is particularly
useful in the cleaning of badly accessible and uneven surfaces, i.e..: books and picture frames.
VC11_IB_090630.indd 4 2009-07-22 14:09:53
5User’s manual
Vacuum Cleaner
GB
Operating the vacuum cleaner:
• Unwind a sufficient length of the power cord. The optimal length has been marked in
YELLOW. Do not unwind the cord beyond the section marked in RED.
• Mount all the necessary accessories. Plug the appliance into the mains and press the ON/
OFF switch.
• The suction power can be adjusted by the air inlet regulator located on the pipe
• After completed work and unplugging the power cord, wind it back by pressing the button.
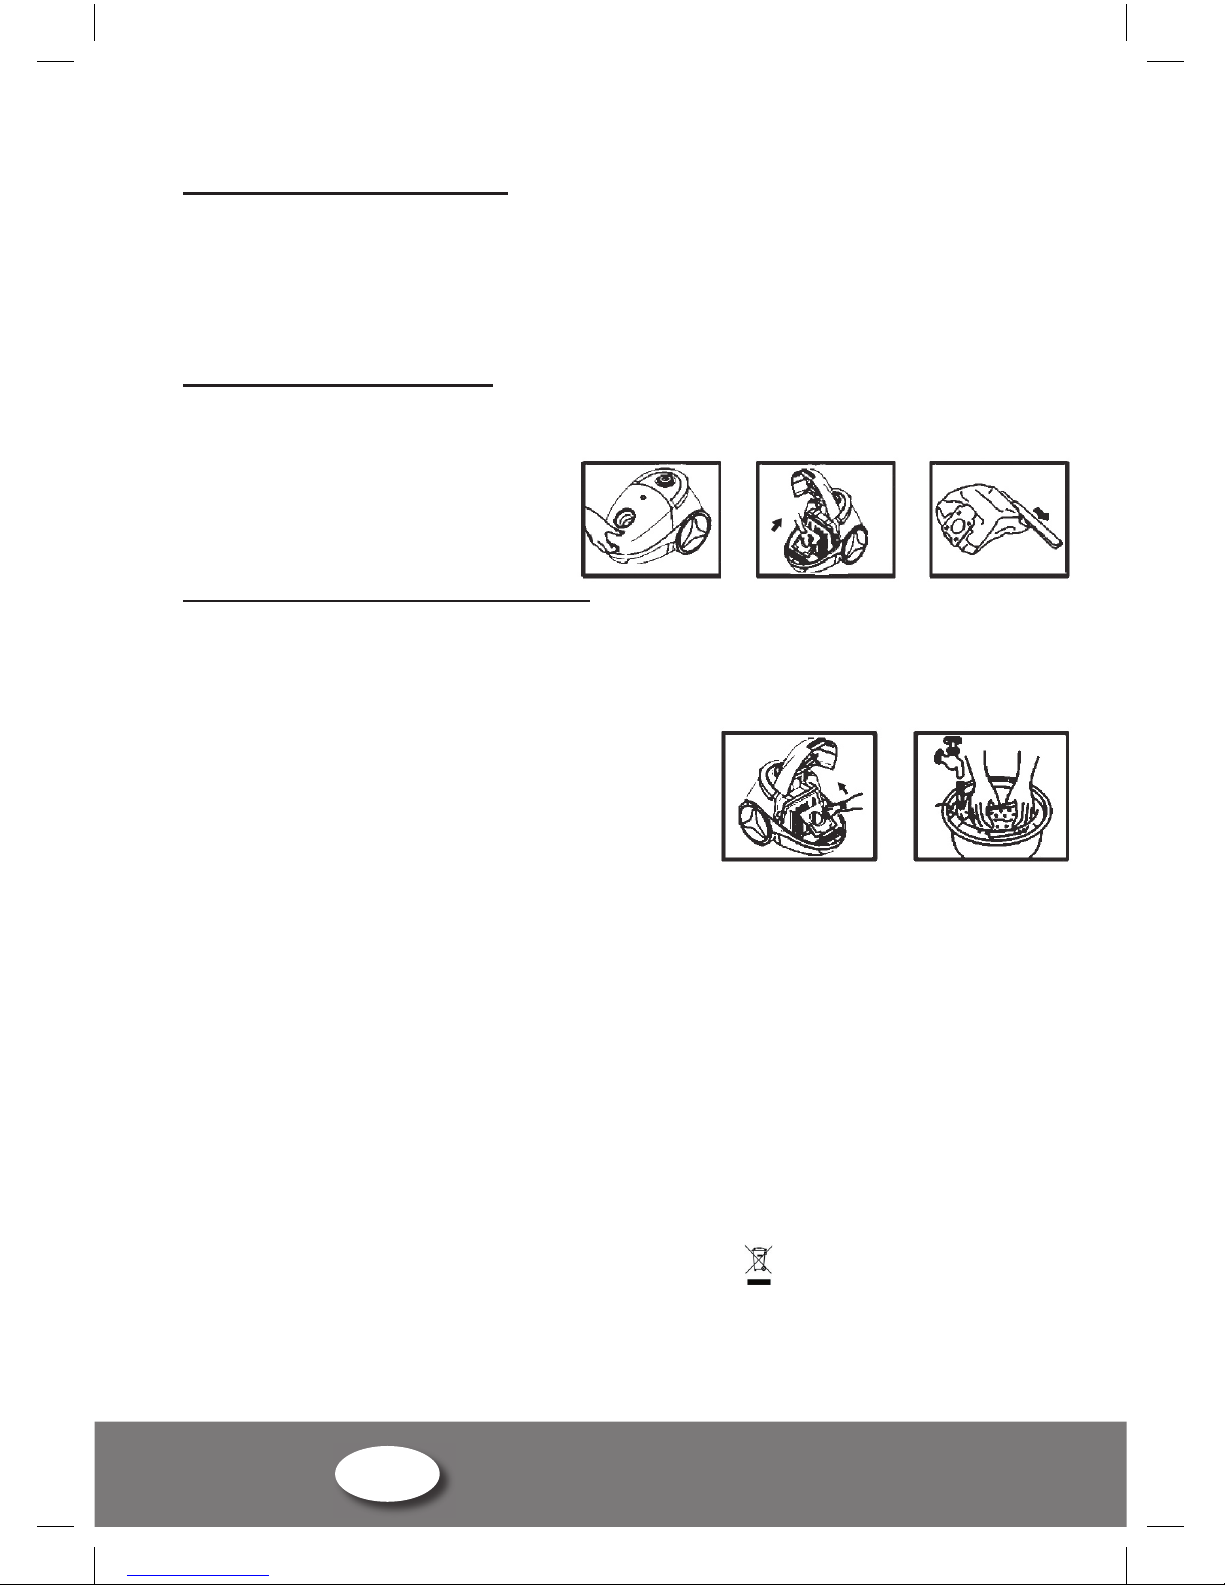
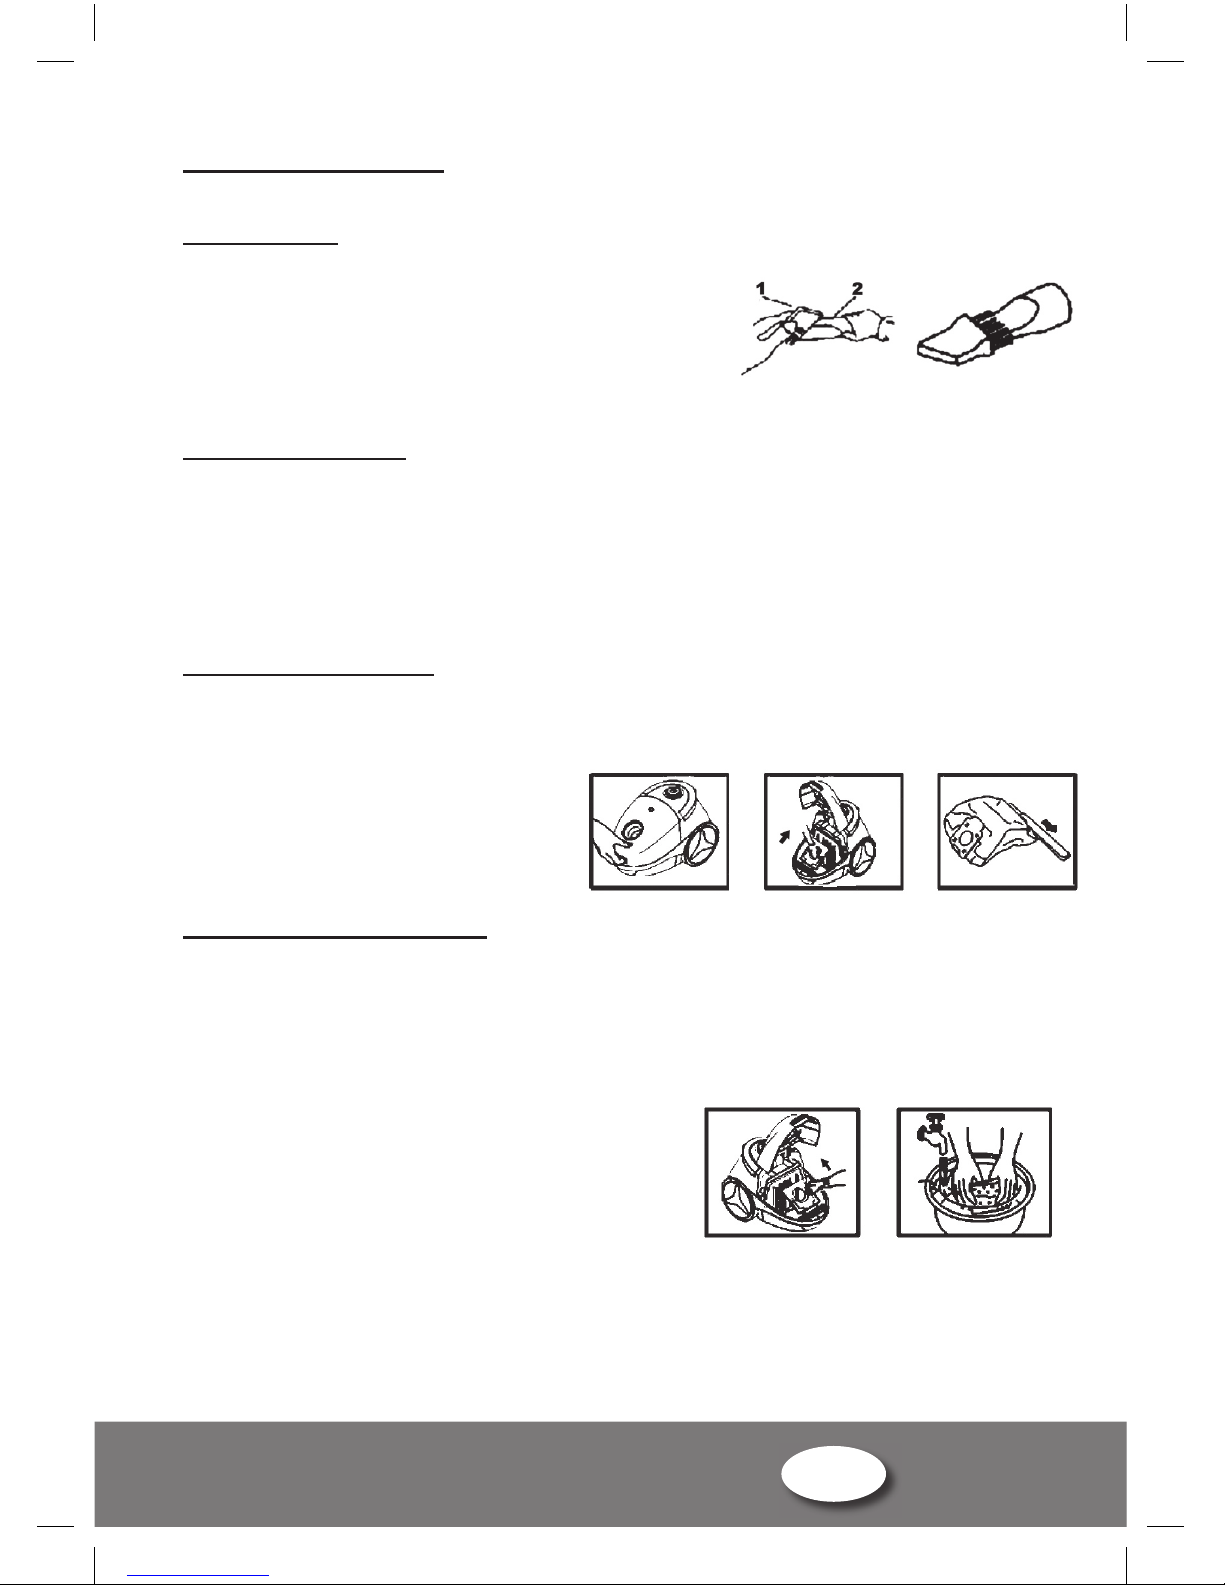
Replacement of the dust bag:
Remember not to switch on the device, if the dust bag has not been placed properly.
If you forget to place the dust bag, or if you place it improperly, the appliance hood may not close.
• Remove the suction hose from the opening on the hood (1.1).
• Lift the hood.
• Remove the full dust bag, pulling it by
the handle. Replace it with a new one.
• Close the hood
Replacement and cleaning of the filter:
The vacuum cleaner is equipped with a filter that prevents contaminants from penetration into the
interior of the motor.
During regular work, the filter should be cleaned at least once in six moths. When the filter
demonstrates symptoms of considerable wear, clean it more frequently or replace it. The
appliance should only be used with an operable filter. A dirty or damaged filter may result in a
motor malfunction.
• Unplug the appliance from the mains.
• Remove the dust bag, and then remove the filter
• Rinse the filter in running water and dry it thoroughly
• Do not wash the filter in a washing machine.
• Do not dry the filter with a hair-dryer. Wait until it dries completely.
• Place a clean filter and dust bag.
The vacuum cleaner is also equipped with a filter that prevents contaminants from escaping from
its interior. The filter should be cleaned at regular intervals, and replaced when it is worn.
• In order to remove the filter, energetically pull the filter shield located on the motor hood, over
the motor
• Wash the filter in lukewarm water.
• Do not use a washing machine.
• Do not use a dryer to accelerate the drying process.
• Before replacing the filter, wait until it dries completely.
In order to preserve our environment and protect human health, the waste electrical and electronic
equipment should be disposed of in accordance with specific rules with the implication of both
suppliers and users. For this reason, as indicated by the symbol on the rating label, your
appliance should not be disposed of as unsorted municipal waste but should either be returned to
the vendor, or disposed of in a separate collection point performing waste recovery by means of
reuse, recycling or use for other applications.
VC11_IB_090630.indd 5 2009-07-22 14:09:53

6
Gebrauchsanweisung D
Kaffeemaschine
Sicherheitshinweise
• Lesen Sie diese Gebrauchsanweisung vor dem Gebrauch sorgfältig durch und bewahren Sie
sie zur späteren Einsichtnahme auf.
• Vor dem Stecken in eine Steckdose stellen Sie sicher, dass die auf dem Typenschild
angegebene Netzspannung mit der Ihres Stromnetzes übereinstimmt.
• Überprüfen Sie vor dem Gebrauch, ob der Staubbeutel richtig eingesetzt ist.
• Benutzen Sie den Staubsauger niemals zum Aufsaugen von Wasser, leichtbrennbaren
Stoffen und heißen Asche.
• Benutzen Sie den Staubsauger niemals ohne Motorschutzfilter.
• Leeren Sie den Staubbeutel regelmäßig.
• Sollte der Staubbeutel beschädigt werden, dann ist er auszuwechseln.
• Bei Verstopfung des Schlauches, Rohres oder Düse, unterbrechen Sie das Staubsaugen
und entfernen Verstopfung.
• Das Gerät weit von der Quelle der hohen Temperaturen aufbewahren und benutzen.
• Stellen Sie das Gerät außer Reichweite von Kindern und unbefugten Personen.
• Bei alarmierenden Geräuschen, alarmierendem Geruch oder Rauch sowie bei
irgendwelchem anderen Mangel, unterbrechen Sie das Staubsaugen und ziehen den
Stecker aus der Steckdose.
• Benutzen Sie keinen beschädigten Staubsauger.
• Sollte das Gerät oder das unangeschlossene Netzkabel defekt oder beschädigt werden,
dann muss es aus Sicherheitsgründen umgehend beim Produzenten oder in einer
zugelassenen Kundendienstwerkstatt durch ein neues ersetzt werden. Die Garantie erlischt,
wenn Sie Reparaturen oder Änderungen am Gerät vornehmen.
• Das Gerät ist ausschließlich für den haushaltsüblichen Gebrauch bestimmt. Benutzen Sie
das Gerät niemals draußen.
• Das Gerät niemals an dem Gerätekabel ziehen oder heben, sowie den Stecker aus der
Steckdose nicht auf diese Art und Weise ziehen. Das Kabel niemals um das Gerät wickeln,
nicht biegen und nicht verseilen.
• Achten Sie, dass Abluft nicht gesperrt wird.
• Benutzen Sie das Gerät nur zweckentsprechend, sonst erlischt die Garantie.
Zubehörmontage
• Bevor Sie irgendein Zubehörteil einsetzen, ziehen Sie den Netzstecker aus der Steckdose.
• Setzen Sie den Saugschlauch in den
Schlauchanschluss in der Abdeckung mit der
richtigen Düse ein.
• Schließen Sie das Teleskoprohr ein, um
Manöverfeld zu vergrößern. Das Gerät ist mit
einem ausfahrbaren Teleskoprohr ausgestattet.
Sein Montage wurde auf der Abbildung: 2.1 i
2.2. dargestellt.
• Setzen Sie eine entsprechende Bürste am Rohrende
setzen ein (Abb.2.3).
Bürste wählen
Das Gerät ist mit drei Arten der Düsen ausgestattet: Universelle Bodendüse, Polsterdüse,
Fugendüse. In der Abdeckung des Geräts befinden sich ein Zubehörhalter für Polsterdüse, und
Fugendüse.
• Bodendüse:
Bodendüse kann man je nach der Art des zu
reinigenden Bodens mit Hilfe des Schalters
umschalten. Bei dem nach vorne gepressten
VC11_IB_090630.indd 6 2009-07-22 14:09:54
7Gebrauchsanweisung
DKaffeemaschine
Schalter reinigen Sie weiche Flächen, wie Teppiche und Bodenbelege. Beim Drücken des
Schalters in eine entgegengesetzte Richtung wird die Bürste ausgeschoben. Man kann damals
harte Flächen aus Holz und Kunststoff oder Stein reinigen. Sehe Abbildung 3.1
• Polsterdüse
Polsterdüse ist besonders geeignet zum Staubsaugen von Polsterbelegen.
• Fugendüse:
Um Verschmutzung an schwer zugänglichen Stellen (Scheuerleisten, Ritzen) zu entfernen,
benutzen Sie die Fugendüse.
Dank dem speziellen Aufsatz kann man diese
Düse als Saugpinsel benutzen - besonders
empfehlenswert bei Reinigung von schwer
zugänglichen ungleichen Ebenen, z.B.: Bücher,
Bildrahmen
Inbetriebnahme des Staubsaugers
• Ziehen Sie das Kabel genug lang auf. Optimale Länge wurde mit der gelben Farbe
markieret. Ziehen Sie das Kabel niemals länger auf, als es mit roter Farbe markiert ist.
• Bringen Sie nötige Zubehörteile an. Schließen Sie das Gerät an die Stromversorgung an
und drücken Sie Ein/ Ausschalter (ON/OFF) .
• Die Saugleistung kann man auch mit Hilfe der am Rohr angebrachten manuellen
Saugleistungsregulierung einstellen.
• Nach dem Staubsaugen schalten Sie das Gerät ab und ziehen den Stecker aus der
Steckdose. Dann spulen Sie das Kabel mit Hilfe der Kabelaufwicklung zurück.
Auswechseln des Staubbeutels
Achten Sie darauf, das Gerät nicht einzuschalten, wenn der Staubbeutel nicht richtig eingesetzt
wurde.
Wenn Sie vergessen, den Staubbeutel einzusetzen, oder setzen ihn nicht richtig ein, dann kann
die Abdeckung nicht geschlossen werden.
• Nehmen Sie den Saugschlauch aus dem Schlauchanschluss ( Abb. 1.1) heraus.
• Heben Sie die Abdeckung.
• Entfernen Sie den gefüllten
Staubbeutel, indem Sie an dem
Staubbeutelhalter ziehen. Setzen
Sie neuen Staubbeutel ein.
• Schließen Sie die Abdeckung
Auswechseln und Reinigung des Filters
Der Staubsauger ist mit dem Filter ausgestattet, der Eindringen der Schmutzpartikel in den Motor
verhindert. Bei dem üblichen Gebrauch soll der Filter mindestes ein Mal pro halbes Jahr gereinigt
werden und beim sichtbaren Verbrauch öfter gereinigt oder gegen einen neuen ausgewechselt
werden. Das Gerät ist nur mit einem einsatzfähigen Filter zu benutzen. Der schmutzige oder
beschädigte Filter kann zur Beschädigung des Motors führen.
• Ziehen Sie den Stecker aus der Steckdose.
• Entfernen Sie den Staubbeutel und dann nehmen Sie den Filter heraus
• Waschen Sie den Filter unter laufendem Wasser
und trocknen ihn genau ab.
• Waschen Sie den Filter niemals in der
Waschmaschine.
VC11_IB_090630.indd 7 2009-07-22 14:09:54

8
Gebrauchsanweisung D
Kaffeemaschine
• Trocknen Sie den Filter niemals mit dem
Haartrockner. Waschen Sie bis er selbst und
völlig trocken wird.
• Setzen Sie den neuen Filter und Staubbeutel ein.
Der Staubsauger ist mit dem Abluftfilter ausgestattet, der Herauskommen der Schmutzpartikel
aus dem Staubsauger verhindert. Ab und zu soll man den Filter reinigen und wenn er schon
verbraucht ist gegen einen neuen auswechseln.
• Um den Filter auszuwechseln, muss man den hinteren Gitterrahmen energisch entfernen.
• Waschen Sie Filter in lauwarmem Wasser.
• Waschen Sie den Filter niemals in der Waschmaschine.
• Trocknen Sie den Filter niemals mit dem Haartrockner.
• Vor dem wiederholten Einsatz warten, bis der Filter völlig trocken ist.
Zum Schutz unserer Umwelt und unserer Gesundheit, müssen Elektro- und Elektronik-Altgeräte
nach bestimmten Regeln entsorgt werden. Dies fordert den Einsatz sowohl des Lieferanten als
auch des Benutzers. Aus diesem Grund darf das Gerät, wie das Symbol auf dem Typenschild
angibt, nicht als unsortierter Restmüll entsorgt werden, sondern es muss entweder zum Verkäufer
zurückgesendet werden, oder zu Zentren für getrennte Sammlung gebracht werden, in denen die
Altgeräte spezifisch behandelt, verwertet und recycelt werden.
VC11_IB_090630.indd 8 2009-07-22 14:09:54

9
PL Instrukcja obsługi
Odkurzacz
Zasady bezpiecznego użytkowania
• Przed użyciem przeczytaj uważnie instrukcję i zachowaj ją dla przyszłych potrzeb.
• Zanim włączysz urządzenie do kontaktu sprawdź czy napięcie sieciowe zgadza się z
parametrami podanymi na tabliczce znamionowej urządzenia.
• Sprawdź czy worek na kurz jest założony poprawnie.
• Nie stosuj urządzenia do odkurzania wody, materiałów łatwopalnych ani tlącego się popiołu.
• Nie używaj odkurzacza bez osłony silnika.
• Regularnie opróżniaj worek na kurz.
• Jeżeli worek na kurz ulegnie uszkodzeniu, wymień go.
• W przypadku zatkania węża, rury ssącej lub nasadki przerwij odkurzanie i usuń przyczynę
zatkania.
• Przechowuj i użytkuj urządzenie z dala od źródeł wysokich temperatur.
• Trzymaj z dala od dzieci i osób niepowołanych.
• W przypadku wystąpienia niepokojących odgłosów, woni lub dymu oraz w przypadku
stwierdzenia jakiejkolwiek usterki przerwij odkurzanie i wyłącz urządzenie z sieci.
• Nie używaj urządzenia niesprawnego lub uszkodzonego.
• Jeżeli urządzenie lub jego kabel zasilający ulegnie uszkodzeniu powinno być naprawione
u wytwórcy lub w specjalistycznym zakładzie naprawczym. Samodzielna naprawa może
spowodować utratę gwarancji.
• Urządzenie jest przeznaczone tylko do użytku domowego. Nie używaj urządzenia na
zewnątrz.
• Nigdy nie ciągnij, nie podnoś itp. urządzenia za kabel ani nie wyłączaj wtyczki z sieci w ten
sposób. Nie owijaj kabla wokół urządzenia, nie zginaj go, nie skręcaj.
• Dopilnuj aby wylot powietrza nie był przysłonięty.
• Używaj urządzenia wyłącznie zgodnie z przeznaczeniem. W przeciwnym razie traci ważność
gwarancja.
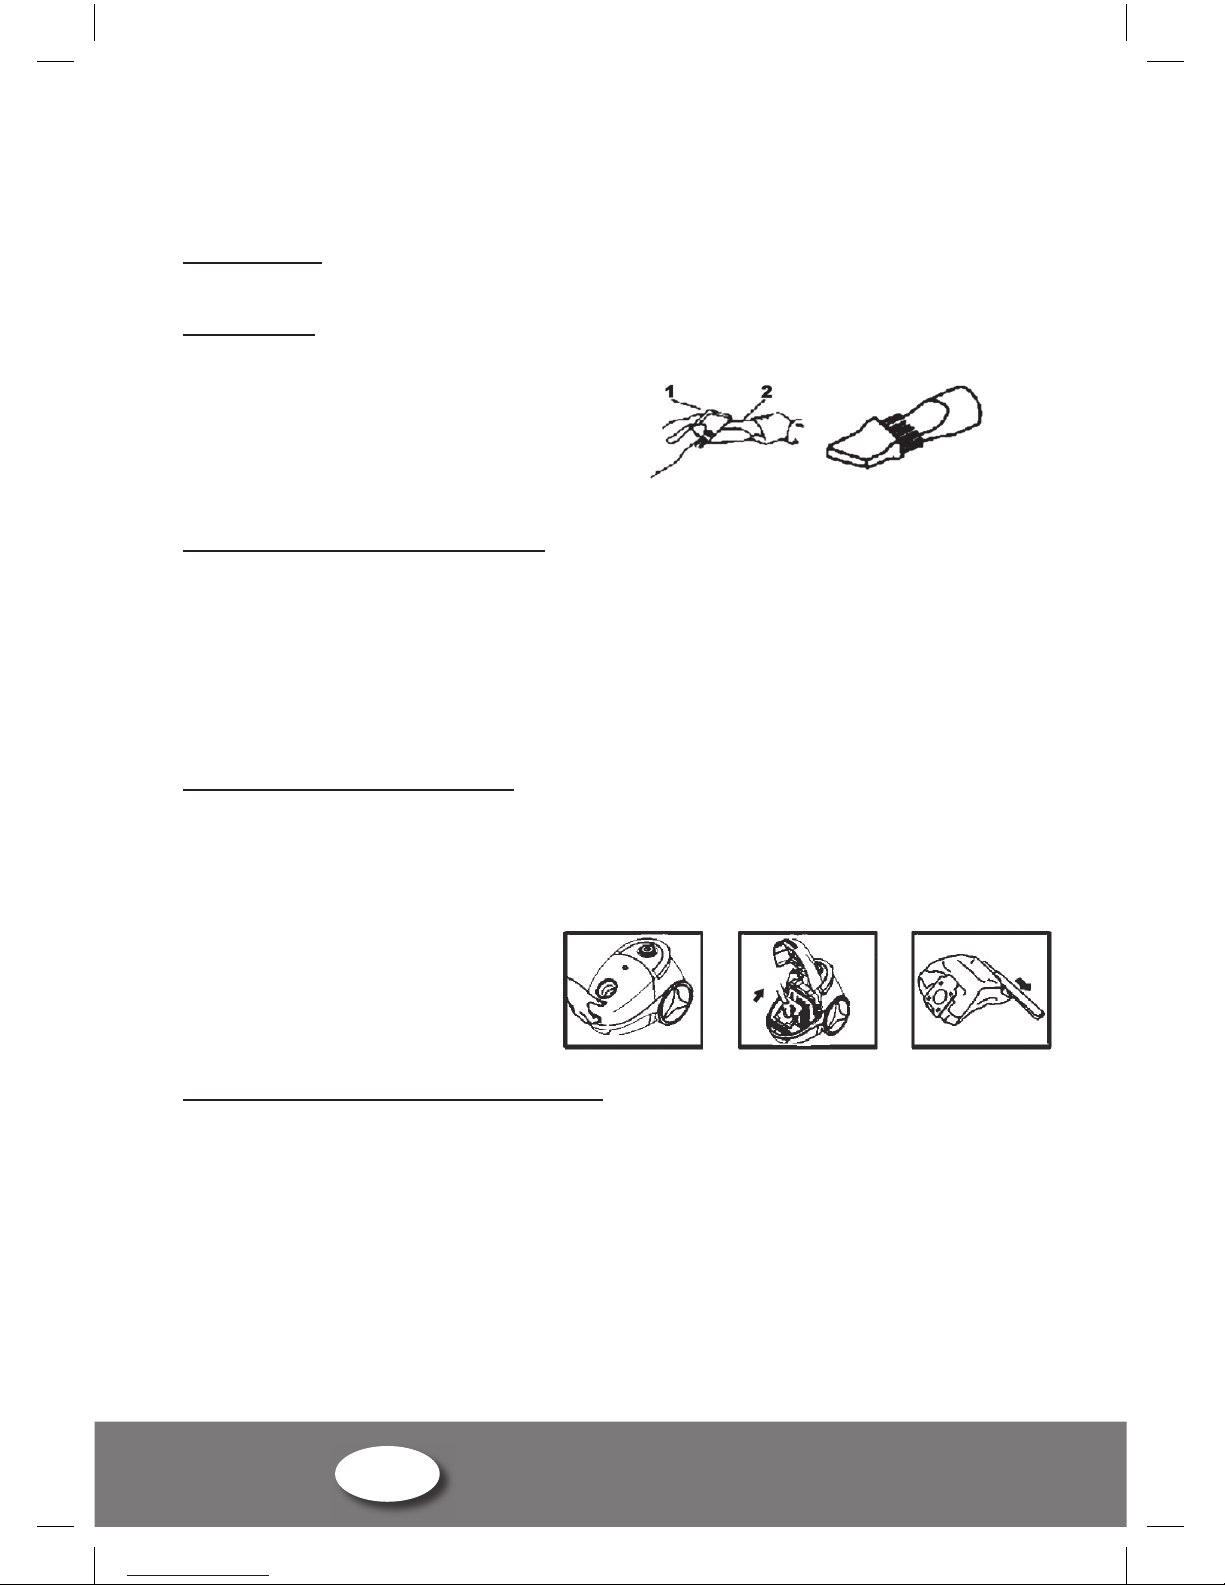
Montaż akcesoriów
• Zanim zamontujesz jakiekolwiek akcesoria wyłącz kabel zasilający z sieci.
• Wąż ssący zamontuj odpowiednią końcówką
w otworze znajdującym się w pokrywie
urządzenia.
• Dołącz rurę teleskopową aby zwiększyć
zasięg manewrowania. W wyposażeniu
znajduje się wysuwana rura teleskopowa.
Jej montaż przedstawiono na rys. 2.1 i 2.2.
• Na końcu rury zamontuj odpowiednią
szczotkę (rys.2.3).
Dobór szczotki
W wyposażeniu tego odkurzacza znajdują się trzy rodzaje końcówek: uniwersalna ssawko-
szczotka, podłużna mała ssawka i szczelinówka. W pokrywie odkurzacza znajduje się poręczny
schowek na małą ssawkę i szczelinówkę.
• Ssawko-szczotka:
Ssawko- szczotkę w zależności od podłoża które
czyścisz można przełączać specjalnym przyciskiem.
Przycisk wciśnięty (ssawka) do przodu ułatwia
czyszczenie miękkich powierzchni takich jak dywany
i wykładziny. Wciśnięcie przycisku w druga stronę
powoduje wysuw szczotki. Możesz wtedy czyścić twarde
powierzchnie z drewna, tworzyw sztucznych lub kamienia.
Patrz rys. 3.1
VC11_IB_090630.indd 9 2009-07-22 14:09:55
10
Instrukcja obsługi PL
Odkurzacz
• Podłużna mała ssawka:
Jest ona szczególnie przydatna do odkurzania obić tapicerskich.
• Szczelinówka:
Do usuwania zanieczyszczeń z miejsce trudno dostępnych
(przy listwach podłogowych, ze szczelin) użyj ssawki
szczelinowej.
Dzięki specjalnej nakładce można używać tej końcówki jako
mała szczotka - szczególnie przydatne jest do czyszczenia
trudnodostępnych, nierównych powierzchni np.: książek i ram
obrazów.
Działanie odkurzacza
• Rozwiń dostateczną ilość kabla zasilającego. Optymalna długość została zaznaczona
ŻÓŁTYM kolorem. Nie rozwijaj kabla poza oznaczenie w kolorze CZERWONYM.
• Zmontuj wszystkie potrzebne akcesoria. Włącz urządzenie do sieci i wciśnij włącznik/
wyłącznik ON/OFF.
• Można również ustawić moc ssania używając regulatora wlotu powietrza umieszczonego na
rurze
• Po skończonej pracy i wyłączeniu kabla zasilającego z sieci zwiń go za pomocą przycisku.
Wymiana worka na kurz
Pamiętaj aby nie włączać urządzenia bez odpowiednio założonego worka na kurz.
Jeśli zapomnisz założyć worka lub założysz go w nieprawidłowo pokrywa urządzenia może się nie
zamknąć.
• Wyjmij wąż ssący z otworu na pokrywie
(1.1).
• Podnieś pokrywę (rys 5).
• Wyjmij napełniony worek ciągnąc go za
uchwyt. Załóż nowy worek.
• Zamknij pokrywę
Wymiana i czyszczenie filtra:
Odkurzacz wyposażony jest w filtr zapobiegający przedostawaniu się zanieczyszczeń do
wewnątrz silnika.
Przy normalnym używaniu urządzenia filtr powinien być czyszczony przynajmniej raz na pół roku.
W przypadku widocznego zużycia czyść go częściej lub wymień na nowy. Urządzenie powinno
być używane wyłącznie ze sprawnym filtrem. Brudny lub uszkodzony filtr może wpłynąć na
uszkodzenie silnika.
• Wyłącz urządzenie z sieci.
• Wyjmij worek na kurz, a następnie wyjmij filtr
(rys 6).
• Wypłucz filtr pod bieżącą wodą i wysusz go
dokładnie
• Nie pierz filtra w pralce.
• Nie susz filtra suszarką do włosów. Poczekaj aż sam całkowicie wyschnie.
• Załóż czysty filtr i worek na kurz.
Odkurzacz wyposażony jest również w filtr zapobiegający wydostawaniu się zanieczyszczeń z
wewnątrz odkurzacza. Co jakiś czas filtr należy oczyścić, a gdy jest już zużyty wymienić na nowy.
• Aby wyjąć filtr należy energicznym ruchem zdjąć osłonę filtra znajdującą się na obudowie
silnika odkurzacza, nad silnikiem.
VC11_IB_090630.indd 10 2009-07-22 14:09:55
Table of contents
Languages:


