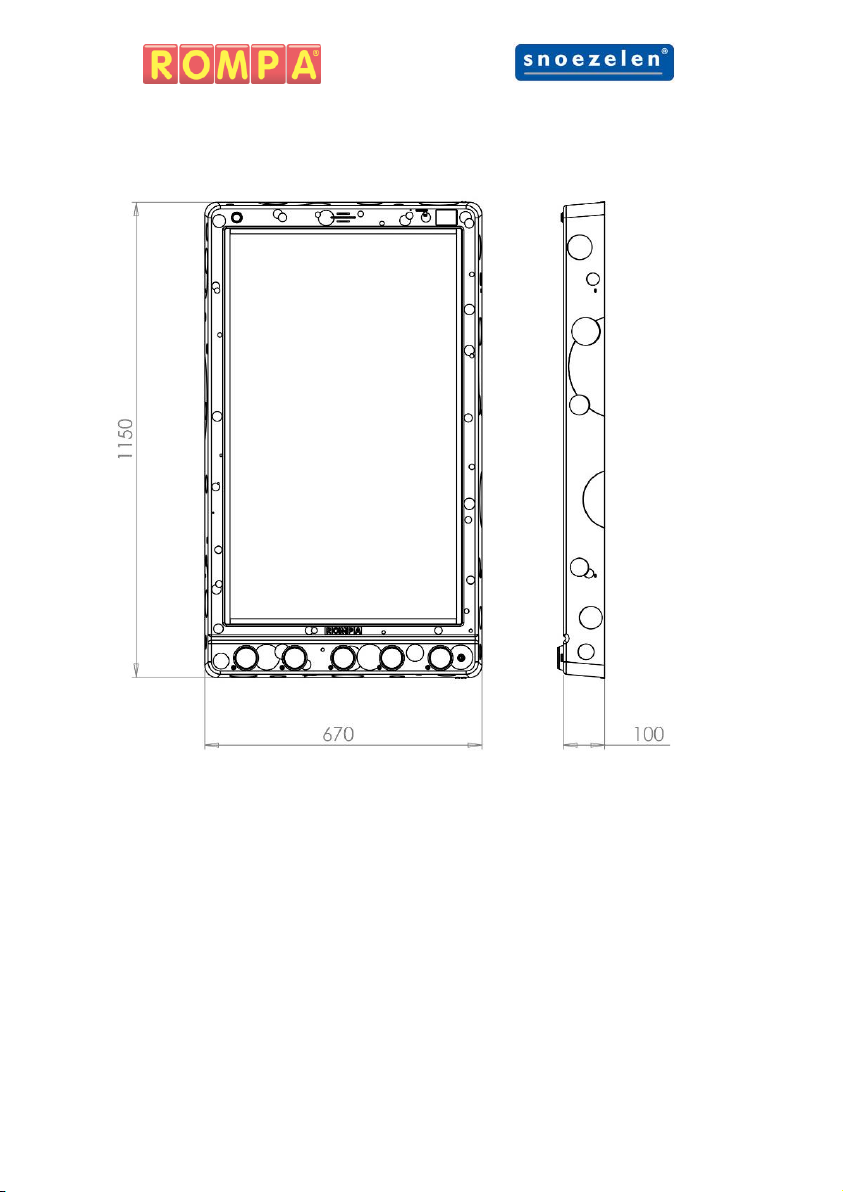
Rompa Snoezelen Multifinity Explorer User manual

Multifinity Explorer™ 22869 July 2019
Copyright ROMPA®Ltd
Multifinity Explorer™
Instruction Manual

2

3
Contents
3
5
Panel Overview
Colour
5
5
6
6
Description
Technical Specification
Dimensions
Contents
7
Compatible Rompa® Products
8
Operation
8
Modes
9
Touch Screen
12
Illuminated Push Buttons
13
External Switches
13
14
17
Microphone Input
Shapes, Patterns and Colours
Rompa® Wireless Operation
18
Installation
24
Safety
25
Care and Maintenance
26
Troubleshooting

4
Panel Overview (Front)

5
Panel Overview (Back)

6
Colour
The Panel is available in 4 colours:
Black, White, Cream and Blue
Description
Create visually stunning infinity effects by selecting from a number of
shapes, colours, patterns and speeds.
The panel is packed with sound effects and music which makes for a truly
exciting multi-sensory experience. With a huge range of effects to choose
from! Allows supervisors to match activity to need.
Encourages interaction, visual tracking, hand-eye co-ordination and an
understanding of cause and effect.
Technical Specification
Weight: 14kg
Input: 100-240V 50/60Hz
Output: 5V DC 10A
Material: ABS (Phthalate-Free)

7
Dimensions
(All dimensions in mm)
Contents
1x Multifinity Explorer™
2x Wall Mounting Bracket
4x M4 Screws (screwed on sides)
1x UK Mains Lead
1x US Mains Lead
1x EU Mains Lead

8
Compatible Rompa® Products
20848 Sensory Magic®
21098 Sensory Magic Portable®
19847 Deluxe 8 Colour Wirefree Controller
21006 8 Colour Wirefree Switch
19939 WiFi Interactive Carpet Switch Set
18870 Talking Cube
20402 Mini Talking Cube
21917 WiFi Microphone
22871 Colour Command Centre™
21918 WiFi Override Transmitter
21728 WiFi App Control Box
22867 Wireless Colour Controller Cushion Wall Mat

9
Operation
Modes
The mode dictates how the panel behaves. The Multifinity Explorer™ has
3 modes which can be selected via the touchscreen and an additional mode
when one microphone is plugged into the ¼”/6.35mm microphone input:
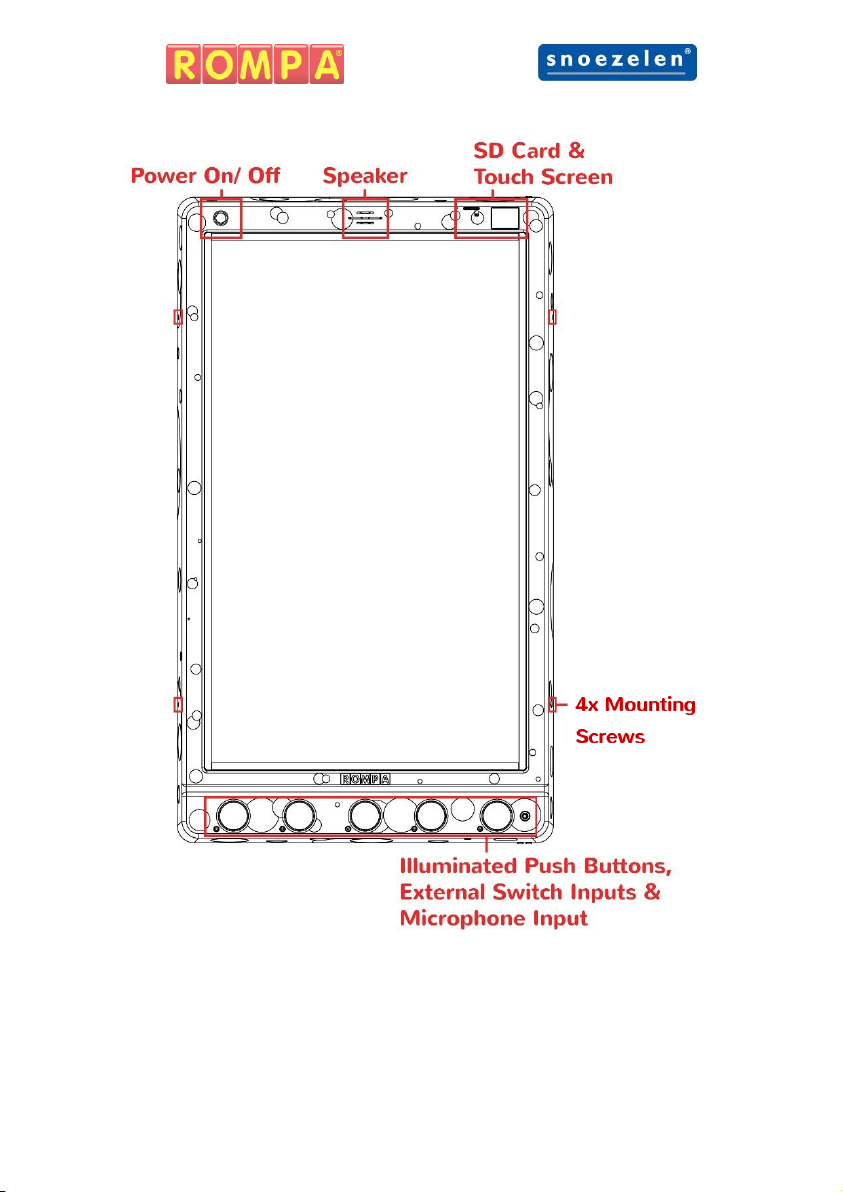
Mode 1: Interactive
The panel does not change current shape, pattern, colour or speed unless
told to do so via the illuminated push buttons.
Mode 2: Relax (Passive)
The panel scrolls through shapes, patterns and colours. The panel
changes state after 1 minute of inactivity. The panel can be used as
normal in this mode.
Mode 3: Music and Sound Effects
Music and sound effects are paired with each pattern for a more
stimulating multisensory experience. The panel works as Mode 1:
Interactive.
Microphone Mode
This mode cannot be accessed via the touch screen. To access this mode
plug a microphone into the ¼”/6.35mm microphone input. The panel will
automatically change to microphone mode once a microphone has been
detected. The mode and brightness of the panel cannot be adjusted via
the touchscreen whilst a microphone is plugged in.
The brightness of the panel is controlled by the volume of sounds made.
The louder the sound the brighter the panel will go. The panel also
detects sounds via its on-board microphone so sounds do not have to be
made directly into the microphone. This allows multiple users to play
simultaneously.

10
Touch Screen
The touch screen is intended for the supervisor of the session not the
primary user of the panel. The touch screen allows you to control in detail
how the panel behaves as well as view statistics of panel usage.
Upon booting the panel up it will revert to its default settings:
Mode 1: Interactive
Volume: 2
Screen Brightness: 100%
Panel Brightness: 100%
Sound Effects: On
WiFi: On
Lock: Off
Mode
Press the light blue mode button to cycle
through the modes of the panel.
Press the Red forward or back buttons to cycle
through the other menu options.
Media*
Press the ‘play/ pause’ button to play or pause
music. Press the ‘skip forward’ to play the next
track or ‘skip back’ to play the previous.
Press the Red forward or back buttons to cycle
through the other menu options.
*This functionality may only be available when
an SD card has been inserted.

11
Volume
Pressing the ‘+’ will increase the volume and
pressing ‘-‘ will reduce the volume.
Press the Red forward or back buttons to
cycle through the other menu options.
Sound Effects
Pressing the light green sound effect button
will cycle the sound effects on or off. Sound
effect refers to the sounds made when the
user activates the illuminated push buttons.
Press the Red forward or back buttons to
cycle through the other menu options.
Touch Screen Brightness
Pressing the yellow screen brightness
button will cycle the panel through 6 levels
of brightness to 100%.
Press the red forward or back buttons to
cycle through the other menu options.
Panel Brightness
Pressing the turquoise screen brightness
button will cycle the touch screen through 3
levels of brightness to 100%.
Press the red forward or back buttons to
cycle through the other menu options.

12
Lock
Pressing the red lock button will lock and
unlock the illuminated push buttons. When
locked the push buttons will dim and be
unresponsive.
Press the red forward or back buttons to
cycle through the other menu options.
Wireless
Pressing the purple Wireless button will turn
the panel Wireless on or off.
With Wireless turned on the panel will
respond to other Rompa® compatible
wireless products.
With wireless turned off it will ignore
Rompa® compatible wireless products. (see
page 6)
Press the red forward or back buttons to
cycle through the other menu options.
Stats
Pressing the blue stats button will open the
stats screen.
From the stats screen you can see in real
time the amount of button presses that have
been made on the panel and the duration the
panel has been used for.
To return to the main menu, press the red
backward button.
Press the red forward or back buttons to
cycle through the other menu options.

13
Illuminated Push Buttons
The Multifinity Explorer™ has 5 illuminated push buttons so the user can
control the visual and audio effects the panel produces. When pressed
each button will flash and a unique sound effect will be triggered. Sound
effects can be turned off via the touch screen. Illuminated buttons can
also be locked via the touch screen if required. The brightness of the
illuminated buttons is reduced and the buttons are unresponsive when
locked.
Shape
The panel has 8 shapes which can be selected via the
‘Shape’ illuminated push button or an external switch
plugged into the ‘Shape’ ¼”/6.35mm input jack.
Pattern
The panel has 6 patterns which can be selected via the
‘Pattern’ illuminated push button or an external switch
plugged into the ‘Pattern’ ¼”/6.35mm input jack.
Colour
The panel has 11 colours which can be selected via the
‘Colour’ illuminated push button or an external switch
plugged into the ‘Colour’ ¼”/6.35mm input jack.
Play/ Pause
The panel has can be paused or resumed via the ‘Play/
Pause’ illuminated push button or an external switch
plugged into the ‘Play/ Pause’ ¼”/6.35mm input jack. A
different sound effect is associated with play and
pause.
Speed
The panel has 3 speeds which can be selected via the
‘Speed’ illuminated push button or an external switch
plugged into the ‘Speed’ ¼”/6.35mm input jack. A
different sound effect is associated with slow, medium
and fast.

14
External Switches
The panel has 5 external switch inputs each located underneath their
associated illuminated push button. To connect the external switch
simply plug into the ¼”/6.35mm jack and remove when finished (external
switches without a ¼”/6.35mm jack may need an adapter fitting).
Microphone Input
The panel has 1 microphone input. To use a microphone with the panel
simply plug a microphone into the ¼”/6.35mm jack located in the bottom
right of the panel. When the microphone is inserted the panel will
automatically detect its presence and turn to ‘Microphone Mode’. The
panel also acts as a karaoke and sounds spoken through the microphone
can be heard through the integrated speaker. Simply remove the
microphone from the panel when finished and the panel will automatically
revert back to its previous mode.

15
Shapes, Patterns and Colours
Shape
The panel has 8 shapes which can be selected via the ‘Shape’ illuminated
push button or an external switch plugged into the ‘Shape’ input jack:
Infinity
Lower Cricle
Upper Cricle
Rectangle
Hourglass (double triangle)
Lower Triangle
Upper Triangle
Scattered
Patterns
1
No Pattern
All LEDs are illuminated with no change.
*When ‘Scattered’ shape is selected panel will hard transition
through random arrays.
2
Slow Fade
All LEDs will fade in and out.
*When ‘Scattered’ shape is selected panel will fade out and then
fade in through random arrays.

16
3
Sparkling
Random pixels fade in and out to create a magical sparkling effect.
4
Looping
6 LEDs loop around the selected shape. 3 LEDs travel clockwise
and 3 LEDs travel counter clockwise.
* When ‘Scattered’ shape is selected panel LEDs will illuminate
from the centre of the panel until all LEDs are illuminated. Once
complete LEDs will extinguish from the centre until all LEDs are
extinguished.
5
Rotating
Shapes appear to be rotating by alternate LEDs travelling around
the shape’s circumference.
* When ‘Scattered’ shape is selected panel LEDs will illuminate
from the outside of the panel to the centre of the panel until all
LEDs are illuminated. Once complete LEDs will extinguish from the
outside until all LEDs are extinguished.
6
Snake
LEDs (or a snake) loop around the selected shape ‘eating’ other
LEDs along the way. Each LED ‘eaten’ make the snake longer. This
continues until the shape is filled. Once shape is filled all the LEDs
extinguish one at a time.
* When ‘Scattered’ shape is selected a multi-direction falling stars
pattern can be seen instead. LEDs appear to shoot across the panel
in multiple directions.

17
Colour
1
Multi-Coloured (LEDs are multi-coloured)
2
All Colours Soft Fade (LEDs transition through colours)
3
All Colours Hard Fade (LEDs hard transition through
colours)
4
Red
5
Green
6
Blue
7
Yellow
8
Orange
9
Pink
10
Purple
11
White

18
Rompa® Wireless Operation
The Multifinity Explorer™ is compatible with a range of Rompa® wireless
products (see Compatible Rompa® Products):
8 Colour Wirefree Controller: Simple and Deluxe
Pressing the colour buttons turns the all the LEDs in array the
corresponding colour selected. The panel will remain this colour unless a
new colour is selected via the panel or a Rompa® wireless controller or
the panel is in a passive mode where it continue cycling through colours
and patterns after 60 seconds.
Pressing the central ‘function button’ acts as pressing the pattern button
on the panel. Pressing the function button multiple times allows the user
to cycle through all 6 of the panel’s patterns.
Other Wireless Products
Selecting a colour turns the all the LEDs in array the corresponding colour
selected. The panel will remain this colour unless a new colour is selected
via the panel or a Rompa® wireless controller or the panel is in a passive
mode where it continue cycling through colours and patterns after 60
seconds.

19
Installation
Installing Wall Mount Brackets & Panel
Ensure that, after installation, the mains plug and/or power switch for
the Panel is easily accessible to facilitate removal of power.
Due to the size of the product it is recommended that two people are
required to install the product.
Recommended Tools
Drill
Spirit Level
Pencil
Tape Measure
Appropriate Fixings (e.g. Wall plugs, etc)

20
(All dimensions in mm)
Table of contents
Other Rompa Dj Equipment manuals