Rompa 20699 User manual

1. ProductName
SolarLights
2. ProductCode
20699,20700
3. Colour
White/Mixedcolourlights
4. BriefDescription
LEDlightsforindoorandoutdooruse

5. Contents
•1x2wattsolarpanel
•1x60/100LEDstring
•1xgroundstake
•1xinstallationattachment
•2xtubes
•2xscrews

6. Snoezelen®Stimulations
•Sight
7. BestUse
Useoutdoorsinassunnyalocationaspossible.
8. CompatibleROMPA®Products
ROMPA®offersanextensiverangeofgardenproducts.Visitwww.rompa.comformore
information.
9. StartingUp
•Connectthesolarpaneltothegroundstakeinadryplace.
•Inasunnylocation,either:insertthegroundstakeintotheground;fixthebase
attachmenttothewallwiththetubesandscrewsorattachthelighttoapillar/fence.
•InserttheplugoftheLEDstringintothebackofthepanel.
•SwitchON.
10. DetailedDescription
LEDlightsforindoorandoutdooruse.Automaticallycomeonatduskandswitchoffafter8
hours.Includessolarpanelwithrechargeablebatteries,multi‐functioncontroller,
wall/fencebracketandgroundstake.
Duringthedaythesolarpanelconvertssunlightintoelectricityandrechargesthebattery.
Atnightthelightturnsonautomaticallywiththesolarenergygeneratedelectricitythathas
beenstoredduringtheday.Thenumberofhoursthelightstaysondependsonyour
geographicallocationaswellasweatherandseasonalconditions.Therechargeable
batterieshavebeeninsertedintotheirhousingandwerefullychargedbeforedespatch.
Shouldthelightbelowatfirstuse,allowthebatteriestofullychargebeforeuse.Oncethe
rechargeablebatterieshavebeenreplaced,returnthelightoutdoorsandallowthemto
chargeforatleast5hours.Onacloudyorrainyday,thechargemaytakeapproximately10
hoursandthelightwilllastapproximately3–4hours,fadinggradually.Thebatteriescan
lastuptooneyear(around500charges).Thisisdependentonclimateconditions.
11. Safety
•Supervisetheuseofthisproduct.
•Thisproductisnotatoy
•Donotassembletheproductinadamplocation.

12. TechnicalSpecification
Size: 3mmlights,10cmapart;200cmLlead(green)
SolarPanel:1WattSolarPanel(poly‐crystalline)
Battery:three1300mAhNi‐MHrechargeablebatteries
Functions:8pattern
LED: 60/100
13. Installation
1. Assembletheproductinadrylocationbeforeinstallation.Connectthesolarpanel
tothegroundstake.
2. Chooseasuitableandsafelocationwithfull,directsunlight.Donotplaceinthe
shadowofotherobjects.Donotplacenearotheroutdoorlightingasthesemay
makethislightturnoffautomatically.Insertthegroundstakeintotheground.
3. Alternatively,fixthebaseattachmenttothewallwiththetubesandscrews.Attach
thepaneltothebaseattachment.

4. Anotheralternativeistoattachthelighttoapillarorfence.Assemblethepartsas
shownbelow,thenfixtheattachmentontothepillarorfenceandscrewonthe
butterflynuttightly.
5. InserttheplugoftheLEDstringintothebackofthepanel.
6. SwitchtoONandpresstheMODEbuttonforthefunctions.PresstheMODEbutton
forthreesecondsforpermanentlight.
7. SwitchtopositionCiftheweatheriscloudytochargethebatteryonly.
8. SwitchtopositionAtoturnonthelight.
9. PlacetheLEDstringinyourdesiredlocation.

14. CareandMaintenance
•Toreplacethebattery,switchOFF.Screwoffthebackofthesolarpanel.Change
thebatterywiththree1300mAhNi‐MHrechargeablebatteries.
•Alwayskeepthesolarsurfacecleanandclearofdebristopreventinterferencewith
thebatterycharge.
•Beforechargingthebatteries,makesuretheyareinsertedthecorrectwayround
(observethepolarity).Makesurethebatteryisrechargeable.
15. Troubleshooting
Problem:Thebatterywillnotchargefully?
•EnsurethattheswitchisON
•Makesurethelightislocatedinasunnyplaceandnotinashadow
•Iftheweatherhasbeencloudyorovercast,itislikelythatthebatterywillnotbe
charged.Itwillberechargedduringthenextsunnyday.
Problem:Thelightdoesn’tworkatnightwhentheswitchattherighthandsideissetto
‘C’?
•Setthisswitchto‘A’atnight
Furthercopiesoftheseinstructionscanbedownloadedatwww.rompa.com
Wehopeyoufindourinstructionsinvaluable.Ifyouhaveanysuggestionsforimproving
themfurtheryourcommentswillbegreatlyreceived–pleasecontactusat
SOLARLIGHTS20699,20700,April2012
CopyrightROMPA®Ltd

1. NomedoProduto
LuzSolar
2. CódigodoProduto
20699,20700
3. Cores
Branco/Luzescoloridasmisturadas
4. DescriçãoBreve
LuzesLEDparautilizarnointerioreexterior

5. Conteúdo
•1xpainelsolarde2W
•1xfiocom60/100LEDs
•1xestacaparaochão
•1xuniãodeinstalação
•2xtubos
•2xparafusos

6. EstimulaçõesSnoezelen®
•Visão
7. MelhorUtilização
Utilizenoexteriornumlocalondehajasolsepossível.
8. CompatibilidadecomProdutosRompa
ARompadisponibilizaumavastagamadeprodutosparaojardim.Visitewww.rompa.com
paraobtermaisinformações.
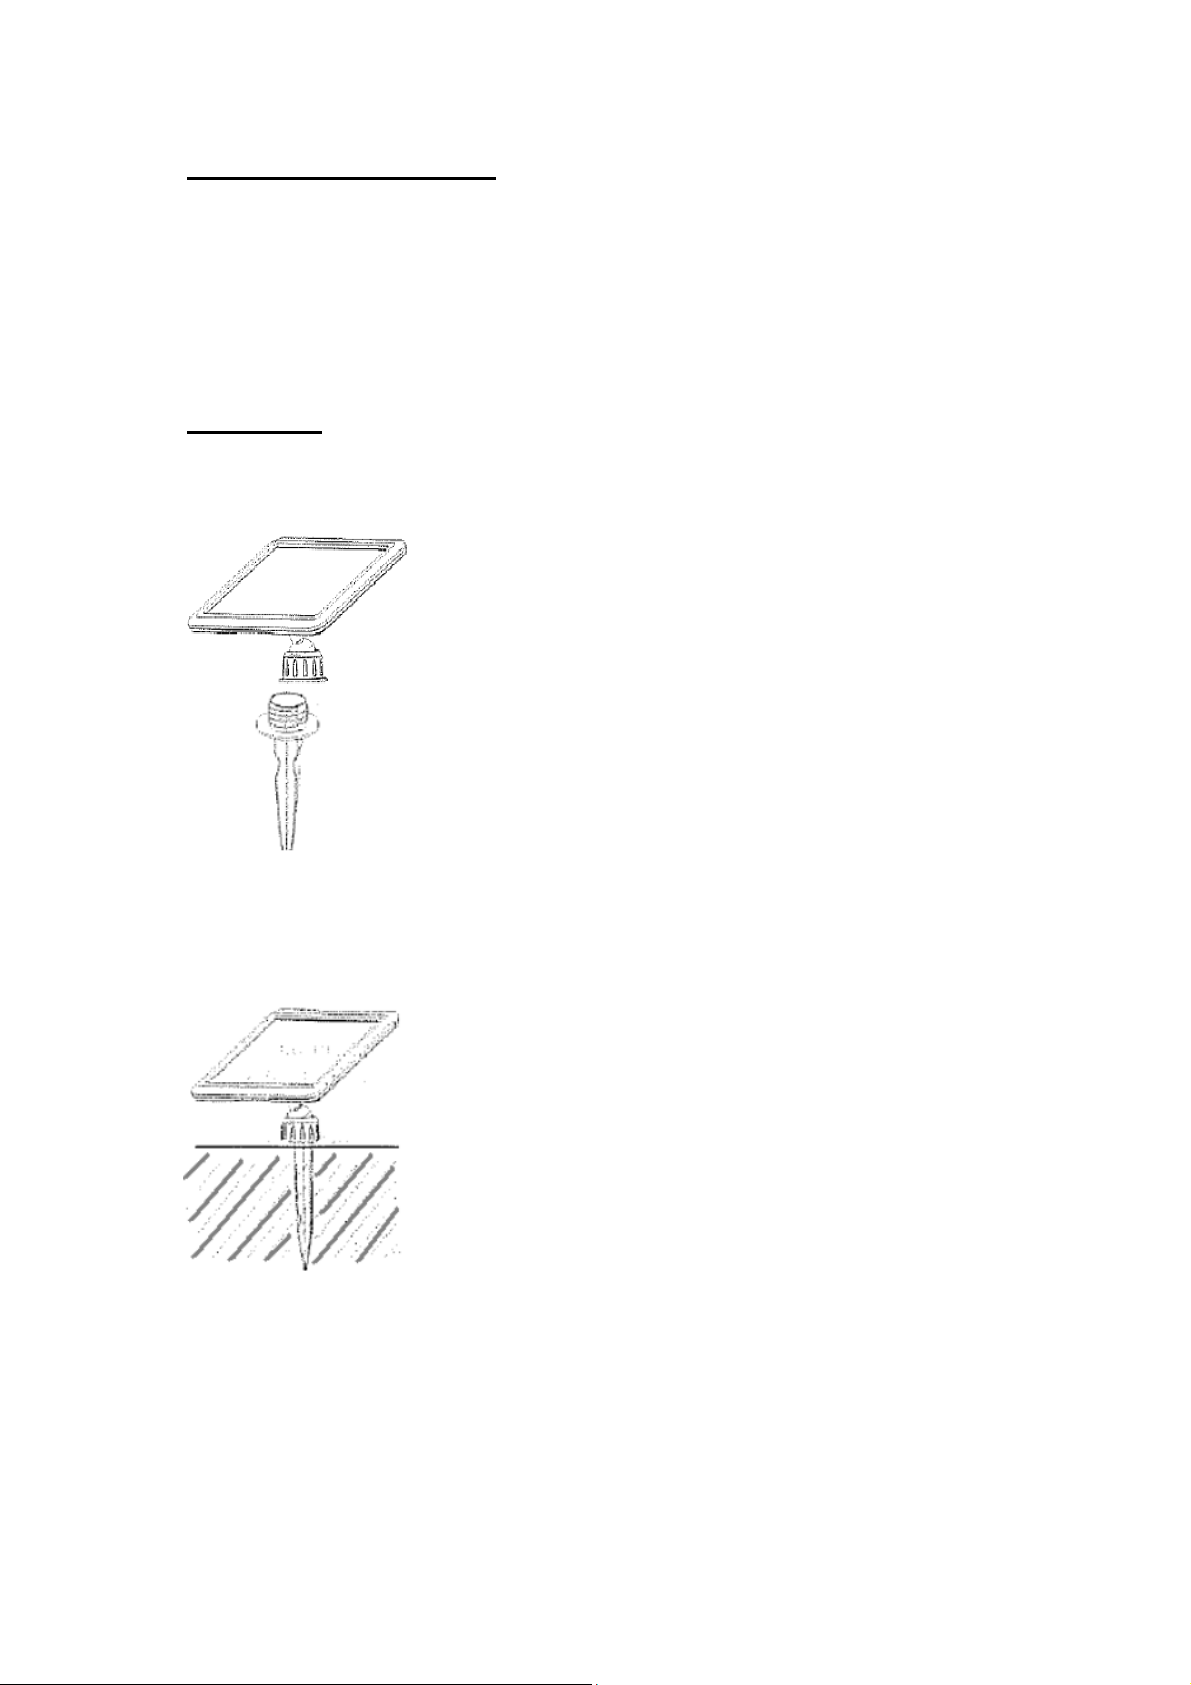
9. Começar
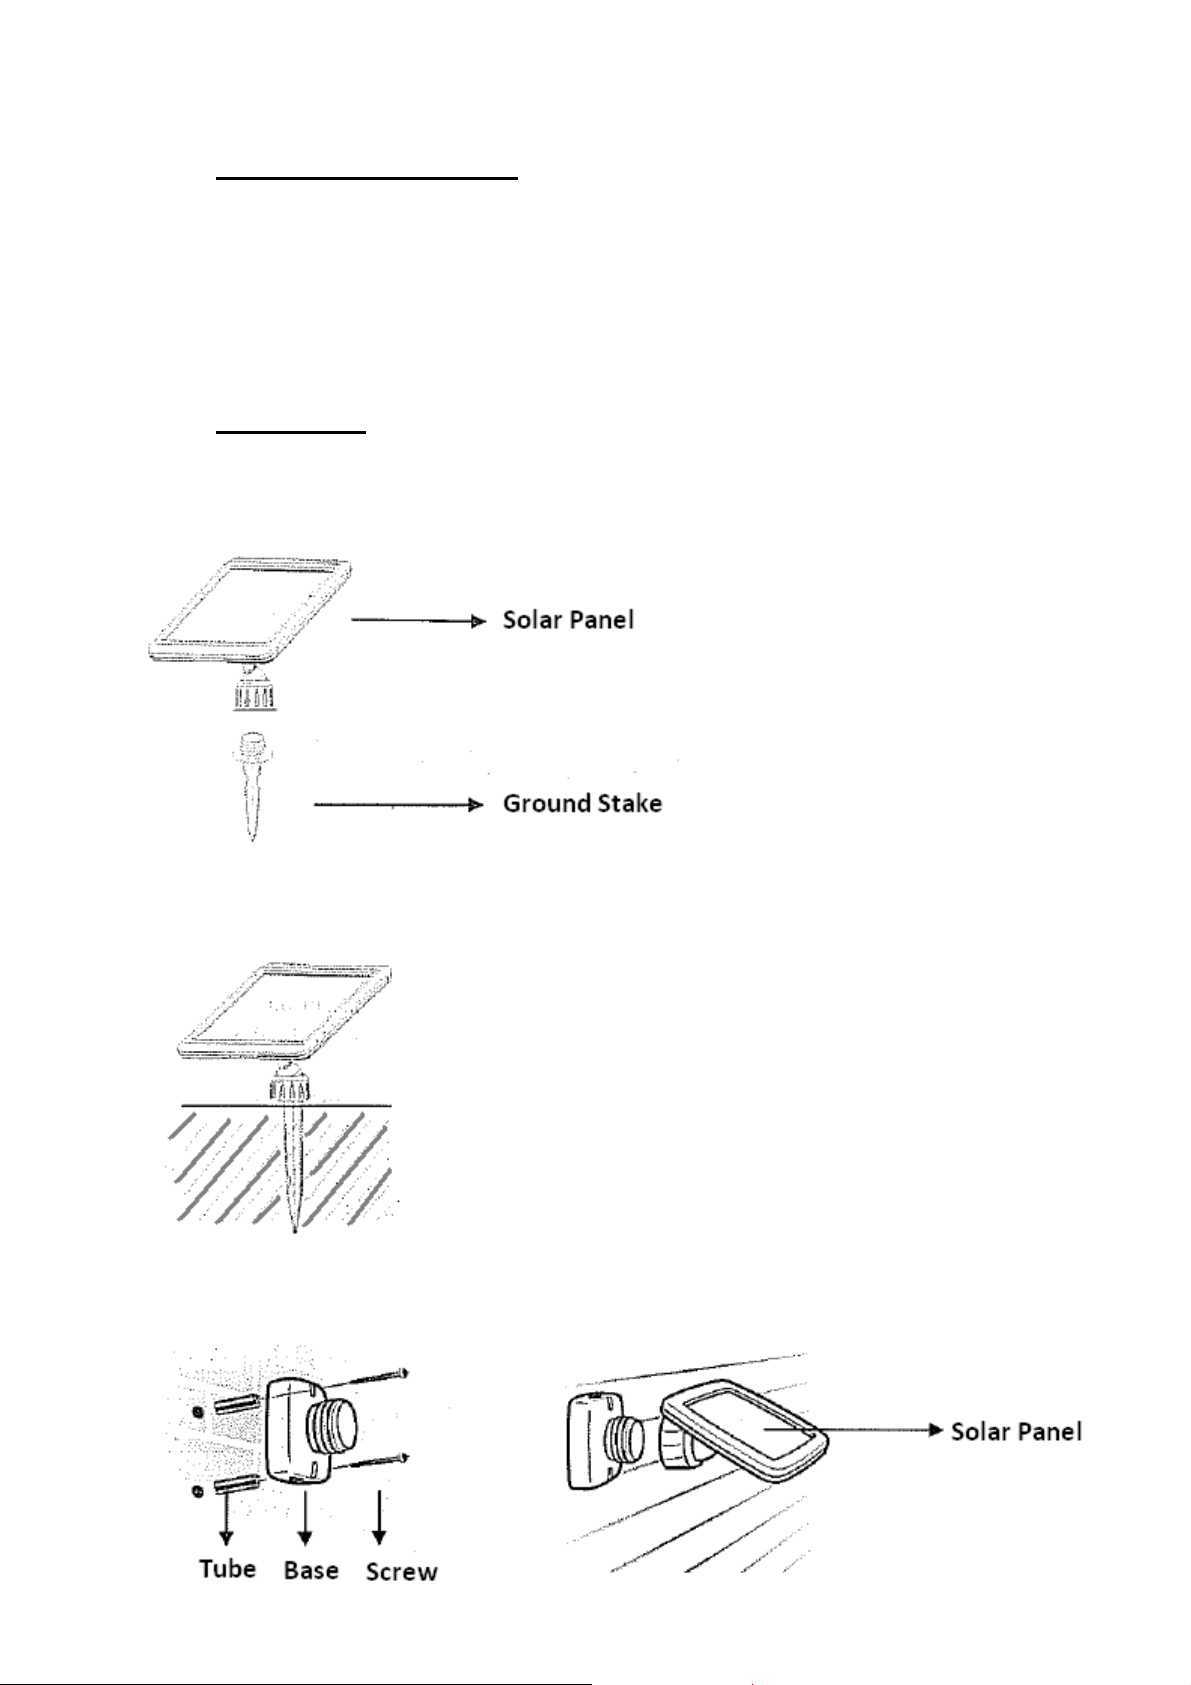
•Ligueopainelsolaràestacadochãonumlocalseco.
•Numlocalaosol,introduzaaestacanochão;fixeabasenumaparedeouprendaa
luznumpilar/cerca.
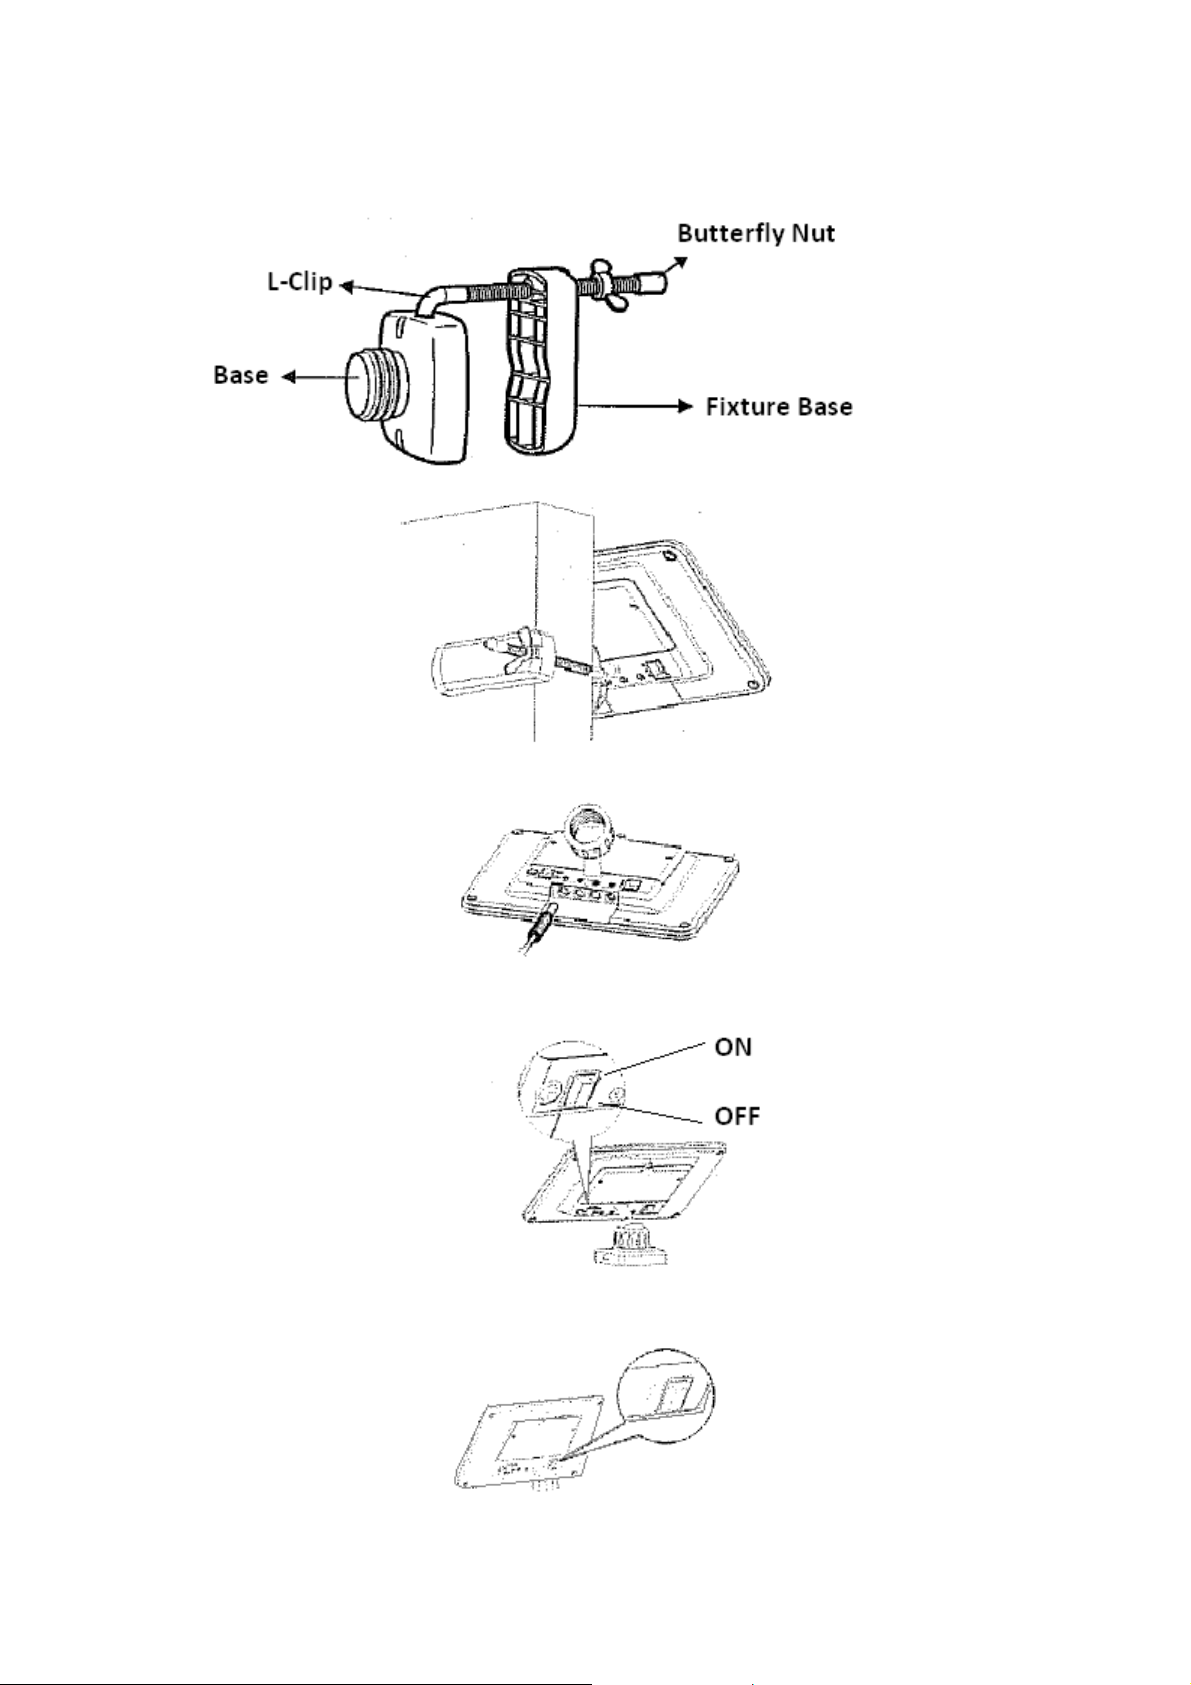
•IntroduzaafichadocordãoLEDnapartedetrásdopainel.Ligue.
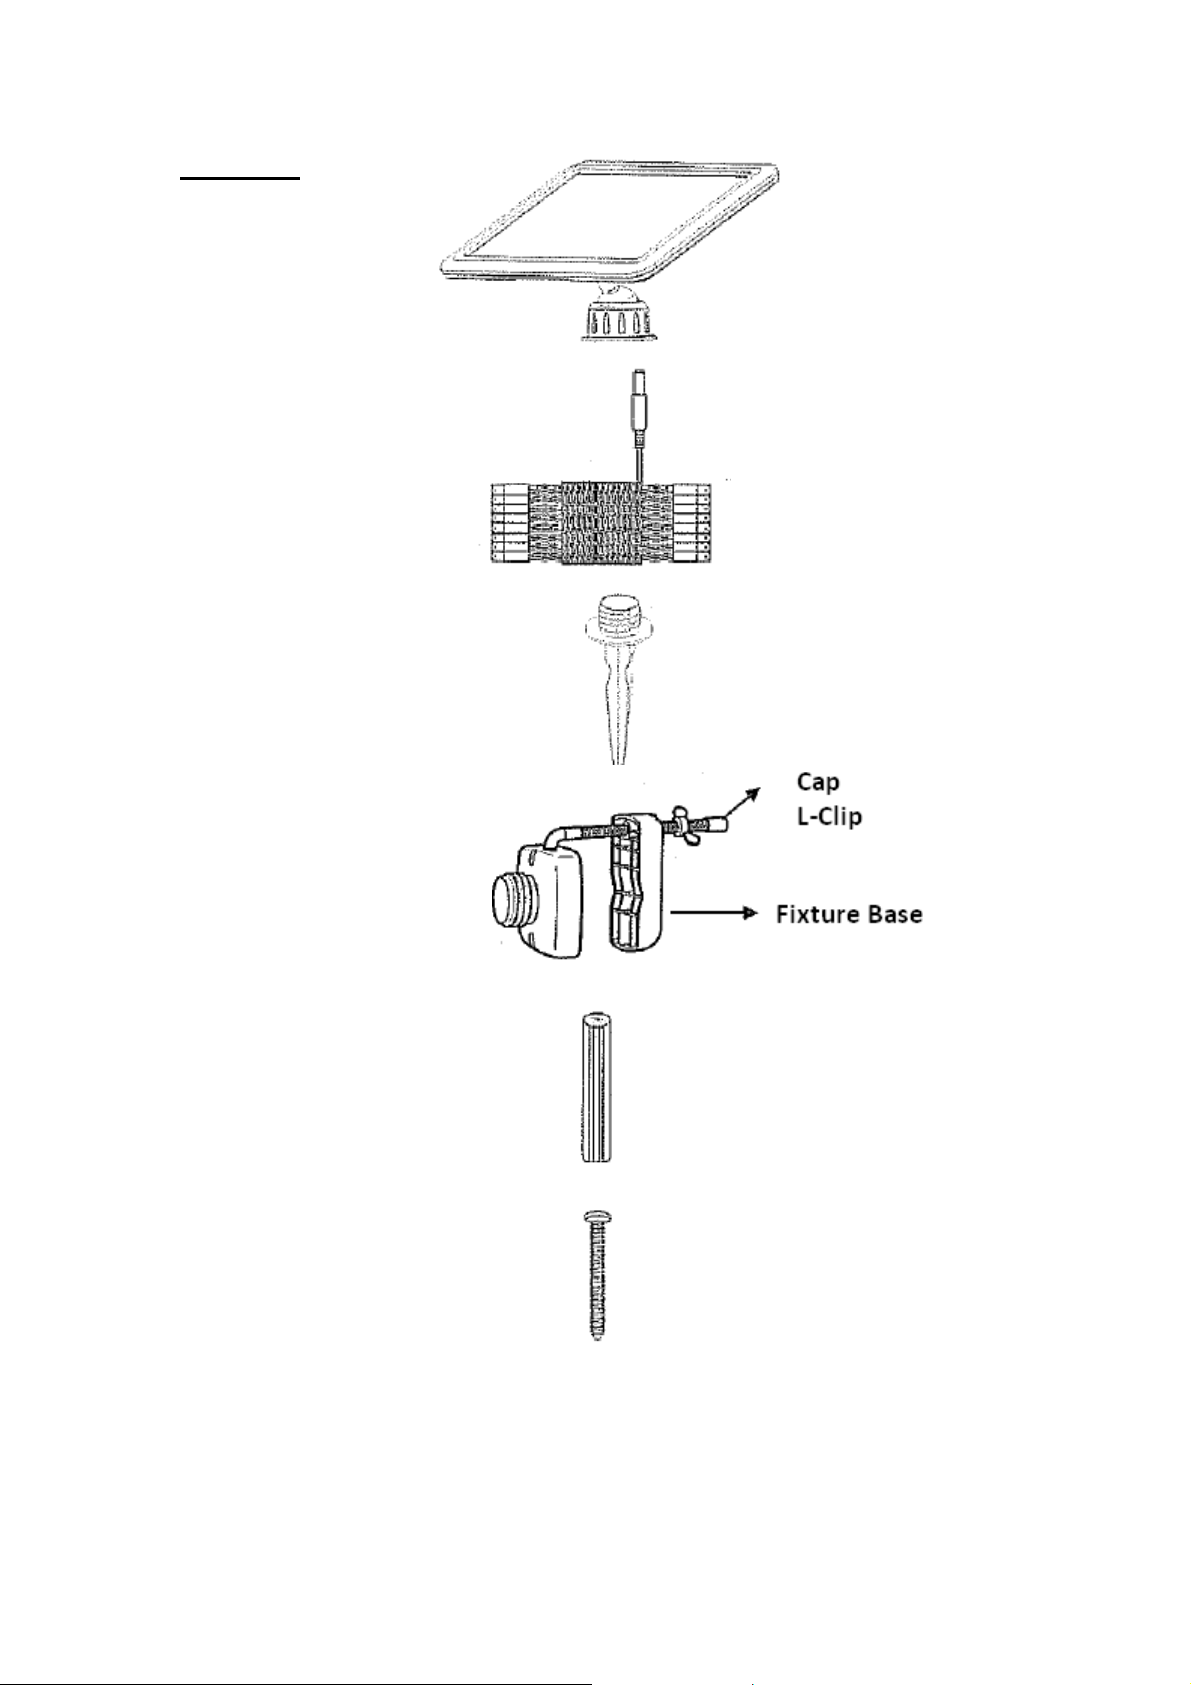
10.DescriçãoDetalhada
LuzLEDparautilizarnointerioreexterior.Ligaautomaticamenteaoentardeceredesliga
após8horas.Incluipainelsolarcompilhasrecarregáveis,controladormultifunções,suporte
paraparede/cercaeestacaparaochão.
Duranteodia,opainelsolarconvertealuzsolaremeletricidadeerecarregaabateria.À
noitealuzligaautomaticamentecomaenergiaquefoiarmazenadaduranteodia.O
númerodehorasquealuzficaacesadependedalocalizaçãogeográficaedeoutrosfatores
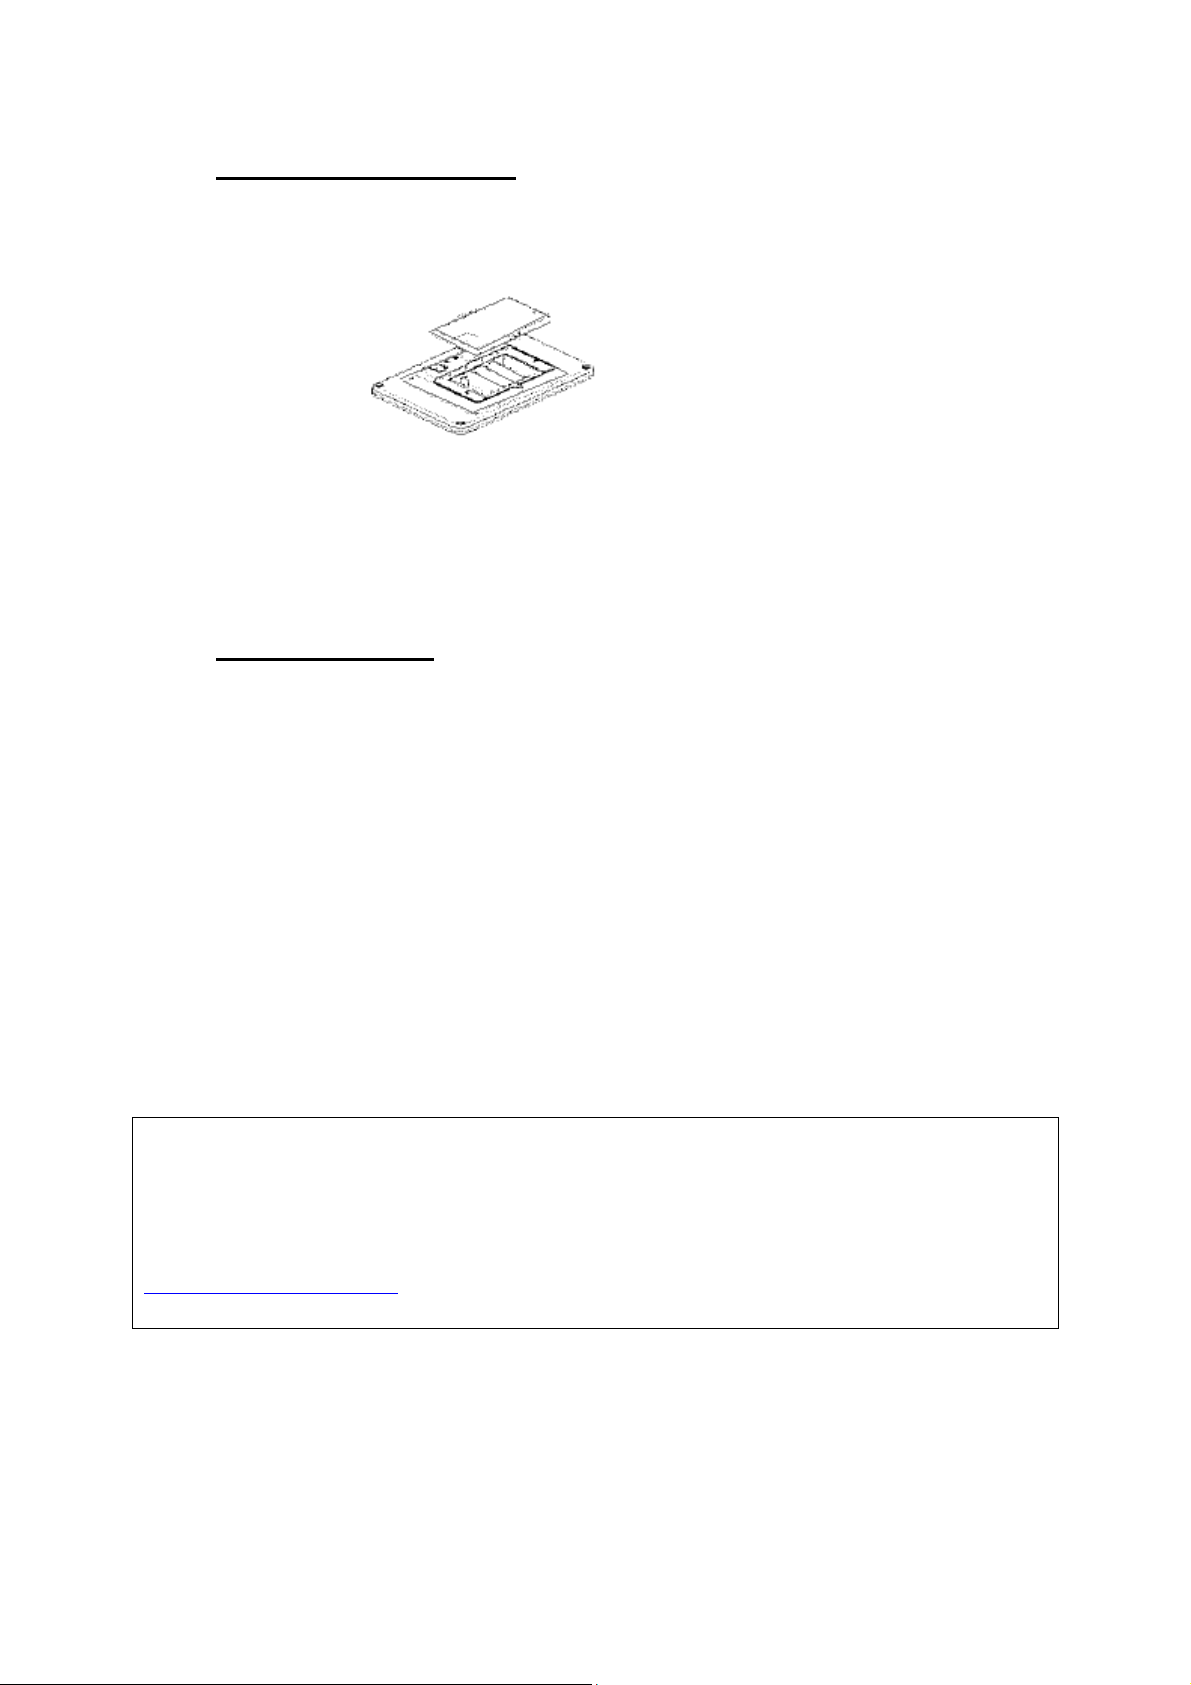
relacionadoscomotempoecondiçõessazonais.Asbateriasrecarregáveisforam
introduzidasnorespetivocompartimentoeforamtotalmentecarregadasantesdoenvio.
Casoaluzsejafracanaprimeirautilização,deixequeasbateriascarreguemtotalmente
antesdeutilizar.Quandosubstituirasbateriasrecarregáveis,volteacolocarnoexteriore
deixecarregarpelomenos5horas.Nosdiasdechuvaoucommuitasnuvens,acargapode
demoraraproximadamente10horasealuzduraaproximadamente3–4horas,ficando
maisfracagradualmente.Asbateriaspodemdurarcercade1ano(aproximadamente500
cargas).Istodependedascondiçõesatmosféricas.
11.Segurança
•Supervisioneautilizaçãodesteproduto.
•Esteprodutonãoéumbrinquedo.
•Nãomonteesteprodutonumlocalhúmido.

12.EspecificaçõesTécnicas
Tamanho: Lâmpadascom3mm,separadaspor10cm;fiocom200cm(verde)
Painelsolar: Painelsolarde1Watt(policristalino)
Baterias: Trêspilhasde1300mAhNi‐MHrecarregáveis
Funções: 8Padrões
LED: 60/100
13.Instalação
1. Monteoprodutonumlocalsecoantesdeinstalar.Ligueopainelsolarnaestacado
chão.
PainelSolar
Estacaparaochão
2. Escolhaumlocalseguroeapropriadocomluzsolardireta.Nãocoloquenasombra
deoutrosobjetos.Nãocoloquepertodeoutrasiluminaçõesesteriorespoispodem
fazercomqueesteprodutosedesligueautomaticamente.Coloqueaestacanochão.
3. Emalternativa,fixeabasenaparedecomasbuchaseparafusos.Prendaopainelna
base.

4. Outraalternativaéfixaraluznumpilarounumacerca.Monteaspeçasconformea
ilustraçãoabaixo,fixeosuportenumpilarounumacercaeaperteaporcade
orelhas.
5. IntroduzaafichadocaboLEDnapartedetrásdopainel.
6. LigueepressioneobotãoMODEparaselecionarasfunções.Pressioneobotão
MODEdurante3segundosparamanteracesopermanentemente.

7. MudeparaaposiçãoCseotempoestivernebuladoparacarregarabateriaapenas.
8. MudeparaaposiçãoAparaligaraluz.
9. ColoqueofioLEDnalocalizaçãodesejada.
14.CuidadoeManutenção
•Parasubstituirabateria,desligue.Desaperteapartedetrásdopainelsolar.
Substituaaspilhasportrêspilhasrecarregáveisnovasde1300mAhNi‐MH.
•Mantenhasempreasuperfíciesolarlimpaesemdetritosparaprevenir
interferênciascomocarregamentodabateria.
•Antesdecarregarasbaterias,verifiqueseestasestãointroduzidascorretamente
(observeapolaridade).Verifiqueseabateriaestárecarregada.

15.ResoluçãodeProblemas
Problema:Abaterianãocarregatotalmente?
•Verifiqueseoswitchestáligado
•Verifiquesealuzestásituadanumlugaraosolenãoàsombra.
•Seotempoestivernebulado,éprovávelqueaspilhasnãotenhamcarregado.Irão
carregarnopróximodiadesol.
Problema:Aluznãoacendeànoitequandoobotãodoladodireitoestánaposição‘C’?
•Coloquenaposição‘C’ànoite
LuzSolar20699,20700,April2012
CopyrightROMPA®Ltd
This manual suits for next models
1
Table of contents
Languages:
Other Rompa Outdoor Light manuals
Popular Outdoor Light manuals by other brands

BEGA
BEGA 84 299 Installation and technical information

PCE Health and Fitness
PCE Health and Fitness Handlamp Akku LED 5x3W Operation manual

Springdale Lighting
Springdale Lighting STT11129 Assembly instructions

HEPER
HEPER ZEROX M Hybrid Installation and maintenance instructions

Mathmos
Mathmos Fireflow pod+ instructions

Briloner
Briloner MAL 2763 Mounting instructions