ROSIERES Cookers User manual


INHALT
1. Allgemeine Hinweise
1.1. Bedeutung Der Im Text Verwendeten Symbole
1.2. Konformitätserklärung
1.3. Sicherheitshinweise
1.4. Nützliche Hinweise
2. Installation
2.1. Standort Des Herdes
2.2. Einbauposition
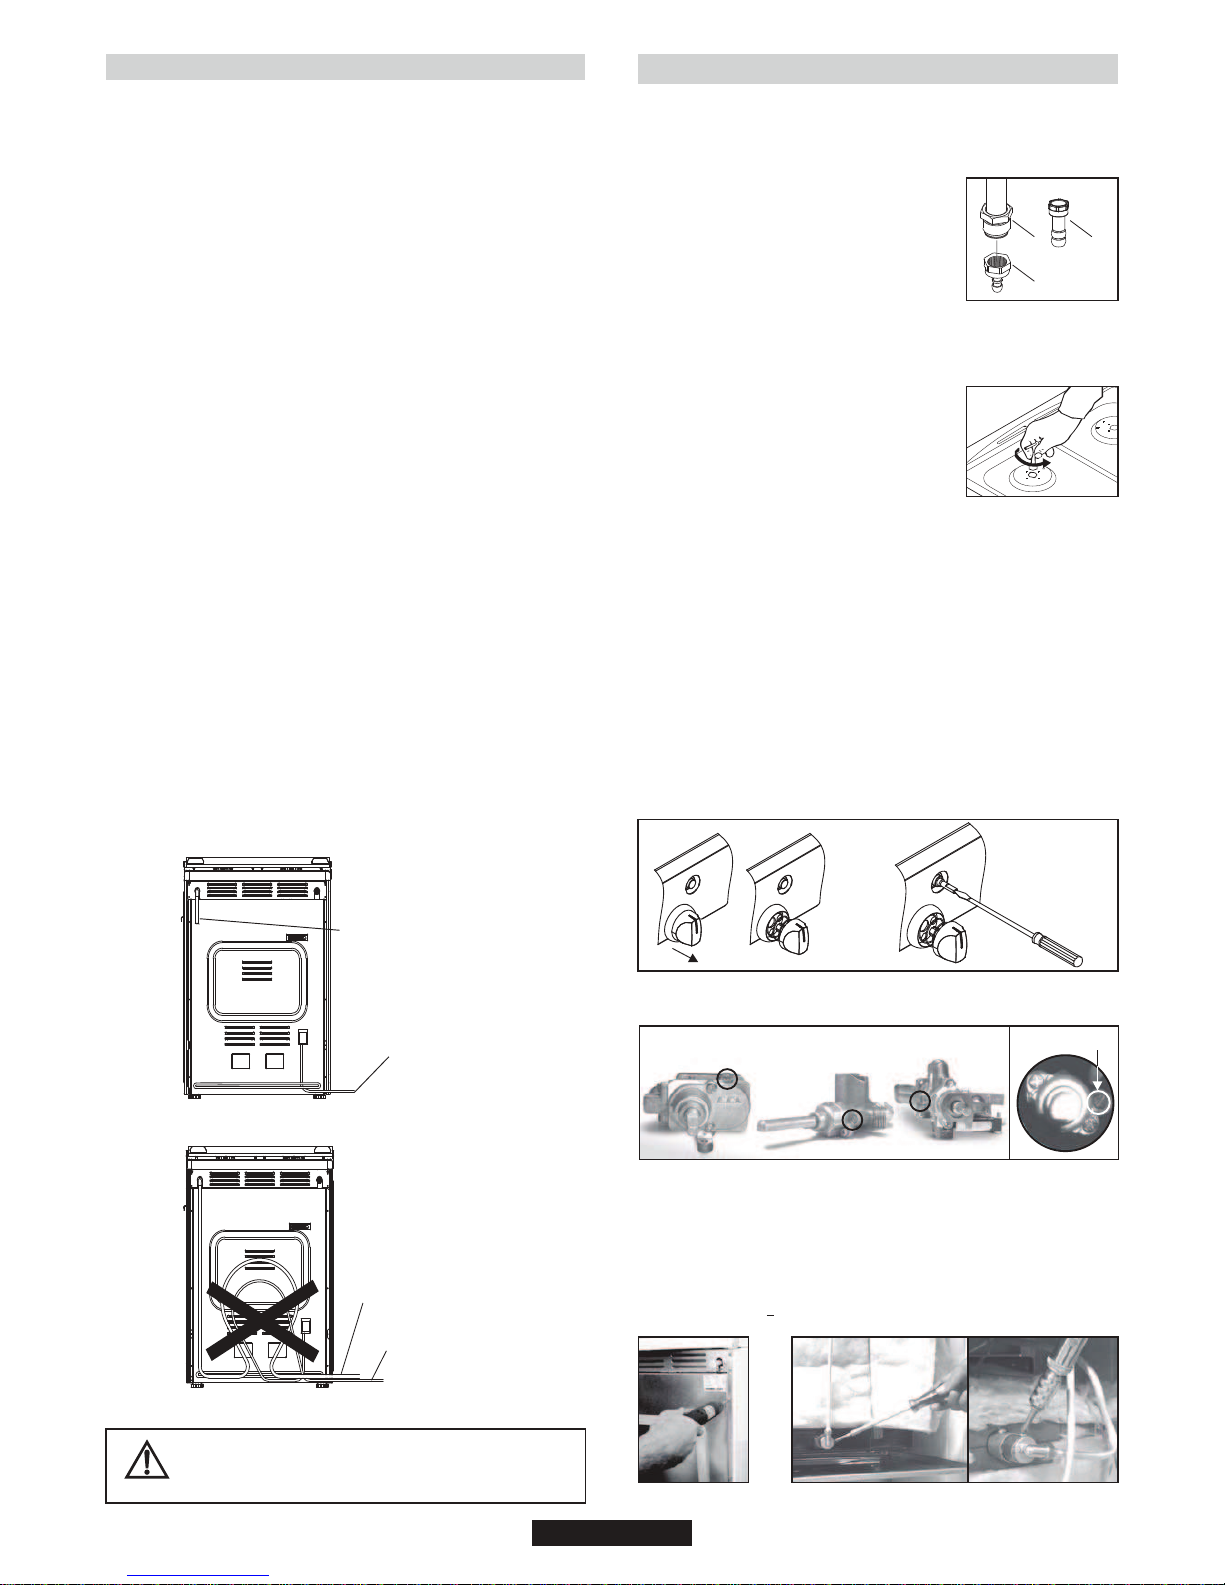
2.3. Höhenregulierung Der Füsse
2.4. Elektrischer Anschluss
2.5. Herde Mit Anschlusskabel
2.6. Herde Ohne Anschlusskabel
2.7. Gasanschluss
2.8. Abstimmung Des Herds Auf Eine Andere Gasart
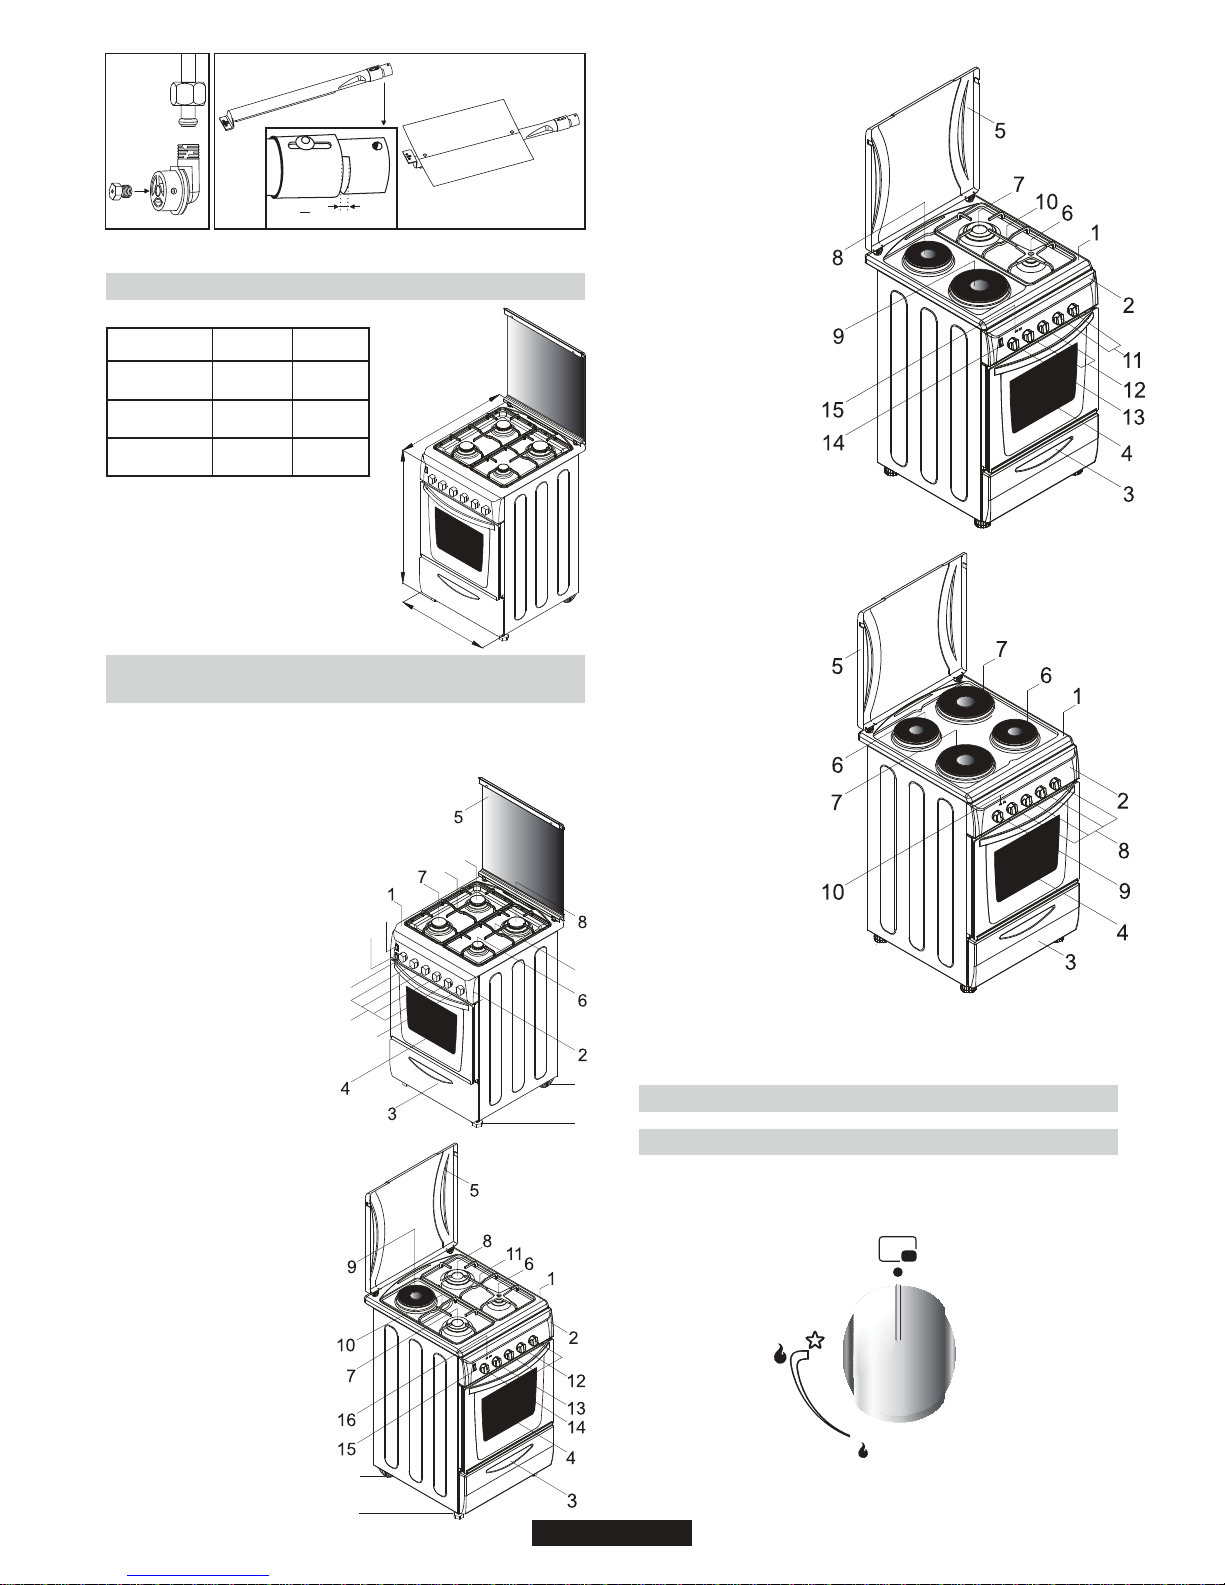
2.9. Gerätemasse
2.10. Allgemeine Beschreibung Des Geräts
3. Bedienung Der Kochstellenbrenner
3.1. Bedienung Der Kochstellenbrenner Des Kochfelds
3.2. Bedienung Der Elektrischen Kochstellen Des Kochfelds
4. Bedienung Des Backofens
4.1. Grill
4.2. Electric Oven
4.3. Bedienung Des Backofens - Tipps
4.4. Zubereitung Von Pizza
4.5. Kuchen Und Gebäck
4.6. Fleisch
4.7. Fisch
4.8. Drehspieß
4.9. Minutenzähler
4.10. Benutzung Des Timers Für Backzeitende
4.11. Gasbackofen
4.12. Bedienung Des Elektronischen Programmierers
4.13. Tabelle Backen, Überbacken, Braten, Grillen
5. Reinigung Und Pflege
5.1. Backofen Mit Katalytischer Reinigungshilfe
6. Kundendienst Und Abhilfe Bei Störungen
7. Umweltgerechte Entsorgung
DE
........................................................................................37
..............................................37
.....................................................................................37
........................................................................................37
..........................................................................................37
........................................................................................................38
.......................................................................................38
................................................................................................38
..........................................................................38
....................................................................................39
...............................................................................39
...........................................................................39
..................................................................................................40
...........................................40
..................................................................................................41
..........................................................41
...............................................................41
........................................41
................................42
..............................................................................43
..................................................................................................................43
...................................................................................................43
..................................................................44
....................................................................................44
.......................................................................................44
.............................................................................................................44
................................................................................................................44
.......................................................................................................45
..................................................................................................45
.....................................................45
.................................................................................................45
..........................................45
...............................................46
.....................................................................................47
....................................................47
....................................................47
..........................................................................47
CONTENTS
1. General Warnings
1.1. Symbols Used In This User Manual
1.2. Declaration Of Compliance
1.3. Safety Hints
1.4. Useful Tips
2. Installation
2.1. Environment The Appliance Should Be Placed
2.2. Positioning
2.3. Feet Adjustment
2.4. Electrical Connection
2.5. Cookers With Energy Cable
2.6. Cookers Without Energy Cable
2.7. Gas Connection
2.8. Conversion For Different Gas Types
2.9. Dimensions Of The Appliance
.10.2 General Appearance And Definition Of The Appliance
3. BurnersUse Of Cooktop
3.1. Gas BurnersUse Of Cooktop
3.2. Use Of Cooktop Electrical Plates
4. Use Of The Oven
4.1. Grilling
4.2. Electric Oven
4.3. Electric Oven Suggestions For Cooking
4.4. Cooking Pizza
4.5. Cooking Cakes
4.6. Cooking Meats
4.7. Cooking Fish
4.8. Cooking Turn Spit
4.9. Using The Minute Timer
4.10. Using The End Of Cooking Timer
4.11. Gas Oven
4.12. Use Of The Electronic Programmer
4.13. Cooking Tables
5. Cleaning And Maintenance
5.1. Catalytic Self - Cleaning Oven
6. Service Centre & Troubleshooting
7. Protection Of The Environment
GB
............................................................................................03
...............................................................03
.............................................................................03
....................................................................................................03
.....................................................................................................03
........................................................................................................04
..............................................04
......................................................................................................04
.............................................................................................04
.....................................................................................05
..........................................................................05
......................................................................05
..............................................................................................06
...............................................................06
........................................................................07
................................07
................................................................................07
.........................................................................07
....................................................................08
.............................................................................................09
............................................................................................................09
.................................................................................................09
.........................................................10
.................................................................................................10
................................................................................................10
................................................................................................10
...................................................................................................10
...........................................................................................11
..................................................................................11
.................................................................11
......................................................................................................11
..............................................................11
.............................................................................................12
.............................................................................13
........................................................................13
.................................................................13
.....................................................................13
CONTENUTO
1. Avvertenze Generali
1.1. Simboli Usati In Questo Manuale
1.2. Dichiarazione Di Conformità
1.3. Suggerimenti Per La Sicurezza
1.4. Suggerimenti Utili
2. Installazione
2.1. L'ambiente In Cui Installare L'elettrodomestico
2.2. Posizionamento
2.3. Regolazione Dei Piedini
2.4. Collegamento Elettrico
2.5. Cucine Con Cavo Di Corrente
2.6. Cucine Senza Cavo Di Corrente
2.7. Collegamento Al Gas
2.8. Conversione Per Tipi Di Gas Diversi
2.9. Dimensioni Dell'elettrodomestico
2.10. Aspetto Generale E Definizioni Dell'elettrodomestico
3. Utilizzo Dei Bruciatori Del Piano Di Cottura
3.1. Utilizzo Dei Bruciatori A Gas Del Piano Di Cottura
3.2. Utilizzo Di Piastre Elettriche Del Piano Di Cottura
4. Uso Del Forno
4.1. Grill
4.2. Forno Elettrico
4.3. Suggerimenti Di Cottura Per Il Forno Elettrico
4.4. Funzione Pizza
4.5. Preparazione Di Torte
4.6. Cottura Della Carne
4.7. Cottura Del Pesce
4.8. Girarrosto
4.9. Uso Del Contaminuti
4.10. Uso Del Temporizzatore
4.11. Forno A Gas
4.12. Utilizzo Del Programmatore Elettronico
4.13. Tabelle Di Cottura
5. Pulizia E Manutenzione
5.1. Forno Catalitico Autopulente
6. Centri Assistenza E Risoluzione Dei Problemi
7. Protezione Dell'ambiente
IT
......................................................................................... 41
1................................................................... 4
1............................................................................ 4
1...................................................................... 4
1........................................................................................... 4
......................................................................................................15
..............................................15
...............................................................................................15
..................................................................................15
...................................................................................16
........................................................................16
.....................................................................16
......................................................................................17
...............................................................17
....................................................................18
...................................18
..................................................18
.........................................18
..........................................19
..................................................................................................20
..................................................................................................................20
................................................................................................20
................................................21
...............................................................................................21
.....................................................................................21
........................................................................................21
...........................................................................................21
........................................................................................................22
.......................................................................................22
................................................................................22
..................................................................................................22
........................................................22
.........................................................................................23
...................................................................................24
...........................................................................24
.............................................24
................................................................................24
SOMMAIRE
1. Recommandations
1.1. Symboles Utilisés Dans La Notice
1.2. Déclaration De Conformité
1.3. Consignes De Sécurite
1.4. Conseils Utiles
2. Installation
2.1. Environnement Dans Lequel L'appareil Doit Être Installé
2.2. Positionnement
2.3. Réglage Des Pieds
2.4. Raccordement Electrique
2.5. Cuisinière Livrée Avec Cordon D'alimentation
2.6. Cuisiniere Livree Sans Cordon D'alimentation
2.7. Raccordement Gaz
2.8. Modification Pour Type De Gaz Différent
2.9. Dimensions De L'appareil
2.10. Aspect Général Et Definition De L'appareil
3. Utilisation Des Brûleurs
3.1. Utilisation Des Brûleurs De La Table De Cuisson
3.2. Utilisation Des Plaques Electriques Sur De La Table De Cuisson
4. Utilisation
4.1. Utilisation Du Four Grill
4.2. Four Electrique
4.3. Suggestions De Cuisson Au Four Electrique
4.4. Cuisson Pizza
4.5. Preparation De Gateaux
4.6. Cuisson De La Viande
4.7. Cuisson Du Poisson
4.8. Cuisson Au Tournebroche
4.9. Utilisation De La Minuterie
4.10. Utilisation Des Bruleurs A Gaz De La Table De Cuisson
4.11. Four A Gaz
4.12. Utilisation Du Programmateur Electronique
4.13. Tableau De Cuisson
5. Nettoyage Et Maintenance
5.1. Four Catalitique Autonettoyant
6. Centre D'assistance Technique Et Résolution Des Problèmes
7. Protection De L’environnement
FR
..........................................................................................25
.................................................................25
.............................................................................25
..................................................................................25
...............................................................................................25
.......................................................................................................26
..............................26
..............................................................................................26
........................................................................................26
..............................................................................27
...............................................27
...............................................27
........................................................................................28
.......................................................28
..............................................................................29
...................................................29
.................................................................................30
..........................................30
.................30
.........................................................................................................31
..................................................................................31
...............................................................................................31
.................................................32
................................................................................................32
................................................................................32
....................................................................................32
.......................................................................................32
.............................................................................33
.............................................................................33
..............................33
....................................................................................................33
..................................................33
.....................................................................................34
............................................................................35
......................................................................35
..................36
....................................................................36

WARNING: The appliance and its accessible parts become hot during use. Care should be taken to avoid
touching heating elements.
• Children under 8 Year of age must be kept away from the appliance unless they are continuously
supervised.
• This appliance can be used by children aged from 8 years and above and persons with reduced
physical, sensory or mental capabilities or lack of experience and knowledge if they have been given
supervision or instruction concerning use of the appliance in a safe way and understand the hazards
involved.
• Children must not play with the appliance.
• Cleaning and user maintenance shall not be made by children without supervision.
WARNING: Unattended cooking on a hob with fat or oil can be dangerous and may result in fire.
NEVER try to extinguish a fire with water, but switch off the appliance and then cover flame e.g. with a lid
or a fire blanket.
WARNING: Danger of fire: do not store items on the cooking surfaces.
• During use the appliance becomes hot. Care should be taken to avoid touching heating elements inside
the oven.
WARNING:Accessible parts may become hot during use. Young children must be kept away.
• Do not use harsh abrasive cleaners or sharp metal scrapers to clean the oven door glass since they can
scratch the surface, which may result in shattering of the glass.
• The internal bottom surface of the drawer can get hot.
• The oven must be switched off before removing the guard, after cleaning, the guard must be replaced in
accordance with the instructions.
• Only use the temperature probe recommended for this oven.
• Do not use a steam cleaner for cleaning operations
•Any spillage should be removed from the lid before opening.
• The hob surface must be allowed to cool down before closing the lid.
WARNING: Avoid possibility of electric shock - ensure the appliance is switched off before replacing the
lamp.
• If the range is placed on a base, measures must to be taken to prevent the appliance slipping off the
base.
• The means for disconnection must be incorporated in the fixed wiring in accordance with the wiring
rules.
• The instructions state the type of cord to be used, taking into account the temperature of the rear surface
of the appliance.
• If the supply cord is damaged, it must be replaced by a special cord or assembly available from the
manufacturer or its service agent.
CAUTION: In order to avoid a hazard due to inadvertent resetting of the thermal cutout, this appliance
must not be supplied through an external switching device, such as a timer, or connected to a circuit that
is regularly switched on and off by the utility.
• This appliance must be installed in accordance with the regulations in force and only used in a well
ventilated space. Read the instructions before installing or using this appliance.
• These instructions are only valid if the country symbol appears on the appliance. If the symbol does not
appear on the appliance, it is necessary to refer to the technical instructions which will provide the
necessary instructions concerning modification of the appliance to the conditions of use of the country".
• Prior to installation, ensure that the local distribution conditions (nature of the gas and gas pressure) and
the adjustment of the appliance are compatible.
• The adjustment conditions for this appliance are stated on the label (or data plate).
• This appliance is not connected to a combustion products evacuation device. It shall be installed and
connected in accordance with current installation regulations. Particular attention shall be given to the
relevant requirements regarding ventilation.
• The use of a gas cooking appliance results in the production of heat and moisture in the room in which it
is installed. Ensure that the kitchen is well ventilated: keep natural ventilation holes open or install a
mechanical ventilation device (mechanical extractor hood). Prolonged intensive use of the appliance
may call for additional ventilation, for example opening of a window, or more effective ventilation, for
example increasing the level of mechanical ventilation where present.
CAUTION:Accessible parts may be hot when the grill is in use.Young children must be kept away".
SAFETY INSTRUCTIONS
04 GB

05 GB
1. GENERAL WARNINGS
Thank you for choosing one of our products. To get the most out of
your cooker we recommend that you:
•Read the notes in this manual carefully: they contain important
instructions on how to install, use and service this cooker in safety
Keep this booklet in a safe place for easy, future reference.
•In the case of the sale or transfer of the appliance, this manual should
be given together with the appliance in order to guarantee the proper
transfer of the information on installation/usage of the appliance and
the relative warnings .
•Take care to not touch these elements. When the cooker is first
switched on it may give off acrid smelling fumes this smoke is-
harmless we suggest to operate the cookers for 2 hours while empty.
These instructions are only valid if the country symbol appears on the
appliance. If the symbol does not appear on the appliance, it is
necessary to refer to the technical instructions which will provide the
necessary instructions concerning modification of the appliance to the
conditions of use of the country.
1.1. SYMBOLS USED IN THIS USER MANUAL
For easier comprehension, the symbols below are used in this user
manual.
Safety Information
Information for Environment Protection
This appliance complies with the EU E.E.C directives.
1.2. DECLARATION OF COMPLIANCE
All parts of this appliance that may come into contact with foodstuffs
comply with the provisions of EEC Directive 89/109. The appliance
complies with European Directives 73/23/EEC, 89/336/EEC and
90/396/EEC, replaced by 2006/EC, 2004/108/EC and 2003/55/EC,
and subsequent amendments. The appliance also complies with
93/68 General Directives and subsequent amendments.
1.3. SAFETY HINTS
•The cooker must be used only for the purpose for which it was
designed: it must only be used for cooking food. Any other use, e.g. as
a form of heating, is improper use of the cooker and is therefore
dangerous.
•The manufacturers cannot be held responsible for any damage
caused by improper, incorrect or unreasonable use.
•When using any electrical appliance you must follow a few basic
rules. If the appliance breaks down or develops a fault switch it off,
disconnect it from mains, do not touch it, call the authorised Service.
•Children less than 8 years of age shall be kept away unless
continuously supervised.
•This appliance can be used by children aged from 8 years and above
and persons with reduced physical, sensory or mental capabilities or
lack of experience and knowledge if they have been given supervision
or instruction concerning use of the appliance in a safe way and
understand the hazards involved.
•Always use gloves to remove food from the oven.
•Always keep your appliance clean, for safety and health reasons. Fat
and food residues may cause fire.
•Any spillage should be removed from the lid before opening.
•The hob surface should be allowed to cool down before closing the
lid.
•Do not insert your hand between oven and the upper lid hinges. Keep
children away.
CAUTION: Accessible parts may be hot when the grill is in use. Young
children should be kept away.
•Make sure that all the knobs are in the OFF position when the
appliance is not in use.
•The oven drawer is to store empty trays or to keep food warm.
•Do not put flammable, explosive or cleaning materials like nylon
bags, paper, cloths, etc, into the drawer.
•Use only heat resistant pots and pans . Do not use flammable
materials.
•It is dangerous to modify or to attempt to modify the properties of
the appliance.
•Particular attention is necessary when you are frying: do not leave the
appliance unattended.
•The appliance is heavy. Take care when moving.
NEVER try to extinguish a fire with water, but switch off the appliance
and then cover flame e.g. with a lid or a fire blanket.
WARNING: Danger of fire: do not store items on the cooking surfaces.
• The emission of hot air is normal while the appliance is working. Do
not close the vents on the oven.
•Some spillage on the appliance may occur, when placing food on or
into the appliance or when removing food with excess fat or water.
Clean such residues immediately after cooking, in order to prevent
unpleasant smells and possible fires.
•Either reduce the flame or shut down the burners, before removing
pans.
•ARNINGW ! Heat and humidity are produced in the area where
appliances which burn gaseous fuels are used. Special attention must
be paid for correct aeration of the environment: if natura ventilation is
inexistent or insufficient, an extractor fan must be installed. If in doubt,
please apply to a Service for advice.GIAS
•When using any electrical appliance you must follow a few basic
rules:
*It is not generally a good idea to use adapters, multiple sockets for
several plugs and cable extension.
*Do not pull the power cable to remove the plug from the socket.
*Do not touch the oven with wet or damp hands or feet.
*If the main cable is damaged it must be replaced promptly:
*When replacing the cable, follow the instructions given below:
*Cable replacement must be carried out by qualified technicians. Use
only an approved service centre for repairs end ensure that only
original parts are used.
*When necessary, remove the power cable and replace it with one of
the H05RR-F, H05VVF, and H05V2V2-F type. The cable have the
capacity for the electrical current required by the product.
•Check the flexible gas connection pipe periodically.
•The gas inlet hose must be kept away from the hot parts of the oven
and must not come into contact with the oven. You can move the gas
inlet connector to the left or to the right of the oven. After such a
modification, check for possible gas leakage with a soapy solution.
•After attaching the gas pipe to the connector, anchor it firmly with a
clamp. Particular attention must be paid for gas leakage: check with a
soapy solution.
•Do not leave the appliance unattended before it has cooled down.
If your appliance has a top lid, it is designed for either protecting the
cook top against dust when it is not functioning or to prevent against oil
spillage during cooking.
•Do not use the lid for other purposes.
•ATTENTION! (For models with glass lid) The glass lid can break if it is
exposed an excessive heat. Always check that the burners are off
before closing the lid.
•Do not use deformed or unbalanced pans.
•Clean the grill and the fat collecting tray carefully before initial usage.
•When using cleaning sprays, do not spray on heaters or on the
thermostat.
•Make sure that oven shelves are correctly placed.
•Light the burner before placing the pan on top for quicker ignition.
•Check the burner for a normal flame.
•Do not cover oven parts with aluminium foil.
1.4. USEFUL TIPS
If the above instructions are not adhered to, the
manufacturer cannot guarantee the safety of the cooker.

06 GB
2. INSTALLATION
Installation have to be made by qualified personnel. The manufacturer
have no obligation to carry this out. If the assistance of the manufacturer is
required to rectify faults arising from incorrect installation, this assistance
is not covered by the guarantee.
The installation instructions for professionally qualified personnel must be
followed. Incorrect installation may cause harm or injury to people,
animals or belongings. The manufacturer cannot be held responsible for
such harm or injury.
WARNING! Care must be taken regarding where the appliance is placed!
It can only be installed in a continuously ventilated room.
Electrical connections must always be disconnected before any repair,
installation or modification.
The use of a gas cooking appliance results in the production of heat and
moisture in the room in which it is installed. Ensure that the kitchen is well
ventilated: keep natural ventilation holes open or install a mechanical
ventilation device (mechanical extractor hood). Prolonged intensive use
of the appliance may call for additional ventilation, for example opening of
a window, or more effective ventilation, for example increasing the level of
mechanical ventilation where present.
•Before positioning your appliance, check the properties of the energy
supply (gas type, gas pressure) and make sure that your appliance is
regulated accordingly.
•This appliance must not be connected to the exhaust system of any
equipment running on other fuel.
•The appliance must not be installed near flammable materials (e.g.
furniture, curtains, etc.)
•If the range is placed on a base, measures have to be taken to prevent the
appliance slipping from the base.
CAUTION: In order to avoid a hazard due to inadvertent resetting of the
thermal cutout, this appliance must not be supplied through an external
switching device, such as a timer, or connected to a circuit that is regularly
switched on and off by the utility.
•This grill(s) should be constructed so that it cannot be closed from
either side and positioned preferably near the floor. Grill(s) must not be
placed across the channels through which combustion gases and
exhausted fumes pass.
•If it is impossible to install grilled air vents in the room where the
appliance is installed, the air needed can also be supplied from an
adjacent room providing it is not a bedroom or a room where an air
current could cause danger.
2.1. ENVIRONMENT THE APPLIANCE
SHOULD BE PLACED
•The appliance must not be placed on a base
•There must be sufficient natural air ventilation in the room for gas
combustion for the appliance to function correctly.
•The air flow should enter through grilled air vents in the outer walls.
•Air grills must have a cross section of 100 cm² for the passage of air and
for appliances with a flame safety device. For appliances with no flame
safety device, this cross section should be 200 cm². (Single or multiple
grills can be used)
Emission of Combustion Gases
•Combustion gases from cooking appliances must be released directly out
of doors or via a hood connected to a chimney or flue (Figure 1)
•If it is impossible to install a hood, an electric extraction fan should be fitted
in a wall or a window opening out of doors (Figure 2)
•Extractor fans should have a capacity of replacing kitchen air 3- 5 times
per hour.
Figure 1 Figure 2
2.3. FEET ADJUSTMENT
2.2. POSITIONING
This appliance is of the "X" type and it has been designed on the
presumption that the adjacent work tops will be no higher than the
cook top surface.
This appliance is class 2.1
750 mm
400 mm
200 mm 200 mm
•The maximum height of cooker will be 868mm by fixing the adjustable
front feet and rear wheels to the 4th hole.
•Rear wheels should be fixed to the 2nd hole (pictureA1), standard
height. Thus, standard height will be 850 mm.
Adjustable feet.
CB
4
3
2
1
A A1 A2
Your appliance has adjustable feet at the lower corners of its chassis.
•The feet can be adjusted individually with the aid of a wrench to
guarantee that the oven is perfectly balanced and levelled, so that any
liquids in the pans is horizontal .
Adjustable feet and wheels.

2.4. ELECTRICAL CONNECTION
Cookers can be presented with or without enrgy cable. Cable
connection should be done by Autorited service according to
following instructions.
The electrical connection must be made according to the standards
and regulations in force. Before making the electrical connection,
check the following:
•Is the capacity of the electrical connections and safety fuses in the
building sufficient to cope with the load of the appliance? (Check with
the adhesive info label)
•Does the electricity supply line have an earth connection conforming
with the standards in force? A proper earth connection must exist in
your home. If there is not a proper earth connection at your home,
please apply to an authorized technician to deal with this problem.
•Is the socket or the multi-pole switch at a easily reachable point after
the installation of the appliance?
•A plug conforming to standards should be connected to the mains
cable and the cable should be inserted into a safe socket.
•A multi-pole switch must be used between the appliance and the
electricity line if a direct electrical connection to the appliance is
required. (It must comply with standards and be appropriate for the
load)
The green-yellow ground cable must not be interrupted by a switch.
The brown phase cable (from the “L" coded connector of the oven)
must always be connected to the phase line of the mains.
•The power line must be positioned so that it is not exposed to
temperatures higher than 50° C.
•When the power cable must be changed, a cable with a cross section
appropriate to the indicated power must be used. The green-yellow
ground cable should be approximately 2 cm longer than phase and
neutral cables.
•Check the heaters by switching them on for 3 minutes, after having
completed the connection.
•The manufacturer will not accept responsibility for damages
arising due to non-compliance with the safety standards.
•For the direct connection to the fixed wiring, it’s nessessary to provide
means for disconnection from the supply mains having a contact
separation in all poles that provide full disconnection under
overvoltage category III conditions, in accordance with the wiring
rules
2.5. COOKERS WITH ENERGY CABLE
•Connection is exclusively envisaged under tensions of 220-240V
Between phases or between phases and neutral.
Neutral
(blue)
Ground cable (Green-Yellow)
Phase cable
(brown)
•The eventual replacement of the supply cord must be carried on by
the After Sales Service or by an agreed engineer, with a cord whose
characteristics must be similar to the original one
07 GB
Model rated
power (kW)
Rated Voltage
(V) Rated Current
(A) Supply Cable
2.3 kW
3.5 kW
4.0 kW
220 - 240 V
220 - 240 V
220 - 240 V
9.1 A
15.9 A
18.2 A
3 x 1.0 mm2
3 x 1.5 mm2
3 x 2.5 mm2
Ratings/Supply Cable Sections:
Cable box connection types
1- Monophase connection 2- Three-phase connection
Attention: A poor clamping can draw away risks dangerous
heating at the level of the cable feeding
2.6. COOKERS WITHOUT ENERGY CABLE
Cable - Section
Cable - Type
Monophase
220-240 V~
Two-phase
380-415V2N~
3 G 2.5 mm2
H05VV-F
H05RR-F
L1 : Phase
shunt 1-2 and
shunt 2-3
N : Neutral
shunt 4-5
PE Earth
1 Phase
2 Phase
5 Neutral
shunt 4-5
PE Earth
4 G 1.5 mm2
H05VV-F
H05RR-F
Three-phase
380-415V3N~
1 Phase
2 Phase
3 Phase
5 Neutral
shunt 4-5
PE Earth
5 G 1.5 mm2
H05VV-F
H05RR-F

The gas must be connected to the appliance according to standard
and the provisions in force.
•When the appliance left the factory, it was regulated for the gas type
stated on the adhesive info label near the gas inlet at the back of the
appliance.
Make sure that you are using the gas stated on the label. If it is a
different type of gas, follow the instructions in the chapter on
conversion to different gas types'.
•Make sure that gas supply pressure is that given in the gas type
category table (Last 3 pages in this user manual) in order to achieve
maximum efficiency and lowest consumption. If the gas pressure is
different, a proper gas regulator should be used on the gas inlet. The
use of a gas regulator complying with the standards for LPG is
allowed.
Connection with a Solid or Flexible Metal Pipe
•The gas supply can be connected by a proper flexible stainless steel
pipe according to the safety standards in force. In this case, there will
be no further need to move the appliance. The gas inlet connector of
the appliance is Gc ½.
Connection with a Flexible Non-metallic Pipe
•If the gas connection is in a position where it can be switched on and
off when required, a flexible pipe complying with the standards in force
can be used. The flexible pipe must be firmly fixed with a clamp.
•The flexible pipe can be connected as follows:
•Since the flexible pipe will be placed behind the oven, it should be
exposed to temperatures no higher than 30ºC at any point.
•The length should be no longer than 150 cm.
•It must not be exposed to steam.
•No folding, bending or tension is allowed.
•It should be protected against sharp or piercing objects.
•It must be accessible in order to allow for periodic inspection.
•The flexible pipe must be checked as follows to guard against wear
over time:
•Check that there are no cracks, cuts or burned spots on or at the ends
of the pipe.
•The material must maintain its flexibility . Excessive rigidity is not
allowed.
•There must be no rust on the clamps.
•It should be replaced in any case after no more than 5 years' usage.
Check all connections for leaks with a soapy substance
after the installation is completed. Do not use a flame
for to check gas leaks.
RIGHT
FLEXIBLE GAS PIPE LINE
ELECTRICAL CABLE
WRONG
FLEXIBLE GAS PIPE LINE
ELECTRICAL CABLE
2.7. GAS CONNECTION
For the cookers below written adjustment have to be done by qualified
technician.
Follow the steps given below to convert the appliance from the factory
set up to that for a different gas type.
Cookers are adjusted NG and connection type
is cylindric (1). For hose type NG connection,
hose adapter (2) can be fixed to cylindrical
adapter with seal.
For LPG connection, LPG hose adapter (3) can
be fixed to cylindric adapter with seal.
Adjustments and changing injectors
Changing Injectors
•Remove grates.
•Remove burner caps and burners.
•Remove injectors by using a 7 mm wrench, then screw on the correct
injector selected from gas type category table
(last 3 pages in this user manual) according to
the gas to be used.
•Follow the above steps in the reverse order
after completing the assembly of the new
injector.
Stand byAdjustment
S for the cookerstand by adjustment
without safety devices and with safety devices and button
ingition
•Turn the burner control knob to the small flame position and remove
the knob.
•If conversion from natural gas to LPG is required, turn clockwise the
by-pass screw of the gas valves with a screw driver to their final
position.
•If conversion from LPG to natural gas is required, turn anti-clockwise
the by-pass screw of the gas valves with a screw driver till a smaller
flame of ¼ size is obtained.
•After completing the adjustment, insert the knobs again.
•Check the adjustment by turning the burner control knob quickly from
maximum to minimum position. If the flame does not go out, it means
that the adjustment is correct.
•For safety devices, idle flame setting can be done with screw on valve
body. If there is ignition on the knob for idle flame setting cooktop,
toplid and panel must be removed.
2
3
2.8. CONVERSION FOR DIFFERENT GAS TYPES
1
By-pass screw for the burner
without safety
devices
Gas Oven
•Remove rear cover ( Figure3)
•Remove adapter.(Figure 4)injector
•Remove injectors by using a 7 mm wrench, then screw on the correct
injector selected from gas type category table (last 3 pages in this
user manual) according to the gas to be used. (Figure 5)
•Follow the above steps in the reverse order after completing the
assembly of the new injector.
•Burner Gap is 4.5 + 0.3 mm for NG and LPG (Figure 6)
Figure3 Figure4
safety devices
•For thermostat valve idle frame setting cooktop, top lid and panel
must be removed.
08 GB

4.5 + 0.3
Figure5 Figure6
09 GB
2.9. DIMENSIONS OF THE APPLIANCE
Height (mm)
Width (mm)
Depth (mm)
850
598-600
600
60 x 60
W
D
H
863
510
600
50 x 60
2.10. GENERAL APPEARANCE AND DEFINITION
OF THE APPLIANCE
This User Manual has been drawn up as a guide for several models.
Some of the properties mentioned in this manual may not exist in your
appliance.
1-
2-
3-
4-
5-
6-
7-
8-
9-
10-
11-
12-
13-
14-
15-
16-
17-
18-
Cook top
C panelontrol
Drawer
Oven door (Front door)
Glass top lid or metallic top lid
burnerAuxilary
burner burnerRapid (Semi-Rapid )
burnerUltra rapid burner (Rapid )
Semi-Rapid burner
Left grate
Right grate
Burner control knobs s
Thermostat oven knob
Ignition button or fan button
Lamp knob
Timer knob
Moving Foot (Adjustable Feet)
Bolt Foo t(Adjustable Feet)
9
10
11
14
15
13
12
16
17
18
17
18
1-
2-
3-
4-
5-
6-
7-
8-
9-
10-
11-
12-
13-
14-
15-
16-
17-
18-
Cook top
panelControl
Drawer
Oven door (Front door)
Metallic top lid or Glass top lid
Auxilary burner
burner burnerRapid (Semi-Rapid )
burnerUltra rapid burner (Rapid )
Hot plate
Left grate
Right grate
Burner control knobs s
Hot plate control knob
Thermostat oven knob
Ignition button or fan button
Signal lamp
Moving Foot (Adjustable Feet)
Bolt Foot (Adjustable Feet)
1-
2-
3-
4-
5-
6-
7-
8-
9-
10-
11-
12-
13-
14-
15-
Cook top
panelControl
Drawer
Oven door (Front door)
Metallic top lid or Glass top lid
burnerAuxilary
burnerRapid
ot plateH
ot plateH
Right grate
Burner control knobs s
Hot plate control knobs s
Thermostat oven knob
Ignition button or fan button
Signal lamp
1-
2-
3-
4-
5-
6-
7-
8-
9-
10-
Cook top
Control panel
Drawer
Oven door (Front door)
Metallic top lid or Glass top lid
Hot plate
Hot plate
Hot plate control knobs
Thermostat oven knob
Signal lamp
3. USE OF COOKTOP BURNERS
The knobs which control the burners are positioned on the control
panel.
3.1. GAS BURNERSUSE OF COOKTOP
Figure 7

10 GB
Off Position
When the knob is turned so that the 'dot' symbol faces towards
the panel, it is in the Off position and the gas valve is closed and
the flame will go out.
Maximum Gas Flow
Press the burner knob and turn it to the left till the 'dot' symbol
faces towards the large flame symbol.
The flame is on full at this position.
In this position, the gas valve is completely open.
Minimum Gas Flow
The flame can be decreased by turning the knob so that the 'dot'
symbol faces towards the small flame symbol. The valve will be
partially open and the burner will then be on low.
A- Burner Lid
- BurnerB
- ElectrodeC
- Injector ( Jet )D
E- Burner body
- Safety deviceF
A
B
C
D
E
F
Figure 8
Ignition of the Burners
Cooktop Gas Burners
The burner must be ignited before a pan is placed over it.
For models with automatic ignition, the 'spark' button must be
pressed.
Press the knob controlling the burner you want to ignite and then turn it
left to the big flame symbol. Press the ignition button. On models with
ignition-thru knobs, press and turn the knob controlling the burner you
want to ignite as far as the star symbol; the electrode will be
automatically activated. All the electrodes will be activated
automatically and the burner to which gas is supplied (that relative to
the knob pressed) will ignite.
Oven Gas Burners
The button must not be kept pressed down for more than 15 sec. If the
burner has not ignited after 15 sec. release the button and open the
compartment door and/or wait at least 1min. before attempting again.
For other models the gas is ignited by means of the control knobs.
Make sure that the gas is actually burning after this
step! If there is no flame, repeat the procedure
After ignition, adjust the flame to the size required.
Manual ignition (if the electricity supply is not available)
Hold a flame (a match or a lit taper or a hand-operated gas lighter),
near the burner.
WARNING! to wait 1 minute between two ignition tentative.
Press and turn the knob of the burner you want to ignite as far as the
large flame symbol. If the burner does not catch fire at the first attempt,
try again pressing the knob a little longer. When the burner is lit, adjust
the flame to the required level.
If the burner does not light after several attempts, check the correct
position of the burner and its cap.
Turn the knob clockwise to the “ position in order to close the gasO”
flow. If the burner accidentally stops burning, wait at least one minute
before attempting to relight it.
Some cookers have a flame safety device (see the picture above,
safety device F). If the flame goes out, the gas supply is automatically
cut off.
Minimum and maximum diameters of the cooking pan bases :
Burner
Auxiliary Burner
Semi Rapid Burner
Rapid Burner
Ultra rapid Burner
Min. Diameter [mm]
Ø 240 mm
180Ø mm
120Ø mm
240Ø mm
Max. Diameter [mm]
280Ø mm
240Ø mm
180Ø mm
280Ø mm
•The outer surface of the flame is hotter than the inner part. The tips of
the flames must touch the bottom of the pan. Flames extending
outside the pan cause unnecessary gas consumption.
•Gas burners, unlike the electrical hot plates, do not need flat
bottomed pans. Flames touching the base of the pan conduct the heat
completely.
•Although there is no need for special pans for gas burners, pans
made of thinner material conduct the heat faster than those in thicker
material.
•Some parts of the food may be heated while others remain cold due
to the uneven distribution of heat under the pan. Therefore,
continuous stirring of the food being cooked is necessary in the case
of thin-bottomed pans. Heat is more effectively and evenly distributed
with thick-based pans.
•Use of very small pans is not recommended. Wider, low-sided pans
are more suitable for more effective and quicker cooking than small,
deep pans.
•You cannot shorten cooking time by using a small pan over a large
burner. You will only waste gas in this way. However, a pan with a lid
will save energy.
Turn the knob to the position for the required temperature of the hot
plate. The indicator light of the hot plate will come on and the hot plate
will start to heat.
When cooking is completed, turn the knob to the position. Do not“O”
leave the hot plate turned on without a pan on it. The diameter and the
base of the pan you use is critical. The m mum diameter of the panini
base is 14 cm and the base should be flat.
Leave the hot plate to heat up for 5 minutes before placing a pan on it
the first time you use it. This will allow the heat resistant coating of the
plate to harden due to burning.
Use a wet cloth and detergent for cleaning the hot plates. Do not
remove food residues from the hot plates with a knife or any other
hard, sharp object.
Turn on the hot plate for a few moments to dry it after cleaning.
However, it must never be left on for more than a few moments without
a pan on top.
3.2. USE OF COOKTOP ELECTRICAL PLATES

11 GB
This is especially important for pans used for roasting or pressurized
cooking at high temperature.
Do not leave burners unattended without a pan or with an empty pan
on top.
Check the suitability of cooking pans with respect to the following
criteria;
They should be heavy.
They should completely cover the burner surface; they may be a little
bigger but no smaller.
Base surfaces should be completely flat and fit well on the cooking
surface.
•For the best use of the electric hotplates and to minimize energy
consumption, only pans with smooth flat bases should be used. The
size of the pan should be as close as possible to the diameter of the
hotplate, and never smaller. The base of the pan should be dry and
spillage should be avoided. Empty pans must not be left on the plates,
and the plates should not be left switched on without a pan.
Figure 11
Figure 12
Suitability of Cooking Pans
Keep in mind that larger pans have larger heating surfaces.
This will help them to cook the food faster than pans with smaller
heating surfaces.
Always use pan sizes proportionate to the amount of the food to be
cooked. In order to prevent splashing, do not use very small pans,
especially for foods with excess liquid. If you use excessively large
pans for quick cooked foods, sausages and liquids will stick and
residues will remain attached to the pan after being emptied.
Closed pans and baking trays or oulds are suggested for cookingm
sweets. Splashed sugar and juices from an open pan may stick to the
cooker surface and will be difficult to remove.
Figure 9 Figure 10
1
2
3
5
6
Hilight
4
Explanation
Off
Heating
Cooking at low temperature
Cooking, Roasting, Boiling
Power
(Watt)
Posi iont
0
1
2
3
4
5
6
0
100 W
180 W
250 W
500 W
750 W
1000 W
0
135 W
220 W
300 W
850 W
1150 W
1500 W
0
175 W
220 W
300 W
850 W
1150 W
2000 W
Power
(Watt) Power
(Watt)
4. USE OF THE OVEN
•Meat and fish that is going to be grilled should first be lightly doused with
oil.
•Place a fat collecting tray beneath during grilling. Put some water into the
tray to prevent unpleasant smells and to prevent the fat catching fire.
•Grilling is usually preferred for cooking pieces of meat, for example
steaks, which are not too thick, different sized meat parts, cleaved hunted
birds, fish, some vegetables (e.g. courgettes, aubergines, tomatoes, etc.)
together with meat and fish products on spits.
Oil the fish lightly before putting it directly under the grill.
Add salt on meat after cooking, salt fish into the cleavage before cooking.
•The distance from the grill will depend on the thickness of the meat or fish.
If the distance is correctly judged, the outer parts will not be burnt and the
inside will not remain raw.
•Prevent unpleasant odours and smoke caused by dripping fats and
sauces by pouring 1-2 glass of water into the fat-collecting tray.
•You can also use the grill for toasting, toasted bread or sandwiches, for
example, and also to cook certain fruits (bananas, grapefruit or pineapple
slices, apples etc.). However, fruit must not come into contact with the
heating elements.
Never cover oven inner walls or the bottom with
aluminium foil. Accumulated heat can damage the oven
enamel and your meal.
While the oven functions are running, top lid of the
cooktop must be open position.
4.1. GRILLING
Oven Function
Position
Not in function
Grill heater
Lower and upper heating element
Lower heating element
Manual
Pizza
Upper heating element
Lamp
Grill heater and fan
Fan
Lower heating element and fan
Upper heating element and fan
Upper heating element, lower heating element and fan
Turn spit and grill heater
Function
Cooking time
Temperature
4.2. ELECTRIC OVEN
ELECTRIC GRILL: Use with closed door
ONLY
GAS GRILL: It can be used with open door
WITH panel protector inserted under control
panel, as in picture.
•Grilling gives food a rich brown colour
quickly. Depending on the quantity of the
food, you can switch the grill on to different
positions. Almost all food can be cooked
under the grill except for very lean game and
meat rolls.

•Unless otherwise suggested, preheat the oven for at least 10 minutes
before use. Do not open the oven door when cooking cakes otherwise
they will not rise (cakes or dishes with yeast and soufflés). The blast of
cold air which will enter the oven will prevent rising. You can check
whether cakes are properly cooked by inserting a rod into the dough. If
the rod comes out dry when you pull it out, it means that the cake is
properly cooked. Do not check in this way until at least three quarters
of the cooking time has elapsed.
Please keep in mind the following tips
•If the surface of the food is cooked well but it is still raw or partly raw
inside, it must be cooked longer at a lower temperature.
•On the other hand, if the surface of the food is too dry, it should be
cooked at a higher temperature for a shorter time.
4.5. COOKING CAKES
•The minimum quantity of meat to be cooked in the oven is 1 kg.
Otherwise, the meat will be too dry.
If you require well done meat, use less fat. If meat has a little fat, there
is no need to use oil. If one side of the meat is fatty, place this side up.
The melted fat will sufficiently grease the part below. Red meats
should be taken out of the fridge at least 1 hour before the cooking.
•Otherwise the meat may become tough due to the temperature
difference. Do not use salt before cooking, especially when grilling
meat. Salt will draw the blood and juices out of the meat which will
consequently prevent the roasting of the upper surface of the meat.
•Add salt to roast meat only after half of the cooking time has elapsed.
•Place the meat to be roasted in a wide, shallow pan.
•Deep sided containers / pans act as a shield against the heat. Meat
can be placed in the oven in a heat resistant pan or directly onto the
grill. Insert a fat / gravy collecting tray beneath the grill. Sauces must
be added at the beginning if the food is cooked for a short time, while it
would be better to add sauces in the last half hour if the food is cooked
for a longer time.
4.6. COOKING MEATS
Small fish can be cooked at the maximum temperature from start to
finish. Medium sized fish must be cooked at the maximum
temperature at the beginning and then the temperature must be slowly
reduced. Larger fish must be cooked at lower temperatures from start
to finish. Check the cut at the bottom of fish to understand whether it is
cooked properly. In order to understand whether the fish properly
grilled or not, check the cleavage at the bottom of the fish. The colour
(for grilled fish) should be an even matt white. This is not the case for
salmon and trout.
4.7. COOKING FISH
4.3. ELECTRIC OVEN SUGGESTIONS FOR
COOKING
Traditional Cooking
Heat is generated from the upper and lower heaters. Generally, the
middle shelf position is preferable for cooking. However, if the top or
bottom surface of the food must be cooked more, place it on the upper
or lower shelf.
Convection Cooking (with Fan)
•The food is cooked by evenly distributed preheated air blown into the
oven by the help of the fan located on the inside back wall of the oven.
It is possible to cook several dishes simultaneously on different
shelves thanks to the evenly distributed heat inside the oven.
•This type of oven is also very useful for defrosting frozen food. It can
also be used for sterilizing canned food, preparing fruit syrups, and
dehydrating fruits and mushrooms.
•Thermostat setting at maximum
•P min minreheating time 15 (20 if possible)
•Position of the tray in either one of the two lowest position
•Cooking time 20 min.
4.4. PIZZACOOKING
12 GB

The oven temperature and heater can be
selected by turning the oven adjustment
knob to the desired temperature level.
The oven thermostat range is: 140-
2 °C.70
Some cookers have flame safety device
on burners. If the flame goes out, the gas
supply is automatically cut off.
4.11. GAS OVEN
•The cooker is equipped with a metal turnspit, two forks and a hook
used to support the spit.
•Instruction for use:
-Remove all accessories from the oven;
-put the deep pan on the bottom of the oven or on the lowest bench;
-stick the turnspit through the meat, centered between the two forks;
-Fix the turnspit into the drive hole located in the bottom wall, then
hang
the support hook in the drive located at the top front of the oven cavity
and around the edge of the turnspit
•Preheating is not necessary with the turnspit.
•Cooking Time Recommended in turnspit Position
4.8. COOKING TURN SPIT
Cooking time (min)
Gas Oven Electric oven
Beef (1kg)
Lamb sheep, (1kg)
Veal, Poultry (1kg)
Por (1 kg)k
25/35
35/45
65/75
60/70
20/30
30/40
60/70
65/75
Type of food
4.10. USING THE END OF COOKING TIMER
This control enables to set the desired
cooking time (max. 90 min.) the oven will
automatically switch off at the end of the
set time.
The timer will count down from the set
time return to the “O” position and switch
off automatically.
For normal use of oven set the timer to
the position.
To set the oven ensure the timer is not on
the “O” position.
To set the cooking time, turn dial one
complete revolution and then position
the index to the required time. When the
time has lapsed, the signal will ring for a
few seconds.
4.9. ING THE MINUTE TIMERUS
• Press and hold the TIMER and END buttons ( and )
• Set time with buttons
• Release all buttons
ATTENTION the oven only operates if set on manual function or preset time.
N.B.: on some models the symbols are replaced by + and - .
•Sounds an alarm at the end of the
set time.
•To check how long is left to run
press the button
FUNCTION HOW TO ACTIVE HOW TO SWITCH IT OFF WHAT IT DOES WHAT IT IS FOR
MINUTE
MINDER
•Allows to use the oven as alarm clock (could be activated either with
operating the oven or with out operating the oven)
•Press and hold the
button
•Press the buttons
or to set the
equired time
•Release all the buttons
•For cooking the desired recipes
MANUAL
FUNCTION
•Turn the oven function
selector to position“O” •Enables you to operate the oven.
COOKING
TIME
•At the end of the cooking set time, the oven will switch off automatically
and an audible alarm will ring.
•When the time is elapsed
the oven will switch off
automatically. Should you
wish to stop cooking earlier
either turn the function
selector to 0, or set time to
0:00(TIMER and
buttons)
•It allows to preset the cooking
time required for the recipe
chosen.
•To check how long is left to run
press the TIMER button.
•To alter/change the preset time
press TIMER and buttons
END OF
COOKING
•This function is typically used with “cooking time” function. For example
if the dish has to be cooked for 45 minutes and needs to be ready by
12:30, simply select the required function, set the cooking time to 45
minutes and the end of cooking time to 12:30.
•Cooking will start automa-tically at 11:45 (12:30 minus 45 mins) and will
continue until the preset end of cooking time, when the oven will switch
itself off automatically
WARNING!
If the END of cooking is Selected without setting the length of cooking
time, the oven will start cooking Immediately and it will Stop at the END of
cooking time set.
•At the time set, the oven
will switch off. To switch off
manually, turn the oven
function selector to position
“O”.
•Enables you to set the end of
cooking time
•To check the preset time press
the END button
•To modify the preset time press
buttons END+
•Press and hold the
TIMER button
•Press the buttons
or to set the lenght
of cooking required
•Release all buttons
•Set the cooking
function with the oven
function selector
•Press the button
•Set the cooking
function with the oven
function selector
•Press and hold the
END button
•Press the buttons
to set the time at which
you wish the oven to
switch off
•Release the buttons
•Set the cooking
function with the oven
function selector
Setting the correct time:
•When the set time as
elapsed an audible alarm
is activated (this alarm will
stop on its own, however
it can be stopped
immediately by pressing
the button)
4.12. USE OF THE ELECTRONIC
PROGRAMMER
13 GB
50
40
30
20
10
Figure 13
90
80
70
60
50
40
30
20
10
Figure 14
Figure 15
150
180
210 240
Max
Min
WARNING : the first operation to carry out after the oven has been installed or
following the interruption of power supply (this is recognizable the display pulsating
and showing ) is setting the correct time. This is achieved as follows
In the programming of a timer with 5 buttons, for manual function, press "TIMER"
and "END" buttons simultaneously

4.13. COOKING TABLES
Traditional and HotAir Circulation Cooking Methods; Weights (Gr)
TYPE OF THE FOOD Traditional Cooking Method
4
3
2
1
Shelf Pozitions
Weight
(Gr) TYPE OF THE FOOD Traditional
Cooking
Method
Hot Air
Circulation
Method
Cooking
times
(Minutes) N O T E S
CAKES AND DESSERTS
Dough with stirred egg
Dough
Small Cakes
Cheese Cake
Apple Pie
Strudel
Jam tart
Small cakes
Biscuits
Cream cakes
2
1
2
1
1
2
2
2
2
2
180
180
180
175
180
175
180
180
180
100
2(1and3)
2(1and3)
2(1and3)
2
2(1and3)
2(1and3)
2(1an 3)d
2(1and3)
2(1and3)
2(1and3)
160
160
160
150
160
150
160
160
160
100
45 - 60
20 - 35
20 - 30
60 - 80
40 - 60
60 - 80
45 - 60
15 - 25
10 - 20
90 - 120
BREAD AND PIZZA
White Bread
Rye Bread
Sandwich
1
1
2
200
200
200
2
2
2(1and3)
175
175
175
45 ~ 60
30 ~ 45
20 ~ 35
Inside the closed oven on
dishes 8 pieces on a tray
Under the grill
1000
500
500
PASTRY
Macaroni
With vegetable
Small pastries
Lasagne
2
2
2
2
200
200
200
200
2(1and3)
2(1and3)
2(1and3)
2
175
175
175
175
40 ~ 50
45 ~ 60
35 ~ 45
45 ~ 60
1000
1200
1000
1500
1200
1000
4000
1500
3000
1200
MEATS
Roast beef
Roast pork
Roast veal
British style roast beef
Lamb
Chicken
Turkey
Duck
Goose
Rabbit
2
2
2
2
2
2
2
2
2
2
200
200
200
220
200
200
200
175
175
200
2
2
2
2
2
2
2
2
2
2
175
175
175
200
175
175
175
160
160
175
50 ~ 70
100 ~ 130
90 ~ 120
50 ~ 70
110 ~ 130
60 ~ 80
210 ~ 240
120 ~ 150
150 ~ 200
60 ~ 80
Cook on grill
Cook on grill
Cook on grill
Cook on grill
Leg
Full size
Full size
Full size
Full size
In parts
1000
800
FISH
Whole fish
Fillet
2
2
200
200
2(1and3)
2(1and3)
175
175
40 ~ 60
30 ~ 40
2 Fishes
4 Fillets
NOTE :
1) Cooking times do not include pre heating. Preheating the oven for about 10 minutes is advisable especially for cakes, pizzas and breads.
2) Indicates tray positions for cooking several dishes simultaneously.
3) All cooking operations must be carried out with oven door closed.
FOOD TYPES
QUANTITY COOKING ON GRILL COOKING TIMES
(Minutes)
Beefsteak
Grilled cutlet
Sausage
Chicken parts
Mixed grill
Milky desserts
Tomato slices
Fish fillets
Scallops
Toast
Bread slices
N. OF
PARTS WEIGHT SHELF
POSITION TEMPERATURE
(°C)
4
4
8
6
4
4
8
4
6
4
4
800
600
500
800
700
400
500
400
---
---
—
4
4
4
3
4
4
4
4
4
4
4
max
max
max
max
max
max
max
max
max
max
max
10
12
10
30
12
13
12
8
12
8
2-3
8
8
6
20
10
10
--
6
--
--
1
UPPER
SECTION LOWER
SECTION
Shelf
Position
Tempera-
Cture(° )
Tempera-
Cture(° )
Shelf
Position
14 GB
Figure 16

•After positioning the appliance, packaging materials
must be correctly disposed of for safety and
environmental purposes.
•Before disposing of old equipment, cut the power
cable in order to render the equipment unusable.
This appliance is marked according to the European
directive 2002/96/EC on Waste Electrical and
Electronic Equipment (WEEE).
•By ensuring this product is disposed of correctly, you will help prevent
potential negative consequences for the environment and human
health, which could otherwise be caused by inappropriate waste
handling of this product.
•The symbol on the product indicates that this product may not be
treated as household waste. Instead it shall be handed over to the
applicable collection point for the recycling of electrical and electronic
equipment
•Disposal must be carried out in accordance with local environmental
regulations for waste disposal.
•For more detailed information about treatment, recovery and
recycling of this product, please contact your local city office, your
household waste disposal service or the shop where you purchased
the product.
6. SERVICE CENTRE & TROUBLESHOOTING
•If the oven is not working, before calling the service centre we
recommended that :
•You should check that the oven is properly plugged into the power
supply.
Gas input is abnormal
•Check the following:
•Are the holes of the burner clogged?
•Is the pressure regulator working properly?
•If you are using a pipe, is there any gas in the pipe? Is the valve open?
•If you detect something abnormal with the gas valves, contact a
qualified electrician or an authorised service centre for assistance.
There is a smell of gas where the appliance is placed
•Please check the following:
•Has a gas valve been left open?
•Is the gas pipe in the correct position and in good condition?
If you suspect a gas leak, do not use a flame to check
The oven does not heat up
Are the oven control knobs at the correct position ?
The cooking time is too long
Has the correct temperature been selected ?
Smoke comes from the oven
It is advisable to clean the oven after each use. If fat which splashes
during the cooking of meat is not cleaned, it will cause an unpleasant
smell and smoke the next time you use the oven. (See the Cleaning
and Maintenance chapter)
The oven light does not come on
•The light might be faulty. To change the bulb, please see the relative
page.
•If you have checked the above and the oven still does not work
properly, contact the nearest authorized service for assistance
• Model and Production Number (PNC or ENR).
5. CLEANING AND MAINTENANCE
Before all cleaning and maintenance :
•Cleaning and user maintenance shall not be made by children
without supervision
•Disconnect mains voltage.
•Shut off the gas valve for your own safety. If the oven is adjusted to
natural gas, shut off the natural gas valve.
•If the oven is hot, wait till it has cooled down.
•Never use steam or a vaporizer for cleaning.
•Clean enamelled surfaces with warm, soapy water or with suitable
brand products. On no account use abrasive powders that may
damage surfaces and ruin the appearance of the cooker.
It is very important to clean the oven each time it is used.
•Use detergents and abrasive metal pads for the stainless steel grills.
•The glass surfaces such as the top, the oven door and the warming
compartment door must be cleaned when they are cold.
•Damage caused by failure to respect this rule is not covered by the
guarantee.
•You can clean burners and burner caps with hot water and detergent.
Also the gas channels of the burners can be cleaned by a brush. Make
sure that burners are dry before replacing them in their seats. Check
correct positioning of the burner.
especially for cakes, pizzas and breads.
•Periodically clean the ignition electrodes of automatic ignition ovens.
This will prevent ignition problems. Check frequently that
the gas channels of burners are not blocked by food residues, etc.
•Wipe the top lid with a dry cloth in order to prevent harmful effects of
water, oil and steam generated by the cooked food.
•Do not use abrasive products, metal cleaning pads, sharp objects,
rough cloths, or chemical products and detergents that can
permanently damage the catalytic lining.
•It is a good idea to use deep roasting trays for fatty foods such as
joints of meat etc. and to put a tray underneath the grill to catch surplus
fat.
Cleaning of Oven Door
For thorough cleaning of the oven door, it is advisable to remove the
same, as shown in below.
Open the door completely, turn the two feet on the hinge arms 180º.
Close the door partly by a 30º. Remove the door by slightly lifting the it
at this position.
For replacing the door, follow the steps above in the reverse order.
To Replace the inside light
•Switch off the mains power supply and unscrew bulb.
Replace with an identical bulb that can withstand very high
temperatures.
7. PROTECTION OF THE ENVIRONMENT
5.1. CATALYTIC SELF - CLEANING OVEN
•Special self-cleaning panels covered in a micro-porous coating are
available on some of our models. If they are fitted, the oven no longer
needs to be cleaned by hand.
•The lining must be porous for self-cleaning to be effective.
•Excessive splattering of fat may block the pores and therefore hinder
self-cleaning. This self-cleaning capacity may be restored by
switching on the empty oven to maximum for about 10-20 minutes.
•If the walls of the oven are so thickly coated in grease that the
catalytic lining is no longer effective, remove surplus grease with a soft
cloth or sponge soaked in hot water. All catalytic linings currently on
the market have a working life about 300 hours. They should therefore
be replaced after about 300 hours.
15 GB
Figure 16
Figure 17
1800

ATTENZIONE: l'apparecchio e le parti accessibili diventano calde durante l'uso. Prestare attenzione a
non toccare le parti calde.
• I bambini al di sotto di 8 anni dovrebbero essere tenuti a distanza se non continuamente supervisionati.
• L'apparecchio può essere usato da bambini dagli 8 anni in su e persone con ridotte capacità fisiche,
sensoriali o mentali o senza esperienza e conoscenza del prodotto se supervisionate o dando loro
istruzioni riguardo al funzionamento dell'apparecchio in maniera sicura e coscente del rischio possibile.
• I bambini non dovrebbero giocare con l'apparecchio.
• La pulizia e la manutenzione non dovrebbero essere fatte da bambini senza supervisione.
ATTENZIONE: cucinare senza supervisione grasso o olio sul piano cottura può essere pericoloso e può
provocare incendi
• MAI provare a spegnere il fuoco con acqua. Prima spegnere l'apparecchio e poi coprire le fiamme, ad
esempio con un coperchio o un telo non infiammabile.
ATTENZIONE: pericolo di incendo: non lasciare oggetti sul piano cottura.
• Durante l’uso l’apparecchio diventa molto caldo. Si dovrebbe fare attenzione a non toccare gli elementi
riscaldanti all’interno del forno.
ATTENZIONE: Le parti accessibili possono diventare molto calde durante l’uso. I bambini dovrebbero
essere tenuti a distanza.
• Non usare per la pulizia materiali ruvidi abrasivi o raschietti metallici affilati per pulire le porte di vetro del
forno dato che possono graffiare la superficie e causare la frantumazione del vetro.
• La parte interna del cassetto sotto all'apparecchio può diventare calda
• Spegnere il forno prima di rimuovere lo schermo di protezione e, dopo la pulizia, rimontarlo secondo le
istruzioni.
• Usare solo la sonda termica raccomandata per questo forno.
• Non utilizzare un pulitore a vapore
• Rrimuovere gli eventuali liquidi tracimati dal coperchio prima di aprirlo.
• Far raffreddare la superficie del piano di cottura prima di chiudere il coperchio.
ATTENZIONE: Assicurarsi che l’apparecchio sia spento prima di sostituire la lampada per evitare la
possibilità di scosse elettriche.
• Se la cucina è posta su un piedistallo, si devono adottare misure per evitare che l’apparecchio scivoli dal
piedistallo.
• Il mezzo di disconnessione deve essere incorporato nel cablaggio fisso in accordo con le leggi di
cablaggio
• le istruzioni devono indicare quale tipo di cavo debba essere utilizzato, tenendo presente la
temperatura della superficie posteriore dell’apparecchio.
•Se il cavo di alimentazione è danneggiato, esso deve essere sostituito da un cavo o un assieme speciali
disponibili presso il costruttore o il suo servizio assistenza tecnica.
ATTENZIONE: Al fine di evitare ogni pericolo dovuto al riarmo accidentale del dispositivo termico di
interruzione, il presente apparecchio non deve essere alimentato con un dispositivo di manovra esterno,
quale un temporizzatore oppure essere connesso a un circuito che viene regolarmente alimentato o
disalimentato dal servizio.
• Questo apparecchio può essere installato in accordo con il regolamento vigente e solo in un ambiente
ben ventilato. Leggere le istruzzioni prima dell'installazione o l'uso dell'apparecchio.
• Queste istruzioni sono valide solamente se appare il simbolo del paese sull'apparecchio. Se non
appare il simbolo sull'apparecchio, è necessario consultare le istruzioni tecniche che vi daranno le
istruzioni necessarie riguardo alle modifiche delle condizioni d'uso dell'apparecchio nel paese di
riferimento.
• Prima dell'installazione, assicurarsi che le condizioni di distribuzione del locale (natura del gas e
pressione del gas) e l'aggiustamento dell'apparecchio siano compatibili;
• le condizione di aggiustamento dell'apparecchio sono indicate nell'etichetta (o nella targa);
• l'apparecchio non è connesso a un sistema di avacuazione dei prodotti di combustione. Dovrebbe
essere installato e connesso in accordo con le correnti norme di installazione. Particolare attenzione
deve essere posta sui rilevanti requisiti riguardo alla ventilazione.
• L'utilizzo di un apparecchio a gas causa calore e umidità nella stanza in cui è installato. Assicurarsi che
la cucina sia ben ventilata: lasciare aperti i fori di ventilazione naturale o installare un dispositivi di
ventilazione meccanica (cappa meccanica aspirante). L'uso intensivo prolungato dell'apparecchio
potrebbe richiedere un sistema di ventilazione addizionale, per esempio aumentando il livello di
ventilazione meccanica dove presente.
ATTENZIONE: Le parti accessibili possono diventare calde quando il grill è in uso. I bambini dovrebbero
essere tenuti a distanza.
16 IT
INDICAZIONI DI SICUREZZA

17 IT
1. AVVERTENZE GENERALI
Grazie per aver scelto uno dei nostri prodotti. Per ottenere i massimi risultati
dalle nostre cucine consigliamo di:
•Leggere attentamente le note di questo manuale, poiché contengono
istruzioni importanti sulle modalità corrette di installazione, utilizzo e
manutenzione di questa cucina. Conservare questo opuscolo in luogo
sicuro, per poterlo consultare facilmente in seguito.
•il manuale deve essere consegnato insieme all'elettrodomestico, per
garantire il corretto trasferimento delle informazioni sull'installazione e
sull'utilizzo dell'elettrodomestico e le relative avvertenze.
•Quando la cucina è in uso, tutte le parti accessibili sono molto calde: fare
attenzione a non toccare questi elementi. Alla prima accensione,
l'elettrodomestico potrebbe dare origine ad emissioni di odore acre: tale
fumo è innocuo. Consigliamo di far funzionare la cucina a vuoto per due ore.
•Queste istruzioni sono valide solamente se appare il simbolo del paese
sull'apparecchio. Se non appare il simbolo sull'apparecchio, è necessario
consultare le istruzioni tecniche che vi daranno le istruzioni necessarie
riguardo alle modifiche delle condizioni d'uso dell'apparecchio nel paese di
riferimento.
1.1. SIMBOLI USATI IN QUESTO MANUALE
Per una più facile comprensione, in questo manuale sono stati
utilizzati i simboli indicati di seguito.
1.2. DICHIARAZIONE DI CONFORMITÀ
Le parti di questo elettrodomestico che potrebbero venire a diretto
contatto con gli alimenti sono conformi alle indicazioni della direttiva
CEE 89/109. L'elettrodomestico è conforme alle direttive europee
73/23/CEE, 89/336/CEE e 90/396/CEE, emendate dalle 2006/EC,
2004/108/EC e 2003/55/EC, e dagli emendamenti seguenti. Inoltre
l'elettrodomestico è conforme alle direttive generali 93/68 e ai
successivi emendamenti.
1.3. SUGGERIMENTI PER LA SICUREZZA
•La cucina deve essere usata solo per gli scopi per i quali è progettata: deve
essere usata solo per la cottura del cibo. Qualunque tipo altro utilizzo, per
esempio come forma di riscaldamento, costituisce uso improprio ed è
pertanto pericoloso.
•Il costruttore non può essere ritenuto responsabile per eventuali danni
provocati da uso improprio, non corretto o non ragionevole.
•Quando si utilizza un elettrodomestico occorre seguire alcune regole di
base. Se l'elettrodomestico si rompe o si guasta, spegnerlo, staccare
l'alimentazione di rete, evitare di toccarlo e contattare il centro di assistenza
autorizzato.
•I bambini al di sotto di 8 anni dovrebbero essere tenuti a distanza se non
continuamente supervisionati.
•L'apparecchio può essere usato da bambini dagli 8 anni in su e persone con
ridotte capacità fisiche, sensoriali o mentali o senza esperienza e
conoscenza del prodotto se supervisionate o dando loro istruzioni riguardo
al funzionamento dell'apparecchio in maniera sicura e coscente del rischio
possibile.
•Usare sempre i guanti per rimuovere gli alimenti dal forno.
•Mantenere sempre pulito l'elettrodomestico, per motivi di sicurezza e di
igiene. I residui di grasso e di alimenti possono essere causa di incendi.
•Rimuovere gli eventuali liquidi tracimati dal coperchio prima di aprirlo.
•Far raffreddare la superficie del piano di cottura prima di chiudere il
coperchio.
•Non mettere la mani tra il forno e le cerniere dello sportello superiore.
Tenere lontani i bambini.
ATTENZIONE: Le parti accessibili possono diventare calde quando il grill è
in uso. I bambini dovrebbero essere tenuti a distanza.
•Assicurarsi che quando l'elettrodomestico non viene utilizzato tutte le
manopole siano in posizione spenta.
•Lo scaldavivande può essere usato per riporre vassoi vuoti o per
mantenere caldi gli alimenti.
•Non mettere nel vano scaldavivande oggetti infiammabili, esplosivi o
detergenti, ad esempio borse di nylon, carta, panni, ecc.
•Usare esclusivamente pentole e padelle resistenti al calore. Non usare
materiali infiammabili.
•È pericoloso modificare o tentare di modificare le proprietà
dell'elettrodomestico.
•Occorre prestare particolare attenzione durante la frittura: non lasciare
incustodito l'elettrodomestico.
•L'elettrodomestico è pesante. Prestare attenzione durante gli spostamenti.
MAI provare a spegnere il fuoco con acqua. Prima spegnere l'apparecchio e
poi coprire le fiamme, ad esempio con un coperchio o un telo non
infiammabile.
ATTENZIONE: pericolo di incendo: non lasciare oggetti sul piano cottura.
•Durante il funzionamento dell'elettrodomestico, è normale l'emissione di
aria calda.
Non bloccare le aperture del forno.
•Se si pongono alimenti sopra o all'interno dell'elettrodomestico o quando si
sposta il cibo con acqua o grassi in eccesso, si possono verificare
versamenti. Pulire immediatamente tali residui dopo la cottura, per prevenire
la formazione di odori sgradevoli e di possibili incendi.
•Prima di togliere i recipienti di cottura, ridurre o spegnere la fiamma.
• Nelle zone in cui avviene la combustione di combustibiliAVVERTENZA!
gassosi si producono calore e umidità. Occorre prestare particolare
attenzione all'aerazione dell'ambiente: se l'aerazione naturale è inesistente
o insufficiente occorre installare una ventola di aerazione. In caso di dubbi,
consultare un Centro diAssistenza Candy.
•Quando si utilizza un elettrodomestico occorre seguire alcune regole di
base:
*In generale non è consigliabile utilizzare adattatori, prese multiple per
più spine e prolunghe.
*Non tirare il cavo di alimentazione per staccare la spina dalla presa di
alimentazione.
*Non toccare il forno con le mani o i piedi umidi o bagnati.
*Sostituire immediatamente il cavo di alimentazione danneggiato.
*Per la sostituzione del cavo, attenersi alle seguenti istruzioni:
*La sostituzione del cavo deve essere effettuata da un tecnico
qualificato. Per le riparazioni affidarsi esclusivamente a un centro di
assistenza autorizzato e assicurarsi che vengano usati ricambi originali.
*Se necessario, rimuovere il cavo di alimentazione e sostituirlo con uno
dei seguenti tipi: H05RRF, H05VVF e H05V2V2-F. Il cavo ha la capacità
necessaria per la corrente elettrica richiesta dal prodotto.
•Controllare periodicamente il tubo flessibile del gas.
•Il tubo del gas deve essere tenuto lontano dalle parti calde del forno e
non deve essere a contatto con esso. È possibile spostare il connettore
del gas a sinistra o a destra del forno. Dopo tale modifica, verificare
l'eventuale presenza di perdite con acqua saponata.
•Dopo avere collegato il tubo flessibile del gas al connettore, fissarlo
saldamente con una fascetta. Occorre prestare particolare attenzione
alle perdite di gas: controllare con una soluzione saponata.
•Non lasciare l'elettrodomestico incustodito prima che si sia raffreddato.
L'eventuale presenza di un coperchio superiore dell'elettrodomestico
consente di proteggere dalla polvere il piano di cottura non utilizzato e di
riparare dai versamenti d'olio durante la cottura.
•Non utilizzare il coperchio per altri scopi.
•ATTENZIONE! (Per modelli con coperchio in vetro) Il coperchio in vetro
può rompersi se esposto a calore eccessivo. Prima di chiudere il
coperchio accertarsi sempre che i bruciatori siano spenti.
•Non usare recipienti di cottura deformati o non bilanciati.
•Pulire con cura il grill e la leccarda prima di iniziare a utilizzarli.
•Usando detergenti spray, non spruzzare sulle piastre o sul termostato.
•Assicurarsi che i ripiani del forno siano collocati in modo corretto.
•Per un'accensione più rapida, accendere il bruciatore prima di collocarvi
sopra il recipiente di cottura.
•Verificare che la fiamma dei bruciatori non presenti anomalie.
•Non coprire le parti del forno con fogli di alluminio.
1.4. SUGGERIMENTI UTILI
Il costruttore non può garantire la sicurezza della cucina
qualora le precedenti istruzioni non vengano seguite.
Informazioni per la sicurezza
Informazioni per la protezione dell'ambiente
Questo elettrodomestico è conforme alle direttive CEE
dell'UE

18 IT
2. INSTALLAZIONE
L'installazione deve essere eseguita da personale qualificato. Il produttore non
ha l'obbligo di provvedervi. La garanzia non comprende l'eventuale assistenza
richiesta al produttore per risolvere guasti derivanti da un'installazione non
corretta.
È obbligatorio attenersi alle istruzioni di installazione destinate al personale
professionalmente qualificato. L'installazione non corretta può determinare danni
o lesioni a persone, animali o cose. Il produttore non può essere ritenuto
responsabile di tali danni o lesioni.
AVVERTENZA! Occorre prestare attenzione al posizionamento
dell'elettrodomestico. Esso può essere installato solo in una stanza dotata di
ventilazione costante.
L'utilizzo di un apparecchio a gas causa calore e umidità nella stanza in cui è
installato. Assicurarsi che la cucina sia ben ventilata: lasciare aperti i fori di
ventilazione naturale o installare un dispositivi di ventilazione meccanica (cappa
meccanica aspirante). L'uso intensivo prolungato dell'apparecchio potrebbe
richiedere un sistema di ventilazione addizionale, per esempio aumentando il
livello di ventilazione meccanica dove presente.
Occorre sempre staccare il collegamento elettrico prima di ogni intervento di
riparazione, installazione o modifica.
•Prima di installare l'elettrodomestico, controllare le caratteristiche della fornitura
di gas (tipo e pressione del gas) e accertarsi che l'elettrodomestico sia regolato di
conseguenza.
•Questo elettrodomestico non deve essere collegato al sistema di scarico di altri
apparecchi funzionanti con un combustibile diverso.
•L'elettrodomestico non deve essere installato nelle vicinanze di materiale
infiammabile (es. mobili, tende, ecc.)
•Se la cucina è posta su un piedistallo, si devono adottare misure per evitare che
l’apparecchio scivoli dal piedistallo.
ATTENZIONE: Al fine di evitare ogni pericolo dovuto al riarmo accidentale del
dispositivo termico di interruzione, il presente apparecchio non deve essere
alimentato con un dispositivo di manovra esterno, quale un temporizzatore
oppure essere connesso a un circuito che viene regolarmente alimentato o
disalimentato dal servizio.
•Le griglie devono essere predisposte in modo tale da non poter essere
ostruite da nessuno dei due lati e posizionate preferibilmente vicine al
pavimento. Le griglie non devono essere disposte attraverso i canali
attraverso cui passano gas di combustione e fumi di scarico.
•Qualora fosse impossibile installare griglie di aerazione nel locale in cui è
installato l'elettrodomestico, l'aria necessaria può essere ottenuta da un
locale adiacente, a meno che si tratti di una camera da letto o di un locale
dove la corrente d'aria possa costituire un pericolo.
2.1. L'AMBIENTE IN CUI INSTALLARE
L'ELETTRODOMESTICO
Figure 1 Figure 2
2.3. REGOLAZIONE DEI PIEDINI
2.2. POSIZIONAMENTO
Questo è un elettrodomestico
di tipo “X” ed è stato progettato
nell'ipotesi che i piani di lavoro
adiacenti non siano più alti
della superficie del piano di
cottura. Questo apparecchio è
in classe 2.1
750 mm
400 mm
200 mm 200 mm
CB
4
3
2
1
AA1 A2
-Questo apparecchio è dotato di piedini regolabili, posizionati negli spigoli
inferiori.
-L'altezza massima della cucina è di 868mm, ottenuta posizionando i piedini
frontali e le rotelle posteriori nel 4° buco.
-I piedini possono essere regolati individualmente con l'aiuto di una pinza,
per garantire che il forno sia in posizione perfettamente bilanciata, e che il
livello del liquido nelle pentole sia orizzontale.
-Le rotelle posteriori devono essere fissate sul 2 buco (fugura A1), altezza
stadard. In questo modo,l'altezza standard sarà di 850mm.
•L’apparecchio non deve essere installato su di un piedestallo.
Per un corretto funzionamento dell'elettrodomestico, il locale deve essere dotato
di una ventilazione naturale sufficiente alla dispersione dei gas combusti.
•Il flusso d'aria deve penetrare attraverso le prese d'aria dotate di griglia presenti
sulle pareti esterne.
•Per il passaggio dell'aria, nei modelli dotati di dispositivo di sicurezza della
fiamma, la sezione trasversale delle griglie per l'aria deve misurare 100 cm . Nei
2
modelli privi del dispositivo di sicurezza della fiamma, la sezione trasversale deve
misurare 200 cm . (È possibile adottare una o più griglie)
2
Scarico dei gas combusti
•I gas combusti della cucina devono essere rilasciati direttamente all'esterno,
oppure mediante una cappa collegata a un camino o una canna fumaria (Figura
1).
•Qualora fosse impossibile installare una cappa, occorrerà installare un
aspiratore elettrico su una parete o una finestra rivolte verso l'esterno
(Figura 2).
•L'aspiratore deve garantire il ricambio dell'aria della cucina 3-5 volte all'ora.
L'elettrodomestico è dotato di piedini regolabili sui quattro angoli inferiori
del telaio. I piedini possono essere regolati singolarmente mediante una
chiave, per fare in modo che la cucina e di conseguenza i liquidi nei
recipienti di cottura siano bilanciati ed equilibrati.
Piedini e ruote regolabili
Piedini regolabili

2.4. COLLEGAMENTO ELETTRICO
Le cucine sono fornite con o senza cavo di corrente. Il collegamento
del cavo deve essere effettuato da un centro di assistenza
autorizzando, che dovrà attenersi alle seguenti istruzioni.
Il collegamento elettrico deve essere fatto secondo gli standard e i
regolamenti vigenti. Prima di effettuare il collegamento elettrico,
verificare i punti seguenti:
•La capacità dei collegamenti elettrici e i fusibili dell'edificio sono
sufficienti a garantire il carico dell'elettrodomestico? (Verificare i dati
sull'etichetta adesiva)
•La linea elettrica utilizzata è dotata di una messa a terra conforme
agli standard vigenti? L'abitazione privata deve essere dotata di una
corretta messa a terra. Rivolgersi a un tecnico autorizzato nel caso in
cui l'impianto elettrico domestico non sia dotato di messa a terra.
•La presa e l'interruttore multipolare sono in un punto facilmente
raggiungibile dopo l'installazione dell'elettrodomestico?
•Al cavo dell'alimentazione di rete deve essere collegata una spina
conforme agli standard e il cavo deve essere inserito in una presa
sicura.
•Qualora l'elettrodomestico richieda il collegamento diretto alla linea
elettrica, fra l'elettrodomestico e la linea elettrica occorre usare un
interruttore multipolare. (Deve essere conforme agli standard e
adeguato al carico)
Il cavo di terra, di colore verde-giallo, non deve essere interrotto
dall'interruttore. Il cavo di fase, di colore marrone (che parte dal
connettore indicato con la “L” sul forno) deve sempre essere collegato
con il cavo di fase dell'alimentazione di rete.
•Il cavo di alimentazione deve essere disposto in modo tale da non
essere esposto a temperature superiori ai 50 °C.
•Qualora sia necessario sostituire il cavo di alimentazione, utilizzare
un cavo con una sezione trasversale adeguata alla potenza indicata.
Il cavo di terra, di colore verde-giallo, deve risultare 2 cm circa più
lungo rispetto ai cavi di fase e neutro.
•Dopo avere completato il collegamento, controllare le piastre
accendendole per 3 minuti.
•Il costruttore declina ogni responsabilità per danni derivanti
dalla non conformità agli standard di sicurezza.
•Per il collegamento diretto alla rete, è necessario prevedere un
dispositivo che assicuri la disconnessione dalla rete, con una distanza
di apertura dei contatti che consenta la disconnessione completa
nelle condizioni della categoria di sovratensione III, conformemente
alle regole di installazione
2.5. CUCINE CON CAVO DI CORRENTE
•È previsto esclusivamente un collegamento a tensioni pari a 220-240
V tra fasi o tra fasi e neutro.
Neutro
Cavo di terra (verde-giallo)
Cavo di fase
•L’eventuale sostituzione del cavo di alimentazione deve essere
eseguita dall’Assistenza Tecnica Candy o da un tecnico qualificato,
con un cavo le cui caratteristiche siano equivalenti al cavo originale
19 IT
Potenza
nominale
dell'apparecchio
(kW)
Voltaggio
di targa
(V)
Corrente
di targa
(A)
Cavo di
alimentazione
2.3 kW
3.5 kW
4.0 kW
220 - 240 V
220 - 240 V
220 - 240 V
9.1 A
15.9 A
18.2 A
3 x 1.0 mm2
3 x 1.5 mm2
3 x 2.5 mm2
Sezione dei cavi di alimentazione:
Cavo - Sezione
Cable - Tipo
Monofase
220-240 V~
Due-fase
380-415V2N~
3 G 2.5 mm2
H05VV-F
H05RR-F
L1 : Fase
Derivatore 1-2 e
Derivatore
N : Derivatore
neutro 4-5
PE Terra
1 Fase
2 Fase
5 Derivatore
neutro 4-5
PE Terra
4 G 1.5 mm2
H05VV-F
H05RR-F
Trifase
380-415V3N~
1 Fase
2 Fase
3 Fase
5 Derivatore
neutro 4-5
PE Terra
5 G 1.5 mm2
H05VV-F
H05RR-F
Tipi di collegamento scatola di derivazione
1- Collegamento monofase 2- Collegamento trifase
Attenzione: Un fissaggio inadeguato può determinare rischi
di riscaldamento pericoloso a livello di alimentazione del cavo
2.6. CUCINE SENZA CAVO DI CORRENTE

Il gas deve essere collegato all'elettrodomestico secondo gli standard
e le disposizioni vigenti.
•L'elettrodomestico è stato regolato in fabbrica per il tipo di gas
indicato nei dati sull'etichetta adesiva posta accanto all'ingresso del
gas, sulla parte posteriore dell'elettrodomestico.
Assicurarsi di utilizzare il tipo di gas indicato sull'etichetta. Se il tipo di
gas è diverso, seguire le istruzioni riportate nel capitolo relativo alla
conversione a tipi di gas diversi.
•Per ottenere la massima efficienza e il minimo consumo, assicurarsi
che la pressione del gas corrisponda a quella riportata nella tabella
riportata più avanti. Se si utilizza gas a pressione diversa occorre
utilizzare un regolatore sull'attacco del gas. È permesso l'uso di un
regolatore di gas conforme agli standard GPL.
•Assicurarsi che la pressione del gas sia quella indicata nella tabella
delle categorie gas (ultime 3 pagine di questo manuale) allo scopo di
ottenere il massimo rendimento e il minimo consumo. Se la pressione
del gas è differente, bisogna utilizzare un apposito adattatore
all'ingresso del gas. E' consentito l'uso di un adattatore conforme agli
standard per il GPL.
Collegamento con un tubo metallico rigido o flessibile
•Il gas può essere alimentato mediante un apposito tubo flessibile in
acciaio inox, in base agli standard di sicurezza vigenti. In questo caso
non occorre spostare l'elettrodomestico. Il connettore di ingresso del
gas dell'elettrodomestico è Gc /
1
2
Collegamento con un tubo flessibile non metallico.
•Se la valvola del gas è in una posizione tale da poter essere aperta e
chiusa quando necessario, è possibile utilizzare un tubo flessibile
conforme agli standard vigenti. Il tubo flessibile deve essere fissato
saldamente con una fascetta.
•Il tubo flessibile può essere collegato come segue:
•Poiché il tubo flessibile verrà posto dietro il forno, esso non deve
essere esposto a temperature superiori a 30°C in ogni suo punto.
•La lunghezza non deve superare i 150 cm.
•Non deve esposto a vapore.
•Non devono esserci pieghe, curve o tensioni.
•Deve essere protetto da oggetti taglienti o appuntiti.
•Deve essere accessibile, per permettere ispezioni periodiche.
•Il tubo flessibile deve essere controllato come indicato di seguito, per
prevenire i danni dell'usura:
•Verificare che non vi siano rotture, tagli o punti bruciati lungo il tubo e
alle sue estremità.
•Il materiale deve conservare le sue caratteristiche di flessibilità. Non
deve indurirsi eccessivamente.
•Sulle fascette non deve esserci traccia di ruggine.
•In ogni caso, occorre sostituirlo dopo 5 anni di utilizzo.
Dopo l'installazione controllare eventuali perdite in
corrispondenza dei collegamenti mediante acqua
saponata. Non usare fiamme per controllare perdite
di gas.
GIUSTO
TUBO GAS FILESSIBILE
CAVO OELETTRIC
SBAGLIATO
TUBO GAS FILESSIBILE
CAVO OELETTRIC
2.7. COLLEGAMENTO AL GAS
20 IT
Per le cucine indicate di seguito, la regolazione deve essere eseguita
da un tecnico qualificato. Seguire i passaggi seguenti per convertire
l'apparecchio dall'impostazione di fabbrica a un diverso tipo di gas.
Le cucine sono regolate per gas naturale e la
connessione è di tipo cilindrico (1). Per la
connessione con tubo tipo gas naturale, si può
fissare l'adattatore (2) all'estremità cilindrica
con guarnizione. Per la connessione GPL,
l'adattatore GPL (3) può essere fissato
all'estremità cilindrica con guarnizione.
Regolazione e sostituzione degli iniettori
Sostituzione degli iniettori
•Rimuovere le griglie
Rimuovere i copri bruciatori e i bruciatori
Rimuovere gli iniettori usando una chiave da
7mm, poi avvitare l'iniettore adeguato,
selezionato dalla tabella (ultime 3 pagine di
questo manuale) in funzione del gas utilizzato.
Eseguire i passaggi precedenti in sequenza
inversa dopo aver completato il montaggio del
nuovo iniettore.
Regolazione stand-by
Regolazione stand-by per le cucine senza sicurezza o con
sicurezza e accensione a tasto.
Ruotare la manopola di controllo del bruciatore portando l'indicatore
in corrispondenza della fiamma piccola e rimuovere la manopola.
Se si intende convertire da gas naturale a GPL, ruotare la vite di
bypass delle valvole del gas in senso orario con un cacciavite fino alla
posizione definitiva.
Se si intende convertire da GPL a gas naturale, ruotare la vite di
bypass delle valvole del gas in senso antiorario con un cacciavite fino
ad ottenere una fiamma più bassa di ¼.
Al termine della regolazione, inserire nuovamente le manopole.
Controllare la regolazione ruotando rapidamente la manopola di
controllo del bruciatore dal massimo al minimo. Se la fiamma non si
spegne, la regolazione è corretta.
Per le cucine con sicurezza, la regolazione del minimo può essere
effettuata attraverso una vite sul corpo del rubinetto. Se è presente
l'accensione a tasto, per la regolazione del minimo occorre rimuovere
il coperchio, la placca e il pannello frontale.
2
3
2.8. CONVERSIONE PER TIPI DI GAS DIVERSI
1
By-pass screw for the burner
without safety
devices
Forno a gas
•Rimuovere il pannello posteriore (Figure 3).
•Rimuovere l'adattatore dell'iniettore (Figure 4)
•Rimuovere gli iniettori usando una chiave da 7mm, poi avvitare
l'iniettore adeguato, selezionato dalla tabella (ultime 3 pagine di
questo manuale) in funzione del gas utilizzato (Figure 5).
•Eseguire i passaggi precedenti in sequenza inversa dopo aver
completato il montaggio del nuovo iniettore.
•La distanza del bruciatore è di 4,5 +/- 0,3mm per il gas naturale e il
GPL(Figure 6).
Figure3 Figure4
safety devices
Per la regolazione del minimo, bisogna rimuovere il coperchio, la
placca e in pannello frontale.
Table of contents
Languages:
Other ROSIERES Cooker manuals