Rosito BisanI Tecnica Two Group Instruction Manual

TCI: CONTROLLO TEMP. INDIPENDENTE (SAVE ENERGY SYSTEM)
TCI: INDEPENDENT TEMP. CONTROL (SAVE ENERGY SYSTEM)
MISCELATORE H2O
HOT /COOL WATER MIX
CAPPUCCINATORE NERO
BLACK CAPPUCCINO MAKER
CAPPUCCINATORE ACCIAIO INOX PER TUBO VAPORE
STAINLESS STEEL CAPPUCCINO MAKER FOR STEAM PIPE
CAPPUCCINATORE ACCIAIO CON SONDA ESTERNA
STAINLESS STEEL CAPPUCCINO MAKER WITH EXTERNAL PROBE.
CAPPUCCINATORE ACCIAIO CON SONDA INTERNA (APS)
AUTO PROBE STEAMER (APS)
ISTRUZIONI DOSATURA ELETTRONICA
INSTRUCTIONS FOR ELECTRONIC DOSING
IMPIANTO GAS
AUTOMATIC GAS
ADATTATORE CIALDE
POD ADAPTER
OPTION
INSTALLAZIONE e MANUTENZIONE
INSTALLATION and MAINTENANCE
MONTAGE und WARTUNG
INSTALLATION et ENTRETIEN
INSTALACIÓN y MANTENIMIENTO
УСТАНОВКА и ТЕХНИЧЕСКОЕ ОБСЛУЖИВАНИЕ
2-3-4 gr
0213_Rev002

IL PRODOTTO NON PUO’ ESSERE AVVIATO ALLO SMALTI-
MENTO NEL NORMALE CICLO DI RACCOLTA RIFIUTI, MA
SMALTITO NEI CENTRI AUTORIZZATI.
THE PRODUCT CANNOT BE DISPOSED OF AS NORMAL WASTE,
BUT MUST BE TAKEN TO AN AUTHORIZED DISPOSAL CENTRE.
DAS PRODUKT DARF NICHT DEM NORMALEN ABFALLKREIS-
LAUF ZUGEFÜHRT WERDEN, SONDERN IST IN AUTORISIER-
TEN ZENTREN ZU ENTSORGEN.
LE PRODUIT NE PEUT PAS ÊTRE ÉLIMINÉ COMME UN DÉCHET
NORMAL, MAIS IL DOIT ÊTRE CONFIÉ À UN CENTRE DE TRAI-
TEMENT DES DÉCHETS AUTORISÉ.
EL PRODUCTO NO PUEDE ENVIARSE AL VERTEDERO PARA EL
CICLO DE RECOGIDA DE DESECHOS CORRIENTE, SINO QUE
DEBE ELIMINARSE A TRAVÉS DE LOS CENTROS AUTORIZA-
DOS.
-
,
.

INDICE /INDEX
SCHEMI ALIMENTAZIONE
WIRING DIAGRAMS _________
ACCESSORI in DOTAZIONE
ACCESORIES SUPPLIED _________
ADDOLCITORE
WATER SOFTNER ___________
ITALIANO _________________
Avvertenze di sicurezza
Controindicazione d’uso
Presentazione
Installazione
Accensione macchina
Commutatore in posizione 0,1,2,3
Accensione macchine ergonomica
Funzionamento macchina a pulsante /
a levetta / elettronica
Manutenzione
ENGLISH _________________
Safety warnings
Precautionary measures
Introduction
Installation
Machine ignition
Selector on position 0,1,2,3
Ergonomic machine ignition
Machine operation by push button /
lever / electronics
Maintenance
DEUTSCH _______________
Sicherheitshinweise
Unzweckmäßiger Gebrauch
Einleitung
Installation
Einscahltung der Maschine
Hauptschalter in Position 0,1,2,3
Einschaltung der ergonomische Maschine
Betrieb der Drückknopf /mit
Hebel / Vollautomatisch
Wartung
FRANÇAIS _______________
Regles de securite
Contre-indications d’emploi
Introduction
Installation
Allumage de la machine
Commutateur en position 0,1,2,3
Allumage de la machine ergonomique
Fonctionnement machine à commandes
marche arrêt / à levier / électronique
Entretien
ESPAÑOL ________________
Advertencias de seguridad
Contraindicaciones de uso
Presentación
Instalación
Encendido de la máquina
Conmutador en posición 0,1,2,3
Encendido ergonómico de las máquinas
Funcionamiento de la máquina con
botón / palanca / electrónico
Mantiniemento
_______________
«0,1,2,3»
/
/
a
b
c-d
1-6
7-12
13-18
19-24
25-30
31-36

a
SCHEMI ALIMENTAZIONE / WIRING DIAGRAMS
Funzionamento con tensione a 380 V.
Operation with a voltage of 380 V
3P+N+PE
Funzionamento con
tensione a 230 V.
Operation with
a voltage of 230 V
Funzionamento con tensione a 220 V o 110 V.
Operation with a voltage of 220 V or 110 V
1P+N+PE
Funzionamento con tensione a 240 V.
Operation with a voltage of 240 V
1P+N+PE
1P+N+PE 3P+PE

b
Filtro una tazza
One - cup lter
Filter ein tasse
Filtre pour 1 tasse
Filtro para una taza
1
Filtro cieco
Blind lter
Blindlter
Filtre borgne
Filtro ciego
Filtro due tazze
Two - cups lter
Filter zwei tassen
Filtre pour 2 tasses
Filtro para dos tazas
2
Molle fermaltro
Filter - retaining springs
Filterfeststellfedern
Ressorts cale-ltre
Muelles jacion ltro
Baccuccio una tazza
One - cup spout
Auslauf ein tasse
Becs de débit pour 1 tasse
Pitorro para 1 taza
1
Beccuccio due tazze
Two - cups spout
Auslauf zwei tassen
Becs de débit pour 2 tasses
Pitorro para 2 tazas
2
Tubo di scarico e tubo di carico
Draining pipe and delivery pipe
Ablaufschlauch und Zulaufschlauch
Tuyay de vidange et tuyau de chargement
Tubo de desagüe y tubo de carga
Pressino
Coffee tamper
Press - stempel
Tasseur de mouture
Pisador de café
Portaltri
Filter holders
Siebträgern
Porte-ltres
Portaltros
-
Spazzolino di pulizia
Cleaning brush
Reinigungsbürstchen
Petite rosse de nettoyage
Cepillo de limpieza
Cucchiaino dosatore
Measuring spoon
Dosierlöffel
Pétite cuillère de dosage
Cuchara para dosicar
ACCESSORI in DOTAZIONE / ACCESORIES SUPPLIED

ADDOLCITORE: ISTRUZIONI PER L’USO
WATER SOFTENER: INSTRUCTIONS FOR USE
FASE DI LAVORO
WORKING STAGE
ARBEITSSTELLUNG
POSITION DE FONCTIONNEMENT
POSICION DE TRABAJO
DEPRESSIONE E CARICO SALE
DEPRESSION AND SALT-LOADING
ENTLÜFTUNG DESBEHALTERS EINFÜLLEN VON SALZ
DECOMPRESSION ET INTRODUCION DU SEL
DEPRESSION Y CARGO SAL
RIGENERAZIONE
REGENERATION
REGENERIERUNG
RÉGÉNÉRATION
REGENERACIÒN
Entrata acqua
Tapwater inlet
Wassereintritt netz
Entré d’eau du reseau
Entrada agua red
Rubinetto entrata acqua
Water inlet tap
Hahn eintritt wasser
Robinet d’entrée d’eau
Grifo entrada agua
Tubo di depressione
Depression tube
Depressionsrohr
Tuyau de depression
Tubo depressión
Pomolo aperture coperchio
Cover opening knobe
Griff Öffenen deckel
Poignée d’ouverture couvercle
Pomo apertura tapa
A:
C:
E:
G:
Uscita acqua
Water outlet
Austritt wasser
Sortie d’eau
Salida agua
Rubinetto uscita acqua
Water outlet tap
Hahn austritt wasser
Robinet de sortie d’eau
Grifo salida agua
Tubo rigenerazione
Regeneration tube
Regenerierungsrohr
Tuyau de regeneration
Tubo regeneración
B:
D:
F:
A
B
G
E
F
C
D
c

MODELLO
MODE
MODELL
MODELE
MODELO
МОДЕЛЬ
- QUANTITÀ DI ACQUA ADDOLCITA IN BASE
ALLA SUA DUREZZA (espresso in gradi francesi)
- QUANTITY OF SOFTENED WATER ACCOR
DING TO ITS HARDNESS (in french degrees)
- WASSERMENGE SEINER HAERTE GEMAESS
ENTHAERT (in franzoesischen Graden)
- QUANTITE D’EAU ADOUCIE SUR LA BASE DE
SA DURETÉ (exprès en deés françaises)
- CANTIDAD DE AGUA ABLANDADA SEGUN
(expressada en grados franceses)
- КОЛИЧЕСТВО УМЯГЧЕННОЙ ВОДЫ НА ОСНОВА-
НИИ ЕЕ ЖЕСТКОСТИ (выражено во французских градусах)
ALTEZZA
HEIGHT
HOEHE
HAUTEUR
ALTURA
ВЫСОТА
SALE
SALT
SALZ
SEL
SAL
СОЛЬ
20° 30° 40° 60° 80° h Kg
L 8
L 12
L 16
L 20
lt. 1200
lt. 1900
lt. 2500
lt. 3500
lt. 1000
lt. 1500
lt. 2100
lt. 3000
lt. 1900
lt. 1350
lt. 1800
lt. 2600
lt. 700
lt. 1050
lt. 1400
lt. 2100
lt. 600
lt. 750
lt. 1000
lt. 1500
mm 400
mm 500
mm 600
mm 900
1
1,5
2
2,5
TABELLA DUREZZA ACQUA
RIGENERAZIONE IN GRADI FRANCESI
ATTENZIONE: Per addolcitore nuovo o inutilizzato da
molto tempo è consigliato effettuare la rigenerazione.
ATTENTION: Regenerate the water softener if it is new or
has not been used for some time.
ACHTUNG: Für neue oder langunbenutzte Wasserenthär-
ter empfehlen wir eine Reinigung.
ATTENTION: pour adoucisseur neuf ou non utilisé depuis
longtemps il est conseillé d’effectuer une régénération.
ATENCIÓN: Para el ablandador nuevo o inutilizado duran-
te mucho tiempo se aconseja efectuar la regeneración.
ВНИМАНИЕ: при использовании нового или долго неис-
пользовавшегося умягчителя воды выполнить цикл регене-
рации.
d

1. AVVERTENZE DI SICUREZZA
◆Prima di collegare la macchina accertarsi che i dati di targa siano rispondenti a quelli della rete di
distribuzione elettrica.
◆È vietato l’uso di adattatori, prese multiple e/o prolunghe.
◆ In caso di dubbio o di incertezza far controllare da personale qualicato l’impianto di alimentazione
elettrica, che deve rispondere ai requisiti disposti dalle normative di sicurezza vigenti, fra i quali:
- efcace messa a terra;
- sezione dei conduttori sufciente alla potenza di assorbimento;
- dispositivo salvavita efciente.
◆Prima di qualsiasi operazione di manutenzione interna, mettere l’interruttore generale nella posizione
0 o staccare la spina dalla presa di alimentazione. A macchina elettricamente collegata, non introdurre
mai le mani o altri oggetti all’interno della stessa.
◆Non esporre la macchina a intemperie o installarla in ambienti a elevata umidità come locali da
bagno ecc.. Non lasciare l’apparecchio contenente acqua in ambienti a temperatura inferiore o uguale
a 0°C.
◆Non ostruire le griglie di aspirazione o di dissipazione, in particolare non coprire con panni o altro il
piano scaldatazze.
◆ Utilizzare solo accessori e ricambi autorizzati dal produttore. Questo signica garanzia di sicuro fun-
zionamento privo di inconvenienti.
◆In caso di emergenza, come principio d’incendio, rumorosità anomala, surriscaldamento, ecc... in-
tervenire immediatamente a staccare l’alimentazione elettrica di rete, chiudere i rubinetti del gas e
dell’acqua.
◆In caso di guasto e/o cattivo funzionamento dell’apparecchio, spegnerlo e non manometterlo. Per
eventualiriparazionirivolgersisolamenteaduncentroassistenzaautorizzatodalcostruttoreerichiede-
re l’utilizzo di ricambi originali. Il cavo di alimentazione di questo apparecchio non deve essere sosti-
tuito dall’utente. Se il cavo è danneggiato o deve essere sostituito, rivolgersi ad un centro autorizzato.
◆Conservare con cura questo libretto per ogni ulteriore consultazione. Per operazioni diverse da quelle
descritte in questo manuale, consultare il nostro centro assistenza.
Il mancato rispetto di queste avvertenze può compromettere la sicurezza
dell’apparecchio. Un’errata installazione puó causare danni a persone e
cose per i quali il costruttore non può considerarsi responsabile.
2. CONTROINDICAZIONE D’USO
Le macchine sono destinate ad uso esclusivamente alimentare per cui é vietato l’impiego di liquidi
o materiali di altro genere come ad esempio riscaldare liquidi o inserire macinato nel portaltro che
possano generare pericoli e inquinare gli erogatori.
Il costruttore declina ogni responsabilità per danni a persone o cose dovuti ad uso improprio, errato o
irragionevole e all’uso delle macchine da parte di operatori non professionali.
MACCHINE PER CAFFÈ ESPRESSO
INSTALLAZIONE e MANUTENZIONE
Da chi le macchine le pensa, le progetta e le produce
1

3. PRESENTAZIONE
Questo libretto costituisce una guida rapida e semplice alla manutenzione ed uso delle macchine per
caffè. Leggere attentamente quanto riportato nelle sezioni che compongono questo manuale.
La ditta assicura, nel caso vi fossero problemi e mal funzionamenti, la sua più ampia collaborazione
tramite i suoi centri assistenza.
Fate controllare almeno una volta all’anno la Vostra macchina per caffè da personale
qualicato. Questa costante attenzione, renderà la macchina più efciente e sicura.
Le macchine sono state progettate e costruite nel rispetto di tutte le caratteristiche che contraddistin-
guono le tradizionali macchine per caffè espresso da bar: materiali nobili quali rame e acciaio e com-
ponenti afdabili, rendono le macchine costruite dalla ditta, sicure, afdabili e funzionali.
L’eventuale diverso utilizzo non contemplato nelle riportate istruzioni, solleva la ditta da qualsiasi
responsabilità per eventuali danni a persone o cose.
4. INSTALLAZIONE
1) Togliere l’imballo esterno, vericando immediatamente l’integrità e che non abbia subito danni.
2) Posizionare l’apparecchio sopra un tavolo o bancone robusto ed in piano, vicino ai punti di collega-
mento elettrico ed idraulico. Regolare i piedini per mettere “in bolla” l’apparecchio.
Accertarsi che la tensione della rete elettrica corrisponda a quella indicata nelle caratteristiche tecniche.
3) Togliere la vaschetta anteriore e collegare, tramite tuboex in dotazione (3/8”), il raccordo di carico
della macchina al depuratore (usare solo tubi omologati per acqua potabile secondo D.M. 21.03.73 e
successivi emendamenti). Collegare il tubo di scarico ssandolo alla vaschetta in plastica (di scarico)
(Foto 1). Inne mettere l’addolcitore in fase di lavoro e vericare che non ci siano delle perdite.
(Attenersi alle regole emanate dagli enti preposti di ogni singolo stato, regione, contea).
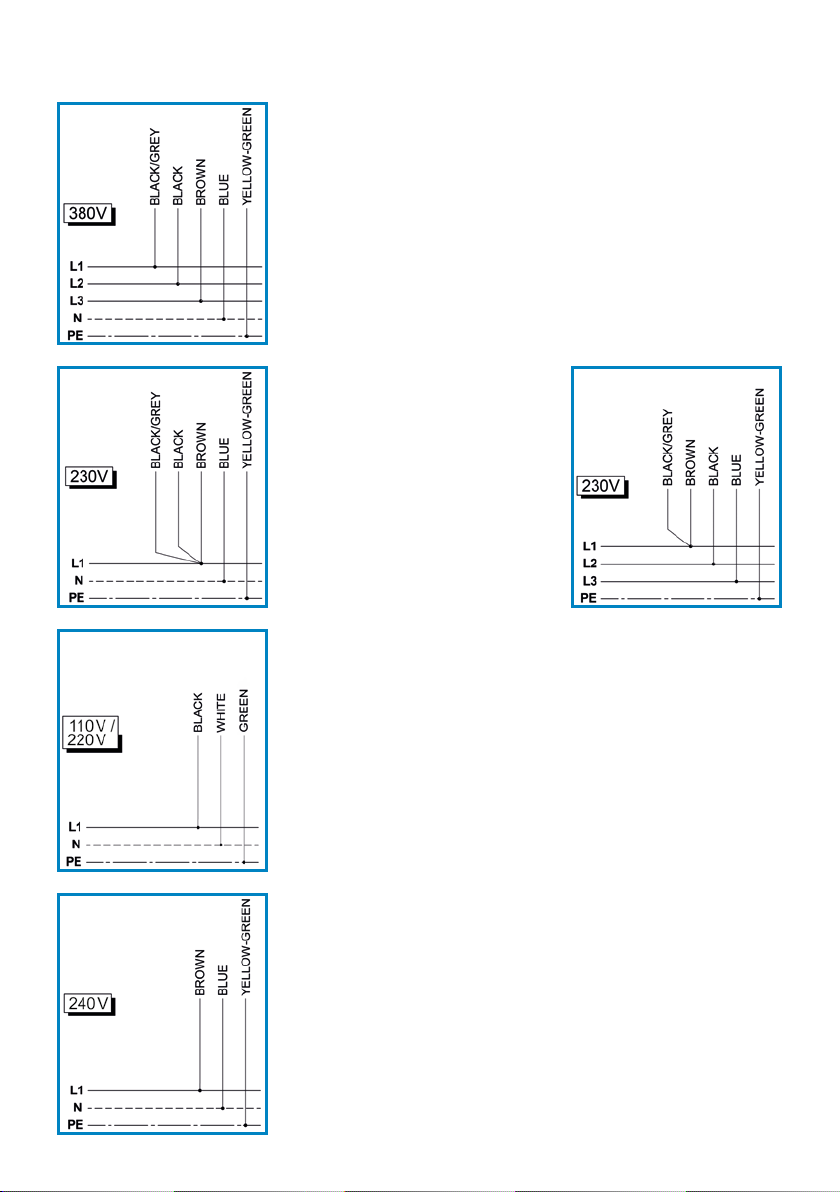
4) L’installazione elettrica della macchina deve essere eseguita esclusivamente da personale quali-
cato, secondo le prescrizioni del presente manuale ed in accordo con la normativa di installazione
vigente nel paese di destinazione. La macchina viene fornita di prassi con cavo di alimentazione tipo
H07RN-F 5x2,5 mm2di lunghezza 2,5 m opportunamente testato al quale l’installatore deve prov-
vedere a collegare una spina industriale 3P+N+PE 16A - 400V omologata EN 60309 (non fornita).
In caso di richiesta del cliente o normative differenti da quelle italiane, la macchina potrebbe essere
fornita con cavo di alimentazione differente.
In alternativa l’installatore può collegare il cavo ad un interruttore di manovra e protezione onnipolare
le cui caratteristiche le deve ricercare in funzione dell’impianto elettrico utilizzatore e della norma im-
pianti vigente nel paese di destinazione e alla IEC 60364-1. Prima della messa in funzione, l’installa-
tore deve vericare che la macchina sia stata collegata correttamente all’impianto elettrico utilizzatore
e all’impianto di terra, vericando l’efcienza della protezione dai contatti indiretti secondo la IEC
60364-1. È VIETATO UTILIZZARE LA MACCHINA IN ASSENZA DI UN EFFICACE E
SICURO COLLEGAMENTO A TERRA.
2
A: Carico acqua in caldaia
B: Tubo di scarico
Leggere attentamente quanto descritto sopra.

5. ACCENSIONE MACCHINA
1) Ruotare la manopola dell’interruttore nella posizione 1. La spia rossa si accenderà.
2) All’accensione della macchina la scheda elettronica controlla lo stato del livello di acqua in caldaia
e dopo circa 3 secondi avviene il riempimento tramite l’abilitazione della pompa e della elettrovalvola
di carico.
3) La macchina nella posizione 1 inizierà a riempirsi di acqua au-
tomaticamente sino al raggiungimento del livello impostato (sonda
autolivello in caldaia).
Tutte le macchine sono anche dotate di una leva di carico manuale
(montato nel massello distributore) (Foto 2) da utilizzare in caso di
emergenza, quando si verifica un malfunzionamento dell’autoli-
vello.
NB: Le macchine elettroniche incorporano un sistema di sicurezza di livello. Se entro 120’’ la sonda
non rileva l’acqua in caldaia, la macchina si blocca ed i led della tastiera lampeggiano. Per resettare
l’allarme spegnere e riaccendere la macchina. In caso il problema persista, verificare arrivi acqua dalla
rete idrica.
4) Quando la motopompa interna si ferma, la macchina ha raggiunto il livello di acqua prestabilito.
Successivamente azionare l’interruttore nella posizione 2.
5) L’interruttore nella posizione 2 mette in funzione la
resistenza, la spia verde si accende e inizia il riscalda-
mento dell’acqua.
Si consiglia di far uscire acqua dal gruppo di erogazione
per 5 secondi in modo da eliminare eventuali bolle d’aria
nel circuito termosifonico e permetterne una migliore
termocompensazione.
6) Attendere circa 30 minuti per permettere alla macchina di rag-
giungere la temperatura di lavoro. Lo spegnimento della spia verde
segnala che la macchina ha raggiunto la pressione prestabilita. La
spia rossa rimarrà sempre accesa per segnare la tensione di alimen-
tazione.
7) Per regolare la pressione interna in caldaia secondo le caratte-
ristiche usuali, agire sulla vite di regolazione posta sul pressostato.
(Foto 3: aumenta la pressione; diminuisce la pressione).
Questa operazione deve essere eseguita da un tecnico spe-
cializzato.
8) Per regolare la pressione di erogazione del caffè secondo le ca-
ratteristiche usuali, agire sulla regolazione vite della motopompa
(Foto 4: aumenta la pressione; diminuisce la pressione).
Questa operazione deve essere eseguita da un tecnico
specializzato.
3

6. COMMUTATORE IN POSIZIONE 0,1,2,3
Nel caso la macchina sia dotata di commutatore a risparmio energe-
tico (posizione 0,1,2,3) presenta le caratteristiche elencate di seguito.
1) Nella posizione 0 la macchina è spenta.
2) Nella posizione 1 la macchina inizierà a riempirsi di acqua automaticamente
sino all’ raggiungimento del livello impostato (sonda auto livello in caldaia).
3) L’interruttore nella posizione 2 mette in funzione un solo elemento della
resistenza (mezza potenza), questo permette un risparmio energetico nelle ore
dove la macchina è in stand-by.
4) L’interruttore in posizione 3 mette in funzione entrambi gli elementi della
resistenza elettrica (massima potenza) da utilizzare in fase di lavoro.
7. ACCENSIONE MACCHINA ERGONOMICA
I modelli ergonomici non prevedono l’utilizzo del commutatore, ma di un interruttore on/
off generale. Per l’accensione della macchina procedere come segue.
1) Effettuare il carico manuale di acqua tramite la leva montata nel massello distributore e controllare
quindi che il livello di acqua si assesti tra il minimo ed il massimo (vedere nel vetro livello).
NB: Si raccomanda di riempire d’acqua la caldaia, prima di azionare l’interruttore di accensione
generale (la resistenza di caldaia, scoprendosi, si brucerebbe).
2) Azionare l’interruttore di colore rosso posto vicino al vetro livello. Attendere circa 30 minuti per
permettere alla macchine di raggiungere la temperatura di lavoro.
3) Effettuare alcune erogazioni dai gruppi facendo uscire solamente acqua, per permettere il riscal-
damento degli stessi.
4) Lo spegnimento della spia verde segnala che la macchina ha raggiunto la pressione prestabilita.
Questa operazione deve essere eseguita da un tecnico specializzato.
Vapore ed acqua calda sono in pressione. PERICOLO USTIONI.
8. FUNZIONAMENTO MACCHINA A PULSANTE /
A LEVETTA / ELETTRONICA
1) Per erogare vapore, operare sulla manopola laterale con simbolo riportante la nuvola del vapore.
2) Per erogare acqua calda, operare sulla manopola centrale (o laterale SB - ergonomica) con il simbo-
lo riportante la goccia di acqua. Nel caso della macchina elettronica per erogare acqua calda premere
il pulsante di erogazione del tè.
3) Per erogare caffè dai gruppi, dosare la giusta quantità di caffè nel portaltro e dopo averlo pressato
e richiuso sul gruppo, premere il pulsante apposito di erogazione posto sul frontale di acciaio (o tramite
pulsantiera elettronica, vedere cap. 9).
4) Nel modello a levetta, per erogare caffè, azionare la leva manuale laterale al gruppo verso l’alto. Per
fermare l’erogazione azionare la stessa verso il basso.
5) Il manometro a doppia scala posizionato frontalmente, rileva in ogni momento la pressione della
caldaia (0,9 - 1,1 BAR) e la pressione di erogazione del caffè (8 - 10 BAR).
6) Visionare abbastanza frequentemente l’indicatore livello di acqua in caldaia ed il manometro a
doppia scala.
9. ISTRUZIONI DOSATURA ELETTRONICA
Si rimanda al libretto dell’utilizzatore specifico per ogni modello.
4

10. MANUTENZIONE
◆Pulire la lancia del vapore dopo ogni utilizzo per evitare le incrostazioni e l’otturazione dei fori di
uscita vapore.
◆ Vuotare e pulire i ltri del caffè tutte le sere; togliere il ltro e pulire con l’apposito spazzolino l’inter-
no; immergerli in acqua calda al ne di dissolvere i grassi del caffè.
◆Pulire la vaschetta raccogli gocce da residui del caffè che si vanno depositando sul fondo per evitarne
l’ostruzione.
◆ Con l’apposito ltro cieco in dotazione, eseguire il lavaggio del gruppo erogazione utilizzando un
specico detergente (da richiedere ai nostri centri assistenza).
Procedere come segue:
1- Inserire il ltro cieco nel portaltro e aggiungere il detergente secondo le dosi indicate nella con-
fezione.
2- Inserire il portaltro nel gruppo erogatore.
3- Accendere l’erogazione per 10 secondi. Fermare per 10 secondi. Ripetere per 5 volte.
4- Rimuovere il portaltro. Accendere l’erogazione e risciacquare il portaltro con l’acqua calda che
esce dal gruppo erogatore. Fermare l’erogazione.
5- Inserire il portaltro nel gruppo erogatore. Per risciacquare ripetere il punto 3 senza detergente.
6- Sostituire il ltro cieco nel portaltro con il ltro corretto e fare un espresso da eliminare.
◆Le parti esterne della macchina devono essere pulite con un panno umido e non utilizzare mai
detersivi o sostanze abrasive. Analogamente per i circuiti idraulici interni si deve evitare di utilizzare
sostanze aggressive e/o abrasive. Non pulire la macchina con getti d’acqua.
◆ Per pulire il portaltro ed i cestelli del ltro, preparare in un contenitore di plastica o acciaio inox
una soluzione con acqua calda e detergente, ed immergerli nella soluzione per almeno 30 minuti.
Sciacquarli con acqua pulita.
5

DICHIARAZIONE DI CONFORMITÀ
Prodotto :
◆Macchine per caffè espresso
Modello :
◆2/3/4 GR Pulsante /Elettronica /Levetta
B.F.C. srl dichiara sotto la propria responsabilità, che il prodotto soddisfa per progettazione
e costruzione i requisiti della direttiva:
1) DIRETTIVA BASSA TENSIONE
2006/95/CE (ex 93/68/CEE)
La conformità è stata vericata con l’ausilio delle seguenti norme armonizzate:
CEI EN 60335-1 / CEI EN 60335-2-14 / CEI EN 60335-2-14⁄A1
CEI EN 60335-2-15 / CEI EN 60335-2-15⁄A1 / CEI EN 60335-2-15⁄A2
2) DIRETTIVA COMPATIBILITA’ ELETTROMAGNETICA
2004/108/CE (ex 89/336/CEE 92/31/CEE 93/68/CEE)
La conformità è stata vericata con l’ausilio delle seguenti norme armonizzate:
CEI EN 55014-1 / CEI EN 55022
CEI EN 61000-3-2 / CEI EN 61000-3-3
CEI EN 61000-4-2 / CEI EN 61000-4-4 / CEI EN 61000-4-5
CEI EN 61000-4-6 / CEI EN 61000-4-8 / CEI EN 61000-4-11
3) DIRETTIVA ATTREZZATURE A PRESSIONE (PED)
97/23 (TÜV NORD System certicate No: 07 202 9080 Z) (0618/9/0144 REV01)
Le nostre macchine per caffè, sono conformi ai requisiti della direttiva 97/23 CE - Mo-
dulo A1 - Categoria II - e sono composte dalle seguenti apparecchiature che rientrano
nella direttiva stessa:
Caldaia in rame Marcata CE 0045
Valvola di sicurezza Marcata CE 0045
◆2002/95/CE RoHS
2002/96/CE RoHS
2003/108/CE RoHS
Sulla base delle nostre conoscenze, i nostri fornitori di materiali non utilizzano nella fab-
bricazione dei loro prodotti, le sostanze pericolose che sono elencate nelle Direttive CEE
sopramenzionate.
◆D.M. 21/03/73 D.M. nr. 227 - 4/05/2006
Legge italiana e suoi emendamenti.
◆Regolamento CE: 1935/2004 1895/2005
Relativa al ravvicinamento delle legislazioni degli STATI MEMBRI concernenti i mate-
riali e gli oggetti destinati a venire a contatto con i prodotti alimentari.
6

1. SAFETY WARNINGS
◆Check that the data on the machine corresponds to that of the electrical supply network, before
connecting the equipment.
◆ Adaptors, multiple sockets and /or extensionsmust not be used.
◆ When in doubt, request a detailed diagram of the supplied power from a qualied electrician.
The power supply must be provided with the following safety devices:
- efcient earthing connection;
- section of conductors suitable for absorption capacity;
- efcient earthing leakage protection circuit breaker.
◆Always press the main switch to 0 or disconnect the coffee machine from the mains before any
internal maintenance. Never put your hands or any object into the machine when it is connected
to the mains.
◆ Do not leave the machine exposed to environmental elements or place them in damp rooms such
as bathrooms... Do not leave water inside the appliance in environments where the temperature is
equal to or less than 0°C.
◆Do not obstruct the suction or dispersion grilles and do not cover with cloths, etc.
◆Only use original spare parts in order to avoid compromising the safety and proper functioning of
the machine.
◆In an emergency, such as re, unusual noise, overheating, etc., take immediate action, disconnect the
power and close gas and water taps.
◆If the appliance does not seem to be working correctly, switch it off and do not tamper with
it. Return it only to an aftersales service centre authorised by the manufacturer for repair and request
original spare parts.
The power cord of this appliance must not be replaced by the user. If the cord is damaged or needs
to be replaced, take it to an authorised after-sales service only.
◆Carefully keep this booklet for future reference. Contact our Repair Service for any maintenance
that is not described in this leaet.
Failure to comply with these warnings could jeopardise the safety of the
appliance. Improper installation can cause damage to people, animals and
things for which the manufacturer cannot be considered responsible.
2. PRECAUTIONARY MEASURES
This machine may only be used with foodstuffs. It cannot be used for heating liquids or grinding any
other kind of product that could damage and pollute it.
The manufacturer cannot be held responsible for damage to people or things caused by unsuitable,
erroneous or irrational use.
ESPRESSO COFFEE MACHINES
INSTALLATION and MAINTENANCE
Devised, designed and produced by us
7

3. INTRODUCTION
This booklet is a guide to rapid and easy use and maintenance of coffee machines.
Please read these instructions carefully.
The company garantees that should any defect or problem occur, it will provide its support through
its Repair Service points.
Have your coffee machine inspected by qualied personnel at least once a year. This
constant care will make your machine safer and more efcient.
Our coffee machines have been designed and manufacured in complicance with all specications that
distinguish traditional espresso coffee machines: noble materials such as copper and steel and reliable
components make alla machines made by the company safe, reliable and funciontal.
No liability can be accepted by the company for any damage to persons or things caused by non-com-
pliance with these instructions.
4. INSTALLATION
1) Remove the coffee machine from its parcking and check that it has not been damaged.
2) Place the appliance on a stable top, close to the mains sockets and water line connections.
Level the coffee machine by adjusting its feet. Check that the voltage of your mains supply corre-
sponds to that indicated in the technical specications.
3) Remove the front tray and use the hose (3/8”) provided to connect the machine inlet pipe to the
water purier (use only pipes approved for potable water as required by Italian Ministerial Decree
21.03.73 and later amendments). Connect the outlet pipe by xing it to the plastic tray (drainage)
(Photo 1). Switch on the water purier and check for any leaks.
(Observe the rules issued by the relevant authorities for each state, region or county).
4) Electrical installation of the machine must be carried out exclusively by qualied personnel, ac-
cording to the instructions in this manual and the standards in force in the country of installation. The
machine comes with a suitably tested 2.5 m long H07RN-F 5x2.5 mm2 power lead to which the tter
must connect an EN 60309 approved 3P+N+PE 16A - 400V industrial plug (not provided). Another
type of power lead could be provided if required by the customer or local standards.
As an alternative the tter may connect the power lead to an omnipole circuit breaker with character-
istics suitable for the electrical system involved, the standards in force in the country of installation and
IEC 60364-1. Before start-up the tter must make sure the machine has been properly connected to
the electrical and earthing systems involved and check the efciency of protection from direct contact,
as per IEC 60364-1.
IT IS STRICTLY FORBIDDEN TO USE THE MACHINE WITHOUT EFFECTIVE SAFE
EARTHING.
8
A: Water intake into the boiler
B: Outlet pipe
Carefully read the instructions above.

5. MACHINE IGNITION
1) Rotate the switch knob to position 1. The red indicator light comes on.
2) When the machine is switched on, the electronic card checks water level inside the boiler. After
approx. 3 seconds, the lling pump and solenoid valve are enabled
for lling.
3) In position 1 the coffee machine will automatically be filled with
water up to the pre-set level (level probe inside the boiler).
All machines come with a manual filling lever (fitted to the water
distribution unit) (Photo 2) which can be used in an emergency if
the automatic level control device is not working properly.
NB: Electronic models are fitted with a safety level indicator. If the probe does not detect water in the
boiler within 120’’, the machine stops and the keypad LEDs start to flash. To reset the alarm turn
the machine off then on again. If the problem remains, check that water is arriving from the water
circuit.
4) When the internal pump stops the water in the machine has reached the set level. Take the switch
to position 2.
5) When the switch is on position 2 the heating element
is activated, the green warning light comes on and the
heating element starts heating the water.
It is advisable that you dispense water for 5 seconds so
as to eliminate any air bubbles from the thermosyphon
circuit and for better thermal compensation.
6) Wait approximately 30 minutes to allow the machine to reach its
operating temperature. When the green warning light goes out the
set machine pressure has been reached. The red indicator light will
be always light (tension on the electrical circuit).
7) Adjust pressure inside the boiler to the usual specications by
means of the relevant screw on the pressure gauge.
(Photo 3: increases pressure; reduces pressure).
This operation must be carried out by a specialized tech-
nician.
8) Adjust coffee delivery pressure to the usual specications by
means of the relevant screw of the internal pump.
(Photo 4: increases pressure; reduces pressure).
This operation must be carried out by a specialized
technician.
9

6. SELECTOR ON POSITION 0,1,2,3
If the machine has an energy saving selector (position 0,1,2,3) it has
the characteristics listed below.
1) On position 0 the machine is off.
2) In position 1 the coffee machine will automatically be filled with water up to
the pre-set level (level probe inside the boiler).
3) On position 2 the selector activates just one of the heating elements (half
power); this saves energy when the machine is on stand-by.
4) On position 3 the selector activates both heating elements (full power) used
for operation.
7. ERGONOMIC MACHINE IGNITION
Ergonomic models have a general ON/OFF switch instead of selectors. To turn on the ma-
chine, proceed as follows.
1) Use the lever on the water distribution unit to ll the machine with water manually and check that
the water level is more than the minimum quantity and less than the maximum quantity (as indicated
on the level indicator).
NB: It is recommended that the boilers is filled before switching the machine on. (otherwise the heat-
ing element in the boiler will burn because of the absence of Water).
2) Start the red switch near the level indicator. Wait approximately 30 minutes to allow the machine
to reach its operating temperature.
3) Heat the groups by operating them a few times with hot water only.
4) When the green warning light goes out the set machine pressure has been reached.
This operation must be carried out by a specialized technician.
Steam and water are under pressure. SCALD HAZARD.
8. MACHINE OPERATION BY PUSH BUTTON /
LEVER / ELECTRONICS
1) Steam is delivered by turning the side knob with a steam cloud sing on it.
2) Hot water is delivered by means of the central knob (or side SB-ergonomic knob) with the hot water
drop sign.
With electronic machines press the tea-making button to deliver hot water.
3) To deliver coffee from the coffee spouts, ll the lter holder with the correct quantity of coffee and
having it pressed, put it back above the coffee spout and press the relevant push-button on the steel
front (if the machine is tted with an electronic console, refer to chapter 9).
4) With lever models lift the manual lever on the side of the unit to deliver coffee. To cut off delivery
lower the lever.
5) The double-range pressure gauge on the front constantly measures boiler pressure (0,9 - 1,1 BAR)
as well as coffee delivery pressure (8 - 10 BAR).
6) Frequently check the boiler level indicator and double-range pressure gauge.
9. INSTRUCTIONS FOR ELECTRONIC DOSING
See the special user’s manual for each model.
10

11
10. MAINTENANCE
◆Clean the steam wand after every use, so as to prevent scale deposits from obstructing the steam
outlet points.
◆ Empty and clean the coffee lters every evening; remove the lter and brush the inside with a suita-
ble brush; soak the lters in hot water in order to dissolve coffee greases.
◆Remove coffee residues from the drip tray, otherwise it could get clogged.
◆ Use the relevant blind lter supplied with the machine to wash the coffee spout with a special deter-
gent (obtainable from our repair centre points).
Proceed as follows:
1- Insert the blind lter in the the lter holder and add the amount of detergent indicated on the pack.
2- Insert the lter holder into the group head.
3- Start brew cycle for 10 seconds and stop for 10 seconds. Repeat this operation for 5 times.
4- Remove the lter holder from group head. Start brew cycle and rinse the lter holder with the
boiling water from group head.
Stop cycle.
5- Insert the lter holder into group head and repeat step 3 to rinse without detergent.
6- Replace the blind lter in the lter holder with the correct lter and make and discard an espresso.
◆ Clean the external parts of the machine with a damp cloth. Never use detergents or abrasive sub-
stances. Also for the interior hydraulic circuits must avoid to use aggressive and/or abrasive substanc-
es. Do not use jets of water to clean the machine.
◆ To clean the lter holder and the lters, leave them to soak for at least 30 minutes in a solution of
hot water and detergent prepared in a plastic or stainless steel container. Rinse them with clean water.

DECLARATION OF CONFORMITY
Product :
◆Espresso coffee machines
Types :
◆2/3/4 GR Switch/Electronic model /Lever model
B.F.C. srl declare here with on our own responsability that the above - metioned product
meets the requirements of the Directive:
1) LOW VOLTAGE DIRECTIVE
2006/95/CE (ex 93/68/CEE)
Confromity has been controlled with the aid of the following harmonized standards:
CEI EN 60335-1 / CEI EN 60335-2-14 / CEI EN 60335-2-14⁄A1
CEI EN 60335-2-15 / CEI EN 60335-2-15⁄A1 / CEI EN 60335-2-15⁄A2
2) ELECTROMAGNETIC COMPATIBILITY
2004/108/CE (ex 89/336/CEE 92/31/CEE 93/68/CEE)
Confromity has been controlled with the aid of the following harmonized standards:
CEI EN 55014-1 / CEI EN 55022
CEI EN 61000-3-2 / CEI EN 61000-3-3
CEI EN 61000-4-2 / CEI EN 61000-4-4 / CEI EN 61000-4-5
CEI EN 61000-4-6 / CEI EN 61000-4-8 / CEI EN 61000-4-11
3) PRESSURE DEVICE DIRECTIVE (PED)
97/23 (TÜV NORD System certicate No: 07 202 9080 Z) (0618/9/0144 REV01)
Our coffee machines are in compliance with the directive 97/23 CE - Form A1 - Cat-
egory II - and are equipped with the following items which are included in the same
directive:
Copper boiler Mardek CE 0045
Safety valve Mardek CE 0045
◆2002/95/CE RoHS
2002/96/CE RoHS
2003/108/CE RoHS
To the best of our knowledge, our material suppliers do not use in the manufacturer of
their products the hazardous substances which are listed in the above mentioned EU
Directives.
◆D.M. 21/03/73 D.M. nr. 227 - 4/05/2006
Italian law and its amendments.
◆Commision Regulation EC: 1935/2004 1895/2005
On the approximation of the laws of the MEMBER STATES relating to materials and
articles intended to come into contact with foodstuffs.
12

1. SICHERHEITSHINWEISE
◆Vor Anschluß der Maschine sich davon überzeugen, daß die auf dem Schild angegebenen Daten mit
jenen des am Installationsort vorhandenen Versorgungs-netzes übereinstimmen.
◆Vom Einsatz von Adaptern, Vielfachsteckdosen und/oder Verlängerungskabeln wird abgeraten.
◆Im Zweifelsfall die elektrische Anlage von einem Fachmann überprüfen lassen, welche den nachfol-
gend aufgeführten Sicherheitsvorschriften entsprechen muß:
- Sicherheitserdung;
- einen für den Leistungsbedarf angemessenen Kabeldurchmesser;
- Leitungsschutzschalter.
◆ Vor beginn jeder inneren Wartungsarbeit den Hauptschalter auf Position 0 stellen oder ausziehen
den Netzstecker. Ist die Maschine an das Stromnetz angeschlossen, nie die Hände oder Gegenstände
ins Maschineninner e bringen.
◆ Die Maschine nicht Witterungseinüssen aussetzen und in feuchten Räumen wie Badezimmer in-
stallieren. Das Gerät nicht in Umgebungen mit Temperaturen unter oder gleich 0°C mit Wasser
befüllt lassen.
◆ Die Gitter zur Ansaugung und Verteilung nicht verstopfen und die Oberäche zur Erwärmung der
Kaffeetassen nicht mit Tüchern oder Anderem abdecken.
◆Zum Austausch von defekten Teilen nur vom Hersteller genehmigte Ersatzteile verwenden. Dies
gewährleistet Funktionstüchtigkeit ohne Störungen.
◆Im Notfall, wenn die Maschine Feuer fangen sollte, merkwürdige Geräusche von sich gibt oder
sich überhitzen sollte, sofort den Netzstecker ziehen und Gas- und Wasserzufuhr abdrehen.
◆Das Gerät im Falle von Defekten und/oder Funktionsstörungen ausschalten und nicht manipulie-
ren. Für eventuelle Reparaturen wenden Sie sich bitte ausschließlich an ein autorisiertes Kunden-
dienstzentrum des Herstellers und verlangen den Einsatz von Originalersatzteilen.
Das Stromversorgungs Kabel des Geräts muss nicht vom Benutzer ersetzt werden. Wenn das Kabel
beschädigt oder ersetzt werden muss, sich an einem autorisierten Service-Center wenden.
◆Diese Bedienungsanleitung für eine zukünftige Einsichtnahme sorgfältig aufbewahren. Sollen an-
dere, als die hier beschriebenen Vorgänge ausgeführt werden, wenden Sie sich an eine unserer
Kundendienstellen.
Die Nichteinhaltung diese Warnungen beeinträchtigt die Gerätesicherheit.
Eine nicht fachgerechte Installation kann zu Personen- und Sachschäden
führen, für die der Hersteller nicht verantwortlich gemacht werden kann.
2. UNZWECKMÄSSIGER GEBRAUCH
Die Maschine darf nur für den Gebrauch eingesetzt werden, für den sie ausdrücklich entworfen wor-
den ist. In den Filterträger nur gemahlenen Kaffee füllen, da dieser sonst beschädigt werden könnte.
Der Hersteller übernimmt für eventuelle Schäden, die durch ungeeigneten, falschen oder unvernünfti-
gen Gebrauch durch nicht informierte Bediener hervorgerufen worden sind, keinerlei Verantwortung.
ESPRESSOMASCHINEN
MONTAGE und WARTUNG
Von uns, die wir uns die Maschinen ausdenken,
entwicheln und produzieren
13
This manual suits for next models
2
Table of contents
Languages:
Other Rosito BisanI Coffee Maker manuals