Rotem communicator User manual

Communicator
User’s Manual

Page 1 of 82 Revision No.: 1.5
WARRANTY & LIMITATION OF LIABILITY
1. ROTEM warrants that the product shall be free of defects in materials or
workmanship and will conform to the technical specification for a period of 1 (one)
year from the date of initial installation on sight (the "warranty period").
2. Load cells are not covered by ROTEM’s warranty.
3. ROTEM warrants that during said warranty period, any item/items or part/parts of
equipment found defective with respect to materials or workmanship or which do not
conform to the technical specification shall be repaired or replaced (at ROTEM's sole
discretion) , free of charge.
4. During the warranty period, in the event of an alleged defect, authorized reseller in
relevant region should be reported as soon as possible from the date of noticing the
said defect, but no longer than thirty (30) days from such a discovery. The report shall
include (1) a short description of the defects noticed (2) type of card / component and
its' matching serial number.
5. ROTEM's sole liability under this warranty is the repair or replacement of the
defective item of product.
Conditions and Limitations
1. ROTEM will not be responsible for any labor costs or expenses associated with
replacement of defective items or other part of the product or repair.
2. This warranty shall not cover: (i) product or part therein which has been modified
(without prior written approval of ROTEM), or (ii) product or part therein which has not
handled or installed by ROTEM's authorized reseller or (iii) product or part therein
which has either handled or installed not in strict accordance with ROTEM's
instructions, (iv) products which where used for function other then agriculture
industry.
3. This warranty will not apply in the following cases: (i) if all components of the product
are not originally supplied by ROTEM (ii) the defect is the result of act of nature,
lighting strikes, electrical power surge or interruption of electricity (iii) the defect is the
result of accident, misuse, abuse, alteration, neglect, improper or unauthorized
maintenance or repair.
ROTEM worn and alert all users that the Product is inherently complex and may not be
completely free of errors. ROTEM's products are designed and manufactured to provide
reliable operation. Strict tests and quality control procedures are applied to every product.
However, the possibility that something may fail beyond our control exists. Since these
products are designed to operate climate control and other systems in confined livestock
environments, where failure may cause severe damage, the user should provide adequate
back up and alarm systems. These are to operate critical systems even in case of a
ROTEM system failure. Neglecting to provide such a backup will be regarded as the user’s
willingness to accept the risk of loss, injury and financial damage.
In no event will ROTEM be liable to user or any third party for any direct, indirect,
special, consequential or incidental damages, including but not limited to any damage
or injury to business earnings, lost profits or goodwill, personal injury, costs of delay,
any failure of delivery, costs of lost or damaged data or documentation, lost or
damaged products or goods, lost sales, lost orders, lost income.
Except of the above express warranty, ROTEM makes no other warranties, express
or implied, relating to the products. ROTEM disclaims and excludes the implied
warranties of merchantability and fitness for a particular purpose. No person is
authorized to make any other warranty or representation concerning the performance
of the products other than as provided by ROTEM.
Software Version: 2.14r1
Document Version: 1.5
ROTEM Computerized Controllers Ltd. 972-3-920-6200 FAX: 972-3-924-9834 ISRAEL

Page 2 of 82 Revision No.: 1.5
Table of Contents
TABLE OF FIGURES.................................................................................................4
1) USER'S PROFILE ..................................................................................................7
1.1 Description .............................................................................................7
1.2 Main Features ........................................................................................7
2) ABBREVIATIONS..................................................................................................7
3) USER INTERFACE................................................................................................8
1. Front Panel ........................................................................................8
2. Hot Keys ............................................................................................9
4) COMMUNICATION SETTING..........................................................................13
I) Initial Setup .............................................................................................13
1. Hardware Profile .................................................................................13
2. Local Network Setup...........................................................................13
3. Regional Setting .................................................................................13
II) Advanced Settings .................................................................................14
1. Local Network.........................................................................................14
1.1 My Farm............................................................................................15
1.2 Controller Port...................................................................................15
1.3 Serial Port .........................................................................................15
1.4 Test...................................................................................................16
1.4.1 RS232/RS485 ............................................................................16
1.4.2 RF ..............................................................................................16
1.5 Network List ......................................................................................17
2. Regional Setting .....................................................................................17
3. Security ..................................................................................................17
4. Modem ...................................................................................................18
4.1 Line Modem ......................................................................................18
4.1.1 Setup..........................................................................................19
4.1.2 Pager (send page)......................................................................20
4.1.2.1 Pager Setup ............................................................................20
4.1.2.2 Test (send page) .....................................................................21
4.1.3 Dial Out ......................................................................................21
4.1.4 Phone Line .................................................................................22
4.2 GSM Modem.....................................................................................22
4.2.1 Setup..........................................................................................22
4.2.2 Signal Strength...........................................................................22
4.2.3 Send SMS ..................................................................................23
5. Address Book .........................................................................................23
5.1 Contact Group ..................................................................................23
5.2 Options .............................................................................................24
6. Event Viewer ..........................................................................................24
6.1 Application ........................................................................................24
6.2 Security.............................................................................................24
6.3 System..............................................................................................25
7. Alarm......................................................................................................25
7.1 Network.............................................................................................25
7.1.1 Reset..........................................................................................25
7.2 Communicator ..................................................................................26

Page 3 of 82 Revision No.: 1.5
7.2.1 Reset..........................................................................................26
7.2.2 Options.......................................................................................27
7.2.3 View ...........................................................................................27
7.2.4 Disable Alarm.............................................................................27
7.3 Test (relay)........................................................................................27
8. Accessories ............................................................................................28
8.1 Digital Input.......................................................................................28
8.1.1 Setup..........................................................................................28
8.1.2 Test ............................................................................................29
8.2 Relay.................................................................................................29
8.2.1 Setup..........................................................................................29
8.2.2 Test ............................................................................................30
8.3 Save / Restore Settings ....................................................................30
8.3.1 Restore.......................................................................................30
8.3.2 Save ...........................................................................................30
9. System ...................................................................................................31
9.1 Hardware Profile ...............................................................................31
9.2 Voice.................................................................................................31
9.3 Battery ..............................................................................................32
9.3.1 Battery Test................................................................................32
9.3.2 Options.......................................................................................33
9.4 Test...................................................................................................34
9.4.1 RS232/RS485 ............................................................................34
9.4.2 RF ..............................................................................................34
9.4.3 Pager..........................................................................................35
9.4.4 Dial Out ......................................................................................35
9.4.5 Phone Line .................................................................................36
9.4.6 GSM Signal ................................................................................36
9.4.7 SMS ...........................................................................................36
9.4.8 Alarm Relay................................................................................37
9.4.10 Relays ......................................................................................37
9.4.11 EEPROM..................................................................................38
9.4.12 Voice ........................................................................................38
9.4.13 Battery......................................................................................38
9.4.14 Keyboard..................................................................................39
5) SENDING TEST MESSAGE COMMANDS AND STATUS REQUESTS
FROM / TO THE COMMUNICATOR...................................................................40
6) NETWORK SETUP..............................................................................................41
7) VOICE – DIALING TO THE COMMUNICATOR..........................................42
8) VOICE DIAL OUT TO CONTACT LIST..........................................................43
9) FLOW CHART OF VOICE DIAL OUT PROCESS.........................................44
10) SPECIFICATION ...............................................................................................46
11) INSTALLATION.................................................................................................47
11.1 Network Connection ...........................................................................53
Connecting the External Connection box to Rotem's controllers using RS-
232 Card .................................................................................................53
Approximate Distances & Baud rate ...................................................54

Page 4 of 82 Revision No.: 1.5
Connecting the External Connection box to Rotem's controllers using RS-
485 Card .................................................................................................55
Approximate Distances & Baud rate ...................................................56
11.2 RF Network Connection .....................................................................57
Option A with Platinum Plus RF (RCLP-RF) ...........................................57
Option B with Platinum Plus RF Remote ................................................58
11.3 Routing Considerations ......................................................................59
12) APPENDIX A: TROUBLESHOOTING...........................................................60
Hardware ................................................................................................60
Communication.......................................................................................60
Cellular Modem.......................................................................................62
RF Communication .................................................................................62
Voice Card ..............................................................................................63
Alarm ......................................................................................................63
Line Modem ............................................................................................64
13) APPENDIX B: RF...............................................................................................65
14) APPENDIX C: ALARM CODE NUMBERS....................................................68
15) APPENDIX D: USB DRIVER INSTALLATION............................................72
1) Files attached.........................................................................................72
2) Driver Installation ...................................................................................72
2.1) Driver Installation using Windows XP ..............................................72
2.2) Driver Installation using Windows 2000 ...........................................77
2.3) Virtual COM Port Driver Installation Windows 98 SE.......................78
16) APPENDIX E: ORDERING INFORMATION................................................79
Table of Figures
Fig. 1: Front Panel................................................................................................................. 8
Fig. 2: Example of using Hot Key '0' .................................................................................. 11
Fig. 3: Main menu screenshot – part 1................................................................................ 14
Fig. 4: Main menu screenshot – part 2................................................................................ 14
Fig. 5: Main menu screenshot – part 3................................................................................ 14
Fig. 6: Main Menu screenshot............................................................................................. 14
Fig. 7: Farm/Site option screenshot..................................................................................... 15
Fig. 8: Local Network menu screenshot.............................................................................. 15
Fig. 9: Controllers Port option screenshot If yes RF there are jumpers > Appendix........... 15
Fig. 10: Serial Port option screenshot.................................................................................... 16
Fig. 11: Modem menu screenshot ......................................................................................... 16
Fig. 12: 'Communication' option screenshot ......................................................................... 16
Fig. 13: 'RF Test' option screenshot ...................................................................................... 16
Fig. 14: RF screenshot........................................................................................................... 17
Fig. 15: 'Network List' menu screenshot ............................................................................... 17
Fig. 16: 'Regional Setting' menu screenshot.......................................................................... 17
Fig. 17: 'Security' option screenshot...................................................................................... 18
Fig. 18: 'Modem' menu screenshot........................................................................................ 18
Fig. 19: Line Modem menu screenshot – part 1.................................................................... 18
Fig. 20: Line Modem menu screenshot – part 2.................................................................... 19
Fig. 21: 'Line Modem' menu screenshot – Part 1 .................................................................. 19
Fig. 22: 'Line Modem' menu screenshot – Part 2 .................................................................. 19

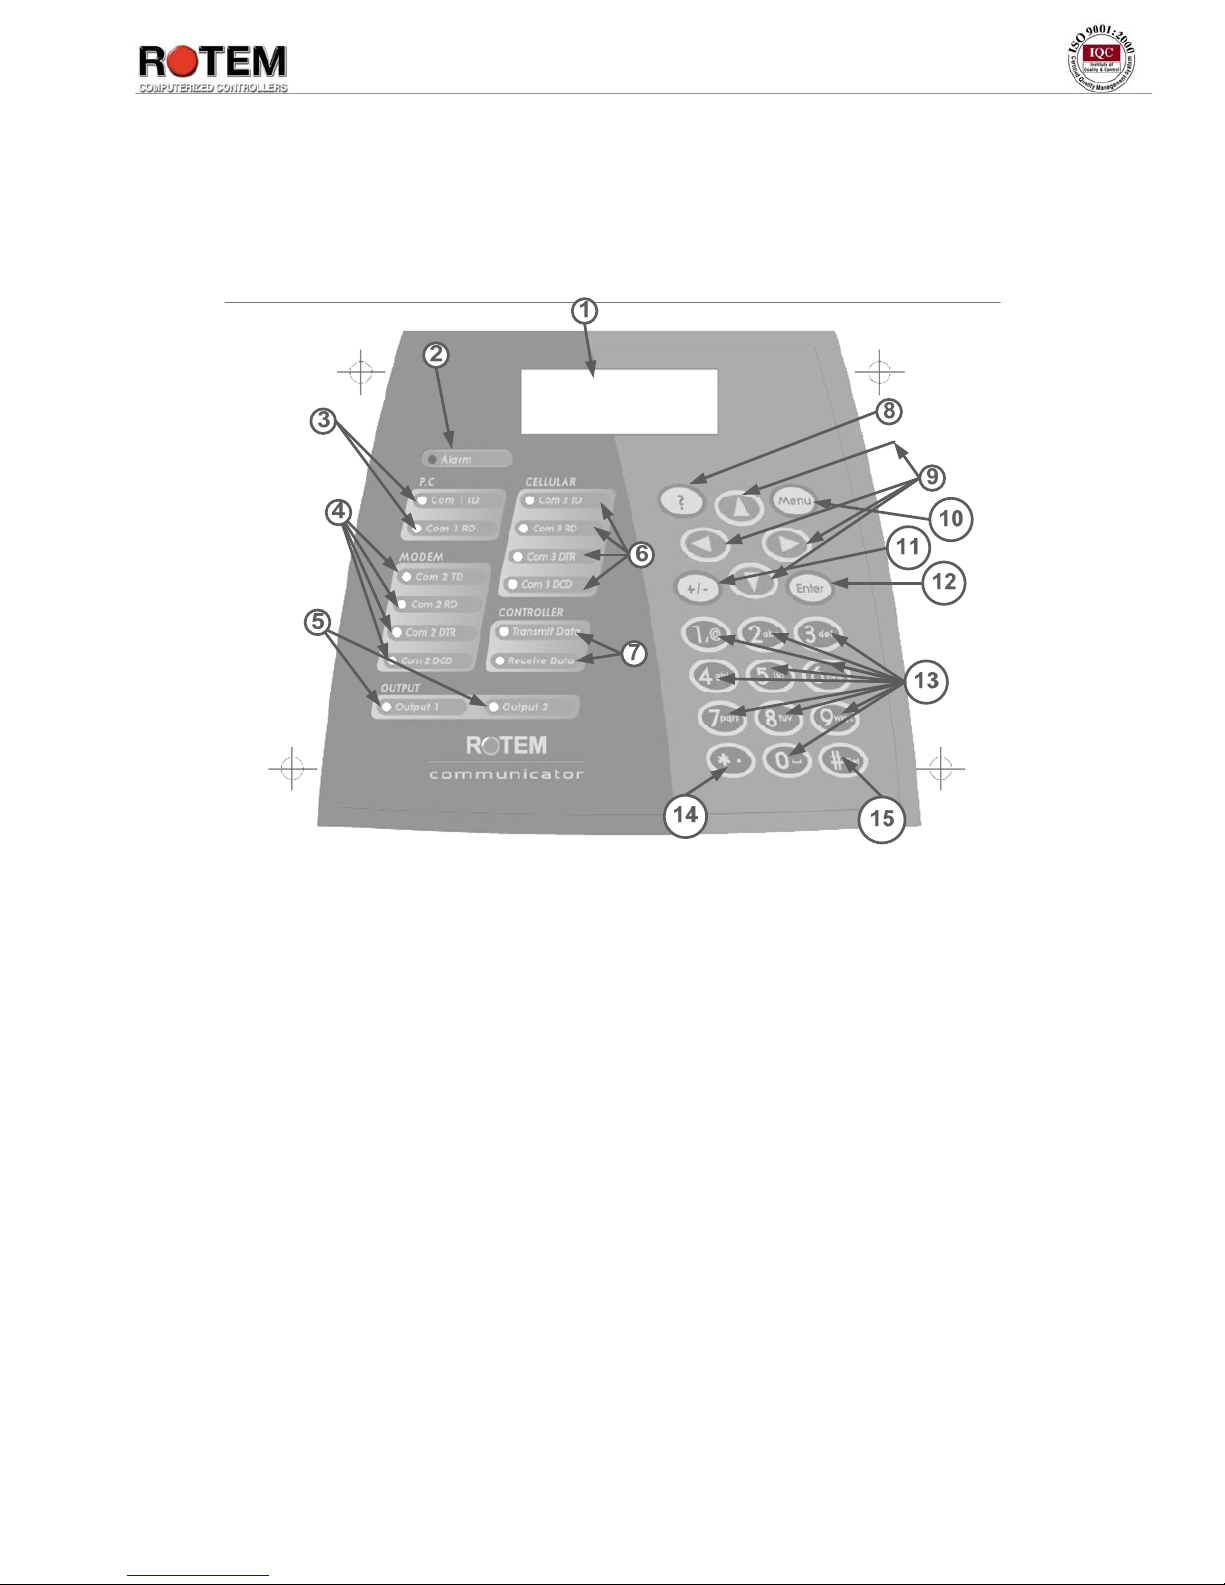
Page 5 of 82 Revision No.: 1.5
Fig. 23: Advanced screenshot................................................................................................ 20
Fig. 24: Pager screenshot....................................................................................................... 20
Fig. 25: Test screenshot – part 1............................................................................................ 21
Fig. 26: Test screenshot – part 2............................................................................................ 21
Fig. 27: 'Dial Out' option selection Screenshot ..................................................................... 21
Fig. 28: 'Phone Line' option selection screenshot.................................................................. 22
Fig. 29: 'GSM Modem' menu screenshot .............................................................................. 22
Fig. 30: 'Cellular Modem' option screenshot......................................................................... 22
Fig. 31: 'Signal Strength' option screenshot .......................................................................... 22
Fig. 32: 'Send SMS' option screenshot.................................................................................. 23
Fig. 33: 'Address Book' menu screenshot.............................................................................. 23
Fig. 34: 'Options' menu screenshot........................................................................................ 24
Fig. 35: 'Event Viewer' menu screenshot .............................................................................. 24
Fig. 36: 'Application Event' option screenshot...................................................................... 24
Fig. 37: 'System Event' option screenshot............................................................................. 25
Fig. 38: 'Alarm' menu screenshot.......................................................................................... 25
Fig. 39: 'Network' menu screenshot....................................................................................... 25
Fig. 40: Reset screenshot....................................................................................................... 26
Fig. 41: Reset screenshot after clicking on '?' key................................................................. 26
Fig. 42: 'Communicator' menu screenshot............................................................................. 26
Fig. 43: 'Reset Alarm' option screenshot............................................................................... 27
Fig. 44: 'Alarm Options' features screenshot......................................................................... 27
Fig. 45: 'Alarm Viewer' features screenshot.......................................................................... 27
Fig. 46: 'Accessories' menu screenshot ................................................................................. 28
Fig. 47: 'Digital Input' menu screenshot................................................................................ 28
Fig. 48: 'Setup' selection screenshot...................................................................................... 28
Fig. 49: 'Test' selection screenshot ........................................................................................ 29
Fig. 50: Relay menu screenshot............................................................................................. 29
Fig. 51: Relays setting screenshot ......................................................................................... 29
Fig. 52: 'Relays Test' option screenshot ................................................................................ 30
Fig. 53: 'Save/Restore Setting' menu screenshot................................................................... 30
Fig. 54: 'Memory Restore Point' selection screenshot........................................................... 30
Fig. 55: 'Save' selection screenshot ....................................................................................... 31
Fig. 56: 'System' menu screenshot......................................................................................... 31
Fig. 57: Hardware Profile screenshot.................................................................................... 31
Fig. 58: 'Voice Setting' menu screenshot............................................................................... 32
Fig. 59: 'Battery' menu screenshot......................................................................................... 32
Fig. 60: Battery Test screenshot............................................................................................ 32
Fig. 61: Power Options screenshot........................................................................................ 33
Fig. 62: 'System Test' menu screenshot................................................................................. 34
Fig. 63: 'Communication' option screenshot ......................................................................... 34
Fig. 64: 'RF Test' option screenshot ...................................................................................... 34
Fig. 65: RF screenshot........................................................................................................... 35
Fig. 66: Test screenshot – part 1............................................................................................ 35
Fig. 67: Test screenshot – part 2............................................................................................ 35
Fig. 68: 'Dial Out' option selection Screenshot ..................................................................... 36
Fig. 69: 'Phone Line' option selection screenshot.................................................................. 36
Fig. 70: 'Signal Strength' option screenshot .......................................................................... 36
Fig. 71: 'Send SMS' option screenshot.................................................................................. 36
Fig. 72: Alarm Relay screenshot ........................................................................................... 37
Fig. 73: 'Test' selection screenshot ........................................................................................ 37
Fig. 74: Relays Test screenshot............................................................................................. 37
Fig. 75: EEPRO Test screenshot ........................................................................................... 38
Fig. 76: 'Voice Setting' menu screenshot............................................................................... 38
Fig. 77: Battery Test screenshot............................................................................................ 38
Fig. 78: Keyboard screenshot................................................................................................ 39

Page 6 of 82 Revision No.: 1.5
Fig. 79: Hot key '0' ................................................................................................................ 41
Fig. 80: 'Auto Answer' screenshot......................................................................................... 42
Fig. 81: 'Voice Dial In' parameter screenshot........................................................................ 42
Fig. 82: 'Hardware Profile' menu screenshot......................................................................... 47
Fig. 83: 'Battery Test' selection screenshot............................................................................ 47
Fig. 84: Functional block diagram......................................................................................... 48
Fig. 85: Wiring Diagram using RF communication card...................................................... 49
Fig. 86: Wiring Diagram using RF communication card – external view............................. 51
Fig. 87: External connection box wiring diagram................................................................. 52
Fig. 88: Connection with RS-232 card wiring diagram......................................................... 53
Fig. 89: Connection with RS-485 card wiring diagram......................................................... 55
Fig. 90: Adjusting the volume............................................................................................... 64
Fig. 91: Channel explanation................................................................................................. 66
Fig. 92: Install Driver screenshot .......................................................................................... 72
Fig. 93: Software Installation screenshot – part 1................................................................. 73
Fig. 94: Software Installation screenshot – part 2................................................................. 73
Fig. 95: Pre-installer screenshot ............................................................................................ 74
Fig. 96: Hardware Wizard USB Communicator screenshot – part 1..................................... 74
Fig. 97: Hardware Installation screenshot............................................................................. 75
Fig. 98: Hardware Wizard USB Communicator screenshot – part 2..................................... 75
Fig. 99: Hardware Wizard Communicator screenshot – part 1............................................. 76
Fig. 100: Hardware Installation screenshot............................................................................. 76
Fig. 101: Hardware Wizard Communicator screenshot – part 2............................................. 77
Table of Tables
Table 1: Hot keys summary..................................................................................................... 10
Table 2: Baud rate states.......................................................................................................... 65
Table 3: Jumper modes summary............................................................................................ 65
Table 4: RF performance range............................................................................................... 66
Table 5: Potential Signal Strength Loss due to Antenna Cable Length .................................. 67

Page 7 of 82 Revision No.: 1.5
1) User's Profile
This manual is meant to be used by either any grower or its' authorized personnel
who own any kind of either a farm or a greenhouse.
1.1 Description
ROTEM Communicator is a device for alarm purposes and central communication
systems.
The Communicator has a user friendly interface with an alfa-numeric keypad, 20
character X 4 line LCD and indicative LED.
1.2 Main Features
1. Supports several communication sources and can link to any / all ROTEM
controllers simultaneously.
2. Plugs in voice solution, supports incoming and outgoing phone calls in
case of alarms and status reports. Voice messages can be edited according
to personal preference.
3. Plugs in analog modem can speed up to 56Kbit with V.92, USB, Data and
Voice Functions.
4. Plugs in cellular modem (GSM/GPRS) providing two-way wireless
capabilities via GSM services
5. Mobile originated and mobile terminated SMS messages.
6. 8 Digital Inputs
7. 3 Dry Contact, Output Relays 5 Amp
8. Battery Backup
2) Abbreviations
Abbreviation Meaning Description
RD Receive Data
TD Transmit Data
DTR Data Terminal Ready
DCD Data Carrier Detect
LED Light Emitting Diode – an electronic
device used to indicate the status of
various functions on the front panel.

Page 8 of 82 Revision No.: 1.5
3) User Interface
1. Front Panel
Fig. 1: Front Panel
Available Keys
Every item is explained according to its' number seen in Fig. 1.
1. Main menu screen.
2. Alarm LED – is activated when one or more alarm conditions are detected.
The LED is turned off after doing 'Reset' and by that is acknowledged. When
the LED is off the controller will show Normal state, and all alarms are in
reset mode in all houses.
3. P.C. LEDs – when their lights turn on indicates an existence of PC
communication.
▪'Com 1 TD': indicating communication in PC TD.
▪'Com 1 RD': indicating communication in PC RD.
4. Modem LEDs – when their lights turn on, indicates an existence of Modem
communication.
•'Com 2 TD': indication communication in PC TD.
•'Com 2 RD': indicating communication in PC RD.
•'Com 2 DTR': indicating the modem communication operates well.
•'Com 2 DCD': indicating communication in DCD.
5. Output LEDs – when their lights turn on, indicates the relay's status.
6. Cellular LEDs – when their lights turn on indicates an existence of Cellular
communication.

Page 9 of 82 Revision No.: 1.5
•'Com 3 TD': indicating communication existence in Cellular TD.
•'Com 3 RD': indicating communication existence in Cellular RD.
•'Com 3 DTR': indicating communication existence in Cellular DTR.
•'Com 3 DCD': indicating communication existence in Cellular DCD.
7. Controller LEDs – when their lights turn on indicates a Controller
communication existence.
•'Transmit Data': indicating communication existence in the controller
concerning transmitting data.
•'Receive Data': indicating communication existence in the controller
concerning receiving data.
8. Serves as a Help key. Press the help key at any time to receive a short helpful
explanation concerning the screen you are currently viewing.
In order to exit ‘?’ screen at any time, press the 'MENU' key.
9. Arrow keys: These keys move around the menus, and help make selections. In
some cases you can also use them to change values.
10. This key displays the main menu from the standard screen, and is used as an
"escape" key to exit menus you are currently in.
11. This key changes values between positive and negative numbers, and makes
check-mark choices when checking or selecting options are needed.
12. 'ENTER' key serves as a selective confirmation key.
13. Use these keys to insert numbers or text. For example, the option of Address
book enables to select both numeric and alphanumeric values. Note that
number '1' LED can serve as a comma key when needed.
14. This key lets you insert decimal point if necessary.
15. This key erases typing mistakes. It also enables the ‘Cold Start’ function when
held at power on (see Table 1 for further explanation).
2. Hot Keys
The Communicator incorporates keys enable quick access information of
different varieties (see Table 1).

Page 10 of 82 Revision No.: 1.5
Table 1: Hot keys summary
Action Keys to press Explanation
Local Network Press on '0' key This feature makes sure that
the controllers you connected
to the system are actually
recognized (see Fig. 2).
Lock the system based
on an initialized
password
Press on '9' key.
Otherwise, the system
will be automatically
locked after 5 minutes.
This is a security hot key and
it will instantly lock the
system based on the
initialized password (refer to
Security section in the
Initial Setup chapter).
Cold Start 1. Disconnect the
communicator by
switching the battery off.
2. Turn power on while
pressing and holding the
'#Del' key until Cold
Start pop-up screen
appears.
3. If 'NO' is selected, the
communicator continues
to its usual power up
procedure and the
settings will remain
untouched.
4. If 'YES' is chosen,
Cold Start procedure
begins; all control
settings including update
drivers for all devices.
The history will be
erased and restored back
to the factory default
settings, switch battery
on.
This procedure resets the
communicator to the original
factory settings. It should be
performed after replacing a
software version, either when
reinstalling or when
instructed by ROTEM's
technician.
Version Press on '?' key To check kinds of version
numbers such as software,
hardware.

Page 11 of 82 Revision No.: 1.5
Fig. 2: Example of using Hot Key 0
Note that the squares (see Fig. 2) describe the houses do not have to be
sequential. The squares can be one of the following:
•Empty squares represent non-identified controllers.
•Filled squares represent identified controllers.
•The letter 'F' indicates there is an alarm. This sign also appears after
reset operation.

Page 12 of 82 Revision No.: 1.5
Fig. 3: Communicator's menu structure

Page 13 of 82 Revision No.: 1.5
4) Communicator Setting
Cold Start procedure is committed with every software change. Restoring old setting
is always recommended.
I) Initial Setup
1. Hardware Profile
Go to Menu 9.1 (see Fig. 3) that defines the Hardware Profile and check whether the
Communicator recognizes the hardware. If the communicator did not recognize all of
the connected hardware, please refer to Appendix A.
2. Local Network Setup
After making sure the Communicator's hardware is ok adapt the Communicator to
Rotem controllers by either hard wired 485/RS232 or RF.
Go to menu 1.2 (see Fig. 3) and set the next parameters:
•Baud Rate: Set according to the controllers Baud rate. The recommended
rate is 9600.
•Primary Units: Insert the number of master controllers, for example -
Platinum Plus.
•Secondary Unit: Insert the number of slave controllers. Note that when
exiting this menu, the communicator will reset in order to save changes.
3. Regional Setting
Go to menu 2(see Fig. 3) and fill in the correct clock time, date and region of the
communicator. The communicator will reset in order to build Network Objects.

Page 14 of 82 Revision No.: 1.5
II) Advanced Settings
Fig. 4 – 6 demonstrate the available options the main menu offers.
Fig. 4: Main menu screenshot – part 1
Fig. 5: Main menu screenshot – part 2
Fig. 6: Main menu screenshot – part 3
1. Local Network
Fig. 7: Main Menu screenshot
These menus function as network definition tools and help you determine the right
communication configuration suitable for your needs (Fig. 7 results pressing 'Menu'
key).

Page 15 of 82 Revision No.: 1.5
1.1 My Farm
Fig. 8: Farm/Site option screenshot
a) Select option 1 from previous section and press 'ENTER'.
b) Insert the farm / site name using numeric text box keys (see Fig. 8).
1.2 Controller Port
Fig. 9: Local Network menu screenshot
Menu 1.2 (see Fig. 3) defines the basic applications and communication settings for
the Communicator (see Fig. 9). Wrong defenition can result alarms for missing
controllers or prevent communication from unidentefied controllers.
Fig. 10: Controllers Port option screenshot If yes RF there are jumpers > Appendix
Baud Rate setting must match all controllers otherwise the communication will not
operate. The default setting is 9600bps (see Fig. 10). Make sure the same rate is set to
all controllers both primary and secondary units connected to the communicator.
1.3 Serial Port
The serial port (see Fig. 11) connects between the Communicator and the PC
software. The baud rate set must be identical to the one set on the PC communication
software in order to establish communication. The default is also 9600bps. Note that
this is also being used for USB.

Page 16 of 82 Revision No.: 1.5
Fig. 11: Serial Port option screenshot
1.4 Test
Fig. 12: Modem menu screenshot
This menu helps you test communication between Primery controllers and the
communicator. Each controller is named by number, allowing the Communicator to
identify and test the connection with it (see Fig. 12).
1.4.1 RS232/RS485
Fig. 13: Communication option screenshot
In order to test comminication, insert the controller’s number and press 'ENTER'
to start / stop the test procedure (see Fig. 13). 'Tx' means “Transmited data” and
'Rx' means “Received data”. In order to indicate good communication both
indicators must flash allternaitly.
1.4.2 RF
Fig. 14: RF Test option screenshot

Page 17 of 82 Revision No.: 1.5
The RF test menu (see Fig. 14) checks the signal strength received from a certain
controller.
Fig. 15: RF screenshot
Set the controller's number in your network and press 'ENTER'. A signal strength is
received. Can be one of the six following options: "No Connection", "Very Low",
"Low", "Good", "Very Good" (see Fig. 15) and "Excellent".
Decent communication can be achived by low signal as well.
1.5 Network List
Fig. 16: Network List menu screenshot
In the menu (see Fig. 16) number of controllers detected by the communicator is
displayed.
Use the '+/-' key to change from 'NO' to 'YES' and press 'ENTER' to scan the network
for changes. The system will restart and rescan the network automatically. Make sure
all controllers are found in the menu list.
2. Regional Setting
Fig. 17: Regional Setting menu screenshot
The main purpose of this option is to adjust the communicator to the local phone
system, time and date (see Fig. 17).
3. Security
Use the security feature to protect your Communicator.

Page 18 of 82 Revision No.: 1.5
Fig. 18: Security option screenshot
Type password;
•Retype for conformation and verify by selecting 'YES' (see Fig. 18). The
system locks down automatically after 5 minutes.
•In order to perform an instant lockdown press key number '9' (from the
main screen).
•In order to change or disable the security feature, type the password to
unlock the system.
•Go to the security menu and type a new password. Verification of the new
password is required.
•If you wish to disable the security feature leave the password '0000' and
press the 'ENTER' key twice.
4. Modem
Fig. 19: Modem menu screenshot
Fig. 19 demonstrates selection of option 4 in Main Menu.
4.1 Line Modem
This option offers a variety of choices regarding setting and viewing line modem (see
Fig. 20-21).
Fig. 20: Line Modem menu screenshot – part 1

Page 19 of 82 Revision No.: 1.5
Fig. 21: Line Modem menu screenshot – part 2
4.1.1 Setup
Fig. 22: Line Modem menu screenshot – Part 1
Fig. 23: Line Modem menu screenshot – Part 2
An explanation regarding the fields mentioned in Fig. 22-23 is provided below;
a) Auto Answer: Number of rings before auto answering. For example, if number '4'
is set, the communicator will answer a call after 4 rings.
b) Line Test: Select 'YES' to monitor the phone line and activate an alarm in case of a
disconnection.
c) Dial Delay: When dialing a pager service, some services require additional tone
menu browsing. Use this feature to set a delay between the phone number and the
tone browsing. Each “,” will represent the number of seconds in delay between the
phone number and the next browsing number.
d) Input Gain: For factory use only. If your communicator is unable to connect your
voice dial in phone line, consult your local dealer regarding this feature.
e) Advanced (see Fig. 24):
Table of contents
Other Rotem Cell Phone manuals