RotoBed FREE User manual

User Manual
RotoBed®Free

2
Table of Contents
1 | Introduction and general information .............................................................................................................................................................................. 3
1.1 | RotoBed®Free –an innovative rotating bed.............................................................................................................................................................3
2 | Before commissioning .......................................................................................................................................................................................................4
2.1 | Reception....................................................................................................................................................................................................................4
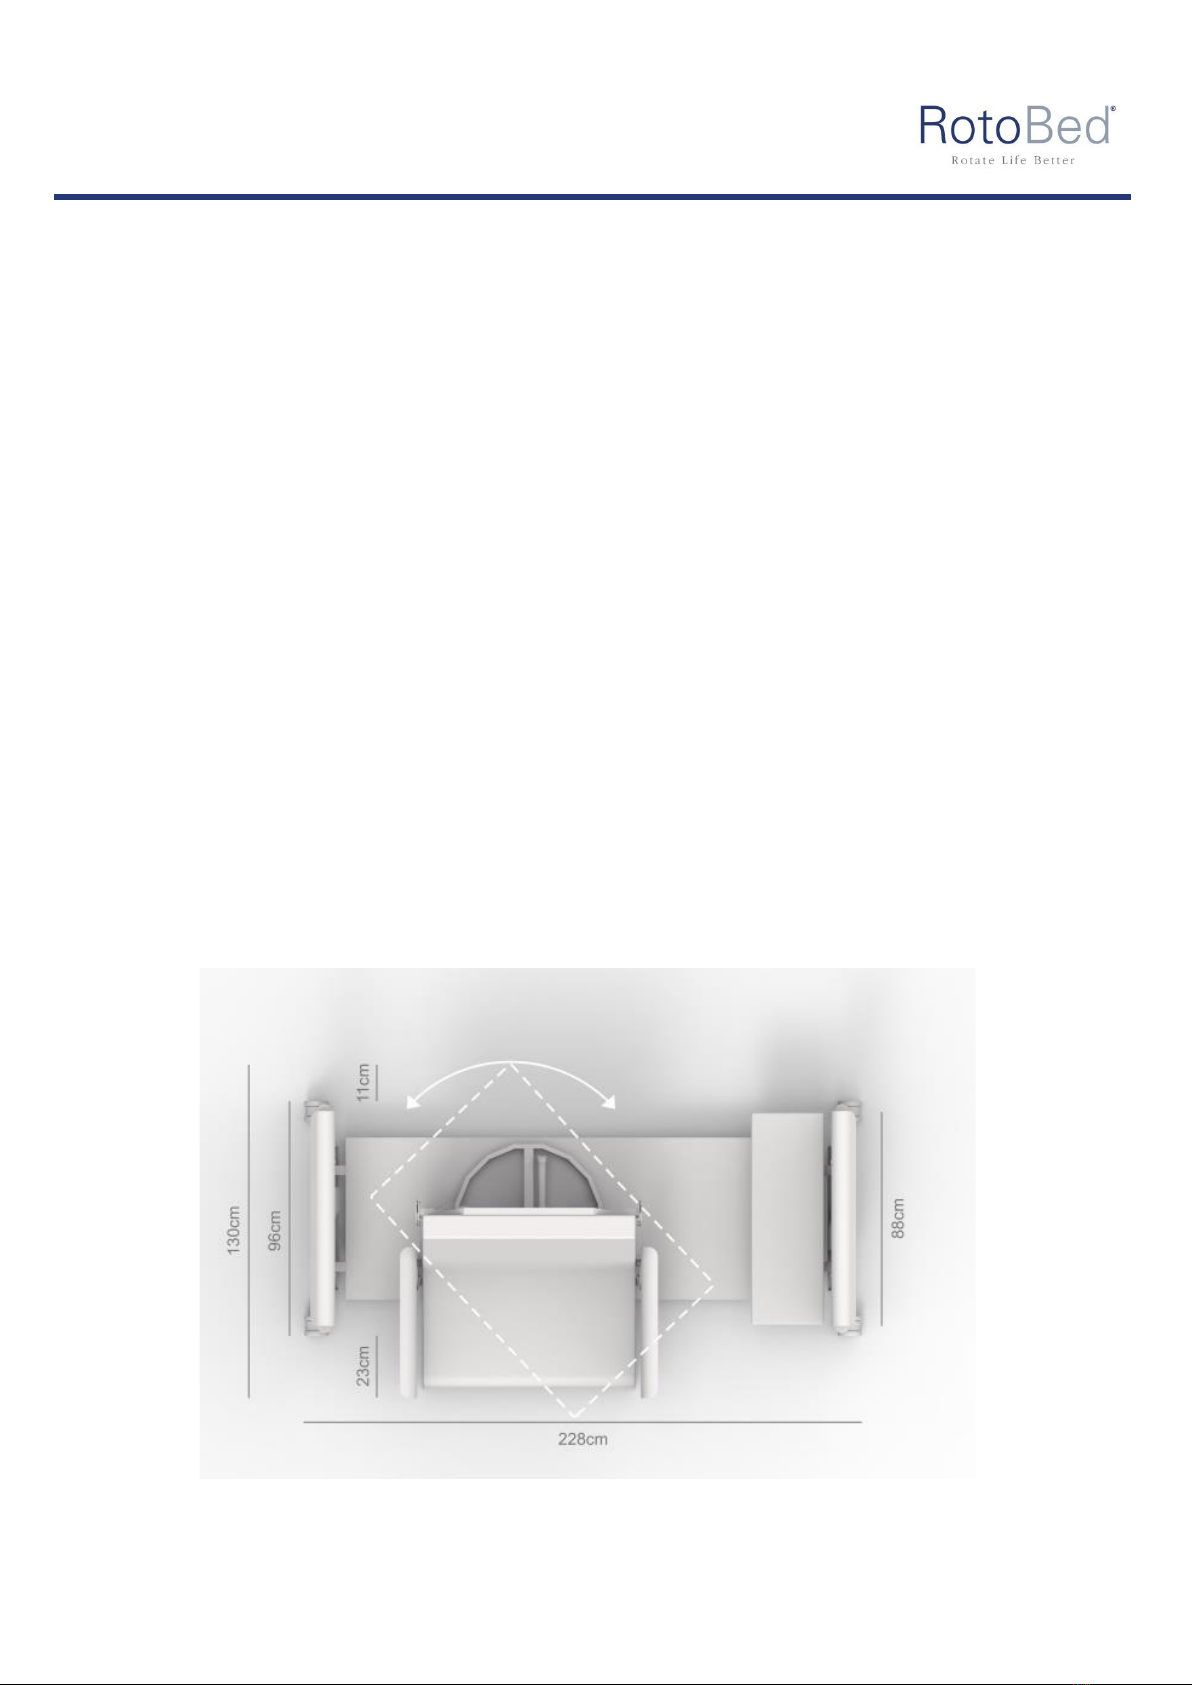
2.2 | Location.......................................................................................................................................................................................................................4
3 | Commissioning...................................................................................................................................................................................................................5
3.1 |
Mounting of the mattress
........................................................................................................................................................................................ 5
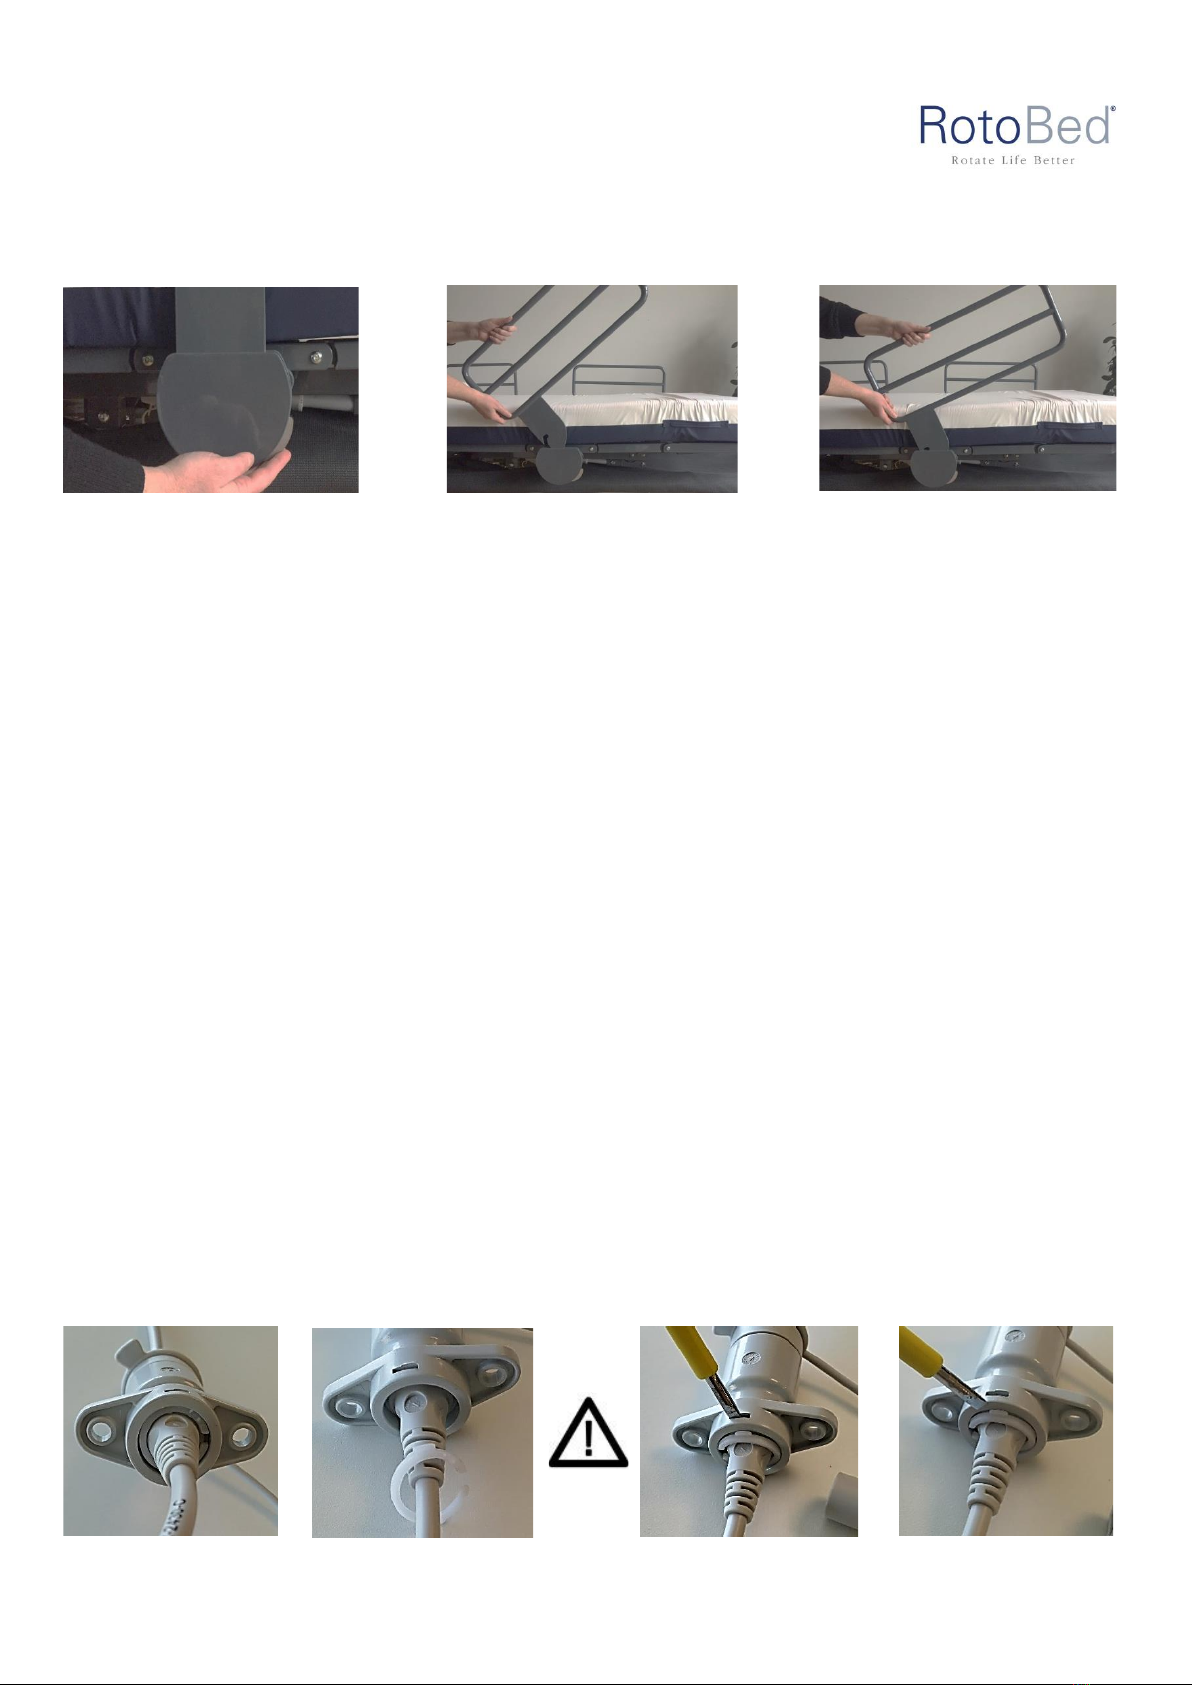
3.2 | Mounting of bedrails
................................................................................................................................................................................................6
3.3 | Remote control........................................................................................................................................................................................................... 6
3.4 | Operating RotoBed®Free ...........................................................................................................................................................................................8
3.5 | Important documents and video material................................................................................................................................................................9
4 | Safety ................................................................................................................................................................................................................................10
4.1 | Purposes and standards...........................................................................................................................................................................................10
4.2 | Limitations ................................................................................................................................................................................................................10
4.3 | Maximum load..........................................................................................................................................................................................................10
4.4 | Security during use...................................................................................................................................................................................................10
4.5 | General instructions.................................................................................................................................................................................................11
4.6 | Children.....................................................................................................................................................................................................................11
4.7 | Use of accessories ....................................................................................................................................................................................................11
4.8 | Squeeze risk..............................................................................................................................................................................................................12
4.9 | Fall risk ......................................................................................................................................................................................................................12
4.10 | Topple risk ..............................................................................................................................................................................................................12
4.11 | Castors and brakes.................................................................................................................................................................................................12
4.12 | Bedrails ...................................................................................................................................................................................................................12
4.13 | Lifting pole..............................................................................................................................................................................................................12
4.14 | Mattresses..............................................................................................................................................................................................................13
4.15 | Electricity safety .....................................................................................................................................................................................................13
4.16 | Transportation of the bed......................................................................................................................................................................................13
5 | Cleaning and maintenance..............................................................................................................................................................................................14
5.1 | Manuel cleaning .......................................................................................................................................................................................................14
5.2 | Disinfection...............................................................................................................................................................................................................14
5.3 | Cleaning in washing system.....................................................................................................................................................................................15
5.4 | Service and maintenance.........................................................................................................................................................................................15
5.5 | Guide for lubricating RotoBed®Free .......................................................................................................................................................................16
6 | General and technical information .................................................................................................................................................................................20
6.1 | Warranty...................................................................................................................................................................................................................20
6.2 | Life expectancy.........................................................................................................................................................................................................21
6.3 | Disposal.....................................................................................................................................................................................................................21
6.4 | Technical information ..............................................................................................................................................................................................22
6.5 | Troubleshooting .......................................................................................................................................................................................................23
6.6 | Reset motors ............................................................................................................................................................................................................24
7 | Accessories .......................................................................................................................................................................................................................25
8 | Type plate and symbols ...................................................................................................................................................................................................27
© Replication, duplication or modification in whole or in part is prohibited without prior written permission from RotoBed ApS. All ® mentioned in
this user manual belongs to RotoBed Aps.

3
1 |Introduction and general information
Thank you for choosing RotoBed®Free. RotoBed®Free is a high-quality product which, when used correctly and maintained
according to the regulations, will help you for many years to come.
To get the most out of your bed, please read these instructions carefully. The same applies to any other persons, such as relatives,
who must operate the bed. It is important that everyone who must operate the bed is aware of the safety section. This is especially
true if there are children in the immediate vicinity of the bed.
Please note the warranty section, including what to comply with to maintain the warranty.
This manual may contain inaccuracies or typographical errors. The information contained herein is regularly updated, and changes
to product care and others may be enrolled in later editions. Changes and improvements without notice may occur. The latest
version of the user manual will always be available for download on our website under the tab "Download". If you have any
questions, you are always welcome to contact us.
In addition to the instructions in this manual as well as the applicable accident prevention rules of the country of use, a
RotoBed®Free must always be used in accordance with recognized safety rules.
Please contact us if your needs change after the purchase of the bed. We have a wide range of accessories that can help make your
RotoBed®Free provide optimal help for you. We hope that your new rotating bed will give you increased comfort, mobility, and
quality of life.
Sincerely
RotoBed®
Storegade 44
6640 Lunderskov
Tel.: +45 7550 5025
Mail: [email protected]
1.1 | RotoBed®Free –an innovative rotating bed
People who are struggling to get into or out of the bed themselves can, with a RotoBed®Free, become self-reliant and manage entry
and exit without physical effort.
By holding down a single key on the remote control, the bed is raised to chair position and rotated towards the room. This facilitates
both exit and potential transition to a wheelchair or stand-up hoist. The movement takes less than a minute. RotoBed®Free helps
the user maintain mobility and supports the user's standing function. The bed makes the user more self-reliant and reduces the
trouble and pain of getting up and going to bed.
The patient surface is 4-sectioned, and entry and exit are possible on both sides of the bed. In addition to the rotary function,
RotoBed®Free features electrical adjustment of height, backrest, and leg parts. It is also possible to individually store backrest
inclination and exit angle.

4
2 | Before commissioning
2.1 | Reception
•Damage that has occurred during transport must be reported immediately upon delivery. Check that all ordered parts are
free from defects and defects upon receipt.
•Do not acknowledge receipt until the entire delivery has been reviewed. If there is any doubt as to whether there is
damage to the delivery, it must be received subject to the receipt.
•Contact the manufacturer or dealer if the item is damaged, if it bears other visible signs of defects / defects, or if the bed
does not work.
2.2 | Location
Choose the right location for the bed
•
Provide sufficient distance to wall/furniture, considering the movements of the bed.
•
Place the bed near a wall outlet to prevent free cables/fall risk.
•
If a lifting pole is mounted on the bed, ensure sufficient free ceiling height with the bed in the highest position.
Be aware that the backrest inclination can be stored between 35° and 55°. The chosen inclination will affect the required distance to
the wall during rotation. Standard delivery setting is a 45° inclination of the backrest which requires a distance to the wall of at least
11 cm.
Illustration of the bed's dimensions and space requirements.

5
3 |Commissioning
3.1 |
Mounting of the mattress
The RotoBed®Free includes a principal mattress as well as a foot mattress. The principal mattress is equipped with five mattress
attachments on the underside, and correspondingly the foot mattress has two mattress attachments on the underside. These
mattress attachments must be mounted on the bed's lying surface to ensure retention during rotation. The mattresses are mounted
as follows:
1. Drive the bed to the chair position and then raise the foot end to the highest position using the remote control.
2. Fold the principal mattress at the middle and place it so that the three lower mattress attachments are placed at the
opening for the three holes at the leg part. It is important that there is a nylon disc on both the top and bottom of the
metal plate.
3. Then pull the principal mattress towards the foot end so that all three mattress attachments slide to the bottom of the
holes.
4. Move the lying surface completely horizontally using the remote control.
5. Push the mattress attachment in the middle of the underside of the principal mattress into the hole in the lying surface.
You can advantageously turn the hard Velcro strap to the side so that it does not grip the soft Velcro until the mattress
attachment is correctly inserted in the hole. It is important that there is a nylon disc on both the top and bottom of the
metal plate. This is ensured by pressing on the principal mattress while pulling it to the side.
6. Pull the Velcro strap out towards the edge of the bed so that the upper nylon disc is firmly attached to the lying surface.
Now press the two Velcro pieces well together.
7. Repeat procedure for point 5 and 6 on the other side of the bed.
8. The two mattress attachments on the foot mattress are pressed down into the two round holes in the lying surface of the
foot part.
Placement the principal mattress
Placement of mattress attachment
Mattress pulled toward the foot end
Mattress attachment correctly placed in the hole in the middle of
the lying surface
Soft and hard Velcro pressed well together

6
Bracket for bedrail with lock
Bedrail pulled out of bracket
Bedrail remounted in bracket
3.2 |Mounting of bedrails
RotoBed®Free can be delivered with bedrails made of metal or oak veneer. Regardless of material, the bedrails are mounted and
removed in the same way:
Press the small fitting underneath while lifting the bedrail. The bedrails can simply be put back into place and will automatically lock.
NB!: The bedrails should only be mounted or not mounted. Do not leave them upright and loose. This may cause squeeze risk and
damage to the bed during rotation.
3.3 |Remote control
3.3.1 | Setting up the remote control
The remote control can optionally be connected to the right or left side of the bed under the middle of the seat.
Important: Make sure the cable connection of the remote control is secured with a cable lock. This prevents the cord from being
accidentally pulled out of the socket. If the remote control does not work, check if the cable is connected correctly in the socket. If
the remote control does not work and is connected properly, resetting the motors will often solve the problem. Detailed
instructions for resetting the motors can be found on page 24 of this user manual.
The electrical equipment of the bed must not be changed. Make sure that cable locks are clicked into position.
Removing the cable lock
1. Press the cable lock with the flat-blade screwdriver and tilt out the cable lock.
2. Push the screwdriver in between the cable lock and the plug and pull out the cable lock.
Installation of cable lock
1. Place the cable lock on the cable, the locking pins must face the plug.
2. Slide the cable lock into place until both locking pins are properly seated in the slots.
Cable lock mounted
Cable lock removed
Removing the cable lock using a flat-blade screwdriver

7
The RotoBed®Free remote control is clear and
easy to operate.
Hold down one key to operate the bed. When
you release the key, the movement stops.
Only press two keys at a time if you want to
reprogram the bed. See instructions below.
When the remote control is not in use, it is
hung on the bed rail.
3.3.2 | Operating the remote control
3.3.3 |Store your favorite positions
Bed height
For best comfort push yourself as far back in the seat as possible. The standard seat
height without mattress is 32 cm above the floor. The optimal seat height is when the
entire foot surface rests on the floor without supporting the weight of your legs. Use
the bed height keys to find your favourite height.
Store the bed height by simultaneously pressing down both
keys for bed height for 10 seconds until you hear a beep.
The bed will then automatically move to the stored height every time the key CHAIR
POSITION is activated.
Back tilt when rotating
It is important that you sit comfortably without pressure on the abdominal region
while the bed rotates. Standard inclination of backrest when the bed is delivered is
45°. The inclination can be set to an angle from 35˚ to 65˚. Outside this range, the
bed will make an alarm. Move the backrest to your favorite inclination when rotating.
Press down both keys for the backrest simultaneously for 10
seconds until you hear a beep.
Now your favorite backrest inclination is stored, and the bed will always move to this
inclination when rotating.
Change exit angle
The exit angle is oblique as standard to facilitate the transition to a wheelchair or
walker. Press down the key CHAIR POSITION until the bed stops in the exit
position.
For perpendicular exit, press down both POSITION keys for 5
seconds until you hear a beep.
Backrest up
Leg part up
Bed height up
CHAIR POSITION
SLEEPING POSITION
Bed height down
Backrest down
Leg part down

8
RotoBed®Free in SLEEPING POSITION
RotoBed®Free in CHAIR POSITION
3.4 |Operating RotoBed®Free
3.4.1 |At first commissioning
Press down the CHAIR POSITION key until the bed stops in exit position. By default, RotoBed®Free is set to go to an oblique exit
angle to facilitate the transition to a wheelchair or walker. To change the angle, see the instructions in section 3.3.3 | Store your
favourite positions.
3.4.2 |Getting into bed
Place yourself as far back in the seat as possible. This will provide the best comfort. Press down the key SLEEPING POSITION
until the lying surface is fully rotated. Now RotoBed®Free works like a regular adjustable bed.
3.4.3 |Getting out of bed
Press down the key CHAIR POSITION until the bed stops in the exit position. When the movement stops, you can release the
key and then press "Backrest up" so that the backrest moves the last piece forward. Then you can use the key "Bed height up" to
move the bed up in height. This facilitates the exit.

9
3.5 |Important documents and video material
The following documents have been prepared for this bed:
User manual
This user manual describes all aspects of the bed. This applies to both safety and cleaning, commissioning, and instructions
in relation to the location and use of the bed. General information about assembly, service, warranty, and maintenance can
also be found in the user manual.
Quick guide
The quick guide is a brief and focused instruction on how to help the user enter and
exit the bed using the remote control. It is recommended that the guide is available at the bed in daily use.
Video material
Video instructions for service and assembly can be found on https://rotobed.com/en/downloads-en/

10
4 |Safety
4.1 |Purposes and standards
RotoBed®Free is designed to help users with physical and / or psychological constraints.
RotoBed®Free helps the user enter and exit the bed without pain or physical exhaustion and reduces the workload for assistants in
connection with care and transfer.
RotoBed®Free is used in care centres, home care and private homes.
According to the standard for hospital and care beds (EN-60601-2-52), the intended use environment for a RotoBed®Free is as
follows:
Application Environment 3. (201.3.203)
Long-term care in a medical environment, where monitoring and measurement can be performed with other medical devices
equipment. This includes care centres, rehabilitation centres and the like.
Application Environment 4. (201.3.204)
Used in homes or home care, where equipment is used to relieve or to compensate for an injury, disability or illness.
Application Environment 5. (201.3.205)
Used for outpatient treatment in hospital or in another medical centre environment where equipment is needed for the treatment,
diagnosis or monitoring of persons with injury, disability, or illness.
4.2 |Limitations
•Users with physical or mental constraints must not operate the bed's electrical functions unless the staff allow it and the
user has received thorough training.
•Users who are considered suicidal should not use the bed unattended.
4.3 |Maximum load
RotoBed®Free may be used only by persons within these values:
Height: Minimum 146 cm BMI: Body Mass Index 17 or more
Rated load: 225 kg User weight:Min. 40 kg / max. 190 kg
4.4 |Security during use
•Always read the instruction manual before use and follow the instructions.
•When adjusting the bed's positions, all objects, and persons, especially children, must be kept clear of the moving parts of
the bed.
•The bed should only be raised in height when this has a purpose, such as care. Apart from this, the bed should be set in a
comfortable exit height.
•The entire body of the user must be within the patient surface.
•Be aware that the bedding does not get caught in the moving parts of the bed while adjusting the bed's positions.
•The connecting cable must be free of the rotation mechanism and height adjustment and capable of moving while

11
adjusting the bed positions.
•Adjust the bed positions based on the instructions in this manual.
•A RotoBed®Free must not be used lifting / rotating anything other than the user.
•The bed should only be used by a person who has sufficient mobility and cognitive understanding to utilize the bed's
functions and avoid accidents.
•Staff should always assess the physical and mental condition of the user and the ability to use the bed safely.
•The rotary function must not be used with more than one person in the bed.
4.5 | General instructions
•Regularly check the power cable for damage. In case of obvious damage, turn off the power supply and seek professional
advice.
•The RotoBed® engines meet all relevant standards and norms. Electrically adjustable beds use extremely powerful engines.
To prevent overload or damage to the bed, it is important to follow the regulations when operating the engines.
•The remote control must always be available and located correctly. Keep in mind that the remote control does not clamp
between the moving parts of the bed, as this may cause the keys to be activated without the intention.
•The castors must be locked unless the bed is to be moved. This is to prevent the bed from moving during exit and entry.
•Avoid free wiring on the floor. You can stumble on these and thus disconnect the power without intention.
•The mattress is best protected by using the semi-impermeable cover in stretchable incontinence foil.
4.6 |Children
RotoBed® wishes to draw users’ attention to the potential dangers of children who play in and around the bed. Children are
naturally curious. They find beds with moving parts exciting, but due to the powerful engines, the bed is absolutely not suitable as a
toy. In case of improper use there is a risk of getting squeezed. The following must therefore be emphasized:
•Do not let children play with the bed and its remote control / functions.
•Inform visitors and persons responsible for children about the potential safety risk.
•Children who stay close to the bed must be guided and not left alone.
•Place the remote control away from curious eyes and hands.
•Disconnect any power supply if deemed appropriate.
4.7 |Use of accessories
RotoBed®Free and accessories are nationally assessed and approved according to EN60601-2-52 standard. The standard contains
essential requirements for the combination of bed and accessories such as mattress, bedrails, lifting pole etc. It is the responsibility
of the staff to ensure that bed and accessories are assembled and used according to the manufacturer's regulations.
•The staff must always make an overall safety assessment of the bed and the chosen accessory before introducing a user to
the bed.
•Always read the operating instructions before using the bed. Incorrect use of the bed and the manufacturer's approved
accessories may pose a safety hazard.
•Do not use third party accessories or mattresses without the manufacturer's approval. Violation of this may pose a safety
hazard.

12
4.8 |Squeeze risk
When the bed's functions are operated, the moving parts of the rotary bed constitute a squeezing
hazard.
•When adjusting the bed's positions, all objects, and persons, especially children, must be kept clear of the moving parts of
the bed.
•Keep an eye on the bed while operating the functions.
•Be aware that no persons or things can be squeezed when the bed is lowered in height.
4.9 |Fall risk
•
The bed should only be raised in height when this has a purpose, such as care. In addition, the bed should be set in
comfortable exit height. For physically restless users, it is recommended to keep the bed in the lowest position (32
cm).
•
Use bedrails when there is a risk that the user falls out of bed.
4.10 |Topple risk
•Always observe the maximum user weight (190 kg) and the maximum load (225 kg).
•Move the bed to the lowest height before transport. This prevents rollover risk.
•Pay particular attention when transporting the bed on an uneven surface. This increases the risk of the bed falling over or
that parts of the bed are damaged.
4.11 |Castors and brakes
As standard, the bed comes with integral Tente Linea double castors. The
castors are rotatable. The brakes work in pairs and can be operated from
both sides of the bed. The castors should only be unlocked for
transportation of the bed.
4.12 |Bedrails
The bed is approved and tested with removable, two-piece bedrails, which are placed in the middle and in the bed's head end. The
bedrails offer the user safety and prevent falls. They can also be of help during entry and exit, leading to increased mobility for the
user. The bedrails can be delivered in two variants: one in wood and the other in metal. Bedrails are recommended for safety
reasons.
•Do not use any other bedrails than those constructed for the bed. Mount correctly.
•Be aware that the user does not try to crawl over the bedrails to get out of bed. This will pose a risk of fall injuries.
•If the user is uneasy, physically restless or tends to have involuntary movements, upholstery for the bedrails can be
purchased. See RotoBed®Upholstery under Accessories.
4.13 |Lifting pole
RotoBed®Free can be delivered with a lifting pole which can be mounted freely on the right or left side of the bed's head. The grip is
provided with a roller belt for height adjustment to the individual user.
•Maximum load of lifting pole: 75 kg.
Locked castor
Unlocked castor

13
•Always check the ceiling height before installing the lifting pole. There must be about 220 cm
of free ceiling height with the bed in its highest position.
•The lifting pole must be removed during transport of the bed.
•Do not use the lifting pole outside the bed frame as this may constitute a rollover risk.
•Before use and for continuous maintenance, check the lifting pole for damage to the roller belt's stitches and cracks in the
grip.
4.14 | Mattresses
RotoBed®Free can be delivered with different types of mattresses with pressure ulcer prevention in stages 3 or 4. The mattress will
consist of two parts; a principal mattress and a foot mattress. All mattresses are specially designed to fit your RotoBed®Free.
•No third-party mattresses may be used without the manufacturer's approval as they are not fitted to the bed and may
therefore constitute a safety hazard.
•Remember to attach the mattress to the bed as per the regulations (see assembly instructions page 5). Failure to fasten
the mattress can cause the mattress to not follow the bed's movements or slide off the bed. This will pose a security risk to
the user.
4.15 | Electricity safety
It is important that cable locks are installed at both ends of the bed, where the headboards are mounted with the bed frame (see
photos below).
•Be sure to place the wireless remote control in the holder located on the bedrail when not in use so that it does not get
damaged or falls to the floor.
•Make sure that the wireless remote control does not get caught between the moving parts of the bed during use.
•Avoid free wires on the floor that you may trip over or run over.
•Before commissioning and during service and maintenance, check all electrical wires, power supplies and connections for
cracks, fissures, or other visible damage.
4.16 | Transportation of the bed
•Unplug the power cord before moving the bed. If the power plug has a power switch, turn it off first and then unplug it.
•Ensure that no wires or cables, such as the remote control, may clamp or otherwise be damaged during moving.
•Lock the castors when moving the bed.
•Do not move the bed in the raised height as this increases the risk of toppling.
•Be aware of lifting pole, bedside lamp or other accessories mounted on the bed.
•Always remember to reactivate the castors’ brakes when the bed is moved.
The electrical parts of the bed
must not be changed. Make sure
the cable lock is fitted by plug.
Cable lock mounted
Cable lock disassembled
Removing the cable lock using a flat-blade screwdriver

14
5 | Cleaning and maintenance
5.1 |Manuel cleaning
Metal parts
All surfaces can be cleaned with a soft, damp cloth soaked in mild detergent. Wipe dry with a cloth wrung out in clean water and
dry. Make sure all parts of the bed are dry before putting the mattress back in the bed
.
Wooden parts
Use cleaning and care products designed for wood furniture. Make sure all the bed’s parts are dry before putting the mattress back
into the bed frame.
5.2 |Disinfection
A RotoBed® care bed must be disinfected regularly and ideally for each new user to prevent disease infection. The bed is classified
IPX6W and can be cleaned in a washing system or it can be cleaned manually according to the following requirements:
•Always disconnect the power supply before cleaning.
•Use gloves and possibly protective clothing when performing cleaning procedures.
•Do not use hypocarbonate or phenolic based cleaners.
•Do not use abrasives or pastes.
•Do not clean the bed at high pressure, neither manually nor mechanically.
•Be careful not to touch actuators during use and cleaning. After prolonged use the actuators can become very hot.
•In case of visible dirt, clean the bed first, see section on manual cleaning.
For disinfection between two users, clean with sodium hypochlorite or the like (up to 1000 ppm active chlorine). For
decontamination (removal of potentially infectious material such as body fluids or infection from a known infected user), the bed
should then be cleaned with sodium hypochlorite or the like (up to 10,000 ppm active chlorine).
Medium antimicrobial effect
("intermediate-level")
Alcohol***
70-85% v/v ~
63-80% w/w
Waste: Surfaces
contaminated with vegetative
bacteria, mycobacteria,
capillary and certain non-
capillary viruses as well as
most fungi.
Minimal antimicrobial effect
("low-level")
Products with low
concentration of chlorine.
Various blend products
containing, for example,
hydrogen peroxide, biguanides
and quaternary ammonium
compounds
<100 ppm hypocloric acid>
Doubtful indication, as
products in this group are
estimated to have limited
additional efficacy compared
to cleaning with common
detergents.

15
5.3 |Cleaning in washing system
When cleaning in washing systems, make sure to take the following precautions:
•Unplug the power plug. Remove all fabrics (including mattress and covers) as well as all parts of wood.
•All plug connections must be sealed with a plug cover.
•All plugs and plug covers must be fitted with locking-ring to prevent water from entering the engines.
•Drive all engines fully down/in (so no engine arms protrude) to prevent lime and rust formation
•The electrical parts of the bed and mechanical functions must be tested before using the bed again.
NB: The supplied standard castor for a RotoBed® care bed has not been tested for cleaning in washing systems. Unless the castors
are removed before washing, shorter lifespan should be calculated. Alternatively, special wheels can be purchased, which have
been tested for a washing system.
RotoBed® points out that washing in machines will cause the bed to age faster over time.
5.4 |Service and maintenance
RotoBed®Free do not require much maintenance, but it will minimize any problems to keep the bed clean and follow the
instructions for use and cleaning. RotoBed recommends annual lubrification.
Control of electrical parts
•Check all cables for damage.
•Check the power plug condition.
•Check the remote-control functions.
Control of mechanical parts
•Check all frame components for wear, damage, and corrosion.
•Check that backrest and leg parts are running smoothly and at full power using the remote control.
•Check that the lifting engine is running smoothly and for full power.
•Check that the rotary engine is running smoothly and for full power.
•Check that all joints (nuts, screws, etc.) are fastened, but still movable.
•Check the lifting pole (if mounted).
•Apply Teflon Spray to all moving parts and remove excess grease (See instruction next page).
Control of castors
•Check that all castors have free movement and rotate satisfactorily.
•Check the brake function.
Control of bedrails
•Check the function of the bedrails
•Check the bedrail grips for damage.

16
1. Remove the retaining clip.
2. Remove the bolt.
3. Apply grease.
4. Insert the bolt and clip again.
5. Follow the same procedure with the bolt at the other end of the
motor. Do not remove the bolts at both ends at the same time.
Location of retaining clip and bolt
Retaining clip in the other end
5.5 |Guide for lubricating RotoBed®Free
It is recommended to lubricate your RotoBed®Free annually. On our website under Downloads, you can find a video instruction in
lubrication of your RotoBed®.
Use the following or similar types for lubrication:
Teflon Spray: Würth HHS 2000 Lubricating Oil 500ml
Description: Universal grease with white solid lubricants and NSF H2 approval - Lubrication of normal-load friction, rolling and
pivoting bearings - Lubrication of moving parts at fine-mechanical devices –Waterproof.
Grease: OKS 470 –White Universal High-Performance Grease
Description: High-pressure resistant- Extraordinarily tear-resistant lubricating film with outstanding noise and vibration damping
properties - High creep capacity - Excellent lubricating properties with close tolerances - Reliably protects against corrosion - Active
adhesive effective. No throwing off of the lubricant with turning and rotating parts - Splash and saltwater-resistant, withstands weak
acids and alkaline solutions - Contains no silicone, resin, or acid.
Clean and dry cloth
Use a clean and dry cloth to wipe off in case of excess spray.
5.5.1 |Lubrication of the backrest
Move the backrest to an upright position. Make sure to fix it before you start removing bolts, otherwise it will fall down. You can fix
the backrest either by getting help from another person holding it or by securing the backrest with a transport strap.
Figur 1: Fedt påført bolt
Grease applied

17
5.5.2 |Lubrication of the frame parts
All the moving parts where the frames are connected to each other must be sprayed with Teflon. Spray in the gap between pieces
of metal.
Very important: do not tighten the locking nuts and bolts too much as the frame parts pivot on them. Repeat the procedure on the
other side of the bed.
5.5.3 |Lubrication of leg motor connection points
Raise the leg part to the horizontal position using the remote control and follow the procedure below:
1. Remove the rear bolt retaining clip.
2. Remove the bolt.
3. Apply grease.
4. Reinsert bolt and make sure the clip is secured in place.
5. Follow the above procedure for the bolt at the other end of the motor.
Moving parts where the frame is connected
Location of retaining clip
Grease applied
Location of bolt in the other side of the motor
Gap between the metal parts

18
The leg part’s wheel runners lifted out of the U-profile
Gas strut
Spray in U-profile and on the thin strut
Location of white wheel runners
Apply grease on axle
Remount wheel runners on axle
5.5.4 |Lubricating of gas strut, U-profile, and wheel runner
1. Remove the leg part from the wheel runners.
2. Apply spray to the bolts on both ends of the gas strut. Spray in gaps between metal.
3. Follow the same procedure at the gas strut on the other side of the bed.
4. Spray into the U-profile (under the leg-part) on both sides.
5. Spray little on the thin strut on the gas strut on both sides.
6. Wipe off with a clean and dry cloth excessed spray from spraying both the U-Profile and the thin strut.
7. Remove the white wheel runners from axle.
8. Apply a little grease to the shaft.
9. Remount the wheel runners.
Important! do not overtighten the outer locking nuts as struts pivot on the bolts.

19
Location of white rollers
Spray on the white roller
Location of wheelhouses. There are in total five wheelhouses
Spray above and under the bolt head
5.5.5 | Lubrication of foot plate axle
1. Spray on the white rollers as shown in both photos
2. Repeat on both sides of the foot plate axle.
5.5.6 |Lubrication of rotating platform
1. Turn the bed to end position for better access. The five rotation wheels located under seat should be sprayed periodically
and minimum once a year.
2. Spray all five wheelhouses located on the rotation platform. Spray in the little opening above or below the bolt head on the
wheelhouse as shown on the photos.

20
6 |General and technical information
6.1 | Warranty
RotoBed®Free is a high-quality product which is to ensure many years of trouble-free use. RotoBed® offers a three-year warranty
provided that the bed is purchased from new and that the instructions in this manual are followed. All electrical components from
LINAK such as control box and actuators are covered by a five-year warranty. These warranties cover spare parts and repair of
defects in the product during this period, unless otherwise stated in the sales agreement.
The warranty covers problems due to defects in the design or production of the bed - however, only if the bed has been used in
accordance with these instructions. Faults and defects that arise during the warranty period must be reported immediately to the
dealer or manufacturer, which will determine if the bed is to be repaired, replaced, or discarded. Incorrect use of the bed, abuse
and accidental damage is not covered by the warranty, and in that case, there will be a fee for the repair. A minor breach of
warranty will not affect the continuation of the warranty. Under certain circumstances, actions that cause fundamental damage to
the bed will lead to invalidation of the warranty for the remainder of the warranty period.
Events that are not covered by the warranty include:
•Damage caused by overload or improper use of the bed.
•Damage caused by washing or cleaning where the cleaning instructions have not been followed.
•Damage caused by lack of or incorrect maintenance.
•Accidental damage to the remote control, for example by dropping it in liquid or driving over in a wheelchair.
•Damage to cables caused by, for example, being run over or trapped in the moving parts of the bed.
•Damage to mechanical or electrical parts under the bed due to improper use of lifting or hoisting equipment.
•Damage to mattress and upholstery for any reason.
•Damage to wall or adjacent furniture due to incorrect placement of the bed.
•Damage to the socket for any reason.
•Damage caused by electrical parts being opened or used incorrectly.
In addition to the warranty, RotoBed® guarantees to be able to deliver spare parts for at least 10 years from the date of purchase.
The bed is designed and tested to carry a defined maximum weight. Max user weight and rated load appears in the manual and
must not be exceeded.
The above are examples, and the list is thus not to be read as all-inclusive.
Wood is a natural product and undergoes a natural aging process. Over time, environmental influences such as humidity, heat and
UV radiation will cause changes in the surface of the wood. Changes caused by natural aging are not covered by the warranty.
Other manuals for FREE
2
Table of contents
Other RotoBed Indoor Furnishing manuals
Popular Indoor Furnishing manuals by other brands

CorLiving
CorLiving DPU-604-B quick start guide

Decorotika
Decorotika MISTICO 1400 Assembly instruction

Gruppo Pozzi
Gruppo Pozzi System Holz SYSTEMA PARETE Assembly instructions

Dream On Me
Dream On Me 598 Assembly instructions

Costco
Costco BACK-IN-MOTION 790820 operating instructions

Olympia Tools
Olympia Tools 82-738 user manual