RSC tonto User manual

tonto
dashcam
Copyright © 2018 RSC Labs Inc. All rights reserved
User Manual

Table of Contents
Page
Box Contents....................................................... 1
Camera Overview................................................. 2-3
Installation.......................................................... 4-7
Insert memory card
Attach mount to camera
Remove Lens Protection Film
Installing the camera
Connect the power cable
Adjust Camera Angle
Organize the wiring
Camera Operation................................................8-9
Button usage and operation
Initial Camera Setup
Using the Camera................................................ 10-11
Powering On/Off
Loop recording
Emergency le locking
Parking Surveillence Mode
Retrieving your videos
Firmware upgrade
Camera Settings ................................................. 12-13
Notice..................................................................14-15
FCC Statement
Warranty
Contact

Box Contents
tonto Camera
GPS Suction Cup
Mount
1
Charging CableCar Power Adapter

Camera Overview
2
Power Port
Reset Button
Power/
Screen Off
Button
SD Card Slot
Speaker Camera Lens
Left view Right viewFront View
Top View
Bottom View
Microphone

Camera Overview
3
Back View
Record LED
(Red)
Power LED
(Blue)
Return / File Lock
Up / Mode / Playback
OK / Mute
Down / Menu
LED Status
LED Activity Status
Record
LED
(Red)
Solid Red Not Recording
Flashing Red Video Recording
Power
LED
(Blue)
Solid Blue Power connected.Charging Battery.
Off Battery not charging.

Installation
4
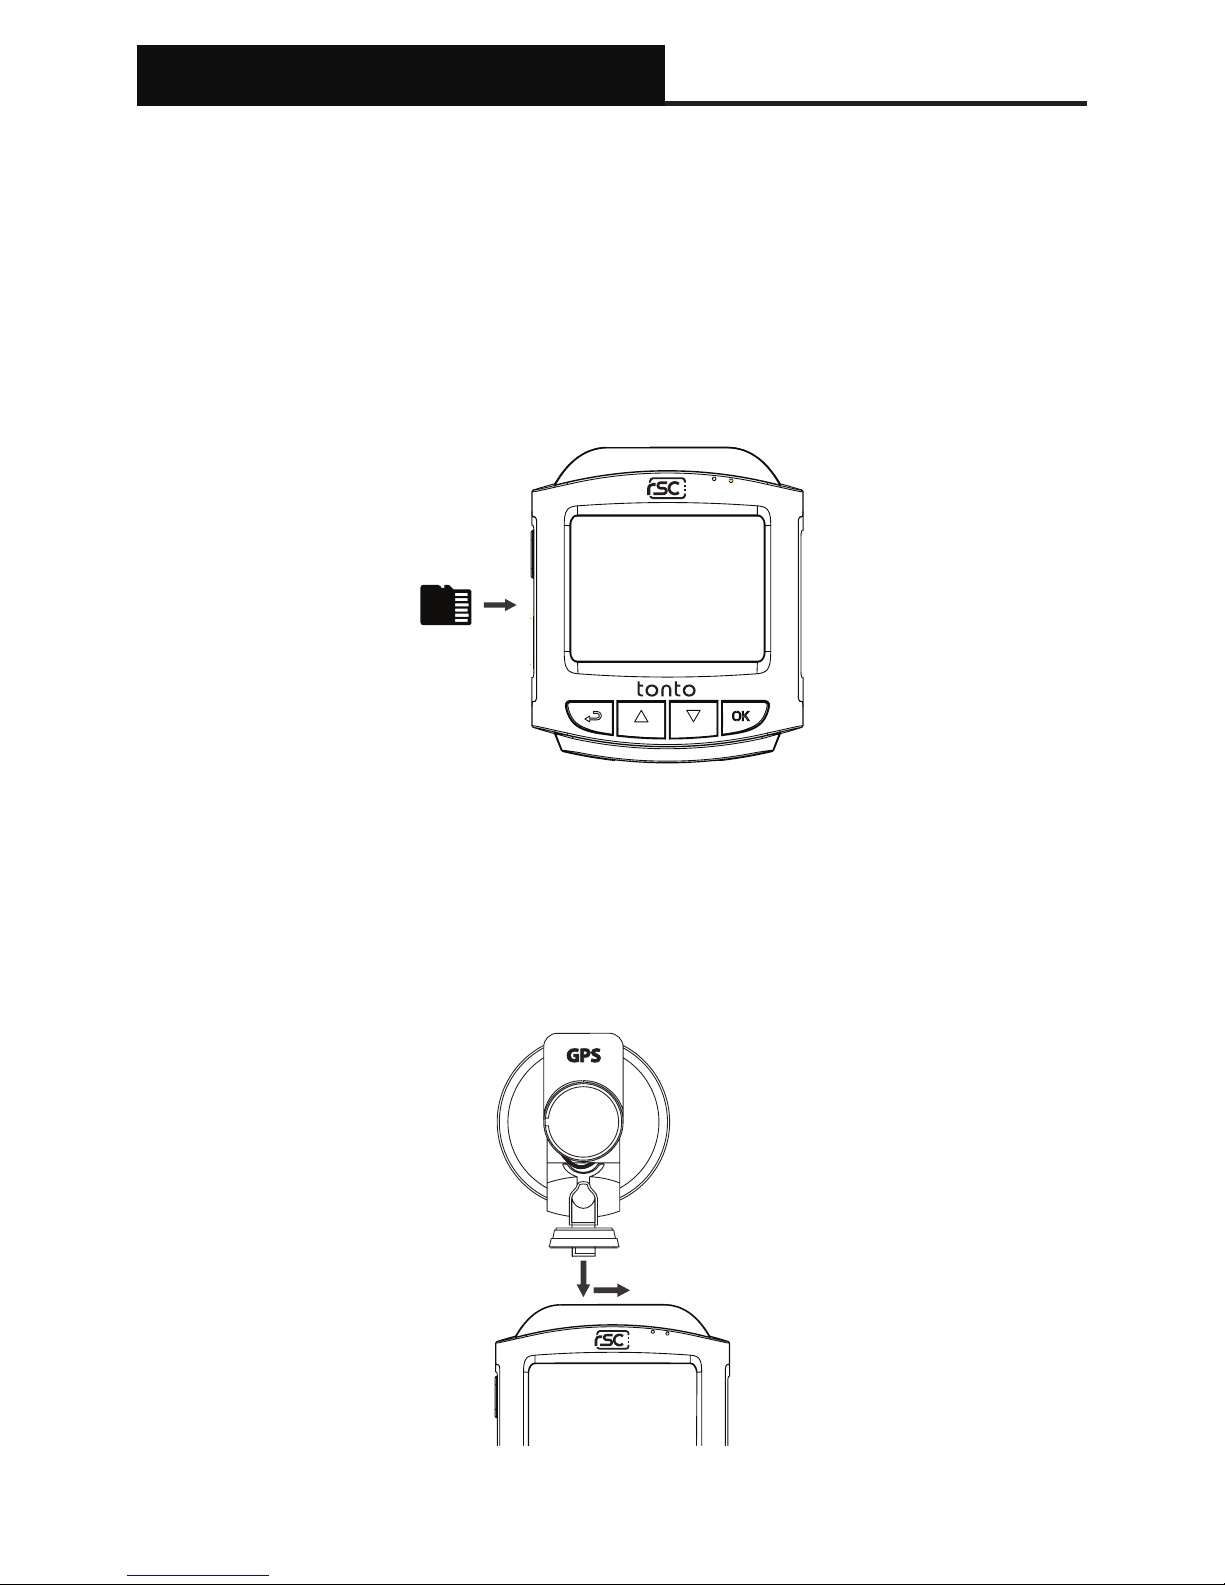
1. Insert memory card
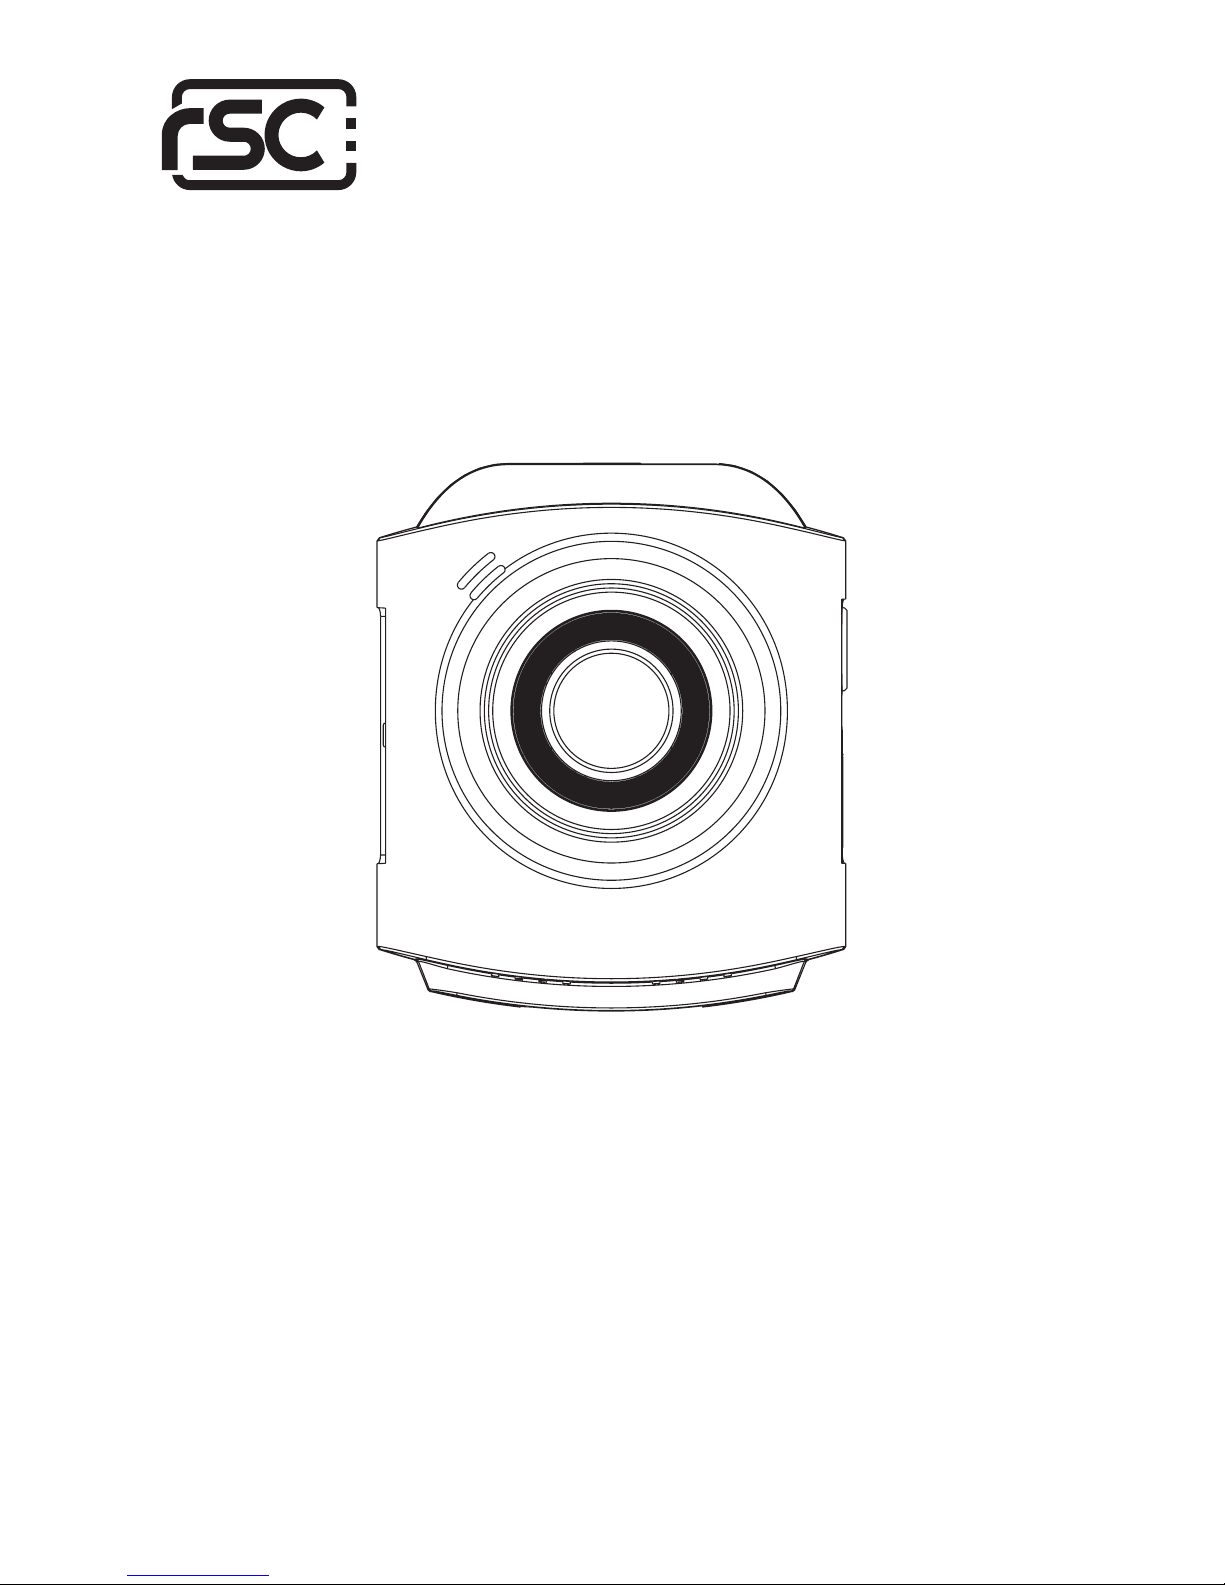
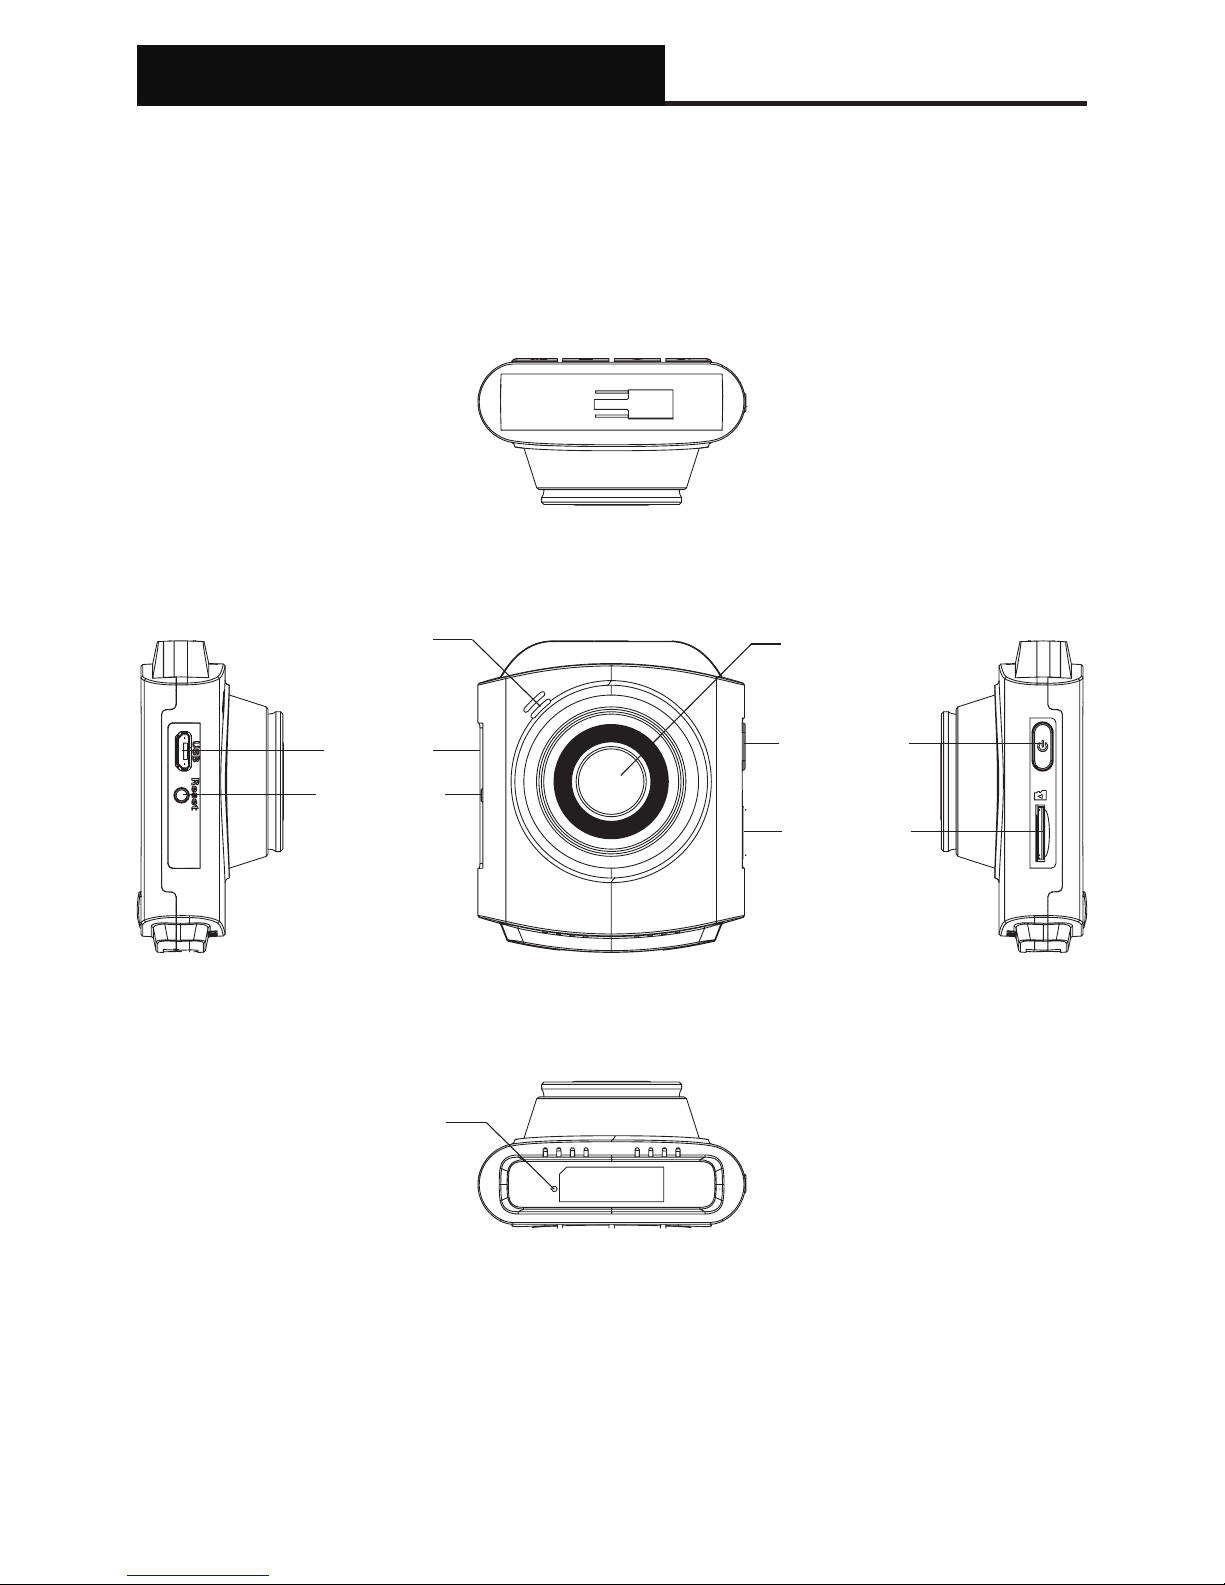
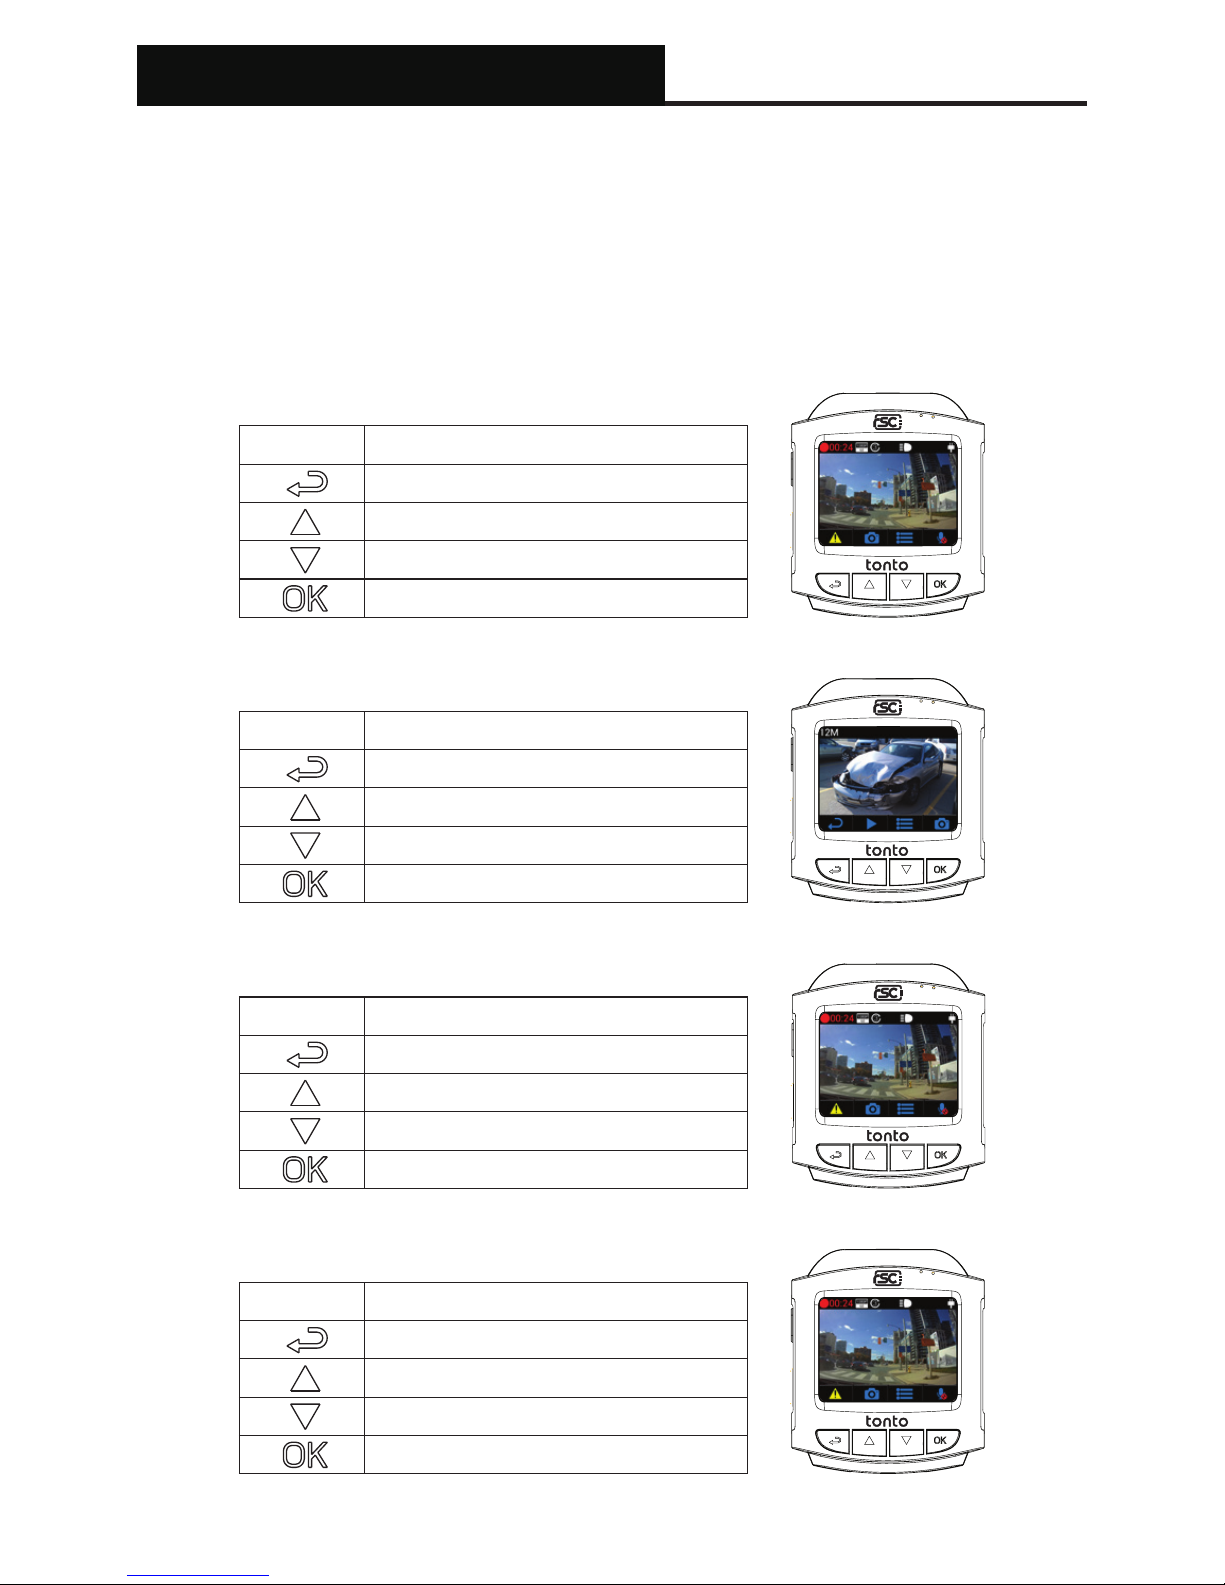
Insert a microSD memory card into the memory card slot located at the left
side of the LCD screen. Be aware of the orientation shown in the picture below
(Electrical contacts of the memory card should be facing the LCD display side of
the cameram, with the notches of microSD card facing up.) When the memory
card is successfully inserted, you will hear a ‘clicking’ sound.
A Class 10, 8GB or above microSD memory card is required. The camera
supports up to 128GB of memory capacity. (Memory card not included.)
2. Attach mount to camera
Align the mount with the mounting groove located at the top of the camera, slot
into the groove, and slide it to the right.
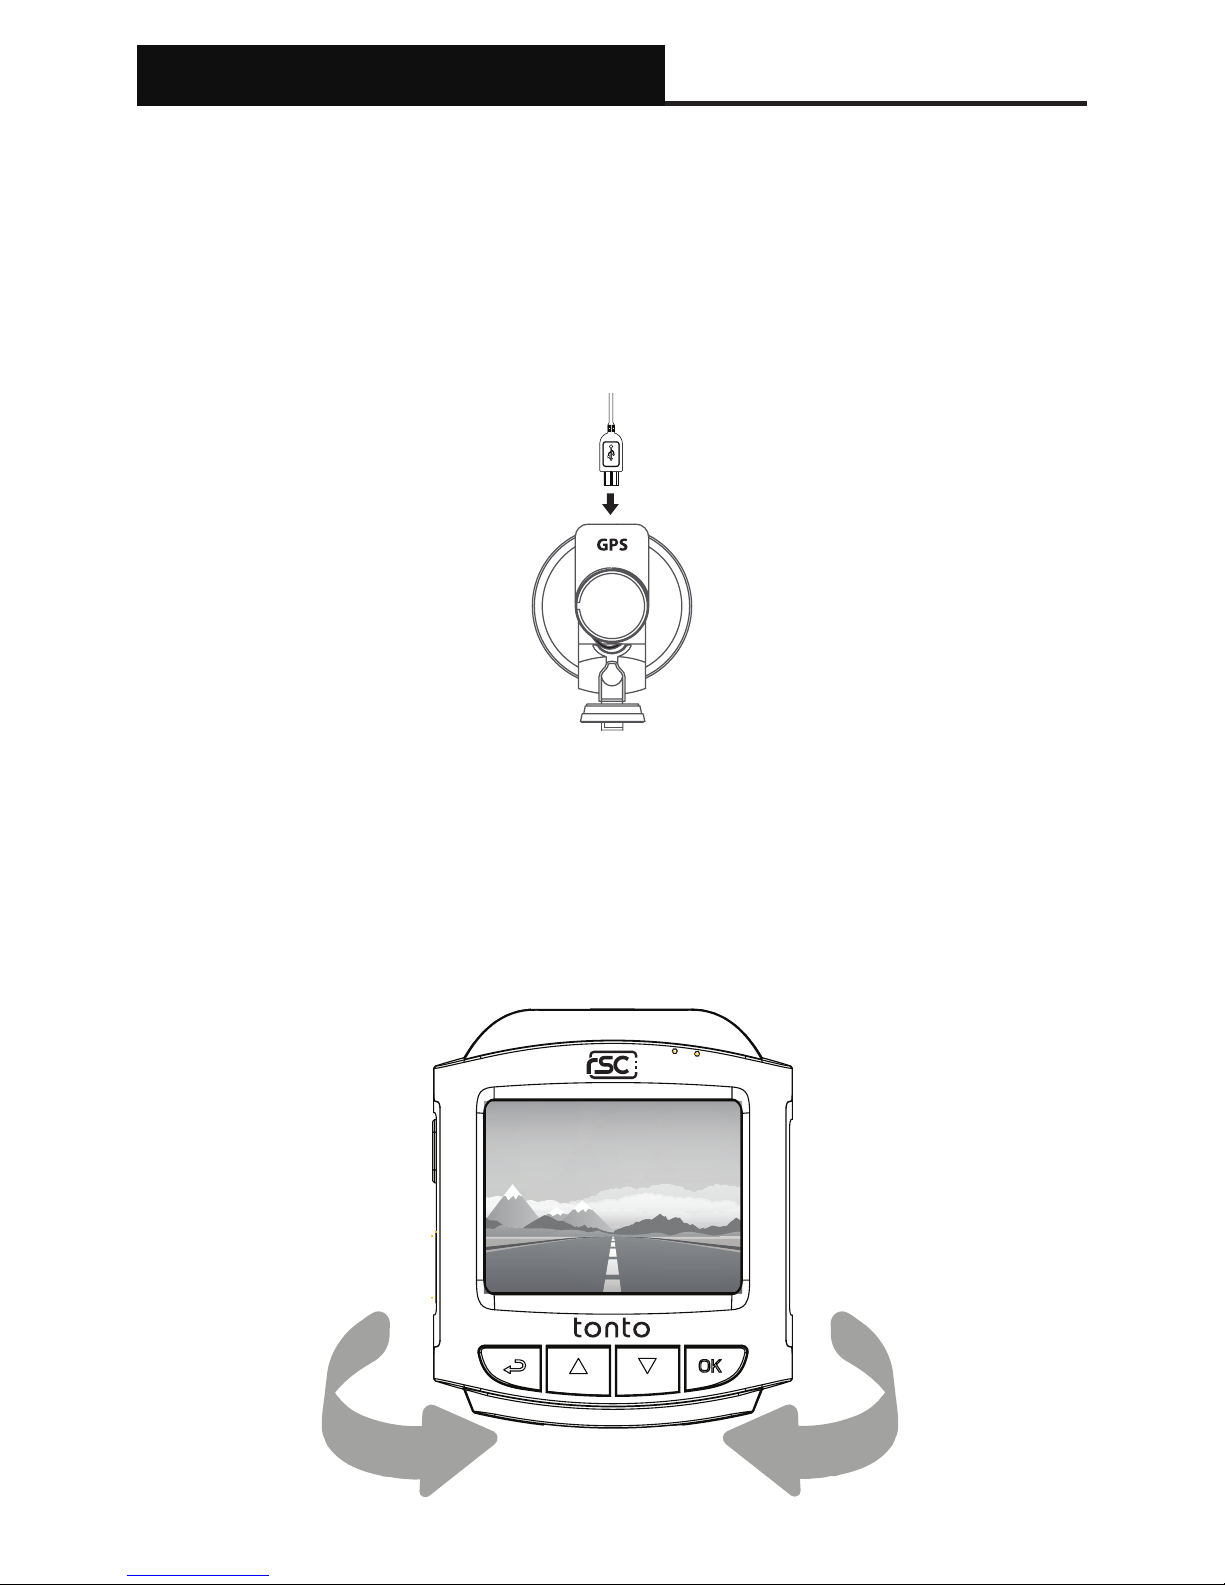
After the mount is secured into place, plug in the short microUSB cable from the
mount into the power port of the camera.

Installation
5
4. Installing the camera
Locate a suitable place on your windshield to install the camera. We recommend
placing the camera behind the rear view mirror without obstructing your view
when driving.
Clean the windshield using water or alcohol, and wipe clean with a lint-free cloth.
Install the suction mount to the windshield, and rotate the locking bar on the
mount upward 90 degrees till it clicks, then the camera is mounted on the
windshield securely.
3. Remove Lens Protection Film
Before installing the camera onto the windshield, remove the Protection lm
from the camera lens. For best results, please try to avoid touching the camera
lens with ngers, as ngerprints and/or oil may degrade image quality.

Installation
6
Connect the microUSB Cable end of the Charging Cable into the Suction Cup
Mount’s GPS module. Carefully route the power cable around the windshield
and tuck the wire under the trim. When complete, insert the Car Charger into
your vehicle’s cigarette lighter port.
5. Connect the power cable
Power on the camera by starting your vehicle. The camera will automatically
power on upon receiving power from the cigarette lighter port. After the initial
setup, use the live view on the LCD screen to adjust the camera angle.
6. Adjust Camera Angle

7. Organize the wiring
Hide the power cable by tucking the cable into the space between the seams of
the vehicle headliner and the top of the windshield. Route the cable down from
the side of the windshield
Installation
7

Camera Operation
8
Button usage and operation
The camera is primarily operated and controlled using buttons located at
the bottom of the camera. Depending on the current mode of operation, the
functions of the button will change accordingly. Listed below is a chart of how
each button operates in different camera modes.
Video Recording Mode
Button Action
Manual File Lock
Switch to Photo/Playback Mode
Access Settings Menu
Enable/Disable Audio
Photo Mode
Button Action
Return to Video Recording
Access Video Playback
Access Settings Menu
Take Photo
Settings Menu
Button Action
Manual File Lock
Switch to Photo Mode
Access Settings Menu
Enable/Disable Audio
Video Playback Mode
Button Action
Back
Delete Video / Rewind
Lock/Unlock Video / Fast Forward
Play/Pause

Camera Operation
9
Initial Camera Setup
Upon powering up the camera for the rst time, you will need to complete the
initial setup process.
Upon completion of initial setup, the camera will enter normal video recording
mode.
1. Select a Language 2. Setting Time & Date
3. Select Timezone 4. Select Speed Unit

Using the camera
10
Powering On / Off
The camera is designed to automatically power on when it receives power from
the car power adapter. A start-up sound will be played when the camera has
started successfully.
Automatic: When the camera is ON, simply turn OFF the engine or unplug the
power cable and the camera will switch OFF automatically.
Manual: Switching the camera OFF manually is required for vehicles where the
vehicle’s power socket provides continuous power after the engine is turned
OFF. To turn the power off manually, press and hold the power button for at
least 3 seconds. A Countdown will display on the screen. Press and hold the
power button until the camera is powered off.
To turn the camera on manually, press and hold the power button for at least 3
seconds.
Loop Recording
Default: 3 Minutes
The loop recording function allows the camera to continuously record video
footage on your memory card. When there is insufcient space on the memory
card, loop recording will automatically overwrite the oldest non-protected le on
the memory card, and replace with a new recording.
The available settings of 3/5/10 minutes allows you to choose how long to
record for each video le.
Emergency le protection
Default: Low
When the G-sensor is activated due to a collision, the footage currently recorded
will be automatically locked to avoid being overwritten by loop recording. Adjust
the G-sensor level of the camera to the appropriate setting based on your
driving area.
Parking Surveillance Mode
Default: Off
When Parking Mode has been turned on, the Dash Cam enters standby mode
when the vehicle has been turned OFF (typically removing your ignition key).
Should physical movement of the vehicle be detected, the Dash Cam will power
on and start recording a 30 second protected video. If no further physical
movement is detected then the camera will return to standby mode, if physical
movement is detected subsequently, then the camera will continue to record
normally, i.e. driving once more.

Using the camera
11
Retrieving your videos
Retrieving using a PC/Mac:
Connect the camera to a computer using a micro USB cable (Cable not
included). The camera will automatically turn on, and the computer will detect a
“removable disk”, similar to connecting a USB Flash Drive on your computer.
Navigate to the corresponding folder to access video recordings;
Recording Type Folder Location
Normal Recording \VIDEO
Emergency Protected \EMERGENCY
Photo Snapshot \PHOTO
Firmware Upgrade
Step 1: Download latest rmware from our ofcial website, unzip the le.
Step 2: Copy & Paste or drag & drop the extracted .bin le to the root of the
Micro SD card.
Step 3: Insert the Micro SD card into the camera’s card slot once the transfer is
completed.
Step 4: Connect the camera into a power source and then turn the camera ON.
Step 5: The LED indicator will start ashing to conrm the update’s progress.
Step 6: Once the upgrade is completed, the camera will automatically reboot.
Step 7: To verify the installed rmware version, access the ‘Version’ tab on the
mobile app.
Step 8: Before using the camera, please reformat the memory card using the
mobile app.
Please Note:
• To ensure a stable rmware upgrade, we recommend formatting the memory
card prior to the upgrade process.
• DO NOT unplug or power-off the camera during a rmware upgrade process,
as it may cause irrepairable damage to the camera.
Enable Screen Saver Manually
To manually enable screen saver, press the Power button once, and the screen
will turn off, while the camera is still recording video. Press any button on the
camera to deactivate Screen Saver.
Enable/Disable Audio Recording
Audio recording can be enabled/disabled by pressing the “OK” button while the
camera is in video recording mode. An icon with a disabled microphone will
appear at the top of the screen, conrming audio recording has been disabled.

Camera Settings
12
Settings Menu
Change video recording resolution
Default: 1920x1080P60
Change length of video segments
Default: 3 Minutes
Change Time and Date of camera
Toggle Audio Recording
Default: On
Toggle options such as Driver Fatigue
Alarm, Headlight Reminder, and Overspeed.
Enable/Disable Motion Detection recording
Default: Off
Change bump sensor sensitivity level
Default: Low
Toggle options for on-video stamps
Set customized text to display on video
stamp
Adjust exposure level for different light
conditions Default: 0
Enable/Disable audible beep sound
when button is pressed
Enable/Disable Screen Saver Mode
Default: Off
There are a total of 5 settings pages. These screens are numbered from 1 - 5.
Each screen contains 4 settings. To change a setting, use the up/down arrow
keys to navigate to the desired option, and press the OK button for selection.
Please refer to examples shown below.

Camera Settings
13
Change display language of the camera
Enable/Disable Parking Surveillence
Mode Default: 0ff
Enable/Disable Wide Dynamic Range for
enhanced video quality Default: Off
Erase all les stored on memory card
Scheduled reminder to format memory
card
Revert all settings to factory defaults
Provides information on rmware
currently installed in camera

Notes
14

Notes
15

Notice
FCC Statement
This equipment has been tested and found to comply with the limits for a Class
B digital device, pursuant to part 15 of the FCC Rules.
These limits are designed to provide reasonable protection against harmful
interference in a residential installation. This equipment generates, uses and
can radiate radio frequency energy and, if not installed and used in accordance
with the instructions, may cause harmful interference to radio communications.
However, there is no guarantee that interference will not occur in a particular
installation.
If this equipment does cause harmful interference to radio or television
reception, which can be determined by turning the equipment off and on, the
user is encouraged to try to correct the interference by one or more of the
following measures:
• Reorient or relocate the receiving antenna.
• Increase the separation between the equipment and receiver.
• Connect the equipment into an outlet on a circuit different from that to which
the receiver is connected.
• Consult the dealer or an experienced radio/TV technician for help.
Caution:
Any changes or modications to this device not explicitly approved by
manufacturer could void your authority to operate this equipment.
This device complies with part 15 of the FCC Rules. Operation is subject to the
following two conditions: (1) This device may not cause harmful interference,
and (2) this device must accept any interference received, including interference
that may cause undesired operation.
RSC Labs Inc. declares that this Radio-Frequency peripheral is in compliance
with the essential requirements and other relevant provisions of Directive
1999/5/EC.
16

Notice
Warranty
This RSC product is warranted by RSC LABS to be free from defects in material
and workmanship for one (1) year from the date of purchase. PROOF OF
PURCHASE IS REQUIRED TO OBTAIN WARRANTY SERVICE.
During this period if this product is found to be defective in material or
workmanship, RSC LABS or one of its authorized service facilities will at its
option, either repair or replace this Product without charge, subject to the
following conditions, limitations and exclusions:
1. This warranty extends to the original consumer purchaser only and is not
assignable or transferable.
2. This warranty shall not apply to any Product which has been subjected to
misuse, abuse, negligence, alteration or accident, or has had its serial number
altered or removed.
3. This warranty does not apply to any defects or damage directly or indirectly
caused by or resulting from the use of unauthorized replacement parts and/or
service performed by unauthorized personnel.
THIS WARRANTY IS IN LIEU OF ALL OTHER WARRANTIES, EXPRESS OR
IMPLIED, INCLUDING BUT NOT LIMITED TO ANY IMPLIED WARRANTY OF
MERCHANTABILITY OR FITNESS FOR A PARTICULAR PURPOSE PROVIDED,
HOWEVER, THAT IF THE DISCLAIMER OF IMPLIED WARRANTIES IS INEFFECTIVE
UNDER APPLICABLE LAW, THE DURATION OF ANY IMPLIED WARRANTIES
ARISING BY OPERATION OF LAW SHALL BE LIMITED TO ONE (1) YEAR FROM
THE DATE OF PURCHASE OR SUCH LONGER PERIOD AS MAY BE REQUIRED BY
APPLICABLE LAW.
UNDER NO CIRCUMSTANCES SHALL RSC LABS BE LIABLE FOR ANY
CONSEQUENTIAL, INCIDENTAL, SPECIAL, DIRECT, INDIRECT, EXEMPLARY OR
PUNITIVE DAMAGES RELATED TO OR ARISING OUT OF ANY BREACH OF THIS
WARRANTY OR ANY OTHER CLAIM REGARDING THIS PRODUCT, INCLUDING BUT
NOT LIMITED TO CLAIMS OF NEGLIGENCE, STRICT LIABILITY OR BREACH OF
CONTRACT.
SOME PROVINCES/STATES DO NOT ALLOW (A) LIMITATIONS ON HOW LONG
AN IMPLIED WARRANTY LASTS OR (B) THE EXCLUSION OR LIMITATION OF
INCIDENTAL OR CONSEQUENTIAL DAMAGES, SO THE ABOVE LIMITATIONS OR
EXCLUSIONS MAY NOT APPLY TO YOU. THIS WARRANTY GIVES YOU SPECIFIC
LEGAL RIGHTS AND YOU MAY HAVE OTHER RIGHTS WHICH VARY FROM STATE
TO STATE.
17

Notice
In order to obtain performance of the warranty obligations, the original
consumer purchaser must return this warranty form and this RSC LABS Product
together with proof of purchase and proof of purchase date (Bill of sale) either
in person or addressed to the appropriate Service Department of RSC LABS for
your product.
For dash cameras and accessories requiring repair service, please contact the
RSC LABS Service Department of your designated country using the phone
or email contacts listed in the contact section below. Please do not mail your
equipment before receiving a RMA number.
In returning this Product for repair or replacement under this warranty, the
original consumer purchaser must prepay all postage, shipping transportation,
insurance and delivery costs, and the Product must be delivered in either in its
original carton or a similar package affording an equal degree of protection.
RSC LABS will not be responsible for any loss or damage incurred in connection
with the return of this Product.
Contact
RSC LABS
9225 Leslie Street, Suite 201
Richmond Hill, ON L4B 3H6, Canada
Website: www.rsc-labs.com
Phone: 1-888-456-0772 (Toll-Free)
Email: support@rsc-labs.com
©2018 RSC Labs Inc. RSC and the RSC logo are trademarks or registered trademarks of RSC Labs Inc. Android, Google
Play, and the Google Play logo are trademarks of Google LLC. Apple and the Apple logo are trademarks of Apple Inc.,
registered in the U.S. and other countries. App Store is a service mark of Apple Inc., registered in the U.S. and other
countries. IOS is a trademark or registered trademark of Cisco in the U.S. and other countries and is used under license.
Any other trademarks on this document are for reference purposes only and belong to their respective owner(s). All
rights reserved.
Other manuals for tonto
1
Table of contents
Other RSC Dashcam manuals