RTX RTX8930 User manual

Page | 1
RTX8930 Userguide

Page | 2
Contents
1.1 Audience.................................................................................................................................................. 4
1.2 Abbreviations........................................................................................................................................... 4
2 Making Headset Ready ................................................................................................................................... 4
2.1 Package - Contents/Damage Inspection.................................................................................................. 4
2.1.1 Before Package Is Opened................................................................................................................ 4
2.1.2 Contents of Package ......................................................................................................................... 4
2.1.3 Damage Inspection ........................................................................................................................... 5
2.2 Before Using the Headset........................................................................................................................ 5
2.2.1 Using the Charger ............................................................................................................................. 5
3 Headset overview ........................................................................................................................................... 5
4 LED indicators ................................................................................................................................................. 6
5 Charger overview............................................................................................................................................ 6
6 Register headset with phone system ............................................................................................................. 7
6.1 Register on DECT network....................................................................................................................... 7
6.2 Registration failed.................................................................................................................................... 7
6.3 Automatic registration ............................................................................................................................ 8
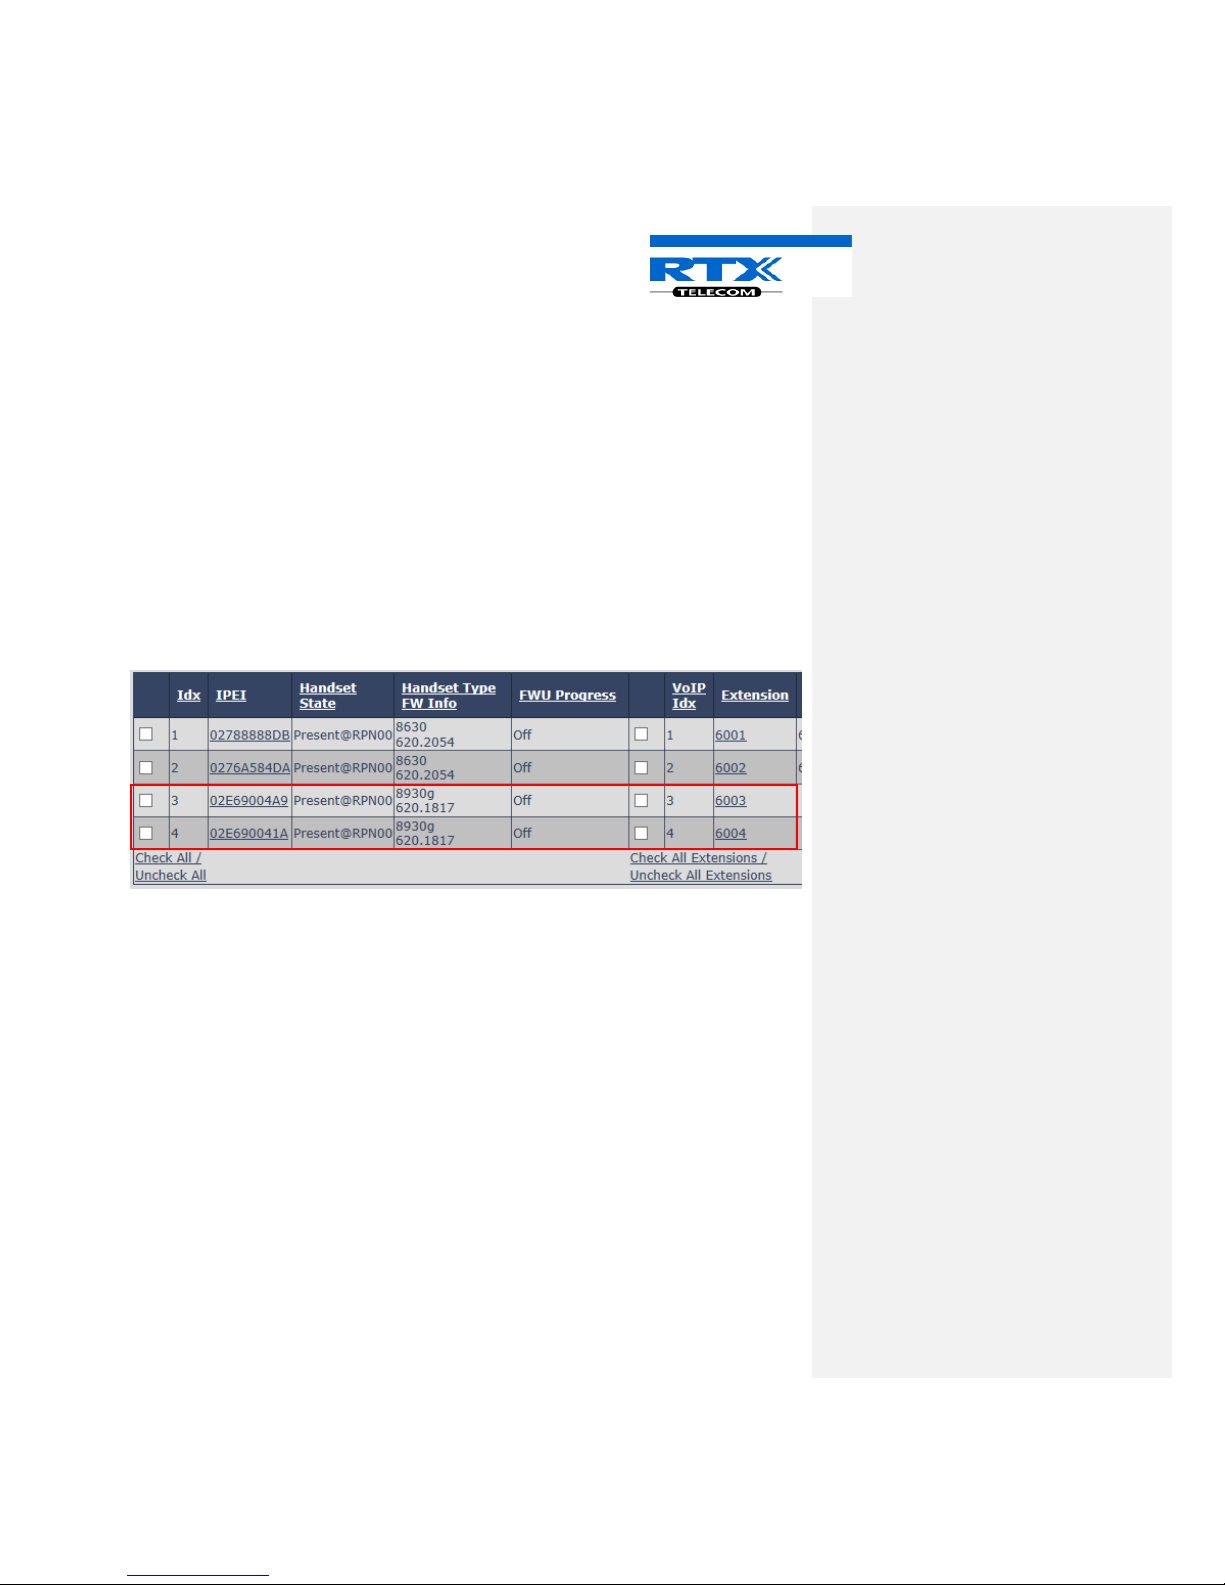
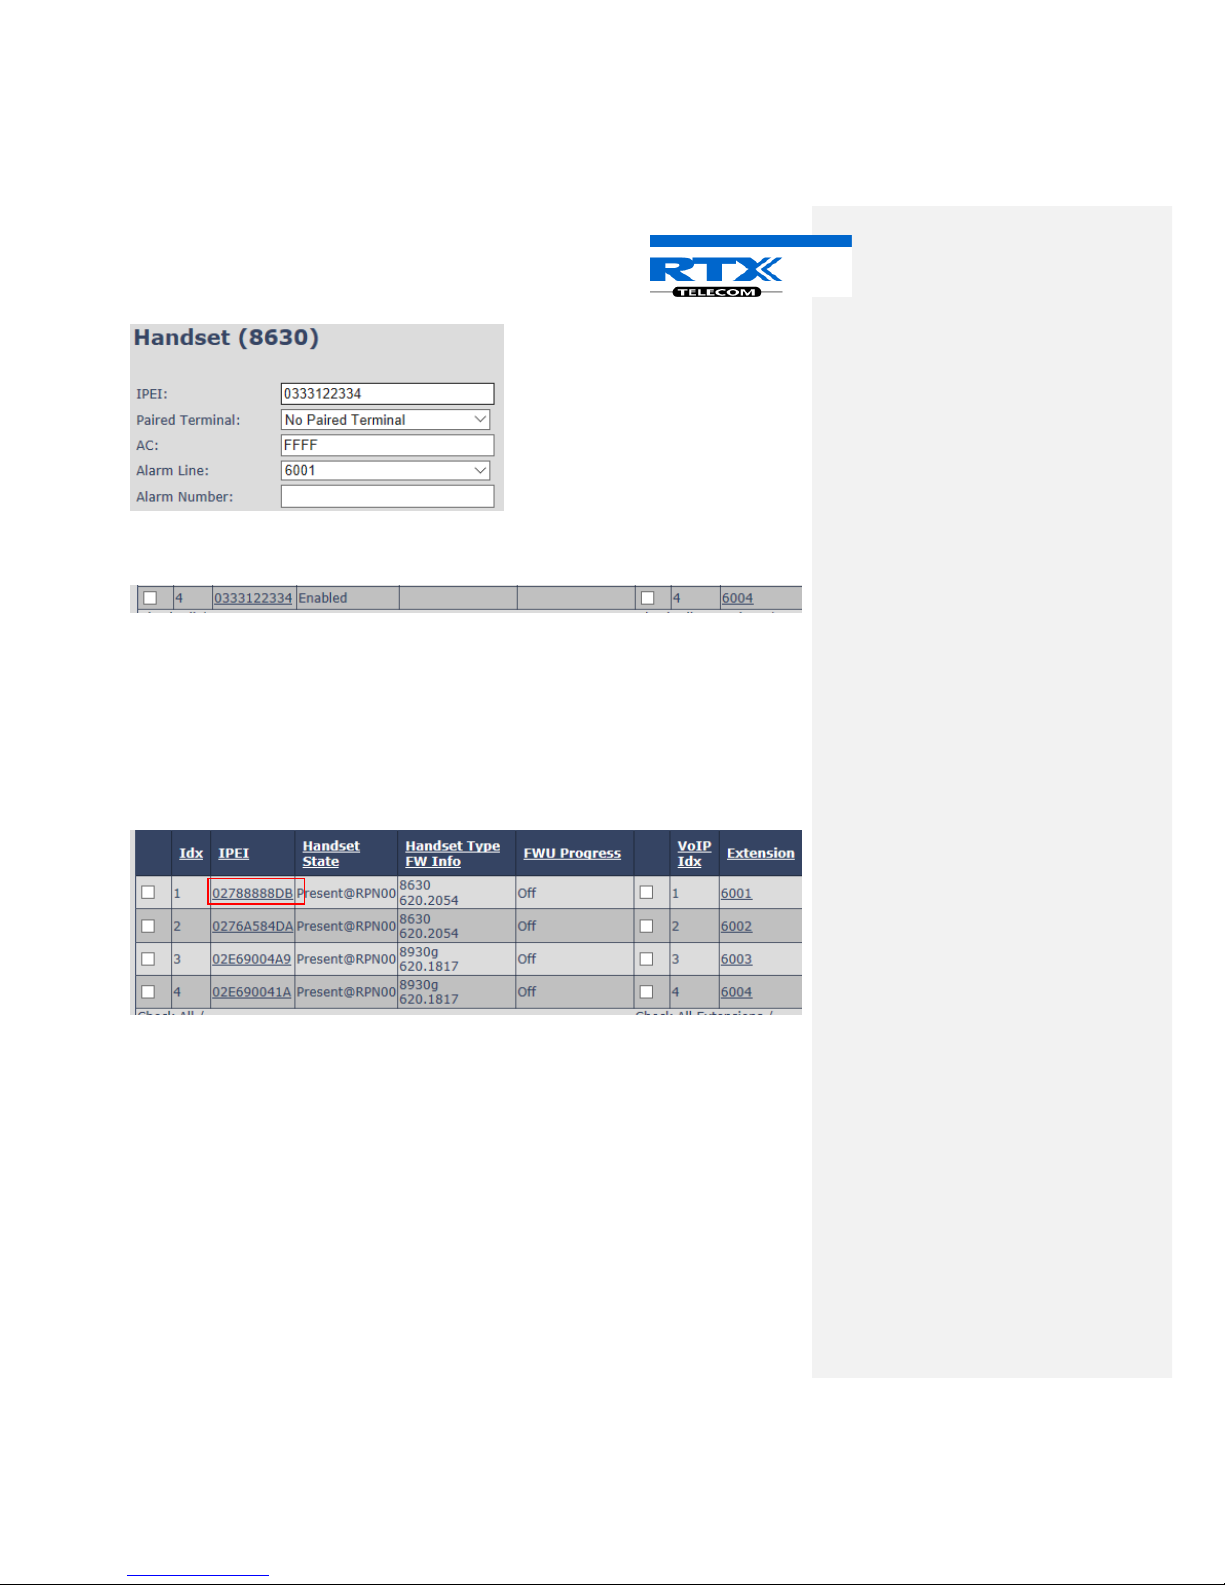
6.4 Pairing headset ........................................................................................................................................ 9
6.5 Decoupling............................................................................................................................................. 10
6.5.1 Deregistered ................................................................................................................................... 10
7 Headset operations ...................................................................................................................................... 11
7.1 Headset Operating States...................................................................................................................... 11
7.1.1 Idle .................................................................................................................................................. 11
7.1.2 Incoming call –One active call ....................................................................................................... 11
7.1.3 In call –second call incoming ......................................................................................................... 12
7.1.4 In call –one active and one on hold............................................................................................... 12
7.1.5 Menu .............................................................................................................................................. 12
7.1.6 Menu, Item selected....................................................................................................................... 13
7.1.7 Menu structure............................................................................................................................... 13
8 Handling call ................................................................................................................................................. 14
8.1 Claim call................................................................................................................................................ 14
8.2 Incoming call.......................................................................................................................................... 14
8.2.1 Answer/End call.............................................................................................................................. 14
8.2.2 Hold call .......................................................................................................................................... 14

Page | 3
8.2.3 Retrieve call on hold ....................................................................................................................... 14
8.2.4 Reject incoming call........................................................................................................................ 15
8.2.5 Mute/Unmute call .......................................................................................................................... 15
8.3 Second call............................................................................................................................................. 15
8.3.1 Receive a second call ...................................................................................................................... 15
8.3.2 Answer second call ......................................................................................................................... 15
8.3.3 Reject second call ........................................................................................................................... 15
8.3.4 Answer second call and terminate first call ................................................................................... 15
8.3.5 Swap call ......................................................................................................................................... 15
8.4 Outgoing call.......................................................................................................................................... 15
8.4.1 Add a second outgoing call............................................................................................................. 15
9 Stand-Alone headsets................................................................................................................................... 15
10 Technical data............................................................................................................................................. 16
DECT: ........................................................................................................................................................... 16
Headset:....................................................................................................................................................... 16
10.1 Security:............................................................................................................................................... 17

Page | 4
1 About This Document
This document describes the features and functionalities available in the RTX8930 DECT Headset. We
describe how to operate the headset without going into details of its mechanical features. The reference
for features and operation in this manual is RTX generic mode.
1.1 Audience
This guide is intended for everyday users as well as system administrators.
1.2 Abbreviations
For the purpose of this document, the following abbreviations hold:
DECT: Digital Enhanced Cordless Telecommunications
IPEI: International Portable Equipment Identity
MAC: Media Access Control
PBX: Private Branch Exchange
1.4 Document History
Reversion
Author
Release date
Comments
1.0
HDJ
26-06-2017
New version
2 Making Headset Ready
In this chapter, we briefly describe how to prepare the headset for use and install it.
2.1 Package - Contents/Damage Inspection
2.1.1 Before Package Is Opened
Examine the shipping package for evidence of physical damage or mishandling prior to opening. If there is
proof of mishandling prior to opening, you must report it to the relevant support center of the regional
representative or operator.
2.1.2 Contents of Package
Make sure all relevant components are available in the package before proceeding to the next step. In
principle, every shipped handset unit package/box contains the following items:
1 x Headset.
1 x Charger.
1 x Power plug.

Page | 5
2.1.3 Damage Inspection
The following are the recommended procedure for you to use for damage inspection:
1. Examine all relevant components for damage.
2. Make a “defective on arrival - DOA” report or RMA to the operator. Do not move the shipping carton
until it has been examined by the operator. The operator/regional representative will initiate the necessary
procedure to process this RMA. They will guide the network administrator on how to return the damaged
package if necessary.
3. If no damage is found then unwrap all the components and dispose of empty package/carton(s) in
accordance with country specific environmental regulations.
2.2 Before Using the Headset
The following are the precautions users should read before using the headset:
2.2.1 Using the Charger
Each headset is charged through the use of a headset charger. The charger is a compact desktop unit
designed to charge and automatically maintain the correct battery charge levels and voltage. The headset
charger is powered by AC supply from 110-240VAC that supplies 5.5VDC at 600mA. When charging the
battery for the first time, it is necessary to leave the headset in the charger for at least 10 hours before the
battery is fully charged, and the headset is ready for use.
2.2.3 Headset in the Charger
For correct charging, ensure that the room temperature is between 5°C and 25°C / 41°F and 77°F. Do not
place the headset in direct sunlight. If the headset is turned off when placed in charger, the handset turns
on and announces “Subscribed or Not Subscribed”
3 Headset overview
AUX Function Key (Power ON)
Volume + Key
LED Indicator
Volume - Key
Hook ON/OFF Key
Mute Key
Microphone
Speaker

Page | 6
1
4 LED indicators
Color
LED indication
Status
Green
Short blink followed by long blink
Power Up
Green
Long blink followed by short blink
Power Down
Blue
Short blink repeated fast.
Registration, ongoing
Blue
Long blink
Registration completed
Red
Long blink
Registration failed
None
Deregistered
Blue
Single short blink, repeated slow
Idle, Connected
Red
Single short blink, repeated slow
Idle, Out of range
Green
Fast, short blink, repeated
Incoming call
Green
Fast, short blink, repeated
2nd Incoming call, call active, Silent mode on
Green
Single short blink. Notification of call
only via audio in HS
2nd Incoming call, call active, Silent mode Off
Green
Single short blink
In call
Red
Fast, short blink
Low battery*
Red
Steady on
Battery charging, low bat
Green
Long blink
Battery charging
Green
Steady on
Battery charging, full
Purple
Steady on
Menu
5 Charger overview
1: Charging pins.
2: Charger connection.
1
2

Page | 7
6 Register headset with phone system
The RTX8930 headset is registered on the phone system, in the same way as a normal DECT phone.
The default PIN code is “0000”
6.1 Register on DECT network
1: Enable registration on the base stations as you would a normal phone (See Base station manual).
2: Put the headset in registration mode by pressing the Hook ON/OFF + Volume+ and Volume- key, for
more than 5 seconds. The headset is in subscription mode when the LED makes short blue flashes and voice
prompt announce “registering”.
3: The headset now connects to the base station. On success voice prompt, announce “Headset subscribed”
You are now able to see the headset on the extension page:
In this case 2 headsets are registered with ext. 6003 and 6004.
At this stage the headset is not paired with a handset. You can call the headset by using the assigned ext.
number and answer the call by pressing HOOK ON/OFF Key.
6.2 Registration failed
If the registration fails, the voice prompt will announce “Headset not subscribed”.
Before trying to register the headset again, please check the following:
•Voice Prompt announce “Registering”
•Headset is within range of base station.
•Extension not in use.

Page | 8
Hardware key
Short press
Double press
Long Press
Long press
threshold
AUX function
Enter Menu mode
Hook ON/OFF
Volume+
Volume–
Mute
Register
Enter Register state
2 seconds
Power Off
Power off
5 seconds
NOTE: Register and Power off key are key combinations that have to be pressed at the same time.
Register = HOOK ON/OFF + Volume+ and Volume-
Power off = AUX function key + Volume+ + Volume-
6.3 Automatic registration
It is possible to register the headset with “Zero-touch” function. The only thing you need is the IPEI number
of the headset. (IPEI number can be found on the box label)
1: Add Extension
2: Enter extension number and password
3: Press save.
4: On the extension page press the IPEI link (FFFFFFFFFF)
5: Enter the IPEI number of the headset

Page | 9
6: Press save
7: Check the box on the left and press “Register handset”
8: Turn on the headset. It will start in registration mode and register automatically.
6.4 Pairing headset
It is possible for a handset and headset to share a SIP registration in the RTX8660 system, and work as a
paired unit.
Register handset and headset as normal (see RTX8660 user guide).
To pair headset and handset, press the IPEI link of the handset that you want paired with a headset.

Page | 10
On the handset page, choose “Paired Terminal” and select the Idx. number of the headset that you want to
pair to the handset.
Press –Save
Now headset and handset is paired.
The headset gets the same ext. as the handset.
NOTE: When Headset is paired with a handset, it is possible to register a new terminal with the extension
that the headset had before pairing.
6.5 Decoupling
If you want to decouple a handset and headset, press the IPEI link of the headset that you want to
decouple.
On the headset page choose “Paired Terminal” and select No Paired Terminal and press save.
NOTE: The headset will DECT de-register and announce “Out of range” followed by “Headset not
subscribed”. The headset has to be re-registered.
6.5.1 Deregistered
Hardware key
Short press
Double press
Long Press
Long press
threshold
AUX function
Enter Menu mode
Hook ON/OFF
Enter Search mode
Volume+
Enter Search mode
Volume–
Enter Search mode
Mute
Enter Search mode
Register
Enter Search mode
Power Off
Enter Search mode
Power off
5 second

Page | 11
7 Headset operations
The headset has different operating stages. The 5 physical buttons can have different functions depending
on what operation state the headset is in.
NOTE: Register and Power off key are key combinations that have to be pressed at the same time.
Register = HOOK ON/OFF + Volume+ and Volume-
Power off = AUX function key + Volume+ + Volume-
7.1 Headset Operating States
7.1.1 Idle
The Idle state, is when the headset is ready to handle calls.
Hardware key
Short press
Double press
Long Press
Long press
threshold
AUX function
Enter Menu mode
Hook ON/OFF
Volume+
Increase ringer
volume
Enable Silent mode
2 seconds
Volume–
Decrease ringer
volume
Disable Silent mode
2 seconds
Mute
Register
Enter Register state
2 seconds
Power Off
Power off
5 seconds
7.1.2 Incoming call –One active call
The incoming call stage is when one call is active on the headset.
Hardware key
Short press
Double press
Long press
Long press
threshold
AUX function
Hook ON/OFF
Accept incoming call/
Terminate active call
Reject incoming call
Put active call on
hold/retrieve call
2 seconds
Volume+
Increase call volume
Volume–
Decrease call volume
Mute
Mute microphone
Register
Power Off

Page | 12
7.1.3 In call –second call incoming
The headset is in call and receiving a second call.
Hardware key
Short press
Double press
Long press
Long press
threshold
AUX function
Hook ON/OFF
Terminate active call
–accept second call
Reject second call
Put active on hold and
accept second call
2 seconds
Volume+
Increase call volume
Volume–
Decrease call volume
Mute
Mute microphone
Register
Power Off
7.1.4 In call –one active and one on hold
Then you have an active call and one on hold, you can switch between the 2 calls.
Hardware key
Short press
Double press
Long press
Long press
threshold
AUX function
Hook ON/OFF
Terminate active call
–retrieve call on hold
Switch calls
2 seconds
Volume+
Increase call volume
Volume–
Decrease call volume
Mute
Mute microphone
Register
Power Off
7.1.5 Menu
When the headset is in Idle, registration Failed or Deregistered state, the user can enter the menu to
change different setting in the headset
Hardware key
Short press
Double press
Long press
Long press
threshold
AUX function
Select item
Exit Menu mode
2 seconds
Hook ON/OFF
Accept incoming call
Reject incoming call
2 seconds
Volume+
Next item
Volume–
Previous item
Mute
Register
Power Off

Page | 13
7.1.6 Menu, Item selected
Hardware key
Short press
Double press
Long press
Long press
threshold
AUX function
Select value
Back (deselect item)
Exit Menu mode
2 seconds
Hook ON/OFF
Accept incoming call
Reject incoming call
2 seconds
Volume+
Next value
Volume–
Previous value
Mute
Register
Power Off
When you enter the menu, the voice prompt will announce “Silent mode” On or Off. Now you can navigate
through the menu and adjust the settings as preferred.
7.1.7 Menu structure.
•Silent mode: Silences the ringer when enabled. Does not affect the stored value of ringer volume.
oOn
oOff
•Language: Two languages are available on the headset. English and another language, selectable for the user.
oEnglish
oNative
•Registration: Access code (default “0000”).
oRegister
oDeregister
•Audio feedback: Choose between beeps or voice prompts (where available) as user feedback. Where no voice
prompts are available, beeps will be played and this setting is ignored. The menu will always use voice prompts.
oVoice prompts
oBeeps
•Tone Protection: Automatic protection against loud noises and protection from too high volume settings with
prolonged use of the headset.
oOff
oOffice
oQuiet
•Noise reduction: Enable or disable digital noise reduction.
oOn
oOff
•Equalizer: Choose between three different equalizer settings.
oNormal
oBass
oTreble
•Auto mode: Automatic hook on when headset is removed from charger on incoming call.
oOn
oOff
•Silent charging: The headset makes no call indication (neither ringer nor LEDs) while cradled.
oOn: LED indication only while cradled.
oHeadset Deactivated: Appear disconnected, cannot receive calls while cradled.
oOff: Normal mode w LED and audio while cradled.
Commented [A1]: “hook on”, ? or perhaps “accept call”
instead of hook off

Page | 14
8 Handling call
When headset and handset is paired, is it still possible to use the handset as standalone unit. If you answer
incoming call on the handset it will not use the headset, unless you claim the call.
A third option is to use the headset as a standalone unit, but then it is not paired with a handset, see
section 9 for details.
8.1 Claim call
When a call is active on either device it is possible to transfer the call between the two devices. (Claim call)
•If the call is present on the handset, a short press on the headsets Hook ON/OFF key, will claim the call and
activate it on the headset.
•If the call is present on the headset, a short press on either the Hook OFF key or the SPEAKER key on the handset
will claim the call to the handset.
NOTE:
•If you press the speaker key on the handset, the call will be put on speaker.
•If the call is muted when the device makes a claim call, the call is unmuted.
•If the call is on hold when the device makes a claim call, the call is retrieved from hold.
•If one call is active and another is on hold, the call conditions are maintained.
•If two call is active on the handset. it is not possible to claim these calls to the headset and the other way
around.
8.2 Incoming call
When receiving a call, both devices will ring and it is possible to, answer or reject the call on both terminals
if paired.
8.2.1 Answer/End call
Answer on handset: press the hook OFF key on the handset and the call will be active on the handset.
End call on Handset: Press the hook ON key
Answer on Headset: press the hook ON/OFF key on the headset and the call will be active on the headset.
End call on Headset: Press the hook ON/OFF key on the headset.
NOTE: The handset screen, shows “Connected (Passive)” showing that the handset is passive.
•Reject call on the headset: double press the Hook ON/OFF key.
8.2.2 Hold call
To put an active call on hold, long press hook ON/OFF (5 seconds) the voice prompt will announce “Call on
hold”
8.2.3 Retrieve call on hold
To retrieve a call on hold, press the long press hook ON/OFF (5 seconds) the voice prompt will announce
“Call retrieved”

Page | 15
8.2.4 Reject incoming call
An incoming call can be rejected by double pressing the hook ON/OFF Key on the headset or the Hook On
key on handset.
8.2.5 Mute/Unmute call
You can mute or unmute a call by pressing the physical mute button on the headset or handset.
8.3 Second call
When one call is active, it is possible to receive or make a second call
8.3.1 Receive a second call
If the terminal is in call and a second call in coming, a beep will be heard in the headset every 5 seconds.
8.3.2 Answer second call
Long press the hook ON/OFF key (2 seconds). The voice prompt, announce “Call accepted, call on hold”
The second call is then accepted and the first call is put on hold.
If second caller ends the call, the voice prompt, announce “call retrieved” and the first call is again active.
8.3.3 Reject second call
Double press the hook ON/OFF key, the voice prompt, announce “Call rejected” or Hook ON key on
handset.
8.3.4 Answer second call and terminate first call
Short press the hook ON/OFF key.
NOTE: No voice prompt announcement
8.3.5 Swap call
When there are two active calls, the user can swap between the two calls, by long press the hook ON/OFF
key (2 seconds), the voice prompt, announce “Call swapped”
8.4 Outgoing call
An outgoing call, have to be done from the handset. As soon as the call is answered, press the hook
ON/OFF key on the headset to claim the call to the headset.
To end the call, press the hook ON/OFF key on the headset or the Hook key on the handset.
8.4.1 Add a second outgoing call
To add a second outgoing call press “Conf” on the handset and dial the referred number. When the call is
accepted, you can swap between calls as described in 8.3.5.
9 Stand-Alone headsets
The headset can be used as stand-alone in an 8660 multicell system. The functionality is limited to:
•Receive call
•Putting call on hold
•Retrieve call
•Reject call

Page | 16
•Mute/Unmute
10 Technical data
DECT:
Multiband mode: (NOTE: DECT band is configured in production)
1880 –1900 MHz (EU)
1900 –1920 MHz China)
1910 –1930 MHz (LATAM)
1920 - 1930 MHz (USA, Canada)
1790 –1800 MHz (Korea)
Headset:
Dimensions:126 x 50 x 17 mm
Weight: 49g.
Operating temperature:10° to 50°
Storage Temperature: -20° to 70°
Range: DECT
Charging time: < 3 hours
Talk time: >7,5 hours
Standby time: > 100 hours
Audio Codec: Narrowband (G.726)
Wideband (G.722)
Battery: Lithium-Polymer battery 3.7 V, 320mAh.

Page | 17
10.1 Security:
Important safety information:
Read the instruction manual carefully before using this product.
If this product is passed on to a third party, this manual must follow the product.
This product may not be used if it has visible damage.
To avoid hearing damage, do not use this product with the volume set too high for extended periods of
time.
This product must only be cleaned with a dry and soft cloth.
To avoid damages to the product, do not expose it to high levels of humidity, moist, extreme low or high
temperatures.
This product contains a Lithium-Polymer battery.
In case of misuse, the battery can:
•Explode
•Catch Fire
•Generate heat
•Generate smoke or gas
Other manuals for RTX8930
1
Table of contents
Other RTX Headset manuals