Russell Hobbs RHCW004 User manual

York Pressure Cooker
Instructions & Guarantee
RHCW004 & RHCW007

2
Instruction Booklet
Congratulations on purchasing your Russell Hobbs Pressure Cooker. Using a pressure cooker
is a healthy alternate. It helps to lock in the nutrients, preserve vitamins, cook meals faster and
intensify the natural avour of your ingredients.
A pressure cooker uses steam pressure to cook your meals faster and healthier. Please read this
instruction booklet carefully before rst use. Remove any labels on the pressure cooker and
thoroughly clean it as instructed.
Important Safeguards
t 5IJTBQQMJBODFDPPLTVOEFSQSFTTVSF*NQSPQFSVTFNBZSFTVMUJOBTDBMEJOHJOKVSZ
tImproper use may be dangerous and immediately voids the warranty.
tAlways take care when moving a pressure cooker containing hot liquids.
tDo not touch hot surfaces on the pressure cooker, use the handles.
tImproper use may cause safety devices to release sudden expulsion of steam and in extreme
cases liquid.
t Use only liquids that give o steam when boiling such as: water, stock, wine and milk.
t Do not use oil or melted fat in the pressure cooker when cooking under pressure.
t Always double check the lid has been locked in the correct position before cooking.
t Always double check the pressure has been released before removing the lid.
t If the lid is dicult to open, do not force it. Allow the pressure cooker to cool a little longer
to ensure the pressure has been released.
t Do not allow children to operate this appliance.
t Check the vent pipe and safety devices for blockages before each use.
t Never cook without water in the pressure cooker. We recommend using at least 250ml of
liquid for every 12/15 minutes of cooking
t Do not ll the pressure cooker more than 2/3 of its capacity with solid food or ½ of its
capacity with liquid. Over lling may cause the food to block the vent pipe.
t 5BLFFYUSBDBSFXIFODPPLJOHGPPETTVDIBTBQQMFTBVDFDSBOCFSSJFTCBSMFZDFSFBMTTQMJU
QFBTOPPEMFTBOEQBTUB5IFTFGPPETUFOEUPGPBNXIFODPPLFE
t Do not use the basket insert when cooking with foods that foam.
t Check that the lid is properly closed by making sure the handles are locked in line. Failure to
do so may cause the pressure cooker to be damaged.
t Do not cook dumplings with the lid on, as the dough will rise and may block the safety
devices. Cook the dumplings in the basket with the lid open.
t Do not place the pressure cooker in an oven.
t Use only the parts supplied with the original purchase.
t For household use only.
Please retain this Instruction Booklet for future reference

3
Before Use
Before using the pressure cooker for the rst time, remove all packaging, wash the body in hot
TPBQZXBUFSSJOTFBOEESZ5IFMJEBOEHBTLFUBSFUPCFDMFBOFECZXJQJOHXJUIBEBNQDMPUI
5IFHBTLFUTIPVMECFDPBUFEXJUIBMBZFSPGWFHFUBCMFPJM
1
2
3
4
6
8
7
9
11
10
5
12*
13*
1. Locking indicator
2. Anti-block cover
3. Regulator
4. Regulator pipe
5. Safety valve
6. Pressure release cavity
7. Upper handle
8. Gasket
9. Cleaning pin
10. Helper handle
11. Lower handle
*Only included with 7Litre model
12. Steamer basket*
13. Wire stand*

4
How Pressure Cooking Works
Under normal conditions water boils at a temperature of 100°C. If the pressure is increased,
the boiling point also rises. Your Russell Hobbs pressure cooker has been specially designed to
control the escape of steam to allow pressure to build up safely in the pressure cooker, thereby
JODSFBTJOHUIFDPPLJOHUFNQFSBUVSF5IJTSFTVMUTJODPPLJOHUJNFTVQUPUJNFTRVJDLFSUIBO
normal.
Using a pressure cooker has many advantages.
Economical – Cooks up to three times faster and uses only one hob or ring, saving both time
and fuel
Nutritional – Cooking under pressure is recognised as one of the healthiest ways to prepare
food. More vitamins and minerals are retained, with minimum loss of colour
and avour, compared with conventional cooking.
Versatile – Cheaper, tougher cuts of meat may be tenderised.
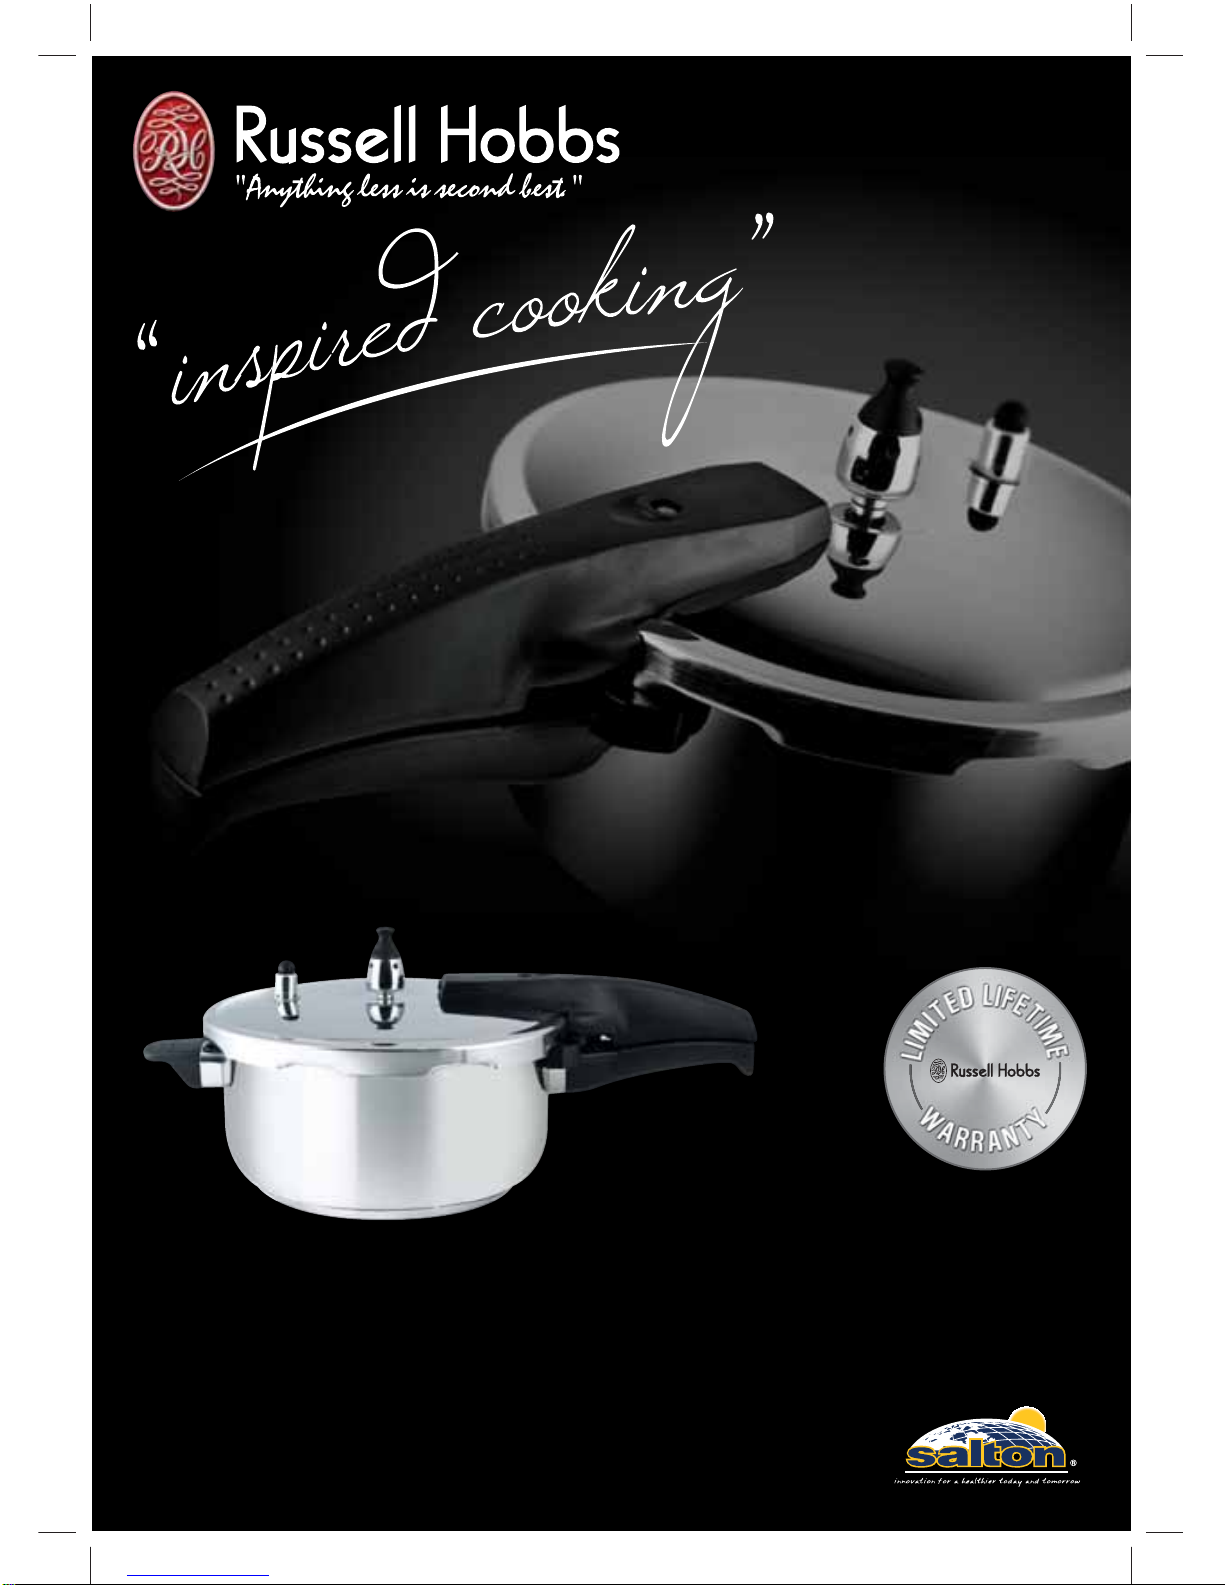
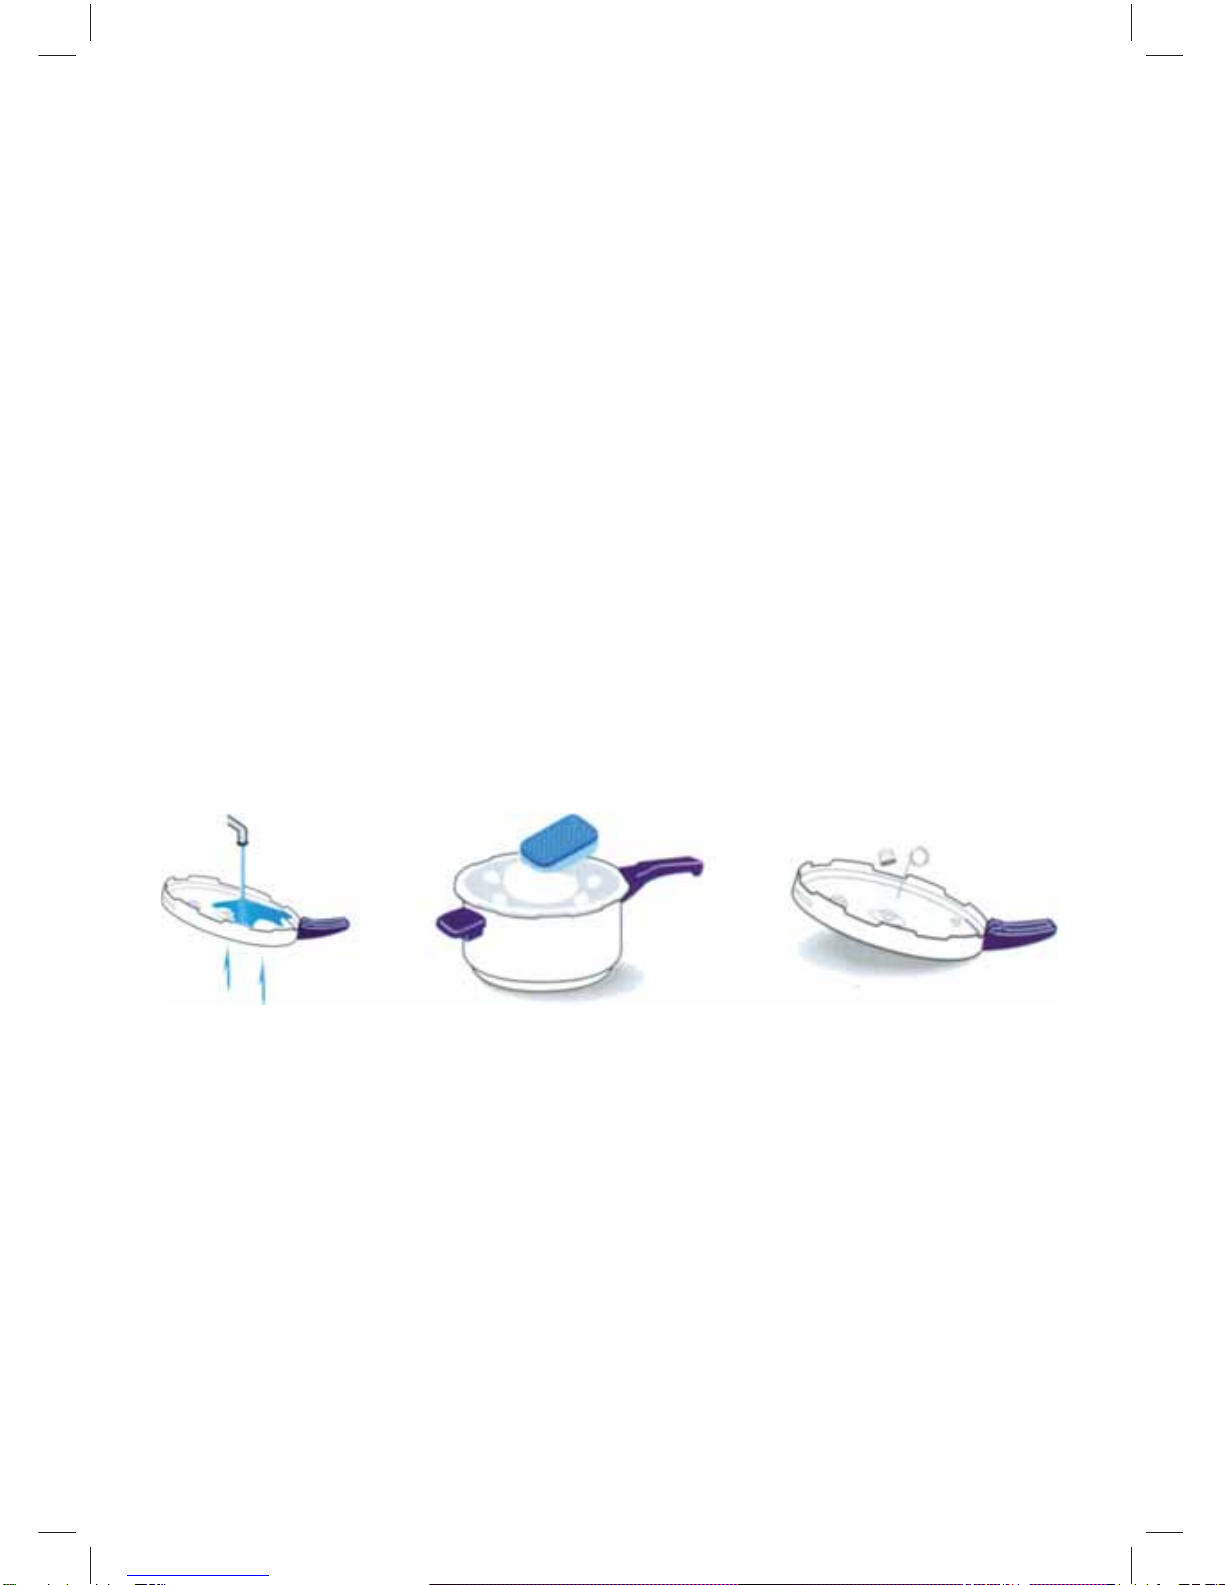
Preparing and Cooking with your Pressure Cooker
1. Before each use, check that the holes in the
weight, vent pipe and spring safety valve are
free from any blockages.
2. If there are blockages, use the cleaning pin
supplied to remove them.
3. Gaskets are manufactured to be slightly
oversized as they shrink in use. After a number
of uses the gasket will shrink to t. Once a
month, we recommend the gasket seal should
be removed from the lid and stretched lightly
in all directions and retted.
4. Make sure you oil the gasket with vegetable
oil before retting.
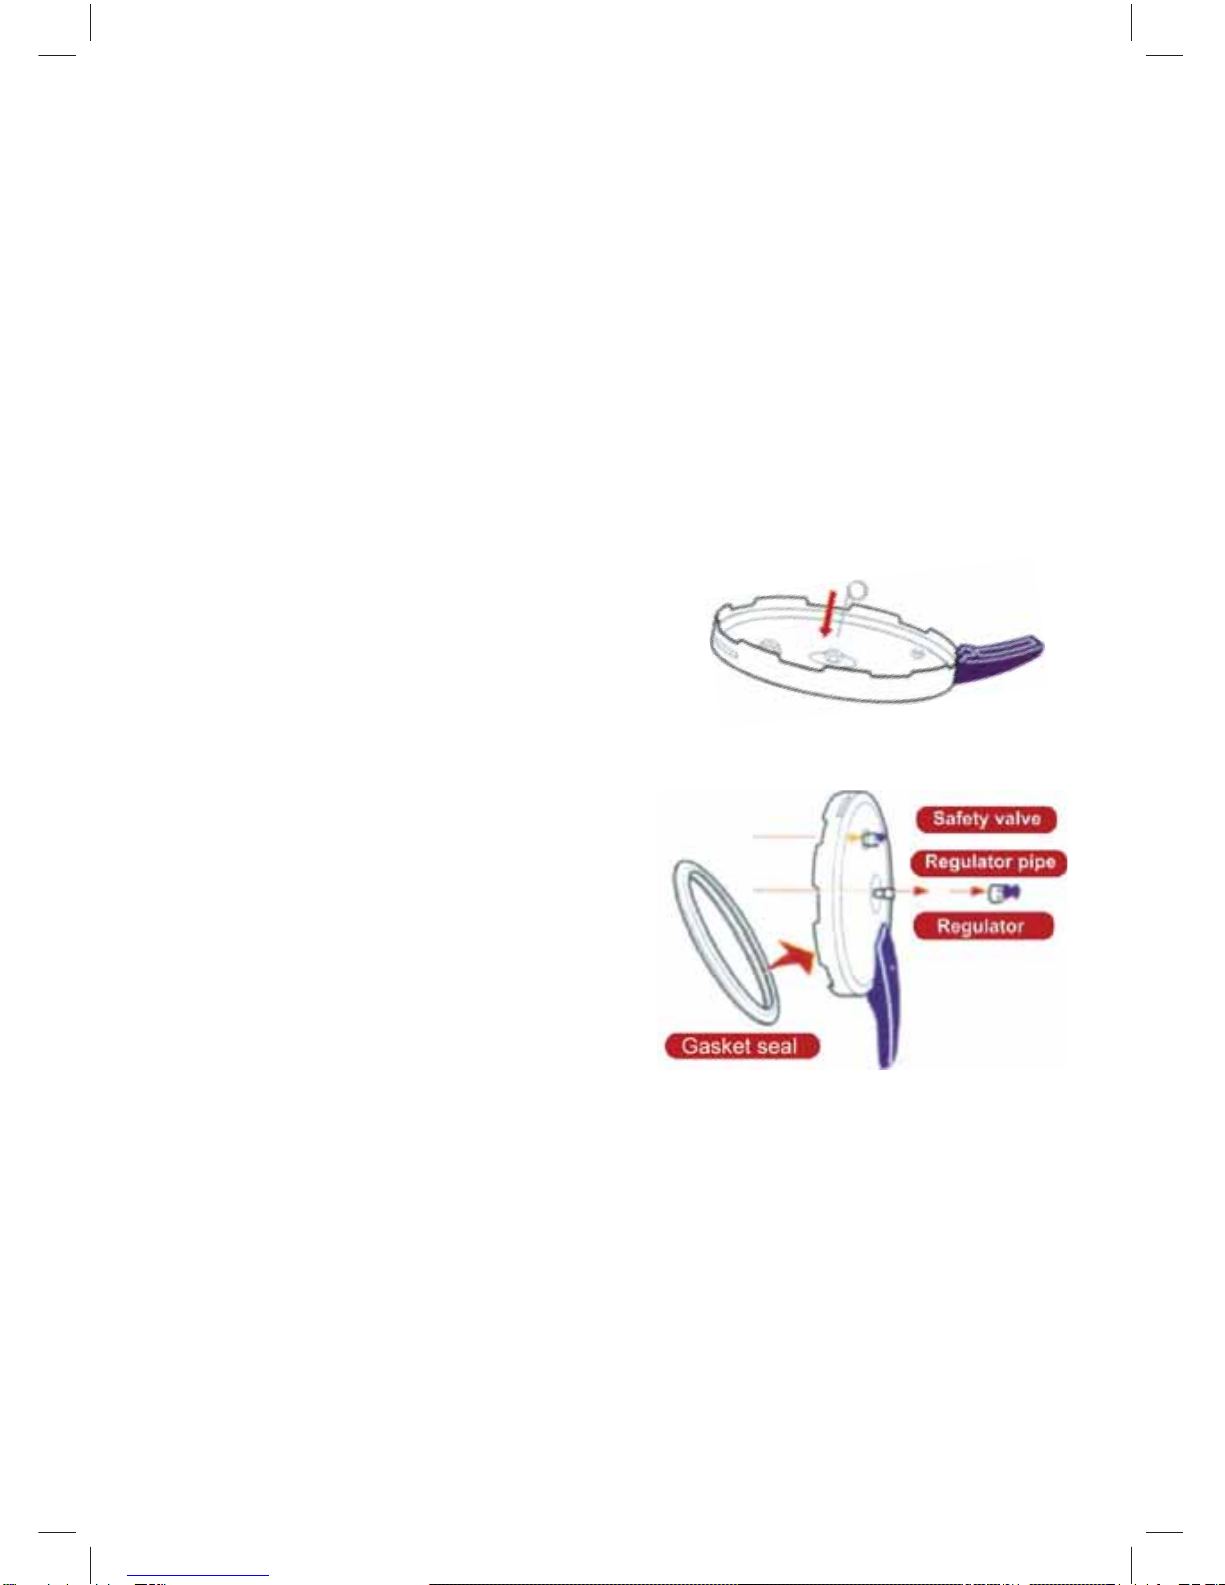
5. Place the ingredients into the pressure cooker
and add the recommended amount of water
or liquid. Never use oil, or fat in the pressure
cooker when cooking under pressure. Small
amounts of oil or fat can be used when browning
ingredients but the lid must be o. You must
use at least 250ml of liquid for every 12-15minutes
of cooking time. Increase liquid by 150ml for every
additional 12-15 minutes of cooking.
%POPUöMMUIFQSFTTVSFDPPLFSUPJUTGVMMDBQBDJUZ5IFQSFTTVSFDPPLFSTIPVMEPOMZFWFSCF
lled up to 2/3 of its maximum capacity.
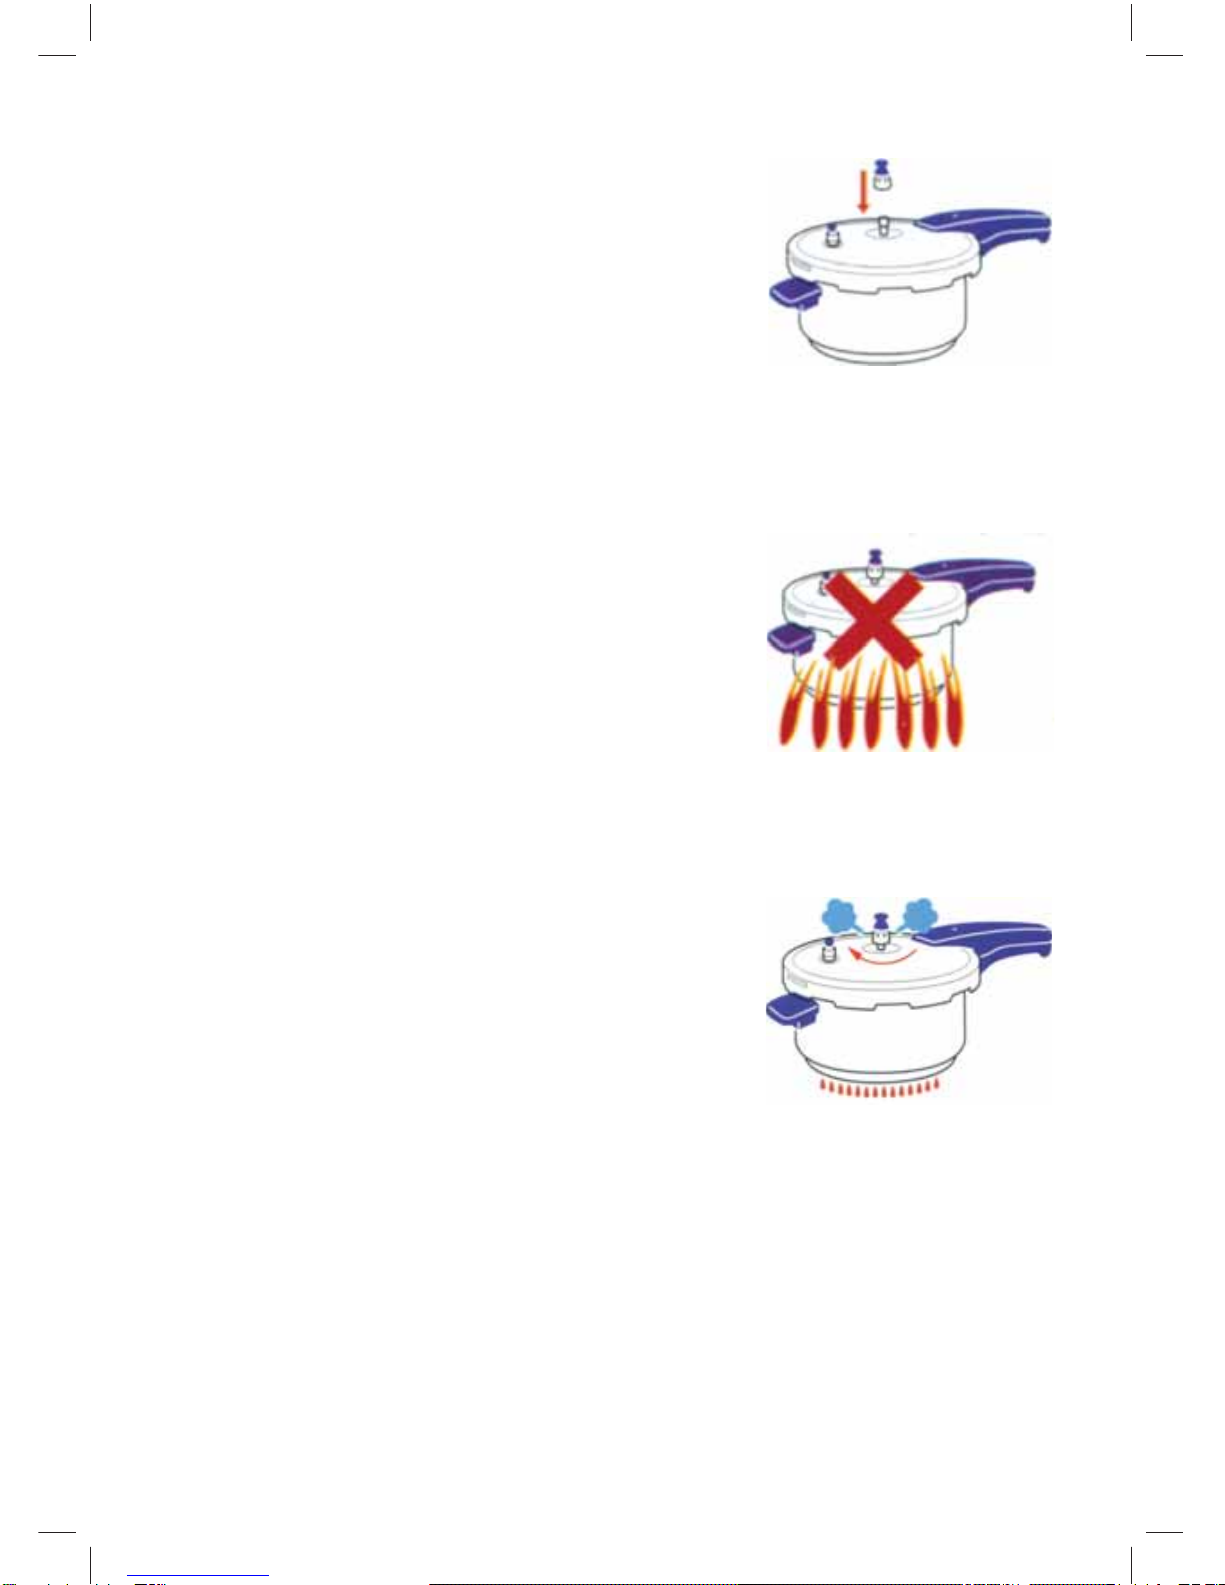
7. Do not ll the pressure cooker more than half way with food items such as apple sauce,
OPPEMFTSJDFBOEQBTUB5IFTFGPPETUFOEUPGPBNXIFODPPLFEBOENBZCMPDLUIFWFOUQJQF

5
Fitting the Lid
5IFMJEBOEIBOEMFIBWFBOBSSPXJOEJDBUPS)PMEUIF
lower handle, and align the mark “T”on the lid with
the mark “S” on the lower handle. Shut the lid by
UVSOJOHUIFVQQFSIBOEMFDMPDLXJTF5IFCPUUPN
handle and top handle should sit aligned when closed.
9. Put the Regulator on the Regulator vent pipe by
pressing gently downward to set it. Check that it
is free to spin.
Start Cooking
10. Place the closed pressure cooker on the hob and apply
medium - maximum heat. If cooking with gas, make sure
the ames do not go up the sides of the pressure cooker.
11. As the pressure cooker heats up, air and steam will be
expelled from the locking indicator section and from the
regulator valve.
12. As the pressure increases, the locking indicator on the
handle will rise and lock the handle.
13. When this happens, reduce the heat and start your
timing for cooking.
Regulate the Heat
3FHVMBUFUIFIFBUCZBEKVTUJOHUIFIFBUPOUIFIPCAt
the correct pressure, the regulator will turn slowly and
steam will come out of the steam holes. You may not be
able to see the steam, but you will hear a hissing noise.
15. If the pressure rises, the regulator will turn faster (allowing
more steam to escape) and the hissing noise will get
MPVEFS5IJTPDDVSTUPSFHVMBUFUIFQSFTTVSFJOTJEFUIF
pressure cooker, it does not make the food cook faster.
16. If the pressure falls below the operating minimum the
regulator will stop turning and the locking indicator will
drop back down into the handle.
5IFUSJDLJTUPSFHVMBUFUIFIFBUTPUIBUJUJTQSPEVDJOHKVTU
enough pressure to keep the regulator turning and hissing.
*OJUJBMMZUIJTNBZNFBOZPVOFFEUPBEKVTUUIFIFBUBGFXUJNFT
19. Some steam will escape from around the locking indicator and regulator during cooking.
5IJTJTOPSNBMBOETIPVMEOPUCFBDBVTFGPSBMBSN
20. You may nd wisps of steam come from the lid edge, the safety devices and the handles
EVSJOHUIFDPPLJOHQSPDFTT5IJTJTQBSUPGUIFOPSNBMPQFSBUJPOPGBQSFTTVSFDPPLFS

6
21. If you see a great deal of steam coming from the edge of the lid, the gasket is probably not
seated correctly – let the pressure cooker cool down, then reseat the gasket. If this does
not solve the problem, the gasket needs to be replaced.
22. At the end of the cooking time, turn o the heat and remove the pressure cooker from the
hob using both handles.
Releasing Pressure
5IFSFBSFUXPXBZTUPSFMFBTFTUFBNBGUFSZPVIBWFDPNQMFUFEDPPLJOHXJUIUIFQSFTTVSF
cooker. During the process of de-pressurisation, make sure the steam is not directed
towards anyone.
24. Quick Release:
Place the pressure cooker in the sink and run cold
tap water over it (do not submerge the pressure
cooker in water). Steam and pressure will be released
from around the locking indicator.
25. Slow Release:
Leave the pressure cooker to cool naturally. Steam
and pressure will be released slowly from around the
locking indicator area.
26. As the pressure is released, the locking indicator will retract into the handle.
5PFOTVSFUIBUBMMUIFQSFTTVSFIBTCFFOSFMFBTFEGSPNJOTJEFUIFQSFTTVSFDPPLFSDIFDL
that the locking indicator has dropped into the handle.
28.When the pressure has gone, use a cloth or oven glove to protect your hand from the
IFBUBOEMJGUUIFXFJHIUPòUIFWFOUQJQF5IFOSFNPWFUIFMJECZUVSOJOHUIFMJEIBOEMF
anti-clockwise.
Let it cool Turn handle to remove lid Allow remaining
steam to be released
29.If the lid is dicult to remove there may be some pressure inside the pressure cooker.
Leave it to cool for a few minutes; do not try to force it open.

7
Pre-steaming
Some recipes, such as Christmas pudding, require a period of pre-steaming before being
brought to cooking temperature. Pre-steaming should be done in a closed pressure cooker
on medium heat, with the regulator left o. Once the pressure cooker is steaming, the heat
TIPVMECFSFEVDFEUPMPXTPUIBUPOMZBTNBMMBNPVOUPGTUFBNFTDBQFT5IFXBUFSTIPVMEOPU
be allowed to boil rapidly, as more steam will be given o and the pressure cooker could boil
dry before the end of the cooking time.
When the pre-steaming time is complete, check that there is sucient water in the body of the
pressure cooker. Put the weight in position, close the pressure cooker and increase the heat to
bring it up to cooking pressure.
Using the Steamer* only with the 7Litre Pressure Cooker RHCW007
5IFCBTLFUBMMPXTTUFBNUPDJSDVMBUFGSFFMZBSPVOEUIFGPPE5IFCBTLFUDBOCFMJOFEXJUI
aluminium foil for foods such as rice or pasta. A wire stand is included if you require the
steamer basket to sit above the water.
Cleaning your Pressure Cooker
5IFQSFTTVSFDPPLFSTIPVMECFDMFBOFEUIPSPVHIMZBGUFSFBDIVTF"MXBZTBMMPXUIFQSFTTVSF
cooker to cool down completely before cleaning.
1. Remove the regulator and rinse in warm water. Use the supplied cleaning pin and check
the regulator pipe for any blockages.
2. Only use non abrasive sponges. Do not use metal sponges or cleaning utensils on your
pressure cooker.
:PVNBZXBTIUIFCPEZPGUIFQSFTTVSFDPPLFSJOUIFEJTIXBTIFS5IFMJEJTOPUEJTIXBTIFS
safe. However, to maintain your stainless steel pressure cooker, we recommend hand
washing only.
4. Remove the gasket from the lid and rinse in warm soapy water. Wash the body and lid
in warm soapy water. Rinse thoroughly and dry. Make sure you re-oil the gasket with some
vegetable oil.
5. Check that the vent pipe is clean and unblocked; otherwise the pressure cooker will not
work properly.

8
Cleaning your Pressure Cooker (continued)
5PQSFWFOUEJTDPMPVSBUJPOBMJUUMFMFNPOKVJDFPSWJOFHBSDBOCFBEEFEUPUIFDMFBOJOH
XBUFS5IFQSFTTVSFDPPLFSNVTUUIFOCFöMMFEBOEQVUPOUIFIPCUPTJNNFSGPSBCPVU
NJOVUFTXJUIUIFMJEPò5IFQSFTTVSFDPPLFSDBOUIFOCFXBTIFEBHBJOXJUITPBQZXBUFS
7. Remove scorch with a wooden ladle. Do not use a metal brush as it will damage the
QSFTTVSFDPPLFS*GTDPSDIJTIBSEUPSFNPWFJUDBOCFFYQPTFEUPUIFTVOUPESZPVU5IF
inside of the pressure cooker will then need to be coated in cooking oil to soak. After it has
soaked, pour hot water into the cooker. Several hours later, it’ll be easier to remove.
8. When storing the pressure cooker do not leave the lid on the body. Store the gasket, lid and
body seperately.
5PFOTVSFMPOHFWJUZPGZPVSQSFTTVSFDPPLFS
i) Do not wash the gasket in the dishwasher
ii) Do not wash the lid in the dishwasher
iii) Do not use soda, washing powder, scourers or abrasive cleaning pads, as these will
damage the pressure cooker.
5IFHBTLFUXJMMTISJOLTMJHIUMZBGUFSFBDIVTF*UTIPVMECFWFSZMJHIUMZTUSFUDIFEJOBMMEJSFDUJPOT
It will also harden. If steam is found to be leaking from the lid, the gasket may need to be
replaced. Generally the gasket should last 9-12 months of regular use. Proper care and
maintenance of the gasket will prolong its lifespan.

9
Troubleshooting Guide
Problem Causes Solution
Noise rattling from regulator,
there’s no steam escaping.
tRegulator is not installed
tproperly.
t5IFOP[[MFPGUIFSFHVMBUPS
tpipe is blocked.
tDry burning.
tPressure cooker is overlled
tInstall regulator on the
tregulator pipe properly.
tRemove residue with
tcleaning pin.
t5VSOPòIPCJNNFEJBUFMZ
tand take away cooker from
tIFBU5JMUVQUIFSFHVMBUPS
thalf way to let steam
tescape. Open lid and check
tfor damage
tCheck content level inside
Steam escapes from safety
valve
tRegulator pipe is blocked.
tExcessive loading
tHeat is too high.
tRemove residue and dirt
with cleaning pin.
tReheat after decreasing the
load of the cooker.
tCheck food in cooker,
reheat by moderate
UFNQFSBUVSFBOEBEKVTU
regulator movement
accordingly
Steam escapes from all
directions.
tBoth regulator and safety
valve malfunction.
tSealant ring is not properly
installed.
tSealant ring is damaged.
t5IFDMFBSBODFCFUXFFO
the lid and the gasket may
be clogged with foreign
substance such as food
residue etc.
tLid is not shut properly.
tRemove residue and dirt
with cleaning pin.
tReinstall gasket
tReplace gasket.
tRemove residue and dirt.
tDe-pressurise the cooker
and re-t the lid, making
sure it is tted correctly.
Q. Where do I get spare parts?
Contact Salton (Aust) Pty Ltd or Salton NZ Limited for any spare parts, or repairs. Do not
take item back to place of purchase. Contact Salton for advice and repairs or replacement.
Contact details on page 11.

10
6TFUIJTDIBSUBTBDPPLJOHUJNFHVJEF5JNFTBSFTUBSUFEXIFOUIFDPPLFSJTQSFTTVSJTFE
Cooking times can vary depending on your personal taste.
Food Water Quantity Cooking Time (Min)
SOUPS
Rice Soup 5P5BTUF 4-6
Vegetable Soup 5P5BTUF 5-7
Fish Soup 5P5BTUF 3-4
Noodle Soup 5P5BTUF 3-5
PASTA
Chicken and Rice 2 cups for 1 cup of rice 6-7
Spaghetti Cover 4-5
VEGETABLES
Leeks Cover 3-5
Carrots Cover 4-6
Cabbage 2 cups 4-5
Cauliower 2 cups 4-6
Spinach Cover 3-4
Broad Bean Cover 3-4
Chickpeas Cover 20
Lentils Cover 15-20
POTATOES
Potato IL per kg 5-7
FISH
5VOB 5P5BTUF 5-7
Squid 2 cups 10
Octopus Cover 20
5SPVU 1 cup 4-6
Steamed Mussels 1/2 litre 2-3
MEAT
Meatballs 2 cups 10-12
Round of Beef Cover 20-22
Lamb 1/2L per kg 10-12

In line with our policy of continuous product development we reserve the right to change the product,
packaging and specications without notice.
Any claims must be made direct to Salton (Aust) Pty Ltd / Salton NZ Ltd.
Do not return cookware to the place of purchase. All products must be assesed by Salton customer service
representatives or repair department before action will be taken. For service, repair or any questions regarding
your cookware, call Australia toll free 1800 427842 and New Zealand Free Call 0508629777.
Please keep your receipt as proof of purchase.
To register your product please:
· Visit www.salton.com.au/warranty OR
· Fill in the warranty card and send to the address shown below.
Nothing in this warranty or the instructions relating to the product excludes, restricts or
otherwise aects your statutory rights under the Trade Practices Act 1974 and other
relevant legislation.
In addition to your statutory rights, Salton (Aust) Pty Ltd and Salton NZ Ltd (hereafter
referred to as “Salton”) provide a LIMITED LIFETIME WARRANTY for this product. Salton
warrants this product free from defects in material and workmanship. Within this
warranty period Salton will repair or replace defective parts at no charge.
The warranty does not cover general wear, improper installation, misuse, commercial
use, abuse or neglect on the part of the owner. Additionally, scratches, stains,
discolouration, damage caused by automatic dishwasher use or damage caused by
overheating are not covered under warranty. Warranty is also invalid in any case that
the product is taken apart, altered or serviced by an unauthorised repairer.
Salton (Aust) Pty Ltd / Salton NZ Ltd reserve the right to change or discontinue
cookware ranges at any time. Where possible, repair or replacement will be made using
identical items, however this may not be possible if designs and styles have changed.
Salton (Aust) Pty Ltd / Salton NZ Ltd will replace your products with those of
comparable quality and value at its discretion.
Limited Lifetime Warranty
Thank you for choosing Salton
RHCW004_IB_18110 9

NOTES

This manual suits for next models
1
Table of contents
Other Russell Hobbs Electric Pressure Cooker manuals

Russell Hobbs
Russell Hobbs RHNPC800P Nutritionist User manual

Russell Hobbs
Russell Hobbs RHEP5 Installation guide

Russell Hobbs
Russell Hobbs EXPRESS CHEF RHPC1000 Installation instructions manual

Russell Hobbs
Russell Hobbs RHEP7 Installation guide

Russell Hobbs
Russell Hobbs Classic Satin RHNPC400 User manual

Russell Hobbs
Russell Hobbs RH SIZZLE User manual

Russell Hobbs
Russell Hobbs RH ALPHA User manual

Russell Hobbs
Russell Hobbs RHNPC401 User manual

Russell Hobbs
Russell Hobbs 14951 User manual

Russell Hobbs
Russell Hobbs 17995 User manual