PRESSURE KING PRO SC-100S User manual

®
User’s Manual
Please visit www.pressurekingpro.co.uk for video instructions
and cooking demonstrations.

2 SAVE THESE INSTRUCTIONS - FOR HOUSEHOLD USE ONLY SAVE THESE INSTRUCTIONS - FOR HOUSEHOLD USE ONLY 3
Important SafeguardsIndex
• Read and follow all instructions carefully
• This appliance can be used by children aged
from 8 years and above and persons with
reduced physical, sensory or mental capabilities
or lack of experience and knowledge if they
have been given supervision or instruction
concerning use of the appliance in a safe way and
understand the hazards involved. Children shall
not play with the appliance. Cleaning and user
maintenance shall not be made by children
without supervision.
• Appliances can be used by persons with reduced
physical, sensory or mental capabilities or lack of
experience and knowledge if they have been
given supervision or instruction concerning use of
the appliance in a safe way and understand the
hazards involved.
• Children shall not play with the appliance.
• Do not touch hot surfaces. Use handles or knobs
• To protect against electric shock do not immerse or
rinse cords or plug in water or other liquid.
• This appliance should never be operated by children
and special care should be taken when the unit is
in use in their presence. Keep the appliance and its
cord out of reach of children
• Unplug from outlet when not in use and before
cleaning. Allow to cool before putting on or taking
off parts
• Do not operate any appliance with a damaged cord
or plug or after the appliance malfunctions or has
been damaged in any manner. Return appliance to
the nearest authorised service facility for examination,
repair or adjustment.
• Do not use any attachments or utensils that were not
recommended or supplied by the manufacturer. The
use of attachments not recommended for use by the
manufacturer may cause serious hazardous situations
including personal injury
• Do not use outdoors
• Do not let cord hang over edge of table or counter,
or touch hot surfaces
• Do not place on or near a hot gas or electric burner,
or in a heated oven
• Extreme caution must be used when moving an
appliance containing hot oil or other hot liquids
• Always attach plug to appliance first, then plug cord
into the wall outlet. To disconnect, set any control to
“Off”, then remove plug from wall outlet.
• Do not use appliance for anything other than its
intended use
• This appliance cooks under pressure. Improper use
may result in scalding injury. Make certain unit is
properly closed before operating. See instructions
For Use.
• Never fill the unit above MAX line in the Inner Pot.
When using foods that expand during cooking such
as rice or dried beans, follow the recipe for “pressure
cooking” those products, and as a rule of thumb, do
not fill the unit above the “halfway” point. Overfilling
may cause clogging, allowing excess pressure to
develop. See Instructions For Use.
• Be Aware that certain foods, such as apple-sauce,
cranberries, pearl barley, oatmeal or other cereals,
split peas, noodles, macaroni, rhubarb, and
spaghetti, can foam, froth, sputter, and clog the
pressure release device (steam vent). Recipes using
these items must be followed carefully to avoid
problems
• Always check the pressure release devices for clogs
before use
• Do not open the pressure cooker until the unit has
cooled and all internal pressure has been released.
If the unit is difficult to open, this indicates that the
cooker is still pressurised – do not force it open.
Any pressure in the cooker can be hazardous. See
instructions For Use.
• Do not use this pressure cooker for pressure frying
with oil.
• This appliance has been designed for use with a 3
prong, grounded, 220-240V electrical outlet only. Do
not use any other electrical outlet
• The pressure cooker generates extreme heat and
steam in its operation. All necessary precautions must
be taken to avoid fire, burns and other personal injury
during its operation
• When in operation the pressure cooker requires
sufficient air space on all sides including top and
bottom. Never operate the unit near any flammable
materials such as dish towels, paper towels, curtains,
paper plates, etc.
• Always plug the electrical cord directly into the wall
outlet. Never use this unit with an extension cord of
any kind.
• Anyone who has not fully read and understood all
operating and safety instructions contained in this
manual is not qualified to operate or clean this
appliance.
• If this unit falls or accidentally becomes immersed in
water, unplug it from wall outlet immediately. Do not
reach into the water!
• Do not operate this appliance on an unstable
surface
• If this appliance begins to malfunction during use,
immediately unplug the cord. Do not use or attempt
to repair a malfunctioning appliance!
• NEVER FORCE OPEN the pressure cooker. If you need
Topic
Important safeguards 03
Safety features 05
Parts and accessories 05
Operating instructions 06
Programme settings 12
Care and cleaning 14
Specification 15
Troubleshooting 15
When using electrical appliances, basic safety precautions should
always be followed including the following:
4 SAVE THESE INSTRUCTIONS - FOR HOUSEHOLD USE ONLY SAVE THESE INSTRUCTIONS - FOR HOUSEHOLD USE ONLY 5
• Pressure Cooker
• Steam
• Fish
• Meat
• Pasta
• Stew / Soup
• Vegetables
• Cereals
• Rice
• Multi Cook
• Slow Cook
• Frying
• Cake
• Bake
• Crispy
• Pizza
• Egg
• Yoghurt / Proofing
• Jam
• Delay timer
• Keep Warm
• Steamer tray
• Spoon
• Measuring cup
• Condensation cup
(supplied attached)
• A short power-supply cord is provided to
reduce the risk resulting from becoming
entangled in or tripping over a longer
cord. Do not use an extension cord with
this product.
• If the electrical circuit is overloaded
with other appliances, your appliance
may not operate properly. It should be
operated on a dedicated electrical
circuit
• The pressure release valve will automatically
exhaust and limit the pressure.
• If the pressure release valve fails the lid
will release the pressure. In this case the
pressure release valve is faulty and needs to
be replaced.
• The cooker features a safety temperature
cut out if the temperature rises too much,
it will cut off and only start heating again
when the temperature has returned to the
normal temperature.
• If this function fails the pressure cooker will
cut off, it will not re-start and needs to be
replaced.
• The lid cannot be opened if the pressure
inside is high.
NOTE: This product must be grounded. If it should malfunction or break down, grounding provides
a path of least resistance for electric current to reduce the risk of electric shock. This product
is equipped with a cord having an equipment grounding conductor and a grounding plug.
The plug must be plugged into an appropriate outlet that is properly installed and grounded in
accordance with all local codes and ordiances.
Important Safeguards (cont..)
Short Cord Instructions
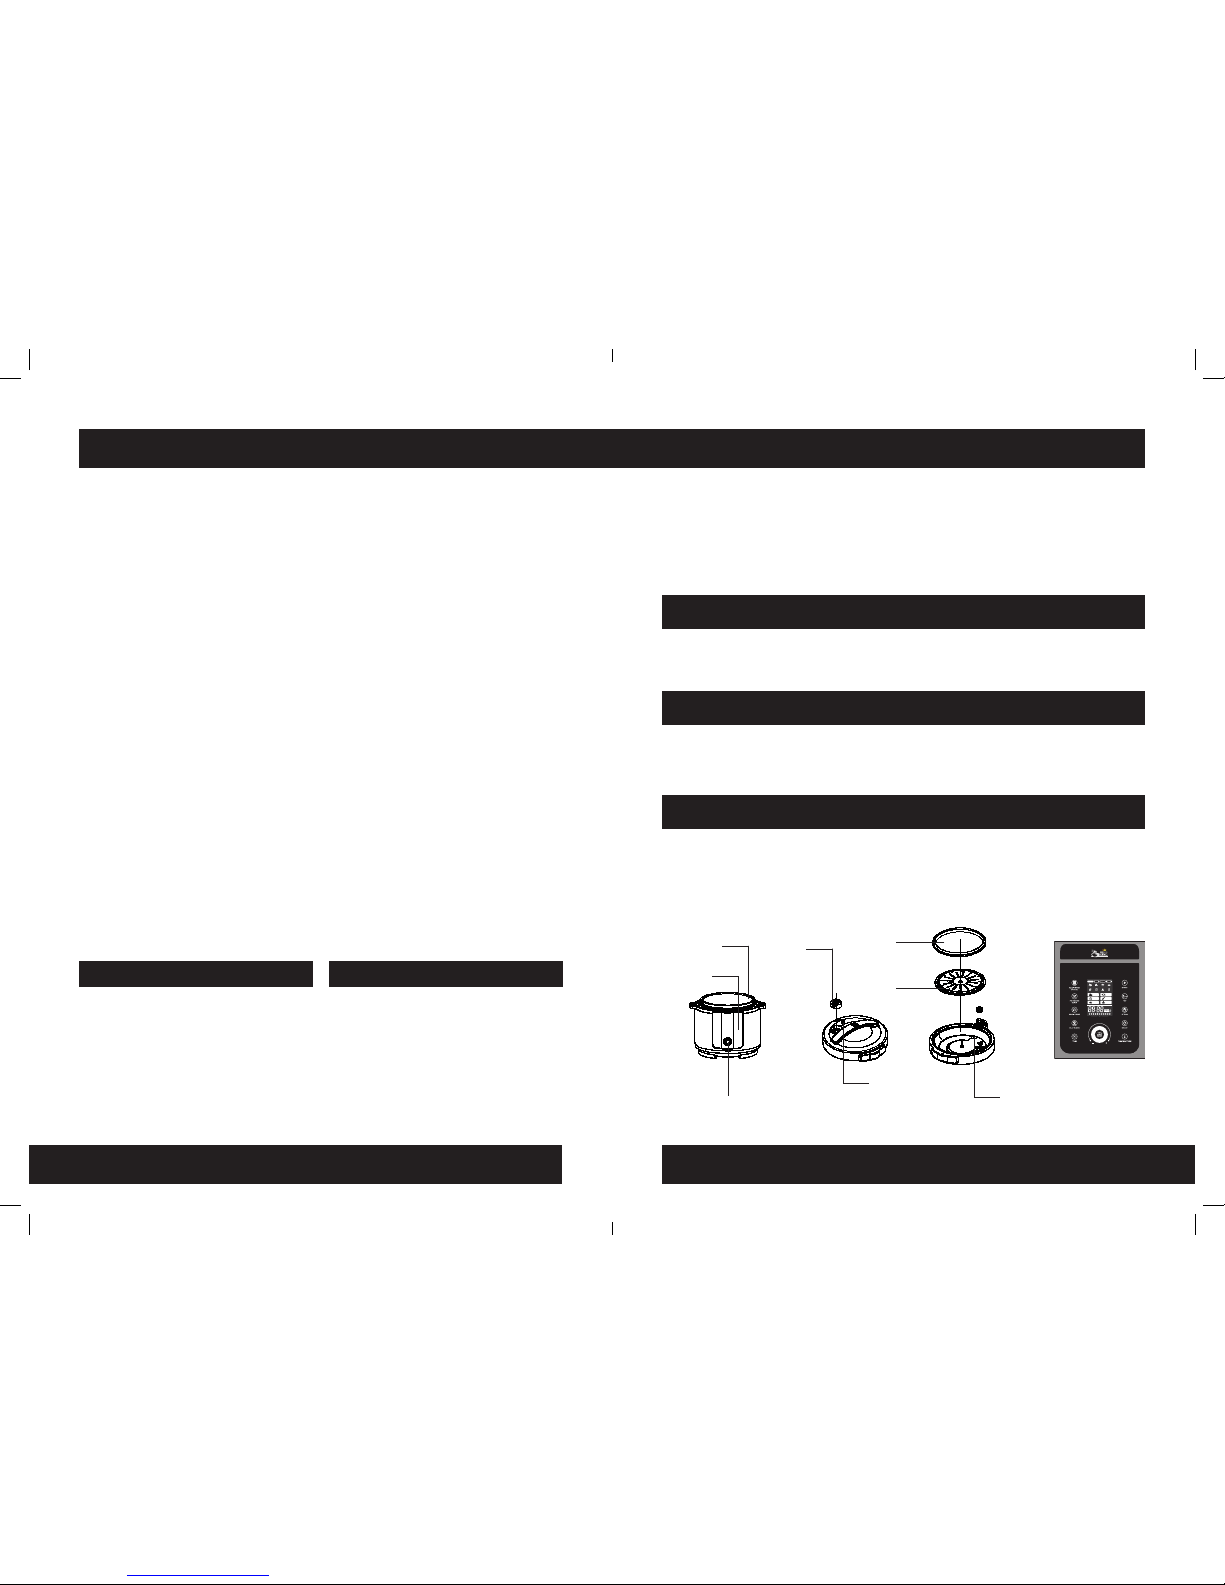
Pressure Cooker Features
Multi Cook Features
Additional Features
Electric Power
Safety Features
HEATING
Cereals Pa sta Rice Crispy
Pizza Egg Yoghurt J am
Meat Fish
Stew/Sou p Veg
Bake Cake
MULTI-COOKER
control knob
float valve
float valve
pressure
release valve
silicone
gasket
inner lid
control panel
inner pot
to open the pressure cooker press the CANCEL button
and using tongs or a kitchen tool carefully rotate the
pressure valve to the OPEN position to fully release the
building pressure inside the cooker. Make sure that all
the steam has dissipated from the cooker. Carefully
turn the handle clockwise to open. Always open the
lid away from you to avoid skin contact with any
remaining heat or steam.
• CAUTION: TO REDUCE RISK OF ELECTRIC SHOCK COOK
ONLY IN THE REMOVABLE CONTAINER. Do not immerse
the housing or base in water. Before use, clean the
bottom of the Inner Pot and the surface of the heater
plate… insert the Inner Pot, turning it slightly clockwise
and counter clockwise until you are sure it is sitting
correctly on the heater plate. Failure to do so will
prevent proper operation and may cause damage
to the unit.
• CAUTION HOT SURFACE. This appliance generates
heat and escaping steam during use. Proper
precautions must be taken to prevent the risk of
personal injury, fires, and damage to property.
• When in operation, never leave the appliance
unattended.
• Be careful also about the risk of scalding from the
steam coming out of the appliance when you open
the lid. First open the lid very slightly to allow the
steam to escape gently.
• Do not damage the silicone gasket. If it is damaged
please call Customer Services for a replacement.
• Make sure that the appliance is properly closed
before bringing up to pressure (see Instructions for
use).
• Do not use the appliance empty, without its inner pot
or without liquid inside the inner pot. This could cause
serious damage to the appliance.
• After cooking meat which has an outer layer of skin
(such as Ox tongue, bacon joints, chicken etc.),
which could swell due to the effects of pressure, do
not pierce the skin after cooking if it appears swollen:
you could get burnt. Pierce it BEFORE cooking.
• When cooking food with a thick texture (chick peas,
rhubarb, compotes, etc.), shake the appliance
slightly before opening it to ensure that the food or
cooking juices do not spurt out.
• Please be aware that quickly releasing the pressure
after cooking is nor suitable for food with a large
liquid volume or high starch content (e.g. porridge,
congee, sticky liquids, soup etc.). Food content may
splatter out from the pressure release valve. Use
natural release method inside - allow the cooker to
cool down naturally until the float valve drops down.
This may take between 15 and 20 minutes.
• This appliance is intended to be used in household
and similar applications such as:
– staff kitchen areas in shops, offices
and other working environments;
– farm houses;
– by clients in hotels, motels and other
residential type environments;
– bed and breakfast type environments.
• The heating element surface is subject to residual
heat after use, please pay attention to it!
• ENSURE THE LID IS CLOSED FULLY BEFORE SELECTING A
PRESSURE FUNCTION.
• AVOID SPILLAGE ON THE CONNECTOR.
6 SAVE THESE INSTRUCTIONS - FOR HOUSEHOLD USE ONLY SAVE THESE INSTRUCTIONS - FOR HOUSEHOLD USE ONLY 7
Operating Instructions
• Before first use please wash the inner pot, steamer, cup and spatula in warm soapy water.
Be careful not to use metal utensils as this will scratch and remove the non-stick surface.
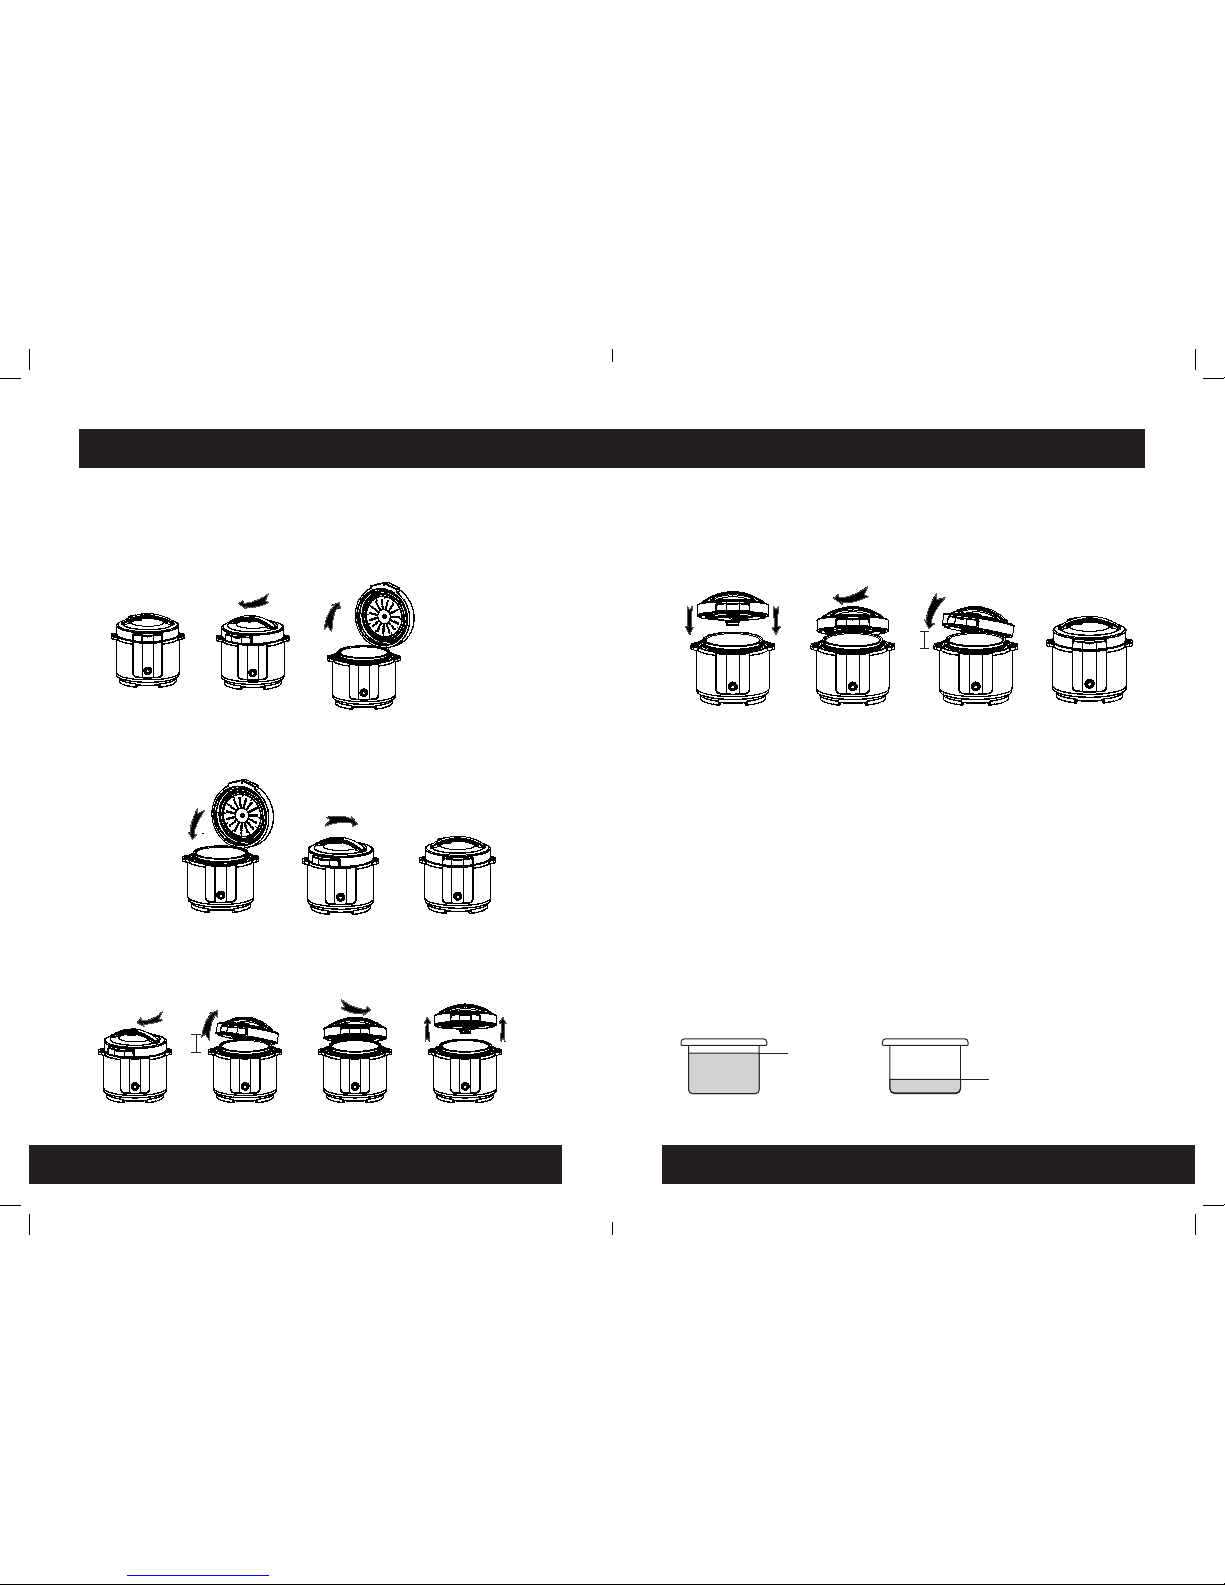
• To open the lid turn the lid handle in a clockwise direction and lift up to the vertical position.
Be careful not to catch the inner pot when lifting up the lid.
• Place the inner pot inside, gently lower the lid and close it by turning it anti-clockwise until it
clicks and locks.
• To remove the lid fully (for cleaning purposes), turn it clockwise and lift to around 15 cm then
turn it anti-clockwise and then lift off.
• To place the lid back on reverse the process, you will need to guide the runner at the back
of the lid into the groove at the back of the base unit, tilting at around 15 cm turn clockwise,
gently place the lid down and turn anti-clockwise until it clicks and locks.
• Due to expansion during cooking the lid may stick, in this case gently twist and lift off.
• Before cooking please ensure that the heating plate and the inside of the outer pot are
clean and free from food debris.
• NEVER COOK WITHOUT THE INNER POT. DO NOT PUT WATER IN THE OUTER POT.
• Refer to video instructions which can be found at www.pressurekingpro.co.uk.
• Fill the pot with products and water so that the combined level is between marks MIN and
MAX. For products which expand during cooking the maximum level should be below the
MAX line, it is recommended not to fill above the “halfway” mark for these kind of foods (see
warning section) Do not overfill the inner pot. Do not fill above the MAX line.
• CAUTION! When cooking under pressure never cook with no water or any liquid. Liquid
volume should always be at least the MIN level.
MAX
MIN
15cm
15cm
ONLY OPERATE WHEN THE LID
IS CLOSED CORRECTLY

8 SAVE THESE INSTRUCTIONS - FOR HOUSEHOLD USE ONLY SAVE THESE INSTRUCTIONS - FOR HOUSEHOLD USE ONLY 9
Selecting Cooking Functions Use of Pressure Valve
Setting the PRESSURE RELEASE VALVE.
• To cook under pressure simply turn the pressure release to the closed position as indicated
on the valve
• Select your desired programme and time and press START. The arrows on the LED display will
start to move and it will display HEATING, once the desired temperature has been reached
it will display STARTING PRESSURE, once temperature and pressure has reached the optimum
level the cooking will start and the LED display will display COOKING and the time will start to
count down. Once cooking is finished it will bleep and enter the KEEP WARM function, WARM
will be displayed. Press CANCEL to stop this function.
• The pressure release valve now needs to be moved slowly to the vent position, this will
release the pressure. Turn the pressure release valve to open, this will release the steam and
pressure. Only once all the steam and pressure has been released and the float valve has
gone back down can the lid be opened. NEVER FORCE THE LID OPEN.
• CAUTION! Steam is extremely hot, wear oven gloves and use tongs or similar item to move
the pressure release valve.
To select the following functions simply touch the button on the front panel.
To select the functions on the LED panel, turn the control knob until you have selected your
desired function
Using the MULTI COOKING functions
• Leave open the pressure release valve for the following functions, whilst using these settings
the lid can either be open or closed, except for FRY the lid MUST ALWAYS BE LEFT OPEN.
Please note it is not possible to adjust the TEMPERATURE on the cooking functions which require
pressure:
• KEEP WARM / CANCEL
• PRESSURE COOK
• SLOW COOK
• MULTICOOK
• FRY
• STEAM
• TIME ADJUST
• DELAY TIMER
• TEMPERATURE
• START
• CEREALS
• PASTA
• RICE
• CRISPY
• PIZZA
• EGG
• YOGHURT
• JAM
• MEAT
• STEW/SOUP
• BAKE
• FISH
• VEG
• CAKE
• PRESSURE COOK
• STEAM
• MEAT
• FISH
• STEW/SOUP
• VEG
• CEREALS
• PASTA
• RICE
• SLOW COOK
• MULTICOOK
• FRY
• CAKE
• BAKE
• CRISPY
• PIZZA
• EGG
• YOGHURT
• JAM
To adjust the cooking time
• After function selection the TIME function will also be lit up, it is now possible to adjust the
TIME by turning the control knob. To adjust the minutes press TIME once to adjust the hours
press TIME twice, by pressing TIME again you can toggle between the minutes and the
hours. Once you have selected the required time press START or TEMPERATURE (If applicable)
to adjust the TEMPERATURE.
To adjust the temperature
• After function selection the TEMPERATURE function will also be lit up, it is now possible to
adjust the TEMPERATURE by turning the control knob. Once you have selected your desired
TIME and TEMPERATURE press START.
CLOSED OPEN

10 SAVE THESE INSTRUCTIONS - FOR HOUSEHOLD USE ONLY SAVE THESE INSTRUCTIONS - FOR HOUSEHOLD USE ONLY 11
The LED display will follow as pressure cooking above but it will not indicate STARTING PRESSURE.
Please note the timer count down will begin immediately on the following functions:
The timer count down on the following functions will only start when the desired temperature is
reached:
Keep Warm Function
• After cooking the cooker will bleep and go into the KEEP WARM function automatically and
this will keep the food warm for up to 24 hours. WARM will be displayed on the LED panel. To
cancel this function, press the CANCEL button. KEEP WARM is not available on the FRY and
YOGHURT functions.
• It can also be used to warm up already cooked food, press the KEEP WARM and WARM will
be displayed on the LED panel. To cancel this function, press the CANCEL button.
• If you do not require the KEEP WARM function this can be cancelled by pressing KEEP WARM
during the cooking stage but only if the DELAY function has been pre-set.
Delay Function
• After selecting your cooking function, it is possible to delay the cooker from beginning the
cooking process by pressing the DELAY function and adjusting the time using the control
knob. Cooking can be delayed for up to 24 hours, it can be adjusted in 5 minute intervals.
Volume Control
• It is possible to mute the cooker. Simply touch the TEMPERATURE and TIME buttons
simultaneously.
Power saving mode
• LED Display will automatically go off if no function is selected after approximately 30
seconds, simply press any button to re-start the cooker.
Condensation cup
• At the rear is a condensation cup. This will pick up any moisture that may drip off when using
the pressure cooker. Simply slide the cup into the channels on the back. Empty and clean
after each use.
Useful Tips:
• To cancel any function, press CANCEL.
• When steaming fish or vegetables to speed up the cooking time, hot water may be used.
• If the lid is difficult to replace after use either allow the lid, inner and outer pots to cool down
to room temperature or hold in place and push down for a few seconds with the pressure
release valve open. This will release any pressure and the lid will be easier to close.
• When connecting to supply, panel displayed “0000”. “0000” stands for stand by mode.
Selecting Cooking Functions Selecting Cooking Instructions
• MULTICOOK
• CAKE
• YOGHURT
• JAM
• SLOW COOK
• -FRY
• BAKE
• CRISPY
• PIZZA
• EGG
12 SAVE THESE INSTRUCTIONS - FOR HOUSEHOLD USE ONLY SAVE THESE INSTRUCTIONS - FOR HOUSEHOLD USE ONLY 13
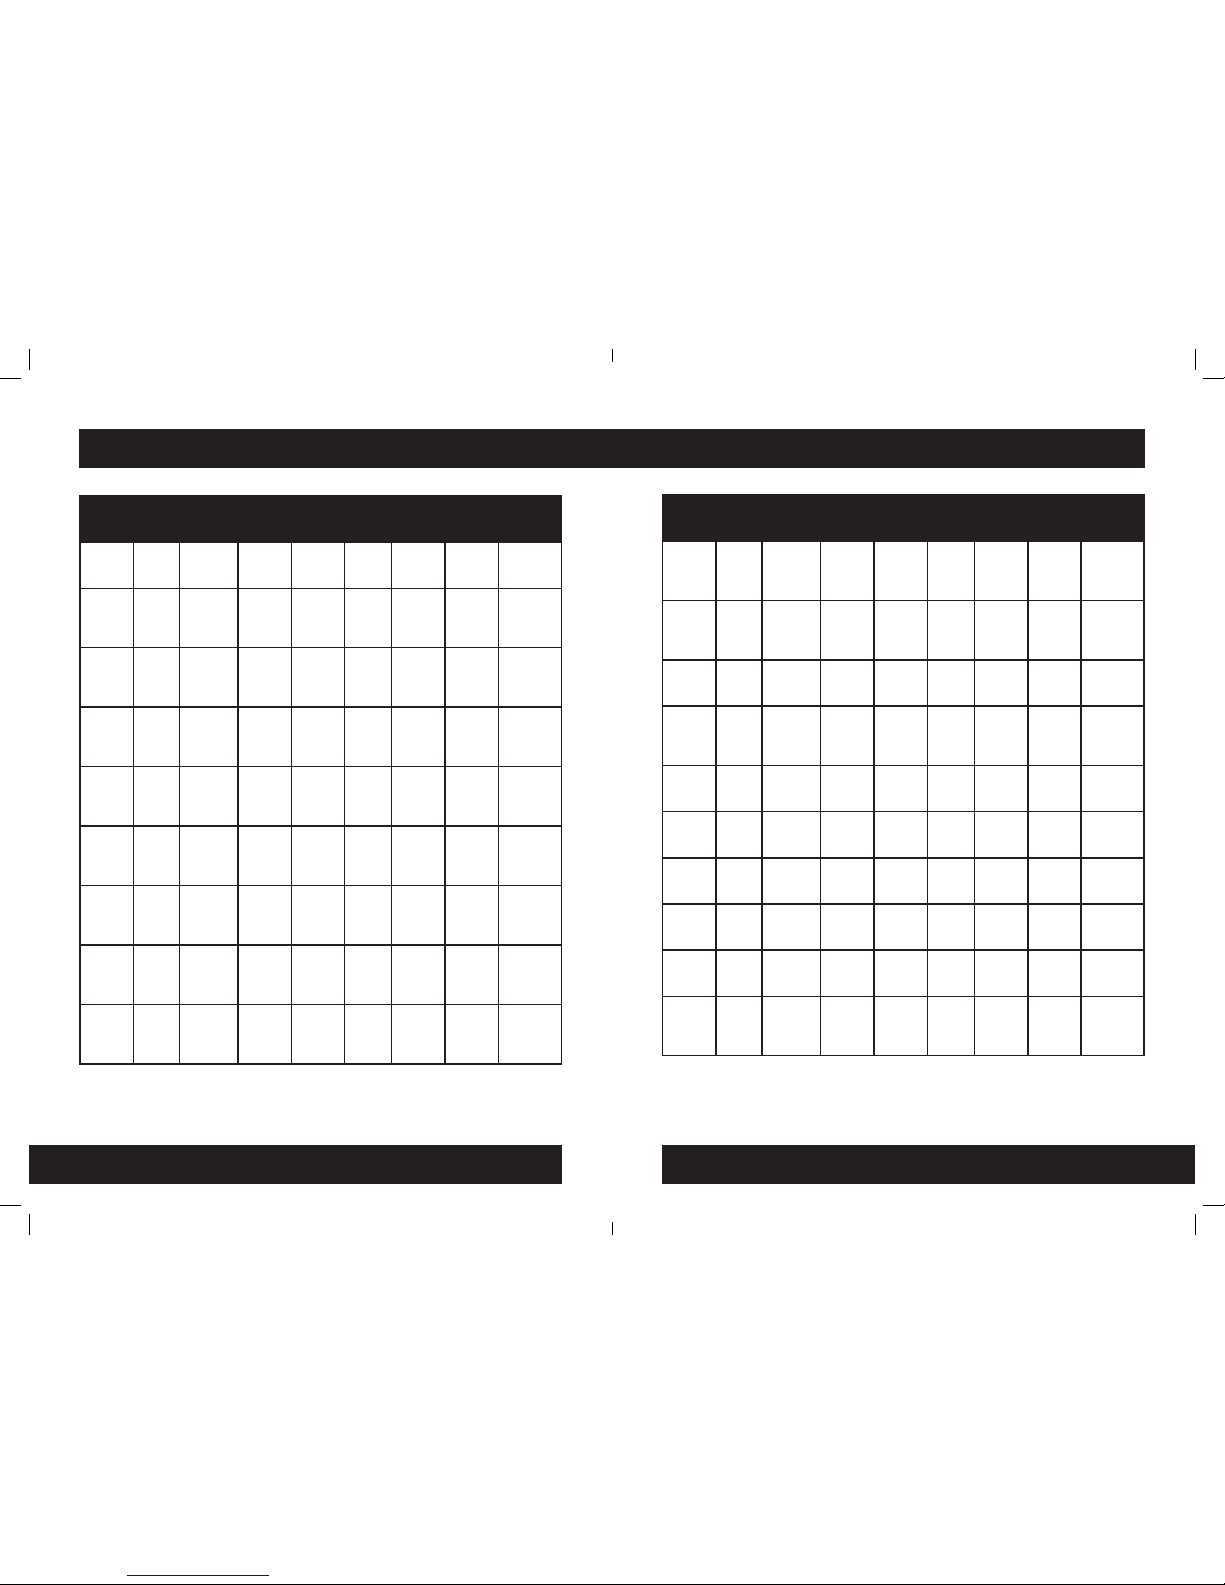
Program Default
Time
Adjust time Time
Interval
Default
Temp C
Temp
adjust
(by 1C)
Keep
Warm
Delay Pressure
Pressure
Cooker
2 mins 1-59 mins
1 hour – 24
hours
1 min
1 hour
145 C No Yes 1-59 mins
1 -24
hours
0.05 – 0.06
Mpa
Steam 3 mins 1-25 mins
1 hour – 24
hours
1 min
1 hour
150 C No Yes 1-59 mins
1 -24
hours
0.05 - 0.06
Mpa
Meat 13 mins 1-60 mins
1 hour –
24 hours
1 min
1 hour
140 C No Yes 1-59 mins
1 -24
hours
0.05 – 0.06
Mpa
Fish 8 mins 1-15 mins
1 hour –
24 hours
1 min
1 hour
150 C No Yes 1-59 mins
1 -24
hours
0.05 – 0.06
Mpa
Stew /
soup
30 mins 1-120 mins
1 hour – 24
hours
1 min
1 hour
150 C No Yes 1-59 mins
1 -24
hours
0.05 – 0.06
Mpa
Veg 5 mins 1-59 mins
1 hour – 24
hours
1 min
1 hour
145 C No Yes 1-59 mins
1 -24
hours
0.05 – 0.06
Mpa
Cereals 8 mins 1-59 mins
1 hour – 24
hours
1 min
1 hour
145 C No Yes 1-59 mins
1 -24
hours
0.05 – 0.06
Mpa
Pasta 10 mins 1-15 mins
1 hour – 24
hours
1 min
1 hour
155 C No Yes 1-59 mins
1 -24
hours
0.05 – 0.06
Mpa
Rice 12 mins 1-20 mins
1 hour –
24 hours
1 min
1 hour
160 C No Yes 1-59 mins
1 -24
hours
0.05 – 0.06
Mpa
Program Settings Program Settings
Program Default
Time
Adjust time Time
Interval
Default
Temp C
Temp
adjust
(by 1C)
Keep
Warm
Delay Pressure
Slow
Cook
2 hours 1-59 mins
1 hour – 24
hours
1 min
1 hour
98 C Yes
30-180 C
Yes 1-59 mins
1 -24
hours
No
Multi
Cook
10 mins 1-59 mins
1 hour – 24
hours
1 min
1 hour
100 C Yes
30-180 C
Yes 1-59 mins
1 -24
hours
No
Fry 30 mins 1-59 mins
1 hour – 24
hours
1 min
1 hour
160 C Yes
30-180 C
No No No
Cake 30 mins 1-59 mins
1 hour –
24 hours
1 min
1 hour
140 C No Yes No No
Bake 8 mins 1-59 mins
1 hour –
24 hours
1 min
1 hour
145 C Yes
30-180 C
Yes No No
Crispy 45 mins 1-59 mins
1 hour –
24 hours
1 min
1 hour
165 C Yes
30-180 C
Yes Yes No
Pizza 15 mins 1-59 mins
1 hour – 24
hours
1 min
1 hour
165 C Yes
30-180 C
Yes No No
Egg 10 mins 1-59 mins
1 hour – 24
hours
1 min
1 hour
110 C No Yes No No
Yoghurt 8 hours 1-59 mins
1 hour – 24
hours
1 min
1 hour
38-40 C No No No No
Jam 45 mins 1-120 mins
1 hour – 24
hours
1 min
1 hour
100 C No Yes 1-59 mins
1 -24
hours
No

14 SAVE THESE INSTRUCTIONS - FOR HOUSEHOLD USE ONLY SAVE THESE INSTRUCTIONS - FOR HOUSEHOLD USE ONLY 15
Care and cleaning
After each use all safety devices must be cleaned after each use, unplug and let the pressure
cooker cool to room temperature before cleaning:
• To remove the pressure release valve, simply pull up and the valve will release from its
spring locked mechanism. Wash it under running warm water, replace by simply pushing it
down onto the spring loaded mechanism. Always remove the pressure release valve and
clean the opening with a pin to remove any blockage that may have occurred during the
cooking process.
• To clean underneath the aluminium inner lid, the float valve and silicon gasket pull out the
inner lid using the knob. Wash in warm soapy water.
• Wipe the inner lid and inside the lid with warm soapy water.
• Remove the gasket seal and wipe with warm soapy water. Dry and replace on the
aluminium inner lid. It must always be properly positioned on the inner lid. Check
periodically to make sure that it is clean, flexible and not torn.
• Ensure the float valve is not clogged and can move up and down freely, wipe if necessary.
• -The inner pot and lid are fully immersible in water for cleaning. Rinse inner pot and lid
under hot running water, using only a mild detergent and a soft cloth or sponge. Do not use
abrasive powders, bicarbonate of soda or bleach. Do not use scouring pads.
• Wipe the base unit with a soft damp cloth, making sure all food residue is removed. DO NOT
IMMERSE BASE IN WATER.
Specification
Troubleshooting
Power supply 220 – 240 V – 50 Hz
Power 1000 W
Net weight 5.5 kgs
Dimensions 335mm x 338mm x 345mm
Lid does not close properly. Check inner lid and gasket seal are correctly positioned
Lid is difficult to remove. Float valve has not dropped. Ensure pressure has dropped to
normal.
Steam is released under the
lid during cooking.
Ensure the gasket seal is fitted correctly and not worn out.
Ensure all food residue is removed from the gasket.
The float valve does not rise. Not enough food or water in the inner pot.
Ensure all food residue is
removed from the valve.
System error – unplug, and allow the pressure cooker to cool
down if applicable. Close the lid. If the problem persists after
re-plugging in, the appliance has developed a fault and
needs replacing.
Displays E1, E2, E3 or E4. System error – unplug, and allow the pressure cooker to cool
down if applicable. Close the lid. If the problem persists after
re-plugging in, the appliance has developed a fault and
needs replacing.

®
Model number :
SC-100S
Altrincham, WA15 5BJ
Version 6 09/17
Table of contents
Other PRESSURE KING PRO Electric Pressure Cooker manuals


