Russell Hobbs Nutrichef RHGC14 Installation instructions manual

1
RHGC14_IB_FA_160119 Part No. T22-9000708
2 YEAR WARRANTY
RHGC14
INSTRUCTIONS & WARRANTY
NUTRICHEF
GRAIN & RICE COOKER

2
IMPORTANT SAFEGUARDS
When using this appliance, basic safety precautions should always be followed, including the
following:
Read all instructions before, and follow whilst using this appliance.
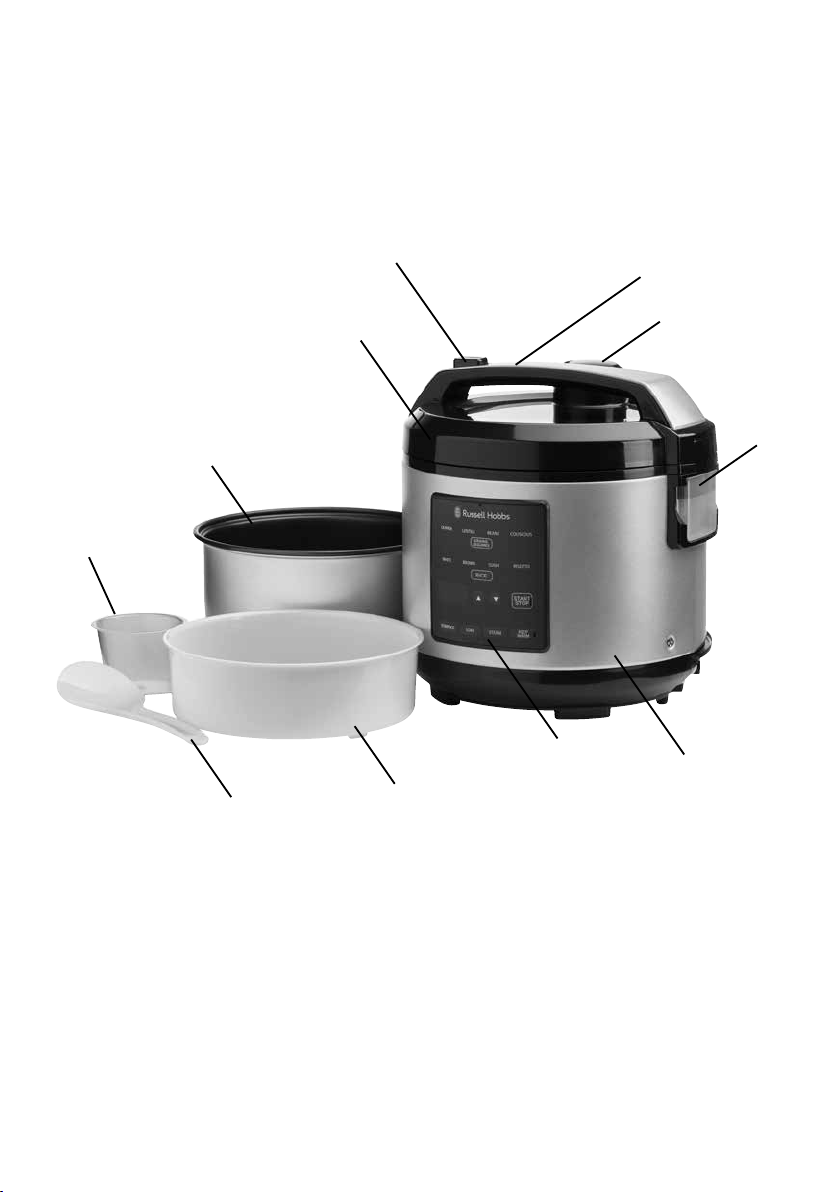
1. Do not touch hot surfaces. Use handles or knobs provided.
2. To avoid burns, stay clear of the steam vent during cooking.
3. Ensure the steam vent is clean and unobstructed at all times.
4. Do not leave the serving spoon, measuring cup or any other utensils in or on the unit while it is
in use.
5. When hot, this appliance contains hot water and steam. Open the lid carefully to avoid
scalding, and allow water to drip into the cooking bowl.
6. To protect against electric shock DO NOT spill liquids over the controls or immerse cord, plug
or heating body in water or any other liquid.
7. To prevent damage or shock hazard, do not cook directly in cooking base. Cook only in
cooking bowl provided.
8. Do not use this appliance near bathtubs, showers, basins or other vessels containing
water.
9. Do not use outdoors.
10. This product is not intended for use by persons (including children) with reduced physical,
sensory or mental capabilities, or lack of experience and knowledge, unless they have been
given supervision or instruction concerning use of the product by a person responsible for
their safety.
11. This appliance is not a toy. Children must be supervised to ensure they do not play with this
appliance.
12. Cleaning or user maintenance shall not be carried out by children without the supervision of a
person responsible for their safety.
13. Always switch off and disconnect this appliance from the wall power outlet when not in use
and before cleaning.
14. Follow the instructions when cleaning.
15. To disconnect, turn off the wall power outlet, then grasp and remove the plug. Never pull by
the cord.
16. Do not operate the appliance with a damaged cord or plug or after the appliance has
malfunctioned, or has been dropped or damaged in any manner. Contact customer service
for replacement, examination, repair or adjustment.
17. Do not use the inner pot if dented, bent or damaged.
18. There are no user serviceable parts. If the power cord is damaged, it must be replaced by the
manufacturer or similarly qualied person in order to avoid a hazard.
19. Do not operate the appliance if empty.
20. Do not use on an inclined plane or unstable surface.
21. Keep the appliance and the power cord away from the edges of benches and countertops
and out of reach of children and persons with reduced physical, sensory and mental
capacities.
22. When using this appliance, provide adequate air space above and on all sides for air
circulation.
23. Do not operate this appliance while it is touching or near curtains, wall coverings, clothing,
dish towels or other combustible materials.
24. Do not place on or near any heat sources.

3
25. Do not allow the cord to come in contact with hot surfaces including stovetops.
26. Do not move the appliance whilst in use.
27. WARNING: After use, the appliance surfaces, contents and heating plate inside cooking base
will remain hot for some time.
28. Extreme caution must be used when moving an appliance containing hot foods and/or
liquids.
29. Do not use the KEEP WARM function for cooking or to reheat cold rice or other foods.
30. Never use the cooking bowl on a gas or electric cooktop or on an open ame.
31. Do not cut foods directly in the cooking bowl to avoid scratching the non-stick coating.
32. Do not attempt to heat or cook non-food items in this appliance.
33. Do not use the appliance for other than its intended purpose.
34. Misuse of this appliance may result in potential injury.
35. This appliance is not intended to be operated by means of an external timer or separate
remote control system.
36. For added safety, electrical appliances should be connected to a power outlet that is
protected by a residual current device (RCD), also often referred to as a ‘Safety Switch’. Your
switchboard may already incorporate an RCD. If unsure, call an electrician for verication and
tting if necessary.
This appliance is intended to be used in household and similar applications such as:
• Staff kitchen areas in shops, ofces and other working environments;
• Farm houses;
• By clients in hotels, motels, and other residential type environments;
• Bed & breakfast type environments.
SAVE THESE INSTRUCTIONS

4
Congratulations on the purchase of your new Russell Hobbs NutriChef Grain & Rice Cooker. Each
unit is manufactured to ensure safety and reliability. Before using the NutriChef Grain & Rice
Cooker for the first time, please read this instruction booklet carefully and keep it for future
reference. Pass it on if you pass on the product.
When using this appliance, basic safety precautions should always be followed.
1. Cooking base
2. Control panel
3. Locking lid
4. Lid release button
5. Lid handle
6. Steam vent cap
7. Condensation cup
8. Steaming basket
9. Serving spoon
10. Cooking bowl
11. Measuring cup
1
2
3
4
5
6
7
8
9
10
11

5
GENERAL USE
BEFORE FIRST USE
• Remove all packing material, any stickers, and the plastic protector from over the power
plug.
• Select a location where this unit is to be used. Place the unit on a stable, heat resistant
surface, free from cloth, liquids and any other ammable materials. Ensure that the unit
has enough space all the way around and above it to allow heat and steam to ow without
damage to cabinets, walls or over head cupboards.
• Remove and save instruction booklet.
• All parts of the NutriChef Grain & Rice Cooker need to be thoroughly cleaned before
being used for the rst time (see ‘Care and Maintenance’).
• Place the clean, dry cooking bowl in the cooking base.
IMPORTANT INFORMATION ABOUT YOUR GRAIN & RICE COOKER
• It is not necessary to preheat the grain & rice cooker before use.
• The cooking bowl gets hot. When in use, always use oven mitts or potholders when
touching any outer or inner surface of the appliance.
• During the rst few minutes of use you may notice some light smoke and a slight odour.
This is normal.
• As the grain cooks, steam will escape through the steam vent cap. Position the grain
cooker so the steam vent is facing away from cabinets, walls or over head cupboards.
CAUTION: Do not place hand over steam vent while cooking. The hot steam may cause burns.
• Use the plastic serving spoon (or a wooden spoon) to stir and remove grain. Do not use
metal utensils that can scratch the non-stick cooking bowl.
• Do not ll the cooking bowl higher than recommended. There are different maximum ll
levels for different ingredients. Refer to the cooking charts provided.
• When the grain cooker is plugged in, three dashes will blink on the display screen,
indicating that the appliance is on standby and ready to program.
• Display screen indicates that the cooker is in use: solid numbers with a blinking colon
sign (:) or dashes ashing in a clockwise rotation.
• The display will show how many minutes it has been in
keep warm mode. After 30 minutes the appliance will beep
three times and turn itself off.
• When a function is complete (except for the steam
function), the appliance will beep three times and go into
keep warm mode for 30 minutes.
QUINOA LENTILS BEANS COUSCOUS
WHITE
PORRIDGE SOAK STEAM KEEP
WARM
BROWN SUSHI RISOTTO

6
OPERATING YOUR GRAIN COOKER
COOKING GRAINS/LEGUMES
1. Place the cooking bowl into the cooking base.
2. Measure desired amount of grain with the provided measuring cup.
3. Rinse the grain with water to remove any excess starch and then drain.
4. Add the grain to the cooking bowl.
NOTE: With the COUSCOUS setting, pearl couscous (the largest size) works best. To cook fine
couscous, check the grain for doneness about halfway through the cooking program.
5. Using the measuring cup provided add the required amount of water to match the number
of cups of grain being cooked (refer to Cooking Chart).
DO NOT ll past the maximum volume printed in the cooking bowl.
NOTE: Boiling water, rather than water at room temperature will speed up the cooking process.
Please adjust cooking times to be less than recommended when using boiling water.
6. Place the cooking bowl into the cooking base, then close lid.
7. Plug in the appliance. The dashes on the display will blink, indicating that the unit is in
standby mode.
8. Select the desired grain setting by pressing the GRAINS/LEGUMES button until the light
above the desired grain ashes.
9. Press the START/STOP button and the light above your selected grain will turn solid. The
display screen will illustrate that the cooking has begun through either a time count down
or dashes ashing in a clockwise rotation.
NOTE: When using QUINOA or LENTILS programs, the display screen will show a time count
down. This means that the food will cook for the set length of time.
NOTE: When using BEANS or COUSCOUS programs, the display screen will show rotating
dashes. This means that the food will cook until water is absorbed.
10. When the program has concluded the cooker will produce three beeps signifying that
your grain is ready. The grain cooker will switch to KEEP WARM and the display will start
counting up the minutes for up to 30 minutes.
11. To turn the grain cooker off, press the START/STOP button. Unplug the appliance when
not in use and always allow the grain cooker to completely cool before cleaning.

7
CHART FOR GRAINS/LEGUMES PROGRAMS
• Please use the measuring cup provided (160ml) to measure the grain and water.
• Rinse the grain with water to remove any excess starch and then drain.
NOTE: Please do not cook more cups than recommended per program as this could cause
overflow.
TYPE OF GRAIN/LEGUME GRAIN / LEGUME
(cups)
WATER
(cups)
White Quinoa
NOTE 4 cups is the maximum amount of Quinoa recommended to cook.
1 cup 2 cups
2 cups 4 cups
3 cups 6 cups
4 cups 7 cups
Whole Lentils
NOTE the lentils were rinsed before cooking. 3 cups of whole lentils is the maximum
amount recommended to cook.
Split Lentils - In order to cook split lentils please follow the table below and open the lid
half way of the cooking cycle.
1 cup 3 cups
2 cups 6 cups
3 cups 9 cups
Red Kidney Beans & Chickpeas
NOTE 3 cups dry Beans & Chickpeas is the maximum amount recommended to cook.
1 cup of dry beans/chickpeas = 2 cups
after being soaked overnight.
1 cup (dry) =
2 cups soaked
2.5 cups water =
2 cups water to cook
2 cups of dry beans/chickpeas = 4 ¼ cups
after being soaked overnight.
2 cups (dry) =
4 ¼ cups soaked
5.5 cups water =
3.5 cups of water to cook
3 cups of dry beans/chickpeas = 7 ¼ cups
after being soaked overnight.
3 cups (dry) =
7 ¼ cups soaked
8 cups water =
5 cups of water to cook
Pearl Couscous
NOTE 6 cups is the Maximum amount of Couscous recommended to cook.
Add 1 tsp olive oil to prevent sticking. 1 cup 1.5 cups
Add 2 tsp olive oil to prevent sticking. 2 cups 3 cups
Add 3 tsp olive oil to prevent sticking. 3 cups 4.5 cups
Add 4 tsp olive oil to prevent sticking. 4 cups 5.5 cups
Add 5 tsp olive oil to prevent sticking. 5 cups 6 cups
Add 6 tsp olive oil to prevent sticking. 6 cups 7 cups

8
CHART FOR PORRIDGE PROGRAM
• Please use the measuring cup provided (160ml) to measure both the oats and water.
NOTE: Please do not cook more cups than recommended per program as this could cause
overflow.
PORRIDGE OATS
(cups)
WATER
(cups)
Rolled Oats
NOTE 3 cups is the maximum amount of Rolled Oats recommended to cook.
1 cup 2 cups
2 cups 4 cups
3 cups 6 cups
COOKING RICE
1. Measure desired amount of rice with the provided measuring cup and add to the cooking
bowl. For best results rinse the rice to remove any excess starch and then drain.
NOTE: Please refer to the cooking chart and use the measuring cup provided.
2. Using the measuring cup provided, add the required amount of water to match the
number of cups of rice being cooked (refer to Cooking Chart).
DO NOT ll past the maximum volume printed in the cooking bowl.
Add butter, oil, or seasonings as desired.
3. Place the cooking bowl into the cooking base and then close lid.
4. Plug in the appliance. The function lights and dashes on the display will blink, indicating
that the unit is in standby mode. Select the desired rice setting by pressing the RICE
button until the light above the desired rice setting ashes.
5. Press the START/STOP button and the light above your selected rice will turn solid and
the display screen dashes will begin rotating. This means the appliance is cooking.
6. When the rice is ready, the unit beeps three times and switches to KEEP WARM and the
display will start counting up the hours for up to 30 minutes.
7. For best results, allow the rice to rest on warm for 15 minutes with the lid in place. This
will help further steam the rice. If desired, stir the rice with the serving spoon before
serving.
8. To turn the unit off, press the START/STOP button. Unplug the appliance when not in use
and always allow the unit to completely cool before cleaning.

9
CHART FOR RICE PROGRAMS
• Please use the measuring cup provided (160ml) to measure both the rice and the water.
• Rinse the rice with water to remove any excess starch and then drain.
NOTE: Please do not cook more cups than recommended per program as this could cause
overflow.
TYPE OF RICE RICE
(cups)
WATER
(cups)
White Long Grain Rice
NOTE 6 cups is the maximum amount of White rice recommended to cook.
1 cup 2 cups
2 cups 3.5 cups
3 cups 4.5 cups
4 cups 5.5 cups
5 cups 6.5 cups
6 cups 7.5 cups
Brown Medium Grain Rice
NOTE 4 cups is the maximum amount of Brown rice recommended to cook.
1 cup 2.5 cups
2 cups 5 cups
3 cups 7 cups
4 cups 7.5 cups
Sushi Medium Grain Rice
NOTE 6 cups is the maximum amount of Sushi rice recommended to cook.
1 cup 1.75 cups
2 cups 3 cups
3 cups 4.5 cups
4 cups 5.5 cups
5 cups 6.5 cups
6 cups 7.5 cups
Risotto
NOTE 4 cups is the maximum amount of Risotto recommended to cook.
1 cup 1.5 cups
2 cups 3 cups
3 cups 4.5 cups
4 cups 6 cups

10
STEAMING
This setting allows you to steam vegetables, proteins, dumplings and more.
1. Add about 1.5 to 2 cups of water into the cooking bowl, and then place the cooking bowl
into the cooking base.
2. Add ingredients to the steaming basket, place the basket into the cooking bowl, then
close lid.
3. Plug in the appliance. The dashes on the display will blink, indicating that the unit is in
standby mode.
4. Press the STEAM button.
5. To set the time, press the arrow keys up uor down duntil the desired number of
minutes is showing on the display.
NOTE: The maximum STEAM setting is 1 1/2 hours. The default setting is 15 minutes.
6. Press the START/STOP button to begin.
CAUTION: Do not place hands over steam vent during cooking cycle as this may cause
burns.
7. The Steam light will turn solid and the display screen dashes will begin rotating, indicating
that the appliance is heating.
8. Once the appliance has reached a certain temperature, which allows water to boil, the
display screen will begin to countdown the minutes.
9. Once the cooking time is complete, the appliance will turn off.
10. To turn the appliance off, press the START/STOP button. Unplug the appliance when not
in use and always allow the appliance to completely cool before cleaning.

11
KEEP WARM
This setting allows you to keep foods warm for 30 mins. It is not recommended to keep food
on warm for more than 4 hours.
WARNING: Do not use the KEEP WARM function for cooking or to reheat cold rice or other
foods.
1. Add already hot ingredients to the cooking bowl. Place the cooking bowl into the cooking
base, and then close lid.
2. Plug in the appliance. The function lights and dashes on the display will blink, indicating
that the unit is in standby mode.
3. Press the KEEP WARM button.
4. To adjust the time, press the arrow keys up u or down duntil the desired number of
minutes is showing on the display.
5. Press the START/STOP button to begin; the warm light will turn solid and the display
screen will begin to countdown the minutes.
6. Once the cook time is complete, the appliance will switch off.
7. Unplug the appliance when not in use and always allow the grain cooker to completely
cool before cleaning.
CARE AND MAINTENANCE
IMPORTANT: Never immerse cooking base in water or other liquids.
1. Always unplug the grain cooker and allow to cool completely before cleaning.
2. Wash cooking bowl in warm water and dish soap. If food sticks to the cooking bowl, allow
it to soak before cleaning with a plastic scouring pad.
3. Remove the steam vent cap, condensation cup and the inner bafe assembly placed in
the lid. They can be washed along with the serving spoon and measuring cup.
NOTE: To remove the inner baffle assembly gently pull it out using two hands. Once cleaned
under soapy water place it back into the lid.
NOTE: When reassembling the inner baffle assembly please make sure the larger rubber ring in
the middle is facing the lid.
NOTE: The cooking bowl has an aluminium outer surface, therefore it is best to wash it by hand.
If washed in the dishwasher, the outer aluminium surface may become cloudy, but will not affect
cooking.
4. Rinse and dry thoroughly.
5. Wipe interior and exterior of the cooking base with a soft,
slightly damp cloth or sponge.
6. Reassemble the steam vent cap, the condensation cup, inner
bafe assembly and cooking bowl, on/into the grain cooker.
IMPORTANT: Never use abrasive cleansers or scouring
pads to clean the cooking base, as they may damage the
surfaces.
7. If water accidentally gets near the control panel or onto the
heating plate, allow the grain cooker to dry completely before
using. Any other servicing should be performed by an
authorized service representative

12
STORING
Make sure that the appliance is thoroughly cool and dry. Never wrap the cord tightly around
the appliance; keep it loosely coiled.
HELPFUL HINTS AND TIPS
• If grain or other foods start to boil over, open the lid and stir for a couple minutes. Leaving
the lid open for a short period of time will allow some of the liquids to boil off and for the
mixture to slightly cool. Close the grain cooker and repeat if needed. Adding a small
amount (1 Tbs.) of butter or oil to water before cooking will help prevent this issue from
occurring.
• Try using broth, stock, or reconstituted bouillon in place of water for additional avor in
grain or rice recipes. If you do, no additional salt may be necessary.
• Do not keep small amounts of rice or grain in the warm cycle for extended periods of time
because it can dry out.
• During cooking, a thin crust may develop on the rice or grain at the bottom of the bowl. If
you do not like crust, you can easily peel it off and discard it.
• Taste/hardness will vary depending on the quality/type of grain and length of time it is
cooked. For softer, ufer grain, add a little more water. For rmer, crunchier grain, use
less water.
• For other types of grains not listed here, follow package directions.
• Do not ll bowl above the highest water marking cup level on the cooking bowl.
ADDITIONAL USES FOR YOUR GRAIN & RICE COOKER
Packaged foods: condensed and ready to serve soups, pastas, and stews
• Do not ll bowl above the largest water marking cup level on the cooking bowl.
For even heating, stir occasionally.
• To cook food with meats, use only boneless meats and poultry that are cut into cubes no
larger than 1½ inches. It is not necessary to brown the meats before cooking.
• When cooking rice, grain or pasta in a soup, add additional liquid in the recipe.
• Since most frozen vegetables cook very quickly, it is best to add them at the end of the
cooking time. Stir them into the soup or stew and allow the mixture to cook an additional
5 to 10 minutes.

13
TROUBLESHOOTING
PROBLEM POSSIBLE CAUSE SOLUTION
Some kernels of grain do not
seem fully cooked
• The grain was not
allowed to nish
cooking.
• There was not enough
water in the cooking
bowl.
• Once the switch on the
grain cooker
automatically switches to
keep warm, allow grain
to rest for 15 minutes
before serving.
• Add a few more
tablespoons of water
and cook a little longer
by pushing the control
switch back to cook.
Check the grain again
when the appliance
automatically switches
back to warm and has
rested for 15 minutes.
Cooking bowl is not as clean
as I would like.
• Starch built up on sides
and bottom of the bowl.
• Fill the bowl with hot
soapy water and let
stand for several
minutes; then use a
nylon scrubber along
sides and bottom. Rinse
well.
Grain boils over. • Too much grain is being
cooked.
• There is too much water
for the amount of grain.
• Make sure to cook no
more than maximum
amount suggested. The
amount of grain to be
cooked should match
the water markings on
the bowl.
• Add a small amount (1
Tbs.) of butter or oil to
water before cooking.
Grain is too dry. • There is too much grain
or not enough water.
• Use the measuring cup
that comes with the
appliance. The grain
measure provided holds
¾ cup (6 uid oz.) of
uncooked grain.
Rice is gummy. • There is too much water
or not enough rice.
• Make sure you have the
correct ratio.

14
Spectrum Brands Australia Pty Ltd
Locked Bag 3004 Braeside
Victoria 3195 Australia
Customer Service in Australia
TollFree: 1800 623 118
Email: [email protected]
Website: www.spectrumbrands.com.au
Spectrum Brands New Zealand Ltd
PO Box 9817 Newmarket
Auckland 1149 New Zealand
Customer Service in New Zealand
TollFree: 0800 736 776
Email: [email protected]
Website: www.spectrumbrands.co.nz
Spectrum Brands Australia Pty Ltd and Spectrum Brands New Zealand Ltd
Warranty Against Defects
In this warranty:
Australian Consumer Law means the Australian consumer law set out in Schedule 2 to the
Competition and Consumer Act 2010;
CGA means the New Zealand Consumer Guarantees Act 1993;
Goods means the product or equipment which was accompanied by this warranty and
purchased in Australia or New Zealand, as the case may be;
Manufacturer, We or us means:
1. for Goods purchased in Australia, Spectrum Brands Australia Pty Ltd ABN, 78 007 070 573;
or
2. for Goods purchased in New Zealand, Spectrum Brands New Zealand Ltd, as the case
may be, contact details as set out at the end of this warranty;
Supplier means the authorised distributor or retailer of the Goods that sold you the Goods in
Australia or in New Zealand; and
You means you, the original end-user purchaser of the Goods.
1. Our goods come with guarantees that cannot be excluded under the Australian Consumer
Law, or the CGA. You are entitled to a replacement or refund for a major failure and
compensation for any other reasonably foreseeable loss or damage. You are also entitled
to have the goods repaired or replaced if the goods fail to be of acceptable quality and the
failure does not amount to a major failure.
2. The benefits provided by this Warranty are in addition to all other rights and remedies in
respect of the Goods which the consumer has under either the Australian Consumer Law
or the CGA. The original purchaser of the Goods is provided with the following Warranty
subject to the Warranty Conditions:
3. We warrant the Goods for all parts defective in workmanship or materials for a period of 2
years (Warranty Period) from the date of purchase.
If the Goods prove defective within the Warranty Period by reason of improper workmanship
or material, we may, at our own discretion, repair or replace the Goods without charge.
Warranty Conditions
4. The Goods must be used in accordance with the manufacturer’s instructions. This
Warranty does not apply should the defect in or failure of the Goods be attributable
to misuse, abuse, accident or non-observance of manufacturer’s instructions on the
part of the user. As far as the law permits, the manufacturer does not accept liability
for any direct or consequential loss, damage or other expense caused by or arising
out of any failure to use the Goods in accordance with the manufacturer’s instructions.
5. Exhaustible components (such as batteries, filters and brushes) of the Goods are
included under this Warranty only where there is a defect in workmanship or materials
used.
6. The warranty granted under clause 3 is limited to repair or replacement only.
7. Any parts of the Goods replaced during repairs or any product replaced remain the
property of the manufacturer. In the event of the Goods being replaced during the
Warranty Period, the warranty on the replacement Goods will expire on the same
date as for the Warranty Period on the original Goods which are replaced.
8. In order to claim under the warranty granted under clause 3 you must:
(a) Retain this warranty with your receipt/proof of purchase; and
(b) Return the Goods to us at the relevant address or to the Supplier by prepaid
freight within the Warranty Period accompanied with (i) the legible and unmodified
original proof of purchase, which clearly indicates the name and address of the
Supplier, the date and place of purchase, the product name or other product serial
number and (ii) this warranty.
9. This warranty is immediately void if:
(a) Any serial number or appliance plate is removed or defaced;
(b) The Goods have been serviced or otherwise repaired by a person not authorised
to do so by us or where non approved replaced parts are used.
10. The Goods are designed for domestic use only. The Goods must be connected to the
electrical voltage requirements as specified in the ratings label located on the Goods.
11. This warranty does not cover the cost of claiming under the warranty or transport
of the Goods to and from the Supplier or us.
12. This warranty is only valid and enforceable in Australia against Spectrum Brands
Australia Pty Ltd and in New Zealand against Spectrum Brands New Zealand Ltd.
Contact us or the Supplier for further details.
Register your product online
If you live in Australia please visit: www.spectrumbrands.com.au/warranty
If you live in New Zealand Please visit: www.spectrumbrands.co.nz/warranty
Registration of your warranty is not compulsory, it gives us a record of your purchase
AND entitles you to receive these benefits: Product information; Hints and tips; Recipes
and news; Information on special price offers and promotions.
Any questions? Please contact Customer Service for advice.

15
Spectrum Brands Australia Pty Ltd
Locked Bag 3004 Braeside
Victoria 3195 Australia
Customer Service in Australia
TollFree: 1800 623 118
Email: [email protected]
Website: www.spectrumbrands.com.au
Spectrum Brands New Zealand Ltd
PO Box 9817 Newmarket
Auckland 1149 New Zealand
Customer Service in New Zealand
TollFree: 0800 736 776
Email: [email protected]
Website: www.spectrumbrands.co.nz
Spectrum Brands Australia Pty Ltd and Spectrum Brands New Zealand Ltd
Warranty Against Defects
In this warranty:
Australian Consumer Law means the Australian consumer law set out in Schedule 2 to the
Competition and Consumer Act 2010;
CGA means the New Zealand Consumer Guarantees Act 1993;
Goods means the product or equipment which was accompanied by this warranty and
purchased in Australia or New Zealand, as the case may be;
Manufacturer, We or us means:
1. for Goods purchased in Australia, Spectrum Brands Australia Pty Ltd ABN, 78 007 070 573;
or
2. for Goods purchased in New Zealand, Spectrum Brands New Zealand Ltd, as the case
may be, contact details as set out at the end of this warranty;
Supplier means the authorised distributor or retailer of the Goods that sold you the Goods in
Australia or in New Zealand; and
You means you, the original end-user purchaser of the Goods.
1. Our goods come with guarantees that cannot be excluded under the Australian Consumer
Law, or the CGA. You are entitled to a replacement or refund for a major failure and
compensation for any other reasonably foreseeable loss or damage. You are also entitled
to have the goods repaired or replaced if the goods fail to be of acceptable quality and the
failure does not amount to a major failure.
2. The benefits provided by this Warranty are in addition to all other rights and remedies in
respect of the Goods which the consumer has under either the Australian Consumer Law
or the CGA. The original purchaser of the Goods is provided with the following Warranty
subject to the Warranty Conditions:
3. We warrant the Goods for all parts defective in workmanship or materials for a period of 2
years (Warranty Period) from the date of purchase.
If the Goods prove defective within the Warranty Period by reason of improper workmanship
or material, we may, at our own discretion, repair or replace the Goods without charge.
Warranty Conditions
4. The Goods must be used in accordance with the manufacturer’s instructions. This
Warranty does not apply should the defect in or failure of the Goods be attributable
to misuse, abuse, accident or non-observance of manufacturer’s instructions on the
part of the user. As far as the law permits, the manufacturer does not accept liability
for any direct or consequential loss, damage or other expense caused by or arising
out of any failure to use the Goods in accordance with the manufacturer’s instructions.
5. Exhaustible components (such as batteries, filters and brushes) of the Goods are
included under this Warranty only where there is a defect in workmanship or materials
used.
6. The warranty granted under clause 3 is limited to repair or replacement only.
7. Any parts of the Goods replaced during repairs or any product replaced remain the
property of the manufacturer. In the event of the Goods being replaced during the
Warranty Period, the warranty on the replacement Goods will expire on the same
date as for the Warranty Period on the original Goods which are replaced.
8. In order to claim under the warranty granted under clause 3 you must:
(a) Retain this warranty with your receipt/proof of purchase; and
(b) Return the Goods to us at the relevant address or to the Supplier by prepaid
freight within the Warranty Period accompanied with (i) the legible and unmodified
original proof of purchase, which clearly indicates the name and address of the
Supplier, the date and place of purchase, the product name or other product serial
number and (ii) this warranty.
9. This warranty is immediately void if:
(a) Any serial number or appliance plate is removed or defaced;
(b) The Goods have been serviced or otherwise repaired by a person not authorised
to do so by us or where non approved replaced parts are used.
10. The Goods are designed for domestic use only. The Goods must be connected to the
electrical voltage requirements as specified in the ratings label located on the Goods.
11. This warranty does not cover the cost of claiming under the warranty or transport
of the Goods to and from the Supplier or us.
12. This warranty is only valid and enforceable in Australia against Spectrum Brands
Australia Pty Ltd and in New Zealand against Spectrum Brands New Zealand Ltd.
Contact us or the Supplier for further details.
Register your product online
If you live in Australia please visit: www.spectrumbrands.com.au/warranty
If you live in New Zealand Please visit: www.spectrumbrands.co.nz/warranty
Registration of your warranty is not compulsory, it gives us a record of your purchase
AND entitles you to receive these benefits: Product information; Hints and tips; Recipes
and news; Information on special price offers and promotions.
Any questions? Please contact Customer Service for advice.

www.russellhobbs.com.au
www.russellhobbs.co.nz
RUSSELL HOBBS® and logo are Trade Marks of Spectrum Brands, Inc., or one of its subsidiaries.
Manufactured in China to Spectrum Brands specifications. ©2018 Spectrum Brands, Inc.
Table of contents
Other Russell Hobbs Rice Cooker manuals

Russell Hobbs
Russell Hobbs 23570-56 User manual

Russell Hobbs
Russell Hobbs 27030-56 User manual

Russell Hobbs
Russell Hobbs 19750-56 User manual

Russell Hobbs
Russell Hobbs RHRC100AGCAN User manual

Russell Hobbs
Russell Hobbs RHRC20BLK Installation guide

Russell Hobbs
Russell Hobbs JOYCE RH 10950 Product information sheet

Russell Hobbs
Russell Hobbs 27020-56 User manual

Russell Hobbs
Russell Hobbs 19750-56 User manual

Russell Hobbs
Russell Hobbs 19750 User manual

Russell Hobbs
Russell Hobbs 27080-56 User manual