Ruwac DV460 Series Manual

USA Industrial Vacuums
DV460 Series
Installation, Operation, Maintenance & Service
Model No.
Serial No.
Filter No.
Start-Up Date
Version:
1.0 11/04/21

2Questions? Call Ruwac USA at (413) 532-4030 or e-mail us at [email protected]!
Table of Contents
Contents
I. Warranty
II. Safety
III. Start-Up
IV. Inspection and Maintenance
V. Trouble Shooting
Page
3
4
6
7
13
14
VI. Terms and Conditions

3
I. Warranty
RUWAC warrants that new equipment which are complete units and are sold and/or manufactured by RUWAC, Inc. will be
free from defects in material and workmanship for a period of 18 months from date of shipment or 12 months from date of
start-up, whichever come rst. RUWAC warrants that replacement parts sold hereunder will be free from defects in
material or workmanship for a period of 120-days after the date of shipment. RUWAC machines that have been
completely re-built at the factory will carry a 180-day warranty from date of shipment. All eld repairs preformed by
authorized RUWAC service personnel are covered by a 120-day parts only warranty.
RUWAC, Inc. will not assume any responsibility under the terms of this limited warranty on equipment, which has not been
paid in full. This warranty does not apply to any equipment that has been disassembled, repaired, or otherwise altered by
any person without the written authorization of RUWAC’S service department, nor does it apply to any product that has
been subjected to failure sure to corrosive or abrasive attack, misused, damaged, or improperly installed, nor does it apply
to motors, controls, and components not manufactured by RUWAC, Inc. Motors, controls, and other Sub vendor’s compo-
nents therefor are warranted only to the extent of the manufacture’s warranty. All warranty work on such products must be
authorized by RUWAC, Inc. and must be performed in an authorized shop as designated by the manufacturer. RUWAC
sole liability and buyer’s sole and exclusive remedy hereunder is the replacement or repair at RUWAC’S option of prod-
ucts not complying with this warranty. Such repair or replacement shall be F.O.B. RUWAC’S factory, and RUWAC
reserves the right to invoice all expenses incurred when repairs are made in the eld at the request of the customer,
except as specically set forth herein, RUWAC makes no warranty express or implied, with respect to the products and/
or service supplied hereunder, this warranty is in lieu of and excludes all other warranties, including without limitation, any
warranty of merchantability, tness for a particular purpose, or conformance to purchaser’s specications.
4Questions? Call Ruwac USA at (413) 532-4030 or e-mail us at [email protected]!
II. Safety
CAUTION: Ruwac DV460 series machines are not to be used for the removal of liquids or any volatile,
viscous, flammable or explosive media. If you are unsure about your application requirements consult your
Ruwac representative.
CAUTION: Ruwac DV460 series machines are designed for continuous use, provided the vacuum is not
held under constant stress. If you are unsure about your application requirements consult your Ruwac
representative.
CAUTION: The components in this machine can be very heavy. Always follow safe lifting procedures.
CAUTION: A dust mask should be worn when working with ne materials.
CAUTION: Machines equipped with a reverse pulse module must always be supplied adequately when the machine is
on. The module is controlled by an electrical sequential timer (requires a 110 volt power supply) or dierential pressure
switch. The module itself requires a source of compressed air of 90 PSI at 2 - 4 CFM (depending on module). This device
prevents the accumulation of material on the lter and therefore prevents the machine from being held under excessive
stresses due to material blockage.
CAUTION: Machines equipped with a motorized shaker must be supplied with a three phase, 230 - 460 volt (depending
on motor) power supply when ever the machine is on. The motorized shaker is controlled by an electrical sequential timer
(requires a 110 volt power supply), a dierential pressure switch or a manual switch. Manual switch models should be
actuated before and after every use while the vacuum is o. This device prevents the accumulation of material on the lter
and therefore prevents the machine from being held under excessive stresses due to material blockage.
CAUTION: Check motor direction. Vacuum can be produced while operating in both directions. A backwards rotation will
produce 40% less while heating the bearings, however. The motor should always run clockwise.
CAUTION: Vacuums are not design for working in classied explosion atmospheres in accordance to OSHA / NFPA
regulations.
CAUTION: Hoses and accessories must be checked for continuity prior to each use
5
Safety
II.
DV460 SERIES STANDARD INSTRUCTIONS:
GROUNDING INSTRUCTIONS
This appliance must be grounded. If it should malfunction or breakdown, grounding provides a path of
least resistance for electrical current to reduce the risk of electric shock. This appliance is equipped
with a cord having an equipment-grounding conductor and grounding plug. The plug must be inserted
into an appropriate outlet that is properly installed and grounded in accordance with all local codes
and ordinances.
Danger: Improper connection of the equipment-grounding conductor can result in a risk of electric
shock. The conductor with insulation having an outer surface that is green with or without yellow
stripes is the equipment-grounding conductor. If repair or replacement of the of the cord or plug is
necessary, do not connect the equipment-grounding conductor to a live terminal. Check with a quali-
ed electrician or serviceman if the grounding instructions are not completely understood, or if in
doubt as to whether the appliance is properly grounded. Do not modify the plug provided with the ap-
pliance—if it will not t the outlet, have a proper outlet installed by a qualied electrician.
This appliance is for use on a circuit having a nominal rating more than 120V and is factory equipped
with a specic electrical cord and plug to permit connection to a proper electrical circuit. Make sure
that the appliance is connected to an outlet having the same conguration as the plug. No adaptor
should be used with this appliance. If the appliance must be reconnected for use on a dierent type of
electrical circuit, the reconnection should be made by qualied service personnel; and after the recon-
nection, the appliance should comply with all local codes and ordinances.
Grounding Check
ABOUT RUWAC’S DV460 UNITS AND GROUND:
• All DV460 units are constructed of carbon impregnated compression cast composite housings
which dissipate static charge
• Metal components are eclectically grounded through a series of internal ground wires. Grounding
can be confirmed using a standard multimeter
Check from continuity
between the plug and
handle bar, dustpan
lever, and starter box
if applicable.
Also check for
continuity between the
plug,inlet and all four
casters.
Note: If continuity is not found across any of these points, consult the parts manual to check that all
ground wires are in place. For further assistance, contact Ruwac.

6Questions? Call Ruwac USA at (413) 532-4030 or e-mail us at [email protected]!
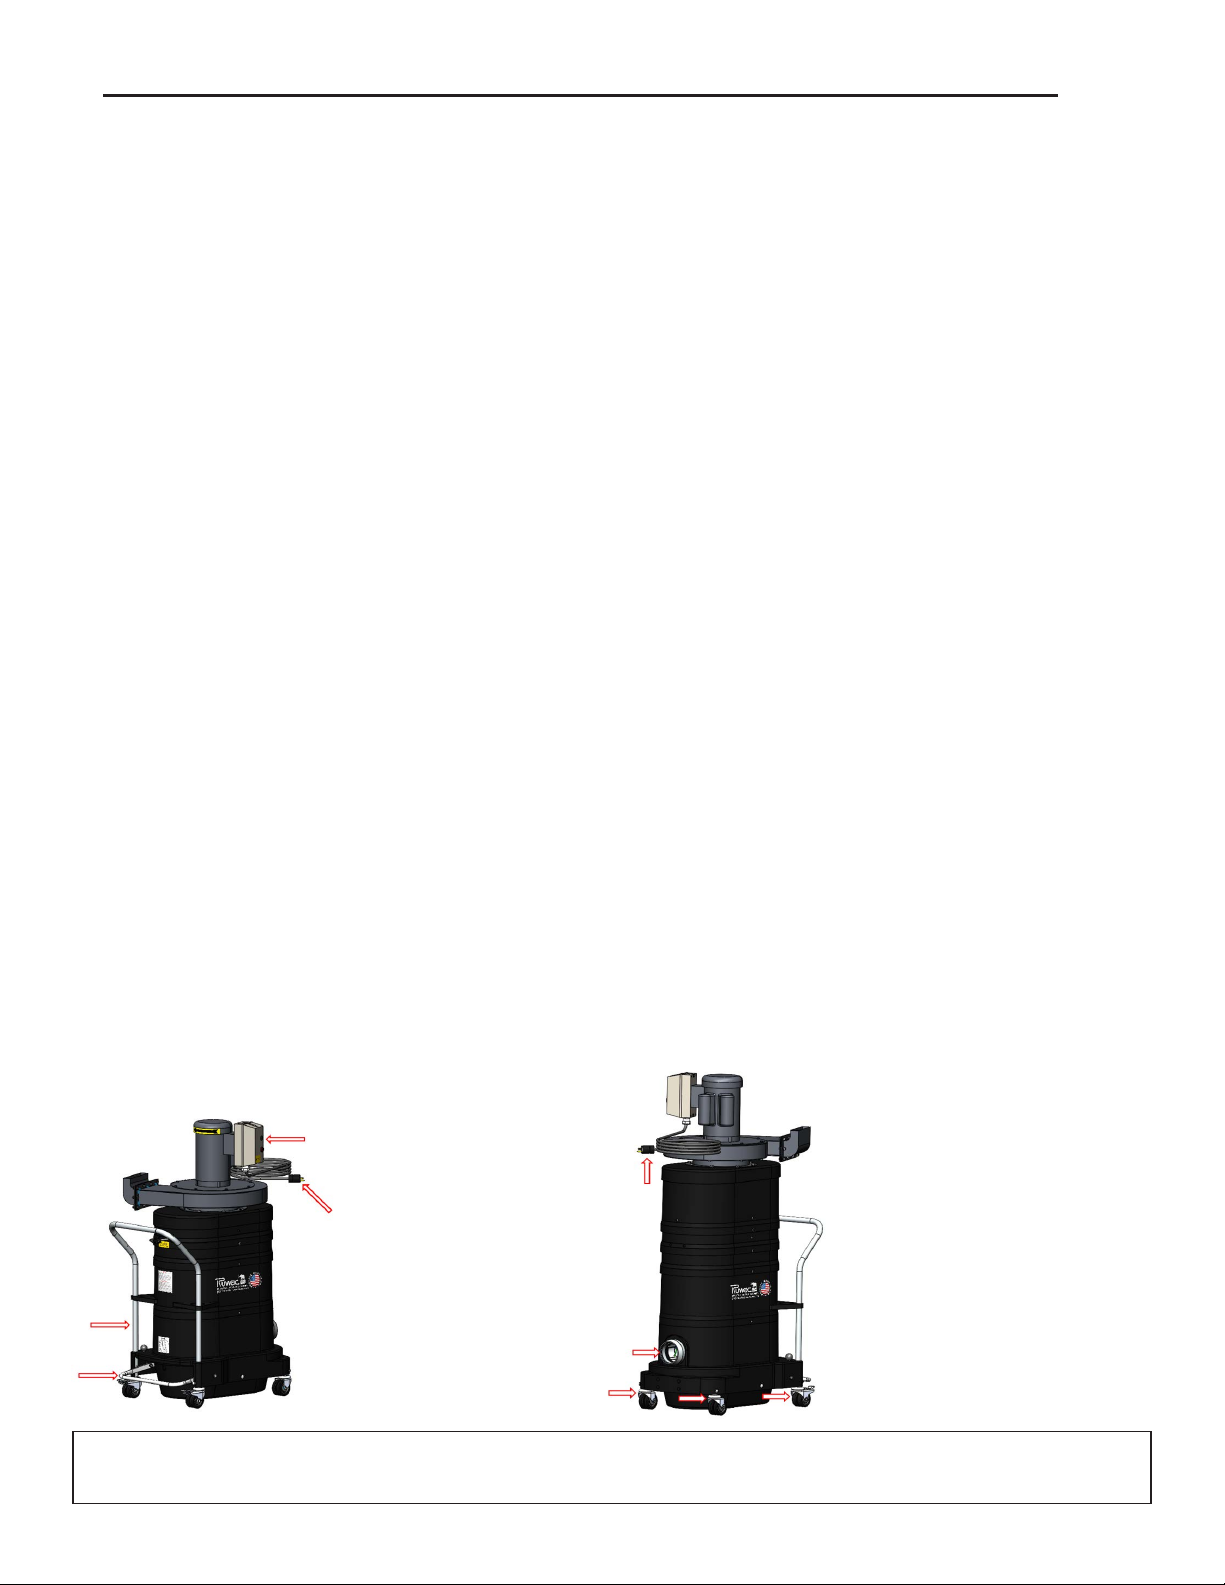
III. Start-Up
Use the lter shaker to
clean the lter before
and after each use.
1 2 34
Pull up on the dust pan
lever to release the
dustpan. Check that the
dustpan is completely
empty, then replace.
Connect the machine
to the proper power
source as indicated
on the machine’s
serial tag.
Turn motor on, then o
quickly to conrm the
motor is spinning in
the correct direction.
DV460 SERIES STANDARD INSTRUCTIONS:
START-UP / SHUT DOWN OPERATION
WARNING: A qualied electrician in accordance to the NATIONAL ELECTRIC CODE and all local
codes should perform all wiring and or electrical adjustments during installation and servicing.
5 6 7
To empty the machine,
release the dustpan
lever.
Turn on the motor
before removing the
dustpan. This will
ensure that excess
material sticks to the
lter.
Remove the dustpan
and empty contents.
The dustpan should
be emptied after ever
use.
*SEE PAGE 18 FOR
DIRECT BAGGING
EMPTYING
INSTRUCTIONS
SEE PAGE 19 FOR
SILO VACUUM
EMPTYING
INSTRUCTIONS

7
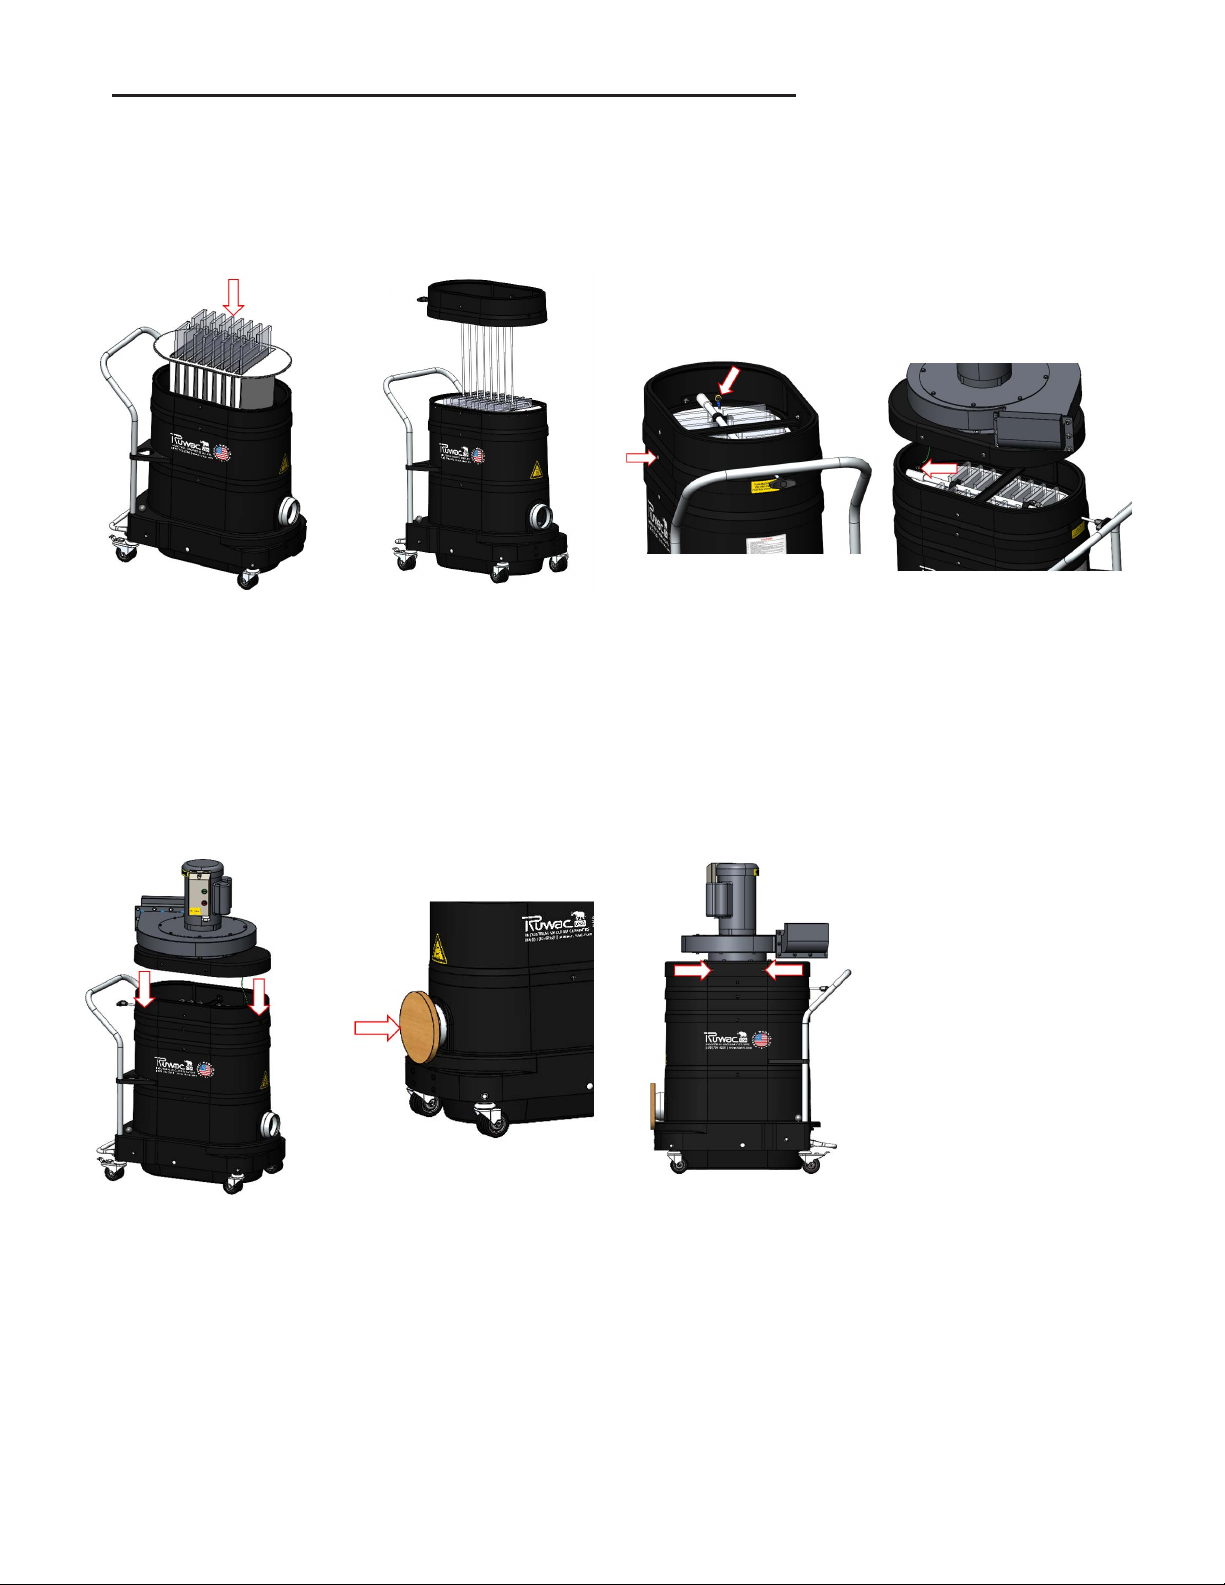
IV. Inspection & Maintenance
Note: Using an object to dislodge material may tear the lter. Consult your RUWAC representative
if material blockage is excessive. Do not use high pressure compressed air or water to clean o
lter, as material may become permanently lodged into lter membrane.
1 2 34
5 6 7
Use the shaker bar to
clean the lter while
the machine is o
Pull up the lever and
remove the dustpan
Lock the rear casters
and carefully tip the
machine back until it
rests on the handle bar
Clean the lter using
another vacuum. Do
not use any sharp tools.
Inspect lter pleats for
any tears or damage.
Inspect the inlet
deector for wear as
well
If the lter is damaged,
it will have to be
replaced. See pg. 10
for replacement
instructions.
Push the dustpan
back into the base.
DV460 SERIES STANDARD INSTRUCTIONS:
STANDARD FILTER INSPECTION
WARNING: Always wear a dust mask when performing lter inspections or service.
8
Push the lever down
to secure the dustpan

8Questions? Call Ruwac USA at (413) 532-4030 or e-mail us at [email protected]!
IV. Inspection & MaintenanceIV. Inspection & Maintenance
Turn vacuum on
and block the inlet to
place vacuum under
pressure.
Remove all motor deck
screws while the
vacuum is under
pressure. Turn o the
vacuum after screws
are removed
Remove the
motor deck and
silencer. Use the
lifting bar if included.
Disconnect the
ground wire.
1 2 34
NOTE: The presence of material in this area or in the exhaust is often the result of a misaligned
seal or damaged lter. Consult your RUWAC representative if either is the case.
DV460 SERIES STANDARD INSTRUCTIONS:
FILTER REMOVAL
CAUTION: Motor deck will be heavy and will require a hoist to remove. Always wear a dust mask
when performing lter inspections or service.
5 6 7
Disconnect the lter
ground and remove the
lter spacer hardware.
Remove the lter ring
and shaker assembly.
Remove and replace
the lter. Keep the
black mesh inserts.
9
IV. Inspection & Maintenance
1 2 35
Reinsert black mesh
inserts into the new
lter.
Insert the lter cage
into the lter pleats.
Insert the lter spacer
hardware and reattach
the ground wire.
Reconnect the
motor deck ground.
DV460 SERIES STANDARD INSTRUCTIONS:
FILTER INSTALLATION
CAUTION: Motor deck will be heavy and will require a hoist to remove. Always wear a dust mask
when performing lter inspections or service.
6 7
Replace the motor
deck .
Place the vacuum
under pressure by
blocking the inlet
and turning the
machine on.
8
Reinstall the motor
deck hardware.
10 Questions? Call Ruwac USA at (413) 532-4030 or e-mail us at [email protected]!
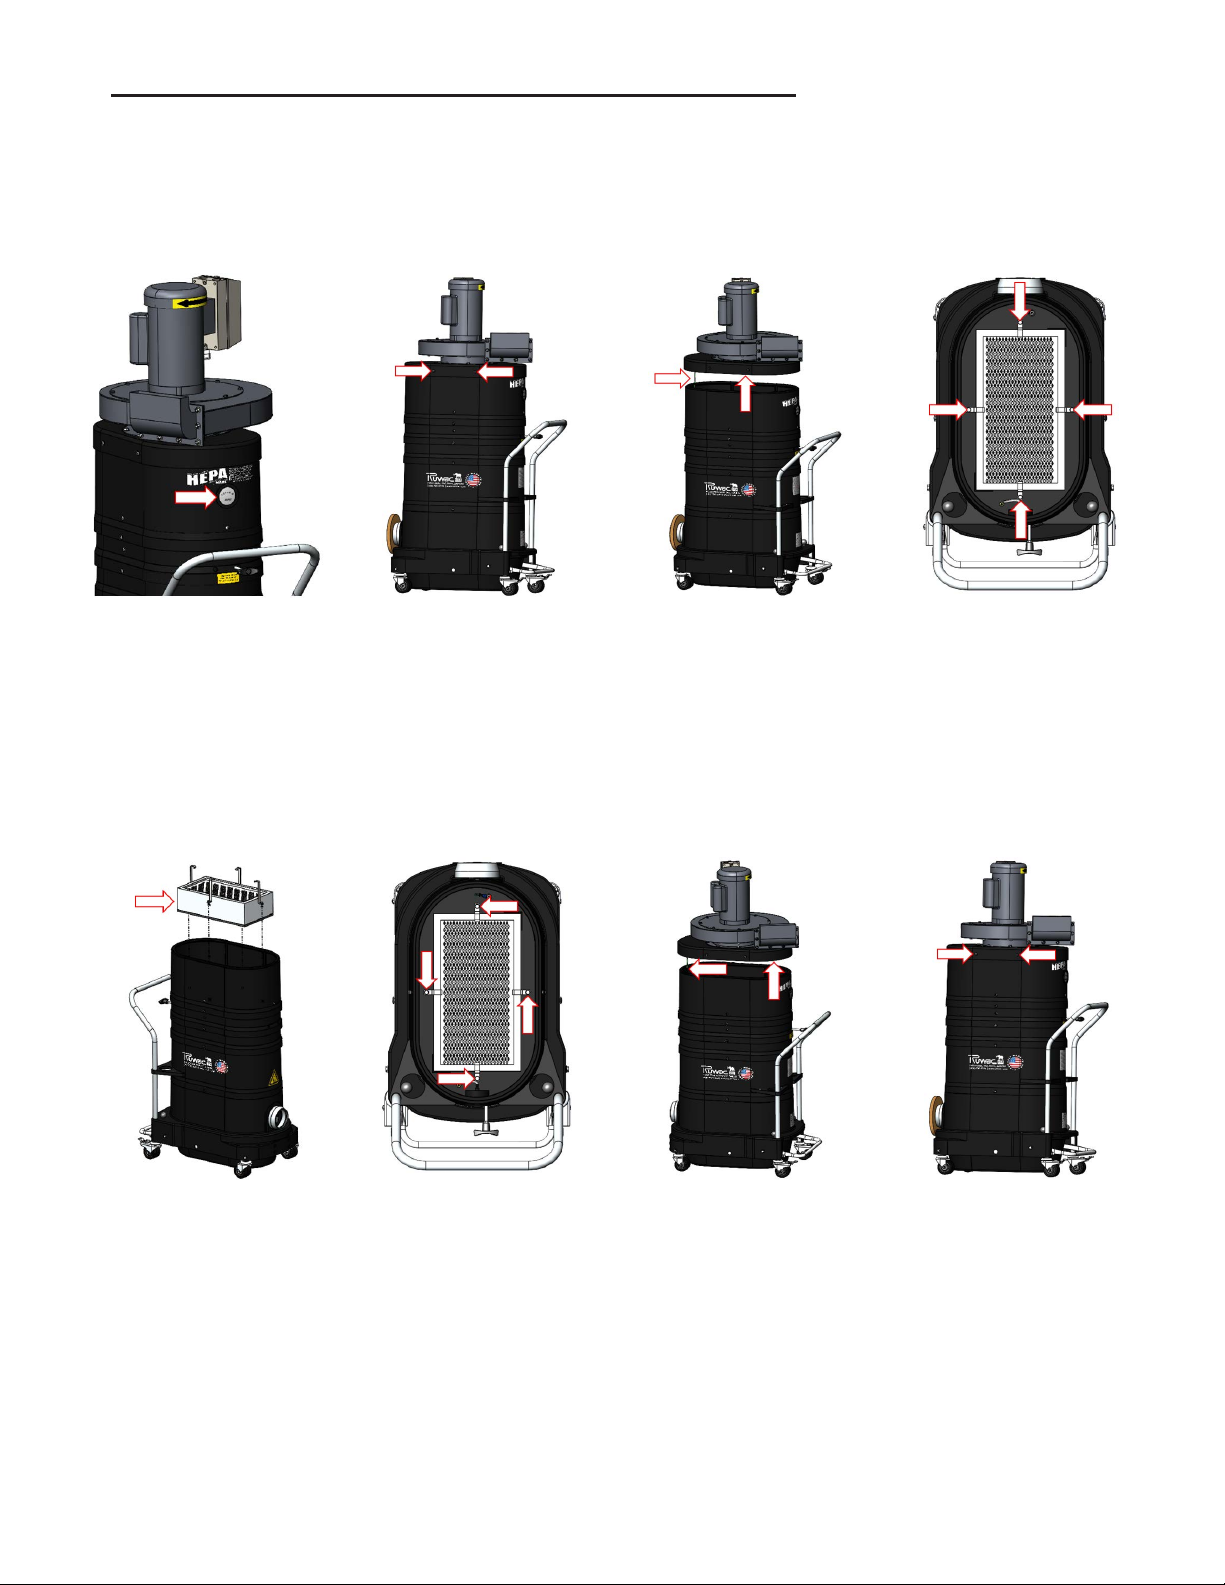
IV. Inspection & Maintenance
5
1 2 34
6 7 8
To ensure optimal
performance of the
HEPA Maxx lter,
replace when the head
loss reaches 8 inches
of water column.
With motor running
and inlet blocked,
remove the motor
deck hardware.
Remove the motor
deck. Use the lifting
bar if included.
Disconnect the
ground wire
Loosen the bracket
hardware.
Remove and replace
the HEPA lter.
Tighten the bracket
hardware.
Replace the
motor deck, attach
the ground wire.
With the motor running
and inlet blocked,
secure the motor deck
hardware.
DV460 SERIES STANDARD INSTRUCTIONS: HEPA MAXX
FILTER MAINTENANCE
CAUTION: Motor deck will be heavy and will require a hoist to remove.
Table of contents


