RVS systems RVS-DC1075 User manual


RVS Systems
2
Table Of Contents
Product Picture & Function............................................................................................3
a) Device Introduction .....................................................................................................3
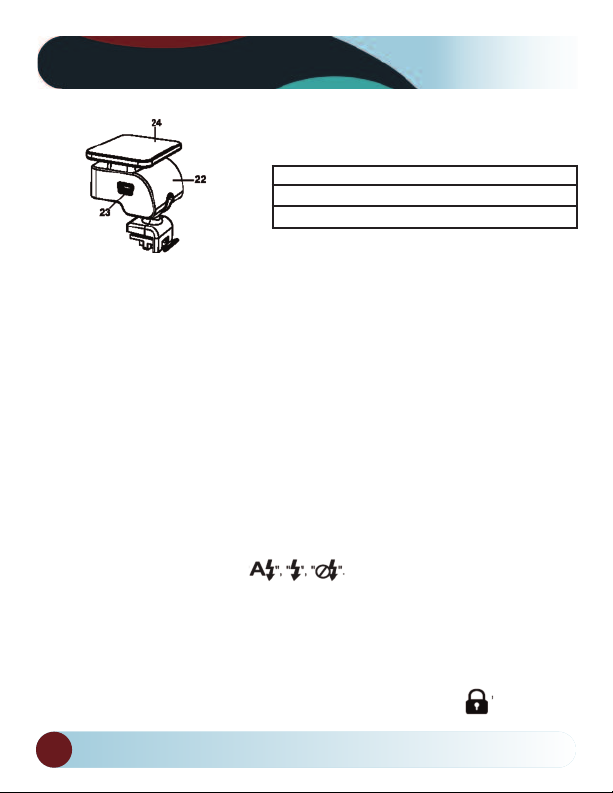
b) Button Function .......................................................................................................4-5
c) LED Light Status List....................................................................................................6
Basic Operation..................................................................................................................6
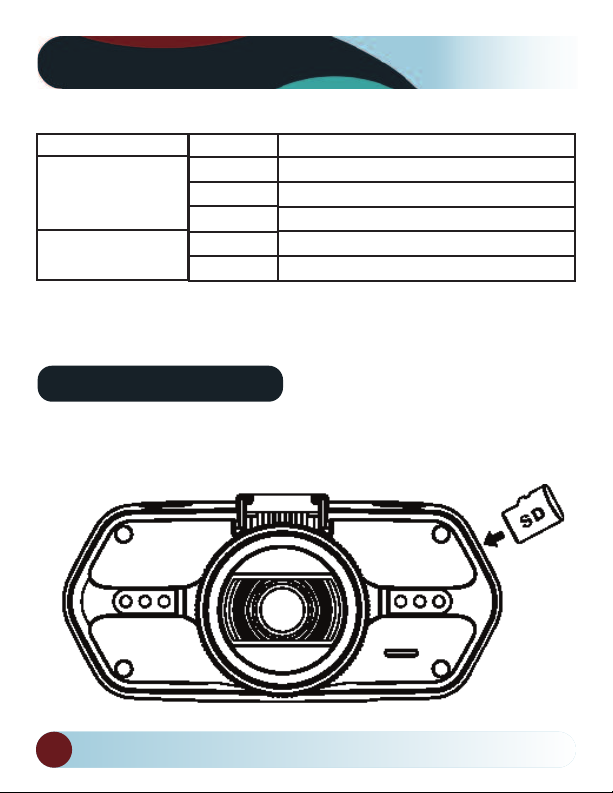
a) SD Card Installation.....................................................................................................6
b) GPS Installation ............................................................................................................7
c) Power Supply ................................................................................................................ 8
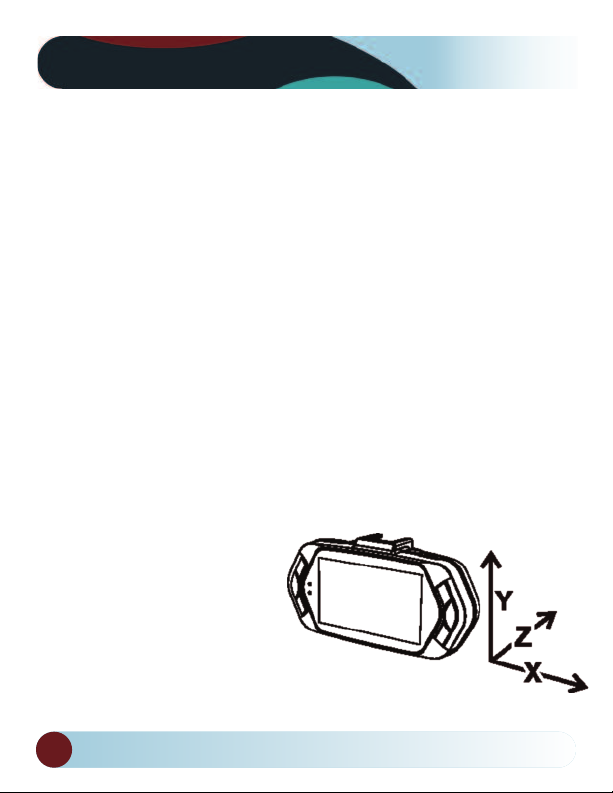
d) G-sensor Function........................................................................................................8
e) Video Mode ....................................................................................................................9
f) Taking Pictures...............................................................................................................9
g) Playback Mode............................................................................................................10
Menu Setting....................................................................................................................11
a) Video Mode...................................................................................................................11
b) Playback Mode............................................................................................................12
Connection........................................................................................................................13
a) Connect to TV..............................................................................................................13
b) Connect to Computer ...............................................................................................13
DVR Player ........................................................................................................................14
Product Specification .............................................................................................15-16
Other Information...........................................................................................................17
Warranty ...........................................................................................................................18
Disclaimer .........................................................................................................................19

3
Product Picture & Function
a) Device Introduction
1. SD Card Slot 11. LCD Display
2. DMI Port 12. Up Button
3. LED Light 13. OK Button
4. Lens 14. Down Button
5. Speaker 15. Power Button
6. Status Light (Blue) 16. Mount Clip
7. Charging Light (Red) 17. Photo Button
8. Menu Button 18. USB Port
9. File Protection Button 19. Reset Button
10. Mode Button 20. Microphone

RVS Systems
4
Product Picture & Function
b) Button Function
Power Button
Press this button for 2~3 sec to turn on/off the device.
P oto Button
In video mode, at any time, press this button to take picture.
Reset Button
If the device crashes, press this button to reset the device.
Menu Button
Press this button during standby or playback mode, to pull up a menu of
camera modes. When the device is in recording mode, press this button to
change the flash settings
File Protection Button
In video mode, when device is recording, press this button to set the record-
ing video to be protected manually, so as to prevent it from being overwrit-
ten by loop recording. In playback mode, press this button to lock or unlock
the video file. When file protection is active, the icon will appear
22. Camera Mount
23. Power Input
24. Sticker for Mount

5
Product Picture & Function
on LCD display.
Mode Button
The device only has two modes, video mode and playback mode. Pressing
this button during standby will switch device to recording mode. When the
device is recording, pressing this button will have no effect.
Up Button
In video mode, press this button to turn on/off LCD display. In menu
settings, press this button to move up. In playback mode, press this button
to choose previous file.
OK Button
In video mode, press this button to start/stop recording. In playback mode,
press this button to play/pause video file. In menu settings, press this button
to confirm the menu setting.
Down Button
In video mode, press this button to start/stop sound recording. In menu
settings, press this button to go to the next item. In playback mode press
this button to choose next file.
Audio Switc
This button is only for the Speed Camera Detector. Push this switch to turn
on/off the voice of the Speed Camera Detector.

RVS Systems
6
Product Picture & Function
c) LED Lig t Status List
LED Light
Status Light (Blue)
Charging Light (Red)
Status
Flash
On
Off
On
Off
Meaning
Device is in Recording
Device is in standby or Playback Mode
Device is off
Charging Battery
Charging complete
Basic Operation
a) SD Card Installation
Install the Micro SD into the Micro SD card slot as shown in the picture.

7
Product Picture & Function
b) GPS Installation
Insert GPS into camera mount as shown in the image below.
Install the device on the windshield with adhesive pad or suction cup
mount. When the power is on, the device will automatically start to catch
GPS signal. If it doesn’t receive the GPS signal, GPS icon will be shown
on LCD display. If it successfully catches the GPS signal, GPS icon will be
shown on LCD display.
Note:
For normal operation, the microSD card must be a class 10 or above
and have at least 4GB of memory.

RVS Systems
8
Product Picture & Function
c) Power Supply
Plug the camera charger into the cigarette lighter in vehicle and start en-
gine. The device will automatically power on and start recording.
Tip: For best performance, charge the battery for 8 hours before first use. When disconnected
from power, the internal battery only lasts a few minutes. This battery is intended for emergency
situations when the camera gets accidentally removed from power (i.e during a vehicle accident).
A few minutes therefore is all that's necessary to capture the rest of the accident.
Note: There are two Mini USB ports, one is on the device, another is on the camera mount. If you
connect the car charger to the Mini USB port on the device, the power supply will be to device
only. If you connect the car charger with Mini USB port on the camera mount, the power supply
will be to the device and to the GPS/Speed camera detector. So, if you want to use the GPS/Speed
Camera Detector Module, the car charger needs to be plugged into the mini USB port on the cam-
era mount.
d) G-Sensor Function
The G-sensor will detect any abrupt movements or stops to the vehicle.
When it senses a sudden stop or an impact on the vehicle, it will activate
"protection mode". This will protect the video files from being over-written
by the loop-recording, saving
the most important video.
e) Motion Detection
To activate motion detection,
select the motion sensitivity
from the menu and then turn off
the recording. The recording will
then resume automatically when
the camera senses motion.

9
Camera Dimensions
f) Video Mode
In video mode, in standby status, LCD display will be shown as below:
In video mode, in recording status, LCD display will be shown as below:
g) Taking Pictures
In video mode, at any time, press photo button to take picture.

RVS Systems
10
Camera Specifications
) Playback Mode
Press the Mode Button to enter playback mode, then press Menu Button to
choose preview video/picture file. Use the direction button to control play-
back operation.
Up Button Previous file
Down Button Next file
OK Button Confirm
Menu Button Enter menu list
File Protection Button Lock/unlock video/picture file
Mode Button Change mode
Preview in six grids
Play
OK Button Play/pause
Mode Button Back to six grids preview

11
Menu Setting
The device has two mode, Video Mode and Playback Mode.
a) In Video Mode:
2560x1080@30fps/ 2304x1296@30fps/
Video Resolution 1920x1080@45fps/ 1920x1080@30fps/
1280x720@60fps
Loop Setting Off/1min/3min/5min
Motion Detect Off/On
Flicker Auto/50 z/60 z
White Balance Auto/sunny/cloudy/tungsten/flourescent
ContrastStandard/ igh/Low
Sharpness Standard/ igh/Low
EV -2/-1.7/-1.3/-1/-0.7/-
0.3/0/0.3/0.7/1/1.3/1.7/2
Quality Super fine/fine/normal
Auto Power Off Off/1min/3min/5min
Time Setup Time Zone/Year/Month/Day/ our:Minute
G-sensor Sensitivity Off/2G/2.5G/3G/3.5G/4G/4.5G
Key Light Auto/Open/Close
Fill Light Auto/Open/Close
Setup Menu Item

RVS Systems
12
Menu Setting
Language English/German/Czech/Polish/
ungarian/Russian/Chinese/French
Default Setting No/Yes
Format No/Yes
Software Version TRCMA7_50_V1.9.9
b) In playback mode:
Back to Previous Level
File Protection Operation Protect Current File/Protect All
File/Unprotect Current File/
Unprotect All File
Auto Play Video Play One/Video Play
All/Video Repeat One/
Video Repeat All
Delete file No/Delete this file/Delete All files
Format No/Yes

13
Connection
a) Connect to TV
The device can output the video to video equipment (TV or Monitor) to
playback the data or adjust the settings.
1. Insert Micro SD card into device.
2. Connect DMI cable to the video equipment (TV or Monitor) and to the
device.
3. Power on the device.
4. Adjust the channel of the video equipment to DMI input.
5. Installation complete.
b) Connect to Computer
1. Insert SD card to device.
2. Connect USB cable to device and computer, “USB connection” will be
shown on the camera screen, and removable disk will be shown on com-
puter.
3. Open the removable disk folder to replay video files and view images.

RVS Systems
14
DVR Player
The camera software comes preloaded onto the device. Simply insert SD
card into the device and then insert SD card into the computer to install
software. The DVR player will be shown as below.
Pressing this button,
video file can copy to any
folder
* means video is locked

15
Product Specification
Resolution 1/3” 4.0 Mega CMOS Sensor, OV4689, good night
vision performance
Lens F/NO=2.0, 110° orizon Angle in 1080P
Standard Mov file, .264 Compression
Resolution 2560x1080@30fps/2304x1296@30fps/1920x10
80@45fps/
1920x1080@30fps/1280x720@60fps
Camera
Video
WDR Function Wide Dynamic Range, Good Night Recording
Audio Built-in Microphone, can be turned off in menu
Still Image 2688x1512 (4M)
LCD 2.7inch 16:9 LCD Display
GPS Logger GPS Logger for path, position, speed and time
record. Replay path, position information on
Google Map
G-Sensor When encounter heavy hit, the device will auto-
matically protect the latest files, so they can’t
be deleted.
G-Sensor When encounter heavy hit, the device will auto-
matically protect the latest files, so they can’t
be deleted.

RVS Systems
16
Product Specification
Filter Lens (Optional)
CPL: Circular-Polarizing Filters, could re-
duce the reflection of inner car on the car
window
UV Lens: Protect the DVR lens
Lit Keyboard for Night Operation
Uniterrupted Recording:
Over-writes first file if memory is full, no
interruption between Video File
File Protection Function: Once File is pro-
tected, it wont be deleted during cycle
recording
Automatically starts recording when car
starts.
Other Function

17
table of contents
One Year Warranty
RVS Systems, Inc. warrants this product against material defects for a
period of one year from date of purchase. We reserve the right to re-
pair or replace any such defective unit at our sole discretion. RVS
Systems, Inc. is not responsible for a defect in the system as a result
of misuse, improper installation, damage or mishandling of the elec-
tronic components. RVS Systems, Inc. is not responsible for conse-
quential damages of any kind.
This warranty is void if: defects in materials or workmanship or damages result from
repairs or alterations which have been made or attempted by others or the unautho-
rized use of nonconforming parts; the damage is due to normal wear and tear, this
damage is due to abuse, improper maintenance, neglect or accident; or the damage is
due to use of the RVS Systems, Inc. system after partial failure or use with improper
accessories.
Warranty Performance
DURING T E ABOVE WARRANTY PERIOD, S OULD YOUR RVS Systems PROD-
UCT EX IBIT A DEFECT IN MATERIAL OR WORKMANS IP, SUC DEFECT WILL
BE REPAIRED W EN T E COMPLETE RVS Systems, INC. PRODUCT IS RE-
TURNED, POSTAGE PREPAID AND INSURED, TO RVS Systems, INC. OT ER
T AN T E POSTAGE AND INSURANCE REQUIREMENT, NO C ARGE WILL BE
MADE FOR REPAIRS COVERED BY T IS WARRANTY.
Warranty Disclaimers
NO WARRANTY, ORAL OR WRITTEN, EXPRESSED OR IMPLIED, OT ER T E
ABOVE WARRANTY IS MADE WIT REGARD TO T IS Rear View Safety, INC.
RVS Systems INC. DISCLAIMS ANY IMPLIED WARRANTY OR MERC ANT-ABIL-
ITY OR FITNESS FOR A PARTICULAR USE OR PURPOSE AND ALL OT ER WAR-
RANTIES IN NO EVENT S ALL RVS Systems, INC. LIABLE FOR ANY INCIDENTAL,
SPECIAL, CONSEQUENTIAL, OR PUNITIVE DAMAGES OR FOR ANY COSTS, AT-
TORNEY FEES, EXPENSES, LOSSES OR DELAYS ALLEGED TO BE AS A CONSE-
QUENCE OF ANY DAMAGE TO, FAILURE OF, OR DEFECT IN ANY PRODUCT
INCLUDING, BUT NOT LIMITED TO, ANY CLAIMS FOR LOSS OF PROFITS.
Warranty

RVS Systems
18
table of contents Disclaimer
RVS Systems and/or its affiliates does not guarantee or promise that
the user of our systems will not be in/part of an accident or other-
wise not collide with an object and/or person. Our systems are not a
substitute for careful and cautious driving or for the consistent ad-
herence to all applicable traffic laws and motor vehicle safety regu-
lations. The RVS Systems products are not a substitute for rearview
mirrors or for any other motor vehicle equipment mandated by law.
Our camera systems have a limited field of vision and do not provide
a comprehensive view of the rear or side area of the vehicle. Always
make sure to look around your vehicle and use your mirrors to con-
firm rearward clearance and that your vehicle can maneuver safely.
RVS Systems and/or its affiliates shall have no responsibility or lia-
bility for damage and/or injury resulting from accidents occurring
with vehicles having some of RVS Systems products installed and
RVS Systems and/or its affiliates, the manufacturer, distributor and
seller shall not be liable for any injury, loss or
damage, incidental or consequential, arising out of the use or
intended use of the product. In no event shall RVS Systems and/or
its affiliates have any liability for any losses (whether direct or indi-
rect, in contract, tort or otherwise) incurred in connection with the
systems, including but not limited to damaged property, personal in-
jury and/or loss of life. Neither shall RVS Systems and/or its affiliates
have any responsibility for any decision, action or inaction taken by
any person in reliance on RVS Systems, or for any delays, inaccura-
cies and/or errors in connection with our systems functions.

19
table of contents
If you have any questions
about this product, contact:
RVS SYSTEMS, Inc.
1797 Atlantic Avenue
Brooklyn, NY 11233
888.881.2601
BETTER CAMERAS. BETTER SERVICE.
IT’S OUR GUARANTEE.
Table of contents
Other RVS systems Dashcam manuals