Ryobi ONE+ R18SUP10 User manual

FRONT PAGE
R18SUP10

2
Original Instructions
IMPORTANT!
It is essential that you read the instructions
in this manual before assembling, operating,
and maintaining the product.
Subject to technical modication.
Safety, performance, and dependability have
been given top priority in the design of your
cordless submersible pump.
INTENDED USE
The cordless submersible pump is intended
to remove clean or dirty water out of ponds,
pools, or tanks. The product is also used to
drain ood water or control excess rainwater
during oods.
The product is intended only for home or
domestic use. The product may be used
indoors or outdoors.
Do not use the product for any other purpose.
GENERAL SAFETY WARNINGS
■The product is not intended for use by
persons, including children, with reduced
physical, sensory or mental capabilities,
or lack of experience and knowledge,
unless they have been given supervision
or instruction concerning use of the product
by a person responsible for their safety.
Children should be supervised to ensure
that they do not play with the product.
■Save all warnings and instructions for future
reference. Refer to them frequently, and
use them to instruct others who may use the
product. If you loan someone the product,
also loan them these instructions to prevent
misuse of the product and possible injury.
■Keep the area of operation clear of all
persons, particularly small children and
pets.
■Inspect the product before each use. Check
for loose fasteners, etc. Make sure that
all guards and handles are properly and
securely attached. Replace any damaged
parts before use. Check for battery pack
leaks.
■Do not modify the product in any way or
use parts and accessories that are not
recommended by the manufacturer.
■Do not operate the product while barefoot or
when wearing sandals or similar lightweight
footwear. Wear protective footwear that will
protect your feet and improve your footing
on slippery surfaces.
■Exercise caution to avoid slipping or falling.
■Avoid inserting hands into the inlets/outlets
of the product while it is turned on.
■Do not install or operate the product in an
explosive environment or near flammable
materials.
■Do not use the product if the switch does
not turn it off. Have the switch replaced by
an authorised service centre.
■Turn off the product, remove the battery
pack, and allow the product to cool down.
Make sure that all moving parts have come
to a complete stop:
●before servicing
●before clearing a blockage
●before checking, cleaning, and working
on the product
●before changing accessories
●before leaving the product unattended
●whenever performing maintenance
■Immediately turn off the product and remove
the battery pack in the event of an accident
or breakdown. Never operate the product
again until it has been fully checked by an
authorised service centre.
BATTERY TOOL USE AND CARE
■Remove the battery pack from the product
before recharging. Recharge only with the
charger specified by the manufacturer.
A charger that is suitable for one type of
battery pack may create a risk of fire when
used with another battery pack.
■Use only battery packs intended specifically
for the product. Use of any other battery
packs may result in a risk of fire, electric
shock, or injury to persons.
■Do not use a battery pack or product that
is damaged or modified. Damaged or
modified batteries may exhibit unpredictable
behaviour resulting in fire, explosion, or risk
of injury.
■Do not expose a battery pack or product to
fire or excessive temperatures. Exposure to
fire or excessive temperature above 130°C
may cause explosion.
■When the battery pack is not in use, keep
it away from other metal objects, like

3
Original Instructions
paper clips, coins, keys, nails, screws, or
other small metal objects that can make a
connection from one terminal to another.
Shorting the battery terminals together may
cause burns or a fire.
■Under abusive conditions, liquid may be
ejected from the battery. Avoid contact.
If contact accidentally occurs, flush with
water. If liquid contacts eyes, additionally
seek medical help. Liquid ejected from the
battery may cause irritation or burns.
■Remove exhausted battery packs from the
product and safely dispose of them.
CORDLESS SUBMERSIBLE PUMP
SAFETY WARNINGS
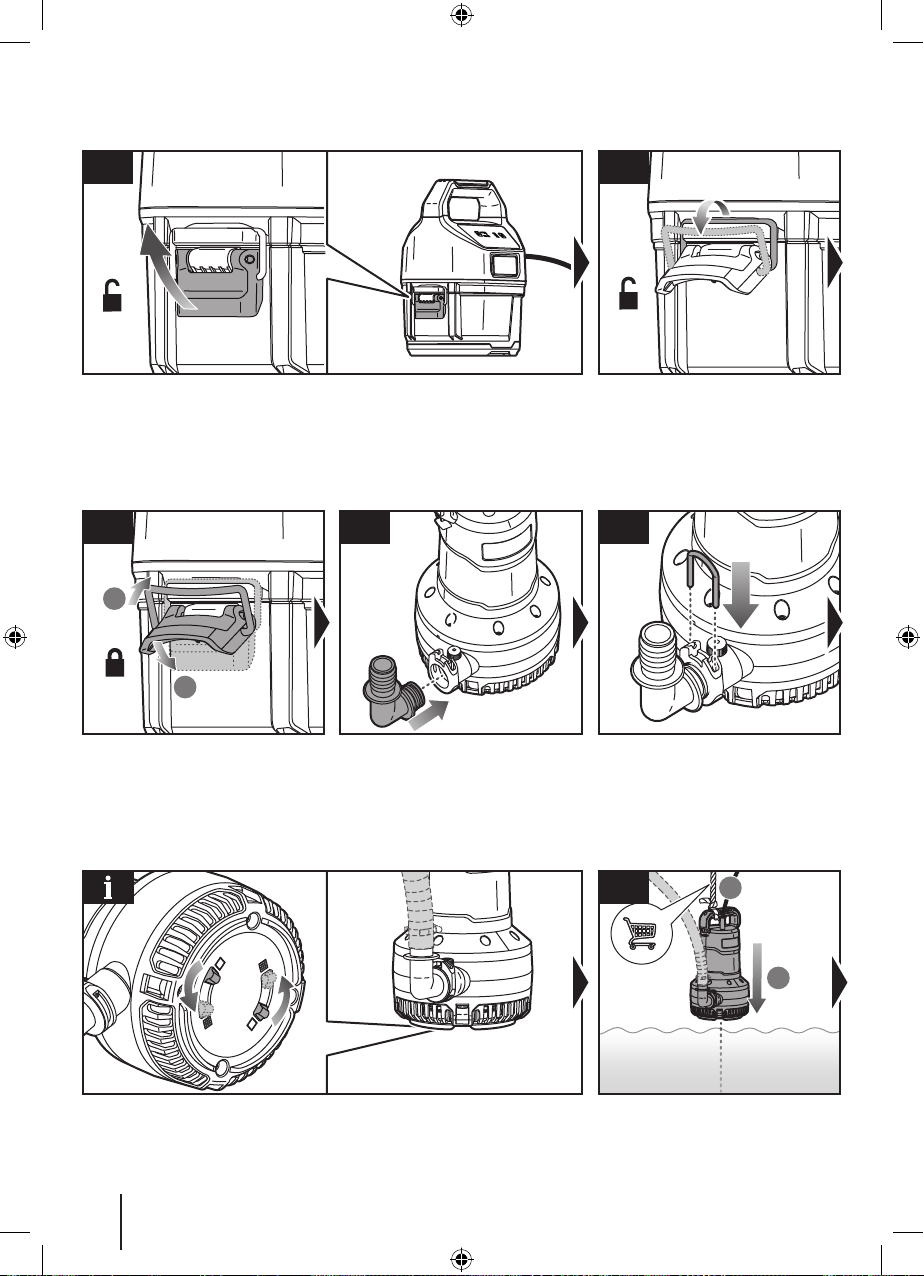
■Ensure that the battery pack is removed
from the battery box when installing the
product.
■Ensure that all connections are leak free.
Use a thread seal tape or a suitable sealant
on the connection thread.
■When tightening threaded connections, do
not apply excessive force that may cause
damage.
■Make sure to select a stable support when
mounting the battery box.
■Avoid twisting the pole or bottom pump
housing when extension collars are
unlocked as this could bind the cable inside.
■If the product needs to be raised or lowered,
connect a suitable lowering rope to the
carrying handle. Do not lift the product using
the hose or power cord.
■Do not use the product for corrosive,
abrasive, explosive or dangerous liquids.
Fluids other than water damage the product,
can create a fire hazard, and could cause
physical injuries to the operator.
■Do not use the product with potable water.
■Do not operate the product without liquid.
Do not run the product dry.
■Do not use the product when people are in
the water.
■Do not remove the hose while the product is
still operating.
■Pollution of the liquid could occur due to
leakage of lubricants.
■Water discharged from the product may
cause the ground to become wet and
may cause slipping. Make sure to clean
the discharged water after operating the
product.
■Do not discharge water to areas with
electrical or high voltage elements, active
chemicals, or other objects or substances
that might cause danger when mixed with
water.
■Hold the product securely. Always wear
the wrist lanyard except when the barrel
hook is used. Do not leave the product
unsupervised while in use. Make sure the
product cannot tip over.
■Do not submerge the battery box in water.
■Do not expose the inside of the battery
compartment to rain or wet conditions.
The product is only water resistant when
the battery compartment is closed. Water
entering the product increases the risk of
electric shock.
ADDITIONAL BATTERY SAFETY
WARNINGS
To reduce the risk of re, personal injury,
and product damage due to a short circuit,
never immerse the battery box, battery pack,
or charger in uid or allow uid to ow inside
them. Corrosive or conductive uids, such as
seawater, certain industrial chemicals, and
bleach or bleach-containing products, etc., can
cause a short circuit.
TRANSPORTATION AND STORAGE
■Turn off the product, remove the battery
pack, and allow both to cool down before
storing or transporting.
■Clean the product thoroughly before storing.
Remove any excess water by fully extending
the product. Store the product upright and
fully extended to drain water completely.
Store the product in a dry, well-ventilated
area that is inaccessible to children. Keep
the product away from corrosive agents,
such as garden chemicals and de-icing
salts.
■When transporting the product in a vehicle,
secure it against movement or falling to
prevent injury to persons or damage to the
product.
TRANSPORTING LITHIUM BATTERIES
Transport the battery in accordance with local
and national provisions and regulations.

4
Original Instructions
Follow all special requirements on packaging
and labelling when transporting batteries
by a third party. Ensure that no batteries
can come in contact with other batteries or
conductive materials while in transport by
protecting exposed connectors with insulating,
nonconductive caps or tape. Do not transport
batteries that are cracked or leaking. Check
with the forwarding company for further advice.
MAINTENANCE
■Use only original manufacturer’s
replacement parts, accessories, and
attachments. Failure to do so can cause
possible injury, can contribute to poor
performance, and may void your warranty.
■Servicing requires extreme care and
knowledge and should be performed only
by a qualified service technician. Have the
product serviced by an authorised service
centre only.
■You may make adjustments and repairs
described in this manual. For other repairs,
contact an authorised service centre.
■Periodically inspect the pump, hoses, and
water inlet. Ensure that the hoses and water
inlet are free from mud, sand, and debris.
■After each use, clean the product with a
soft, dry cloth. Keep the product dry, clean,
and free from oil and grease when not in
use. Any part that is damaged should
be properly repaired or replaced by an
authorised service centre.
■Clean the filter only when there is noticeable
decline of functionality.
■Bring the product to an authorised service
centre to replace damaged or unreadable
labels.
SYMBOLS ON THE PRODUCT
Read and understand
all instructions before
operating the product. Follow
all warnings and safety
instructions.
Regulatory Compliance
Mark (RCM). The product
meets applicable regulatory
requirements.
Waste electrical products
should not be disposed of
with household waste. Please
recycle where facilities exist.
Check with your local authority
or retailer for recycling advice.
SYMBOLS IN THIS MANUAL
Parts or accessories sold
separately
Note
Warning

5
Original Instructions
LED INDICATOR DESCRIPTIONS
LED indicator Red LED Green LED Status
Low battery On -
The battery pack capacity is at
25%. The LED light stays on until
the battery pack is recharged.
Water sensor
- On The product is on.
2 quick ashes -The 15-minute timer is running out.
3 quick ashes -The 10-minute timer is running out.
4 quick ashes - The 5-minute timer is running out.
5 quick ashes
(with buzzing
sound)
-
The water sensor alarm is on. The
product does not detect water. Put
the submersible pump under water.
6 quick ashes -
The low currrent alarm is on. The
motor is idling. Clean the pump
inlet and put the submersible pump
under water.
7 quick ashes -The over voltage alarm is on.
Replace the battery pack.
8 quick ashes -
The short circuit alarm is on. Turn
o the product and remove the
battery pack. Bring the product to
an authorised service centre.
2 slow ashes -
The under voltage alarm is on. The
battery pack is overdisharging.
Change the battery pack.
3 slow ashes -
The current check circuit fault
alarm is on. The circuit is
damaged. Turn o the product and
remove the battery pack. Bring the
product to an authorised service
centre.


7
Know your product
R18SUP10
Handle
Discharge elbow
Latch
Locking pin
Filter switch
Cable
x 4
Battery box
Battery cover
On/off button
Low battery
LED indicator
Water sensor
LED indicator
Timer button
Timer LED indicator
Wall mount hook
Operator’s manual
Battery pack
Flexible hose
Hose clamp
Charger
Mounting screw
Clip hook
Control panel
Power connector
Screw
Submersible pump
Air release valve
x 2

8
Getting started
Insert the locking pin to secure the
discharge elbow.
8
1
2
6
Hook the metal bar on the groove and
flip down the latch to lock the battery
box to the battery cover.
7
Install the discharge elbow into the
submersible pump.
1
Flip up the latch.
2
Remove the metal bar from the groove
to unlock the battery box from the
battery cover.
NOTE: The filter switch that toggles the filter function on or off is found below the
submersible pump.
Tie a rope to the carrying handle of
the submersible pump and lower the
submersible pump into water using the
rope.
1
2
11

9
Getting started
1
2
12
Press the on/off button on the control
panel to turn on the product. Press
the on/off button again to turn off the
product.
9
Attach the flexible hose and hose clamp to the discharge elbow. Tighten the hose
clamp to secure the flexible hose.
6
5
Close the battery box.
10
Lay the submersible pump on its side.
4
Install the battery pack. Make sure that
the latches on the battery pack click
into place.
3
Open the battery box.
NOTE: The submersible pump can
only be submerged within the specified
immersion depth. Do not exceed the
maximum immersion depth for the pump.
x1 x2
x3
5min 10min
15min
NOTE: Press the timer button to set a
timer. Each press of the timer button sets
the timer to 5minutes and the succeeding
press adds another 5minutes.

10
p.15
p.14
p.xxx
Title header
Title header
Title header
Title header
Title header
Title header
Operating the
product
Storing the product
Title header
Title header
Cleaning the
product
Mounting the
battery box
p.11 p.xxx
p.xxxp.xxx
p.xxx
p.xxx
p.xxx
p.xxx
p.17

11
Operation
1
2
2
1
1
2
1
2
3
4
OPERATING THE PRODUCT
WARNING: Do not use the submersible
pump without the filter installed.
1. Flip up the latch and remove the metal
bar from the groove.
2. Open the battery box.
3. Install the battery pack. Make sure the
latches on the battery pack click into
place. Close the battery box.
4. Hook the metal bar on the groove and flip
down the latch to lock the battery box to
the battery cover.

12
Operation
1
2
6
1
2
x1 =
x2 =
x3 =
5min
10min
15min
5
7
5. Tie a rope to the carrying handle of
the submersible pump and lower the
submersible pump into water using the
rope. Do not lift or lower the submersible
pump using the hose or power cord.
NOTE: The submersible pump can only be
submerged within the specified immersion
depth. Do not exceed the maximum
immersion depth for the pump.
NOTE: The control panel contains the on/
off button, low battery LED indicator, water
sensor LED indicator, timer button, and timer
LED indicator.
6. Press the on/off button on the control
panel to turn on the product. Press the
on/off button again to turn off the product.
7. Press the timer button to set a timer.
NOTE: Each press of the timer button sets
the timer to 5 minutes and the succeeding
press adds another 5 minutes. The timer
can go up to 15 minutes only.

13
Operation
=
=
=
5min
10min
15min
8
NOTE: If the topmost timer LED indicator is
on, the timer is set to 5 minutes. If the middle
LED indicator is on, the timer is set to 10
minutes. If the bottom LED indicator is on,
the timer is set to 15 minutes.
8. Discharge water properly into drains,
gutters, or other appropriate sewage
areas.
WARNING: Do not discharge water to areas
with electrical or high voltage elements,
active chemicals, or other objects or
substances that might cause danger when
mixed with water.

14
Operation
1
2
2
1a
1
2
1b
2a
2b
MOUNTING THE BATTERY BOX
1. Install the wall mount hook onto the wall.
Turn the screws clockwise to tighten and
secure the wall mount hook. Mount the
battery box onto the wall mount hook.
NOTE: The battery box has a groove behind
it where the wall mount hook can be hooked
into.
2. Insert the clip hook into the groove behind
the battery box. Press the clip hook and
clip onto a stable support.

15
Maintenance
1
2
1
1
2
1
2
2
1
3
4
5
CLEANING THE PRODUCT
1. Lay the submersible pump on its side.
2. Turn the screws counterclockwise to
remove them from the filter.
3. Remove the filter. Clean the filter with
water and remove dirt or debris with a
stiff brush.
4. Clean the body of the submersible pump
with water and remove dirt or debris with
a stiff brush.
5. Install the filter on the submersible pump.
Lay the submersible pump on its side.

16
Maintenance
12
2
6
7
6. Install the screws into the filter and turn
them clockwise to tighten and secure the
filter into the submersible pump.
7. Remove dirt or debris from the battery
box with a stiff brush. Do not use water to
clean the battery box.

17
Storage
3
1
2
1
2
STORING THE PRODUCT
NOTE: Do not store the product while there
is still dirt or debris on it. Always make sure to
clean the product before storing.
WARNING: Make sure to clean any excess
water from the product to avoid slipping.
1. Loosen the hose clamp to remove the
flexible hose.
2. Flip up the latch and remove the metal
bar from the groove to unlock the battery
box from the battery cover. Open the
battery box.
3. Remove the battery pack. Close the
battery box.

18
Storage
20220513v1
1
2
4
5
4. Hook the metal bar on the groove and flip
down the latch to lock the battery box to
the battery cover.
5. Store the product in a dry, well-ventilated
area that is inaccessible to children. Keep
the product away from corrosive agents,
such as garden chemicals and de-icing
salts.

PRODUCT SPECIFICATIONS
Cordless submersible pump
Model R18SUP10
Rated voltage 18 V d.c.
Flow rate 70 L/min
Maximum head 8 m
Maximum immersion depth 5 m
Water temperature rating
Maximum 35°C
Minimum 5°C
Maximum particle size 10 mm
Water outlet size 13 mm
Minimum suction level 5 mm
Weight 4 kg
BATTERY AND CHARGER
Model R18SUP10
Compatible battery
packs
RB1815C, RB1820C, RB1825C,
RB1840C, RB1840X, RB1850C,
RB1850X, RB1860X, RB18L15,
RB18L15A, RB18L15B, RB18L20,
RB18L20A, RB18L25, RB18L25A,
RB18L40, RB18L40A, RB18L50,
RB18L50A, RB18L13, RB18L60A,
RB18L90A
FLOW RATE PERFORMANCE
The ow rate of the product depends on the height of the
water outlet. As the height of the product increases, the
slower it discharges water.
Outlet height (m) Flow rate (L/h)
0 4,200
23,500
42,700
61,800
8900
NOTE: Visit your local special orders desk or contact RYOBI
customer service for replacement parts.

BACK PAGE
Imported by:
Techtronic Industries Australia Pty Ltd
31 Gilby Road, Mount Waverley, VIC 3149
Melbourne, Australia
Techtronic Industries N.Z. Limited
Unit C, 70 Business Parade South,
Highbrook, Auckland 2013, New Zealand
RYOBI is a trade mark of Ryobi Limited, and is used under license.
961479068-01
Table of contents
Other Ryobi Water Pump manuals

Ryobi
Ryobi RSCD750 Operation manual

Ryobi
Ryobi RPTP196 User manual

Ryobi
Ryobi PMP01 User manual

Ryobi
Ryobi R18XTRP10 User manual

Ryobi
Ryobi RTP900 Operation manual

Ryobi
Ryobi RSSS750 Operation manual

Ryobi
Ryobi R18TP User manual

Ryobi
Ryobi A113UWP User manual

Ryobi
Ryobi P3002 User manual

Ryobi
Ryobi RY31DP18 User manual
Popular Water Pump manuals by other brands

Pentair
Pentair MW50 Series Installation and operation manual

Allfett
Allfett LUBMATIC INTRODUCTION AND USER MANUAL

Winter
Winter H Series operating manual

Debem
Debem CUBIC Series TRANSLATION OF ORIGINAL INSTRUCTIONS

Victor Pumps
Victor Pumps S Series Instruction and maintenance manual

Grundfos
Grundfos UPM3 Installation and operating instructions