Sachs Bikes madass User manual

Your Sachs dealer
SACHS
Recommends
Sachs Fahrzeug- und Motorentechnik GmbH
Nopitschstraße 70 • D-90441 Nürnberg
Telefon: +49 (0)911 4231 400 • Telefax +49 (0)911 4231 332
e-Mail: inf[email protected] • www.sachs-bikes.de
Printed in Germany Nr. P00 649 008 00 02 000 2004 .. ...

owners manual
GB

The MadAss is a sturdy light motorcycle in
modern design.
Its sound construction, the meticulous
selection of materials, the advanced ma-
nufacturing techniques and conscientious
work of dedicated employees provide the
motorcycle with all the characteristics that
are typical of Sachs: economical operati-
on, quality, reliability and a high residual
value.
Because the factory is continuously involved
with the further development of all models,
we reserve the right to change the scope
of delivery in the form of model versions
and technology.
Technical changes to the standard motor-
cycles can void the EC operating license.
Therefore before implementing a change,
ask a specialized dealer whether it is al-
lowable.
We cannot be held liable for any conse-
quential damage caused by accessories
not approved by the factory.
The scope of delivery and version of the
motorbike is determined by the purchase
agreement concluded with the dealer.
This operating manual includes important
instructions for handling a light motorcycle.
Read it carefully, because professional
treatment – in addition to regular care
and maintenance – serves to maintain the
motorbike’s value and is one of the require-
ments for guarantee claims.
We wish you at all times a safe journey.
SACHS Fahrzeug- und Motorentechnik GmbH
You have purchased a Sachs MadAss
Congratulations – and thank you for
putting your trust in us.
PREFACE

1
CONTENTS
Summary and operation
Safety symbols .......................................................................... 3
Right-hand side view ................................................................. 4
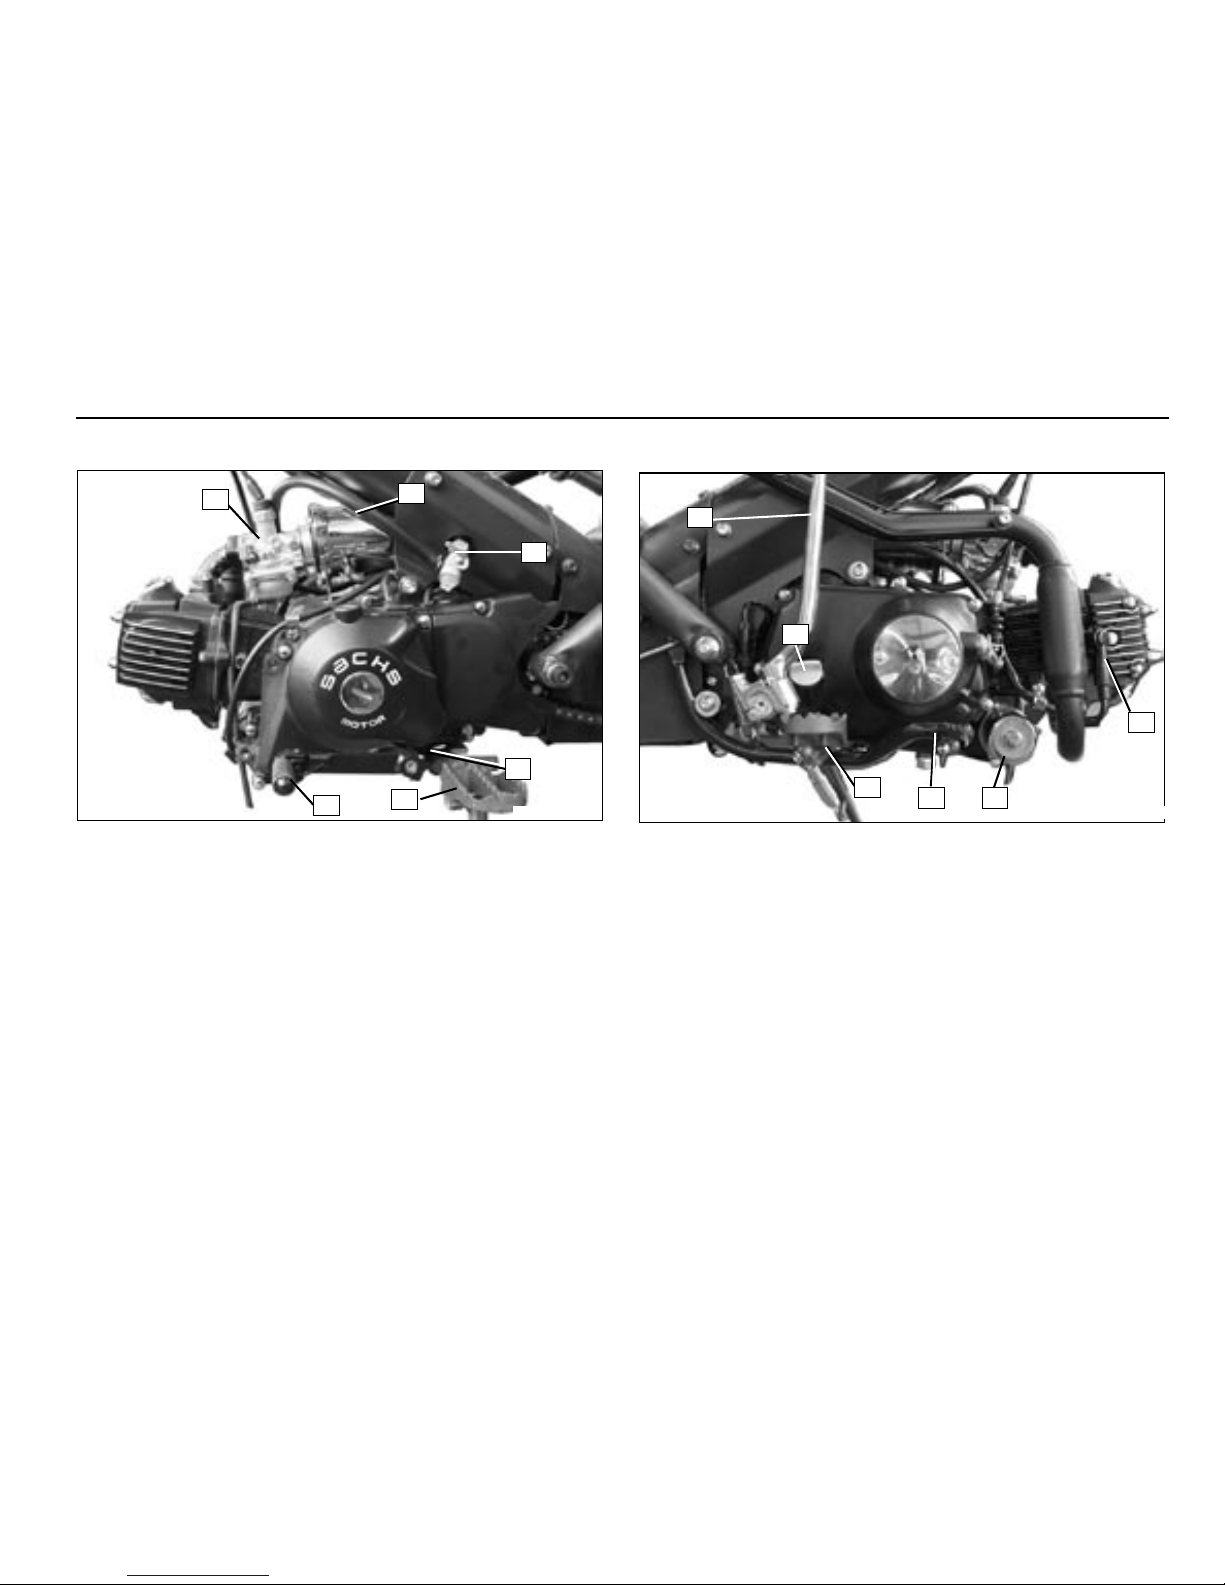
Engine ....................................................................................... 5
Left-hand handlebar fittings....................................................... 6
Right-hand handlebar fittings..................................................... 6
Choke ........................................................................................ 6
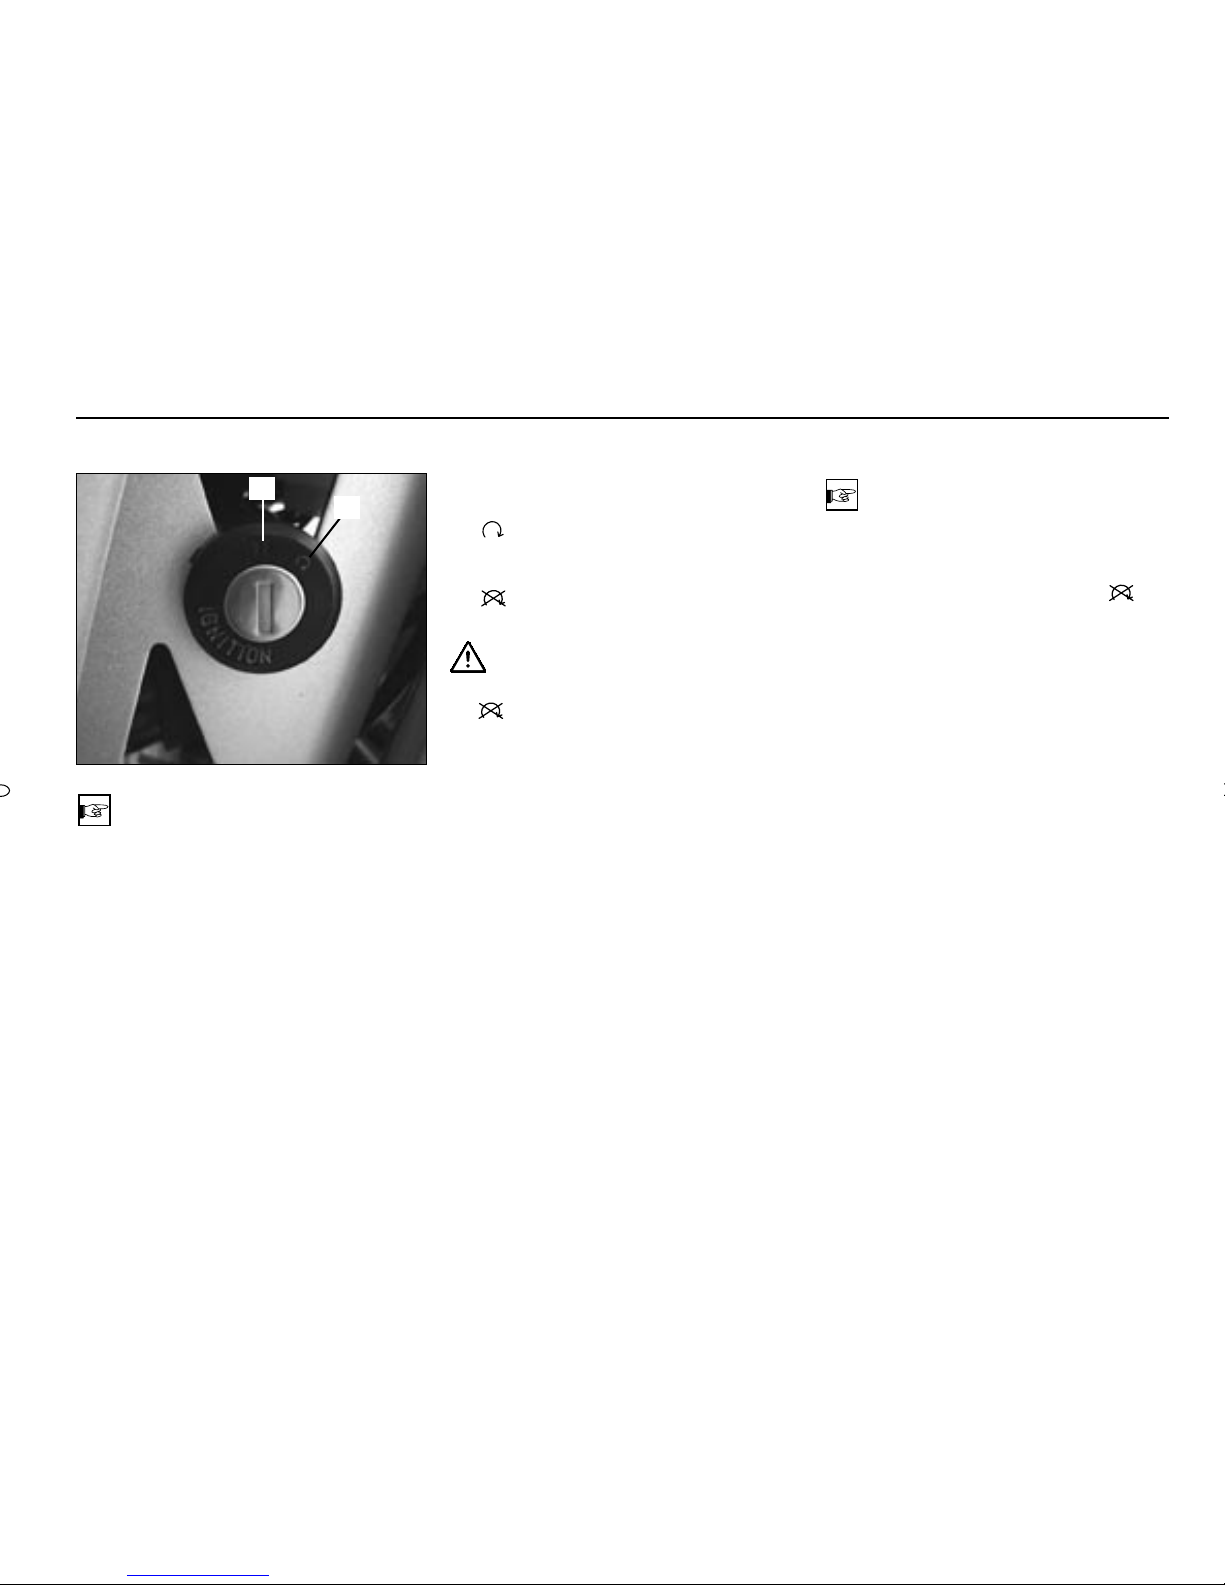
Ignition lock................................................................................ 7
Cockpit....................................................................................... 8
Speedometer set-up, time adjustment....................................... 8
Speedometer battery change.................................................... 9
Safety test
Checklist .................................................................................. 10
Clutch ...................................................................................... 11
Fuel..................................................................................... 12-13
Engine oil............................................................................ 14-15
Front brake .............................................................................. 16
Rear brake............................................................................... 17
Drive chain............................................................................... 18
Tyre profile, tyre pressure and size.......................................... 19
Load / lights ............................................................................. 20
Riding instructions
Ride safely............................................................................... 21
Ride economically and be aware of the environment......... 22-23
Running-in instructions............................................................ 24
Side stand................................................................................ 25
Starting.................................................................................... 26
Starting with kick starter lever.................................................. 27
Starting withelectric starter...................................................... 28
Riding, changing gears............................................................ 29
Braking ............................................................................... 30-31
Stopping the engine / fork-column lock ................................... 32
Service instructions
Servicing the motorbike / cleaning agents.......................... 33-34
Operation in winter and anti-corrosion protection.................... 35
Repairing paint damage / servicing the tyres .......................... 36
Lay-up / commission................................................................ 37
Technical changes, accessories and spare parts.................... 38

2 3
CONTENTS
Maintenance
Maintenance activities ............................................................. 39
Checking the fork-column bearings ......................................... 40
Removing the front wheel........................................................ 41
Installing the front wheel.......................................................... 42
Removing the rear wheel......................................................... 43
Installing the rear wheel........................................................... 44
Checking, adjusting the drive chain......................................... 45
Front brake .............................................................................. 46
Rear brake..........................................................................47-48
Adjusting the clutch lever play ................................................. 49
Sparkplug ................................................................................ 50
Fuse......................................................................................... 51
Battery ...............................................................................52-53
Changing the bulbs ............................................................54-56
Adjusting the headlamps ......................................................... 57
Technical Data
Engine ..................................................................................... 58
Power transmission ................................................................. 59
Chassis.................................................................................... 60
Lubricants and operating fluids ............................................... 61
Electrical Equipment................................................................ 62
Dimensions and weights.......................................................... 63
Warranty
Warranty conditions................................................................. 64
List of wear parts................................................................ 65-66
Inspection plan ................................................................... 67-69
Maintenance confirmations ................................................ 70-74
Motorbike data / Rating plate................................................... 75

2 3
SUMMARY AND OPERATION
NOTE
Special instructions for better handling
during operation and inspection and when
carrying out adjustment procedures and
service activities.
Observe the following:
WARNING
Precautionary measures against the risk of
accidents, injury and/or death.
FIRE HAZARD
The bike is supplied with a catalyst.
The exhaust system becomes very hot.
While riding, idling or parking, make sure
that no easily inflammable materials (such
as hay, leaves, grass, coverings, luggage,
etc.) can come into contact with it.
CAUTION
Important instructions and precautionary
rules to be followed in order to prevent
the motorbike from being damaged. Non-
observation can lead to the guarantee
becoming void.
Safety symbols and notes

4 5
1
2
3 4
5
6
789 SFM 649 051.1
SUMMARY AND OPERATION
Right-hand side view
1 Fuel tank cap
2 Handlebar fittings
3 Brake fluid reservoir front brake
4 Speedometer
5 Chassis number and rating plate
6 Fork column lock
7 Side stand
8 Battery and fuse
9 RH pillion footrest, fold-up

4 5
SFM 649 012.1
11
7
9 8
10
12
SFM 649 013.1
6
1
3
2
5
4
1 Carburattor
2 Air filter
3 Fuel cock with filter
4 Engine number
5 LH Foot rest
6 Gear lever
SUMMARY AND OPERATION
Engine left-hand side view
7 Spark plug connector
8 Electric starter
9 Footbrake lever
10 RH footrest
11 Oil filler cap
12 Kick starter
Engine right-hand side view

6 7
SFM 649 017.1
A B
1
2
3
SFM 649 024.1
56
4
7
8
SFM 649 025.1
9
1 Clutch lever
2 Head light switch
Push button upwards for
the upper low beam
Push button downwards for
the below low beam
2 Direction-indicator switch
Push to the left:
left-hand direction indicators
are activated
Push to the right:
right-hand direction indicators
are activated
3 Push-button horn
4 Emergency off switch
engine will not start
engine starts
5 Handbrake lever
6 Throttle
7 light switch
off
position light
driving light
8 Starter button
Right-handle handlebar ttings
Left-handle handlebar ttings Choke lever right
9 Choke lever ( )
Operating positions:
A Cold start
B Warm start
SUMMARY AND OPERATION

6 7
1
2
SFM 649 015.1
Ignition-lock
NOTE
The ignition-lock as well as the tank cap are
operated with the same key.
Key positions
1 = Operating position: ignition and all
circuits activated.
2 = Ignition off.
WARNING
While riding, do not switch the ignition
off !
NOTE
Activate the parking light only for a limited
period. Take into account the charge of the
battery.
The key can be removed in positions .
SUMMARY AND OPERATION

8 9
SFM 649 059_2
1
43
2
A
B
5
0 KMH
0
DST
B A
0 KMH
0
TRP
B A
0 KMH
11 : 55
CLK
B A
0 KMH
12 : 00
CLK
B A
SUMMARY AND OPERATION
Cockpit
Seedometer
1 KMH - odometer or switchable on
MPH - speedometer (in miles)
2 DST - total distance (km)
TRP - trip odometer
CLK - time announcement
Instrument lights
3 Right and left direction indicator green
4 Change-over gear Neutral (N) green
5 Speedomter light
Speedometer time adjustment
Botton B press once
the clock (CLK) appears
the time can be set.
Botton B press once the hour signal is
flashing
set the hours by pressing botton
A.
Botton B press once the minute signal is
flashing
set the minutes by pressing
botton A.
Botton B press once the time is set
and ( : ) is flashing.
Speedometer set-up
Botton A press once
set-up from odometer
(DST) to trip odometer (TRP)
or
Botton A press once
set-up from trip odometer (TRP)
to clock (CLK)
or
Botton A press once
set-up from clock (CLK) to odo-
meter (DST)

8 9
SFM 649 058.1
4
SUMMARY AND OPERATION
Speedometer battery change
NOTE
If there is no reading on the display or very
poor change the batteries. Always replace
both batteries.
Remove the speedometer for battery
change.
- Remove the screws (1) and take off the
speedometer.
- Remove the batteries (4) and replace
against new once, type AG 13.
- Set-in the batteries with the plus termi-
nal showing upwards.
- Close the cover (3) properly.
NOTE
The batteries must be changed within 30
seconds, so that the odometer memory is
not deleted.
DISPOSAL
Take a dead battery to a collection point.
Never dispose of one with household
refuse.
- Remove the screws (2) and take off the
cover (3).
Conversion of kilometer to miles
In order to change the speedometer from
kilometer to miles, the key (5) must be
pressed approximately 2 seconds with a
ball-point pen.

10 11
SUMMARY AND OPERATION
Checklist
Before each ride, carry out a safety
check using the checklist.
Take the safety check seriously. Carry
out maintenance activities before you
start your ride ( MAINTENANCE) or
ask a specialized Sachs dealer to do so.
This will provide you with the certainty
that your motorcycle corresponds to
traffic regulations. A technically faultless
motorcycle is a basic requirement for the
safety of both yourself and other road
users.
Before starting your ride, check the
following:
– Steering (smooth and free of play)
– Clutch lever play
– Fuel quantity
– Engine oil (level)
– Front brake
– Rear brake
– Tyres (profile and pressure)
– Telescopic fork
– Load / lights
– Total weight
– Lights
– Clutch (operation)
– Brake fluid (level)
– Brakes (operation)
In case of problems or difficulties, contact
a Sachs dealer, who will do everything
possible to assist you.
WARNING
While the engine is running or the
ignition is on, do not touch the ignition
system.
FIRE HAZARD
The exhaust system becomes very hot.
While riding, idling or parking, make sure
that no inammable materials (e.g. hay,
leaves, grass, coverings or luggage, etc.)
can come into contact with it!
SAFETY TEST
Important notes for the operation with
a catalyst.
The catalyst. is designed for a optimal
performance and lifetime.Note the
following:
- Operate a catalyst. bike only with lead
free fuel.
- Don’t turn off the ignition if the bike still
rolls.
- Don’t drive on at misfiring, decline in
performance and poor engine run.
- In case of problems, contact the next
Sachs dealer.
- Longer starting tests by moving the bike
in cold or warm operating state should be
refrained.
At the mentioned operating states unburned
fuel can reach the catalyst., burn and cause
overheating of the exhaust system.

10 11
2
1
3
A
SFM 649 016.1
SAFETY TEST
Clutch
Clutch lever play
CAUTION
If you drive with no clutch lever play, the
clutch will be damaged.
Checks:
- Pull the lever until there is discernable
resistance.
- Measure the play. Required value:
A = min. 3-4 mm
Adjustment:
- Remove the rubber cap (1).
- Release the lock nut (2).
- Turn setting screw (3) as appropriate.
- Tighten up the lock nut (2).
- Check the play.
If this adjustment is not sufficient, adjust
by turning the setting screw at the other
end of the clutch cable in the direction of
the engine
MAINTENANCE.

12 13
SFM 649 007.1
1
2
SFM 649 011.1
3
SAFETY TEST
Fuel
WARNING
Fuel is highly inflammable and can
explode. Do not smoke or bring a naked
ame near the fuel tank.
Tank cap (1)
NOTE
For opening the tank cap (1) only insert the
ignition key (3) and do not turn. Open by
using the cover (2).
The fuel-tank cap (1) is designed to allow
for ventilation. Do not make any changes
to the cap.
Opening:
- Tilt up the cover (2) in the direction of the
arrow.
- Insert the ignition key (3), turn the cover
(2) to the left and open the tank cap (1).
Closing:
- Close the tank cap (1) by turing the cover
(2) to the right and pull out the ignition
key.

12 13
RES
OFF
ON
SFM 649 010.1
4
SFM 649 063.1
OFF
RES
ON
SAFETY TEST
Fuel
CAUTION
When you stop the engine, always set
the fuel cock to OFF. Otherwise, fuel
could enter the engine and this could
make starting difcult or lead to serious
engine damage.
We cannot be held liable under the
guarantee for damage caused by non-
observance of this caution.
Fuel cock (4)
Fuel cock positions:
ON = OPEN
fuel tank will empty down to a
reserve quantity of approx.
0,35 litres
RES = RESERVE
fuel tank is drained. There is a
remaining quantity which can
not be used.
OFF = CLOSED
fuel supply closed.
WARNING
Fuel expands under the inuence of heat
and the sun. Therefore, never ll the tank
to the brim. Never ll the tank while the
engine is running.
Never bring a glowing cigarette or naked
ame near an open tank, because fuel
vapour could suddenly ignite.
Checking the fuel level
- Open the tank cap (1) on the fuel tank.
- Visually inspect the fuel level.
- Close the tank cap (1) on the fuel tank.
Filling up with fuel
- Use only normal lead-free fuel (min. 91
octane)

14 15
MAX.
MIN.
SFM 649 005.1SFM 649 006.1
1
SAFETY TEST
Engine oil
Checking the oil level
CAUTION
Checking the oil while the engine is cold
will lead to a wrong measurement and
therefore the wrong oil quantity. In order
to avoid engine damage, never exceed
the maximum oil level nor let it drop
below the minimum level.
- Stop the warmed-up engine, wait
for approx. 5 minutes and hold the
motorcycle upright.
NOTE
Make sure that the motorcycle during oil-
level checks stands level in all respects.
Even the slightest inclination towards the
side will produce measurement errors.
- Stop the engine and remove the oil
filler cap (1) on the lower right of the
crankcase.
- Clean the oil filler cap at the MIN-MAX
aera with a clean rag.
CAUTION
For checking the oil level only insert the
oil ller cap and don't screw in!
Otherwise there will be a wrong
measurement in order to avoid engine
damage.
- The oil level must be between the
minimum and maximum marks.
If required, replenish the engine oil SAE
15W/40 via the oil-filler opening of the oil
filler cap.
- Tighten the oil filler cap by hand.

14 15
SAFETY TEST
Engine oil
CAUTION
Do not use additives. Since the oil
also serves to lubricate the clutch, do
not use car engine oils supplemented
with friction modiers (such energy-
conserving oils can lead to the
clutch slipping). Use a suitable, light
engine oil for motorcycles, such as
Motorex SAE 15W/40 mineral oil API (SG
or higher).
- If required, replenish the engine oil
(for classification and viscosity, see
the table) via the oil-filler opening
up to the maximum level marking.
Engine oil:
Recommended grade:
Per API: SG or higher or also with additional
release status: ACEA A3/96 (CCMC G5).
Recommended viscosity:
Viscosity depends on the outside
temperature. For short while, the
temperature may exceed or fall short of
the limits of the SAE grades.
The recommended viscosity grade SAE
15W/40 covers the ambient temperature
range –15 °C to +40 °C and therefore
represents the optimum for our latitudes.

16 17
MAX.
MIN.
SFM 649 022.1
SAFETY TEST
Front brake
WARNING
Sudden changes in play or a spongy feel
of the brake lever can be caused by faults
in the hydraulic system. Do not ride on
when in doubt about the operability of
the brake system. Immediately consult
a Sachs dealer.
Check the brake-uid level
WARNING
Every two years, the brake uid must
be changed by a Sachs dealer. The
level must not drop below the MIN
mark. Use only brake uid of the DOT 4
classication.
- Turn the handlebars until the brake-fluid
tank is level.
- The sight glass must be fully covered with
brake fluid.
- If air bubbles can be seen, check the
brake linings for wear; if necessary,
replenish the brake fluid.
CAUTION
Do not spill any brake uid on painted
or plastic surfaces as it will demage the
surface severely.
Checking the brake linings
WARNING
The brake disks and brake linings must
be free of oil and grease.
Brake linings are subject to wear.
In order to guarantee the operability of the
brake system, the wear limits of the brake
linings must not have been reached.
Checking the brake linings:
MAINTENANCE

16 17
1
20 mm
SFM 649 035.1
SAFETY TEST
Rear brake
WARNING
Check the play of the footbrake lever (1)
before riding.
Target value 20 mm.
Adjusting the footbrake lever play:
MAINTENANCE
Checking the brake linings
WARNING
The brake disks and brake linings must
be free of oil and grease.
Brake linings are subject to wear.
In order to guarantee the operability of the
brake system, the wear limits of the brake
linings must not have been reached.
Checking the brake linings:
MAINTENANCE
Other manuals for madass
1
Table of contents
Other Sachs Bikes Motorcycle manuals