Saddlebrook BarnCams Metal/Stone BarnCam User manual

Metal/Stone
BarnCam
Instructions
Important Safety Precautions
-To prevent fire or shock hazard, do not expose this product to rain or
water. Do not use near a bath tub, wash bowl, sink, or laundry tub; do
not use in a wet basement or in or around a swimming pool.
-To avoid electrical shock, do not open the case of this product.
-Operate this product using only the power supply included with it.
-Do not overload electrical outlets or extension cords as this can result
in fire or electric shock.
-Refer servicing to qualified personnel only.
CAUTION:
Changes or modifications not expressly approved by the seller could
void the user's warranty and create an extreme hazard.
NOTE:
This equipment has been tested and found to comply with the limits
for Class B digital device, pursuant to part 15 of the FCC rules. These
limits are designed to provide reasonable protection against harmful
interference in a residential installation. This equipment generates, uses
and can radiate radio frequency energy and, if not installed and used in
accordance with the instructions, may cause harmful interference to
radio communications. However, there is no guarantee that interference
will not occur in a particular installation. If this equipment does cause
harmful interference to radio or television reception, which can be
determined by turning the equipment off and on, the user is encouraged
to try to correct the interference by one or more of the following
measures:
-Reorient or relocate the receiving antenna.
-Increase the separation between the equipment and receiver.
-Connect the equipment into an outlet on a circuit different from
that to which the receiver is connected.
-Consult the seller/dealer or an experienced radio/TV technician
for help.

Camera Setup Instructions
Here is your camera and transmitter.
(Actual camera may vary.)
Here is your receiver.
Step One:Mount the camera in a good location to view
your animals. You can adjust the angle of the camera to
position the camera into place. Run the cables from the
camera to the outside of the barn where the transmitter
will be mounted.
Step Two:Mount the transmitter on the outside of your
barn with the label side facing your house. Try to mount
it so that there is a direct line of sight to where you will
be viewing your camera on your TV. The set screw on
the bracket is adjustable. Make sure it is tightened to the
proper position. The wires coming out of the transmitter
should not point up. The power supply should be
plugged into the red connector and then plugged into an
outlet inside your barn. Your camera system came to you
completely assembled.
If you disconnect the wires during installation, please
make sure they are re-connected correctly
Connect the wires from your camera to the other two
colored jacks coming out of the transmitter. Yellow to
Yellow, White to White. Please make sure that the
power supplies connected to the camera and transmitter
both say Clover and that the one that says 250ma is
connected to the camera, the 500ma to the transmitter.
Step Three:Set up the receiver by flipping up the
antenna and facing the side with holes to the transmitter.
It does not turn 360 degrees so be careful not to break it.
Plug in the power supply to the back of the receiver.
You can adjust the camera number by pressing the
channel button. Your first camera will be set to one, and
so on.
This kit is made up of three main parts. Part one is
the camera, power adapter, mounting hardware and
cable. Part two is the transmitter and power adapter.
Part three is the receiver, power adapter and cables.
Your Camera system was thoroughly tested prior
to shipment. Please set everything up inside your
house before installing outside to ensure nothing
was damaged during shipment.

You can hook the receiver up to your TV with either the
RCA cables (the three colored cables) or the coaxial
cable (thick black cable). They are both offered as an
option. Do not plug in both as it will not work.
If you use the coaxial cable screw it to the back of the
receiver and to your TV. Make sure the switch on the
side of your receiver is set to the same channel on which
you want to watch your BarnCam (3 or 4).
If you use the RCA cables, you might have to change the
inputs on your TV or VCR to get the signal to show on
your TV. If you have problems with this please refer to
your TV or VCR owner’s manual.
Setup tips on next page > > >
Setup Tips
1.) Make sure you’ve ordered the right system for your situation.
A wooden barn covered in metal needs the metal barn system.
2.) Make sure you have set it up completely in your house first.
All of our systems are tested before they are shipped.
3.) If it does not work in the house, you should check to make
sure your TV is set up correctly. Often there is a video/cable
button that needs to be changed to view the signal instead of
the cable feed. Please connect it directly to the TV rather
than through a VCR during testing.
4.) If it does not work in the house, first check that everything is
plugged in and the receiver is turned on. The system for
metal barns has three power supplies. Two come labeled
when shipped (the camera and the transmitter). The third is
for the receiver. Make sure that the 250ma power supply is
connected to the camera and the 500ma to the transmitter.
5.) If it works well in the house but not between the barn and the
house, then usually something between the two is causing the
problem, or they are not aimed properly. The receiver (and
transmitter for wooden barn) should have the pock marked
sides facing each other. The system for metal barns should
have the BarnCams label facing the house.
6.) The signal will pass through walls, but transmits better
through windows. Moving the receiver to a window facing
the barn might make all the difference.
7.) If you have followed these instructions carefully and your
system does not work, please give us a call or email.
Satisfaction guaranteed!

TROUBLE SHOOTING
Cause and remedies
Problems Receiver Camera
No power or
No
picture/sound
AC adaptor not
plugged in
Improper TV or
Monitor connection
AC adaptor not
plugged in
Poor
reception Improper antenna
direction
Improper channel
switching
Antenna
direction
Normal
sound, dim
picture,
picture too
bright/dark
Improper
brightness control
setting on your
TV/monitor
Lighting source
in the field of
view
Picture rolls
and jumps,
scrambled
picture
Improper V-hold
control setting on
your TV / monitor
Other 2.4 GHZ
transmitter
wireless
phone/network
1. POWER ON/OFF
SWITCH
Switch for the power on/off.
6. TV COAXIAL
CONNECTOR
RF jack for connecting the
wall antenna terminal.
2. DC IN
Plug in the 12 volt adaptor
(supplied).
7. TV CHANNEL
SELECTOR
Select the receiving channel
3 or 4 on your TV.
3. VIDEO OUT JACK
RCA video out jack for
operation.
8. DIRECTIONAL 2.4
GHZ ANTENNA
Receive the audio and video
signals.
4. RIGHT AUDIO OUT
JACK
Right audio out jack for
operation with monitor or
TV.
9. CHANNEL
INDICATOR LIGHTS
Must be set to same number
on both.
5. LEFT AUDIO OUT
JACK
Left audio output jack for
operation with monitor or
TV.
10. CHANNEL
SELECTION BUTTON
Use to find optimal
reception. Must select the
same channel on both
transmitter and receiver.

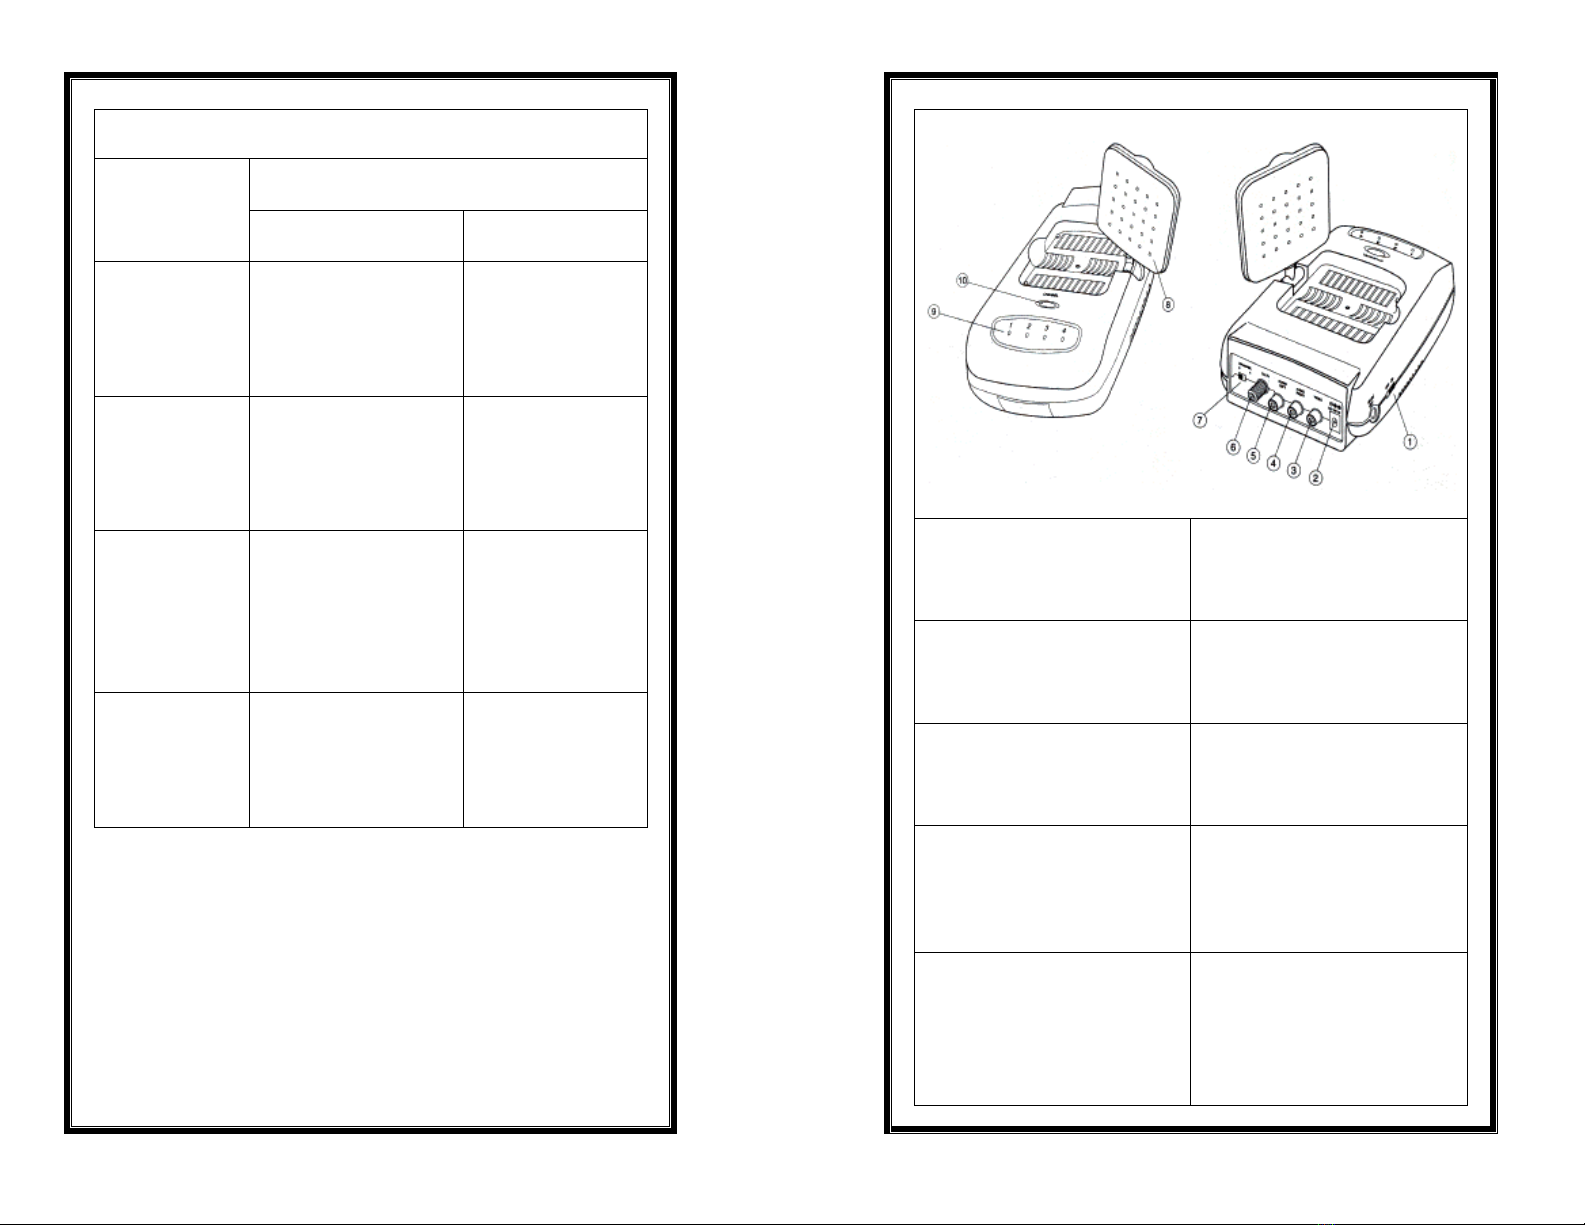
1. Place the wireless receiver unit on or near the TV or
monitor where you want to install it.
2. Set the right angle of the flat pitted face of the antenna
toward the transmitter's antenna.
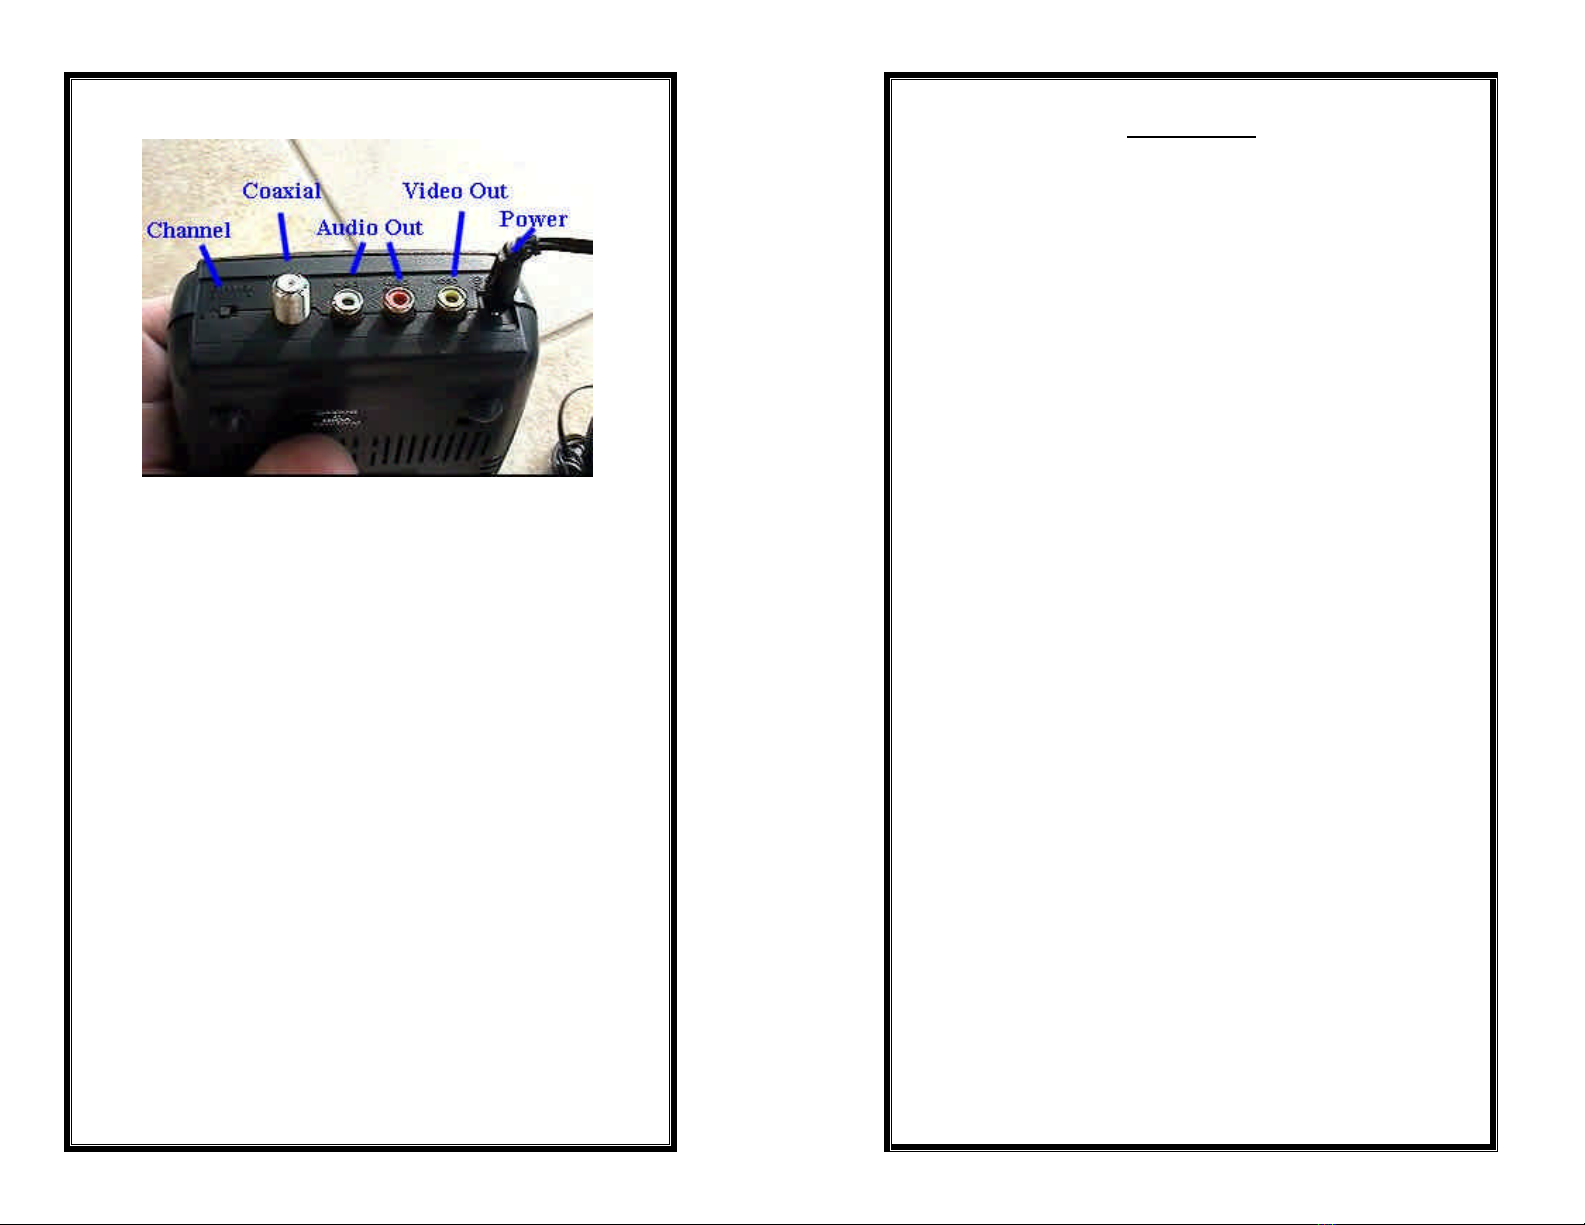
3. Connect the supplied 500 ma AC adaptor to the DC IN
jack at the rear of the receiver and plug it into 120V AC
outlet.
4. Turn on the power switch. The red LED (channel
indicator light) on the receiver will indicate that the unit
is turned on.
WIRELESS OPERATION
Make sure TV or monitor is turned on before using
system.
1. Set your TV and VCR to either channel 3 or 4,
whichever is better for reception in your area. Be sure to
set the wireless receiver to same channel as your TV and
VCR.
2. The flat pitted face of the antenna on the receiver
should be facing the transmitter to get the best picture
and sound.
3. Each home or office has different reception. Different
construction products such as foil insulation, heating
ducts, steel studs, etc., will create different reception
conditions. It may be necessary to set the right angle of
the antenna or move the wireless transmitter and wireless
receiver to get the best reception. Placing the wireless
receiver on a shelf near the TV/monitor or VCR may
improve the reception.
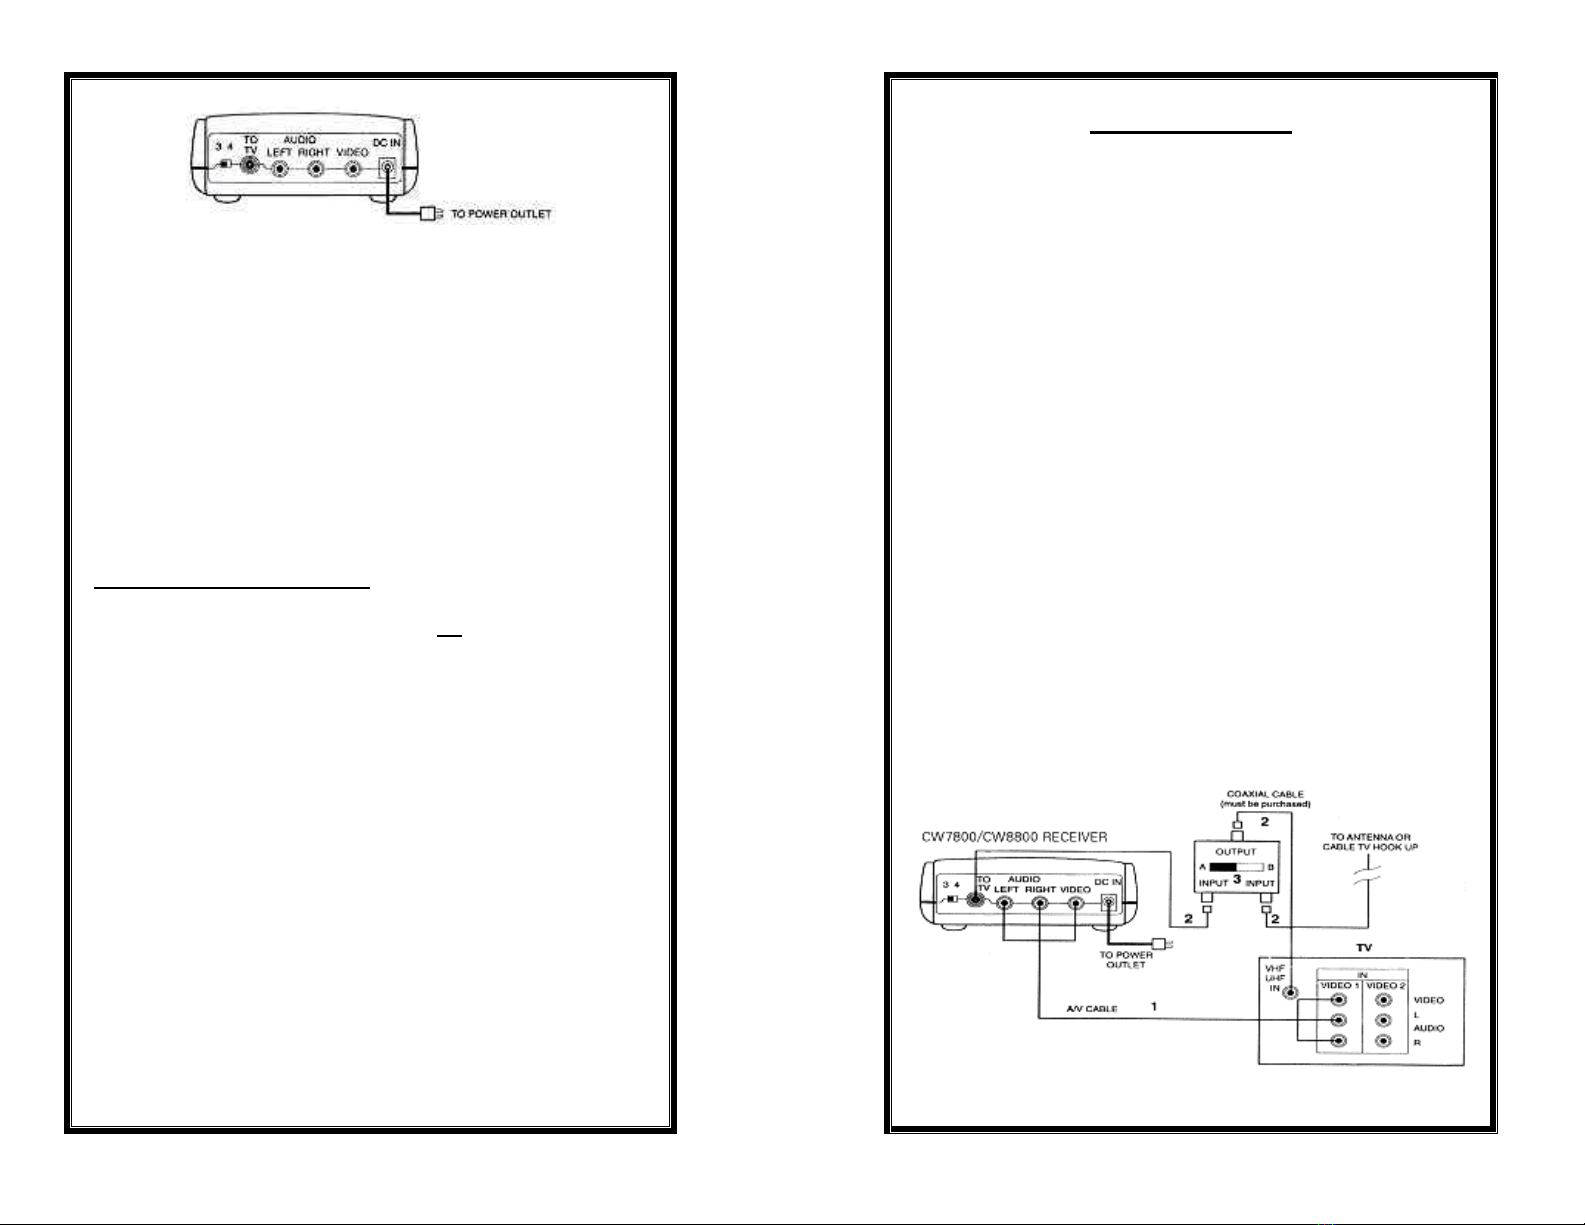
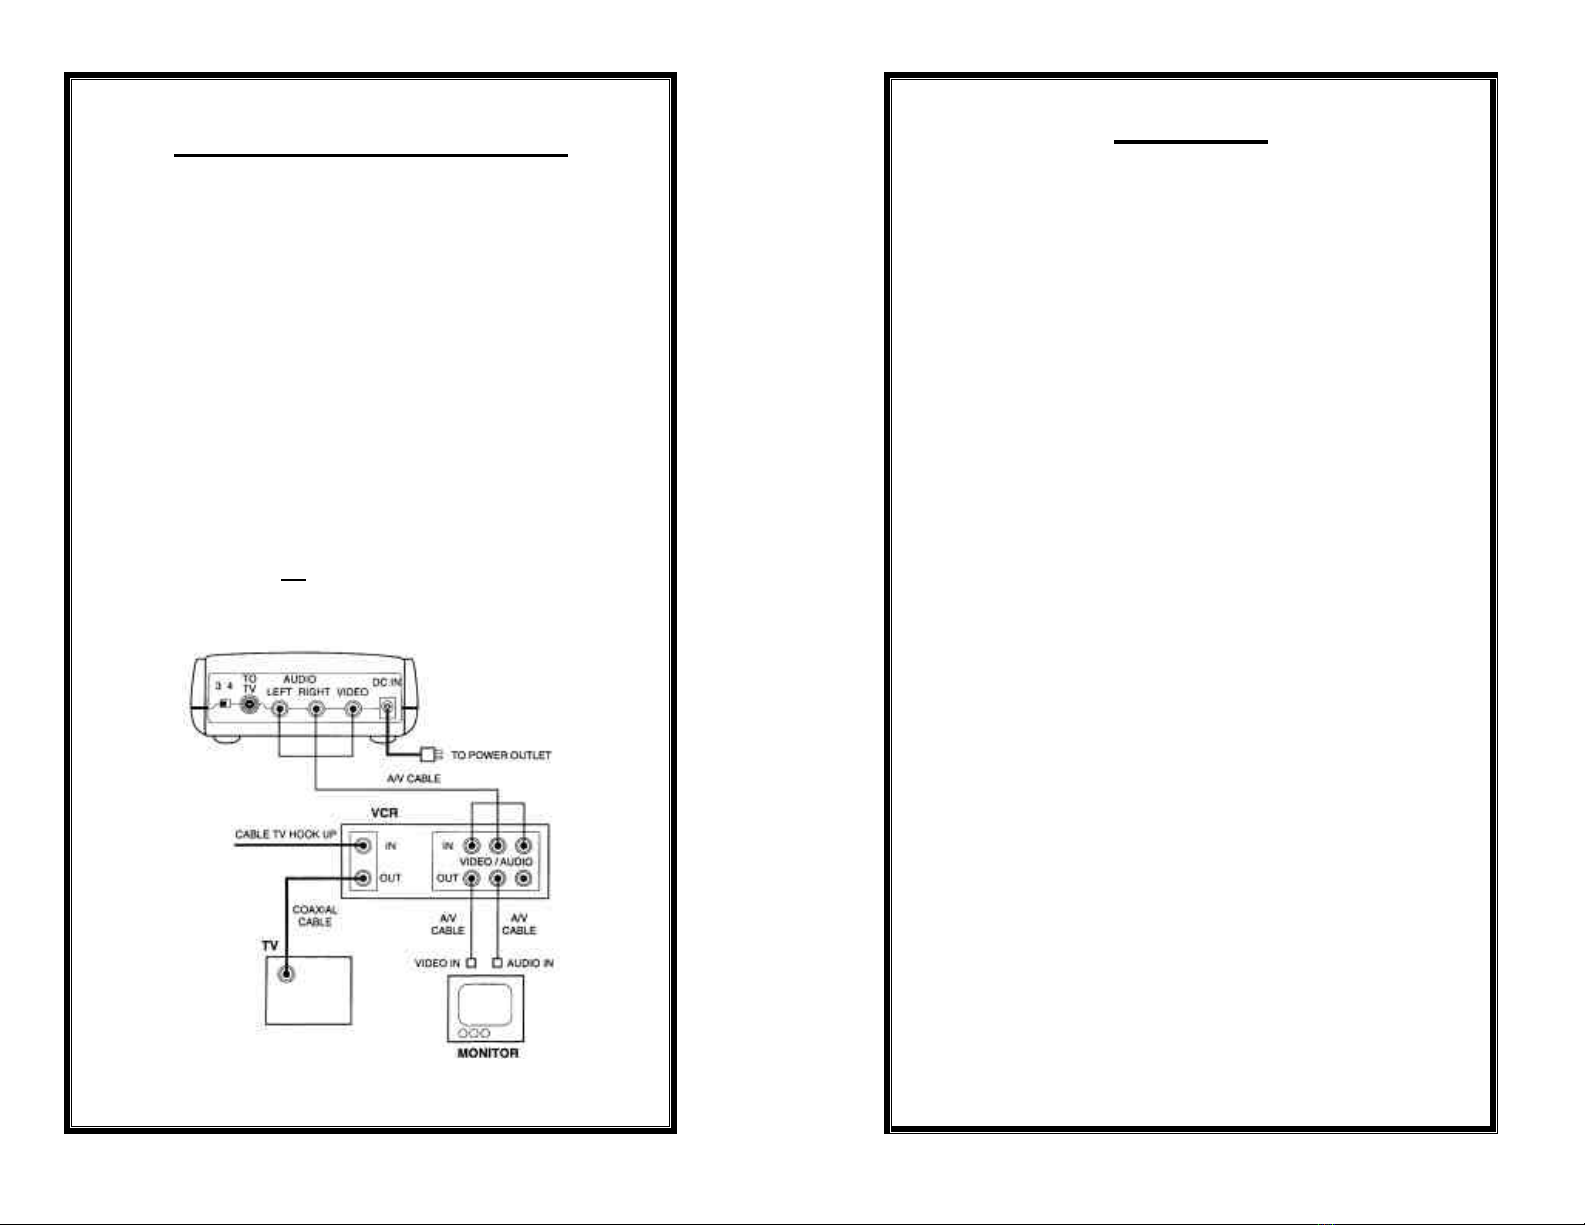
Operation With TV
1. If your TV has A/V jacks, connect one set of A/V cables to
the TV's A/V jacks and to the A/V jacks on the receiver. Be
sure the yellow, red and white plugs match the yellow, red and
white jacks on both the TV and the receiver. If the TV has
only a single jack for audio input, connect the white plug to
that jack.
2. If your TV has only a single coaxial input, connect a length
of coaxial cable from it to the output port of the A/B switch
(not supplied). Then connect coaxial cable from one of the
switch's input ports to the connector labeled TO TV on back
of the receiver, and connect your cable TV or antenna input to
the switch's other input port. Set the channel 3/4 switch on the
back of the receiver whichever channel (3 or 4) is not used by
any local TV stations. Then tune the TV to that station.
3. If using an A/B switch (not supplied), select between
viewing the BarnCam reception and the cable antenna signal
on the TV by moving the switch either to A or B.
4. Make sure the ON/OFF switch is in the ON position. Plug
one end of the receiver’s power adaptor into the back of the
receiver and the other end into any 120 V wall outlet. Use
only the adaptor provided.
5. Locate and orient the receiver according to the Setup
instructions in this manual.

Operation With TV & VCR
This setup enables
you to record
transmitted audio
and video on your
remote VCR and
also enjoy the
picture and sound
on a remote TV.
Refer to your
VCR’s manual for
specific recording
instructions.
I .Connect one set of audio/video (A/V) cables to the A/V
jacks of the receiver and to the jacks on your VCR labeled
LINE IN. Be sure the yellow, red and white plugs match the
yellow, red and white jacks on both the receiver and the VCR.
If the VCR has only a single jack for audio input, connect the
white plug to it.
2. If your TV has A/V input jacks, connect another set of A/V
cables (not supplied) to the TV's A/V jacks and to the jacks on
your VCR labeled LINE OUT.
3. If your TV has only a single coaxial input port, connect a
length of coaxial cable from the TV's VHF/UHF IN coaxial
connector to the OUT coaxial connector on your VCR.
To watch cable channels on that TV, connect your cable TV
hookup to the IN coaxial connector on your VCR.
4. Make sure the ON/OFF switch is in the ON position. Plug
one end of the receiver’s power adaptor into the back of the
receiver and the other end into any 120V wall outlet. Use only
the adaptor provided.
5. Locate and orient the receiver according to the Setup
instructions in this manual.
Operation With Monitor
1. Connect one set of A/V cables to the monitor's A/V
jacks and to the A/V jacks on the receiver.
2. Be sure the yellow, red and white plugs match the
yellow, red and white jacks on both the monitor and the
receiver. If the monitor has only a single jack for audio
input, connect the white plug to that jack.
3. Be sure the monitor, the wireless camera and the
receiver are turned on.

Operation With Monitor & VCR
1. Connect one set of A/V cables to the VCR's A/V
jacks (IN) and to the A/V jacks on the receiver.
2. Be sure the yellow, red and white plugs match the
yellow, red and white jacks on both the VCR (IN) and
the receiver. If the VCR has only a single jack for audio
input, connect the white plug to that jack.
3. Connect the A/V cable (not supplied) to your VCR
OUT jack. Plug one plug into the VIDEO OUT jack and
the other plug into the AUDIO OUT jack on your VCR.
4. Plug the other ends into the VIDEO IN jack and
AUDIO IN jack on your monitor.
5. Be sure the monitor, the wireless camera and the
receiver are turned on.
Warranty
This warranty gives the original purchaser specific legal
rights. The original purchaser may also have other rights
which vary from state to state.
If products do not function because of any defect in material
or workmanship, they will be repaired free for a period of one
year on labor and parts from the date of original purchase.
This warranty does not cover modification, abuse, or neglect.
This warranty does not cover incidental or consequential
damages unless the state of owner's residence specifically
prohibits limitations on incidental or consequential damages.
How to Obtain Service Within Warranty
Please pack unit carefully and safely and send it prepaid by
insured parcel post to:
Saddlebrook BarnCams LLC
N76 W36096 Saddlebrook Lane
Oconomowoc, WI 53066 USA
Please include a note explaining how the unit is defective.
We will repair or replace and return to owner all units under
this limited warranty.
How to Obtain Service After Warranty Expiration
Follow the instructions for “Service Within Warranty” and
include a check for $20 to cover the costs of return postage
and handling. Include your e-mail address for faster and more
accurate communication. An estimate of the
repair/replacement cost will be sent for advance approval.

If you have any questions or need
additional help please e-mail:
or call: (920)474-7776
Saddlebrook BarnCams LLC
N76 W36096 Saddlebrook Lane
Oconomowoc, WI 53066
Table of contents
Other Saddlebrook BarnCams Security Camera manuals